#That's like installing a power outlet over a sink
Photo

I just wanted to point out this one section of the flower shop in Floaroma Town. There’s supposed to be a sink here. But this same sink has a stove next to it.
This would make sense in a home. But this is a RETAIL store. A retail store that specializes in plants. So why would a flower shop like this have something dangerous sit a few inches away from the counter?

After a bit of negotiation, I was able to get a shiny Scyther and Stantler. With Paldea still fresh in my mind, I took them back in time and evolved them into new species that no one will ever know about until a few centuries later. (Even after some of their pre-evolutions were discovered.)
I managed to get more than what you see here. But I didn’t have my SD card on me to record any of them. Check out the shiny collection on my website if you want to see them all.


After all of that, I went back to the present to do some wonder trades. And after a few trys, I was finally able to mark some new territories on the globe.

Wait...

Does THAT look like a Graveler to you?
And that should sum up my time with Pokémon this week.
#pokémon#Pokemon Brilliant Diamond and Shining Pearl#Pokemon Legends Arceus#graveler#Kanto#wonder trade#Kleavor#Wyrdeer#Hisui#Shiny Pokemon#screenshots#Nintendo Switch#nintendo#Game Freak#Creatures Inc.#Ilca#What were they thinking when they opened that store?!#That's like installing a power outlet over a sink#It's such a stupid idea
3 notes
·
View notes
Text
Photos over the course of the morning:
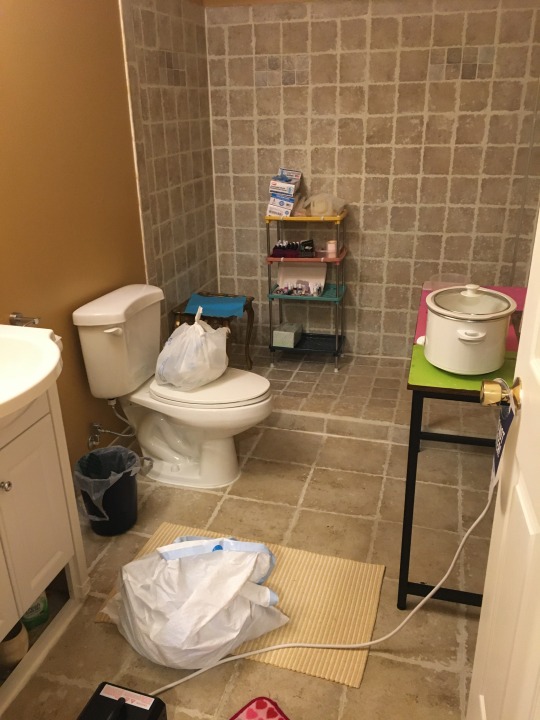
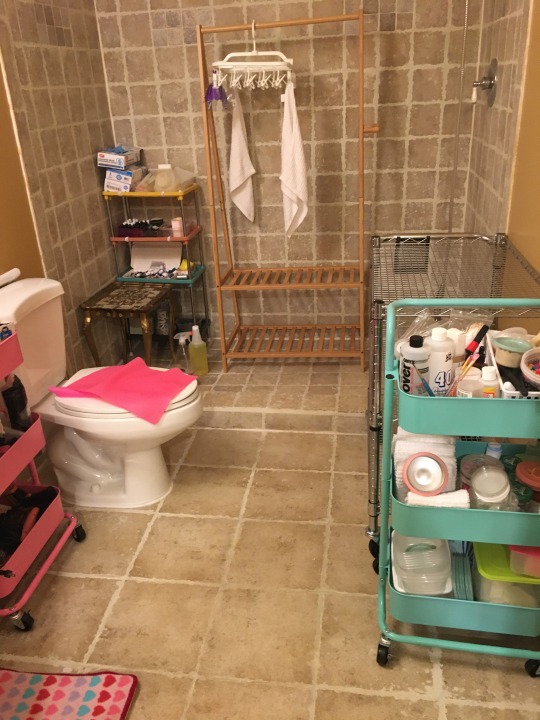
So, this is the space I have to work with. The only thing I can think of why Rolly would have installed an over-large toilet in the basement bathroom is that he liked to sit there to poop and didn’t want his dangle touching the rim.
It’s very much in the way.
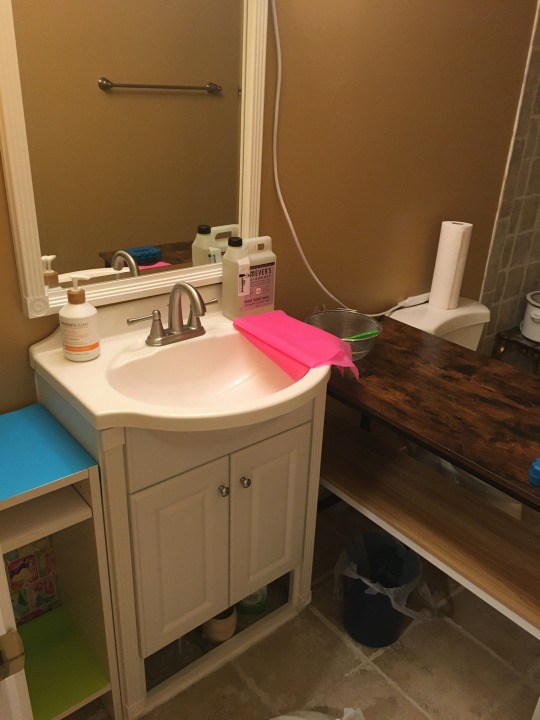
I NEED counter space to work, so moved some stuff around and added a tiny shelving unit that just barely fits into the space between the sink and the wall. The sink leaks so I keep the faux drawer front off of the front of the cabinet...
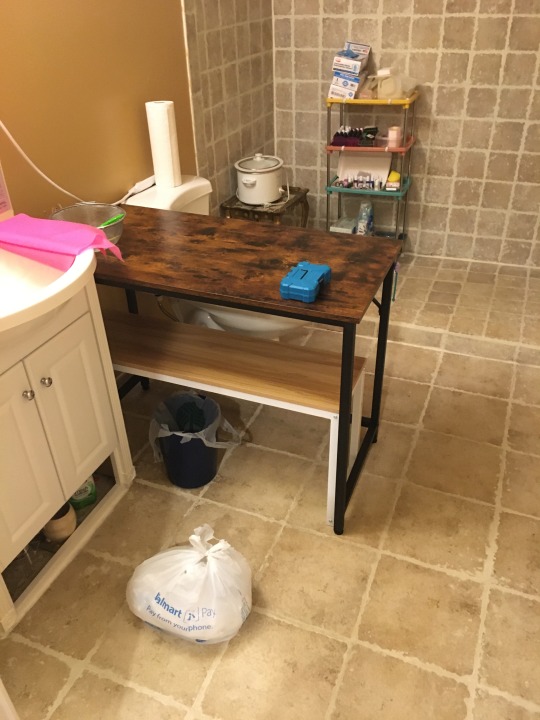
Wrangled a bench under there for extra storage space. The bench is wider than the table so doesn’t exactly fit.
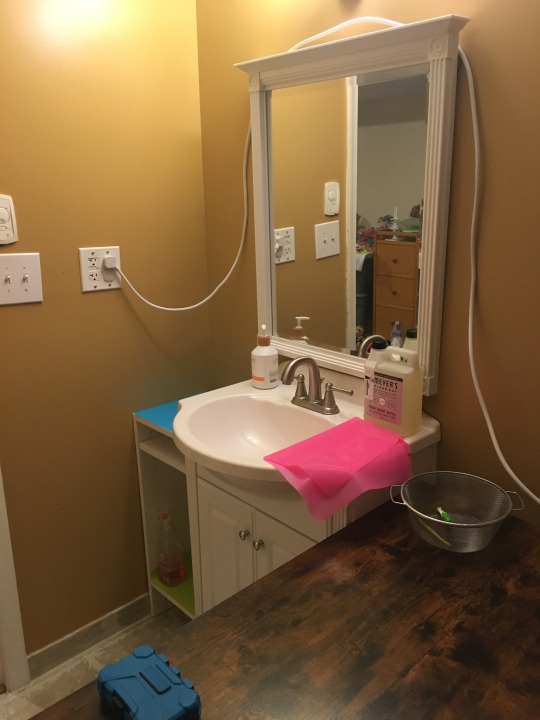
There’s ONE power outlet. It is a small bathroom. It’s very funny to me that Scott was just shaking his head at his father having run power strips around the bathroom and here I am stuck doing the same thing. Mine’s not zip-tied to the wall, though, and the outlet part isn’t right above the sink. It’s on the back of the too-big toilet. I don’t like having a toilet in my workspace, but no one ever uses it, so it’s just a bowl of blue water. I flush it now and then to keep it fresher and that’s it.
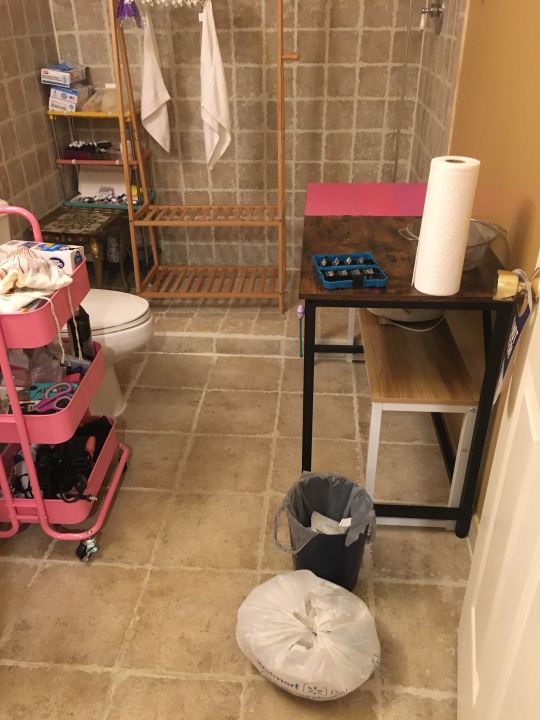
But then I took my small utility carts down there and had to move the table and bench again to make room. I do prefer the table not cutting off half the walkway.
Drying rack is back in the shower. I have to be very careful what I put in the shower because it can and did leak. I also can’t put anything over the back of the toilet because I need to be able to access it if it starts leaking again.
I took out the toilet paper holder and the towel rack because both were in the way. I should take down the shower rod. It’s just tension and installed crooked, but everything I take down reveals lots and lots of holes and missing paint. Rolly didn’t take them down to paint (and apparently doesn’t know how to decide where to drill a hole for a screw swiss cheese walls what the fuck), and I didn’t, either when I repainted.
BUT Pony Cart also needed to go in there, which meant the table and shelf had to come out, and that sucks because that’s all of the counter space. I NEED counter space. I’m used to having an approx 1ft by 1.5ft segment of counter space.

If I hadn’t depressed enough at this point because I’m having to cram myself into a windowless bathroom, I was then. I’m claustrophobic. This was unpleasant.
Right now this is all the workspace I have. If I were able I’d get and install a different sink vanity thing that had some counter space. I can’t do that because money. I was going to put all of my bottles of T.A. on the bottom of this shelf thing but I don’t think it can take the weight, tbh. They’ll go in the shower.
Rearranged a little, again, and that’s better. Dehumidifier will probably be on top of that gold plastic table there, with the hose pointing at the shower drain which is just below it.
I need to take the pony bins down, still, and clean up the kitchen because I’ve made a mess up there dumping things off of workstations to get to the furniture.
I also need to find a place to store the small appliances when they’re not in use. I was keeping the mini crock pot and ozone generator on the table in there, but it’s gone. I’ll need to take my electric kettle down, too. It’s ONLY used for doll and pony hair.
I’m tired. It’s all futile. I comply here, he starts poking his nose elsewhere shrinking and shrinking my space.
Obviously, all work is off until the dehumidifer gets here or else the basement will explode into mold again.
Removing the resin jugs did immediately improve the air quality. Those are out in the garage.
I still need to move the SunBox down, two large and one medium storage unit, all of my dolls, and my computer and things (I’m not sure there even are enough outlets down there to accommodate my computer, not that I really trust Rolly’s electrical work), which I guess will go where the unused sewing machine is.
Act like my stuff is unwelcome in his space, see how he likes having no me near him at all.
15 notes
·
View notes
Text
Keeping Your Rental Ready
10 Non-Essential Updates That Keep Your Rentals Ready
Between tenants, every rental property owner knows that updates are essential. Most focus on essential updates and repairs. However, too much focus on things like appliances and floor quality can leave the home looking dated and underperforming on the market. What you might not realize is that "non-essential" updates are an affordable and highly effective way to modernize a home, improve its profitability, and make it more appealing to long-term tenants.
These 10 non-essential rental updates can keep your properties ready to attract new renters each year.
1) Fresh Coat of Paint
A fresh coat of paint makes any home or apartment feel newer and more modern. You can update the interior color palette and easily cover scuffs left by previous tenants. Securing a good painting team who knows how to do edges and baseboards with quick precision is a valuable investment when your goal is to impress new tenants and improve the quality of each rental property.
2) Faucets, Handles, and Showerheads
Don't wait until the chrome starts flaking to upgrade the plumbing features. All it takes is a few twists of the pipe wrench to keep your faucets, handles, and showerheads up to date. Dated old bathrooms get a new vibe when new hardware is installed, while showerheads and the kitchen sink can updated to compete with the latest rentals on the market at a very affordable price for each update.
3) Door Knobs and Drawer Pulls
A dated kitchen can also be easily updated with three simple changes. Repainting (or revarnishing) the cabnets can update the kitchen color scheme. Replacing the cabinet doors can immediately modernize the kitchen style. You can also modernize by replacing the cabinet handles and drawer pulls, which often reveal a home's true age.
The same can be done for the doorknobs throughout the house, which will ensure each door opens easily and closes with a satisfying click in addition to choosing modern styles.
4) New Light Fixture Covers
Light fixture covers can reveal a home's age, but you don't need all-new light fixtures to update the look. Simply replace the light covers. Most rental homes have ceiling fans and flush ceiling lighting. You can swap out the glass enclosures over each fixture to update the interior design significantly and get rid of dusty old glass covers at the same time.
5) Outlet and Lightswitch Cover Swaps
Speaking of dated lighting. The quality of the plastic on outlet covers and light switch covers can reveal a home's age. But they don't have to. A box of new covers and some quick screwdriver work are all you need to ensure that each rental's hardware looks new and in good quality. You can choose stylish covers or just keep that plastic looking new and clean.
6) Weather Stripping
Good insulation is always worth a little extra effort. Remember to update each rental's weather stripping around doors and re-caulk your windows every 2-5 years. This simple update is very affordable and can make a big difference for your tenant's comfort and power bills. The work also ensures doors close with a satisfying airlock feel and windows never rattle.
7) Periodic Re-Tiling
Tile can clearly indicate the era that a home was last remodeled. While more intensive than swapping a few doorknobs and light covers, retiling is a non-essential update that is worth the investment. Choosing modern, attractive tile once a decade is enough to keep a home looking stylish and appealing to the current generation of renters.
8) Update the Baseboards and Crown Molding
Just like lightswitch covers, crown molding and baseboards can start to look shabby after a few years. These are also easy and low-cost updates that you can make to any rental home. Simply pull off the old molding and use a nail gun to attach new molding in it's place. A little clever cutting and precision painting will have your new molding looking crisp and attractive.
9) Clean/Replace Exhaust Fans
One often-overlooked maintenance step is to clean or replace the exuaust fans in the stove hood and bathrooms. These fans get dusty, clogged, and less effective over time. But their purpose is essential. Have your exhaust fans cleaned with every tenant turnover and replace them after 10-15 years.
10) Install Pantry Organizers
Lastly, you can easily update a rental with the latest little widgets. This year, it's pantry organization. Wire shelves, hooks, and built-in storage features make a kitchen feel cutting-edge without making major or structural changes. Keep an eye on the trends and take the opportunity when a little update will have a big impact on rental desirability.
Attracting New Tenants with Leaf Management
Keeping your rentals attractive and modernized is key to a profitable rental home strategy. Tenants will be drawn to well-maintained and up-to-date living spaces that have clearly been kept in top condition in recent years. Leaf Management can help you keep up with these small but important updates and keep your tenants happy. Contact us to learn more.
0 notes
Text
8 Common Kitchen Renovation Mistakes That Make Interior Designers Cringe
Embarking on a kitchen renovation can be thrilling, but the excitement often leads to hasty decisions and overlooked details. Kitchen interior designers in Bangalore frequently encounter mistakes that could have been easily avoided with a bit of foresight and professional guidance. Here are eight common errors that make interior designers cringe—and how to avoid them.
1. Neglecting the Work Triangle
The kitchen work triangle—the relationship between the stove, refrigerator, and sink—is crucial for a functional kitchen design. Ignoring this principle can result in an inefficient kitchen that's difficult to use.
Solution: Ensure your kitchen layout allows for easy movement between the stove, sink, and refrigerator. The ideal work triangle has each leg between 4 to 9 feet. Use design software or consult a professional to visualize the layout before making final decisions.
2. Insufficient Lighting
Lighting is often an afterthought, but it plays a crucial role in both functionality and ambiance. Poor lighting can make cooking tasks difficult and create an uninviting atmosphere.
Solution: Incorporate a mix of task, ambient, and accent lighting. Use under-cabinet lights for countertops, pendant lights over islands, and recessed ceiling lights for even illumination. Dimmer switches can also help adjust the lighting for different times of day and activities.
3. Overlooking Storage Needs
A lack of adequate storage can turn a beautiful kitchen into a cluttered mess. Not planning for enough storage leads to frustration and detracts from both functionality and aesthetics.
Solution: Consider various storage solutions, including cabinets, drawers, and pantry spaces. Use vertical space with tall cabinets and incorporate pull-out shelves, lazy Susans, and organizers. Custom cabinetry can also be designed to fit specific storage needs for appliances, spices, or cookware.
4. Choosing Style Over Function
Prioritizing aesthetics over practicality can lead to a kitchen that's difficult to work in. High-maintenance materials may result in more time spent cleaning than cooking.
Solution: Balance style with function by choosing durable, easy-to-clean materials. Opt for quartz countertops instead of marble for a low-maintenance yet stylish option. Professional designers can help you find beautiful yet functional choices that suit your lifestyle.
5. Skimping on Quality
Cutting corners to save money often backfires. Low-quality materials and appliances may need to be replaced sooner, leading to higher long-term costs.
Solution: Invest in high-quality materials and appliances, especially for items that see the most use like countertops, cabinets, and cooking appliances. Look for reputable brands and materials known for durability, and consult professionals to choose products offering the best value.
6. Ignoring Ventilation
Good ventilation is crucial to remove cooking odors, smoke, and excess moisture. Poor ventilation can lead to an uncomfortable and potentially unhealthy environment, contributing to mold growth and surface damage.
Solution: Install a quality range hood that vents to the outside, ensuring it’s powerful enough for your kitchen size and cooking habits. Consider strategic window placement to promote natural ventilation.
7. Poor Planning for Electrical Outlets
Not having enough electrical outlets or placing them in inconvenient locations can be a significant annoyance. Modern kitchens require more outlets for various gadgets and appliances.
Solution: Plan your kitchen layout to include ample electrical outlets. Consider appliance placement, charging stations, and other electrical needs. Install outlets along the backsplash, on island sides, and inside cabinets to keep cords out of sight but accessible. Consulting an electrician during planning helps meet all electrical needs.
8. Forgetting About Garbage Disposal
Not planning for waste disposal disrupts the kitchen’s flow and functionality. Poorly placed trash bins or lack of recycling space leads to clutter and inconvenience.
Solution: Incorporate built-in trash and recycling bins into your cabinet design, positioning them near the sink and prep areas for easy access. Use pull-out drawers or dedicated cabinets for waste and recycling, keeping these items hidden yet accessible. Consider composting solutions for an environmentally conscious approach.
Renovating your kitchen is an exciting endeavor, but avoiding these common mistakes is crucial for a successful outcome. Consulting with experienced kitchen interior designers in Bangalore provides the guidance and expertise needed to create a beautiful, functional, and efficient kitchen space. By paying attention to these details, you can transform your kitchen into the heart of your home without the pitfalls that make designers cringe.
0 notes
Text
Things You Must Know Before Upgrading Electrical Wiring

There are ways to protect your house from the dangers of having an antiquated electrical wiring system. There are situations when wiring upgrade or rewiring in Auckland is neither practical nor economical. However, it is desirable to act early when required for safety reasons, such as preventing fires and enhancing convenience by raising power output.
It may seem complicated to do electrical rewiring since you have to remove all the old wires, install the new ones, and then make sure they are setup correctly after the task is done. However, with more energy flowing through outlets in a home, these modifications will help reduce the risk of a fire and improve convenience.
It might be difficult to choose the best contractor for your house or place of business, but hiring a reputable electrical firm to handle the wiring is crucial. Hiring one of the skilled specialists now is the best choice, whether you require modern safety features or just a new look for old wires that are beyond their prime! Dive into this blog to know about some tips for upgrading electrical wiring in your home with Strike Electrical.
Safety Things to Know About Electrical Wiring
Safety compromise with old wiring
There are several hazards in older homes that the occupant may not always be aware of. The most dangerous is old or faulty wiring, which can catch fire if ignored for an extended period of time. According to a research, defective wiring was the cause of more than 50% of residential fires in 2009. As such, it's something you shouldn't overlook while remodelling your house, and it is recommended to prospective homeowners to carefully check their new location before moving in!
Consult a skilled electrician
If you decide to do your own home renovation, know this at least: professional contractors are better familiar with some municipal codes than do-it-yourselves. They may assist in ensuring that certain electrical modifications are approved by city inspectors prior to completion, so significantly reducing the likelihood of fines or injuries.
Check aluminum wiring
Because aluminium wire frequently loosens with time and can result in overheating and even fires at outlets, it is regarded as a safety risk. Adding pigtails to your outlets and breakers may occasionally fix certain issues; your home inspector may assess if it is safe for you to leave the wiring in place.
Tripping circuit breakers
That may indicate that the system isn't able to supply enough power to fulfil the demand at this time. Today's houses have an ever-growing number of electrical gadgets, rendering the traditional 60- or 100-amp systems more antiquated. Nowadays, wiring and panels are usually built with a minimum 150 amp rating when building a new home. Repeatedly tripping circuit breakers can also be a sign of a dangerous short or malfunctioning device; thus, they should always be checked out right away by a skilled electrician in Auckland.
Importance of GFCIs
The constant worry of electrocution has led to the installation of GFCIs, or Residual Current Devices, along basement walls and counters to keep us safe from this terrible fate. By employing these devices, we may be certain that there is a significant decrease in the risk of electrical shock while using appliances near water sources, including sinks and toilets.
Importance of Rewiring or Wiring Upgrades
According to recent studies, improving your home's electrical system with effort and money can increase its worth. Because technology is always changing in this day and age, house wiring systems are sometimes overlooked or disregarded completely. Many advancements have occurred over the past few decades, including the addition of USB charging connections to outlets and the rising use of energy-efficient lighting options like CFLs.
Looking for Electrical Wiring Upgrade? Contact Strike Electrical in Auckland
Are you looking for a residential electrician or commercial electrician in Auckland who can do the safety audit of your electrical system? If yes, Strike Electricals is one of the leading electrical contractors in Auckland and offers a wide range of electrical services in Auckland from switchboard upgrades to home automation setup, fuse box upgrades, and others.
Disclaimer- The information provided in this content is just for educational purposes and is written by a professional writer. Consult us to read more about rewiring in Auckland.
#commercial electrician auckland#fuse box upgrades#electrical services auckland#electrical contractors
0 notes
Text
10 Tips For Childproofing Your Home's Electrical System
As parents and caregivers, one of our primary concerns is ensuring the safety of our children, particularly in our homes where numerous hazards can lurk unnoticed without an emergency electrician Brisbane to inspect them. The electrical system of a house, while essential, can pose significant risks to young, inquisitive minds and hands. To mitigate these risks, childproofing your home's electrical system is a crucial step.
Here are some comprehensive tips to help you safeguard your home and protect your children from electrical accidents.
Use Outlet Covers
One of the simplest yet most effective ways to childproof your home is to use outlet covers. These small, plastic devices are designed to fit snugly into unused electrical outlets, preventing children from inserting foreign objects, which can lead to electric shocks. Choose tamper-resistant covers that are difficult for children to remove but easy for adults to handle, ensuring both safety and convenience.
Keep Electrical Cords Out of Reach
Electrical cords can be enticing to children, who might chew on or play with them. This behaviour poses risks of electric shock or strangulation. To prevent such accidents, secure cords behind furniture or use cord shorteners. Additionally, regularly check cords for fraying and damage, and replace them when necessary to avoid potential hazards.
Secure Heavy Appliances
Heavy appliances like televisions, computers, and microwaves should be securely anchored to prevent them from being pulled or tipped over by curious children. This not only prevents potential physical injuries but also reduces the risk of electrical hazards that can occur if these appliances are dislodged from their usual positions.
Avoid Overloading Outlets
Overloaded electrical outlets are a common hazard in many homes. They can overheat and pose a fire risk. Educate children about the importance of not plugging too many devices into one outlet and use power strips with built-in circuit breakers for added safety. This also includes being mindful of high-wattage appliances and ensuring they have dedicated outlets if necessary.
Regularly Inspect Your Electrical System
A regular inspection of your home's electrical system can help identify and address potential hazards like frayed wires, loose outlets, or overloaded circuits. This proactive approach can prevent many electrical accidents and ensure a safer home environment for your children.
Use Cordless Window Coverings
Cordless window coverings are a safer alternative to traditional blinds and curtains that come with cords. These cords can pose a strangulation hazard to young children. By opting for cordless options, you can significantly reduce this risk and add a modern touch to your home décor.
Install GFCIs in Wet Areas
Ground Fault Circuit Interrupters (GFCIs) are critical in areas where electricity and water may come into contact, such as kitchens, bathrooms, and laundry areas. These devices help prevent electric shock by quickly cutting off power if a difference in electrical current is detected. Regularly test GFCIs to ensure they are functioning correctly, providing an extra layer of protection where it's most needed.
Educate Your Children
As children grow, it's essential to educate them about the dangers of electricity and the importance of adhering to safety rules. This education is not only about warning them of the hazards but also about teaching them the correct way to interact with electrical devices. Empower them with knowledge so they can recognize and avoid potential dangers.
Keep Electrical Devices Away from Water
It is crucial to keep all electrical devices away from water. This is particularly important in bathrooms and kitchens, where the proximity of water and electricity greatly increases the risk of electrical shock. Instilling good habits, such as not using electronic devices near sinks or bathtubs, can go a long way in ensuring safety.
Store Batteries Safely
Batteries, especially small button batteries, can be a choking hazard and are dangerous if ingested. Store all batteries, particularly those small enough to be swallowed, in a secure, inaccessible place. Additionally, ensure that battery compartments on toys and other devices are tightly fastened and secured from curious exploration.
Childproofing your home's electrical system involves a combination of practical measures, regular maintenance, and ongoing education. By implementing the tips above, you can create a safer environment for your children, giving them peace of mind and allowing them to explore and grow in a secure setting. Remember, vigilance and proactive measures are key to safeguarding your loved ones from the potential dangers posed by household electricity.
0 notes
Text
Important Advice for Home Electrical Safety
Hi, and thanks for stopping by our blog article where we've listed the most crucial guidelines for electrical safety in the home. Electrical safety at home must be given careful consideration because so many elements of our lives depend on it. If electrical instability, like flickering lights and poor wiring, is not addressed, there are serious health risks. We'll examine the dangers of electricity, provide guidelines for keeping your house safe from electrical shocks, go over common electrical hazards, and offer some practical tips for preventing and addressing them in this article. Now that we have what might save lives in our possession, let's get started.

Risks Associated with Electricity
Electrical power is a powerful force that powers our modern world and should be treated with respect if it causes harm. The risk of electric shock when handling electricity is significant. Anyone who comes into contact with live electrical cables or broken equipment runs the risk of receiving a deadly electric shock.
Not to be overlooked is the possibility of electrical fires. Bad wiring, overloaded circuits, and the presence of combustible objects close to power sources can all contribute to the catastrophic consequences of an electrical fire. The chance of harm and fatalities rising due to the swift growth and spread of these fires.
The potential for burns is another risk associated with working with electricity. Extended exposure to elevated electrical currents may cause severe burns to the skin and interior structures. Burns that are extremely painful and require medical attention can result from shocks of any size.
The danger of electrocution must also be emphasized. Contact with live wires or improperly grounded equipment significantly increases the danger of electrocution, which occurs when a lethal amount of electricity passes through the body.
Electromagnetic fields (EMFs) in electricity not only cause physical risks but also health issues. Cancer or issues with reproduction may result from prolonged exposure to electromagnetic fields (EMFs) produced by various electrical devices.
Suggestions for Home Electrical Safety
For every homeowner to be protected against electrical hazards, there are a few basic guidelines that need to be followed. If you and your loved ones abide by these guidelines, you can prevent harm.
When installing any electrical fixtures or equipment, it is imperative that expert Calgary electrical services are used. All wiring and repairs will be done safely and in compliance with local building codes if you choose a qualified construction electrician.
You should always be aware that your home may have electrical hazards. Outlets, damaged plugs, and frayed cables are examples of such things. Regular inspections can help identify issues before they get worse.
Another key piece of electrical safety advice is to never connect more than one appliance into an outlet at once. Plugging too many devices into one outlet might cause them to overheat and catch fire. Alternatively, for more consistent power delivery, use power strips with surge protectors installed.
When handling electricity, it's also imperative to exercise extreme caution. Disconnect devices while not in use, keep combustibles away from electrical outlets and heat-generating equipment, and avoid using electronics near moist areas like sinks and bathtubs.
Electrical Hazards in Homes
Electrical dangers could be hiding in plain sight even though a home is typically thought of as a safe place. It is crucial for the safety of your family to recognize and steer clear of electrical hazards.
Electrical risk frequently stems from faulty wiring. The likelihood of electrical fires is increased by cable wear and strain. If you notice any wear on the wiring in your home, check it frequently for signs of damage and call an Calgary electricians.
A significant risk is also posed by circuit overload. Your electrical system could be harmed or a fire could occur if you frequently use extension cords or plug too many things into one outlet.
Water and electrical current are comparable in this regard. Wet areas like kitchens and bathrooms are particularly prone to electrical shocks if outlets are not adequately grounded or protected from moisture.
It's also dangerous to use outdated or damaged electrical appliances. The possibly faulty wiring in older, poorly maintained appliances can cause a fire or shock threat. Anytime an appliance begins to malfunction or exhibit damage indicators, such sparks or strange noises, it's imperative to get it professionally inspected as soon as possible.
Ways to Preserve Your Safety When near electricity
To start, make sure all of your electrical cords and cables are in good shape. If you see any issues, including frayed or exposed wires, replace them. By utilizing a damaged cord, you run the risk of electric shock or fire.
Employ surge protectors: Because they may shield your devices from damage caused by power spikes, high-quality surge protectors are well worth the price. Be careful to adhere to the manufacturer's guidelines while connecting many devices to a single surge protector.
Thirdly, avoid overloading an outlet by not plugging too much at once. This increases the outlet's temperature and increases the risk of an electrical fire. Extend your electrical usage by using extension cords and other strategies.
Every room where there is a chance of a ground fault or an imbalance in the current flow should have GFCIs installed to lessen the danger of electric shock.
5. Water and electrical outlets are not compatible, therefore keep them away from each other. Maintain the distance between your electrical appliances, cords, and outlets and any moist or damp areas, like the bathroom tub, kitchen sink, and outside.
Without first speaking with a licensed, experienced electrician who has received the necessary training to carry out such tasks safely and effectively, never try any significant electrical work.
How to Respond When There's an Electrical Hazard
When there's an electrical threat in the house, you and your loved ones need to take immediate, responsible action to protect yourselves. In the case of an electrical hazard, it is imperative to perform the following actions:
Taking a deep breath and evaluating the situation without losing your cool should be your first step. Determine whether you absolutely need to react immediately and how serious the situation is.
Secondly, disconnect the appliance or, if that's not possible, switch off the main breaker. Injuries from electric shock will be less likely as a result.
Third, refrain from making direct contact whenever you can. Doing so increases your danger of electric shock or burns when handling any nearby electrical equipment or cables.
Call the emergency services and get everyone out of the area right once if there's a fire or other major threat.
Call an electrician with expertise in electrical repairs and services, like those provided by Construction Electricians, once you've confirmed that everyone is safe to continue. Their expertise lies in handling electrical problems both safely and effectively.

In conclusion
You should take electrical safety at home very seriously if you are concerned about the health and safety of your family members. Although handling electricity can carry some significant risks, these can be minimized by following a few basic guidelines.
Always employ the services of certified electricians if you require any kind of electrical maintenance or repairs done in your home. Every electrical task in a building may be finished quickly and safely by a skilled electrician with construction experience. Make sure you are a qualified professional before attempting any DIY electrical work.
Make it your practice to inspect your house on a regular basis for electrical hazards such as loose outlets, overloaded circuits, and cable exposure. You can take action against these issues and prevent major risks to public safety by being watchful.
The danger of electrical fires and other mishaps can be considerably decreased by following sensible procedures including installing surge protectors, avoiding overloading power outlets or extension cables, and handling cords with care. Adhere to the manufacturer's directions while utilizing new appliances, and never use damaged or malfunctioning ones.
0 notes
Text
What You Should Know About Water Heater Installation
There are a lot of things we take for granted in our homes. Like water. It's easy to forget that, without it, we'd be in a world of hurt. The same goes for your hot water heater. You know it heats up water and saves you the time and effort of doing so manually—but what else do you need to know about your appliance? In this article, I'll go over some tips on installing a new water heater and keeping one running efficiently.
How to Install a New Water Heater
Installing a new water heater is one of the easiest ways to save money on your energy bill. It's also a great way to protect against leaks, which can cause damage to your home and create an unpleasant odor. In order for the installation process to go smoothly, you'll need to make sure that all of your tools are ready and arranged so they're easy for you or another person who may be helping with this project. Once everything is set up, turn off the power switch at your breaker box before starting work on removing or installing a new water heater!
After turning off power supply lines and draining hot-water lines (if necessary), disconnect them from their respective fittings using adjustable wrenches or channel locks - but don't remove any other parts yet! Next comes removing old units; take extra care because these devices contain pressurized gas inside them that could explode if exposed during removal efforts!
Once all pipes have been removed from old ones' fittings without breaking anything else off inside them (like valves), start installing onto new ones' fittings by screwing them tightly down into place using adjustable wrenches again - but don't overtighten anything until after initial testing has been done successfully enough times so no leaks occur during operation later down line either due too much pressure being exerted onto certain parts within tanks themselves while others might not get enough support needed
The Plumbing in Your Home
Plumbing is the pipes and fixtures that carry water in your home. It's important to know how plumbing works because it ensures that you have a safe and reliable supply of water.
Plumbing can be complicated, but it's important to understand the basics: there are three major parts of your plumbing system:
The water heater (which heats up your hot water)
Drainage lines under sinks or tubs
Faucets
Preventing Freeze-In
It's important to prevent freeze-in, which is when the water in your tank freezes and expands, causing damage. To do this:
Use a heat tape or cable. This allows you to wrap it around your tank and plug it into an outlet so that it heats up when temperatures drop below freezing outside. This can prevent freeze-in if you live in an area with cold winters where temperatures regularly dip below 32 degrees Fahrenheit (0 Celcius).
Wrap an electric blanket around your water heater if there's still room between the sides of the tank and its outer casing (or install one inside). Be sure not to cover any vents or ports on top of the unit because these need air flow for proper functioning!
Know the Basics of Water Heaters
If you're considering installing a water heater, there are some basic things to know about the different types of water heaters and how to choose the right one for your home.
Water heaters come in many sizes and styles. You should consult with an installer or plumber before purchasing your new unit so that they can help determine which type will work best for your needs.
Most residential homes have gas-fired hot water tanks, but electric models are also available if you prefer not to use natural gas (or don't have access). In addition to these two options, there are also solar powered models--but these tend not be used as primary sources of hot water because they are inefficient compared with traditional methods of heating like those mentioned above!
A water heater can be installed by a professional or by yourself.
A water heater can be installed by a professional or by yourself. If you're thinking of doing it yourself, consider this: water heaters are dangerous to install and require special training and equipment to do so safely. A professional will have the right tools, knowledge and experience needed to perform the job correctly. He or she also has liability insurance that protects you in case something goes wrong while they're working on your home's plumbing system.
We hope that you now have a better understanding of how to install a water heater and some of the common installation issues. If you're still unsure about whether or not installing your own water heater is right for you, then we encourage you to contact a professional plumber who can help guide through the process.
Az Express Plumbing is the premier choice for all of your residential and commercial plumbing service needs. Our services include water heater installation San Tan Valley, toilet repair, and any other services you may need. Our team of professional plumbers are licensed, bonded and insured so you know that your home is in the best care possible. We offer emergency service 24 hours a day to ensure that there is never an unexpected plumbing emergency. Your satisfaction is our goal, so we pride ourselves on having 100% customer approval rating.

Az Express Plumbing
974 E Poncho Ln, San Tan Valley, AZ 85143
480-771-7519
https://azexpressplumbing.com/
0 notes
Text
How To Clean A Teflon Cartridge Filter: The Ultimate Guide
One of the most common kitchen appliances is the Teflon cartridge filter. Whether you’re cooking with gas or electric, chances are you use this filter at least once a month. But what happens when it starts to get dirty? In this blog post, we will show you how to clean a Teflon cartridge filter and keep your kitchen clean and tidy in the process. From removing grease and food residue to cleaning the interior of the filter itself, we will have you cleaning your appliance like a pro in no time.
What is a Teflon Cartridge Filter?
A Teflon cartridge filter is a small, round device that sits inside a kitchen appliance like a stove or oven. It’s used to remove grease and food residue from the air before it’s breathed in by people.A Teflon Cartridge Filter is a device that removes impurities from your water. This filter is made up of a Teflon sheet that's wrapped around a metal core. The metal core absorbs moisture and contaminants, while the Teflon sheet prevents them from sticking to the core. Over time, your Teflon Cartridge Filter will need to be cleaned in order to continue performing at its best. In this article, we'll teach you how to clean your Teflon Cartridge Filter.
To properly clean your Teflon Cartridge Filter, follow these steps:
1) Remove the cartridge from the faucet.
2) Pour 1 liter of white vinegar into a pot or sink.
3) Place the cartridge into the vinegar solution.
4) Allow it to soak for at least 30 minutes, or until the filter has been completely submerged in the vinegar solution.
5) Remove the cartridge from the vinegar solution and rinse it off with cold water.
6) Dry the cartridge off with paper towels if necessary.
7) Replace the cartridge in the faucet and turn it on to hot water.
8) Wait two minutes before using water that's been through this filter again.
How to Clean a Teflon Cartridge Filter
If you are like most people, you probably don’t think much about how your appliances clean themselves. After all, they just do what they are supposed to and we usually don’t have to worry about it. However, if your appliance is a Teflon cartridge filter, there are some simple steps you can take to clean it properly and ensure that your air quality stays good.
The first step is to remove the filter from the appliance. To do this, turn off the power to the appliance by unplugging it from the wall outlet. Once off, remove the screws that hold on the filter cover. Carefully pull off the cover and set it aside.
Next, use a vacuum cleaner with a hose attachment to suck up all of the dirt and debris that has collected on the surface of the filter. Make sure to go over every nook and cranny. When finished, put everything back together in reverse order and reattach the cover.
Now is a good time to check for any clogs or blockages in the filter system. If there are any problems, take appropriate action before continuing with cleaning instructions.
When cleaning your Teflon cartridge filter, be careful not to damage or deform it in any way-this could impair its ability to clean air effectively. And finally, always dry everything off before putting it back together - moisture can create additional pollutants that will end up in your air supply!
What to Do if Your Teflon Cartridge Filter Has Been Ruined
If your Teflon cartridge filter has been ruined, you will need to replace it. This guide will walk you through the process of replacing a Teflon cartridge filter.
To begin, unplug your refrigerator and turn off the power to it. Remove the screws that hold the sides of the refrigerator in place and pull them away from the unit. You will now be able to access the interior of the refrigerator.
Remove the old Teflon cartridge filter and discard it. Install a new Teflon cartridge filter by lining it up in its housing and screwing it into place. Replace the screws that were removed in step one and reattach the sides of the refrigerator to the unit.Plug in your refrigerator and turn on the power.
Conclusion
Thanks for reading our guide on how to clean a Teflon cartridge filter. We hope that this article has helped you understand the process and provided you with the tools necessary to clean your filter effectively.
0 notes
Text
More food waste going down the garbage disposal
Moen GXP50C vs Badger 500 The Moen GXP50C Prep Series PRO 1/2 HP Continuous Feed Garbage Disposal, Power Cord Included dishwasher inlet is not intended to be used as a sink vent. Only use the inlet for the intended purpose of connecting the dishwasher
It does not come with a power cord. It is presumed that you are replacing an existing unit. It features an outlet for connecting to the hose from your dishwasher. You must be cautious and ensure that the plastic insert on the disposal is removed before attaching the hose.
It says 2 years right on the box, however I've had mine for over 6 years and am only now experiencing a problem with it not turning over. It gets power, but it won't turn...I'm at a loss for what to do other than buy another - which I would do. This is an excellent small machine that has never failed, corroded, or broken.
More food waste going down the garbage disposal means less going to the landfill. CONSCIOUS DESIGN: Compact design saves important under-sink space and is lightweight for simple installation. 5-year limited warranty with promises for in-home service When you need it, aid is available. USE SAFELY WITH APPROPRIATELY SIZED SEPTIC TANKS For homeowners who prepare simple meals and wish to keep their kitchens clean and fresh, the Prep Series is made. Prep disposes of common foods like: compared to models where cord must be purchased individually, offers savings. Easy removal of cord for hardwiring
USE SAFELY WITH APPROPRIATELY SIZED SEPTIC TANKS For homeowners who prepare simple meals and wish to keep their kitchens clean and fresh, the Prep Series is made. Prep disposes of common foods like: compared to models where cord must be purchased individually, offers savings. Easy removal of cord for hardwiring Disposals are an environmentally responsible choice for your house since they limit the amount of waste that is dumped in landfills. Designed for people who slice, dice, and peel as part of basic meal preparation and require a bit additional assistance with cleanup, the PREP SERIES removes odors from the area surrounding the sink by more thoroughly removing food leftovers. As long as the electricity is on, stainless steel parts will continue to grind. compared to models where cord must be purchased individually, offers savings. Easy removal of cord for hardwiring QUICK SWAP: Includes pre-installed power cord and fits the majority of existing assemblies, including those from other brands. Its small size and the Universal XPRESS Mount, which fits the majority of current 3-bolt mounting assemblies, make installation simple.
https://litecomparison.com/moen-gxp50c-vs-badger-500/
0 notes
Text
Put Waste As An Alternative
Hopper projections have to be to the acute left of the mounting slot. If the mount ring is tough to show, you may add a small amount of liquid soap to the hopper projections . Now you can slide down on discharge elbow gentle plastic gasket and tight clockwise with plastic nut to the outlet plumbing pipe. If you power provide does not embrace a floor wire, you must provide one until metallic cable is used. Attach a copper wire securely to garburator ground screw and connect other and of wire to a reliable ground.
All plumbers had been punctual, courteous and, most significantly, knew their craft. Like most meals scraps, if it’s a small piece or a number of left on a plate after your meal, it ought to be fine to run via the disposal. Bones, nuts, pits, and other onerous food scraps are too powerful for disposal blades to chop through. Fats and grease are one of the essential gadgets to not put down a garbage disposal. It can additionally be important to notice that cold water will help carry any surprising fat down the drain pipes, preventing you from any future complications. As plumbers, we all know just how frustrating it's to have a damaged, smelly rubbish disposal.
Avoid starchy foods corresponding to pasta or rice, as they soak up water and broaden inside your pipes. Stringy fruits and vegetables can put on down the blades by wrapping themselves around the blades. Hard gadgets that you simply can’t break down along with your enamel, such as bones and seeds, ought to by no means go down your disposal both. Garbage disposal items are a useful and clean method of letting the drain and water take care of meals waste. There are additionally kitchen sink disposals that deliver a quieter performance than commonplace fashions. Choose between a wall switch for normal installations and a sinktop swap, which is right for kitchen islands.
Lets think about the previous first, as this is the half that we now have control over. Arrived at my residence inside a couple of hours and rerouted a sump pump drain line for my renovation. He made a reasonably difficult job, that involved drilling a hole by way of my stucco wall , look fairly easy. Unfortunately he was stung by a small nest of wasps that have garburator been disturbed in the course of however labored through the situation with professionalism and cleaned up the work area earlier than departing. I would definitely recommend Lone Star based on this experience.
We suggest utilizing considered one of our technicians to verify the installation is completed appropriately so your warranty isn't void. This rubbish disposal adapter is manufactured from scratch-resistant industrial grade premium stainless-steel for optimum durability. Make your kitchen a modern, eco-friendly hub of the house with InSinkErator®’s garburators and sizzling water dispensers. Talk to Kitchen and Bath Classics or Wolseley Studio consultants to find a solution that’s right for you. A permit may be required in order to set up your rubbish disposal.
There might be some standing water in the provide line, so put together to both catch the spillage in a small pan or to soak it up with a sponge. If needed, plan for the water line to run by way of cupboards, above storage and behind drawers to stop damage to the line. If there isn’t an independent water provide line, you’ll have to use one that feeds the sink or dishwasher. Locate this connection, preferably from a vertical water supply pipe, then map the shortest path from the provision line to the rear of the fridge . In addition, if food waste leads to the lake it can trigger high nitrogen degree issues, which is why garbarators are banned in some areas.
Jory additionally did an incredible job putting in our subway tile again splash. We extremely recommend BPM to anyone on the lookout for an electrician or home services as you're very professional, expert and go above and beyond to verify every little thing works and looks unbelievable. A garburator is a handy kitchen device, but not when it makes your complete garburator kitchen smell like a compost pile. If your unit is emanating a foul odour, there’s most likely some kind of blockage within the pipes, or within the unit itself. If that is the case, you’ll need a garburator repair technician’s help to take away, disassemble, and totally clear the unit, as nicely as clear the pipe under it. We’ve been in business for over 50 years and have installed numerous garburators in residential properties.
See our on-line specials on new garburators (installed from $249). Try to cut bigger pieces of meals into smaller bits and put them down the garburator one piece at a time to forestall clogs. Simple repairs can take DIYer many hours to identify and full, so embody that into the expense if you decide to deal with the problem yourself. Having a professional plumber, such as Miller Plumbing and Drainage, can diagnose and restore garburator the problem and assist in the discovery of different components that are about to fail. Trees and vegetation like water, and their root systems can grow into your service connection pipe through joints or cracks within the pipe. If you favor to scrub your cookware right away, pour fats, oils and grease in a compostable container and put the container within the compost bin.
Frequently cleansing your garbage disposal helps to ensure the blades and drain are clear of any obstructing materials. One of one of the best methods to scrub the rubbish disposal is flushing it down with some vinegar and baking soda. Never use any cleansing chemical substances similar to bleach or a chemical drain cleaner, as they may help harden grease and eat by way of your plumbing.
InSinkErator Evolution Series disposals characterize the best commonplace in efficiency. Simply put, they are the best grinding, quietest line of disposals we now have ever made. However, some cities elsewhere are looking at the means to do extra with the food scraps of their recycling system. It may seem like a nice way to wash out your disposal, however bleach and other harsh chemicals are corrosive and can truly injury your drain. RPG Calgary is led by a group with 10+ years of economic and residential plumbing experience.
0 notes
Text
kitchen remodel saga part 1?
I don’t know if I’ve posted about this already but Dude and I are going to get the kitchen of our house remodeled. It’s original to the house, it’s from 1950, it’s very dated, the cabinets were very high-end and remain lovely, being real wood and all, but are starting to have hardware failures. We had to replace the stove and fridge already, the sink faucet is starting to go, the sink sprayer broke, the linoleum floor is damaged in a couple of places, it’s got yellow wallpaper, it’s just-- gotta get redone. Right? Right.
We don’t know how much that costs so we don’t know how much to budget. We don’t know any contractors, of course. We don’t really know what we’re looking for. So Dude asked around. A coworker had just had his kitchen done, and recommended a place. So we went there.
Before we came in for a meeting with the specialist, she had us write down anything we really cared about. What do I know about interior design? Nothing, but I do know what I do and don’t like, in a kitchen. I only had a few things I wanted to note down.
The first thing on the list was, no stone countertops. They’re ugly, I think, but more than that, they’re prone to staining, they need special cleaning I think, they’re not *that* heat proof, they’re so hard that anything you set down too hard breaks, they’re so heavy you need special cabinets to hold them and a special process to make them level-- just, in every single way, they’re what I hate about current fashion. So I went in with a bulletproof rock-solid (ha) number one: No stone countertops.
Heh. This place only offers stone countertops. The choices of countertop surface were quartz, granite, marble, or quartzite.
“Okay how about not stone, though,” I tried, and probably I should have just walked out, because the answer was, only stone.
But. Dude was like. Let’s at least get a quote. We gotta start somewhere. But what is the point, I ask you, of getting a quote for a thing you do not want? Stone countertops mean you gotta have special cabinets and a special process to make them level and like none of that is going to apply in any way at all if we go with a laminate or butcher block countertop like we wanted. Like, it’s not even going to be the same kind of cabinets.
(Also, I was like, “i don’t like those microwaves that are supposed to act as range hoods, I don’t think they do a good job, I’d rather just have one on a shelf.” “Oh,” she said, “it’ll have to go on a countertop.” “... No,” I said, “I’d like one on a shelf, there’s never enough counter space and we’re both tall enough to reach a shelf, that would work better for me.” She stared at me. “You can’t put a microwave on a shelf,” she said, “your only other option is to put it in a drawer.” “You can’t put a microwave on a shelf,” I said, flat with disbelief; I grew up with a microwave on a shelf, two of my sisters have microwaves on shelves, I cannot think of a single reason on God’s green fucking earth that you could not put a microwave on a shelf, unless there is some newly-enacted law prohibiting it??? “Right,” she said. “But drawer microwaves are the thing now! We have one in the display upstairs, go check it out.”
We dutifully trooped over to the display. It was in fact a drawer, that slid into the kitchen island and somehow was also a microwave. It was hideous, it looked impossible to clean, it was a steam-burn-accident waiting to happen, and it was two thousand dollars. “I will die before I get a drawer microwave,” I said, and we said to her, much more politely, “No, thanks, we don’t want a drawer microwave.” and inwardly resolved to have a shelf installed and maybe a power outlet put near it and we’d just put the microwave on our shelf ourselves and maybe the authorities wouldn’t find out.)
Anyway.
We had this specialist come to our house, which I wasn’t wild about, but okay, she could measure the room at least, get some idea of what we already have. We have a few pieces of furniture we’ve put in, a stainless steel counter and a wooden buffet sideboard thing, to hold all our dishes and give us some workspace since the existing kitchen had like two square feet of counter, so we pointed those out to her, and said we were planning to get rid of those. And we pointed out the table, where we eat, since we don’t have a dining room. And we explained that we wanted the half-wall to go, since it was sort of passe, we felt, to divide the kitchen proper from the dinette-- just make the whole thing kitchen, and get rid of the awkward corner cabinets. Cool cool, all on the same page, no problem.
So we went in yesterday to see her rendering. And I liked the look of it, it was nice to see the kitchen laid out a little differently. She hadn’t changed much, the stove and fridge were in the same place, sink in the same place, fine and dandy, didn’t mind that.
I didn’t actually notice right away, but as she was finished showing us the last wall, Dude was like “... where do we eat?”
She gave us a blank look. “Oh,” she said, “well, in the dining room.”
...
we don’t have a dining room. Our house is quite small. The next room is the living room, and has just enough room for a sectional couch, a coffee table, an armchair, and a couple of small bookshelves. There’s no room for a dining table there, not unless we ditch everything but the sectional.
Also she’d put in a drawer microwave. “I mean,” she said, “you don’t have to go with that, it’s just, it’ll take up so much room on this counter...”
“We could put it in the dining room,” I said, sotto voce, to Dude.
This is my new personal meme. Anything I don’t have room for can just go be in the dining room, where I’ll eat, since there’s no room in this kitchen for a table.
Sorry, but are eat-in kitchens illegal now too??????????????
I feel like even rich people eat in their kitchens sometimes???? what’s wrong with a kitchen table???
I am feeling like my way of life is under attack here, not gonna lie. Is the kitchen table no longer sacred???
also, insult to injury, or injury to insult, my dang sister who i was helping move has a new house that has a slate floor in the kitchen which is fucking terrible and now my phone is dead from getting knocked off the counter onto that slate floor so i am like even more wildly dead-set on an Absolutely No Stone Surfaces In My House vendetta and yet again we have confirmed, this place can only sell us countertops made out of stone and I will not have stone surfaces in my house i am too clumsy and will fucking break myself and everything i own for the love of god i will not compromise on this but like
i don’t know, i am losing faith
please don’t let me end up spending more on a kitchen remodel than on my undergraduate education only to wind up with nowhere to eat and stone countertops upon which i instantly shatter my skull, please no
67 notes
·
View notes
Text
Talking to someone who is interested in fixing things is very nice, so I’ve been talking with Scott about the weird plumbing and things in the house.
He saw my post about the shower and was asking some questions and giving ideas and omg it’s just really, really nice to be heard.
Anyway. Since I’ve been telling you all about the weirdness, too:
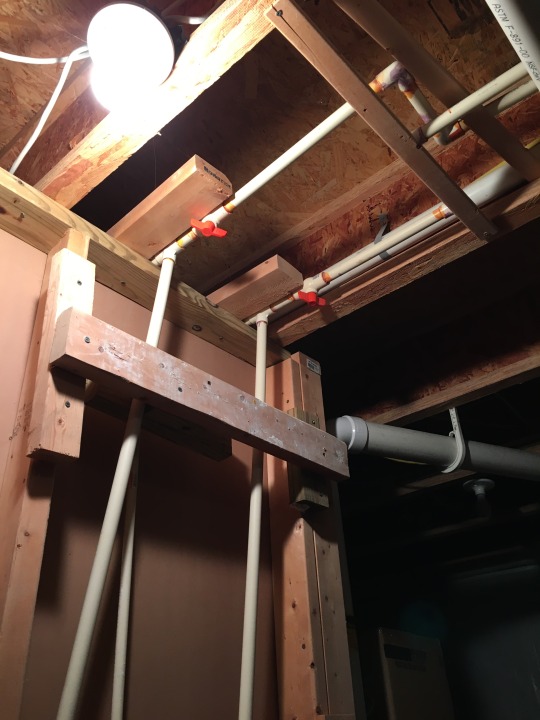
So here are the shut offs for the shower, way overhead where my short ass can’t reach without a step stool which seems like a bad idea in an emergency, but whatever...
So they are accessible-ish. AFAIK it doesn’t matter which way it’s turned (they can only go one way but there’s a little barrier so you can tell which way that is. I couldn’t see it before) because it’s just a little ball with a tunnel and it’s either tunnel lines up with pipe so water can get through, or ball covers pipe and water can’t get through.
I can’t turn them, though. I don’t know if they’re stuck or if it’s my weakness and messed up shoulder. I am very weak in the hands anymore. No grip, lots of pain.
I do have a plumber’s wrench thing that I can probably use to turn them. Haven’t tried, yet.
Also yes, those pipes are crooked AF.
The previous homeowners did it. I’m guessing the extensions over the ceiling there are for the toilet and sink.
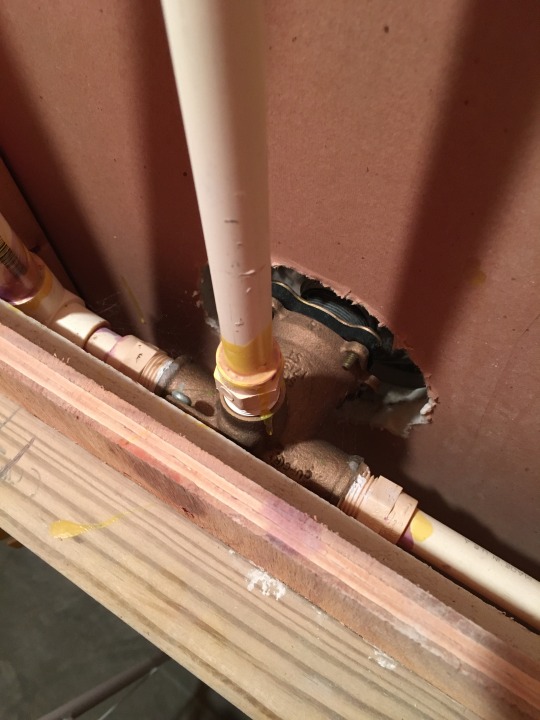
The leak is probably in the.... I keep forgetting what this is called. It’s probably in this thing here which I could likely disassemble and fix or replace no problem, I just don’t want to. Nobody uses this shower.
Really, the entire basement needs torn out and redone professionally.
I’ve had to fix EVERY. SINGLE. POWER OUTLET. because they’re ALL mounted wrong.
Anyway.
You know how I’ve said that I’m not stupid but I’m slow; I’ll get there eventually?
I finally had the smart idea to go outside and measure the distance from the window to the spigot.
14 inches.
Then I came inside and measured from the window again and the spigot is, I shit you not....
right there.
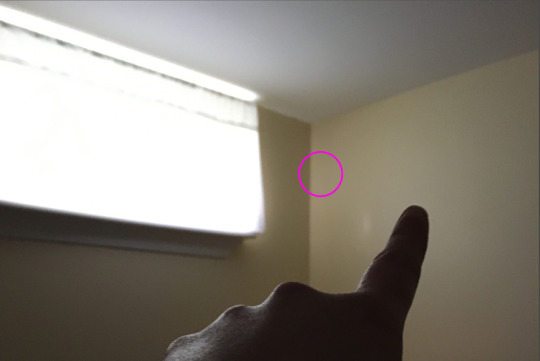
Right where those walls meet. That corner is 13.5 inches from the window.
Which begs the question: Where the fuck is the pipe, then, if there is wall framing there???
Also this means there’s a void behind there. The foundation is a little past the spigot, maybe another 10 inches, and the bathroom isn’t that deep. There’s a good...
guestimating...
1ft by.... maybe 4ft area that’s covered. For some reason.
So I’m wondering if I cut like....

here? if I’d be able to reach in and access the shut off valve (and then install a little access door cubby thing). Or maybe cut all the way out and install a people-size door.
Or is it on the other wall?
Like, does the framing for.....

Is the pipe RIGHT THERE and the framing is installed wrong and the drywall is just floating in the corner???? Or is it the other way so I’d be better off cutting into the window-wall?
Which way am I going to be blocked by boards?
Are BOTH sides floating?????
I wouldn’t put it past him. You should see how poorly he drywalled and framed the stairs.
What the fuck, Rolly. Why.
It would have been fixed by now if That Guy were willing to pay for the repairs or if I were able to. This has been driving me crazy for 16 years.
12 notes
·
View notes
Text
Moving into new house: Complete! But also not really, because jeez there is so much wrong with this house.
(so uh, venting here, also discussion of money stuff in case some people aren’t in the mood to read someone complain about it)
The previous owner did a lot of weird DIY stuff here (except instead of do-it-yourself it feels more like do-it-wrong-and-possibly-out-of-spite). Some of the power outlets were seemingly in the middle of being fixed but then ripped out. The septic system is in an unusual spot, mostly because it’s in the side yard of the house instead of in the front yard like pretty much every other house in this neighborhood. The kitchen cabinets were built weirdly and we’re having them completely replaced because of it. The kitchen sink was also in pretty bad condition too, so another replacement there!!
My room in particular has a ton of weirdness. It seems to be a garage that was (poorly) converted into a room, with its own (janky) bathroom and (questionable) air conditioning system. There’s a closet here that’s big enough for 3 light sources: there’s one light switch inside the closet, one outside, and we’ve yet to find the third switch. Also this room has its own front door, so this weird house has two front doors.
Also apparently the former owner was just a straight up asshole and was on bad terms with pretty much everyone here. Especially possibly the neighbor(s?) across the street, who keep these weird flood lights on the street 24/7.
Though, my parents have been speaking with some of the neighbors and getting to know them. Apparently the general feeling is that pretty much everyone (except the mystery neighbor(s?) across the street) is glad that we’re much nicer than the old owner.
But also, apparently the across-the-street neighbor(s?) have just been like that for as long as anyone around here can remember? The common rumor is that whoever owns that place is afraid of burglars and wild animals (especially bears and hogs), hence the lights. I mean, alright, at least we invested in some blackout curtains, thank god. :u
Anyways, on to money matters... my mom has put the old house on the market. Because of the kind of neighborhood it’s in and the features it has (particularly my little apartment over the garage that I was living in, plus solar panels we got installed, among other things), it’s potentially going to sell high enough that we could pay off the old mortgage on that house and the new mortgage on the house we’re in now. And still have a decent amount left over.
It’s still... honestly kinda unbelievable. If we really do pull that off, then thank god, it would mean I won’t have to deal with having to cover a mortgage at all. ;o;
But it’s also a bit frustrating because most of the people interested in buying at the price it’s listed are pretty much all investors. Just collecting property to sell for a profit later. One guy even admitted something along the lines of “Oh, I buy houses just to keep them for later, I don’t even rent them out most of the time :)”
Can you imagine being that rich that you don’t even have to worry about renting out properties to make back the money you put in? Let alone bothering to actually live in the fucking houses you buy at all?!
If it were up to me, I wouldn’t sell the house to someone unless they were actually going to live in the damn thing! But my mom definitely doesn’t care much either way, she just wants to make sure we get as much out of that old house as we can. Besides the mortgages, we definitely do still need that extra money for some needed improvements to the new house.
... I still can’t help but feel bad about it. Since, y’know, frickin’ investors and all. :/
2 notes
·
View notes
Text
WF4.1.
Part One: The Day the Markets stood still…
Published at M.Stow11.Wordpress.com
1. She.
‘It is like living in a rabbit hutch’ She often said emphatically and metaphorically, and He replied with
a shrug, nothing to say in reply. It was; and it would take long enough to pay for. Four rooms. Eight-floors up,
eight flights of long turning concrete rubbish chute and stairs, and fire escape, for when the elevators did not
function anyway, which was often and took days sometimes to repair. A balcony open passageway at the front,
looking over the street below, now starting to become busy with traffic. They had lived with his parents for a
time, and then after they were married, in a small rented flat in The City, before they needed to afford
somewhere to live together, and to bring-up their two small children.
Both saved, and with some financial help from a relative (deceased) they had managed to get this
place. When the housing market was ‘buoyant’, and mortgages easy to get. The Home was bought with a loan, a promissory note, deposited and co-lateraled together with their combined lives and the home itself. They were
afloat.
Both worked to pay-off the loan, which although it was supposed to re-duce each year did not seem ever to keep up with pay and prices. The loan would anyway be paid-off many times over if they were ever to pay off the debt.
If this place was ever to become their own owned nothing to pay-back; then, if they managed to keep paying-off the loan for the ‘Shelter from the Storm’ as they called Home.
That they did not actuarily now own, and may not ever, actually own, lose-lose. To sell-back at Market Price, the difference between the paid-back buying-price and selling-price, and of which they would have lost completely to The Bank…The Mortgage Company.
TheirHome-Mortgage@rent no(t)()-insurancetheir assured-pension against dire-poverty and homelessness.
No social-recourse and be homeless, to parents and over-crowding again, or with friends similarly fixed, sofa-surfing their home, such as-it-was de-faulted, re-possessed. A two-bedroom apartment, she thought of: kitchen, lounge, shower-bathroom toilet and tiny balcony onto the world below, between them and the sky above. Each day, each month, and each successive year into the unthinkable future; two-thirds of two-lifetimes at least, two-thirds every month of what they were both paid-in wages-for-work earned.
She did the household accounts, and she knew.
The Home. The Loan. Would have been paid for several times over by the time if ever it became theirs
and The Childrens’; and perhaps even their Grandchildrens’ by the time the shared-property many-floored building was un-inhabitable, de-molished land let-again, built-on freehold not-leasehold extended for-bonus payment un-earned…re-build in the new style, in a traditional place, or otherwise breaking into farmland and ocean beyond.
But that is the nature of the human animal, is it no? To do over, and be done-over to again and again she thought: want more and more, for less and less and in the quiet mind wandering moment of pillared door, a room, a table, a bed let go and a bed sheet left behind ready to be buried with perhaps as they did in the olden- times shrouded as now by thin curtains pulled-back.
Each-Day: like a two-step forward and quick-step fox trot later backwards one-step…
Home and Away worked to pay-off the loan on the house and to pay for and cook food, with bills and
extras, clothes, and nights-out occasionally.
Maybe once a month, or not at all.
Then He had been laid-off work at The Bakery.
Three-day-week and three day’s wages.
The Home mortgage was re-negotiated and they continued struggling to pay-off the loan and other
loans, credited and directly debited debt from what they both earned together.
There was never an issue of who would earn more, and be the main breadwinner, they both earned
more or less the same low wages as most the people who worked and they would do the most caring, of each other, and the children: the unpaid responsibilities shared around the home, and in the world of work.
Shopping and holidays and other friends and family out there. All indebted, or in credit day2day.
Week to week, month to next month, years, minute-by-minute.
They were equal, without even having to think about it or confront societies and others’ false
expectations of gender and families. They were equal in debt and credit, and supported each other’s frail and fragile egos with a natural equanimity respectful and loving…
Each contributing their best and differently, in-differently to make the whole, whole.
It’s not all doom and gloom She did often think, and he tried not to think on it. The homily homely
claustrophobia only had to be relieved by going out. To the cinema, to a bar or restaurant. But that was not very often de-finitely now there were children as well.
Sel-dom. did extras make their mark, clothes bought carefully a piece at a time, re-placement rather
than extravagance. The cupboards filled with groceries and emptied by the time the next weeks shopping is
needed and the next week’s earnings…already spent.
She was awake, first this morning, and she got up from the bed on which he still lay awake but not yet awake enough to leave its’ nigh-time warmth. She went through to the next room. The bedroom led across the narrow-passage to the living room, which led directly to the tiny gallery kitchen and balcony on one side and door to the front room, on the other side balcony corridor and more doors along.
Except it wasn’t the front-room, exactly; only, unlike the ‘front-room’ of her childhood playing on the
street and door directly to the rugged ragged matted smell of cooking from the stone wall white-washed country kitchen.
Upstairs two bed-rooms and on the gallery landing for the children and a closet room to flush away with a basin of water from the kitchen sink-tap and toilet-well into the slurry sump, where you could hear it ‘slurry’ all the way down, filtered to spray on fields all around; and then back downstairs to replace the water from the kitchen-tap and outside clean-well.
Pumped-up from the well, refilling the fired china clay bowl for washing and zinc-metal bucket, ready
for the next use.
Log grabbing toughened steel plasma-cutters hydraulic-ram chassis panel welded together. Expertly Put-together giant wheels axle brake.
Pumping-oil to cool the engines’ turbo diesel s-carbed grapple telescopic arms the claw car-crusher
mattress-shredder then the skid-board tracking carbon-fibre e-road automobiles solar panels settled wind farming blades and wave-machines generating heat&power and swimming in clean-air&water:
> Low-No: installation& maintenance-cost yr/yr.
Apparently, free.
At her first childhood home, bed-time children first, then the adults. Rats nested runs, beetles and
cockroaches were kept away by the domesticated cats and dogs that shared the yard and house with horses at the local stables for the carts and filed machinery; to ride, at week-end day-off, and many Holy Days.
Each week, several times into the market town for food supplies, and the children’s treats.
Their whole world a Living Market Place, of Work Trust and Play.
Now, great enclosed parked superstores and supermarkets and factory outlet warehouse. Where goods
are now transported she thought of: to&fro and by foot and horses’ hoofs carried and motor vehicle, train and massive tanker and container-ship electric like cutting through the air or the hydrogen&helium of outer-space a one-metre flight through nothingness baited
> One-click:Low-No-cost subscription no-way out…
< N/nnn…paid-up…again&again.
*
From the docks and airport, at the city harbour hub humming away, remote yet directing everyday life, everywhere.
Exorbitant-Political
Business-Trips
Media: Holiday Passengers, and Freight Cargo.
The affordable flight, to get-away from-it-all: a change; a charge necessary move, once in a while, and
not at-all.
Every year; but, to visit family here and there and elsewhere, or else you’d go stir-crazy.
Do a night-time flit, flip! leave the rent, the mortgage, un-paid.
Only, to otherwise keep on fighting for the bargains: cheap-est with-in budget, to get through to the
Next-day and the day-after-that.
When debts and fines could not be paid, the debt collector.
Bailiffs, The-Auctioneer: selling- off of the personal possessions; sometimes, on the Global Markets;
and then sold-out: the personal; and, T.V. public…
The laptop computer on-sleep and awakened, opened, placed on the table, booted-up and She blogged
instantaneously her-thoughts:
#We all need a roof over our heads…and to: put Food on the Table! without any other word or contextual continuity that did not remain obvious to this early morning.
Everyone, and anyone in the same and similar circumstances getting the same hastily tapped-out
messages excluding, those without tablet, home or food; and those with patently far too-much.
Those who had an Administration to do that for them and her-thought continued in the context of the
mindful moment and that which we all have to pay extortionately for over and again even when the food is eaten and the crap washed away there remains a nasty stain, a nasty taste.
Original wages sweated over day upon day, and loans ever in negative equity to who?
Them!
Income-Tax&Corporation-Tax paid/un-paid through government-deal(s):
Extortionate debt-interest credit-profit and volatile prices, losses on last-accounts records ever higher BINGO! and pay…ex-terminating…prices collapsed…looking up, and down again now, not in dejection, but circumspection against ever apparent possible failure, with desperate optimism, toward un-realistic perfectionism.
Only mechanized buffer-traffic building-up as soon as into a busy rush-hour congestion be-low… Cars and buses, bicycles, motorbike and motorized delivery truck from here, only another view.
From
two-sides; and every side… the bedrooms along the passage corridor, the sleeping children slept, earlier peekedinto soundless in beautiful dream or dreamless seemingly startling worrying death-checked for breathing.
Crossing from night into daytime TV remotely automatically turned on, confirmation, that
life goes on…
The living-room she entered bore all the chatter and the silence of one who listens.
Still and safe, cosy and secure. The other rooms took over the emotions and needs: sleep and food, love and arguments. The central room, the central chamber, looked on and awaited eventual, almost inevitable, but never certain re-conciliation, and rest. Indulged-in social-(e) vents, noisy chatter and quiet evenings indoors. The furniture was adequate and filled the room. Table, chairs, television, a drawer and shelved cabinet standing against a wall, displaying various special icons; plastic flowers family photographs in frames, a portrait of a film star, or a print of a famous oil painting.
Ornaments, statuettes, figures of worship and of novelty. The furniture, the infrastructure, from the
livelihoods and eventually the roof over our heads…’in over our heads’ heard as if originally spoken.
There were unopened envelopes and cajoling leaflet advertisement:
Kill your debts! Die debts!
she thought of letters and bills for payment, propped up behind a ticking clock. There was a picture postcard from someone-else’s holiday forming a picturesque frontage to hide the stack of demands for reply and payment which lay beyond.
She-drewback the curtains and looked out of the window across the balcony, with its unflowering
plants growing in flower-pots. There was a real still rising mistinessoutside from the early morning warming; and she gazed over an area where many lived, and it seemed to her, this morning, where they too just only lived
-out their lives: day to day, week to week, minute-to-minute…
They too thought to-themselves as she looked-out onto the dawn of a gradually opening new day that
the world must have always been this way.
3 notes
·
View notes
Text
Back from the Dead

Reviving a dead PowerMac G5...twice...er...sort of....
Awhile back, my 2005 PowerMac G5 died. It even made a horrible noise as it did so, just to make sure I understood it was dying. I have no way to describe the noise it made other than if an inanimate object can sound a death rattle, then that’s what I heard that day. Death rattle - blank monitor screen - no sounds or lights from the Mac. Electronic death.
I’ve seen a computer or two breathe its last in my time, and I’ve seen a computer pow- er supply or two give up the ghost, and that was my first suspicion as to what I was dealing with. I shopped online and found a replacement (used, obviously) for about $50. This was also a 600W unit, to replace the 430W power supply that shipped with my base model G5. I placed the order.
In about a week, the new power supply arrived. I checked the web for how-to videos to get an idea of what I was facing. I’ve replaced a few PC power supplies, and the process there is pretty straightforward. I’d never attempted this with a Mac of any model. The videos suggested that the procedure was likely to be more involved than what I was used to, but probably wouldn’t be anything I couldn’t handle. I also realized I was going to have to order some more tools - specifically, a torque driver with an extension bar to remove the
dual G5 processors. Yes. You have to re- move the processors to access the power supply. So, it was another trip online and another order placed.
A few days later, I had all the tools and parts assembled for the job and was ready to get started. I removed the external case cover and the internal plastic airflow cover, exposing the Mac’s delicate innards. With the case opened, the next step was to remove the cover from the processors. The video I had found demonstrating this said to simply slide the cover to the left, freeing it from the tabs holding it in place. Which I attempted to do, and quickly realized the video had skipped a step as the cover would not budge. Looking things over a bit, it turns out there’s a metal pin locking the CPU cover to the middle tray in the case. Using a pair of pliers, lots of sweat and copious amounts of my choicest language, I was able to remove the pin. With the pin removed, I was able to slide the CPU cover off the remaining two tabs holding it in place.
Next was to remove the video and other expansion cards. This worked exactly as it would with a PC. it wasn’t a problem.
Next, I had to remove the CPU fan. Unlike a PC, where the CPU fan would typically be mounted on top of a heat sink which would be mounted on the CPU, this Mac’s fan sits in the back of the case, facing the rear vents. From this position, the fans presumably draws hot air away from those massive heat sinks, through the rear vents and out of the case. It’s also perfectly positioned to get in my way. The fan is locked in place by a pair of tabs, which can simply be pushed in to unlock. One of the how-to videos I watched had suggested that the fan’s power cable also be disconnected from the motherboard., but for the life of me, I couldn’t seem to manage this without applying far more force then I was comfortable with, so I left it connected. The wire was sufficiently long enough for me to move the fan out of the way to allow me to continue to work.
Now, on to those dual G5 processors. Instead of being plugged directly into the motherboard as they would be on a PC or a more modern Mac, each CPU sits on a daughter board which is then connected to the motherboard, Sitting on top of each of these daughter boards is a massive heat sink. There is no way to work around these. Those daughter boards had to come out.
The daughter boards are secured to the motherboard with four torque screws. The insanely large heat sinks (I’ve mentioned that the heat sinks are huge, haven’t I?) are absolutely going to get in the way, so a normal length torque driver wasn’t going to cut it. What I ended up doing was taking two admittedly inexpensive torque driver extensions to access the screws. It wasn’t pretty, but it worked. Once the screws are removed, you can carefully pull the daughter boards out.
With the computer practically disassembled, I could now begin work on removing the power supply. Four screws on the bottom of the case secure the power supply. Nothing fancy here, just four Philips screws. Next, there’s a metal plate covering the power supply itself. This was a bit tricky. There’s no screws attaching it to anything, but there are a couple of tabs, and it’s a really tight fit. It took a bit of work, but I managed to remove it.
The power supply itself is now exposed and ready to be removed. There are three cables connecting the power supply to the computer - the main power cable that plugs directly into the motherboard, and two others that connect to cables coming out of the motherboard. With the power supply disconnected, it now pulls easily from the case.
To install the new power supply, I reversed the process (obviously), so it’s not necessary to go into too much detail here.
With the new power supply installed, I was ready to test my work. I plugged the computer in and hear a click I can’t say that I remember other computers doing this, but I didn’t see it as anything to worry too much about. I hit the power switch on the Mac and...nothing. Still dead. I checked the easy stuff first. I plugged it into a different outlet. I tried a different power cord. Still nothing. Suspecting what I what I was going to have to do next, I used some of my best English and got to work.
I opened the case and examined the cable connecting the power supply to the motherboard. I wasn’t certain of it, but it did look like it might not be connected properly. I tried to see if I could get my hands in to try pushing in the cable to the port on the motherboard but my access was blocked by the heat sinks. (They’re really big, you know.) Now knowing with a certainty what I was going to have to do next, I recited more poetry and continued to work.
I almost completely disassembled the computer again up to and including removing the tray covering the power supply. I pushed on the cable connecting the power supply to the motherboard and, sure enough, it was not completely connected. I corrected this and performed an almost complete reassembly of the Mac. I plugged it in, hit the power switch, and this time, the Mac powered on and went through a normal and successful boot.
So, for about $50 and the time to tear down and rebuild the computer twice, I got the PowerMac G5 back. I also learned a valuable lesson: check your work! I’m sure I’ll remember that next time. Maybe.
1 note
·
View note
Last Seen Blogs

ossielv
Ossiel V

kodynoko
Kody

nobaharudaisuki
the Future Yamada
icons-anime
animé icons,etc

a-night-at-the-masquerade
i’m going insane does anyone want anything