#Polyurethane Roller
Explore tagged Tumblr posts
Visit Tumblr Blog
Explore Tumblr blogs with no restrictions, modern design and the best experience.
Last Seen Tumblr Blogs


Fun Fact
Tumblr has 16.74 million mobile monthly users in the US.
Text
SPM Equipment is manufacturer, supplier and exporter in a wide range of polyurethane coated pipe rollers in UAE, Malaysia, Australia, Usa, and Russia. Want to know more, call us now!
#Polyurethane Coated Pipe Roller#Polyurethane Coated Pipe Roller Manufacturer#Polyurethane Coated Pipe Roller Exporter#Best Polyurethane Coated Pipe Roller#Top Polyurethane Coated Pipe Roller#spmequipment
0 notes
Text
Polyurethane conveyor roller

View On WordPress
0 notes
Text


• Roller Skates.
Date: 1980
Medium: Synthetic, nylon, polyurethane, metal.
#history of fashion#fashion history#fashion#vintage fashion#vintage clothing#vintage#1980's#1980's fashion#roller skating#roller skates#1980
1K notes
·
View notes
Text
Extremely Strong Shower Bench
I've gotten feedback from the community asking me to share my plans, so here it is. If you want to build your own shower bench, this is how you do it. Make sure to ask a thinno for help, this will not be easy to do!
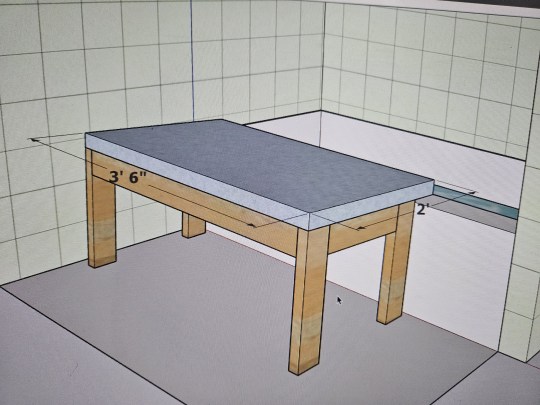
This is an extremely strong shower bench with a 1000+lb capacity. The floor under you will fail before the bench does! This shower bench is designed to remove you from the shower and basically have you sit on the ledge. You will need a couple feet of clearance away from your tub's ledge for it to work.
The top of my tub's ledge is about 1' 3⅜" up from the ground. If yours is taller/shorter by more than ¼" or so, you will need to make some adjustments to measurements down below.
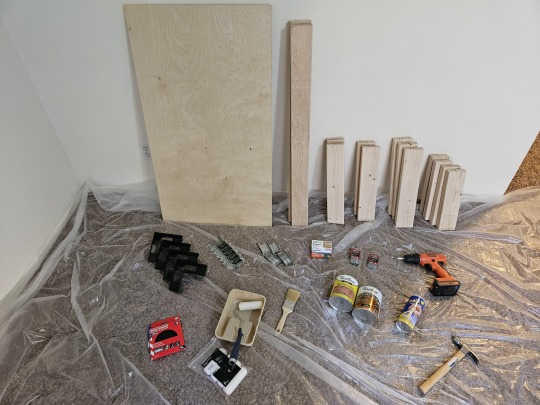
This is a photo of the materials I used to make this build. I got everything I needed at my local hardware store. My build wasn't perfect though. I would suggest you learn from my mistakes and acquire a slightly different material list though:
1x 2'×4' plywood sheet. Get something pre-sanded and rated for outdoor use. I recommend ¾" thick.
2x 8' 2×4s. Most any wood type will work, so get what you like most. I just got some normal 2×4s and made sure they looked pretty. If you don't want to bother with staining or weatherproofing the structure of your bench, get pressure-treated 2×4s.
4x 2' ½"×½" square dowel.
4x Simpson Strong-Tie RTC2Z. Get the black-powder-coated ones if you can.
2x Simpson Strong-Tie LUS24Z. These will be used for the cross beam.
4x Simpson Strong-Tie FB24Z. These will be the feet.
1x Simpson Strong-Drive SD9112R100 #9×1½" 100ct Connector Screws. You won't use the whole box. It comes with a bit.
4x 3" common nails.
32x 1½" common nails.
35x 1" brad/finish nails.
200-220 grit sandpaper.
Oil-based high-gloss polyurethane.
Small dense-foam roller & roller pan.
If you're applying stain, oil stain & staining brush for oil stain.
Liquid rubber. Get something that will provide grip.
Rubber-foam weather stripping. The thicker and wider, the better. I got 20' of 1¼"×7⁄16" and it worked great for me.
4x paper clips, hair ties, or something to hang the feet from.
A plastic tarp, thickness is more important than size.
As for tools, you really only need two things:
Hammer
Drill, ratchet, or socket screwdriver
OPTIONAL: File or knife
I also highly recommend some PPE. Get some cheap/disposable cleaning gloves, a mask of some type, hair ties for your hair, and an old change of clothes.
If you don't have access to a table saw at home, *don't leave the store yet!* You need to cut your wood at the store. Many home improvement stores will cut your lumber for you, either for free or for a low price.
Ask an employee to cut the two 2×4s like this:
2×4 #1: 38", 38", 17"
2×4 #2: 33½", 33½", 13", 13"
NOTE: If your tub ledge was taller/shorter than mine, then for every 1" difference, lengthen/shorten each 33½" cut by TWO inches.
Then ask them to cut two dowels down to 20½", and two down to 24".
You should also ask them to take 6" off the short side of the plywood, so it's 2'×3½' instead of 2'×4'.
You're not ready to leave yet! You need to make two more cuts, and the store employees will not help you with these. Many home improvement stores will have a DIY handsaw table where you can cut moulding down to length. You'll need to use this to make the last two cuts yourself.
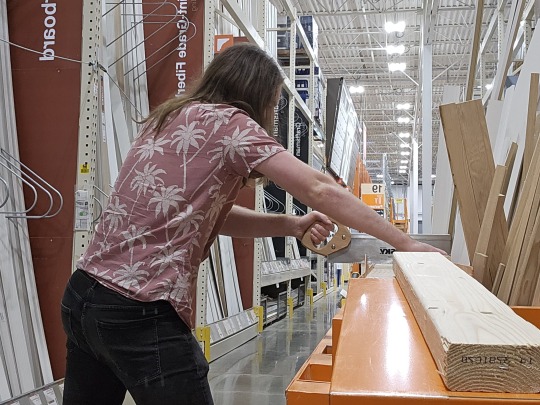
You need to make an ANGLED cut into the 33½" boards. Lay the first 33½" board down flat as shown. On the edge closest to you, mark a point 1' 5⅛" away from the left end of the board. Then on the edge farthest from you, mark a point 1' 5¼" away from the same left end of the board. Position your saw across both points, and cut through the board. You may need to roll the board over to finish the cut.
NOTE: If your tub ledge was taller/shorter than mine, then for every 1" of difference, add/remove 1" from the 1' 5⅛" / 1' 5¼" measurements above.
For the second board, *do not measure!* It is more important that the cuts in the boards be identical than it is for any one cut to have exact dimensions. Lay the second board down, then set one of the cut pieces on top so the ends of the two boards are aligned, then use the existing angle in the cut piece to start the cut in the second board.

When you are done, you will have four boards, two slightly taller than the others, with the exact same angle cut in all of them. In the above photo, the boards are resting on their angled ends. These pieces will be your long and short legs.
NOW you can bring everything home.
First, lay down your tarp somewhere. Ideally you'll have access to a 5'×10' flat area outside.
Then you need to sand *everything* (except the big faces of the plywood, and the pressure-treated wood if you went that route). Pay special attention to the corners and cuts in the wood.
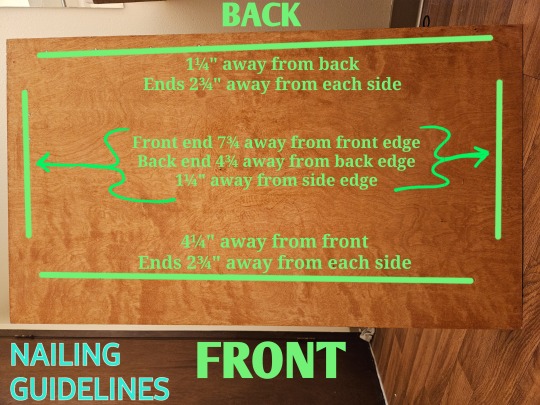
Now you need to attach the square dowels to the outside of the plywood board. Choose a face of the board to be the "up" face, the one you'll sit on. Put the 24" dowels on top, right along the short edges. Choose a long edge to be the back, and squeeze the two shorter dowels in along it between the side dowels. Nail everything down with the finish nails.
Next is staining, if you chose to stain. Apply according to the directions on the tin. You will likely have to do multiple coats.
Now the truly hard part, applying polyeurethane. I recommend using the foam roller for this and applying many coats. You can prop up the plywood sheet using the 2×4s if you like so you can get all the way around the edges in one pass. You'll still need to flip it over and do three more passes when done with the top, so you can protect the underside from warping.
While waiting for your polyethylene to dry, you may as well make the rubber feet. Grab your four FB24Zs and tie something through one of the holes in the end. Open your can of liquid rubber and follow the instructions to fully submerge each one before leaving it out to dry. One coat should be enough. Once dry, try to remove excess rubber from the inside using a file or knife.
When everything's had a good long dry (at least a day after final coat), it's time for assembly.
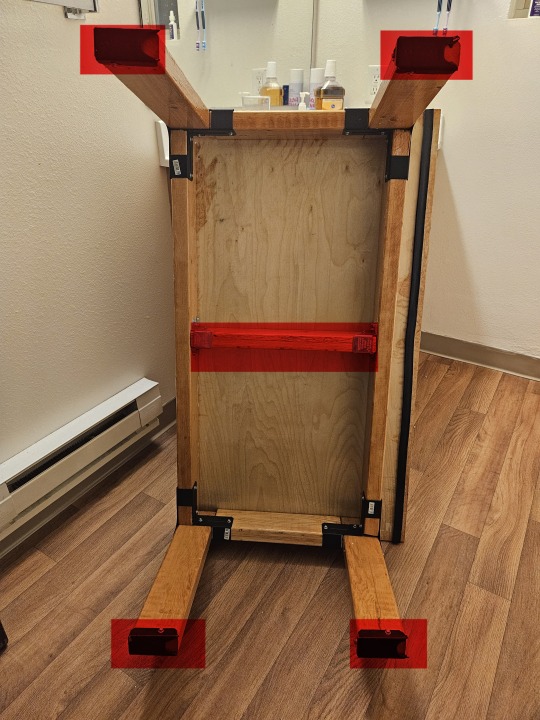
Grab your two 38" boards, your two 13" boards, all four of your legs, and your four RTC2Zs — everything except what's highlighted red in the first photo above. Set the 38" boards down on their narrow side along the long edges of the board, and the 13" boards down on their narrow side along the short edges of the board. Bring them together to form a rectangle, then set the RTC2Zs upside-down on the corners. Each RTC2Z has an L-shaped hole in its bottom; the top/bottom of each L-shaped hole will be filled by the ends of the 38" boards, while the center and left/right of each hole will be filled by the legs. The ends of each 38" board will butt against the wide side of the legs, while the ends of each 13" board will butt against the narrow side of the legs. Now make sure everything is pressed firmly together as you use the Strong-Drive screws to attach the RTC2Zs to the 38" & 13" boards. For each corner, four screws go into the 38" board and two screws go into the 13" board. *DO NOT ATTACH THE LEGS YET!* The legs are just here for spacing right now. Remove the legs when everything is attached.
Grab your 17" board and your LUS24Zs. The 17" board should squeeze in nicely right in the middle, turning your blocky 0 into a blocky 8. Straighten out your LUS24Zs if needed (mine were bowed outwards too much), set them down over the ends of the 17" board, and use 4 screws each to attach them to the sides of the 38" boards. Now grab your long 3" nails and use two on each LUS24Z, installing them at a 45° angle into the remaining holes. They'll nail at an angle into the 17" board and go straight through into the 38" board.
Flip everything over such that the plywood board is now resting good-side-up on top of the mostly-complete frame, with the whole thing resting on the rounded bottoms of the RTC2Zs. Center the frame between the left and right sides of the plywood (should be ½" overhang on each side); let the plywood's back overhang ½" off the back of the frame, and its front overhang 3½" off the front. Now use the 1½" common nails to nail in the plywood into the frame. I used four lines of nails, one for each outer board; measurements are in the second photo above.
OPTIONAL: Apply a final polyurethane coat over the nail heads. This will need a day or two to dry.
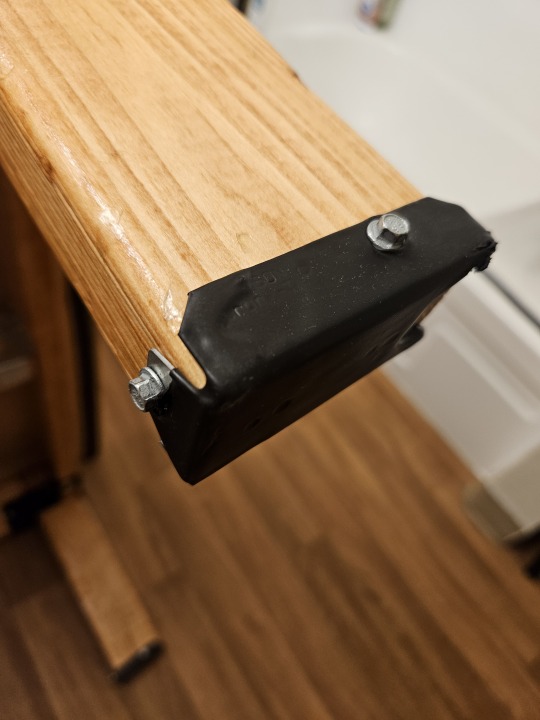
Screw the feet into the ends of the legs. See the third photo above for a reference. Try to make the feet as straight and snug as you can get them.
Insert the legs into the holes left from step 1. The short legs go in on the front side, and the long legs go in on the back side. You should have a bench that tilts slightly forward, to allow for water to drain into the tub. Use some sort of material as a spacer as necessary to adjust each leg to level out the bench. Don't be afraid to introduce gaps between the legs and the plywood; the metal connectors are what hold the weight. Once everything is nice and level, use six screws on each leg to attach then to the RTC2Zs.
Apply your rubber-foam stripping. I applied stripping all along the length of my tub's ledge AND along the underside of my bench.

And you're done! Your bench will look different than the photo above, I hadn't yet added the stripping, the wooden dowel siding, or the feet. And perhaps you chose a different stain color, or made your legs out of pressure-treated wood! In any case, this thing is built like a tank (made with actual home framing materials) and shouldn't break easily. I hope it serves you well!
16 notes
·
View notes
Text
A Simple Guide To Help You Become Familiar With Roller Skates Wheels
If you’re new to skating, then you may be wondering what the differences between wheels are. While there are a lot of types of wheels to choose from, they can all be broken down into hardness ratings and sizes. In this guide, we will explain these concepts and how they affect your best roller skate wheels experience!
Hardness rating
The hardness rating listed on the wheel is a measurement of how much the wheel resists deforming under pressure. The harder the wheel, the faster and longer it will last.

Wheels are typically made from polyurethane, which is an elastic material that can be molded into different shapes by applying pressure during production. When you roll over flat ground at high speeds, your wheels flex slightly under pressure before returning to their original shape once you've passed them over a small bump in the pavement.
A harder wheel has less give than a softer one when rolling over these bumps because it's stiffer; therefore its ability to roll smoothly over uneven surfaces increases with increased hardness in relation to other factors like quality of bearings or frame design (the latter being something we'll discuss later).
Wheel size and placement
Wheel size and placement are important for performance and comfort. The larger the wheel, the faster you will go, but this comes at the expense of maneuverability. Smaller wheels make it easier to turn, but they also have less “traction” (more on that later).
For performance skating, you want to place your wheels close to the toe of your skate so that when you push off with your foot, all of your weight is placed over them. This allows for better stability and acceleration during fast movements such as jumps or speed bursts.
Placing them too far back will cause instability because it puts more weight on either side of the skate as well as slowing down pushing off from them when doing tricks such as power slides or spins which require quick movements by having more friction between skates and ground.
Aesthetic and design
As you can see, there are a lot of things to consider when buying an Impala roller skate. The first and most important step is to know your own preferences and skating style so that you can find the best wheels for your needs. If you're new to roller skating, don't worry about getting too technical—just pick a color you like and start learning how to skate!
If you have any questions or comments, feel free to leave them below. If you're looking for a more in-depth guide on how to choose the right roller skates, check out this article here!
Conclusion
With so many different kinds of roller skates adults available, it can be a little overwhelming. The best way to get started is by looking at what your needs are as well as how much money you want to spend on this purchase.
If you aren’t sure where to start, then take some time looking through our guide! We hope that it helps guide you in the right direction towards finding the perfect set of wheels for your needs today!
2 notes
·
View notes
Text
Enhancing Aesthetics: The Process and Benefits of Lime Washing Timber Floors
Lime washing is a technique that has gained popularity for its ability to enhance the aesthetics of timber floors. This process involves applying a lime-based solution to the wood, resulting in a beautiful, textured finish that highlights the natural grain. If you’re considering giving your timber floors a fresh look, this article explores the process and benefits of lime washing timber floors.

What Is Lime Washing?
Lime washing is an ancient technique that has been used for centuries to protect and beautify wood surfaces. The process involves mixing slaked lime with water and pigment to create a paste, which is then applied to the timber. Unlike traditional paints, lime wash is breathable and environmentally friendly, allowing the wood to maintain its natural characteristics.
Benefits of Lime Washing Timber Floors
Natural Aesthetic Appeal: One of the most significant advantages of lime washing is the unique and natural appearance it provides. The translucent finish allows the wood grain to show through, creating an attractive, rustic look that adds character to any space.
Durability and Protection: Lime wash forms a protective layer on the timber, shielding it from moisture and environmental damage. This added durability can help prolong the life of your floors, reducing the need for frequent maintenance or refinishing.
Eco-Friendly Solution:For environmentally conscious homeowners, lime washing is an excellent choice. The materials used are natural and non-toxic, making it safe for both your family and the environment. This sustainable approach to finishing timber floors is becoming increasingly popular among eco-conscious consumers.
Easy Maintenance: Timber floors that have been lime washed require minimal maintenance. The natural properties of lime wash help resist mould and mildew growth, making cleaning a straightforward process. Regular sweeping and occasional mopping are typically all that is needed to keep your floors looking great.
The Lime Washing Process
Preparation: Before applying lime wash, it’s essential to prepare the timber surface properly. This may involve sanding to remove any old finishes, dirt, or grime. A clean surface ensures better adhesion of the lime wash.
Application: Once prepared, the lime wash can be applied using brushes or rollers. It’s important to work in sections, ensuring even coverage. Multiple coats may be required depending on the desired finish. Each coat should dry completely before applying the next.
Finishing Touches: After the final coat of lime wash has dried, it’s advisable to apply a clear protective finish to enhance durability further. This could be a water-based polyurethane or another suitable sealant, depending on your preferences.
Conclusion
Lime washing timber floors is a unique and effective way to enhance the aesthetic appeal of your home while providing long-lasting protection. The benefits of this process, from its natural beauty to its eco-friendliness, make it an attractive option for homeowners looking to revitalise their timber flooring. If you’re considering a new look for your floors, lime washing may be the perfect solution to achieve a stunning and sustainable finish.
#Timber Floor Lime Wash#Floor Lime Wash#Lime Washing Timber Floors#timber floor sanding#timber flooring
0 notes
Text
Polyurethane roll coating on metal can

View On WordPress
0 notes
Text
When to Replace Printing Press Rollers: Signs of Wear and Tear
Printing press rollers are essential components in the printing industry, responsible for transferring ink to paper and maintaining consistent print quality. Over time, however, these rollers experience wear and tear that can negatively affect print output. Knowing when to replace printing press rollers is crucial to avoid production delays and ensure high-quality prints. This article will explore the key signs that indicate it's time for replacement, helping you maintain optimal performance.
1. Inconsistent Print Quality
One of the most noticeable signs that printing press rollers need replacing is a decline in print quality. When rollers become worn or damaged, they may not distribute ink evenly across the substrate. This can result in streaks, smudges, or uneven colour coverage. If you notice frequent variations in print output despite regular maintenance and cleaning, the rollers may be at fault. Inconsistent print quality can lead to wasted materials and increased production costs, making it essential to address roller issues promptly.
2. Visible Damage to the Rollers
Inspecting the rollers regularly is an effective way to spot signs of damage. Common visible issues include cracks, flat spots, or worn-out areas on the roller surface. These imperfections can disrupt the smooth transfer of ink and negatively impact print consistency. Rollers made from rubber or polyurethane are especially prone to surface damage over time, particularly when exposed to harsh chemicals or abrasive cleaning methods. If you notice any significant wear or physical damage during inspection, it is time to consider replacing the rollers.
3. Hardening or Softening of the Roller Material
Roller material changes can be another indicator of wear and tear. Over time, rollers can harden due to exposure to heat, ink solvents, or prolonged use. When rollers harden, they lose their ability to conform to the surface they are printing on, resulting in uneven ink distribution. Conversely, rollers can also soften and become overly pliable, which can cause excessive ink absorption and poor transfer. Regularly checking the hardness of the roller material and comparing it to the manufacturer’s specifications can help you determine when it’s time for a replacement.
4. Excessive Ink Consumption
If your printing press seems to be using more ink than usual, worn-out rollers might be the culprit. As rollers degrade, they may require more ink to achieve the desired print quality, leading to higher ink consumption. This not only increases operational costs but can also create issues with drying and smudging. Monitoring ink usage can help identify when the rollers are no longer functioning efficiently.
5. Increased Roller Slippage
Roller slippage is another common problem associated with worn printing press rollers. When rollers lose their grip, they may slip or skid during the printing process, causing poor image registration and misalignment. Slippage often occurs when the surface of the roller has become too smooth or the material has degraded. If adjustments to roller settings do not resolve the issue, replacement may be necessary to restore proper functioning.
6. Frequent Roller Adjustments
If you find yourself frequently adjusting the roller settings to maintain print quality, it could be a sign that the rollers are nearing the end of their useful life. Regularly having to recalibrate the rollers to compensate for wear can be time-consuming and may eventually lead to machine downtime. Replacing the rollers can eliminate the need for constant adjustments and ensure consistent performance.
Conclusion
Knowing when to replace printing press rollers is essential for maintaining high-quality prints and efficient operation. By paying attention to signs such as inconsistent print quality, visible damage, changes in roller material, excessive ink consumption, roller slippage, and frequent adjustments, you can identify when your rollers are due for replacement. Regular maintenance and timely replacements will help extend the life of your printing press and keep production running smoothly.
0 notes
Text
Choosing the Right Rolling Shutters: Industrial, Residential & Commercial Insights

Choosing the Right Rolling Shutters: Industrial, Residential & Commercial Insights
Definition of Rolling Shutter
A rolling shutter is a security door system made of horizontal slats (or bars) hinged together, designed to roll up into a coil when opened. These shutters offer protection, energy efficiency, and durability across various applications, from industrial to residential settings.
Gandhi Automations is a leading manufacturer of rolling shutters, offering a wide range of high-quality, motorized, fire-rated, and insulated shutters that meet international standards. With over 28 years of experience, Gandhi Automations provides cutting-edge solutions for industrial, commercial, residential, and specialized environments, ensuring optimal security, safety, and energy efficiency for all types of spaces.
Type of Operation
Manual Operation:
Gear Operated: Ideal for medium-sized shutters, operated manually using a gear mechanism.
Pull Push: Best suited for smaller, lightweight shutters, requiring direct manual operation.
Chain Hoist Operated: Utilizes a chain system for easier manual operation of heavier shutters.
Motorized Operation:
Direct Drive: The motor directly drives the rolling mechanism, ideal for medium-sized shutters requiring frequent and reliable use, reducing maintenance.
Indirect Drive: Operated via torque enhancement gears, chains, or belts, suited for large-sized shutters that need additional mechanical advantage for heavy-duty operations.
Tubular Motor: Compact motor integrated within the roller tube, commonly used in residential or smaller commercial shutters for quiet and efficient operation.
Central Motor: Positioned in the center of the roller, used for small and medium-sized industrial shutters, providing a robust, cost-effective solution for moderate-duty operations.
Application of Area:
Explosion Proof: Shutters designed for environments where explosions are a risk, such as chemical industries and mining.
Atex Zone: Used in areas classified as hazardous due to explosive atmospheres (ATEX zones).
Type of Material
Mild Steel: Durable and heavy-duty, commonly used in industrial settings. Galvalume: A corrosion-resistant material suited for harsh environments. Galvanized Steel: Provides enhanced protection against corrosion, ideal for outdoor applications. Stainless Steel: Resistant to rust and corrosion, widely used in food processing, pharmaceuticals, and other hygiene-sensitive industries. Aluminum Alloy: Lightweight and resistant to corrosion, perfect for environments requiring aesthetic appeal and functionality.
Type of Insulation
Non-Insulated Single Skin: Basic protection for areas not requiring insulation. Puf Insulation: Polyurethane foam insulation, ideal for temperature-controlled environments like cold storage. Rockwool Insulation: Fire-resistant insulation, suitable for high-temperature or fire-prone areas. Mineral Wool Insulation: Provides thermal and sound insulation, used in areas requiring noise reduction. ESP Insulation: Energy-saving insulation, enhancing energy efficiency in commercial and industrial buildings. Ceramic Insulation: High-temperature resistant, suitable for industries such as ovens and kilns.
Location Application
Industrial: Heavy-duty shutters designed for durability in manufacturing and warehousing environments. Residential: Aesthetic and secure shutters that integrate seamlessly with home architecture. Commercial: Shutters used in storefronts, offices, and retail spaces for security and access control. Retail: Rolling grill shutters provide visibility and security, ideal for shopfronts.
Industrial Applications
Rolling shutters are essential in many industrial settings due to their versatility and durability:
Warehouses: Protect inventory with high-security rolling shutters. Mining: Explosion-proof shutters designed for hazardous environments. Oven Applications: Heat-resistant shutters for industries dealing with extreme temperatures. Chemical Industries: Corrosion-resistant shutters for chemical processing plants. Pharmaceuticals: Hygienic shutters for cleanroom and controlled environments. Cold Room: Insulated shutters for maintaining temperature control. Atex Zones: Shutters designed for hazardous explosive atmospheres. Bulletproof Applications: High-security shutters for sensitive or high-risk areas. Food Industry: Hygienic rolling shutters complying with food safety standards. Paint Booths: Shutters resistant to chemicals and paint.
Residential Applications
For homes, rolling shutters offer security and aesthetic appeal:
Rolling Grill Shutters: Provide ventilation and visibility while ensuring security, ideal for garages and small shops. Aesthetic Appeal: Custom designs to complement home exteriors. Ventilation and Visibility: Rolling grills allow air circulation and visual transparency while maintaining safety.
Commercial Applications Rolling shutters offer security and aesthetic flexibility for commercial establishments like:
Malls and Retail Shops: Ensuring product visibility and security. Offices: Enhancing access control while matching commercial aesthetics. Shopping Centers: Transparent rolling shutters allow visibility of store interiors even when closed.
Location of Shutter: Inside or Outside
Inside: Installed internally for space-saving and interior protection. Outside: Positioned externally for weather protection and securing building perimeters.
Wind Speed at Location
For areas with high wind speeds, reinforced rolling shutters with wind load resistance are crucial. These shutters can withstand extreme weather conditions without compromising on security or operation.
Compliance and Certifications
Gandhi Automations ensures that all rolling shutters comply with the following certifications for safety and quality:
IS6248 CE Marked BS Certified UL Certified FM Certified IS Approval
Number of Operations Per Day
Shutters designed for high-frequency use, such as those in industrial or warehouse applications, need motors built to withstand continuous daily operations. Lower-frequency operations can use standard-duty shutters.
Visibility and Ventilation
Some environments, such as parking garages or retail shops, require rolling shutters that provide both security and airflow. Rolling grill shutters are perfect for offering visibility, ventilation, and security simultaneously.
Type of Coating
Coastal Areas: Special anti-corrosion coatings are necessary to protect shutters in coastal regions where high humidity and salt exposure increase the risk of corrosion. A galvanized or powder-coated finish is commonly used for enhanced durability. Non-Coastal Areas: In non-coastal environments, standard coatings like protective paint or powder coatings can be used, which provide sufficient corrosion resistance for regular weather conditions.
Type of Finish Industrial Applications: In industrial settings, rolling shutters are typically coated with protective paint designed for corrosion resistance, particularly in harsh environments such as chemical factories or warehouses exposed to extreme conditions. Residential Applications: Aesthetic finishes are crucial in residential settings. Wooden finishes or custom color coatings are popular choices to enhance curb appeal while offering security. The finish can be chosen to match home exteriors or design preferences, ensuring the shutters blend seamlessly with the overall aesthetics.
For More Information:
Visit our website: https://www.geapl.com/
Explore our product page: https://www.geapl.com/motorised-rolling-shutters
Contact us for more information: https://www.geapl.com/contact
Email us at: [email protected]
Call us on: +91 22 66720200
#Engineering#TechTrends#Innovation#ProfessionalDevelopment#IndustryNews#EngineeringLife#Design hashtag#Tech hashtag#FutureOfEngineering hashtag#RenewableEnergy hashtag#Automation hashtag#CivilEngineering hashtag#Manufacturing hashtag#Robotics#ElectricalEngineering#MechanicalEngineering#Sustainability#Construction#ProjectManagement#EngineeringStudents#India#innovation#management#RollingShutters#SecuritySolutions#IndustrialAutomation#CommercialSecurity#GandhiAutomations#EnergyEfficiency#RetailProtection
1 note
·
View note
Link
Check out this listing I just added to my Poshmark closet: MADEWELL Size 9 The Dee Double-Strap Slide Sandal in Warm Coffee $98 NP292.
0 notes
Text
What Types of Concrete Pool Paint Are Available?
When it comes to maintaining the beauty and durability of your concrete pool, choosing the right paint is crucial. There are several types of concrete pool paints, each with unique properties and benefits. In this blog, we’ll explore the most common concrete pool paint options available to help you make an informed decision for your pool.
1. Epoxy Pool Paint
Overview: Epoxy pool paint is a two-part coating made from resin and hardener. Known for its exceptional durability, it creates a tough, long-lasting finish.
Benefits:
Longevity: Can last 7-10 years with proper maintenance.
Chemical Resistance: Highly resistant to chlorine and other pool chemicals.
UV Protection: Excellent protection against fading from sunlight.
Smooth Finish: Provides a sleek, glossy surface that feels great underfoot.
Considerations:
Higher initial cost compared to other options.
Requires careful mixing and application.
2. Acrylic Pool Paint
Overview: Acrylic pool paint is water-based and offers a wide variety of colors and finishes. It’s a popular choice for DIY projects due to its ease of use.
Benefits:
Ease of Application: Simple to apply with a roller or brush.
Quick Drying: Dries faster than epoxy, allowing for quicker turnaround times.
Flexibility: Can expand and contract with temperature changes, reducing the risk of peeling.
Considerations:
Shorter lifespan (2-5 years) compared to epoxy.
May require more frequent touch-ups and repainting.
3. Rubber-Based Pool Paint
Overview: Rubber-based paints are known for their flexibility and resistance to cracking. They are typically applied on bare concrete or previously painted surfaces.
Benefits:
Flexibility: Can handle movement and settling in concrete.
Ease of Use: Good for DIY projects; easy to apply and clean up.
Cost-Effective: Generally less expensive than epoxy.
Considerations:
Shorter lifespan (3-5 years).
Less chemical resistance than epoxy, which can lead to quicker wear.
4. Polyurethane Pool Paint
Overview: Polyurethane paint offers a strong and resilient finish, combining the benefits of both epoxy and acrylic paints.
Benefits:
Durability: Provides a hard, long-lasting finish.
UV Resistance: Excellent protection against fading and deterioration from sunlight.
Aesthetic Variety: Available in a range of colors and sheens.
Considerations:
More expensive than acrylic options.
Application can be more complex, requiring proper surface preparation.
5. Chlorinated Rubber Pool Paint
Overview: This type of paint is formulated specifically for pool environments, providing a protective barrier against harsh chemicals.
Benefits:
Water Resistance: Effective at repelling water and pool chemicals.
Flexibility: Adapts well to temperature changes.
Cost-Effective: Typically lower in price compared to epoxy.
Considerations:
Generally less durable (2-3 years).
May require more frequent maintenance and reapplication.
Conclusion
Choosing the right type of concrete pool paint depends on several factors, including your budget, desired durability, and maintenance preferences. Epoxy paints are ideal for long-lasting, high-performance finishes, while acrylics and rubber-based paints are great for DIY enthusiasts looking for ease of application. Understanding the differences between these options will help you make the best choice for your pool, ensuring it remains a beautiful and inviting space for years to come.
0 notes
Text
Cast Elastomer Market: Challenges and Opportunities in a Growing Industry

The Cast Elastomer Market is rapidly evolving, becoming an essential sector within the global economy. As the world continues to modernize, cast elastomers are increasingly in demand for their versatility and performance in a wide range of applications, from industrial products to consumer goods. According to market reports, the Cast Elastomer Market is expected to grow from USD 1.3 billion in 2023 at a compound annual growth rate (CAGR) of 4.5% to reach USD 1.8 billion by 2030. This article will explore the various factors driving this growth, the key market players, applications of cast elastomers, and future market trends.
What are Cast Elastomers?
Cast elastomers are specialized polymers known for their unique flexibility, durability, and high-performance capabilities. These materials can be cast into molds to form products that exhibit excellent resistance to wear, tear, chemicals, and environmental stress. Their ability to be custom-formulated for different applications makes them essential in industries like automotive, aerospace, construction, and footwear.
Access Full Report @ https://intentmarketresearch.com/latest-reports/cast-elastomer-market-3137.html
Market Drivers and Growth Factors
Increasing Demand in the Automotive Industry
The automotive sector is one of the largest consumers of cast elastomers. These materials are used in components like seals, gaskets, vibration dampers, and suspension bushings due to their ability to withstand extreme conditions. The rising demand for lightweight vehicles to improve fuel efficiency is further driving the adoption of cast elastomers in manufacturing.
Growth in Industrial Machinery and Equipment
Industrial applications of cast elastomers are vast. From conveyor belts to rollers, cast elastomers are vital in machines that require high-performance materials. As automation in manufacturing continues to grow, so does the need for durable elastomers that can handle repetitive stress and wear over time.
Expanding Use in Footwear
In recent years, the footwear industry has increasingly adopted cast elastomers for shoe soles and insoles due to their excellent cushioning, flexibility, and resistance to abrasion. With consumer preferences leaning towards durable yet comfortable footwear, the demand for cast elastomer-based products in this industry is rising.
Challenges in the Cast Elastomer Market
Fluctuations in Raw Material Prices
The cost of raw materials used in the production of cast elastomers, particularly polyurethane, is subject to significant fluctuations. This volatility can impact profit margins and may pose a challenge for smaller manufacturers.
Environmental Concerns
With growing awareness around sustainability, the environmental impact of synthetic elastomers has come under scrutiny. Companies are now focusing on developing more eco-friendly elastomer formulations, but the shift to greener alternatives may require significant research and development investment.
Technological Barriers
Although cast elastomers offer superior performance, their manufacturing process can be complex, and not all companies have access to the necessary technology or expertise. This limits the number of players in the market and can slow down product innovation.
Key Applications of Cast Elastomers
Automotive Components
As mentioned earlier, cast elastomers play a critical role in the automotive industry. From suspension systems to interior parts, these materials provide durability, flexibility, and resistance to environmental factors like heat and chemicals, making them ideal for automotive applications.
Industrial Machinery
In the industrial sector, cast elastomers are used in a range of machinery components such as rollers, seals, and gaskets. Their high wear resistance and ability to handle continuous stress make them ideal for heavy-duty industrial use.
Footwear
Footwear manufacturers are increasingly using cast elastomers for their cushioning properties and ability to withstand long-term use. They are commonly found in running shoes, work boots, and other high-performance footwear products.
Consumer Goods
Cast elastomers are also used in various consumer goods, including sports equipment, furniture, and even medical devices. Their versatility and ability to be customized make them a go-to material for manufacturers seeking durability and performance.
Download Sample Report @ https://intentmarketresearch.com/request-sample/cast-elastomer-market-3137.html
Market Segmentation
By Type
The cast elastomer market can be broadly segmented into hot cast elastomers and cold cast elastomers. Hot cast elastomers require higher temperatures during processing but offer superior mechanical properties, making them ideal for demanding applications. Cold cast elastomers, on the other hand, are easier to process and are often used for lower-stress applications.
By Application
Automotive
Industrial
Footwear
Consumer Goods
Each segment has unique needs and demands, contributing to the overall growth of the cast elastomer market.
Future Trends in the Cast Elastomer Market
Focus on Sustainability
With increasing environmental concerns, there is a growing demand for sustainable and recyclable elastomers. Manufacturers are investing in the development of bio-based cast elastomers that have a lower environmental impact without compromising on performance.
Technological Advancements
Innovations in processing techniques are expected to lower production costs and improve the overall performance of cast elastomers. The development of advanced elastomer formulations that offer better resistance to extreme conditions, such as high heat and harsh chemicals, will further expand their use across industries.
Expansion into New Markets
Emerging markets in Asia-Pacific and Latin America are expected to see increased demand for cast elastomers due to the growth in industries such as automotive, construction, and consumer goods. As economies in these regions continue to develop, the cast elastomer market will benefit from increased industrial activity.
Competitive Landscape
Several key players dominate the cast elastomer market, including:
BASF SE
Covestro AG
Huntsman Corporation
Dow Inc.
These companies are continuously investing in research and development to improve product offerings and capture a larger share of the market.
Conclusion
The Cast Elastomer Market is poised for significant growth, driven by demand from various industries, including automotive, industrial machinery, and footwear. While challenges such as raw material price volatility and environmental concerns exist, advancements in technology and sustainability efforts are likely to shape the market's future. By 2030, the market is expected to reach USD 1.8 billion, showcasing its increasing importance in the global economy.
FAQs
What are cast elastomers? Cast elastomers are flexible, durable polymers that can be molded into various shapes and are used in industries such as automotive and industrial manufacturing.
What is driving the growth of the cast elastomer market? Key factors include rising demand in the automotive industry, growth in industrial machinery, and expanding use in consumer goods like footwear.
What challenges does the cast elastomer market face? Challenges include fluctuations in raw material prices, environmental concerns, and technological barriers in production.
How is sustainability impacting the cast elastomer market? Manufacturers are focusing on developing eco-friendly, recyclable elastomers in response to growing environmental awareness.
Which regions are expected to see the most growth in the cast elastomer market? Emerging markets in Asia-Pacific and Latin America are expected to witness significant growth due to industrial expansion.
About Us
Intent Market Research (IMR) is dedicated to delivering distinctive market insights, focusing on the sustainable and inclusive growth of our clients. We provide in-depth market research reports and consulting services, empowering businesses to make informed, data-driven decisions.
Our market intelligence reports are grounded in factual and relevant insights across various industries, including chemicals & materials, healthcare, food & beverage, automotive & transportation, energy & power, packaging, industrial equipment, building & construction, aerospace & defense, and semiconductor & electronics, among others.
We adopt a highly collaborative approach, partnering closely with clients to drive transformative changes that benefit all stakeholders. With a strong commitment to innovation, we aim to help businesses expand, build sustainable advantages, and create meaningful, positive impacts.
Contact Us
US: +1 463-583-2713
0 notes
Text
How to Refurbish Solid Wood Flooring
Hardwood flooring is both beautiful and tough. However, over time it can start to lose its looks as its surface is worn down through wear and tear. Rather than replacing the planks, it is cheaper and easier to simply refurbish them.
If you are looking to give your solid wood flooring a refresh yourself, it will take a decent amount of time and effort. Here, you’ll discover how to refurbish and restore solid wood flooring safely.
Tools & Equipment Required
When taking on a DIY project like this you will need to make sure you have everything you need before starting. There is nothing worse than being in the middle of the job and realising you forgot something important. So things required to restore your wooden floor:
Safety equipment - goggles, gloves & we recommend steel toe cap boots.
Vacuum & brush
Professional electric floor sander
Large & small paint brushes for staining
Wood floor stain (you will need to calculate how many tins you will require)
Roller & paint brush for applying the polyurethane / lacquer
Roller tray (for the lacquer)
Cloth for wiping any excess laquer / oil from the floor.
Sanding Solid Wood Floor Planks Down
If you don’t have a sander already, it’s worth hiring one from a local hardware store. Prior to starting, give the floor a clean to ensure there isn’t any dirt or debris that could get in the way.
Remove all furniture from the room and ensure you have a clear space to work in. Then, attach a heavy grit piece of sandpaper to the sander and begin using it on the planks. Make sure you’re using the sander in the same direction as the wood grain.
After you’ve sanded the entire floor, replace the heavy grit with a lighter grit paper. Again, ensure you are using it in the same direction as the grain.
Staining Solid Wood Flooring
Once the floor has been sanded, you have the option to stain it. You don’t have to do this if you prefer the natural look of the wood. However, if you would like to give it a little colour, you’ll want to start by giving the floor a hoover to remove the debris from the sanding.
Locate a small area of the floor which can be easily covered up if needed, to test the staining. This will ensure you are happy with the colour before you apply it to the main floor.
Follow the directions on the staining product you purchased to stain the entire floor. Then, wait until it dries before finishing the refurbishment.
Finishing The Floor
When you’re ready to finish the floor, you’ll need a roller or a brush. This will help you to apply either a lacquered or oiled finish. You’ll need to give it approximately four hours to dry. For best results, consider adding another layer of oil or lacquer once the first has dried.
Tips To Remember
Refurbishing a solid wood floor does take a lot of time and effort. There are also a few things that can go wrong. So, to ensure you are doing it correctly, it’s a good idea to follow a few tips.
Firstly, you’ll want to ensure you are following the manufacturer instructions oh how to refurbish your solid wood floor if they are provided. Each finish and stain you choose will have its own instructions on how it should be applied and maintained. So, familiarise yourself with the instructions you’ll need to follow.
It’s also possible to give solid wood floors a brand-new look without sanding them down. If there is no damage on the planks, you can simply clean the floor before applying a stain or finish.
As you can see, refurbishing a solid wood floor isn’t as difficult as you might think. The above are the main steps and tips to follow. Solid wood may be time consuming to refurbish, but the process helps it to last a lot longer.
Source: www.StoriesFlooring.co.uk
0 notes
Text
How to Paint a Warehouse Floor: A Step-by-Step Guide
Painting a warehouse floor is a task that requires careful planning, the right tools, and proper execution to ensure a durable, safe, and professional finish. Whether you're looking to improve the aesthetic appeal, enhance safety, or protect the floor from wear and tear, a well-painted warehouse floor can make a big difference.

This guide will walk you through the process of painting a warehouse floor, covering preparation, tools, application, and post-paint care.
1. Why Paint a Warehouse Floor?
Painting your warehouse floor offers several benefits:
Protection: A high-quality epoxy or concrete paint creates a protective layer, preventing wear from foot traffic, forklifts, and other equipment.
Safety: Using non-slip paint can improve traction and reduce the risk of accidents.
Aesthetics: A fresh coat of paint gives the warehouse a cleaner, more professional appearance.
Ease of Maintenance: Painted floors are easier to clean and maintain, reducing dust and debris build-up.
2. Tools and Materials You'll Need
Before you start, gather all the necessary tools and materials:
Epoxy or Polyurethane Paint: Designed for concrete or industrial floors, it offers durability and resistance to chemicals and abrasion.
Concrete Cleaner: To remove grease, oil, and other stains before painting.
Pressure Washer: To thoroughly clean the floor.
Concrete Patch: For filling cracks and holes in the floor.
Painter’s Tape: To mark off edges and areas you don’t want to paint.
Primer: Helps the paint adhere better to the concrete.
Paint Roller: Preferably one with an extension handle to cover large areas.
Paint Trays: To hold the paint during application.
Safety Equipment: Gloves, goggles, and a respirator to protect yourself from fumes and dust.
3. Preparing the Warehouse Floor
Preparation is critical for ensuring that the paint adheres properly and lasts a long time. Follow these steps:
Step 1: Clear the Area
Remove all equipment, shelving, and debris from the area you’ll be painting. Ensure the floor is completely clear.
Step 2: Clean the Floor
Use a concrete cleaner to remove all dirt, grease, and oil. A pressure washer is ideal for cleaning large areas quickly and effectively. Allow the floor to dry completely before proceeding.
Step 3: Repair Any Damage
Inspect the floor for any cracks, holes, or damage. Use a concrete patching compound to fill any imperfections. This step ensures a smooth, even surface for painting.
Step 4: Etch the Concrete (If Necessary)
Some floors may require etching to open up the surface of the concrete and improve paint adhesion. This can be done with a concrete etching solution or a mechanical grinder. Follow the manufacturer's instructions carefully.
Step 5: Apply Primer
Once the floor is clean and dry, apply a concrete primer. This will help the paint bond to the floor more effectively and provide a longer-lasting finish. Allow the primer to dry fully before moving on to the next step.
4. Painting the Warehouse Floor
With the floor fully prepped, it’s time to start painting.
Step 1: Choose the Right Paint
For a warehouse floor, epoxy or polyurethane-based paint is ideal. Epoxy is highly durable, chemical-resistant, and ideal for industrial environments.
Step 2: Mix the Paint
Follow the manufacturer's instructions for mixing the paint. Some paints may require adding a hardener or other components before use.
Step 3: Apply the First Coat
Using a roller, apply the first coat of paint in long, even strokes. Start at the far end of the warehouse and work your way toward the exit, so you don’t paint yourself into a corner.
Be sure to cover the entire surface evenly. For edges and corners, use a smaller brush or roller to ensure precise coverage.
Step 4: Allow the Paint to Dry
Let the first coat dry according to the paint manufacturer's instructions. This may take anywhere from 24 to 48 hours, depending on the type of paint and the warehouse environment.
Step 5: Apply a Second Coat
For added durability and a more even finish, apply a second coat of paint. Follow the same process as the first coat and allow it to dry thoroughly.
5. Post-Painting Care
Once the painting is complete, it’s essential to follow these steps to ensure the longevity of the paint job:
Step 1: Curing Time
Give the floor sufficient time to fully cure. Even though the paint may feel dry to the touch, it could take several days for it to harden completely. During this time, avoid placing heavy equipment or machinery on the floor.
Step 2: Regular Maintenance
To keep your painted warehouse floor in top condition, regular cleaning is essential. Sweep and mop the floor to remove dust, dirt, and debris. For tougher stains, use a mild detergent and water, avoiding harsh chemicals that could damage the paint.
Step 3: Inspect for Damage
Periodically inspect the floor for signs of wear or damage. Touch up any worn or scratched areas to prevent further damage and keep the floor looking fresh.
Conclusion
Painting a warehouse floor is a manageable DIY project, provided you take the time to prepare the surface and use the right materials. By following this step-by-step guide, you can transform your warehouse floor, making it more durable, safer, and visually appealing. Whether you're protecting the concrete from wear or simply improving the space’s look, a well-painted floor is a long-term investment in the functionality and safety of your warehouse.
Key Takeaways:
Proper preparation, including cleaning, repairing, and priming the floor, is critical for success.
Choose the right paint, such as epoxy or polyurethane, for durability.
Apply multiple coats, allowing ample drying and curing time for the best results.
Maintain the painted floor through regular cleaning and inspections.
0 notes
Text
Polyurethane (PU) coating roller

View On WordPress
0 notes
Text
Spray Coating for Home Interior
Traditional interior house painting has long been the go-to method for enhancing the beauty of indoor spaces, freshening up walls, and protecting surfaces. But with advancements in home improvement technology, spray coatings have emerged as a game-changing alternative to conventional paint. For homeowners seeking more durable, aesthetically pleasing, and low-maintenance options, spray coatings are proving to be an effective and practical solution. In many cases, these coatings eliminate the need for regular painting altogether.
In this comprehensive blog, we’ll explore everything you need to know about spray coatings for home interiors, how they compare to traditional paint, their benefits, and why you may not need to paint your walls ever again.

1. Understanding Spray Coating Technology
Spray coatings, also known as spray-applied coatings or spray-on finishes, refer to a range of materials that are applied to surfaces using specialized spraying equipment. These coatings differ from traditional paint in several ways, offering distinct advantages in terms of longevity, finish, and performance.
Types of Spray Coatings
Spray coatings can be made from various materials, each designed for specific needs. Some common types include:
Polyurethane Coatings: Extremely durable and resistant to wear and tear, polyurethane coatings are ideal for high-traffic areas like hallways, kitchens, and living rooms.
Acrylic Spray Coatings: These water-based coatings offer a smooth, consistent finish, with better durability than traditional latex paint. Acrylic spray coatings are often used for walls and ceilings.
Epoxy Coatings: Epoxy is a high-performance coating known for its resistance to moisture, stains, and chemicals, making it ideal for areas prone to spills or moisture, such as bathrooms or basements.
Ceramic Spray Coatings: This newer technology incorporates ceramic particles for added durability and insulation, providing superior protection and making surfaces easier to clean.
Each of these coatings offers long-lasting protection and requires less maintenance compared to traditional paint, making them an increasingly popular choice for homeowners.
How Spray Coatings Are Applied
Spray coatings are applied using airless spray guns or high-volume, low-pressure (HVLP) sprayers, which atomize the coating material into fine particles and distribute it evenly onto the surface. This method creates a uniform, smooth finish with fewer imperfections compared to traditional brushes or rollers.
Professional application is key to achieving the best results, as it requires precision, skill, and specialized equipment. A professional applicator ensures that the surface is properly prepared and that the coating adheres correctly for maximum longevity and performance.
2. Why Spray Coatings Are a Superior Alternative to Paint
Durability and Longevity
One of the biggest advantages of spray coatings over traditional paint is their durability. High-quality spray coatings are designed to withstand everyday wear and tear, including scratches, scuffs, and impact. This is particularly beneficial for homes with children, pets, or high-traffic areas where walls are more likely to get damaged.
Traditional paint, even the best quality, tends to chip or peel over time, requiring regular touch-ups or repaints every few years. Spray coatings, on the other hand, are designed to last for decades without needing such frequent maintenance.
Seamless, Professional Finish
Spray coatings offer a smooth, seamless finish that is difficult to achieve with traditional paint, even when applied by skilled painters. Since the coating is sprayed onto the surface in fine particles, it eliminates brush strokes, roller marks, and drips. This creates a flawless, uniform look that enhances the aesthetic appeal of your home’s interior.
The seamless finish also means that spray coatings can be applied to more complex surfaces, such as textured walls, cabinetry, and furniture, with better results than traditional paint.
Faster Application
Another significant advantage of spray coatings is the speed at which they can be applied. Spray application covers large areas much faster than painting with a brush or roller. This makes it ideal for homeowners looking to complete their interior renovation or refresh project quickly.
Professional spray coating teams can complete entire rooms in a fraction of the time it would take to paint manually, without sacrificing quality. Additionally, since spray coatings dry faster than traditional paint, the overall project time is reduced, meaning less disruption to your daily life.
3. How Spray Coatings Reduce the Need for Repainting
Spray coatings have been specifically engineered to resist common issues that plague traditional painted surfaces, such as:
Fading: Many spray coatings incorporate UV-resistant materials that prevent fading over time, even in sunlit areas.
Chipping and Peeling: Spray coatings form a stronger bond with the surface than traditional paint, reducing the likelihood of chipping or peeling.
Moisture Damage: Spray coatings, especially epoxies and acrylics, are moisture-resistant, making them ideal for areas like bathrooms and kitchens where traditional paint may fail.
Staining: Spray coatings offer superior resistance to stains from spills, dirt, and grease. This feature makes them ideal for high-traffic areas, kitchens, or children’s rooms where walls are more prone to accidental staining.
These qualities make spray coatings far less prone to the wear and tear that typically necessitates frequent repainting, saving homeowners both time and money in the long run.
4. Environmental and Health Benefits of Spray Coatings
In addition to their durability and aesthetic benefits, many spray coatings are formulated with environmental and health considerations in mind.
Low-VOC and Eco-Friendly Options
Many traditional paints contain volatile organic compounds (VOCs), which can have harmful effects on indoor air quality and contribute to environmental pollution. However, advancements in spray coating technology have led to the development of low-VOC and even VOC-free formulations. These eco-friendly spray coatings release fewer harmful chemicals into the air, making them a safer choice for indoor environments, especially for households with children, pets, or individuals with allergies.
Hypoallergenic Properties
Certain types of spray coatings, particularly ceramic and acrylic varieties, offer hypoallergenic properties. Their smooth, sealed surfaces make it more difficult for dust, mold, and allergens to accumulate, which can help improve indoor air quality and reduce allergy symptoms.
Easy Maintenance and Cleaning
Because spray coatings are resistant to stains, moisture, and dirt, they require minimal cleaning. Most coated surfaces can be cleaned easily with a damp cloth or gentle cleanser, reducing the need for harsh chemicals or abrasive scrubbing. This not only prolongs the life of the coating but also makes home maintenance more environmentally friendly.
5. Versatility: Where Spray Coatings Can Be Used in the Home
One of the most appealing aspects of spray coatings is their versatility. They can be applied to a wide range of surfaces, making them suitable for various areas throughout the home.
Walls and Ceilings
Spray coatings can be applied to standard drywall, plaster, and even textured surfaces like stucco or popcorn ceilings. They provide a smooth, even finish, and because of their durability, they are ideal for high-traffic areas like hallways, living rooms, and kitchens.
Cabinets and Furniture
Spray coatings are an excellent choice for cabinetry and furniture, offering a flawless finish that’s more durable than traditional paint. Whether it’s kitchen cabinets, built-in shelving, or even wood furniture, spray coatings provide a protective layer that resists scratches, dings, and moisture.
Doors and Trim
Interior doors and trim often see more wear and tear than other areas of the home. Spray coatings can be applied to these surfaces to provide a durable, clean finish that withstands frequent use.
Bathrooms and Kitchens
Moisture resistance makes spray coatings ideal for rooms that see a lot of water exposure, such as bathrooms and kitchens. Epoxy and acrylic spray coatings are especially suited to areas where traditional paint might peel or crack due to moisture buildup.
Basements and Garages
Spray coatings are perfect for basements and garages, where humidity and temperature fluctuations can damage traditional paint. Epoxy coatings, in particular, offer superior resistance to moisture, mold, and mildew, making them the best choice for these spaces.
6. Cost Considerations: Is Spray Coating Worth It?
While spray coatings may have a higher upfront cost compared to traditional paint, their longevity and low maintenance requirements can save homeowners money in the long run. Fewer touch-ups, longer-lasting finishes, and reduced need for repainting mean that the initial investment in spray coatings can pay off over time.
Additionally, the reduced labor costs associated with the faster application process can help offset the material costs, making spray coatings a more cost-effective option for homeowners looking for a long-term solution.
Comparing Long-Term Costs
Let’s compare the long-term costs of traditional paint versus spray coatings over a 20-year period. Traditional paint often requires repainting every 3–5 years, with each repainting involving labor costs, materials, and time. Spray coatings, on the other hand, can last 15–20 years with minimal maintenance, dramatically reducing the total cost over time.
When factoring in the costs of touch-ups, maintenance, and repeated repainting, the long-term savings from spray coatings can be substantial.
7. Choosing the Right Spray Coating for Your Home
With so many options available, choosing the right spray coating for your home can feel overwhelming. Here are some key factors to consider when making your decision:
Surface Type
Consider the surface you’ll be coating. Is it drywall, wood, tile, or another material? Different coatings work best on different surfaces, so be sure to choose one that’s suited to your specific needs.
Room Function
Certain rooms, like kitchens and bathrooms, require coatings that are moisture-resistant and durable. High-traffic areas like hallways and living rooms will benefit from coatings that can withstand wear and tear.
Desired Aesthetic
Spray coatings come in various finishes, from matte to high-gloss, and can be tinted to match any color. Consider the look you want to achieve and choose a coating that complements your home’s interior design.
Environmental Considerations
If indoor air quality and environmental impact are important to you, look for low-VOC or VOC-free coatings. Many eco-friendly options are available that deliver both durability and sustainability.
Conclusion
Spray coatings offer homeowners a durable, aesthetically pleasing, and low-maintenance alternative to traditional paint. Whether you’re renovating your home or simply looking for a long-lasting solution to protect your walls, cabinets, and surfaces, spray coatings are an excellent choice. With their fast application, resistance to wear and tear, and environmental benefits, spray coatings may eliminate the need for regular repainting, saving you time, money, and effort in the long run.
By working with professional applicators and choosing the right coating for your specific needs, you can achieve a seamless, professional finish that enhances the beauty and functionality of your home’s interior. Say goodbye to frequent touch-ups and repaints — spray coatings are the future of home interior maintenance.
0 notes