#PCB assembly Vancouver
Explore tagged Tumblr posts
Visit Tumblr Blog
Explore Tumblr blogs with no restrictions, modern design and the best experience.
Last Seen Tumblr Blogs


Fun Fact
12.7% of mobile users access Tumblr.
Link
so many cool badges this year. #defcon via Hackaday
Hardware is the future. There is no better proof of this than the hardware clans that have grown up around DEF CON, which in recent years has become known as Badgelife. I was first drawn to the custom hardware badges of the Whiskey Pirates at DC22 back in 2014. Hardware badges were being made by several groups at that time but that was mainly happening in isolation while this year the badge makers are in constant contact with each other.
A slack channel just for those working on their own DEF CON badges sprung up. This served as tech support, social hour, and feature brainstorming for all on the channel. In the past badges were developed without much info getting out during the design process. This year, there was a huge leap forward thanks to a unified badgelife API: the badge makers colluded with each on a unified communcations protocol. In the multitude of images below you frequently see Rigado modules used. These, and some others using different hardware, adopted a unified API for command and control, both through makers’ “god mode” badges, and for wireless gaming between participant badges.
I was able to get into the badge makers meetup on Thursday of DEF CON. What follows is the result of a frantic few hours trying to get through the sheer volume of badges and people to share with you all the custom hardware on display. One thing is for sure — there were literally thousands of custom badges built and sold/distributed during DEF CON. I can’t wait to see what the artisanal hardware industry will look like in five years time.
The MrRobot Badge
I knew that Brian Benchoff was working on a badge in his spare time. I had no idea the production he had undertaken. Brian’s Mr Robot Badge was one of the most popular of DC25. He had been working on it for months, ordering several PCB test runs to get the look just right. That’s not a custom solder mask color for the skin tone. Brian used a clear solder mask and two layers of silkscreen when he had Seeed Studio produce the PCBs. It’s driven by an ESP8266 and includes a 144 LED matrix driven by an IS31FL3731. Check out @MrRobotBadge to see the drumbeat of social media he built leading up to the con, and hear the entire story in Brian’s words on his recent project page update.
[Benchoff holding Mr Robot Badge photo by @catmurd0k]
DC DarkNet Badge
DarkNet has got to be the most popular contest at DEF CON. It starts off with a pre-conference online challenge called a casefile. Anyone who solved the casefile was able to purchase one of these badges two hours before they went on sale to the general conference-goers. The badge is necessary to solve the rest of the contest challenges
Our friend [Krux] is the mastermind behind the badge design. As you can see, it is laid out to resemble a rotary phone. Each of the numbers on the dial is a capacitive touch sensor, and the numerals/letters are open spots in the copper. These let back-mounted LEDs shine through. The badge comes as a kit so to use it you first must solder on those surface-mount LED as well as a connector for the screen and the LiPo on the back.
Who Doesn’t Love Blinky?
[Brian Benchoff] actually built three badges for DEF CON. The second was terrible, but the third was a solder kit of Ohm, the Tindie dog. [Jasmine Brackett] and [Shulie Tornel] were on hand talking to people about Tindie (a great place to sell extra hardware badges) and handing out the solder kit that includes two self-blinking LEDs, coin cell and holder, and a custom PCB.
[Sean McCabe] had a 3D badge. It’s the DEF CON 25 logo (note the 2 and 5 make up a skull with keys as the crossbones). There’s an RGB LED controlled by an ATtiny85 and coin-cell on a custom PCB. Grab the design files on his repo.
There was also a ‘punt’ badge. The SecKC folks built a badge (shown later in this article) but couldn’t produce enough in time so they showed up with edge-lit acrylic badges.
DC Zia 505
The DC Zia crew had about 10 people working on the badge this year. It’s their third year building badges for DEF CON and this one features four Cherry MX mechanical keyboard switches… clicky! The badge is a shield for an Arduino 101 (RIP). Last year they built a badge that was a shield for a Raspberry Pi and had a full-color video screen which they were showing off at the meetup. They are also joining in another trend, several badge groups (including MrRobotBadge) were giving away custom fidget spinners as swag.
AND!XOR God Badge
I’m not going to go too far into the AND!XOR badge since I did a full hands-on with the badge before the con. Here we can see the “God” badge that only the core team had. The Bender on a Bender was top three most popular badges at the con if not the most popular. They had a hugely successful Kickstarter and everyone was trying to get one at the con.
They shipped with the multiplayer features disabled until a code was input. This was Tweeted out at the beginning of the con and once people unlocked theirs the botnet game began. I was able to terminal into it and escalate my privileges to get root ([@Hyr0n] did help me out by suggesting which of his hint Tweets to revisit). I came across [Samy Kamkar] with on in the Chill Room. The code running on the ARM processor was read protect and [Samy] was using a Chip Whisperer to try to side-channel attack the badge. That’s pretty awesome!
Note the brain-slug addon board. There were about 10 of these built to test out the breakout header for hardware hacking.
Car Hacking Village Badge
Badgelife is often pushing right up against deadlines to get everything finished — this is an extracurricular activity after all. This is the un-populated Car Hacking Village badge. The assembly took longer than expected and the finished boards hadn’t arrived as of Thursday evening but did make it for sales in the village on Friday. 900 of these were for sale at $50.
You can see the full glory in this animated Tweet. An OLED display makes up the grill of the truck (which is a PCB itself) with amber blinkies all around. This is car hacking after all so the footprint on the left is for an ODB-II connector.
The Tribble Badge
The Tribble badge was a total surprise for me. [@emilyincarnate] built 58 of them and they were all hand-sewn and hand-soldered. The little balls of fluff were built around Adafruit Trinket boards, with addressable LED discs for eyes. I’m a sucker for the PCB badges with challenge games built into them, but I fell in love with this and it was my favorite to wear around the con. Perhaps I’m anthropomorphizing? I checked out the associated website and it seems there are some crypto challenges waiting to be solved over there. Get to work.
DC801
Look on the back of the DC801 Sheep badge and you’ll spot the familiar Rigado module that drives it and links it to the unified botnet game spanning many of the badges and Bluetooth greetings that talk back and forth. In addition, the firmware broadcasts username and then play a game of contagion.
[@rushan_ee] has been developing the board. The prototype boards carried by the core developers have “God” mode that can make clients go in and out of party mode. In total, they built 290 boards plus the 10 prototypes. Presales were coordinated through 801labs hackerspace in Salt Lake City. This is the second year Rushan has led the design and 5 years total for the hackerspace.
Octopus Badge for Bsides Vancouver
The Octopus badge was built for Bsides Vancouver a few months back. [Jake King] made a total of 120 for Bsides Vancouver. It is driven by an ATtiny85 with blue LEDs on four of the eight tentacles. There are two WS2812 modules for the eyes but [Jake] usually leaves them off because they drain the coin cell battery really quickly. You can get your hands on the design files on his blog.
Ides of DEF CON
I think the Ides of DEF CON badge was one of the other top three most popular badges. It was inherently a multiplayer badge, letting you discover and battle other badge owners wirelessly in a video role-playing game. You could walk around the con and see people sitting around glued to these badges like a Game Boy.
Thursday night was the first night everyone was getting together and when we ran into [Zapp] from the AND!XOR crew he was already topped out in level, and XP. The firmware wasn’t read protected (like the AND!XOR firmware) and so [Zapp] dump and disassembled it to artificially boost his player ranking. It’s an instant classic.
You can read about the dev process on the Ides of DEF CON project page. They had a very successful Kickstarter earlier in the summer.
Team Bazooka Badge
This badge was introduced to me as the only badge with a Vacuum Fluorescent Display on it. The VFD is an HD44780 addressable character display. Powering it is a 18650 cell in a battery holder. This is becoming an incredibly popular setup for badges and other custom hardware. You can check out the design, which is based around an ATmega382, on the Team Bazooka repo. This is an ultra-rare badge — so far there’s only one.
Hardware Warehouse
We also took a close look at the Hacker Warehouse badge before the con. It has an ESP8266 laid out right on the board rather than opting to solder on a castellated module. The badge is a built as a WiFi testing unit, leveraging the ESP chip’s flexibility in that realm to scan for AP, listen to packets, and even spew deauth packets. I don’t think there was too much mayhem cause on that front this year.
One of the really cool things that went along with the Hacker Warehouse badge is that they shared their space in the vendor area with other Badgelife folks. This provided an area for people who had acquired any of the badges shown off in this article a place and time to meet up with the badge creators themselves. Neat!
It’s worth noting that this was the first hardware endeavor for Hacker Warehouse which has focused on offensive security up to this point.
DC503
The DC503 throws503.party. Thank you to [Joe Fitz] for letting us crash it. The party is privately financed and supporting these badges is one way to get yourself into the party. [Joe] is behind this badge, as well as the bicycle design we saw at DC23.
One hundred of these badges were made through the effort of four team members and with the labor-saver of professional assembly. You can see the Rigado familiar rigado module on the back, and the coin cell that powers the badge. I really enjoyed seeing the lanyard, which is a USB-to-Serial cable. You are literally wear what you need to hack it around your neck. The badge hacking contest was judged in the suite at Caesar’s during the 503 party.
SecKC Badge
SecKC is the Kansas City infosec meetup. They wanted the badge to be a devboard and based it around an NRF module from Sparkfun. So far they’ve seen numerous hacks on the design, the best of which turned it into a cellphone with a rotary dial.
The crew had a preorder of 50 boards and ended up building 60. There was demand for more but they couldn’t get the boards fast enough so they made the acrylic badges we mentioned earlier in this article.
Puffy Badge
The puffy badge is another that we had an in-depth look at before the con. Shaped like a puffer fish, the badge is based on a router chipset module that was sourced from “some dude in China”. Searching for router chips that could run linux, 40 of the modules were ordered for the project. More details about the development process are available on the website.
Megabling and Derbycon Black Badge
Some people feel like they need to answer the question “How bright can a conference badge really be?”. [Blenster] answered this with a huge triangle badge powered by six 18650 Lithium cells. Look at the power regulation on the back of that thing!
Not to be outdone (by himself), [Blenster] was also sporting a DerbyCon 2016 Black badge which he designed and built himself. Those LEDs have a tiny pitch and he hand-placed and hand soldered with an iron — incredible.
Dragonfly Badge
The Dragonfly Badge was featured on Hackaday before the con. It’s primarily a blinky badge, but put more than one of them within sight of each other and they’ll sync up their flashing. One of the really nice touches is the aesthetic of the IR receiver on the tail.
106 of these were built but only 85 were fully functional on Thursday night. In true hacker fashion, the rest were being reworked in the hotel room. I saw a ton of these around the con so I suspect the rework effort was worth it!
Crypto and Privacy Village Badge
The Crypto and Privacy Village badge was one of the most gorgeous pieces of hardware on hand. The team went all out, even delivering the badge in beautiful matte black boxes with guilded lettering and a magnetic closure. The lanyardware have a cypher on them, the back of the badge has a cypher on it. There were PCB keys, ornately cut in interesting shapes. The badge is based on the WROOM32 (ESP32) moduel. It drives a backlit display with a rotary encoder on the front and a few capacitive touch sensors. The package included earbuds; the badge has a headphone jack and was set up to stream DEF CON radio all weekend. That’s a feature of a different color and quite fun!
Plugging into the badge you were greeted with MicroPython for you own badge hacking. On the wireless side, it finds other badges. I couldn’t get confirmation for sure but I heard that these were putting backdoors into the Bender on a Bender badge. Yes, it’s wireless badge warfare out there, friends. These boards were selling for $120 in the Crypto Village. When they sold out the team was trying to get the nonfunctional badges working but would sell to enterprising hardware hackers for $50 upon request.
Bsides San Francisco Badge / Life’s A Breach
[bon] and [redacted], the team behind the Bsides SF badge, came out with two badges this year. Their ‘official’ badge is being pitched as a ‘body camera badge’ for their conference in February. Their second badge is quite literally the best 3D printing work we’ve ever seen.
The Life’s A Breach / Tiki badge is more or less what you would expect from a conference badge — there are blinky bits, batteries, and some nice silkscreen art on a PCB. This gets dialed up to twelve when the 3D printed parts are added. The plastic parts on the Tiki badge are snap fit, with plastic bosses for holes on the badge, tiny ledges to clasp the PCB firmly, and a bit of vellum used as a diffusor for the eyes. We’ve been around the block with 3D printing, and we’ve never seen anything that marries milled PCBs and printed parts this well. We’re literally begging the Tiki crew for a write-up on how they managed to do their plastic parts.
1Bitsy 1UP
The 1Bitsy 1UP badge should be an incredibly familiar form factor. It’s shaped just like a Game Boy, but with an extra set of right-hand buttons like on the old SNES controllers. With a beautiful color display and audio, this is the portable gaming experience you remember, but hanging around your neck as a conference badge.
The dev board on the front is the 1Bitsy. This was given out to all attendees at the Open Hardware Summit last October. Mine is still on my desk waiting for some love and this is the type of demo I needed to get really excited about it. At the con, [Piotr Esden-Tempski] was running a custom game he wrote for it and the thing is super fast. The pattern demonstration shown here is running at 80 FPS and this is without a framebuffer. It’s the STM32F4 banging 8 bits into the ILI9325 display using DMA that makes this possible. On the back you’ll find an 18650 for power, along with a battery minding circuit and an SD cards slot. We can’t wait to bump into [Piotr] at he next live event to see what’s been a added to the part of the board marked:
Here be dragons. Well, not at the very moment, but soon, I promise! Just wait for it. :D
Red’s LoRa Badge
I missed syncing up with him at the meetup but later ran into [Red] in the Chill Room. He has been doing the hardware badges for SkyDogCon and built a special badge just for DC25. It is sniffing LoRa packets and displaying them on two screens. He wrote the firmware on the plane. The platform is meant for development so plenty of room to grow here. It has a multitude of switches, both momentary press and DIP, which are controlled by the Propeller chip that runs the board. For connectivity there is the LoRa module and an ESP8266.
There’s actually a really cool concept at work here. He sets up a server in his room in a different hotel as the Internet gateway. The badge phones home on LoRa, which has great range, eliminating the need to navigate the shady WiFi options during the con.
Quadcopter Badge
This badge is a lot of things in one. Primarily it’s a quadcopter complete with a badge-based remote control. [Brian] covered it in depth before the con and we were so excited to receive this badge kit at our Breakfast at DEF CON meetup.
Weight was carefully considered during the development process. But for some reason the thing just wouldn’t get off the ground after everything was assembled. For this reason, there are two versions of the skull badge, one that flies and one that bling. You can see the add-on board for prototyping which is mean to look like a pirate’s bandanna, and in the upper left you can see the dual-stick controller complete with a buzzer and screen.
The greatest year of electronic conference badges yet
Badgelife is truly amazing. Should you give it a try? Yes, but not for the money. This is an art and not a business endeavor. There is no badge competition between makers, there is only a willingness to celebrate the effort and ingenuity to that go into every badge, whether it be a blinking LED or a networked multiplayer game. This is what drives the developers and what makes the badges themselves such a hot commodity at the conference.
This was the greatest year of badgelife yet, and we can’t wait to see what everyone will come up with by next year.
[Featured image source of all badges taken by Cat Murdock. You should follow her on Twitter.]
Filed under: news
1 note
·
View note
Text

Vancouver's Top PCB Assembly Company for Quality Electronics
Discover Your Tech Side with the Finest PCB Assembly Services in Vancouver
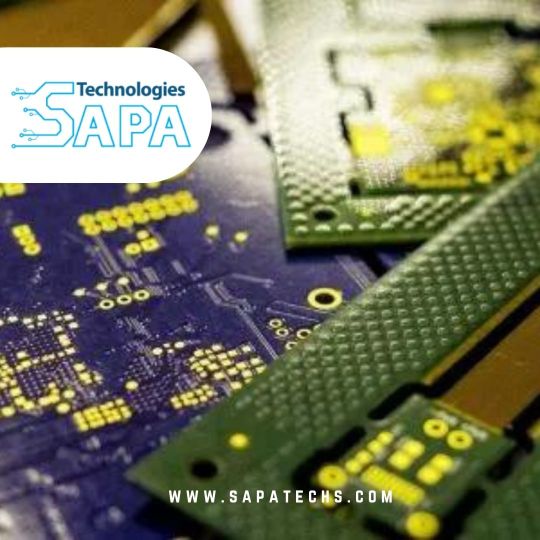
In the fast-paced world of technology, the intricate circuits that enable the gadgets we use on a daily basis are just as fascinating as the actual devices themselves. Printed circuit boards, or PCBs, are the unsung heroes that run everything from your car to your smart home appliances to your laptop and smartphone. PCB assembly in Vancouver is in the epicenter of this electronic revolution, enabling businesses and tech enthusiasts to embrace their inner geeks and fulfill their electrical dreams.
Amazing PCB Assembly
PCBs are the unsung heroes of the electronics sector. These flat, insulated boards are engraved with complex webs of copper lines connecting various electronic components. PCBs are the foundation of many electronic gadgets, ensuring their reliable and seamless operation.
Individuality and Originality
What particularly interests me about PCB assembly is its ability to meet the specific requirements of various applications. Whether PCBs are needed for complicated circuitry in consumer electronics, control boards for industrial equipment, or LED assemblies for lighting solutions, they can be built to order to satisfy specific needs. Its versatility fosters innovation and enables the creation of state-of-the-art electronic goods.
The Mastery of Vancouver's PCB Assembly
As a hub for technological expertise, Vancouver is drawing more and more tech enthusiasts and businesses in need of first-rate PCB assembly services. The region is home to a diverse ecosystem made up of startups and well-established tech giants who are all motivated to push the boundaries of electronics technology.
While PCB assembly finds use across various industries in Vancouver, LED assembly is one of the primary focus areas. LED technology has advanced quickly in recent years, and PCBs have been a key factor in accelerating these advancements. At the forefront of LED innovation, PCB assembly provides everything from energy-efficient lighting solutions to dazzling displays.
Possessing Access to Cutting Edge Technology
Vancouver's PCB assembly services offer state-of-the-art production methods and cutting-edge technology. Whether you're an electronics enthusiast attempting to build your own project or a business trying to stay competitive in the IT sector, this access is revolutionary.
Startups and tech-savvy do-it-yourselfers in Vancouver can get vital prototyping support from PCB assembly. This suggests that you can both quickly and effectively realize your creative ideas and test and refine your technological innovations.
How to Bring Your Techie Inner Thoughts to Life
Often, the first step to embracing your inner techie is coming up with ideas. Vancouver PCB assembly services can help you turn your idea into a working prototype. Whether you're designing an inventive LED lighting system, a robotics project, or a novel Internet of things gadget, PCBs are necessary to bring your vision to life.
PCB assembly may seem complicated, but it's not something you have to accomplish on your own. Professional guidance on everything from design and component selection to production and prototype is provided by excellent PCB assembly services in Vancouver. Their expertise ensures that your projects are finished precisely and effectively.
LED Assembly: Introducing Future Lighting
Techniques to Save Energy
LED technology, which offers energy-efficient solutions that reduce carbon emissions and electricity usage, has completely changed the lighting business. In order to create LED lighting systems that are energy-efficient, dazzling, colorful, and controllable, PCB assembly is necessary.
The uses of LED assembly go beyond traditional illumination. It is utilized in many different technologies, such as display screens, medical equipment, and car lighting. The versatility of PCB assembly increases the adaptability of LED technology, making it an interesting field for tech enthusiasts and creators.
Individuality and Originality
One of the secrets to success in the PCB assembly sector is customization. You may ensure that your projects meet all functional, size, and form factor requirements by using PCB customisation. This level of customization feeds innovation.
The best PCB assembly services in Vancouver employ cutting-edge parts and manufacturing techniques. The aforementioned advancements facilitate the manufacturing of printed circuit boards (PCBs) with exceptional performance and resilience to challenging conditions.
The Dynamic Vancouver Tech Scene
Collaboration and Networking
PCB assembly is just one aspect of Vancouver's growing tech scene. It offers opportunities for networking and collaboration with businesses and individuals that have similar ideals. These connections can spark new ideas and projects and create a lively tech enthusiast community.
Vancouver's thriving tech scene is supported by research facilities, educational institutions, and a strong entrepreneurial spirit. It's a setting that encourages creativity and makes it harder to distinguish between fact and fiction.
Give Your Inner Geek a Break
PCB assembly in Vancouver offers the resources and tools you need to explore, think creatively, and produce, regardless of your level of experience with electronics. This is your opportunity to turn your technical dreams into concepts that could improve people's lives and disrupt entire industries.
If you use precision and quality-driven PCB assembly services, your inner tech will shine through. Vancouver's first-rate services adhere to industry standards and best practices, ensuring the durability and optimal functioning of your projects.
The Techie's Journey:
Concept to Actuality
A techie's journey begins with an idea, a notion that sparks curiosity and excitement. Vancouver PCB assembly may assist you in turning your electronic visions into reality by bridging the concept and reality gaps.
Collaborate and Generate
Collaboration is often the spark that ignites creativity in the realm of technology. Vancouver's PCB assembly services offer a collaborative atmosphere where you may work with experts and other enthusiasts to create something truly remarkable.
1 note
·
View note
Text
Beyond Borders: Vancouver's Leading Edge in PCB Assembly Services
Efficiency and Economy are Optimized with Vancouver PCB Assembly
Are you trying to find trustworthy and reasonably priced PCB assembly services in Vancouver? It's here for you! In this blog post, we'll discuss electrical manufacturing services in more detail as well as the benefits of choosing Vancouver first for any PCB assembly needs. Whether your company is new or well-established, cutting costs and improving productivity should always come first. Let's get going now and see how Vancouver can help you accomplish that!
An Overview of PCB Assembly Services in Vancouver
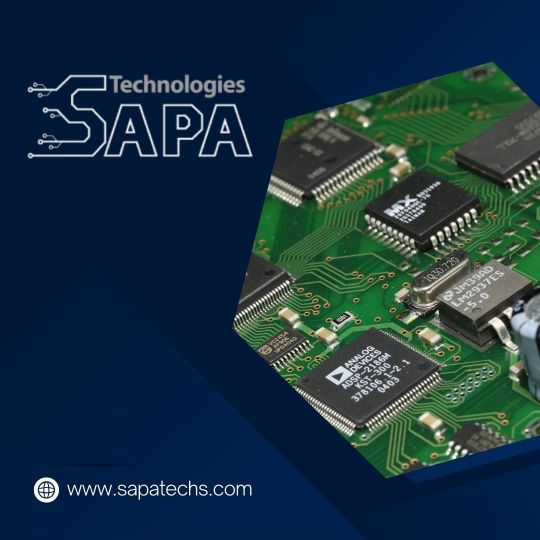
In Vancouver, which is well-known for its thriving tech sector, there are numerous companies that offer top-notch PCB assembly services. But what exactly goes into assembling a PCB? In short, it's the process of creating printed circuit boards by mounting and soldering electrical components onto them.
The first stage in PCB assembly is designing the board's layout and circuits using specialized software. This ensures that each component is linked and positioned correctly. When the design is finished, it is sent to the manufacturing process.
The next step is to purchase the components. Strong supplier relationships have made it possible for Vancouver-based PCB assembly businesses to get premium parts at competitive costs. This not only saves time but also ensures that your items meet high quality requirements.
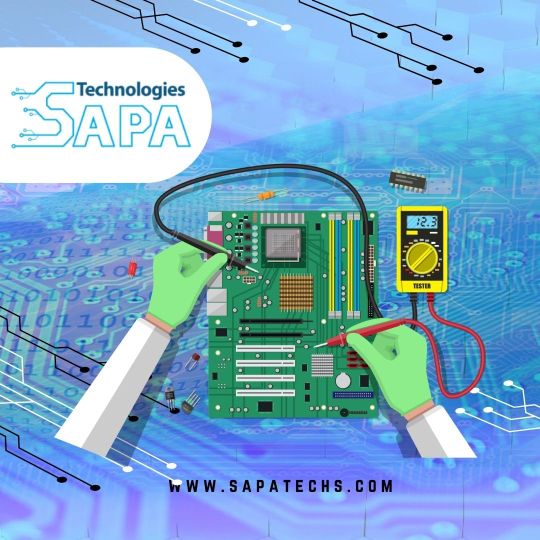
Sophisticated pick-and-place machines are utilized to carefully arrange each component on the board after it has been bought. These devices accurately align each component with the specifications of the design. In order to securely bind the components to the board at the proper positions, soldering is done after installation.
As the final step in PCB assembly, each board needs to go through a thorough inspection and testing procedure before being delivered. This ensures that the functionality is free from errors or malfunctions. Throughout this crucial phase, accuracy and consistency are guaranteed by the use of automated testing equipment.
Now that you have a clear understanding of the process of PCB assembly in Vancouver, let's look at the numerous advantages that choosing this city as your ideal location can provide you in terms of efficiency and cost!
Why Vancouver Is the Best Location for PCB Assembly
Choosing the best location for PCB assembly can make a big difference in terms of increasing output and cutting costs. One location that stands out from the others is Vancouver. These are the principal advantages of selecting Vancouver for your PCB assembly needs.
In Vancouver, the electronic manufacturing services industry is flourishing. This suggests that you have access to cutting edge equipment and a wide range of skilled staff members. There are many top-notch PCB assembly companies in the region that offer complete services, from design and prototype to manufacturing and testing.
Lower lead times and transportation costs can be attributed in large part to Vancouver's excellent geographic location. Due to its west coast position in Canada, it enjoys easy access to both domestic and international markets. This implies that you will be able to meet deadlines without compromising quality because your assembled PCBs will come faster.
Vancouver also has reliable local component providers and a robust supply chain network. This proximity eliminates the need for delays caused by shipping components from far away and reduces the possibility of damage occurring during transit.
Choosing Vancouver for your PCB assembly needs also ensures that strict environmental regulations are followed. Electronics manufacturers view the city as an environmentally favorable choice due to its strong emphasis on sustainability initiatives. You can reduce your carbon footprint without compromising high production standards by working with local companies that adhere to environmental requirements.
In conclusion (as instructed), picking Vancouver as the location for your PCB assembly offers a number of advantages, such as quick access to professionals and state-of-the-art equipment in a bustling commercial district! Its ideal location allows for quick market reach and reduces transportation expenses! Furthermore, its strong supply chain network ensures timely procurement—and this is never the "in conclusion"! It's an environmentally friendly choice, last but not least (never say "overall" or "finally"), if you abide by stringent environmental laws!
A Look at a Few Items for Cost-effective and Efficient PCB Assembly
When attempting to optimize the cost-effectiveness and efficiency of PCB assembly, there are a few factors to consider. If you properly consider these factors, you can ensure a streamlined manufacturing process while keeping costs under control. The following are important points to keep in mind:
Select a Vancouver PCB assembly company with a plethora of industry experience based on experience and expertise. Look for companies who have a history of offering top-notch products and services. Experienced technicians will know how to put things together quickly and effectively, saving you time.
Check the PCB assembly company's quality control methods to make sure they are working effectively. Extensive testing at various stages of the production process is necessary to identify any defects or issues early on. Tight quality control procedures cut down on rework and waste, which decreases costs.
Advanced Equipment: Select a company with state-of-the-art machinery and tools designed specifically for efficient PCB assembly processes. Modern equipment not only speeds up production but also ensures accuracy and precision when installing components.
Supply Chain Management: Effective supply chain management is essential for low-cost PCB assembly. Look for companies that have established relationships with reputable component suppliers who offer competitive pricing without compromising quality.
Design Optimization: Throughout the design phase, collaborate closely with the PCB manufacturer of your choice to optimize layouts, reduce complexity, and increase manufacturability efficiency without sacrificing functionality or performance.
Cost analysis: Perform a comprehensive cost analysis before selecting a Vancouver PCB assembly service supplier.
Consider all of the expenses, such as labor, overhead, and shipping fees.
Obtain quotes from several different providers before selecting one.
By striking the right mix between the value and price offered by each potential vendor, you may prevent choosing an affordable solution at the expense of quality.
0 notes