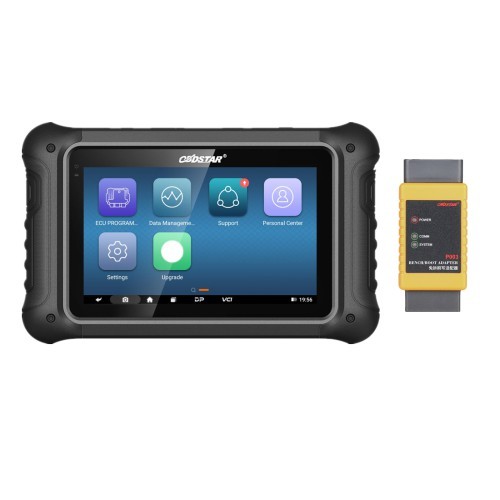
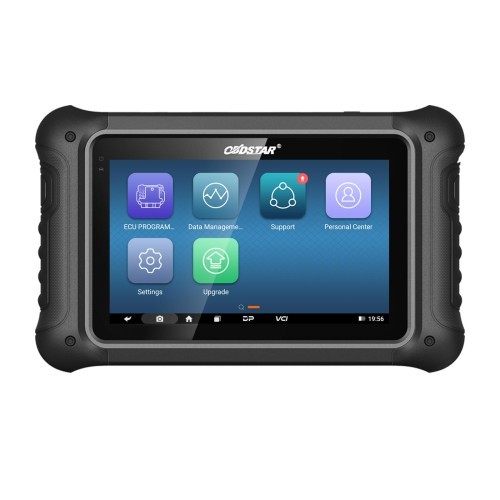
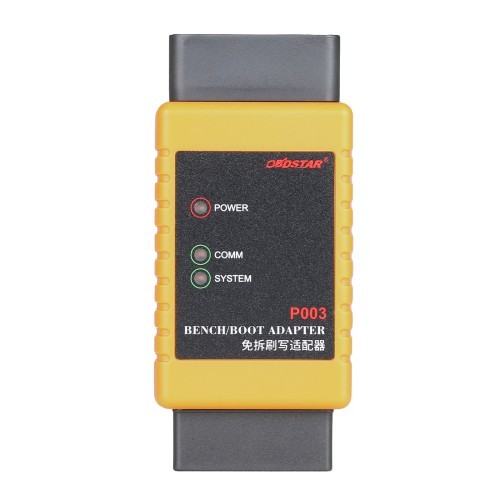
#OBDSTAR DC706
Explore tagged Tumblr posts
Visit Tumblr Blog
Explore Tumblr blogs with no restrictions, modern design and the best experience.
Last Seen Tumblr Blogs


Fun Fact
Tumblr has a low social media market share in South America.
Text
OBDSTAR DC706 Read and Write Porsche SDI10.2 ECM in Boot
how to read and write Porsche SDI10.2 ECM with OBDSTAR DC706 in boot mode?
youtube
0 notes
Text
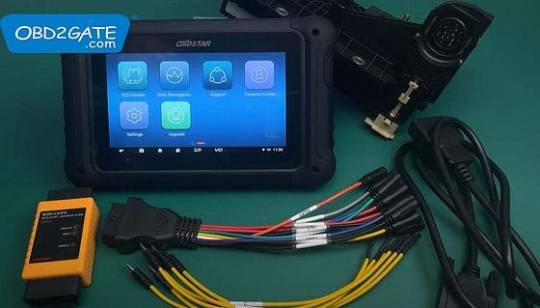
OBDSTAR DC706 Clone BMW ZF 6HP19 TCM by Bench Tutorial
This guide demonstrates how to clone BMW ZF 6HP19 TCM using OBDSTAR DC706 ECU tool on bench
Tools used:
OBDSTAR DC706
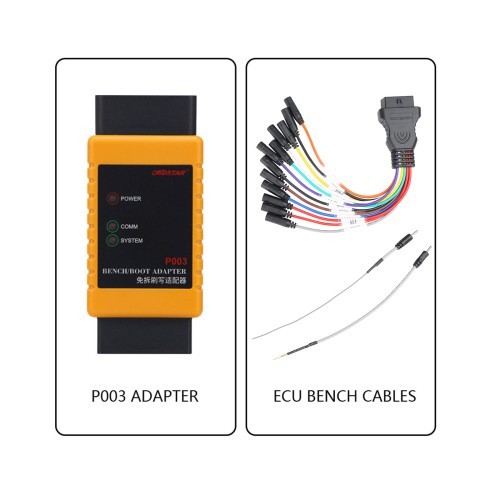
P003 kit
ECU bench jumper
Main cable
BMW ZF 6HP19
Note: Please keep OBDSTAR DC706 charging and communicating throughout the process.
Operation steps:
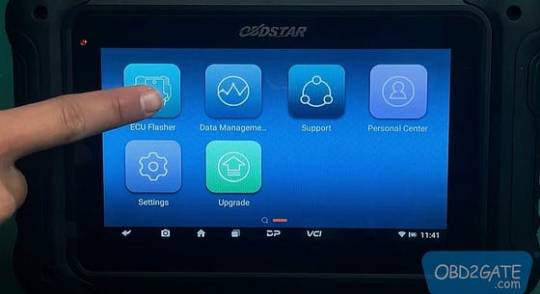
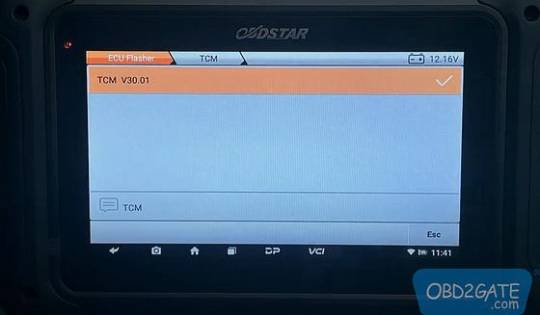
Navigate to main interface, choose “ECU Flasher”-TCM- TCM V30.01
Wait for Initialization communication…


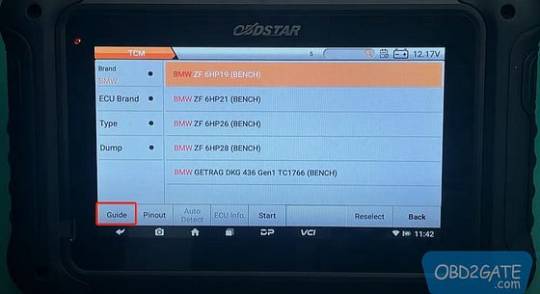
Choose “Brand”- BMW- BMW ZF 6HP19 (BENCH)-Guide

Remarks: click operation instructions at the bottom left to check the best detection method
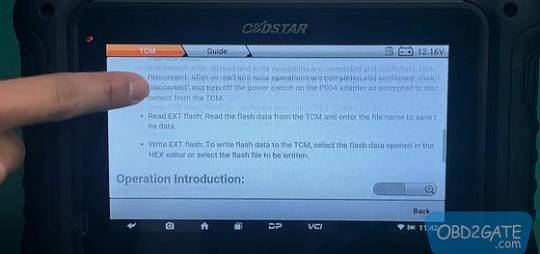
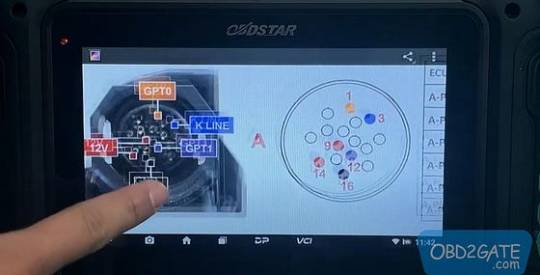
Click “back”- choose “pinout”-always open with gallery-

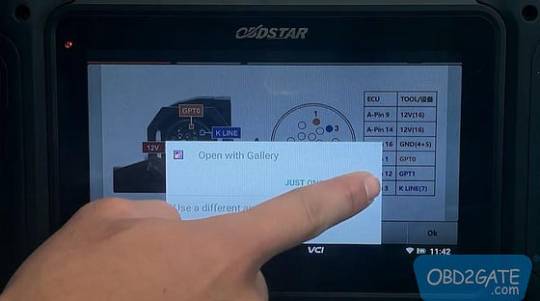
Connect according to the wiring diagram
The harness connection is completed

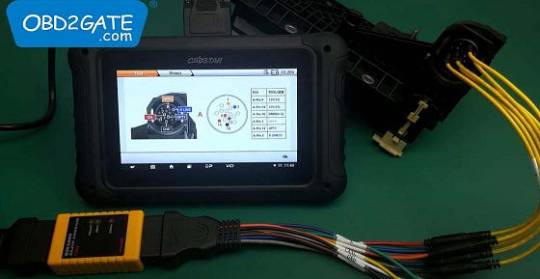
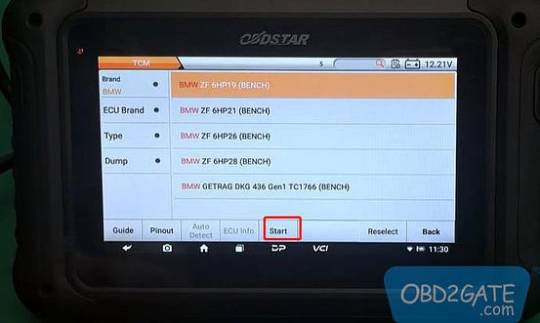
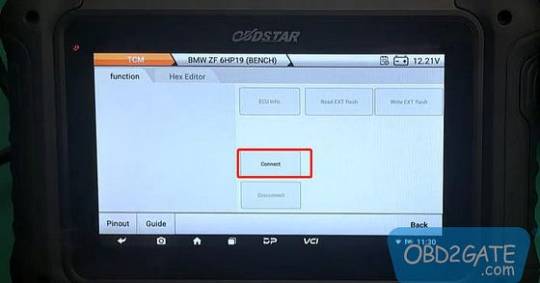
Choose “BMW ZF 6HP19 (BENCH)”- click “start”
In the function interface- choose “connect”
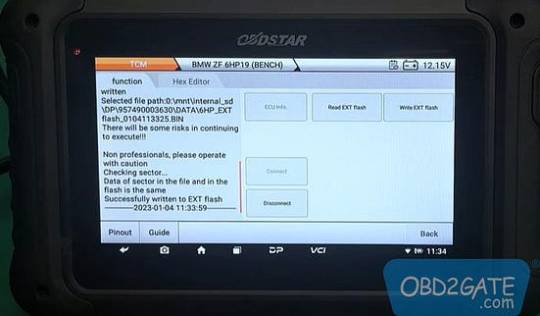
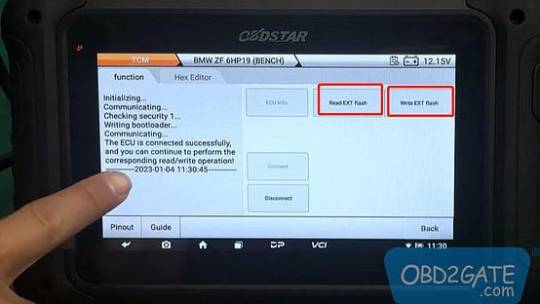
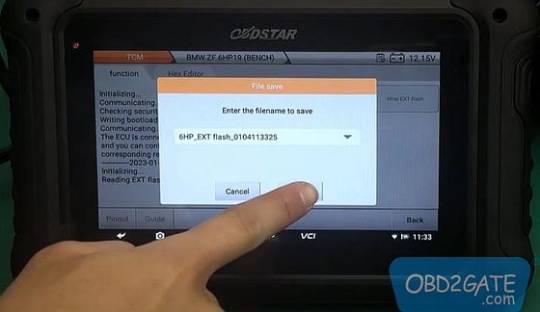
Follow instructions- Read EXT flash- Enter the filname to save- ok
Write EXT flash- No


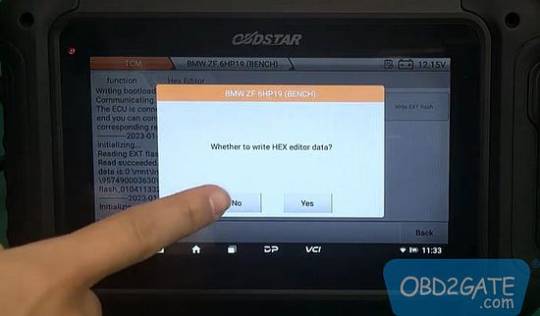
Please Select the flash date to be written
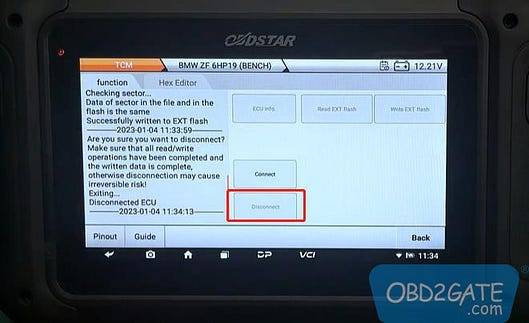
The ECU cloning operation is completed
Disconnect ECU

Job is done. You can follow the steps to use OBDSTAR DC706 to clone BMW ZF 6HP19 TCM BY BENCH.
0 notes
Text
OBDSTAR DC706 Clone BMW ZF 6HP19 TCM by Bench Tutorial
This guide demonstrates how to clone BMW ZF 6HP19 TCM using OBDSTAR DC706 ECU tool on bench
Tools used:
OBDSTAR DC706
P003 kit
ECU bench jumper
Main cable
BMW ZF 6HP19

Note: Please keep OBDSTAR DC706 charging and communicating throughout the process.
Operation steps:
Navigate to main interface, choose “ECU Flasher”-TCM- TCM V30.01
Wait for Initialization communication…
Choose “Brand”- BMW- BMW ZF 6HP19 (BENCH)-Guide
Remarks: click operation instructions at the bottom left to check the best detection method

Click “back”- choose “pinout”-always open with gallery-


Connect according to the wiring diagram
The harness connection is completed

Choose “BMW ZF 6HP19 (BENCH)”- click “start”
In the function interface- choose “connect”
Follow instructions- Read EXT flash- Enter the filname to save- ok
Write EXT flash- No

Please Select the flash date to be written
The ECU cloning operation is completed
Disconnect ECU


Job is done. You can follow the steps to use OBDSTAR DC706 to clone BMW ZF 6HP19 TCM BY BENCH.
0 notes
Text
Opel E98 ECU Recovery with OBDSTAR DC706 Success
Here we are required to recover an Opel E98. We tried writing the ECU with Xhorse but it failed, so we will use OBDSTAR DC706.
All the way straight to E98 menu.
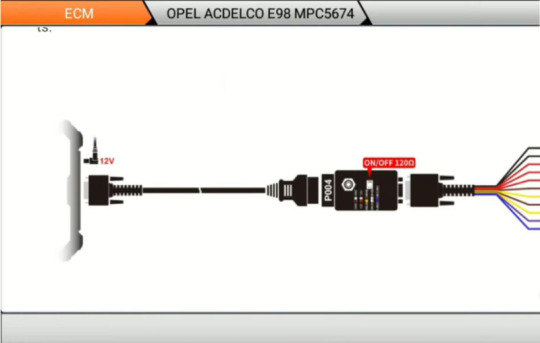
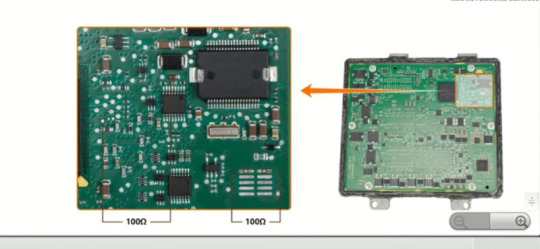
As we can see, we need two 100ohm resistors and set it to boot mode.
For this one, we don't need any 120ohm resistor between can high and can low.
Here we have bench mode and boot mode, because we have to recover the ecu.
Make sure strong Internet connection.
We have to get a shadow flash password whereby we already read ecu to give out the file for it.

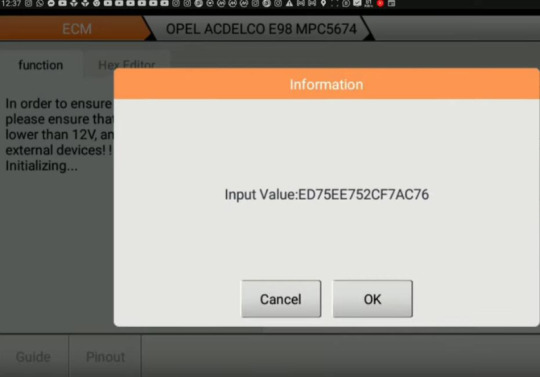
Wait for it to check the password, so we can go into boot mode and write flash and eeprom onto.
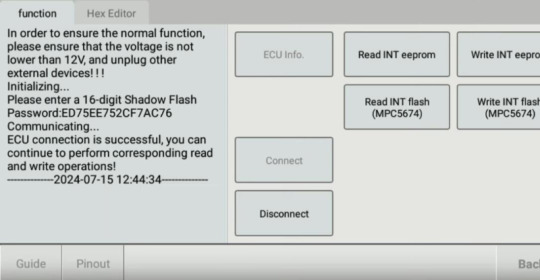
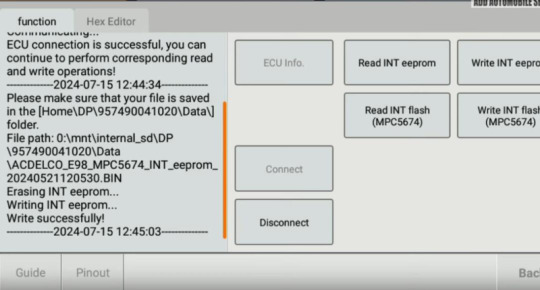
Write eeprom file that we already read before.
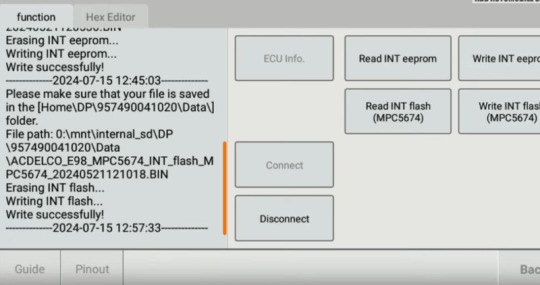
Write Internal flash file.
This flash file is huge, so it take much time.
Someone posted when Xhorse Multi Prog erased data before it writes data, it got to like 40% and it went off. The next day when the Internet was strong and it was able to read all 100% and the ecu is back to alive.
Then we go to bench mode.
Now we have VIN and are able to connect it with the ecu.
Rewrite eeprom and flash.
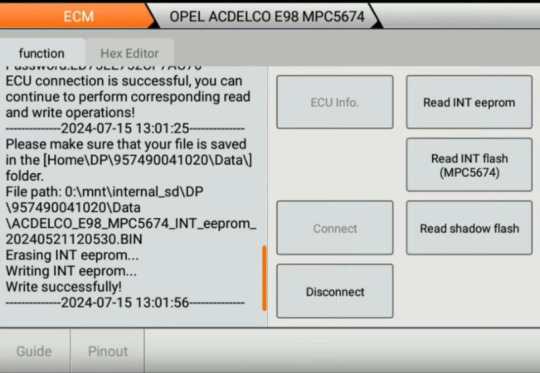
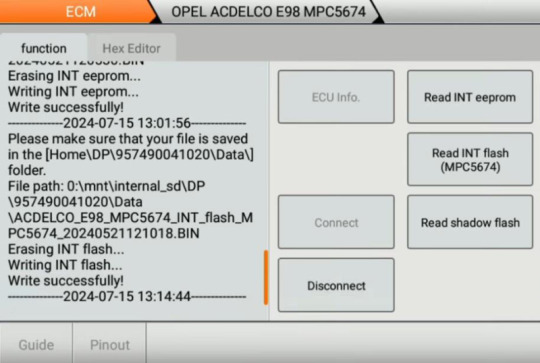
Everything is okay now, the ecu has recovered.
Done! That's how OBDSTAR DC706 Tool recovers E98.
0 notes
Text
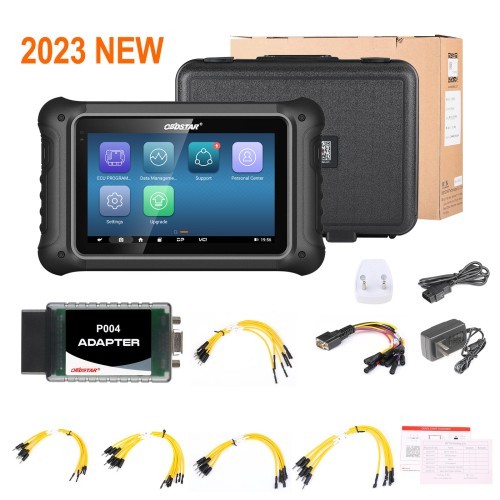
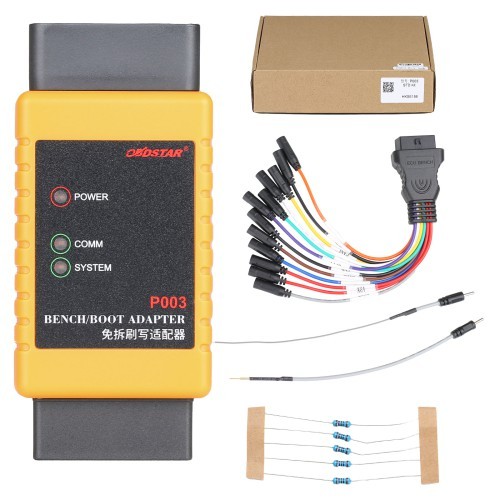
OBDSTAR DC706 ECU Tool Full Version Plus P003 Adapter and ECU Bench Cables for Reading BOSCH ECU Data CS PINCODE ECU Clone/ All by OBD or Bench
#obdstar #obdstardc706 #dc706 #ecutool #ecuprogrammer #dc706ecuprogrammer
WhatsApp:+8617773532862
1 note
·
View note
Text
OBDSTAR DC706 ECU Tool Full Version Plus P003 Adapter and ECU Bench Cables for Reading BOSCH ECU Data CS PINCODE
#obdstar #obdstardc706 #dc706 #ecubench #obdstarecu #autodiagnostictools #autoscanner
whatsapp:+8615886576826

0 notes
Text
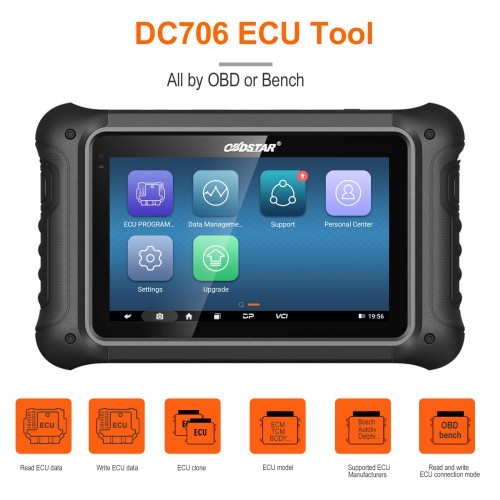
OBDSTAR DC706 ECU Tool Full Version
🚗💨 ECM Clone: Cars: Bosch, Continental, Delphi, Denso, Magneti Marelli, Siemens… Motorcycles: Bosch, Delphi, EFI… ⚙️🏍️ TCM Clone: AC Delco, Bosch, Continental, Getrag, GM, Kefico, Siemens, Temic, ZF… 🔧💪 Body/Other Clone: FCA, FIAT, FORD, GM/OPEL, LAND ROVER/JAGUAR, PSA, SMART, VOLVO… Advanced Features: 1️⃣ Read/write eeprom/dflash/pflash/Map 2️⃣ Reset ECU (Virgin) & calibrate mileage 3️⃣ Read IMMO PIN code & ECU recovery 4️⃣ Support 200+ ECM types (P003 adapter may be required) 5️⃣ Compatible with dozens of TCM types 6️⃣ Cloning for motorcycle Delphi MT05, MT05.2, MT05.3 ECU 7️⃣ BRP ME17.8.5 ECU clone (with P003 adapter) 8️⃣ Piaggio series engine ECU clone (e.g., MIU G4 - M4G1) 9️⃣ Intelligent search by brand, model, part number, ECU manufacturer, MCU controller type 🔟 Automatic identification & strong help data files 1️⃣1️⃣ Perform all functions via OBD or Bench mode
Specifications: 📲 Operating system: Android 5.1.1 💻 CPU: RK3128 quad-core ARM cortex A7 🔋 Battery: 3700mA rechargeable polymer lithium battery 💾 Storage: 16GB (expandable up to 32GB with micro SD card) 🖥️ LCD: 7.0-inch capacitive touch screen (1024x600 resolution) 📡 Connectivity: WiFi supported 🌡️ Temperature range: -20℃55℃ (-4℉131℉) ⚖️ Weight: Approximately 1.3kg 📏 Dimensions: 243mm148mm36mm
Get yours now and unlock limitless possibilities for your vehicles! 💥🚀
1 note
·
View note
Text
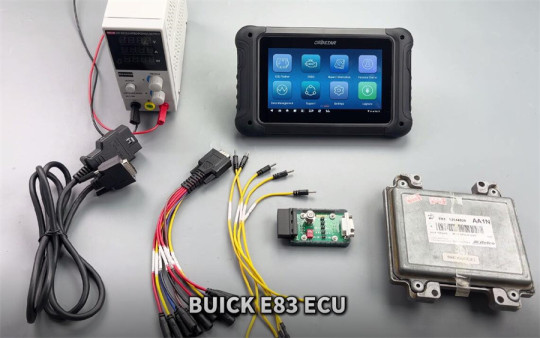
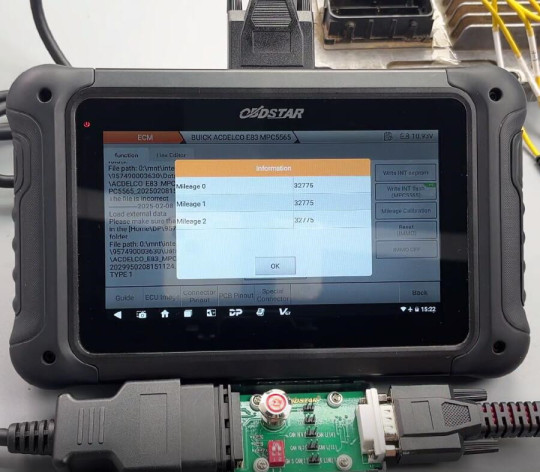
OBDSTAR DC706 Clone and Calibrate Mileage on Buick E83 ECM
How to use OBDSTAR DC706 to read and write data, read pincode, and calibrate mileage on Buick E83 ECM?
The process can be performed on the bench. Ensure you have the following tools and equipment ready:
OBDSTAR DC706 main uint
OBDSTAR P004 Adapter
OBDSTAR ECU Bench Jumper
Main Cable
High-Power Stabilized Power Supply
Buick E83 ECM
Preparation:
Ensure the ECM software is updated to 60.
Enable a stable network connection before starting the operation.
Operation:
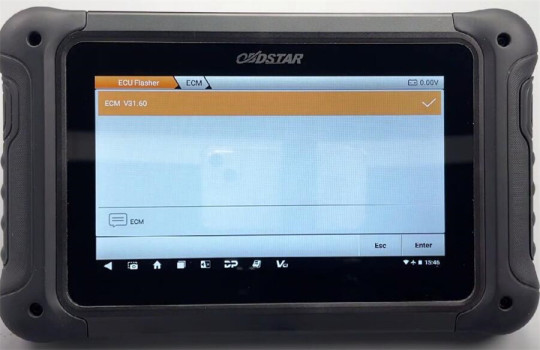
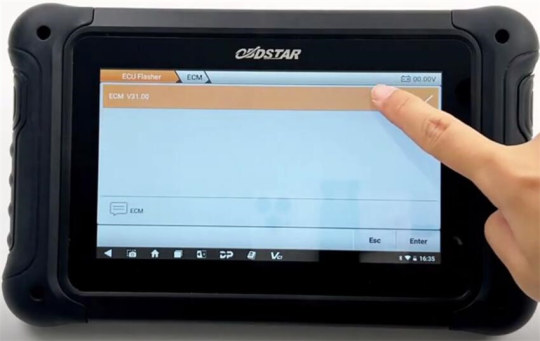
Select ECU Flasher>> ECM>> ECM V31.60
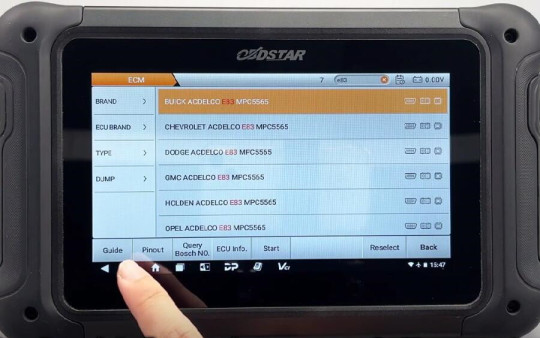
Input e83 in the search box at the top right corner to quickly find the corresponding model (BUICK ACDELCO E83 MPC5565)
Check the instruction by clicking on “Guide”
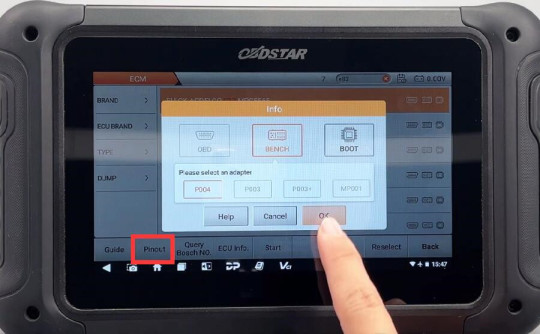
This module supports both BENCH and BOOT modes.
BENCH mode is specifically used for data cloning. If the ECU freezes, you can use the BOOT mode for recovery. The operations and precautions for both BENCH and BOOT modes are provided.
Click “Pinout”, select “BENCH” and “P004”
Check the connector pinout
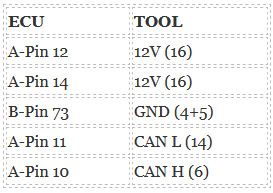

Follow the pinout to connect DC706 ECU Tool and Buick E83 ECM using P004 Adapter, ECU Bench Jumper, main cable and power supply correctly
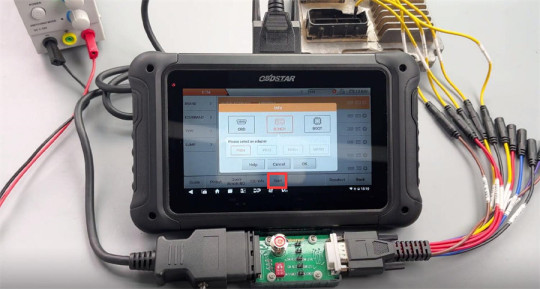
After connection, start to perform the available functions.
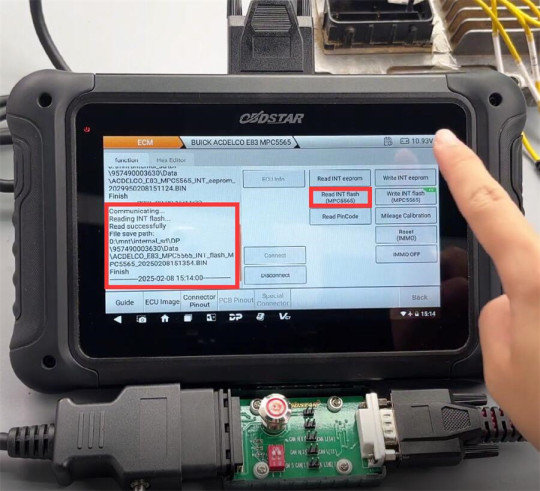
Connect ECU
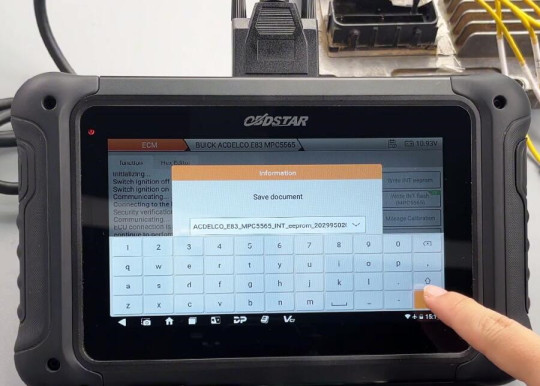
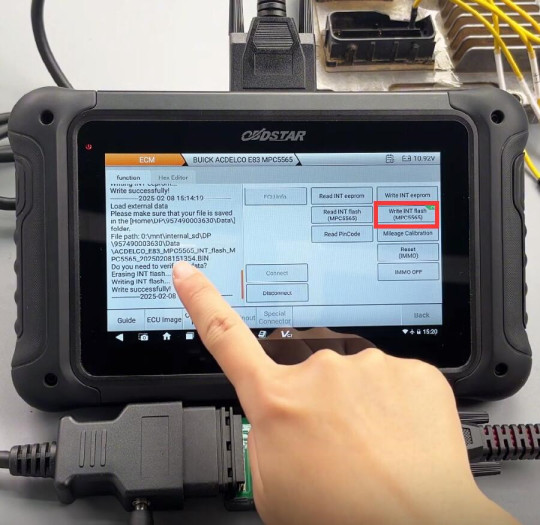
Read INT eeprom and INT flash (MPC5565)
Save the data separately. You can customize the file name, and the saving path along with operation records will be displayed on the left side.

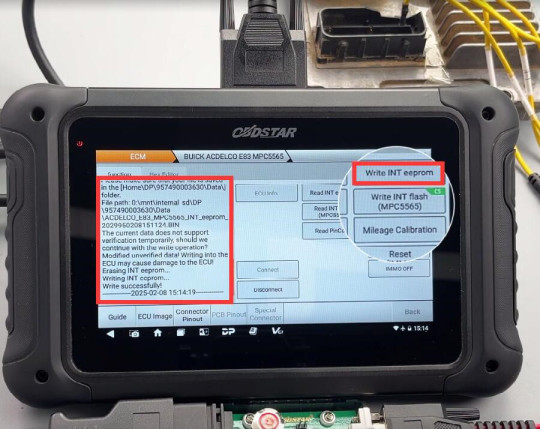
Write INT eeprom
Write INT flash (MPC5565)
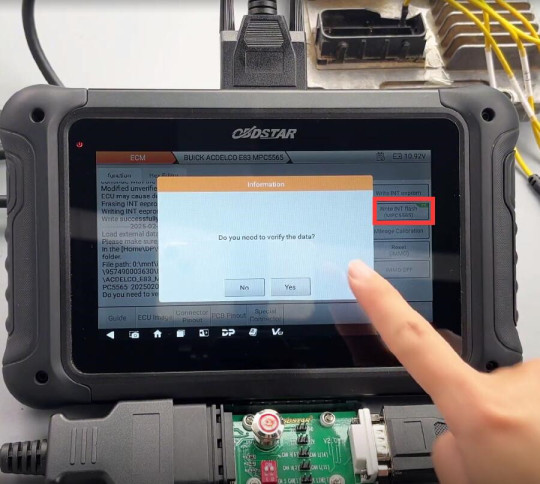
Note: The CS label at the top right indicates support data verification
Verify the data (checksum), write the INT flash data successfully
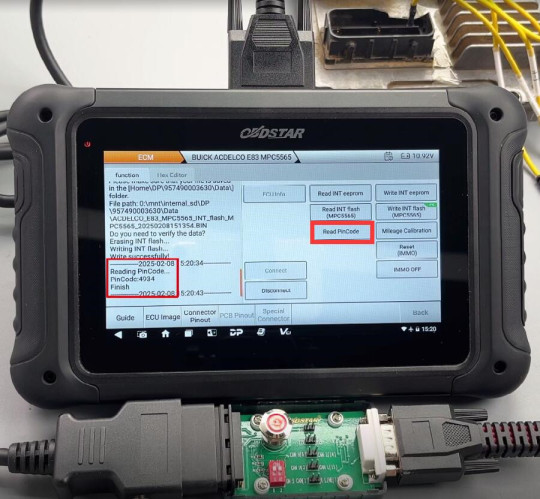
Read Pincode
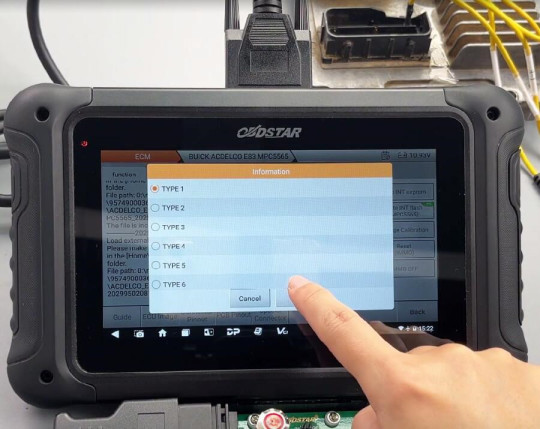
Mileage Correction
Select the type and mileage option
Enter the new mileage to overwrite
Save the file and write it to the ECU
Write INT eeprom successfully
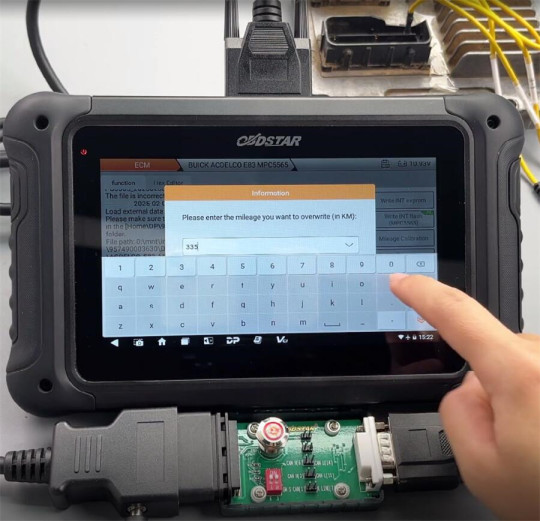
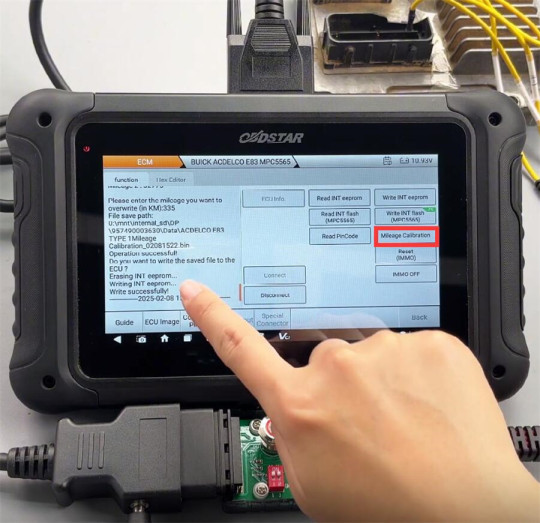
Done!
BUICK ACDELCO E83 MPC5565 reads and writes data, reads Pincode, and calibrates mileage successfully using OBDSTAR DC706 ECU Tool.
0 notes
Video
youtube
OBDSTAR DC706 Unlock ECU, Read and Write Data, Calibrate Mileage and Do ...
0 notes
Text
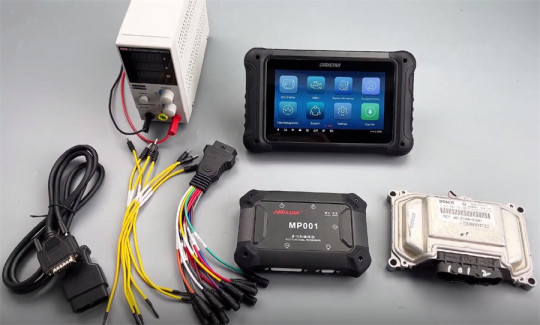
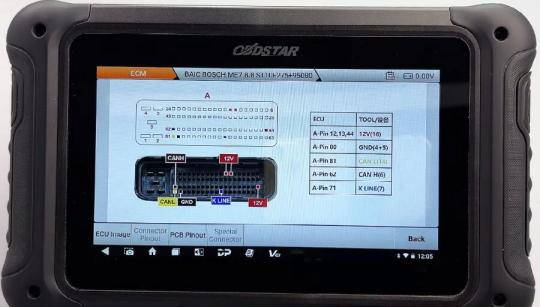
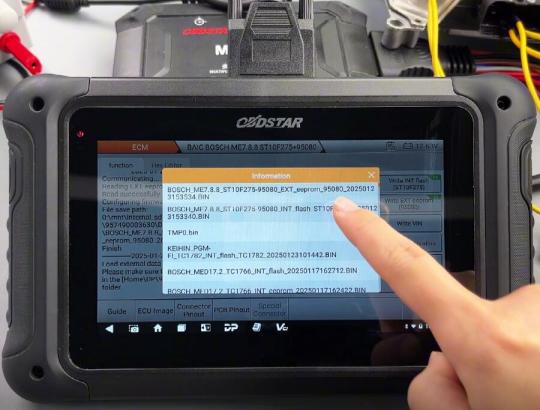
OBDSTAR DC706 Unlock, Read and Write ECU, Calibrate Mileage and Do IMMO Off on BAIC ME7.8.8 ECU By Boot
OBDSTAR DC706 ECU Tool with ECM V31.42 can unlock ECU, read and write data, calibrate mileage and do IMMO off on BAIC Bosch ME7.8.8 ST10F275+ 95080 ECM by boot.
Preparation:
OBDSTAR DC706 main unit
Main cable
High power stabilized power supply
OBDSTAR ECU Bench Jumper
MP001 multifunctional programmer
BAIC Bosch ME7.8.8 ST10F275+ 95080 ECM
Requirement:
Make sure the ECM software is updated to V31.42 or above.
Ensure the internet connection is normal during the operation.

Operation guide:
ECU Flasher>> ECM>> ECM V31.42
Input me7.8.8 in the searching box to quickly find the corresponding ECM model (BAIC Bosch ME7.8.8 ST10F275+ 95080)
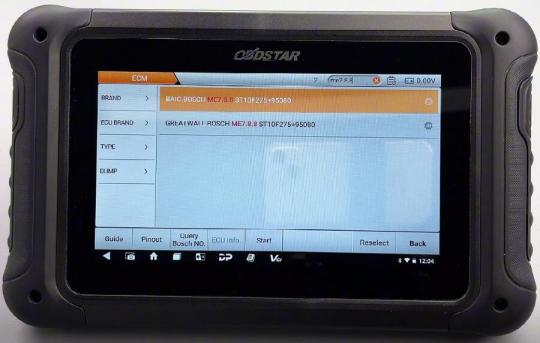
Click [Guide] to check the detailed connection method and operation instruction
Click [Pinout] and select “BOOT” and “MP001” adapter

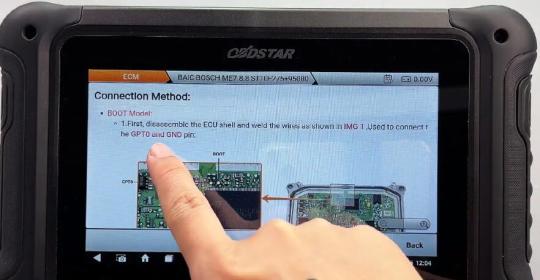
Check [PCB Pinout]
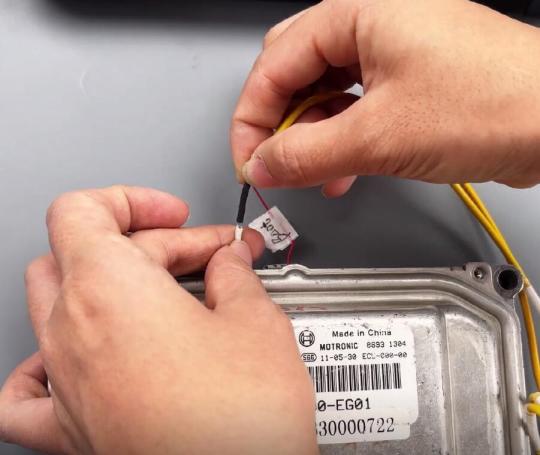
Follow the soldering diagram to open the module cover and solder only GPT0 and GND points
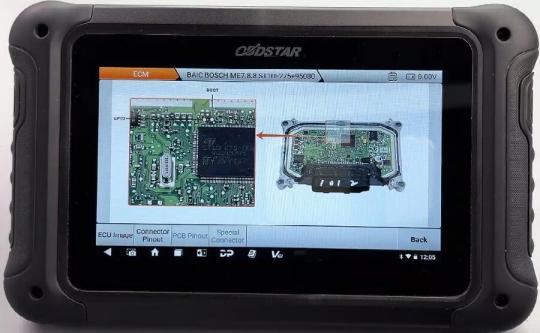
Check [Connector Pinout]
Follow the wiring diagram to make the connection

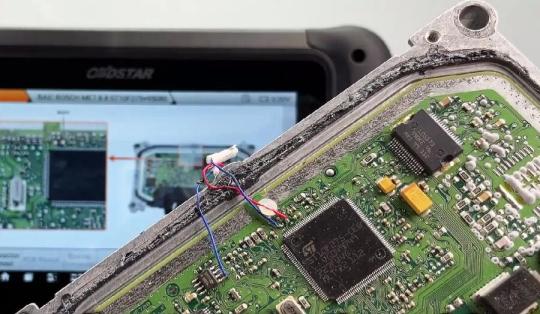
Connect MP001 Programmer and ME7.8.8 ECM via Bench jumper according to the diagram
Connect OBDSTAR MP001 Programmer and DC706 ECU Tool via the main cable
Connect the power supply to the main cable
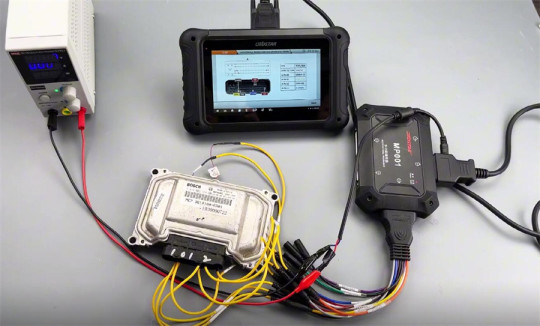
After connection, click [Start], select “BOOT” and “MP001” adapter
Start to perform the related functions supported
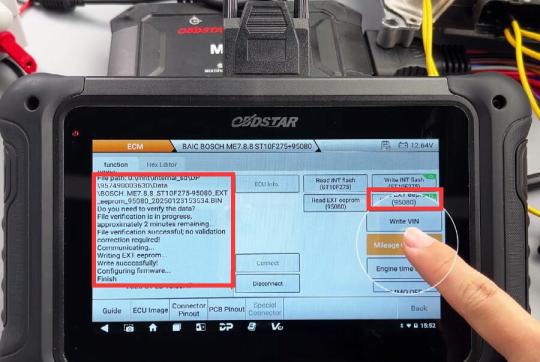
1.Click “Connect” to connect ECU
2.Read INT flash and EXT eeprom
Read INTflash (ST10F275) and EXT eeprom (95080), and save the data separately

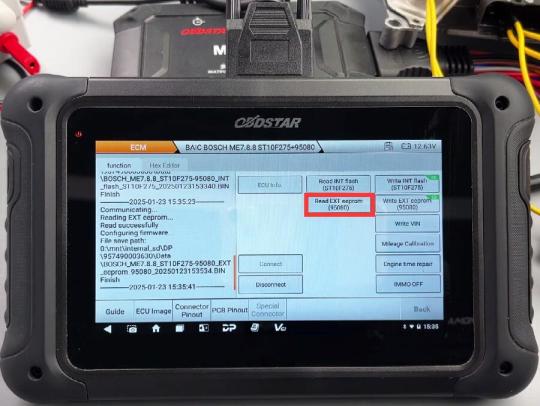
3.Write INT flash and EXT eeprom
Then load the external data (original INTflash and EXT eeprom) data to write into a new ECM
For INTflash, the ECU is in an unencrypted state, confirm to write directly
For EXT eeprom, need to verify the data
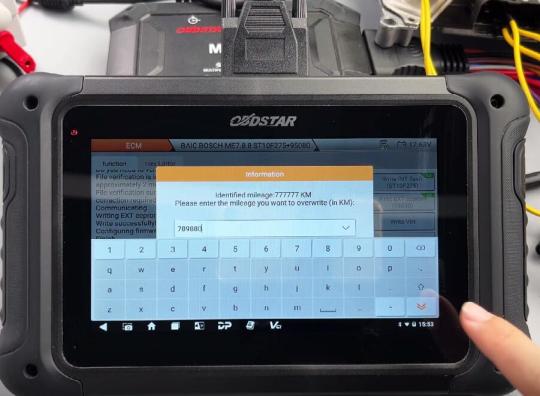
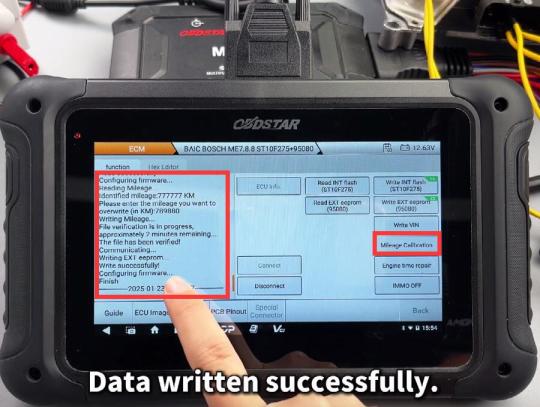
4.Calibrate mileage
Click “Mileage calibration”
The current mileage is identified. Enter the new mileage you want to overwrite.
Write data successfully
5.IMMO OFF
Click “IMMO OFF” and wait the process is completed
6.Disconnect
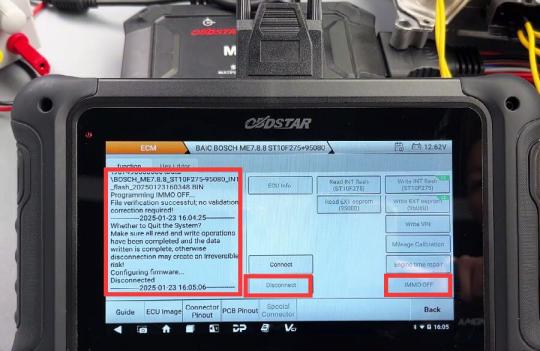
BAIC Bosch ME7.8.8 ST10F275+ 95080 ECM ECU Unlock, Data Read and Write, IMMO Off using OBDSTAR DC706 via Boot successfully.
0 notes
Text
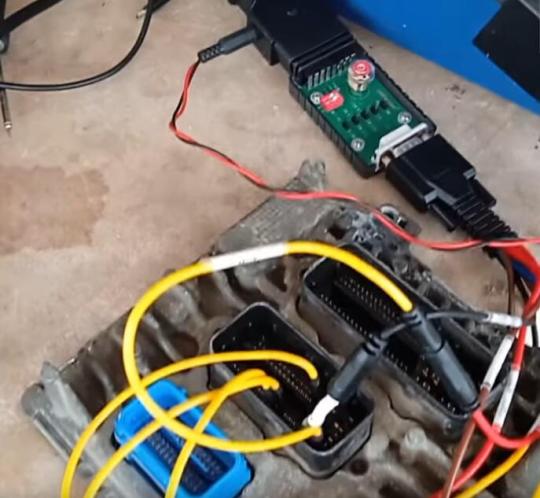
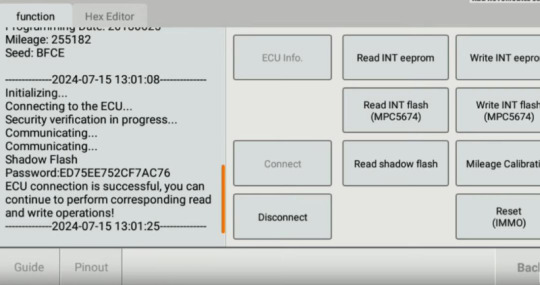
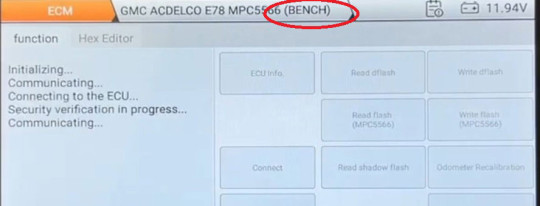
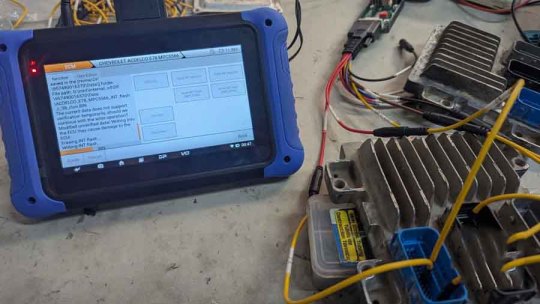
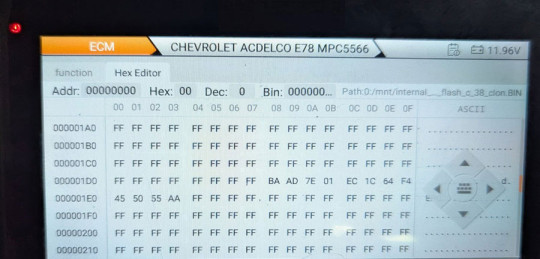
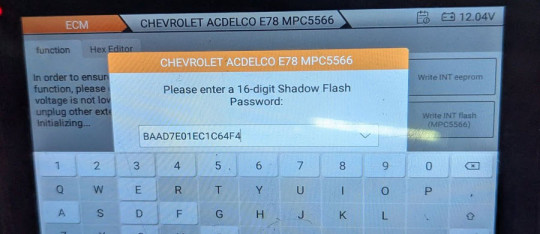
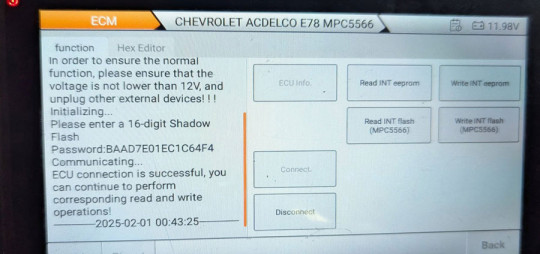
OBDSTAR DC706 Recover GM ACDELCO E78 ECM with Shadow Password
Both OBDSTAR DC706 ECU Tool and I/O Terminal are capable of recovering various GM ACDELCO ECMs with shadow passwords in boot mode.
Here’s a user review on successfully recovering a GM E78 ECM using the DC706:
Importance of Reading ShadowFlash with DC706:
When using the DC706 to read certain ECUs, the tool provides an option to read ShadowFlash.
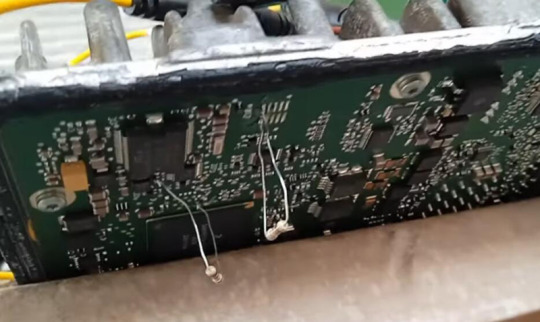
In a recent case, while attempting to clone an E78 ECU from a Silverado, the module became inoperative after a failed bench writing attempt. The ECU stopped communicating via OBD and displayed the error code P0606 (Processor Fault).
Fortunately, OBDSTAR DC706 offers the option to write in boot mode. However, during the process, the tool requests a password, which can only be obtained by reading ShadowFlash beforehand.
Thanks to the ShadowFlash reading function, the ECM was successfully recovered, preventing permanent damage.
Key Note:
The ShadowFlash reading option does not appear in the boot menu; it must be accessed via the Bench Mode Menu. Open the Delco E78/Bench Menu, and you will find the ShadowFlash option.
Check the images of the boot mode progress below:
Read also:
OBDSTAR DC706 VS I/O Terminal Reviews
0 notes
Text
OBDSTAR DC706 Read and Write TOYOTA DENSO GEN3R7F701201+R7F701202 ECU By Bench
How to read and write TOYOTA DENSO GEN3R7F701201+R7F701202 ECU with OBDSTAR DC706 on bench mode
youtube
0 notes
Text
Three Ways for OBDSTAR DC706 Data Export
How to export data from OBDSTAR DC706 ECU Tool to PC or others?
There are three methods below for reference. Hope it helps you!
youtube
0 notes
Text
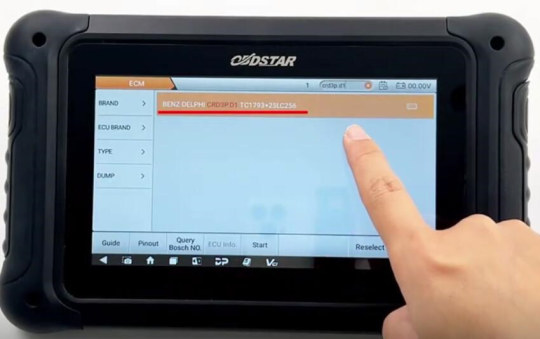
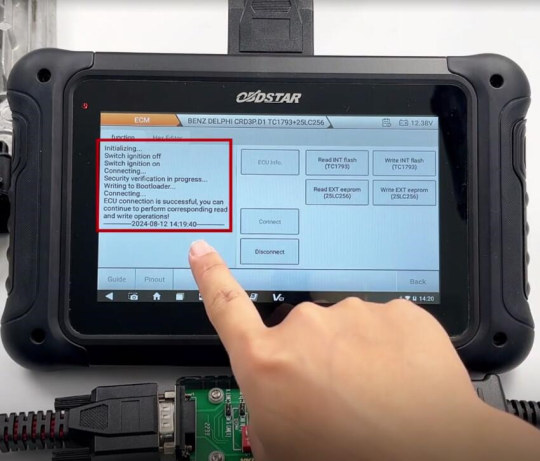
OBDSTAR DC706 Clone Benz DELPHI CRD3P.D1 TC1793+25LC256 ECM Tutorial
OBDSTAR DC706 ECU Tool is able to read and write INT flash & EXT EEPROM, and reset virgin on the Mercedes-Benz DELPHI CRD3P.D1 TC1793+25LC256 ECM in Bench mode.
Requirement:
Benz ECM
OBDSTAR DC706 with ECM V31.00 (or above)
OBDSTAR P004 Adapter and ECU Clone Jumper
12V 5A Power Supply (DC)
Main cable
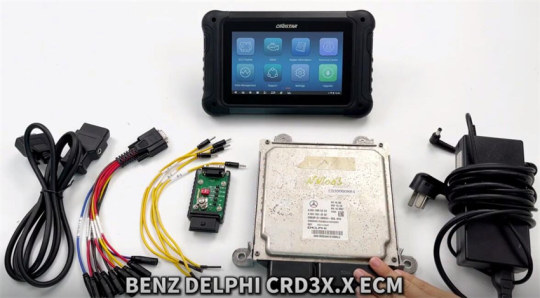
Operation guide:
Select ECU Flasher>> TCM>> TCM V31.00
Input crd3p.d1 in the search box to get the ECM type desired (BENZ DELPHI CRD3P.D1 TC1793+25LC256)
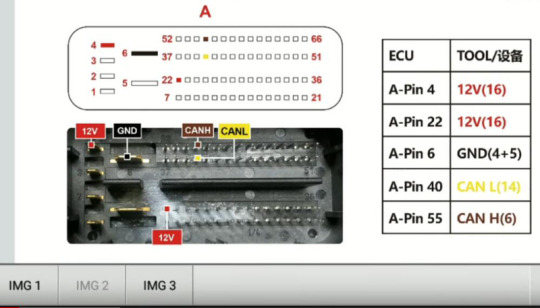
Pinout diagram:ECUTOOLB-Pin5, 1512V (16)B-Pin 2GND (4+5)B-Pin 54CAN L (14)B-Pin 41CAN H (6)
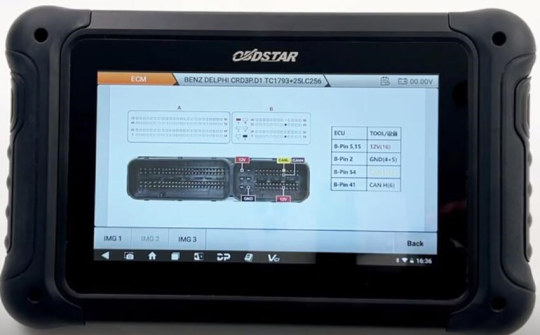
Follow the Pinout diagram to connect OBDSTAR P004 ECU Clone Jumper and Benz CRD3P.D1 ECM
And connect P004 Adapter to P004 Jumper and DC706 ECU Tool via main cable
Supply the 12V power supply to DC706 via the main cable as well
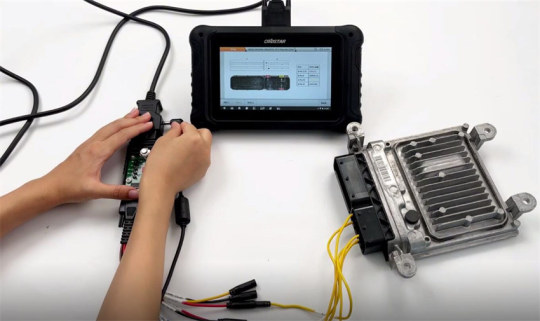
After connection, turn on the switch button on P004 Adapter, and click “Start”
Select Bench and P004 mode
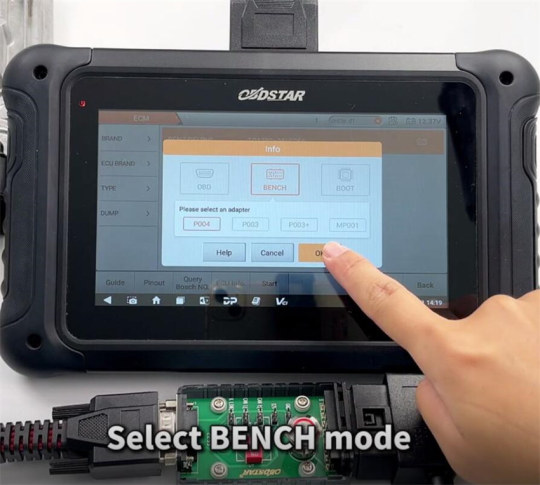
Click “Connect” to connect ECU, turn off and turn on P004 Adapter switch button according to the on-screen prompts
ECU connection is successful, start to perform the corresponding read and write operations.
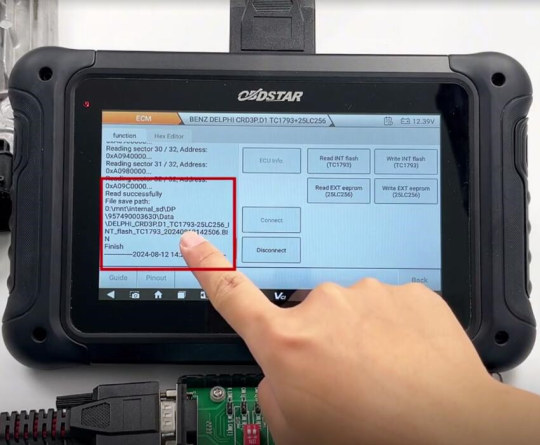
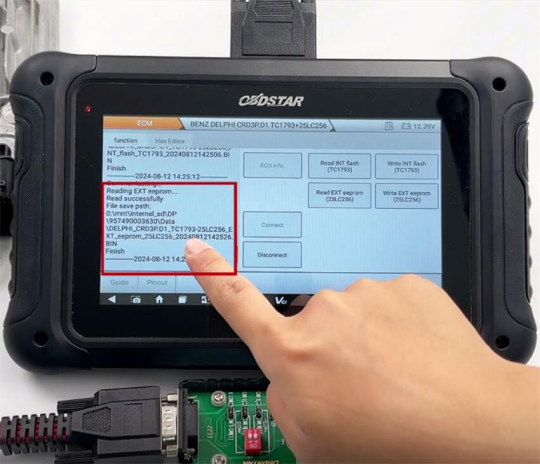
Read INT flash (TC1793) and EXT EEPROM (25LC256) separately
After saving the data, continue to select the corresponding original data to write into the new Benz ECM

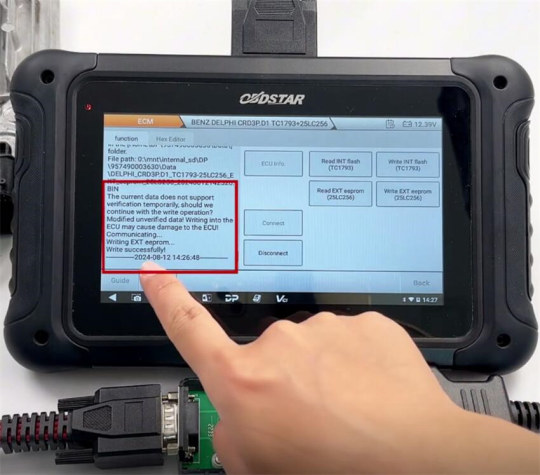
Finally, disconnect the ECU.
OBDSTAR DC706 Support List for Benz ECM (ECM V31.10):

0 notes
Text
OBDSTAR DC706 Erase Mercedes-Benz Siemens VGS2-NAG2 TCM Data
OBDSTAR DC706 ECU Tool added Mercedes-Benz Siemens/Continental VGS2-NAG2 and Benz Siemens/Continental VGS3-NAG2 data erase function in the TCM V30.37. It’s simple and fast to perform a data wipe on the Benz Siemens VGS2-NAG2/VGS3-NAG2 transmission to erase the existing coding data and immobilizer information.
Preparation:
Benz TCM: i.e. Mercedes-Benz Siemens VGS2-NAG2
OBDSTAR DC706 with TCM V30.37 (or above)
OBDSTAR P004 Adapter and ECU Clone Jumper
12V 5A Power Supply (DC)
Main cable
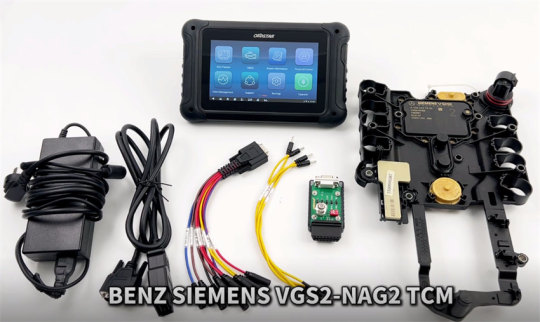
Procedure:
youtube
0 notes
Text
OBDSTAR Update Checksum Correction Function for X300 Classic G3 and DC706
OBDSTAR X300 Classic G3 Key Programmer with ECU TCU Cloning Function License can perform the same function (Car/Motorcycle ECU+ TCM+ Body/Other clone) as OBDSTAR DC706 ECU Tool Full Version. Now both support checksum correction function as well. It was released by OBDSTAR on August 6th, 2024.
Requirement:
Update the ECU software to V31.00 or above.
Add the following types of flash data CS functions:
ALPINA BOSCH MG1CS201 TC298TP
AUDI BOSCH MG1CS001 SPC5777
AUDI BOSCH MG1CS002 TC298TP
BENTLEY BOSCH MG1CS002 TC298TP
BENZ SIEMENS/CONTINENTAL S1M271DE TC1796+ST95128
BENZ SIEMENS/CONTINENTAL SIM271KE TC1796
BMW BOSCH MD1CS001 SPC5777
BMW BOSCH MG1CS003 SPC5777
BMW BOSCH MG1CS201 TC298TP
BMW CONTINENTAL MSD80.X TC1796+ST95640
BMW CONTINENTAL MSD81.X TC1796+ST95640
BMW CONTINENTAL MSD85.X TC1796+ST95128
BMW CONTINENTAL MSD87.X TC1796+ST95128
BMW CONTINENTAL MSV80.X TC1796+ST95640
BMW CONTINENTAL MSV90 TC1796
CITROEN BOSCH MG1CSO42 TC298TP
DS BOSCH MG1CS042 TC298TP
HONDA KHH1N PGM R SH7058
ISUZU BOSCH MD1CS089 TC299TP
MAHINDRA BOSCH MD1CS018 SPC5898
MAHINDRA DELPHI DCM2.7AP MPC5642
MINI BOSCH MD1CS001 SPC5777
MINI BOSCH MG1CS201 TC298TP
OPEL BOSCH MG1CS042 TC298TP
PEUGEOT BOSCH MG1CS042 TC298TP
PORSCHE BOSCH MG1CS002 TC298TP
SAIC BOSCH MD1CS089 TC299TP
SKODA BOSCH MG1CS001 SPC5777
TATA BOSCH MD1CS018 SPC5898
TOYOTA BOSCH MG1CS003 SPC5777
TOYOTA BOSCH MG1CS201 TC298TP
VOLKSWAGEN BOSCH MG1CS001 SPC5777
VOLKSWAGEN BOSCH MG1CS002 TC298TP
Keep updating…
0 notes