#MaximDL
Explore tagged Tumblr posts
Text
All About Image Callibration on Maxlm DL
Recently we have been using a program called Maxim DL to perform a process called calibrating images. We use “darks” and “flats” along with the actual image of the space object in order to get the highest quality we can achieve with the tools we have. A dark calibration image is like taking a picture with the lens cap on. It captures only the "noise" made by the camera itself, like the buzzing or hissing you might hear from electronic devices. We use these kinds of images to figure out how much noise the camera adds to the real pictures we take. By subtracting this noise from our actual photos, we make them clearer and prettier to look at. Now, for a flat image, think about taking a photo of a blank wall, but the light isn't even across the whole picture. For example, one corner might look brighter than the other. A flat calibration image is like taking a photo to see where the light isn't quite right. We can then use this photo to level out and fix the lighting in our real pictures, making sure they look even from one side to the other. When creating colorized images of space objects, we use a red filter photo, a blue filter photo, a green filter photo, and a clear/luminance filter photo. Each of the color photos has numerous amounts of flats, darks, and actual images. For the space objects the we calibrated in this class, I would say there was an average of about 50 images per color image that required multiple rounds of calibration. When we have a bunch of dark or flat calibration images, we need to combine them to make one good calibration picture. We usually choose the "median" combine mode because it helps us deal with any weird or out-of-place spots in our pictures. For example, if there is a spec of dust on the camera, calibrating with the median will not make the spec extremely noticeable, in fact it may just remove it all together. Think about one of your friends blinking while taking a group photo. If we use the "average" combine mode, their blink might make everyone's face look strange. But with the "median" mode, we ignore that blink and just focus on everyone's eyes being open, making for a better final picture. The median is like focusing on the positive, good looking parts of the picture rather than the things that may be out of place.
#astrophotography#maximdl#computers#space#outer space#astronomy#solar system#nasa#planets#galaxy#galaxies#calibration#gimp
0 notes
Text

The Flame Nebula
This is an image of the Flame Nebula that I edited in class, as well as presented on my poster at the StARS presentation on April 24th. I edited the picture using MaximDL, and GIMP. On MaximDL, I used darks and flats to calibrate several images, before then layering them into one. This process allowed me to remove a lot of unnecessary background noise from the images. I would create four single layered image to bring over to GIMP, including a luminance, red, green, and blue layer. This would be the hardest part of the process, as I needed to find flats and darks that matched one another in length, as well as needed to create a set of flats and darks to calibrate against one another. After finishing on MaximDL, I then moved on to GIMP. On GIMP, I would colorize, brighten, and align the four layers I created on MaximDL. I started by brightening each layer individually, aiming to bring out the nebula, as well as any surrounding stars. After doing so, I would then colorize the red, green, and blue layers as their respective colors. Once the three layers were colored, I changed the mode of each layer, putting the luminance layer on luminance mode, and the red, green, and blue layers on screen mode. After doing this, I had to then adjust each layer to align with the luminance layer, which required me to toggle the layers on and off and individually align each one. Once everything was all aligned, I was able to begin to use the levels and curves tool to brighten and darken the image, allowing me to pull out more details. While I was using the curves tool to adjust the layers, I found I was traveling in circles, struggling with having too much red and too much green in the image rather than a combo of the two. This led me to experiment with the curves tool. Instead of using a traditional curve with only one point on the curve, I added a second curve, making the curve turn into a wave. I did this on the red and green layers, which in turn allowed me to pull out the different colors in different areas of the image. This gave the inner part of the Flame Nebula a greenish color to it, while surrounding the outer part of the layer with more of a reddish color. In the end, despite taking a long time to edit the image, with most of the time being dedicated to editing the image on MaximDL, I was extremely happy with the result. Creating this image of the Flame Nebula allowed me to learn a lot about editing astrophotography and allowed me to experiment beyond my comfort zone to create this edited image of the Flame Nebula.
The Flame Nebula is located on the eastern hip of Orion the Hunter. It is located over 1400 light years away from Earth. NASA has worked to study the Flame Nebula using their Hubble Space Telescope, looking to find protoplanetary disks, which are circumstellar disks of gas and dust that rotate around young stars. So far, NASA has found four protoplanetary disks in the Flame Nebula and have also found three globulettes as well. According to NASA, Globulettes are "small, dark dust clouds that can be seen against the background of bright nebulae." Such dust clouds form brown dwarfs, which are warm objects that don't have enough mass to be a star but are also too big to be a planet. The Flame Nebula appears bright due to a large star over 20 times the mass of the sun lit in the center of the nebula. This would make the flame nebula as bright to the human eye as any other star, but due to the surrounding dust, the star appears over four billion times dimmer than it truly is.
Sources: The Flame Nebula - NASA
Hubble Finds Flame Nebula's Searing Stars May Halt Planet Formation - NASA Science
0 notes
Text
The Elephants Trunk Nebula: Image calibration
Week Eight
When it came the time to process my images of the elephant's trunk nebula I was given 4 different types of images: bias’, darks, flats, and data images all taken with 3 different filters: clear, infrared, and red. However, in order to fully capture the true colors of the elephant trunks nebula I would also need images with another filter, V or green. When calibrating deep sky images the first thing I need is the correct software. I used MaxIm DL Pro 6 to calibrate my images. The next crucial thing I needed were the bias’; bias are “essentially a zero-length exposure (or as close as possible to zero length) with the shutter closed.” Along with bias’ I needed darks; darks are “the unwanted free electrons generated in the CCD due to thermal energy. The name dark current or dark charge comes from the fact that it has nothing to do with the incident light, and is generated equally well in complete darkness. Depending on where in the silicon these electrons are generated, some of the charge will get collected in the individual CCD pixels and contaminate signal electrons (generated from the image itself). At the CCD output, electrons generated from dark current look identical to signal generated electrons, so dark current appears as a noise source in the image.” I used the darks and bias to calibrate my flats; flats are “simply a blank, evenly illuminated image which will show the variations in brightness due to the optical system.” By calibrating these images together we eliminate a lot of noise that would be in our final image, giving us a clearer picture. After I calibrated all of the flats, corresponding to filter, I then needed to calibrate the data images or photos of the elephant's trunk nebula with those flats in order to remove that excess noise. When calibrating images you have to calibrate them in separation of their filters. This means that you can't use the bias’ taken with a red filter with flats taken with a clear filter. That will come later in color stacking.
B. (n.d.). Bias Frame Calibration. Retrieved December 16, 2018, from http://www.diffractionlimited.com/help/maximdl/Bias_Frame_Calibration.htm
D. (n.d.). Dark Current. Retrieved December 16, 2018, from https://quantumimaging.com/dark-current/
F. (n.d.). Calibration Images. Retrieved December 16, 2018, from https://starizona.com/tutorial/calibration-images/
3 notes
·
View notes
Text
we are THREE weeks into the observational astronomy lab and oh my god i’ve never felt more strongly about going into theoretical astronomy this shit sucks!!!!!
1. why are there so many different types of noise to account for?
2. why does AstroImageJ hate me personally?
3. WHY DOES THIS PROFESSOR HAVE NO IDEA HOW TO WRITE LAB INSTRUCTIONS? we took 40 different images abraham, which fucking ones do you want me to process??????? it’s literally so bad that one of the teaching assistants is in the process of rewriting the entire manual
4. if MaximDL crashes in the middle of an exposure again i’ll commit tax fraud
5. ik we have no choice but to do these labs at night but still. 10pm-12am labs bad. that’s bedtime :(
6. not rlly the class’s fault but pennsylvania weather fucking SUCKS for clear-sky observations
#do i need to give it more time before i officially decide i hate it? yes#is it my fault for not paying attention during lectures? also yes#but oh my god i do not care at ALL how a ccd works#astronomy#space#this is rlly just a lighthearted vent im just annoyed
1 note
·
View note
Text
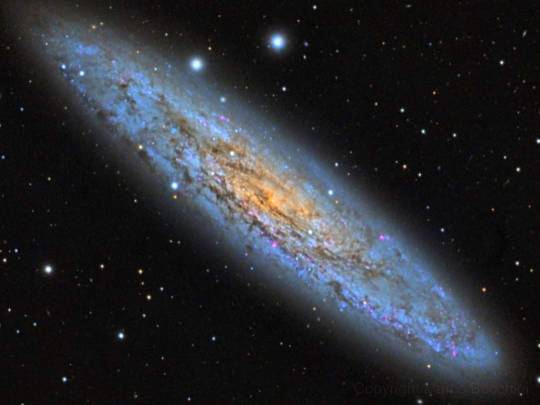
NGC 253 - Sculptor Galaxy. Imaged through Meade's 10" LX200.
Imaging cameras: Moravian 8300
Mounts: Gemini g53F Gemini
Software: PixInsight PinInsight 1.8 · Maxim DL 5 MaximDL 5
PC: Marco Bocchini on AstroBin - https://bit.ly/2IkkJOS
0 notes
Photo
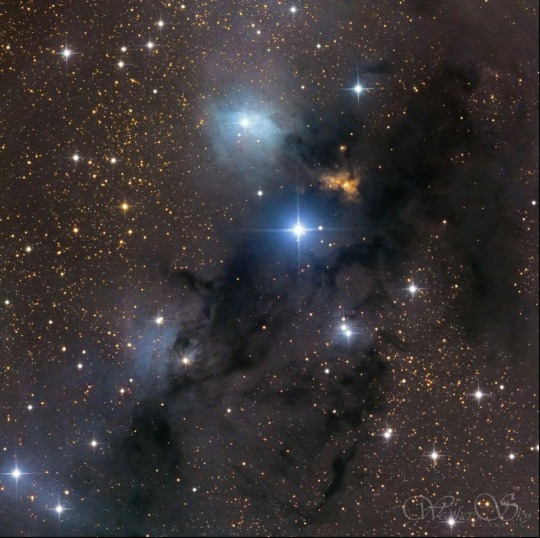
Dark and dusty VdB 123 in the constellation Serpens.... on the North side of the Milky Way galactic centre. It will be in a better position to image in the summer months when it's higher in the sky at a reasonable time in the night. Add this one to your target list and give it a try!! This is a collaboration with Paul Mortfield www.backyardastronomer.com who acquired the data. I processed it. Hope u like it 🥰 Details: 360 min Luminance, 90min each RGB, total 10.5hours of data. RCOS 16” f/8.9, Apogee U16M, Astrodon Gen2 filters. MaximDL v5 and PS CS4. Sierra Remote Observatories, California. ________________________ #weatherandskyphotography #astronomy #astrophotography #universetoday #deepsky #deepspace #outerspace #astrophoto #nightsky #nightscaper #starphotography #starscape #longexpo_addiction #natgeospace #starrynight #milkywaychasers #longexposure #astro_photography #milkyway #nebula #stars #telescopic #amazing #longexposureshots #photooftheday #nightphotography #moodygrams #splendid_shotz #spacetravel https://www.instagram.com/p/B_caMZLJUP8/?igshid=u67o37t2y5c9
#weatherandskyphotography#astronomy#astrophotography#universetoday#deepsky#deepspace#outerspace#astrophoto#nightsky#nightscaper#starphotography#starscape#longexpo_addiction#natgeospace#starrynight#milkywaychasers#longexposure#astro_photography#milkyway#nebula#stars#telescopic#amazing#longexposureshots#photooftheday#nightphotography#moodygrams#splendid_shotz#spacetravel
0 notes
Video
M13_LRGB_AIP by Alvaro Ibañez Perez (@kokehtz) Via Flickr: Telescopio: Takahashi FSQ106EDX Montura: Takahashi EM400 Temma2 Cámara: CCD Atik 460EX mono + Baader LRGB + IDAS LPS + SX Filter Wheel Guiado: Lunático EZG-60 + SXLodestar Enfoque: RoboFocus + AstroMatic (ftorrev) Adquisición: MaximDL + AstroMatic (ftorrev) Procesado y apilado: PixInsight + PS Intelli PowerBox (Pegasus Astro) L: 120x60s bin1 (-10ºC) RGB: 30x60s bin2 (-10ºC) PIOZ, GUADALAJARA, ESPAÑA (06/05/2017)
30 notes
·
View notes
Photo
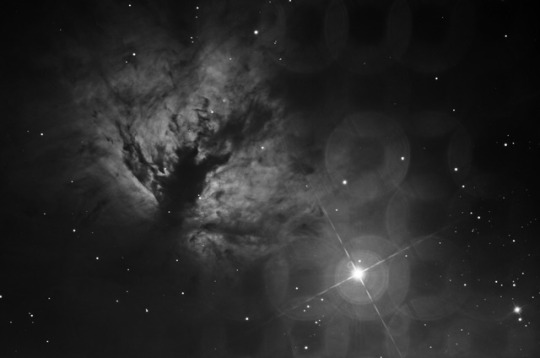
NGC2024 The Flame Nebula
Image Information
The Flame Nebula, designated as NGC 2024 and Sh2-277, is an emission nebula in the constellation Orion. It is about 900 to 1,500 light-years away.
The bright star Alnitak (ζ Ori), the easternmost star in the Belt of Orion, shines energetic ultraviolet light into the Flame and this knocks electrons away from the great clouds of hydrogen gas that reside there. Much of the glow results when the electrons and ionized hydrogen recombine. Additional dark gas and dust lies in front of the bright part of the nebula and this is what causes the dark network that appears in the center of the glowing gas. The Flame Nebula is part of the Orion Molecular Cloud Complex, a star-forming region that includes the famous Horsehead Nebula.
These images consists of images all taken at -20°C at bin 1x1 for 30 minutes each. A total of 21 Hydrogen Alpha images were used. All images used totaled 10.5 hours. All data was acquired using MaxImDl/CCD version 5.24 using ACP7. Pix Insight version 1.8 was used for processing Dithered guiding was on.
Equipment and Location Information
Dogwood Ridge Observatory
Optics
Optical Guidance Systems 12.5" RC @f/9
Mount
Astro Physics AP1200GTO
0 notes
Text

Saturn
This is an image of Saturn I edited in class using GIMP. This was my third and final image edit for the class and was one of the three images I presented at StARS on April 24th. When I was choosing my third image to edit, I wanted to do something completely different from what I had done before. Having done the Crab and Flame Nebulas, I thought a planet would be the perfect thing to edit. When I needed to choose which planet to edit, I had originally chosen Jupiter, but when I went into the data base for images, there was a problem with some of them. This led me to check my second choice, Saturn. When I checked, there had been over 200 different images for each of the luminance, red, green, and blue layers, as well as an already calibrated image for each. With each having the calibrated image already, I was able to skip the MaximDL process and start directly with GIMP. When I got to GIMP and began to brighten the images using the levels and curves tools, I realized that each layer was unaligned by a very large amount, which led me to realign all the layers next. After that was done, I went on to colorize the red, green, and blue layers, as well as set the three to screen mode while setting the luminance layer to luminance mode. After, I began to mess with the curves and levels tools again to adjust the brightness of each layer. In the end, I was able to pull out a yellowish color, with a red ring on the outside. The end product was exactly what I was looking for, as I wanted to be able to make Saturn a yellowish color, as that's how it is in real life.
Saturn is the sixth planet in our solar system and is also the second largest behind only Jupiter. Being sixth from the sun, it takes 29 Earth years for Saturn to orbit the sun. The planet is surrounded by icy rings and is also the only planet to have rings in the entire solar system. Saturn has an atmosphere, which is made up of hydrogen and helium. Saturn has been known for centuries, dating back to ancient times, and is the farthest planet from Earth discovered by the naked eye. Saturn has had a huge showing in pop culture, being viewed as the most iconic planet in our solar system. The planet has been featured in several different shows, movies, and video games, including "WALL-E," "2001: A Space Odyssey," and "Star Trek."
Saturn - NASA Science
0 notes
Video
recorte renacuajos by Alvaro Ibañez Perez (@kokehtz) Via Flickr: Telescopio: Takahashi FSQ106EDX (f/3,6) Montura: Takahashi EM400 Temma2 Cámara: CCD Atik 460EX mono + Baader Ha 7nm Guiado: Lunático EZG-60 + SXLodestar Enfoque: RoboFocus + AstroMatic (ftorrev) Adquisición: MaximDL + AstroMatic (ftorrev) Procesado y apilado: PixInsight + PS Intelli PowerBox (Pegasus Astro) L: 32x600s bin1 (-10ºC) DAGANZO DE ARRIBA, MADRID (10/03/2017) PIOZ, GUADALAJARA (18/03/2017)
15 notes
·
View notes
Photo
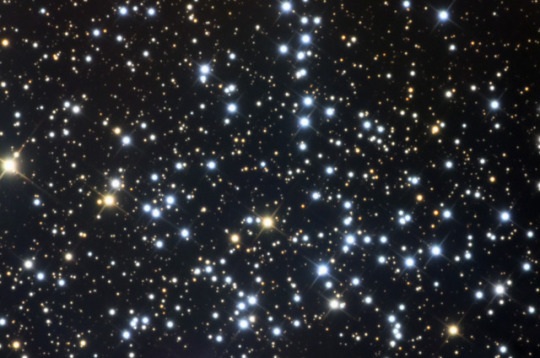
M38 - Open Cluster Image Information Quoted from SEDS: Discovered by Giovanni Batista Hodierna before 1654. Messier 38 (M38, NGC 1912) is one of the three Messier open clusters in the southern part of constellation Auriga. Lying only 2.5 degree northwest (preceding) of M36, this cluster was silently discovered by Hodierna before 1654, and independently found by Le Gentil in 1749. Charles Messier included it in his catalog on September 25, 1764. Its brightest stars form a pattern resembling the Greek letter Pi, or (according to Webb) an "oblique cross". At its distance of 4,200 light years, its angular diameter of about 20' corresponds to about 25 light years, similar to that of its more distant neighbor M37. It is of intermediate age (about 220 million years according to the Sky Catalog 2000) and contains a yellow giant of mag 7.9 and spectral type G0 as its brightest member - this corresponds to an absolute magnitude of -1.5, or a luminosity of 900 suns. For comparison, the Sun would appear as faint as only mag 15.3 from the distance of M38 ! This image is compiled from 8 - 15 minute R, G, & B images and 11-15 minute luminance. A total of 8.75 hours of data was used for this image. All data was acquired using MaxImDl/CCD version 5 using ACP. Images were reduced, De-Bloomed, average combined and saved in MaxImDl version 5. Alignment was done using Registar. The master images were combined, registered and the color image created.
0 notes
Photo
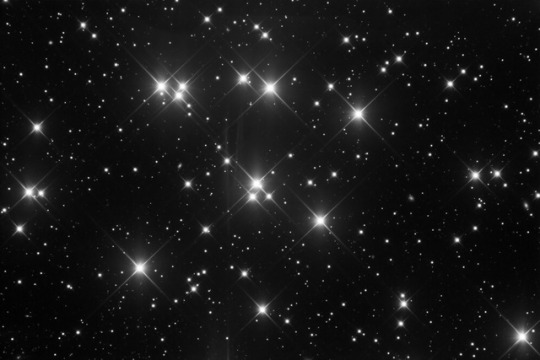
M44 - The Beehive Cluster (Praesepe) Image Information Quoted from SEDS: Known to Aratos 260 B.C. This famous cluster, Messier 44 (M44, NGC 2632), is also called Praesepe (Latin for "manger"), or the Beehive cluster. It is also one of the objects easily visible to the naked eye, and thus known since prehistoric times. Some ancient lore is associated with it: Greeks and Romans saw this "nebula" as the manger (Greek: Phatne) associated with two asses who eat from it, Asellus Borealis, the Northern Ass (Gamma Cnc; Spectral type A1 V, mag 4.7, distance 155 ly) and Asellus Australis, the Southern Ass (Delta Cnc; Spectrum K0 III, mag 3.9, distance 155 ly). Erathosthenes reported that these were the asses on which the gods Dionysos and Silenus rode into the battle against the Titans, who were frightened by the animals' braying so that the gods won. As a reward, the asses were put in sky together with Phatne. Aratos (260 B.C.) mentioned this object as "Little Mist", Hipparchus (130 B.C.) included this object in his star catalog and called it "Little Cloud" or "Cloudy Star." Ptolemy mentions it as one of seven "nebulae" he noted in his Almagest, and describes it as "The Nebulous Mass in the Breast (of Cancer)". According to Burnham, it appeared on Johann Bayer's chart (about 1600 A.D.) as "Nubilum" ("Cloudy" Object). This image is compiled from 17 - 15 minute non-filtered images. A total of 4.25 hours of data was used. All data was acquired using MaxImDl/CCD version 5 using ACP.
1 note
·
View note