#Linux iso usb maker
Explore tagged Tumblr posts
Visit Tumblr Blog
Explore Tumblr blogs with no restrictions, modern design and the best experience.
Last Seen Tumblr Blogs


Fun Fact
Tumblr is available in 18 languages.
Text
MX Linux review
I've used my old secondary computer to distrohop and try out various Linux distributions. And I've recently tried out MX Linux. It is Debian-based, one of my favourite things, and its flagship desktop environment is Xfce, another of my favourite things. I'm currently running Debian with Xfce on my main machine, which provides a good point of comparison.
I have used Antix, which is a closely related distro, with developers working on both. MX is a more fully-featured distro, a self-described "middle-weight" rather than lightweight. The gist of the history is that Antix was originally based on a distro called MEPIS, and when development on that distro died, the Antix community got together with the Mepis community to create a continuation, which is MX.
So what does MX add that is not in vanilla Debian with Xfce? Quite a lot actually, that makes the whole experience a lot more user friendly. The main thing is the MX tools, a set of GUI-based tools that does a ton of useful stuff. The most important IMO is a package manager with update notifications that handles flatpaks in addition to .deb based packages. On Debian, I have to use synaptic to manage .debs, install and update flatpaks entirely via command line, and remember to check for updates myself. Like I know how to do that, but can't argue with something that makes things easier.
One of the more interesting tools is a boot options manager, which enables you to configure boot options from within a booted-up system. This enables you to choose init systems between sisvinit and systemd. Systemd is not enabled by default, the default is sivinit, but it is included in order to run programs that require it. And with the boot options, you can set MX to use systemd as the default. Now systemd is controversial and there are other distros that are systemd-free versions of popular distros, like artix for arch, and devuan for debian. And MX Linux provides a good compromise in the debate by allowing you to choose the init system quite easily.
There are other mx tools, like a multimedia codec installer, a gpg key fixer, and a live usb boot maker that enables you to clone a running system, and make an iso of it, to transfer it to another computer.
MX also does other useful things, like backporting newer versions of Firefox, Thunderbird, and Libreoffice than what Debian provides. And flatpak is enabled by default.
The distro's documentation is excellent too. The user manual is excellent, providing information on how to use MX Linux and how it works, but also on Linux in general works and how to migrate from a proprietary OS.
All in all, MX Linux is a solid derivative distro. It adds features and options to its Debian base without breaking things in the process. And it's entirely community-run, no corporate bullshit like with Canonical. One of the devs even has "anticapitalista" as a handle.
#my writings#mx linux#linux#debian#xfce#welcome to another installment of ''lena rambles about linux''
18 notes
·
View notes
Text
Linux iso usb maker

So instead I propose # dd count= if=/dev/sdb of=win7.img Note, this copies the whole device! - which is usually (much) bigger than the files copied to it. Check the boot checkbox, then close.Īfter all that, you probably want to back up your USB media for further installations and get rid of the ISO file. Open gparted, select the USB drive, right-click on the file system, then click on "Manage Flags". or use the standard GUI file-browser of your systemĬall sync to make sure all files are written. Mount ISO and USB media: # mount -o loop win7.iso /mnt/iso
or (if syslinux is installed), you can run sudo dd if=/usr/lib/syslinux/mbr/mbr.bin of=/dev/sdb.
on newer Ubuntu installs) sudo lilo -M /dev/sdb mbr ( info) Write Windows 7 MBR on the USB stick (also works for windows 8), multiple options here: # cfdisk /dev/sdb or fdisk /dev/sdb (partition type 7, and bootable flag) Delete all partitions, create a new one taking up all the space, set type to NTFS (7), and remember to set it bootable: Grub is installed there!)Ĭheck what device your USB media is assigned - here we will assume it is /dev/sdb. Or alternatively, make sure lilo is installed (but do not run the liloconfig step on your local box if e.g. Install ms-sys - if it is not in your repositories, get it here. This works with the Windows 7 retail version. Basically, the missing step was to write a proper boot sector to the USB stick, which can be done from Linux with ms-sys or lilo -M. Use of livecd-iso-to-disk on any distribution other than Fedora is unsupported and not expected to work: please use an alternative method, such as Fedora Media Writer.OK, after unsuccessfully trying all methods mentioned here, I finally got it working. Even if it happens to run and write a stick apparently successfully from some other distribution, the stick may well fail to boot. Livecd-iso-to-disk is not meant to be run from a non-Fedora system. livecd-iso-to-disk on other Linux distributions If your test boot reports a corrupted boot sector, or you get the message MBR appears to be blank., you need to install or reset the master boot record (MBR), by passing -reset-mbr when writing the stick. If you get this message from fdisk, you may need to reformat the flash drive when writing the image, by passing -format when writing the stick. Partition has different physical/logical endings If you get the message Need to have a filesystem label or UUID for your USB device, you need to label the partition: dosfslabel /dev/sdX LIVE. Information: Don't forget to update /etc/fstab, if necessary.

Number Start End Size Type File system Flagsġ 32.3kB 1062MB 1062MB primary fat16 boot Sector size (logical/physical): 512B/512B Welcome to GNU Parted! Type 'help' to view a list of commands.
Difference between Fedora and Red Hat Enterprise Linux.
Installing, Configuring and Troubleshooting MySql/MariaDB.
Creating Windows virtual machines using virtIO drivers.
Installing virtual operating systems with GNOME Boxes.
Getting started with virtualization (libvirt).
Upgrading Fedora using the DNF system upgrade.
How to Set NVIDIA as Primary GPU on Optimus-based Laptops.
How to join an Active Directory or FreeIPA domain.
Getting started with Apache HTTP Server.
Managing keyboard shortcuts for running an application in GNOME.
Controlling network traffic with firewalld.
Displaying a user prompt on the GNOME login screen.
Understanding and administering systemd.
Performing administration tasks using sudo.
Configuring networking with NetworkManager CLI (nmcli).
Disabling the GNOME automatic screen locking.
Setting a key shortcut to run an application in GNOME.
Configuring Xorg as the default GNOME session.
Configuring X Window System using the nf file.
Installing Chromium or Google Chrome browsers.
Installing plugins for playing movies and music.
APT command equivalents on Fedora with DNF.
Securing the system by keeping it up-to-date.
Adding or removing software repositories in Fedora.
Finding and installing Linux applications.

Creating and using a live installation image.
0 notes
Text
Usb Burning Tool Download Windows
You can use installation media (a USB flash drive or DVD) to install a new copy of Windows, perform a clean installation, or reinstall Windows 10.
To create installation media, go to the software download website, where you'll find step-by-step instructions. On that website, you can select a version of Windows and create your own installation media using either a USB flash drive or a DVD. To go directly to one of the versions, select one of these links:
Download the latest Amlogic burning tool. Extract the files downloaded to your PC. Click on the InstallDriver.exe from the located folder. Allow the tool to install. Click on the USBBurningTool.exe. Access the language to change it (English) Connect the device in the recovery mode to your PC. UNetbootin allows you to create bootable Live USB drives for Ubuntu, Fedora, and other Linux distributions without burning a CD. It runs on Windows, Linux, and Mac OS X. From the makers of UNetbootin: HabitLab, a tool to help you waste less time online (for Chrome).
Windows 10 (Then select Download tool now.)
Important: Back up your files before you install or reinstall Windows on your PC. Learn how for Windows 10 or for Windows 7 and Windows 8.1.
To create the installation media, here's what you'll need:
Download Windows 7 Dvd Usb Burning Tool
A PC with a reliable internet connection. The download time will vary, depending on your internet connection.
A USB flash drive or DVD. A blank USB flash drive with at least 8 GB of space, or a blank DVD (and DVD burner). We recommend using a blank USB or blank DVD because any content on it will be deleted. When burning a DVD from an ISO file, if you're told the disc image file is too large, you'll need to use dual layer (DL) DVD media.
A product key. Your 25-character product key (not required for digital licenses). For help finding it, go to Find your Windows product key.

After you've created the installation media, you can reset or reinstall Windows. To learn more, go to Recovery options in Windows 10.
Download Usb Burning Tool Windows
Platform: Windows. Architecture: 32 bit and 64 bit. Here are some features of the Amlogic USB Burning Tool: Helps you to Flash or installs Stock Firmware (ROM). Supports devices running on the Amlogic Chipset. Comes with multiple configuration options, i.e. Erase Flash, Erase Bootloader, Reset After Success, Overwrite Key.
A cross-platform tool to flash OS images onto SD cards and USB drives safely and easily. Free and open source for makers around the world. A better way to burn.
0 notes
Text
Free Iso Creator Mac
With a bootable Ubuntu USB stick, you can:
Free Bootable Iso Creator For Mac
Mac Iso Burner To Usb
Iso Maker For Mac
Iso Creator For Mac


Free Bootable Iso Creator For Mac
Create a bootable ISO image. Windows Bootable ISO Creator allows you to select the operating system type, enter a CD/DVD label, provide the folder location where the OS setup files are stored,. ISOburn™ 2.0.0 Free. ISOburn can directly write your ISO image file to CD-R,CD-RW, DVD-R, DVD-RW, DVD+R, DVD+RW,HD DVD and Blu-ray Disc, compatible with the ISO 9660 standard, it write any data, support bootable image file. The title 'ISO' is taken from the ISO 9660 file system utilized with CD-ROM media. Let you create archive or self-extracting archives. Compatible with Windows 10/8/7, Mac OS X and Linux. See How to Zip and Unzip Files on Mac. Top 3: ISO Opener. Key features: 1. Free ISO file opener and extractor. Get all files and folders from disc image files directly. Access the contents of ISO image files without paying a penny. Want to know about the best free ISO burners for Windows and Mac computers? You're at the right place. This article introduces 12 most helpful free ISO burners for you, and it also introduces Wondershare DVD Creator, the all-in-one ISO burner, to help you finish the task in easy steps. Plug the bootable installer into a Mac that is connected to the internet and compatible with the version of macOS you're installing. Turn on your Mac and continue to hold the power button until you see the startup options window, which shows your bootable volumes. Select the volume containing the bootable installer, then click Continue.
Install or upgrade Ubuntu, even on a Mac
Test out the Ubuntu desktop experience without touching your PC configuration
Boot into Ubuntu on a borrowed machine or from an internet cafe
Use tools installed by default on the USB stick to repair or fix a broken configuration

Mac Iso Burner To Usb
Creating a bootable USB stick is very simple, especially if you’re going to use the USB stick with a generic Windows or Linux PC. We’re going to cover the process in the next few steps.
Iso Maker For Mac
Apple hardware considerations
Iso Creator For Mac
There are a few additional considerations when booting the USB stick on Apple hardware. This is because Apple’s ‘Startup Manager’, summoned by holding the Option/alt (⌥) key when booting, won’t detect the USB stick without a specific partition table and layout. We’ll cover this in a later step.
1 note
·
View note
Text
Wintoflash Mac Os

If a user wanted to install the operating system on his computer or create a rescue diskette for it a few years ago, he would burn the operating system to CD / DVD. In order to create a bootable pendrive for installing the operating system on our computer, we have to burn the operating system to CD / DVD. So in this article we are going to talk about the best bootable USB maker.
Mac Os Mojave
Wintoflash Mac Os Installer
Wintoflash Mac Os Mac
Wintoflash Mac Os High Sierra
Wintoflash Mac Os Mac
Mac Os Mojave
Best USB Maker Tools for Windows and Mac
Mac OS: Freeware Download Novicorp Wintoflash Free. Order By: Title Data Added Price File Size Downloads. All Freeware Records 1-10; A free Online Service 1.0. Date: May 01, 2013 Advertisement. Feb 20, 2019 WinToFlash is an extremely useful tool that lets you easily transfer your Windows setup from a CD/ DVD to a removable flash drive in no time! WinToFlash currently supports Windows XP, 2003, Vista, 2008 and 7. Also you can transfer the OS setup to practically any removable drive such as USB sticks, flash cards, external HDDs and others.
1. Rufus
Firstly Rufus is simple and easy to use. It automatically detects your USB flash drive and capacity so that you can easily identify which device you are formatting. A bootable USB drive can be built for new hardware or legacy BIOS supporting UEFI. You only have to select the appropriate options from the list.
2. RMPrep USB
It is all in one tool. Features come with a cluttered interface. If you want a simple bootable USB to install a new operating system, I personally do not recommend it.
RMPrep UBS specialized in creating multiple partitions on a single USB drive. You can install multiple ISOs of different OSs or save user files along the edge of a bootable USB.
The special feature of this USB is that we can create partitions easily so that you can so in hard-drive so that you can make it easily accessible to save the files as well as a separate folder for storing files. Uses the same drive.
It keeps your files separate from operating system files.
For advanced users. difficult to use.
Create ISO from USB drive.
Edit the hard drive grub .
Test speed of USB drive.
Support all OSs.
3. Universal USB Installer
Special tools for creating a bootable live Linux OS. It has a predefined list of most Linux distributions available. Route the ISO image and USB flash drive you want to boot from. Create a live antivirus rescue disk using it. A special option for this is also given for reuse of CDs.
+ Special menu for Linux, also supports Window 7
4. YUMI
Yumi, short for your universal multiboot installer. This software allows you to create a bootable USB drive in a format of more than one operating system in a USB drive.
YUMI has a large collection of free OSs based on Linux and other free OS projects. Just choose what you want and YUMI will give you a direct download link for it. Its appearance is quite more attractive and easily hand able.
5. U-Netbootin
This device is an exact clone of the Universal USB installer or you can also say that the Universal USB installer is a clone of UNetbootin.
Create a bootable USB for any Linux distribution.
Wintoflash Mac Os Installer
The best option is to use UNetbootin if you are not using Windows OS .It is available for Linux, iOS and Windows.

most of the software listed here will not run where U-Netbootin comes in to help. Whenever you are using LINUX Myanmar mn font download for mac.
6. Linux Live USB Creator (LiLi)

LiLi is another software used to create a bootable USB. A special feature called built-in globalization allows users to run the installed Linux operating system without restarting Windows which is a distinctive feature of Lily.If you are only concerned about Linux then you should go for it.
7. Win Setup from USB
It is also a tool for those who want to install multiple operating systems on one USB device. With Win Setup USB you can use any recommended windows windows 7, XP or anyone which you want.it is necessary you will be presented with a list of operating systems installed on the thumb drive whenever you are preparing to install USB drive and then select the preferred operating system to boot. Although the interface is simple, non-specialist users may find it difficult to use.
8. X-Boot
This is more than just a bootable USB manufacturer. You can create a rescue CD or a disk that contains many operating systems or tools such as antivirus rescue CDs.
It combines many tools in the ISO image and is more useful than just USB-making tools. X Boot can create ISO images from files and then write these files to a USB drive for booting or installation.
9. Windows Bootable Image Maker
It is a simple and ultra-small device that does its job as you expect. WBIM has a super-simple interface and minimal buttons to avoid confusion for new users. It is a tool of Ask VG.
There are only basic buttons and only one function to do. Simply create a bootable USB drive to install or try out the new operating system. you will be very surprised by the weight and how small this software is. It is just 160KB in size.
Related – Best Rainmeter Skins for Windows 10, 8, 7.
Other Equipment
➤ Novicorp Wintoflash is also a tool that will help you recover a deleted bootloader besides creating a boot flash drive.
➤ Etcher is an excellent tool for Mac OS users

Wintoflash Mac Os Mac
The Windows Official USB Creation Tool is an official tool for creating bootable USB drives to install downloaded Windows 7 and Windows 8 ISO images without burning a traditional disk.
Wintoflash Mac Os High Sierra
MB Flash Boot is a bit tool, which is about 24 MB in download size. It has more options than any other device, but is actually a paid device, but anyone can use it for free.
Wintoflash Mac Os Mac
Ahnlabs v3 windows 10. If you have a related query or any other problem feel free to ask us in the comment section.
0 notes
Text
Clone For Mac Os

Carbon Copy Cloner requires macOS. CCC will not run on Windows.
Carbon Copy Cloner 5 is the latest version available. Users running Yosemite (10.10), El Capitan (10.11), Sierra (10.12), High Sierra (10.13), Mojave (10.14), or Catalina (10.15) should use this version of CCC. If you are having trouble downloading CCC from the link above, try this alternate download location.
Clonezilla is open source and free to use, plus clones 40+ PC simultaneously, and works on Win, Mac and Linux. Easy & secure backup, cloning, recovery to/from local, cloud, network, external or USB drives. Cloning a Mac hard drive to SSD or another HDD is simpler than on Windows. Primarily, you need to connect a new storage device to your Mac using a SATA interface cable. There are a few ways of cloning your storage drive on a Mac. You can either use Disk Utilities or other cloning software for Mac alternatively as well. A Macintosh clone is a computer running the Mac OS operating system that was not produced by Apple Inc. The earliest Mac clones were based on emulators and reverse-engineered Macintosh ROMs. During Apple's short lived Mac OS 7 licensing program authorized Mac clone makers were able to either purchase 100% compatible motherboards or build their.
Upgrading from CCC 4? CCC 5 is a paid upgrade. CCC 4 Personal and Household licenses purchased prior to May 22, 2017 are eligible for upgrade pricing. When you open CCC 5, it will automatically retrieve your new license or an upgrade coupon that you can use to purchase CCC 5 at 50% off. CCC 4 licenses purchased on or after May 22, 2017 are eligible for a free CCC 5 upgrade license.
CCC 5: Support for macOS 10.15 Catalina
CCC 5.1.10 (and later) is qualified for macOS 10.15 Catalina. Open CCC and choose 'Check for updates...' from the Carbon Copy Cloner to get the update, or click the 'Download CCC 5' button above.
CCC 5 (beta): Beta testing on macOS 10.16 Big Sur
Are you beta-testing Apple's new macOS 10.16 Big Sur? Help us test CCC 5 against macOS Big Sur by joining our beta program.
Please choose Ask a Question from CCC's Help menu to let us know if you encounter any problems or have questions about support for new features of that OS.
CCC v5 Beta Release Notes.
Carbon Copy Cloner 4.1.24 is compatible with Mountain Lion (10.8), Mavericks (10.9), Yosemite (10.10), El Capitan(10.11), Sierra (10.12) and High Sierra (10.13). Note that while this version of CCC may work on El Capitan and newer OSes, we recommend that El Capitan+ users upgrade to CCC 5. We offer technical support for CCC 4, but we are no longer actively developing it. If you are having trouble downloading CCC from the link above, try this alternate download location.
CCC 4 and Mojave+: CCC 4 is qualified up to macOS High Sierra. CCC 4 license holders are welcome to continue using CCC 4 on later OSes with the understanding that this is an untested and unsupported configuration. CCC 5 is fully qualified on macOS Mojave and offers extensive support for APFS, including support for point-in-time restores via APFS filesystem snapshots.
Unsupported Versions
Download CCC 3.5.7 for use on Snow Leopard (10.6) and Lion (10.7). Download CCC 3.4.7 for use on Tiger (10.4) and Leopard (10.5). CCC 3.4.7 and 3.5.7 are provided as-is; we regret that we cannot offer any support for the installation or use of these older versions of CCC.
/PowerMyMac /Guide on How to Clone Mac Hard Drive to SSD
When it comes to the cloning topic, what do you expect from the process? If you are planning to clone Mac hard drive to SSD, let us take a close look at what is the cloning process all about. Generally, it is recommended to clone the hard drive of your Mac in case you decide to upgrade the hard drive with a solid state drive (SSD), replace an old or corrupted drive with a new one or if you are going to create a bootable hard drive.
In most cases, all these demands can be achieved with the help of cloning. Essentially, when you clone the hard drive, you will no longer worry about reinstalling the operating system as well as transfer folders, files, applications and some configurations on the new hard disk. Another advantage with the cloning process is that if you have a duplicate hard drive with setup volume, it can aid in booting your Mac easily in case of unexpected disasters.
Article GuideWhat are solid state drives (SSDs)?How to clone Mac hard drive to SSDShould I backup or clone?Let's wrap it up
What are solid state drives (SSDs)?
Before you decide to clone Mac hard drive to SSD, let us take a close look at SSDs. Solid state drives or SSDs utilize flash memory to keep data. If built into a computer, they are usually seen as chips on the circuit board. You can also find them in 2.5” format that you can install in a laptop or an external enclosure.
Generally, SSDs are quiet, compact and fast, especially if you are starting up a computer or waking up the device. Remember that hard disks might go into sleep mode when not used for a certain span of time and takes a few seconds to spin up. SSDs also utilize less power, run cooler, lighter and do not have any movable parts which make them suitable for laptops.
When you accidentally drop your laptop when the hard drive is spinning, there is a likelihood for the drive to be damaged and lose data. SSDs are generally more dependable, and in case they fail, you can still read data whereas you cannot do this with a hard disk.
Nevertheless, SSDs are considered as a costly option if you are considering the cost to storage ratio. At present, you can purchase an 8TB external drive for less than $150 while that same amount of money will only provide you with a 500GB SSD.
People Also Read:How to Partition A Hard Drive on Mac?How to upgrade your MacBook Pro with an SSD?
How to clone Mac hard drive to SSD
Clone Mac Os Disk
There are several reasons why it is best to boot from an external hard drive. In case you prefer to keep your files synchronized from a desktop and laptop, enlarge your storage or have an on-hand bootable backup duplicate of your system, there is an unseen feature in Disk Utility that makes the process an easy task.
Clone Mac Os Drive
Essentially, booting from an external hard drive is usually slower, even if you are using the latest Thunderbolt or the USB-C drives. They are relatively sluggish than the solid state drives (SSDs) that are found in most of the latest Macs. Although this is not suggested for daily use, it is a possible option.
Using Disk Utility
If you are going to clone Mac hard drive to SSD, it is recommended to use Disk Utility.Simply open Disk Utility from the Spotlight (Command+Space) or on the Utility folder in your applications. You will be presented with a list of all the volumes including the internal hard drive and the external hard drive.
It is important to note that the “Restore” option in Disk Utility will work by copying the files from the backup to your core drive. It is ideally intended to the utilized for Recovery mode to reinstate the hard drive in case a failure occurs.
Once you decide to set your external drive as the restore target, you can switch that action around and copy files from the main drive to the backup. Choose your external drive in the sidebar, tap on the “Restore” button in the menu and select your main drive as the “Restore From” option. You have the option to choose an ISO image, but it does not have much use.
Tap on the “Restore” button and Disk Utility will initiate the copying process. In most cases, the process is relatively a long one which is based on the speediness of your external drive as well as its link to your Mac. Due to this, it is recommended to have a rapid hard drive with USB-C, Thunderbolt or USB 3.0 connections.
Once Disk Utility completes the task, you can turn off your Mac and press on the Option when it starts to restart again. You will be presented with the boot switcher and you are allowed to boot from the external hard drive. You can utilize your Mac as usual but remember that it is separate from the installation on the main internal hard drive. Take note that any settings that you alter or files that are saved there will not be reflected on the primary installation.
Clone Mac Os
You can perform the same process in a reverse manner if there is a need to copy the files back over or to restore the backup in case your computer malfunctions.
Should I backup or clone?
Generally, hard disks can be backed up or cloned. Remember that there are differences between the two with their own advantages and drawbacks.
Backing up a hard drive
If you are going to back up a hard drive, the entire content of the chosen drive or partition is backed up into a file on the targeted location. All data is saved into a single file. When a complete backup of the hard drive is carried out, the whole operating system along with the installed applications and settings are also set aside. The file can be protected or encrypted with a password.
The advantage of this approach is no other than simple management since a single file contains the whole backup. You can also compress the backup file so that it utilizes less space.
As for a drawback, you need a backup software to be able to reinstate the system or data to a previous state or to access documents and files.
Cloning the hard drive
If you are going to duplicate or clone Mac hard drive to SSD, a copy of the drive is created directly on the target location. This simply means that you have an instant copy including the hard disk structure. A cloned disk or drive includes all the partitions from the source drive or disk.
An advantage with cloning is that the data is directly copied to the specified location and can be utilized and edited directly. The duplicated system drive which includes the operating system can be mounted as a fresh drive and booted right away.
As for the drawbacks, a clone requires more space since the partitions are created immediately on the targeted disk. Due to this, it is not likely to compress or add encryption to the data.
Let's wrap it up
If there is a need for a backup to be created regularly, it is recommended to opt for the hard drive backup. This usually takes up less space and allows the creation of extra backups.
In case you require a bootable extra drive to be operational after an unforeseen crash and to lessen the downtime period, it is best to clone Mac hard drive to SSD.
Generally, both methods have been proven to be the ideal choice. A consistent drive backup for daily data along with a clone of the system drive is essential for easy accessibility in case of emergencies.
ExcellentThanks for your rating.
Rating: 4.6 / 5 (based on 84 ratings)
People Also Read:
PowerMyMac
Clone Mac Os Mojave To Ssd
A powerful all-in-one App for Mac
How To Clone Macos Catalina
Free Download
Mac Os Clone Hard Drive
Comment ()
The most powerful and useful 16-in-1 Mac Software in 2019
Free Download
0 notes
Link
You need to flash a BIOS or other firmware from DOS. You want to run a low-level utility. Despite its small size, Rufus provides everything you need! Oh, and Rufus is fast. For instance, it’s about twice as fast as UNetbootin, Universal USB Installer or Windows 7 USB download tool, on the creation of a Windows 7 USB installation drive from an ISO. It is also marginally faster on the creation of Linux bootable USB from ISOs. A nonexhaustive list of Rufus supported ISOs is also provided at the bottom of this page. Rufus is a free and open-source portable application for Microsoft Windows that can be used to format and create bootable USB flash drives or Live USBs. It is developed by Pete Batard of Akeo Consulting. Rufus was originally designed as a modern open source replacement for the HP USB Disk Storage Format Tool for Windows, which was primarily used to create DOS bootable USB flash drives. The first official release of Rufus, version 1.0.3 (earlier versions were internal/alpha only, was released on December 11, 2011, with originally only MS-DOS support. Version 1.0.4 introduced Free DOS support and version 1.1.0 introduced ISO image support. Until 1.2.0, two separate versions were provided, with one for MS-DOS and one for FreeDOS. UEFI boot support was introduced with version 1.3.2, localization with 1.4.0 and Windows To Go with 2.0. The last version compatible with Windows XP and Vista is 2.18.x Rufus supports a variety of bootable .iso files, including various Linux distributions and Windows installation .iso files, as well as raw disk image files (including compressed ones). If needed, it will install a bootloader such as SYSLINUX or GRUB onto the flash drive to render it bootable. It also allows the installation of MS-DOS or FreeDOS onto a flash drive as well as the creation of Windows To Go bootable media. It supports formatting flash drives as FAT, FAT32, NTFS, exFAT, UDF or ReFS filesystems. Rufus can also be used to compute the MD5, SHA-1 and SHA-256 hashes of the currently selected image.
0 notes
Text
This $200 Laptop Is Like a Chromebook You Can Hack
A version of this post originally appeared on Tedium, a twice-weekly newsletter that hunts for the end of the long tail.
For some reason, despite the fact that our devices can seemingly do anything with an impressive level of polish, there are folks who want to learn from the tech they use.
They want a challenge—and an adventure. I think I’ve learned over the last year or two that I’m one of those people. I primarily like using Hackintoshes despite the fact that the machines are intended for Windows, and I will mess with old pieces of computing history just to see if they uncover new ways of thinking about things.
So when I heard about the Pinebook Pro, I was in. Here was a laptop built on the same ARM architecture primarily used for smartphones and internet-of-things devices, and designed to run Linux. Is it for everyone?
Maybe not. But, if you love an adventure, you should be excited about what it represents.
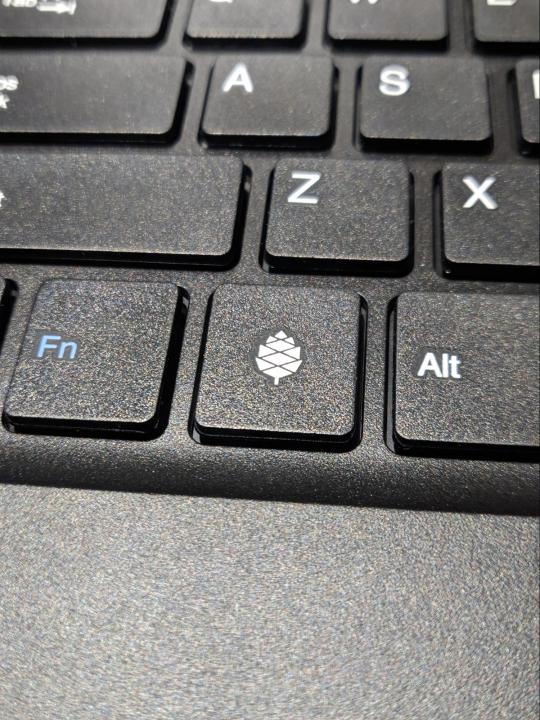
The only logo you’ll find on this entire device. Image: Ernie Smith
The Pinebook Pro’s hardware does the right things right—and cuts corners thoughtfully
Most companies want to scream out their brand name at you everywhere. Not Pine64, the community-focused maker of single-board computers that has done a lot of branching out in the past year or so.
On its latest laptop, literally nothing on the outside signifies that Pine64 was responsible for building this machine, minus a small pinecone logo on the key where most manufacturers might put a Windows logo.
If there’s a reason for that, it’s rooted in the community around this machine that drives the Pine64 project forward. In an interview from a couple of months ago, Pine64 community manager Lukasz Erecinski told me that the while certain hardware decisions were driven by developers in the space and people in the community.
“We listened and took note of the features the community truly wants, such as privacy switches for the camera, microphone and radios; modern IO interfaces; no excessive branding; end-user repairability, and we tried to deliver the best laptop we can,” he explained.
The delivery part is admittedly not easy for something like this. It took me about two months to get the device directly from Hong Kong, and the Wuhan coronavirus could cause delays for future units. Mine was one of the first units Pine64 produced that had a U.S.-centric ANSI keyboard; all of the devices released before the one I received this month used an Eurocentric ISO keyboard. The manufacturing process here is small, bespoke. Erecinski and the firm’s other main figures are moving carefully as they put these devices into the world.
You’re not buying this machine because you’re looking for something simple and cheap—it’s not like the original Pinebook, a $99 device that is basically a proof of concept that a community-built laptop is an actual thing that could exist. (Linus Tech Tips reviewed it last year, though again, it’s a proof of concept.) You could hit up eBay or your local Target for a cheap Chromebook if you wanted that, and skip out on the wait.
Rather, it’s a weekend-warrior machine, a product for people who think ARM is awesome, who think Linux is awesome, and who like the idea of developing on native hardware, or who want an actual keyboard, rather than a cheap tablet. (Side note: Pine64 is also working on a Linux-based tablet now. And a smartphone. And a smartwatch. Like I said, they’ve been busy.)
There’s a general understanding that, even if this device is only $200 plus shipping, people are doing to get more than $200 of use from it. From that front, I think they did a great job making the device feel nicer than the price point might suggest. The case, with its magnesium trims and plastic top case, wears its budget status thoughtfully. The decision to put metal on the outside, sandwiching a plastic interior, feels inspired, as it’s usually the opposite of what many Chromebook-makers do. It’s a great example of stretching a tight budget in a thoughtful way.
And that’s a common theme of the device, whose creators invested in things users would want (a relatively-beefy-for-budget ARM device, a 1080p matte screen, a useable keyboard, a USB-C port). Sure, corners were cut, but they were cut in places where it makes sense to trim, where the price tag makes them easy to explain away. A few examples:

The trackpad is tiny and plasticky, but perfectly usable. (Suggestion: Don’t click; tap.)
The outer case is a fingerprint magnet in a way most laptops are not, to the point where you wish they gave it an extra layer of coating. Fortunately, it’s also quite good for stickers, which I recommend you use for covering this thing.
And the speakers are cheap, in a bad way—but the Bluetooth works, as does the headphone jack. You don’t buy a device like this for the speakers.
You’re willing to forgive a lot because of the fact that this is a team of experimenters that was willing to put their necks out for a group of people that find a non-Intel-based laptop an awesome proposition. I mean, I certainly did.
It doesn’t come with much in the way of warranty—just a month—which is almost freeing in a way. You can break it, but you can also break it, if you get my drift. It’s not like you spent $2,500 on it.
And even amid the compromises, the device has a huge advantage over your average Chromebook in one important place: The ease of repair and modification. You can open this machine up and replace things. The default eMMC storage can be upgraded; you can get an adapter to install an NVMe SSD blade; and because the device has single-board computer roots, it’s not outside of the realm of imagination that you might be able to put another board inside of this machine in the future, while reusing most of the other parts. This is a $200 laptop with an upgrade path, and that’s a rare thing in 2020—especially for a low-stakes device like this.

There didn’t appear to be anywhere to screw in the NVMe adapter, so I just held it in place with that big yellow sticker. I’ll eventually switch to double-sided tape.
As a part of my research into this, I got a hold of an NVMe adapter (sold separately, delivered much quicker than the computer itself) and tried installing a drive myself. The results weren’t perfect: The adapter doesn’t seem to naturally fit anywhere, and a sticker, announcing changes to the device’s internal design, blocked the spot for the ribbon adapter. When I removed that sticker, I got the ribbon cable in, only to find that there is seemingly no easy way to fit in the adapter, which partly goes under the trackpad. It was just hanging out. Fortunately, I had the sticker to go where screws couldn’t. (I joked on Twitter that it’s a load-bearing sticker.)
There are things that one could quibble about with this design—the hinge could stand to go back a little bit further, for example, and backlit keys would definitely be useful—but I think that they pulled off a lot in an extremely tight budget.
The battery life on this is insane—8 to 10 hours easily. And because it doesn’t use a ton of power, it can charge off a cell phone’s power brick, as long as it uses USB-C (though a barrel plug charger is included). If you were backpacking across a continent and wanted the most lightweight and battery-packed device possible, the Pinebook Pro would be a contender.
There were some areas where the device buckled a bit in my testing. For example, while the device is technically capable of 4K video, plugging it into a USB-C adapter on my 4K monitor was a strugglefest. I’m sure that, if I keep tinkering or find a different cable, I can get it to work. Just like a lot of other things here.
Because honestly, that’s the point of this device.
“Our end-users are very well informed, usually technical and specifically want an ARM laptop.”
— Lukasz Erecinski, discussing the user base for Pine64 devices, which is often very community driven and in the open-source spirit.
Software considerations: Get ready to tinker
The first time you boot into your Pinebook Pro, you’re greeted with a red intro screen, complete with Pine64 logo (the same one on the keyboard), that says, “Open Sesame.”
That description feels pretty accurate. This is a device intended in many ways for discovery of the Linux ecosystem, its benefits and quirks, and what might or might not work out of the box. You don’t buy this because you want to save money that you’d otherwise use for a Chromebook; you buy it because you want to be able to screw around a bit.
By choosing an ARM-based device over x86, you’re cutting down your options for both operating systems and software, but there’s still plenty of stuff there. Most of the major browsers have ARM variants, most notably Chromium and Firefox, and I found the ARM version of Vivaldi quite nice. YouTube playback was perfectly serviceable, and I ran into very few situations where I couldn’t install an app because it had not been designed for ARM-based Linux. There’s reason to expect that situation to improve in the coming years, thanks to the rise of hobbyist computers like this.
So, what about the operating systems? I think this is where my viewpoint gets a little mixed. The default Debian-based build included, with a MATE-based graphical interface, is simple and spartan—not as polished as some of the x86-based alternatives, but still offering plenty to work with. It does the job. If you’re just looking for the machine to work, this is probably the default you’ll want to stick with.
Fortunately for those wanting more than that, trying other operating systems is very doable—with the included MicroSD slot, I was able to throw in different cards and try out numerous community builds that supported this device. With the exception of the Android build, I was able to get every one I tried to work with varying levels of stability.
Chromium OS worked decently for surfing the web, but the offered community build had some stability issues and didn’t allow for easily installation of the software’s pretty-good Linux capabilities. As it’s not a pure Linux build it’s likely not getting as much attention as some of the others, but I hope that changes, as it’s a fairly decent way to surf the web on the cheap and it has some great stretch capabilities.
The Manjaro build (which uses a KDE Plasma desktop interface) was nice, though not my personal cup of tea, as I tend to be more comfortable in Debian/Ubuntu terminals. Probably my favorite of the bunch, though, was the Ubuntu MATE community build, which is more customizable than the default Debian MATE build—although, like Chromium OS, it had some quirks, most notably some compatibility issues with the NVMe drive that prevented the laptop from going to sleep.
If you’re looking for a Linux experience with training wheels, this probably isn’t it, and you’ll be happier setting up an old x86 laptop to try the more diverse ecosystem of Linux variants—among them System76’s simple and thoughtful Pop OS Ubuntu variant, the Mac-like Elementary OS, the switcher-targeted Zorin OS, and the highly polished Chinese-made Deepin.
But I don’t think that’s necessarily a knock on the Pinebook Pro. You should get it because you know you’re going to spend weekends messing around with random settings, or programming. And when you do get things where you like them, you get a device with a nice keyboard, a long battery life, and a fully repairable interior.
This ecosystem is still fairly young, and young ecosystems grow older and more diverse over time. This comes with good sides and bad sides. While you can tinker to your heart’s content with a device like this, it also means that you’re at the mercy of fellow tinkerers when something doesn’t work quite right. That might just lead you to a solution, but because it’s relatively early days in the world of ARM-based laptops, you’re stuck if something doesn’t work.
In a year, the operating system situation is likely to look a lot different because there’s a community pushing it forward. If you buy this, you’re buying into the community as much as the device—and Pine64 has a really interesting community right now, one that will become fundamental to its future growth.
And with that in mind, you can see the potential down the line. In our interview, Erecinski noted that there is room for system-on-a-chip (SoC) gadgets to eventually become useful to more than just the tinkerers that will buy this.
“I feel that we are getting very close to ARM Linux desktop computers being viable as a choice for non-technical end-users,” he said. “We aren’t there just yet, but many ARM SoCs are (at least in theory) perfectly capable of running full desktop environments and software for these SoCs is getting better by the day.”
Just as the original Pinebook was a necessary step to stake out the market, the Pinebook Pro helps set the stage for an eventual maturity. For people that buy this, living through the growing pains is basically the fun part.
“When I see Raspberry Pi-shaped things or slightly bigger, or even smaller, I think to myself, ‘Well, we’re just where the PC was in 1985’—you know, way cheaper than the expensive stuff. People make fun of it, but it’s going to get better faster than the older technologies of stuff. People are going to try things out just to try them, and maybe they’ll succeed.”
— Ed Vielmetti , an employee of the cloud firm Packet and a former journalist, discussing the current shape of the market for ARM-based devices, which he has helped to evangelize through his role with Works on Arm, a collaboration between Packet and Arm that aims to make the case for ARM in data centers.
The interesting thing about the Pinebook Pro is not that it exists and works effectively, but that it paints an image of a future where ARM chips could genuinely prove a better use case on the go. The fact that these chips have found a home in our smartphones and connected devices makes one wonder about the long-term potential of a device that took those skills back to more traditional computing form factors.
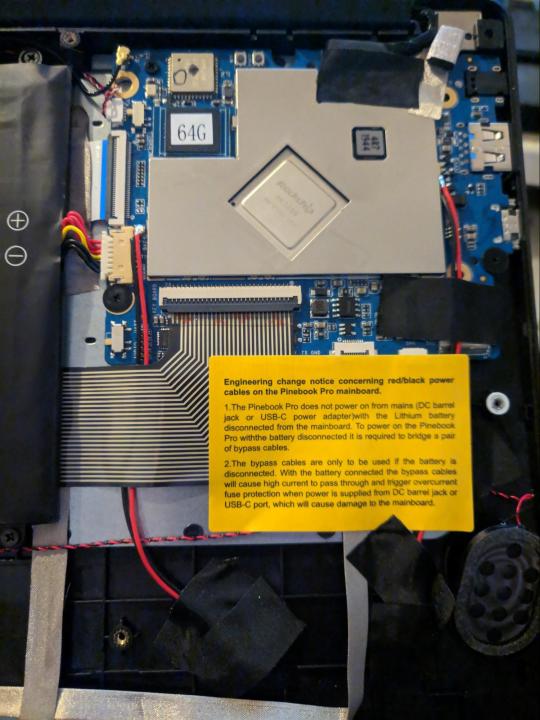
The board at the center of the Pinebook Pro.
It would be a fascinating homecoming of sorts for a chipset that gained momentum in low-power use cases, but whose roots are actually in desktop computers produced by the British firm Acorn.
Certainly, there have been efforts to bring ARM to the laptop realm—most notably the Microsoft Surface Pro X, released last year, that featured impressive hardware, although reviewers were less impressed with the compromised software. Ed Vielmetti, a former journalist who has helped ARM’s reach in the data center through his employer Packet, has tried some of the Windows-based ARM machines, which he notes often have impressive battery life and connectivity compared to equivalent Intel devices.
But Vielmetti, who first gained a professional interest in ARM through exposure to the Raspberry Pi when working on a solar energy project, noted that in many ways, the play for the ARM chipset in more traditional computing form factors is in the long term—rather than right now.
“If it’s like this quarter, something has to be on for some of us this quarter, then you probably want to be, you know, parked very close to what your customers use,” he told me in an interview last summer. “But if you’re looking a little bit out or even further out, and you’re looking at the landscape of changes in the chip industry, and you want to target your software at the people who have the hardware that’s the best, then I think you have to be looking at ARM.”
And there has been growing interest in this specific proposition. Last year, for example, Linus Torvalds noted in an online discussion that there was a growing need for ARM developer boxes if ARM is to have a shot in the world of servers. “Without a development platform, ARM in the server space is never going to make it,” he noted. (The Pinebook Pro is a good start.)
And then there’s the general consumer level, which has seen some exposure to ARM-based laptops running Chrome OS. The wildcard, of course, is Apple, which has long been rumored to be working on an ARM-based Mac. Both Vielmetti and Erecinski noted it was well-positioned to push things forward.
“They have extensive experience with ARM from their phones and their kernel, and presumably also much of the stack already runs on the architecture,” Erecinski said. “Perhaps more importantly, Apple has very loyal customers who would buy an ARM laptop with little or no reservation.”
There are a lot of ways this could end up looking, and Pine64’s image of an ARM-based future may not be the one that wins in the market, although it makes an intriguing present. Another potential path forward involves a recent Kickstarter success story called the NexDock 2, which effectively is a laptop-like shell for ARM-based smartphones with built-in desktop support. It makes sense—after all, many Android phones are already more powerful than desktop computers.
Maybe the future of ARM computing looks like the Pinebook Pro; maybe it looks like the NexDock 2; maybe it even looks like whatever Apple is rumored to be working on. But we may be on the cusp of a future where a chipset famously used in smartphones starts appearing in more traditional computing forms—and the Pinebook Pro shows that the tinkerers are out front here.
Pine64, by building this device and others, is for now at the vanguard of ARM-based computing, but its goals are more modest than most. Speaking about its efforts to support a Linux-based phone ecosystem—another area where Pine64 is at the vanguard—Erecinski underlined the firm’s simple, open-source roots.
“We are not out to sell a million units, dethrone Android and iOS, or build a PINE64 empire,” Erecinski explained. “This project will never be a financial success because we make no money off it—we donate all revenue to our partner projects building the OSes. But that is besides the point.”
This $200 Laptop Is Like a Chromebook You Can Hack syndicated from https://triviaqaweb.wordpress.com/feed/
0 notes
Photo

تحميل برنامج الاسطوانة الوهمية لتشغيل العاب البلايستيشن 2020 daemon tools https://www.plustb.com/2020/03/daemon-tools.html
تحميل برنامج الاسطوانة الوهمية لتشغيل العاب البلايستيشن 2020 daemon tools
لويندوز 7, تحميل, برنامج, الاسطوانة, الوهمية, لتشغيل, العاب, البلايستيشن, daemon tools, حرق الاسطوانات, الخروف, نسخ, الاسطوانات, عربي, مجانا -2019-2020-2021-2022
daemon-tools
daemon tools
قم بتنزيل البرنامج وعمل صنع الأقراص المضغوطة الوهمية مجانًا ، فنحن نقدم لك أفضل برنامج على الإطلاق في مجال إنشاء الأقراص المضغوطة الوهمية بتنسيق ios.
تحميل برنامج صنع وعمل الاسطوانات الوهمية" daemon tools
ستعشقها بالتأكيد لأنها حقيقة واحدة من أكثر الحزم استخدامًا حول العالم ،
طريقة استخدام هذا البرنامج بسيطة للغاية ولا تريد الاستمتاع على طريقة استخدام برنامج صانع الأقراص المضغوطة الوهمية ، حيث لم يعد هذا البرنامج يرغب في الاستمتاع كطريقة لاستخدامه والحصول على جميع عروضه ومزاياه ، و سنتحدث بالتفصيل تقريبًا عن قدرات تطبيق العتاد وعروضه الرائعة لجميع العملاء حيث يتفاعل هذا البرنامج مع جميع هياكل الكمبيوتر بما في ذلك windows 7 و Vista و ثمانية و 10 ،
لا يتناوب مطلقًا ويمكن القول أن هذه الميزة ساعدت على نشر البرنامج بشكل كبير بين البشر.
خفض قوة التحميل ISO حرق وحرق الأقراص المدمجة للنوافذ
الكهرباء ISO من التطبيقات المتميزة في حرق ونسخ الأقراص المدمجة بسرعة عالية. عن طريق نسخ البرنامج ، وإنشاء أقراص مضغوطة مزيفة دون صعوبة ، وتثبيت النوافذ وتعديل المستندات في تخطيط ISO.
، يقوم البرنامج بنسخ الأقراص المضغوطة ، سواء كانت أقراص مضغوطة أو أقراص DVD مع عدم وجود مشاكل وبدون أقراص مضغوطة رقمية ،
يقوم هذا النظام أيضًا بنسخ نسخ من النوافذ والألعاب بتنسيق ISO و BIN وإمكانية عرض محتويات القرص قبل النسخ.
البرنامج سهل التطبيق ، أثناء نسخ الأقراص المضغوطة ، يمكنك تحديد خيار نسخ الأقراص المضغوطة مع أكثر من نسخة متماثلة. بالإضافة إلى ذلك ، يساعد البرنامج في إنشاء وعمل نسخ من الأقراص المضغوطة وأقراص DVD ، وإنشاء نسخة من USB وإمكانية تحويل الأقراص المضغوطة إلى صورة ISO وتحرير القرص المضغوط وتعديله وحذفه من المستندات دون عناء ، بالإضافة إلى تشغيل ألعاب الأقراص الوهمية من خلال إنشاء قرص مضغوط افتراضي الطاقة لجهاز الكمبيوتر الخاص بك ونسخ ملفات القرص المضغوط التي تريد تشغيلها عليه.
PowerISO سهل الاستخدام. بمجرد النقر فوق تقرير ISO أو BIN ، سترى مك��نات القرص التي تحتاج إلى نسخها أو تشغيلها في البرنامج ، ويمتلك هذا النظام واجهة سهلة الاستخدام وسهلة لا تستهلك مصادر الجهاز.
مزايا برامج POR ISO 2020: -
1- يدعم هذا النظام العديد من صور الأقراص المضغوطة وأقراص DVD بما في ذلك ISO و BIN و NRG و CDI و DAA.
2 - فتح واستخراج مستندات ISO ، والسماح بعرضها على جهاز كمبيوتر. قم بتنزيل الأقراص المضغوطة الخاصة بالبرنامج على جهاز الكمبيوتر.
three-Strength Eo هي مؤسسة خبيرة تقوم بإنشاء ملفات صوت وفيديو بلورية.
4. إنشاء وتشغيل أقراص صوتية مضغوطة من ملفات MP3 و FLAC و APE و WMA تلقائيًا.
5 - القدرة على تطبيق البرنامج لخفض تحميل تنسيق BIN إلى ISO وبعض برامج ترميز ISO الأخرى.
6. مساعدة أنظمة 32 بت و 64 بت مع النوافذ.
7. دليل محسن لنسخ المستندات بتنسيقات dmg و wim.
8- ترميم بعض الأخطاء والتحسينات داخل برن الشعبية
تعمل معدات DAEMON Lite على دمج الميزات المطلوبة لتصوير القرص ومجموعة متنوعة من الأدوات للأجهزة الرقمية. يمكنك اختيار تطبيق مجاني لإنشاء قرص DVD ، والاحتفاظ بتثبيت pix ، أو الدفع مقابل قدرات أكثر خبرة تحتاجها حقًا ، أو الحصول على مجموعة كاملة من المعدات بتكلفة 1/2. يمكنك تنزيل مجموعة أدوات DAEMON للكمبيوتر المثبت دون اتصال بالإنترنت من صفحة الويب من خلال النقر على زر التنزيل الفضفاض.
الميزات والميزات الرئيسية
أدوات التصوير التي يجب عليك
يسمح لك بتنزيل جميع أنواع ملفات صور القرص المعروفة ومحاكاة ما يصل إلى 4 أجهزة DT + SCSI + HDD. يمكنك من إنشاء صور لأقراصك الضوئية والوصول إليها من خلال كتالوج منظم جيدًا. تحميل: جميع أنواع الصور الشائعة ، وإنشاء: ملفات MDX و MDS و ISO والحفاظ على صورك المفضلة في متناول اليد.
أهم مميزات DAEMON Tools Lite المجاني:
بسيطة وسلسة للتعامل مع واجهة المستخدم دون صداع.
سريعة وخفيفة على ذاكرة الوصول العشوائي وموارد المعالج لأنها صغيرة جدًا في الطول.
يدعم العديد من برامج الترميز ، وأكثرها شهرة هي NRG و ISO و BIN والكثير.
ليس من الأفضل تشغيل الأقراص المضغوطة المزيفة ، بل يمكنه أيضًا إنشاء نسخ مضغوطة مزيفة.
القدرة على إعادة إنتاج القرص الصلب مع دعم أنواع كثيرة من الأقراص الصعبة التي تتضمن SCSI و IDE ، والتي تسمح بالنسخ الاحتياطي في حالة الطوارئ.
من ناحية ، هذه هي وظائف الإصدار المجاني الأكثر فاعلية ، وفي حال كنت بحاجة إلى ميزات إضافية ، إلى جانب محرك أقراص فلاش USB القابل للتشغيل المحتمل بالإضافة إلى Windows و Linux وغيرها من المعدات والهياكل ودليل من الدرجة الأولى ورقم من الميزات التي سيتم دفع النموذج بالكامل.
لقد جرب فريق تحرير Downzen جهاز DAEMON Tools Lite المجاني لأكثر من عام وقد لاحظنا أنه في كل إطلاق جديد تختفي خاصية غير مثبتة للعودة للحزن وهذا شيء يمكن أن يقف ضد الإنجاز الطويل الأمد لـ DAEMON Gear Lite ونحن نتفق مع ذلك في المستقبل البعيد ، سيتم دفعه بالكامل إلى جانب عنصر التشغيل للأسف ، أفضل الوهمية.
تحميل لأسفل DAEMON Tools Lite 10.11.0.0900 قوة الوهمية مع إصدار العصر الحديث بمساعدة النقر على زر التحميل لأسفل مجانًا من موقع Downzen الإلكتروني
معلومات البرنامج
تاريخ اخر تحديث
الإصدار
10.11.0.0900
التنزيلات
2.0K
الترخيص
مجاني
حجم الملف
773KB
متطلبات التشغيل
Windows
الفئة
انقرهنا لتحميل
برنامج اسطوانات وهمية daemon tools, تحميل برنامج الاسطوانة الوهمية لويندوز 7, الديمون تولز لتشغيل الالعاب, مجانا, lite, للبلايستيشن 1, لعمل اقراص , ديمون تولز 2018, iso على الكمبيوتر, من ميديا فاير, لتشغيل ملفات الايزو, image file, ايزو, طريقة ب ببرنامج ultraiso, كامل, ديمون تولز, برابط مباشر, xp, من ميديا فاير, serial number, disk, 2017, in order to use the program phantom CD maker as this program does not require experience in order to use it and get all its services and advantages and we will talk in detail about the possibilities The program daemon gear and its wonderful services to all users as this program interacts with all computer systems including Windows 7 and Vista, eight, 10, does not change completely and can be said that this f eature helped spread the program significantly among people. Download Power ISO Burn and burn CDs for Windows Power ISO is one of the great programs in burning and burning CDs at high speed, where you can by copying the program and create fake CDs easily and install Windows and edit files in ISO format, the program burns CDs, whether they CDs or DVDs without problems and easily,
0 notes
Text
Introducing Rufus software to Windows users.
Users of Windows 8 also and windows 10 operating systems have experienced this windows to go feature very well. It has remain introduced along with this Windows 8 operating system. No matter they had so many third-party apps to simply install this particular windows 7 in order to have a USB device. So they managed to create a USB drive along with Windows 7 operating system before they had a release regarding windows 8 operating system version.

If you are new to Windows to go feature, then we would like to give you an introduction regarding it. This particular feature will give you an ability to install and also run Windows operating system in version 8 or 8.1. then, And also windows operating system in version 10, which is using a pen drive. But this feature of Windows to go, maker, is only officially available in enterprise edition. You can find several third-party tools to install various types of editions regarding Windows 8 and Windows 7 or this Windows 10 versions to a USB drive.
Rufus download is a popular tool, which will support creating a Windows to go drive for you. With this simple guideline, we will assist you in how you will have an ability to use this Rufus software to make windows to go drive. And that is fast that you think.
Some important things that you should remember when you are creating a Windows to go drive.
First of all, this feature of Windows to go regarding Rufus software is there only when a user is running Windows 8, and Windows 10 or Windows 8.1 versions software. So you require a computer device which has its operating system as windows 8, windows 8.1 or windows 10. So you can make windows to go drive from Rufus software.
When considering the memory or size of that USB drive which you need to utilize as a Windows to go drive. It should have a memory of 16 GB at least. And we recommend users to go for a pen drive which has a memory of 32 GB for safety.
Users are requested to simply get a pen drive which has a certification for Windows to go. It will allow you to gain an optimal performance also. When considering about ordinary pen drives, you cannot use them for installation of windows operating system. Because they are not idyllic for that purpose. If you install Windows operating system in a normal pen drive, it will remain very slow when you compare to an operating system which was installed from USB which is certified.
Rufus software will support all editions for Windows operating system including Windows 8.1, Windows 8 and Windows 10 versions.
If you are a user who uses Windows 7 operating system, then we suggest you configure a dedicated way to perform this task on a USB drive.
This is how you should prepare your Windows to go software along with Rufus software.

First of all, you need to follow all these instructions which are dedicated to making windows to go drive with aid of Rufus software.
Ok, so first of all, you need to Visit here Rufus software official page and then download Rufus software which is there. So you can download its latest version. You need to download normal or regular version of this Rufus software. Make sure not to download its portable version.
Now, you have connect your pen drive that you are planning to use simple as this particular drive to windows. Then, you need to save and also backup all your important data which is on your pen drive. Keep them safe in any particular location. We are doing this step because we need a formatted drive to make it as an installer drive. So that all simple data will simply go.
Then, you have to launch Rufus component on your computer which runs its operating system as windows 8, windows 8.1 or windows 10 version.
Now, you have to select your pen drive which is from the menu of drop-down on Rufus software interface.
Ok, so now you need to choose a proper partition scheme which is from available 3 options. If you plan to use windows drive along with an MBR partition scheme, then you have to choose "MBR partition scheme for BIOS or UEFI computer". Ok, now you need to choose for GPT partition which is for UEFI. Make sure to do this only you are sure regarding it.
Now, you have to select your file system which is NTFS. You should do this because a FAT32 model is cannot simply apply to creating a windows drive. Users can simply and safely skip the section of cluster size.
Ok, now you can click on browser icon which is next to create a bootable disk using selection to simply browsing your ISO file of windows and then, you need to select same.
As a next step, you need to an option of select on windows to go, before you are clicking a start button. Soon you can see a dialog box. This will appear if your pen drive is including an attribute which is removable.
Ok, so now you can simply skip that particular warning. Now, you have to click on yes button. But when considering about performance of windows to go drive, it will not remain as effective or good as windows drives which are certified.
Next, you can see a warning which says that all data on your pen drive will remain permanently erased. Now, you have to click ok. And then this installation process will begin.
This particular software will take several hours to simply create a windows drive. When regarding our test computer which runs Windows 10 operating system. This Rufus software will take about more than 90 minutes of time to simply create a windows drive which is for Windows 10 operating system.
As soon as this particular task is over, you can see a message which says your device is ready to use. Now, users will have an ability to simply restart their computer device. And they can test their windows drive which has remain created a few minutes ago. We hope it will work without any problem.
Rufus is a software which is claimed to remain a fastest tool.

Yes, indeed. Rufus is a piece of a software, we you can use to create a bootable USB drive in a fast time period. We can say that, if you compare this software performance with any other software component, you can realize that this software is a new type of a software which gives you an ability to create a bootable USB in a fast way.
When considering about Windows users, they have a plenty of good types of utilities to simply make a USB drive which is bootable. And you can make it through a proper ISO image file. The, what you have to do is, you need to install it on your Windows operating system through a pen drive. There so many tools for this purpose. Some of them are, Windows 7 DVD or USB tool, WinToFlash, UNetBootin and also universal USB installer are some of them. They are popular in terms of creating a bootable installer from a USB drive for windows operating system.
Well, all these utilities and tools are good and performing a good job to create a bootable USB drive. But there is a problem. All of these tools will take a considerable time to complete this process. That is to transfer ISO file to a USB drive. A user will prefer to use a command line process to make a bootable USB drive, with some third party tools. Users will not prefer going for third-party tools to complete this job.
If you are a user who finds difficulties in using a command prompt technique to create a bootable installer. Then we recommend you to try this Rufus software. Rufus is a small utility and helps you to create a bootable installer in a fast manner. A developer of his particular tool, tells that this tool is twice amounting faster as official Windows 7 DVD or USB tool, a Universal installer for USB and also UNetNooting tools. Apart from using Windows XP operating system, 2003 Windows server R2, Windows Vista, Windows 8, Windows 7. This particular software will support some other operating systems as well.
They are, Arch Linux, Parted Magic, Hiren's Boot CD, NT password, Kubuntu, Knoppix, OpenSUSE, Fedora, CentOS and so many Linux products also. To use this amazing utility, you need to download it. And then select a suitable pen drive to support this task. Browse a particular ISO image file. And then you can begin a task to transfer all content on your ISO image to a pen drive. You can install Windows operating systems with this pen drive technique through Rufus software also. Not only that, users can repair their damaged Window PC using a USB drive which runs Rufus software easily. What you all have to do is download Rufus software. check their Official website.
youtube
#Rufus Download#Windows to go software#create windows to go with Rufus#bootable USB#USB installer from Rufus
0 notes
Video
youtube
how to create windows 10 Bootable Pendrive 2018 Step-by-step: how to create windows 10 Bootable Pendrive 2018 Download link: https://goo.gl/cE2GFz Microsoft Windows 10 Link: https://goo.gl/Jmy9hg 😀 Follow Us Socially 😀 🌐 Facebook page:http://ift.tt/2r7Dyve 🌐 Twitter: https://twitter.com/sheikh_tech 🌐 Tumbler: http://ift.tt/2rRQx1d 🌐 LinkedIn : http://ift.tt/2C8oFOr... 🌐 Blogs : http://ift.tt/2rRugRf windows 10 bootable pendrive software, windows 10 bootable pen drive from iso, pen drive bootable for windows 10 Hindi, pen drive bootable for windows 10 Bangla, windows 10 bootable pen drive, pen drive bootable for windows 10 windows 10 bootable pendrive software download windows 10 pendrive bootable download windows 10 bootable usb pen drive how to install windows 10 from bootable pendrive how to install windows 10 using bootable pendrive how to install windows 10 through bootable pendrive windows 10 bootable pendrive windows 10 bootable pendrive from iso create a windows 10 bootable pendrive how to install windows 10 from a bootable pendrive how to install windows 10 by bootable pendrive windows 10 bootable pendrive creator windows 10 your bootable usb drive could not be created bootable pendrive for windows 10 cmd pen drive bootable command for windows 10 windows 10 bootable usb drive download windows 10 pendrive bootable software free download download windows 10 usb bootable flash drive windows 10 bootable flash drive from iso bootable pendrive for windows 10 software download how can bootable pendrive for windows 10 how make windows 10 bootable pendrive how to make windows 10 bootable in pendrive windows 10 iso to bootable pen drive windows 10 bootable flash drive linux windows 10 bootable pen drive maker windows 10 bootable usb drive mac windows 10 bootable usb drive microsoft create windows 10 bootable usb drive on mac bootable pendrive on windows 10 windows 10 bootable usb drive rufus windows 10 bootable pendrive software windows 10 to pendrive bootable windows 10 bootable usb flash drive windows 10 bootable usb hard drive windows 10 bootable usb disk/ dvd drive windows 10 bootable usb recovery drive bootable usb pen drive windows 10 make pendrive bootable for windows 10 using cmd official windows 10 bootable usb flash drive bootable pendrive with windows 10 how to install windows 10 with bootable pendrive by Sheikh Tech
0 notes
Text
Como grabar una imagen linux en tarjeta SD booteable - Etcher
Como grabar una imagen linux en tarjeta SD booteable – Etcher
Para quien desea probar las mayoría de las distros, como yo, una herramienta muy útil es USB-ISO-MAKER. Siempre necesito tener estas herramientas a mi disposición, ya que siempre estoy probando las distros.
Durante mucho tiempo, he recurrido a Rufus en Microsoft Windows como mi constructor de un USB más confiable, y por todas estas veces, debo confesar, me ha servido bien.
Pero el problema con…
View On WordPress
0 notes
Text
Review: The Asus Tinker Board
In the years since the launch of the original Raspberry Pi we have seen the little British ARM-based board become one of the more popular single board computers in the hobbyist, maker, and hacker communities. It has retained that position despite the best efforts of other manufacturers, and we have seen a succession of competitor boards directly copying it by imitating its form factor. None of them have made a significant dent in the sales figures enjoyed by the Pi, yet they continue to appear on a regular basis.
We recently brought you news of the latest challenger in this arena, in the form of the Asus Tinker Board. This is a board that has made us sit up and take notice because unlike previous players this time we have a product from a giant of the industry. Most of us are likely to own at least one Asus product, indeed there is a good chance that you might be reading this on an Asus computer or monitor. Asus have made some very high quality hardware in their time, so perhaps this product will inherit some of that heritage. Thus it was with a sense of expectation that we ordered one of the first batch of Tinker Boards, and waited eagerly for the postman.
First Impressions
Just what you want the postman to deliver!
The packaging is as professional as you’d expect from such a large manufacturer, a small cardboard box with the Tinker Board logo on top. Open it up, and the board sits encased in an anti-static bag on a cardboard tray. Under the tray is a flimsy instruction leaflet, and a stick-on heatsink for the Tinker Board processor.
Unpacking the board it is immediately obvious that it is a faithful physical clone of the Raspberry Pi form factor. Unlike some Pi clones such as the Odroid boards it has micro SD card, camera, and LCD connectors in exactly the same places as those on the PI, and replicates all the Pi’s external connections. It’s a safe bet that this will fit inside the majority of Raspberry Pi cases. It does manage to fit in a little extra though, there is a detachable antenna connector for the onbard wireless chipset, and hidden between the LAN and USB connectors are a pair of unpopulated holes for PWM and SPD/IF audio.
The Tinker Board in all its glory.
On the board itself, aside from the Rockchip RK3288 system-on-chip, there is a Rockchip RK808 power management/clock chip, Realtek Ethernet and audio codec chips, and a Genesys USB hub chip. There is also a wireless module with that detachable antenna, handling both 802.11 and Bluetooth. On the underside are the RAM chips, and the SD card socket.
The aesthetic design is pretty noticeable, with the board featuring patterns and labels for each connector. A particularly nice touch comes with the GPIO header, its plastic is colour-coded to identify the different types of pin.
Getting started with the Tinker Board is a very similar process to doing so on the Raspberry Pi. Connect a suitably powerful micro USB charger to its power port, add an HDMI monitor and a USB keyboard and mouse combo, and you can boot an OS from a micro SD card.
A Few Potholes In The Road
At this point though, we encounter a snag. A Raspberry Pi owner is used to visiting the website, clicking on the download link, selecting an operating system image, and following the comprehensive instructions, but Asus Tinker Board users get the following instructions in their leaflet:
Download the OS image from the Tinker Board website and burn it into the micro SD card using a third-party ISO software, such as Win32DiskImager.
This all sounds extremely promising, but for one unfortunate omission. There is no Tinker Board website. That’s right, a huge multinational hardware company has produced a high quality product, and neglected to create the online component that goes with it.
For those prepared to search, there is now a section of the Asus driver download site on which you can find some downloadable resources including a pair of OS images. This was nowhere to be seen for a while after the product was available for sale, but appeared before packages started landing on doormats. Presumably someone at Asus was alerted to the dismal prospect of being panned for providing a product with no software, and that was the best they could do. We’re guessing most Hackaday readers will find no problems installing a downloaded image onto an SD card, which is handy because Asus haven’t provided any instructions. It’s probably fortunate then that the Raspberry Pi Foundation’s instructions will also work with the board.
The Tinker Board As A Desktop Computer
The most important test for a new computer.
So having probed the recesses of the Asus support system for a Debian image, our Tinker Board was brought to life. After a pretty fast boot-up sequence we were rewarded with an LXDE desktop with a couple of folders containing GPIO and WiringPi software to help get started talking to hardware. Connecting an Ethernet cable and firing up Chromium gave us a respectably quick general-purpose web browsing platform that is noticeably faster than the same experience on either the Raspberry Pi 3, or the Odroid C2.
After a few minutes use though an odd problem became apparent, corruption in anything typed. This was traced by substitution of peripherals to our bench keyboard, a vintage IBM Model M. It’s the standard input device hereabouts and has been for many years, and it and a Microsoft mouse are permanently plugged into a PS/2 to USB adapter that hangs off the bench USB hub to avoid the computer having to supply the Model M’s hefty power requirement. This combo has worked with innumerable computers of all varieties over the years, yet for some reason the Tinker Board is the first to balk at it. A substitution to a USB keyboard and mouse fixed the issue, but it points to there being something amiss with the board’s handling of USB peripherals.
The GIMP is as smooth as you’d expect it to be on your PC.
With a working keyboard then the Tinker Board makes a very capable desktop machine. When the Raspberry Pi 3 was released last year [Brian Benchoff] hailed it as the moment at which the single board computer line could boast a credible desktop computer rather than a hobbyist’s toy, but while that remains true today a regular Pi 3 desktop user will still often find themselves reminded that they are close to the limit of their device’s capabilities.
The Tinker Board really shows its extra power on the desktop. While it will never match a high-end PC workstation you can do proper work on it without feeling held back.
How About Those Pins?
It’s very nice to have a Linux desktop, but many of us are going to be more interested in the GPIO lines. Opening up the folder containing the Python GPIO library it’s obvious that it is a derivative of the RPi.GPIO library that Raspberry Pi users will be used to. Putting together a quick test script to waggle a GPIO revealed that there was no library of that name though so after a quick run through the install process to make sure that the library was in place the name was found to be ASUS.GPIO. So starting the test script with “import ASUS.GPIO as GPIO” resulted in a script that behaved exactly as you’d expect with its Pi ancestor.
The README warns that SPI, I2C, One-wire, hardware PWM, and serial functionality is not yet implemented, but suggests that we watch that space. Given the lacklustre web support for the product it’ll be interesting to see whether they follow up on that promise.
The final point from our in-use tests of the Tinker Board comes from our temperature measurements. Our trusty radiation thermometer failed to register anything over 27 Celsius from the SoC no matter how much effort we put it to. This compares very favorably with previous measurements from a Raspberry Pi with no heatsink at 44 degrees, and the Odroid C2 whose heatsink we measured at 37 degrees. Thus the supplied stick-on heatsink feels almost superfluous, and we certainly saw no point in fitting it to our test unit.
The benchmarks for this board and the Raspberry Pi 3 have been done to death elsewhere so there is little point in our rehashing them here. Suffice to say that it’s easy to believe a claim of the Tinker Board being twice as fast as its competitor. Detractors point at the RK3288 being a slightly older SoC than those at the cutting edge of the tablet market, but in this application its 1.8GHz clock speed and 2GB of memory is enough to leave the Pi 3’s 1.2GHz and 1MB behind. However this is not the whole story, because the Tinker Board’s Rockchip has a Cortex A17 32-bit-only processor while the Pi’s Cortex A53 is 64-bit capable. Thus it is possible that were the Pi running a 64-bit operating system rather than the 32-bit Raspbian the race between the two would be much closer.
One feature of the Tinker Board we were unable to test due to lack of an available monitor is high resolution performance. This board supports resolutions up to 4K.
Reasons To Buy One, And Reasons To Avoid
So after this extensive description of the Tinker Board experience, what might our verdict be?
For the hardware, the Tinker Board is certainly an impressive and very well-executed board. It’s quick, pretty to look at, and while it’s by no means the cheapest single board computer of its class, it’s not the most expensive either. Asus have amply demonstrated their expertise in producing high-quality hardware, and the result is a clone of Raspberry Pi hardware that’s much better than a real Raspberry Pi in almost every way. We’ll even forgive it for its refusal to deal with our thirty-year-old PC keyboard.
The community is the true added value in a Raspberry Pi.
But before the Asus PR department go crazy and cut-and-paste that sentence comparing it to a Pi as a ringing endorsement, there’s a snag. There is much more than hardware to a good single board computer, we have to consider the software, and the support. This board will not only be used by Linux savants, it will end up in the hands of ordinary people with an interest in computing. Some of them could even end up in the hands of youngsters, and it is for these markets that the intangible side of the purchase is more important than the physical hardware. When you buy a Raspberry Pi, in most cases you are buying it as a vehicle for Raspbian, and when you lose your way you have also bought the Raspberry Pi forums and its community who will supply you with the answers you need to get started again.
At first glance it might seem that Asus have done a good job here, after all the Debian distribution does not have the rough edges you’d find in for example the Ubuntu Mate distribution for the Odroid C2. It doesn’t come with some of the desktop software Raspbian has pre-installed, but all of that is only an apt-get away.
Unfortunately though if you too have had to find and download the distro yourself you’ll understand exactly where Asus have failed with a capital F in cloning the Raspberry Pi. It’s understood that they couldn’t instantly replicate the huge community that surrounds the Pi, but to not even bother with a website for the product beggars belief. There’s a story about hardware companies sometimes being useless when it comes to software, as demonstrated by the lousy interfaces we see on smart TV sets. But you might expect them to look at the product they are copying and at least try to understand that there is more to it than just the board. To release such a polished piece of hardware and fail to back it up with even the most basic online support offering is a mistake we’ve seen many times before. It is one that Asus should take immediate steps to remedy if they expect this board to sell to more than a few hardware enthusiasts.
So would we recommend that you buy a Tinker Board? Of course we would, it’s a fantastic piece of hardware, and as a Hackaday reader you’re likely to be able to get the most out of it. Would we suggest that you recommend it to someone else without it being backed up by a meaningful support offering? Of course not, unless you want to become that person’s personal support hotline. Tell them to buy a Raspberry Pi 3 instead. But it may not always be this way. Asus, it’s up to you to finish this journey by providing the framework users need before they they can begin to love and adore the Tinker Board.
Filed under: Current Events, Featured, reviews
0 notes
Photo

تحميل برنامج الاسطوانة الوهمية لتشغيل العاب البلايستيشن 2020 daemon tools https://www.plustb.com/2020/03/daemon-tools.html
تحميل برنامج الاسطوانة الوهمية لتشغيل العاب البلايستيشن 2020 daemon tools
لويندوز 7, تحميل, برنامج, الاسطوانة, الوهمية, لتشغيل, العاب, البلايستيشن, daemon tools, حرق الاسطوانات, الخروف, نسخ, الاسطوانات, عربي, مجانا -2019-2020-2021-2022
daemon-tools
تحميل برنامج الاسطوانة الوهمية لتشغيل العاب البلايستيشن 2020 daemon tools
قم بتنزيل البرنامج وعمل صنع الأقراص المضغوطة الوهمية مجانًا ، فنحن نقدم لك أفضل برنامج على الإطلاق في مجال إنشاء الأقراص المضغوطة الوهمية بتنسيق ios.
تحميل برنامج صنع وعمل الاسطوانات الوهمية" daemon tools
ستعشقها بالتأكيد لأنها حقيقة واحدة من أكثر الحزم استخدامًا حول العالم ،
طريقة استخدام هذا البرنامج بسيطة للغاية ولا تريد الاستمتاع على طريقة استخدام برنامج صانع الأقراص المضغوطة الوهمية ، حيث لم يعد هذا البرنامج يرغب في الاستمتاع كطريقة لاستخدامه والحصول على جميع عروضه ومزاياه ، و سنتحدث بالتفصيل تقريبًا عن قدرات تطبيق العتاد وعروضه الرائعة لجميع العملاء حيث يتفاعل هذا البرنامج مع جميع هياكل الكمبيوتر بما في ذلك windows 7 و Vista و ثمانية و 10 ،
لا يتناوب مطلقًا ويمكن القول أن هذه الميزة ساعدت على نشر البرنامج بشكل كبير بين البشر.
خفض قوة التحميل ISO حرق وحرق الأقراص المدمجة للنوافذ
الكهرباء ISO من التطبيقات المتميزة في حرق ونسخ الأقراص المدمجة بسرعة عالية. عن طريق نسخ البرنامج ، وإنشاء أقراص مضغوطة مزيفة دون صعوبة ، وتثبيت النوافذ وتعديل المستندات في تخطيط ISO.
، يقوم البرنامج بنسخ الأقراص المضغوطة ، سواء كانت أقراص مضغوطة أو أقراص DVD مع عدم وجود مشاكل وبدون أقراص مضغوطة رقمية ،
يقوم هذا النظام أيضًا بنسخ نسخ من النوافذ والألعاب بتنسيق ISO و BIN وإمكانية عرض محتويات القرص قبل النسخ.
البرنامج سهل التطبيق ، أثناء نسخ الأقراص المضغوطة ، يمكنك تحديد خيار نسخ الأقراص المضغوطة مع أكثر من نسخة متماثلة. بالإضافة إلى ذلك ، يساعد البرنامج في إنشاء وعمل نسخ من الأقراص المضغوطة وأقراص DVD ، وإنشاء نسخة من USB وإمكانية تحويل الأقراص المضغوطة إلى صورة ISO وتحرير القرص المضغوط وتعديله وحذفه من المستندات دون عناء ، بالإضافة إلى تشغيل ألعاب الأقراص الوهمية من خلال إنشاء قرص مضغوط افتراضي الطاقة لجهاز الكمبيوتر الخاص بك ونسخ ملفات القرص المضغوط التي تريد تشغيلها عليه.
PowerISO سهل الاستخدام. بمجرد النقر فوق تقرير ISO أو BIN ، سترى مكونات القرص التي تحتاج إلى نسخها أو تشغيلها في البرنامج ، ويمتلك هذا النظام واجهة سهلة الاستخدام وسهلة لا تستهلك مصادر الجهاز.
مزايا برامج POR ISO 2020: -
1- يدعم هذا النظام العديد من صور الأقراص المضغوطة وأقراص DVD بما في ذلك ISO و BIN و NRG و CDI و DAA.
2 - فتح واستخراج مستندات ISO ، والسماح بعرضها على جهاز كمبيوتر. قم بتنزيل الأقراص المضغوطة الخاصة بالبرنامج على جهاز الكمبيوتر.
three-Strength Eo هي مؤسسة خبيرة تقوم بإنشاء ملفات صوت وفيديو بلورية.
4. إنشاء وتشغيل أقراص صوتية مضغوطة من ملفات MP3 و FLAC و APE و WMA تلقائيًا.
5 - القدرة على تطبيق البرنامج لخفض تحميل تنسيق BIN إلى ISO وبعض برامج ترميز ISO الأخرى.
6. مساعدة أنظمة 32 بت و 64 بت مع النوافذ.
7. دليل محسن لنسخ المستندات بتنسيقات dmg و wim.
8- ترميم بعض الأخطاء والتحسينات داخل برن الشعبية
تعمل معدات DAEMON Lite على دمج الميزات المطلوبة لتصوير القرص ومجموعة متنوعة من الأدوات للأجهزة الرقمية. يمكنك اختيار تطبيق مجاني لإنشاء قرص DVD ، والاحتفاظ بتثبيت pix ، أو الدفع مقابل قدرات أكثر خبرة تحتاجها حقًا ، أو الحصول على مجموعة كاملة من المعدات بتكلفة 1/2. يمكنك تنزيل مجموعة أدوات DAEMON للكمبيوتر المثبت دون اتصال بالإنترنت من صفحة الويب من خلال النقر على زر التنزيل الفضفاض.
الميزات والميزات الرئيسية
أدوات التصوير التي يجب عليك
يسمح لك بتنزيل جميع أنواع ملفات صور القرص المعروفة ومحاكاة ما يصل إلى 4 أجهزة DT + SCSI + HDD. يمكنك من إنشاء صور لأقراصك الضوئية والوصول إليها من خلال كتالوج منظم جيدًا. تحميل: جميع أنواع الصور الشائعة ، وإنشاء: ملفات MDX و MDS و ISO والحفاظ على صورك المفضلة في متناول اليد.
أهم مميزات DAEMON Tools Lite المجاني:
بسيطة وسلسة للتعامل مع واجهة المستخدم دون صداع.
سريعة وخفيفة على ذاكرة الوصول العشوائي وموارد المعالج لأنها صغيرة جدًا في الطول.
يدعم العديد من برامج الترميز ، وأكثرها شهرة هي NRG و ISO و BIN والكثير.
ليس من الأفضل تشغيل الأقراص المضغوطة المزيفة ، بل يمكنه أيضًا إنشاء نسخ مضغوطة مزيفة.
القدرة على إعادة إنتاج القرص الصلب مع دعم أنواع كثيرة من الأقراص الصعبة التي تتضمن SCSI و IDE ، والتي تسمح بالنسخ الاحتياطي في حالة الطوارئ.
من ناحية ، هذه هي وظائف الإصدار المجاني الأكثر فاعلية ، وفي حال كنت بحاجة إلى ميزات إضافية ، إلى جانب محرك أقراص فلاش USB القابل للتشغيل المحتمل بالإضافة إلى Windows و Linux وغيرها من المعدات والهياكل ودليل من الدرجة الأولى ورقم من الميزات التي سيتم دفع النموذج بالكامل.
لقد جرب فريق تحرير Downzen جهاز DAEMON Tools Lite المجاني لأكثر من عام وقد لاحظنا أنه في كل إطلاق جديد تختفي خاصية غير مثبتة للعودة للحزن وهذا شيء يمكن أن يقف ضد الإنجاز الطويل الأمد لـ DAEMON Gear Lite ونحن نتفق مع ذلك في المستقبل البعيد ، سيتم دفعه بالكامل إلى جانب عنصر التشغيل للأسف ، أفضل الوهمية.
تحميل لأسفل DAEMON Tools Lite 10.11.0.0900 قوة الوهمية مع إصدار العصر الحديث بمساعدة النقر على زر التحميل لأسفل مجانًا من موقع Downzen الإلكتروني
معلومات البرنامج
تاريخ اخر تحديث
الإصدار
10.11.0.0900
التنزيلات
2.0K
الترخيص
مجاني
حجم الملف
773KB
متطلبات التشغيل
Windows
الفئة
انقرهنا لتحميل
برنامج اسطوانات وهمية daemon tools, تحميل برنامج الاسطوانة الوهمية لويندوز 7, الديمون تولز لتشغيل الالعاب, مجانا, lite, للبلايستيشن 1, لعمل اقراص , ديمون تولز 2018, iso على الكمبيوتر, من ميديا فاير, لتشغيل ملفات الايزو, image file, ايزو, طريقة ب ببرنامج ultraiso, كامل, ديمون تولز, برابط مباشر, xp, من ميديا فاير, serial number, disk, 2017, in order to use the program phantom CD maker as this program does not require experience in order to use it and get all its services and advantages and we will talk in detail about the possibilities The program daemon gear and its wonderful services to all users as this program interacts with all computer systems including Windows 7 and Vista, eight, 10, does not change completely and can be said that this f eature helped spread the program significantly among people. Download Power ISO Burn and burn CDs for Windows Power ISO is one of the great programs in burning and burning CDs at high speed, where you can by copying the program and create fake CDs easily and install Windows and edit files in ISO format, the program burns CDs, whether they CDs or DVDs without problems and easily,
0 notes
Text
Como grabar una imagen linux en tarjeta SD booteable – Etcher
Para quien desea probar las mayoría de las distros, como yo, una herramienta muy útil es USB-ISO-MAKER. Siempre necesito tener estas herramientas a mi disposición, ya que siempre estoy probando las distros.
Durante mucho tiempo, he recurrido a Rufus en Microsoft Windows como mi constructor de un USB más confiable, y por todas estas…
View On WordPress
0 notes