#Lamp Wiring Diagram
Explore tagged Tumblr posts
Visit Tumblr Blog
Explore Tumblr blogs with no restrictions, modern design and the best experience.
Last Seen Tumblr Blogs


Fun Fact
28.6 is the average number of monthly visits per US mobile user.
Text
Why Understanding Lamp Parts Is Important for Repairs?

When your lamp suddenly stops working or flickers in the middle of the night, the first instinct might be to toss it aside or call a professional. However, knowing why understanding lamp parts is important for repairs can save you time, money, and the hassle of having to replace a perfectly good lamp. In this article, we'll dive deep into the critical lamp components, how they work together, and why it's essential to understand them before attempting any repairs.
1. The Basics of Lamp Anatomy
Before you can start fixing a lamp, you need to understand how it functions. A lamp is made up of several essential parts that work together to light up your space. Some of the most common components include:
Lamp Socket: This is where the bulb is screwed in and provides the electrical connection to light the bulb.
Switch: Controls whether the lamp is on or off by completing or interrupting the circuit.
Bulb: The light source of the lamp.
Power Cord: Carries electrical current from the power outlet to the lamp.
Base and Shade: The structure that holds everything in place and directs the light.
Here’s a quick table summarizing the most essential parts and their functions:Lamp PartFunctionLamp SocketHolds the light bulb and provides electrical connection.SwitchTurns the lamp on or off by completing or interrupting the circuit.BulbThe source of light in the lamp.Power CordTransfers electrical power from the outlet to the lamp.Base and ShadeProvides structural support and directs the light.
Understanding these parts is the first step in being able to troubleshoot and repair your lamp.
2. The Common Lamp Problems and Their Parts
One of the main reasons why understanding lamp parts is important for repairs is that it helps you identify the underlying issues that could be affecting your lamp. Here are a few common problems and how the parts could be involved:
Lamp Won’t Turn On: Often a problem with the power cord, socket, or switch.
Flickering Light: This could be caused by a loose connection in the socket or a faulty bulb.
Dim Light: The bulb may be nearing the end of its lifespan, or the socket might be corroded.
Let’s break it down with a table:ProblemPossible CauseLamp won’t turn onPower cord, socket, or switch issue.Flickering lightLoose bulb, faulty socket, or damaged power cord.Dim lightOld bulb, faulty socket, or incorrect wattage.
By recognizing these issues, you can quickly determine which part needs attention.
3. How Knowing Lamp Parts Helps with Troubleshooting
When you understand the components of your lamp, you’re in a much better position to troubleshoot effectively. Here’s a simple step-by-step guide to diagnosing common lamp issues:
Check the Bulb: Ensure the bulb is screwed in properly. If it’s burnt out, replace it with a new one.
Inspect the Socket: If the bulb still doesn’t work, check the socket for any visible damage or signs of wear.
Test the Switch: If the bulb and socket seem fine, check the switch to make sure it’s functioning correctly.
Examine the Power Cord: Lastly, inspect the power cord for any cuts or frays that could disrupt the electrical flow.
Having a clear understanding of these steps, based on knowing the parts, will make the troubleshooting process much faster.
4. Importance of Choosing the Right Replacement Parts
When it comes to lamp repairs, using the right replacement parts is critical. Mismatched or low-quality components can make the problem worse or cause safety hazards. For example, using a bulb with too high of a wattage can overheat the socket, causing potential fire hazards.
Here’s a table showing common lamp parts and their recommended replacements:Lamp PartRecommended ReplacementLamp SocketCompatible with the bulb size and type.SwitchSame voltage and current rating as the original.BulbMatching wattage and type (LED, CFL, etc.).Power CordSame length and voltage rating as the original.
Always make sure the replacement part matches the specifications of the original to ensure safety and longevity.
5. When to Seek Professional Help
Even with a basic understanding of lamp parts, some repairs might require professional expertise. If your lamp is complex (like an antique or designer piece), or if you’re unsure how to handle electrical components safely, it’s a good idea to reach out to a professional.
Here are a few signs it’s time to call in an expert:
Electrical Burns: Visible damage on the power cord or socket could indicate an internal wiring problem.
Persistent Flickering: If you’ve replaced the bulb and checked the socket but the flickering continues, it might be a deeper electrical issue.
Advanced Wiring Issues: If you suspect the wiring inside the lamp is faulty, it’s best to leave it to an electrician.
6. Conclusion: Empowering Yourself for Lamp Repairs
Understanding lamp parts is not only essential for performing effective repairs, but it also empowers you to save time and money. By familiarizing yourself with the key components and their functions, you can troubleshoot issues on your own, avoid unnecessary replacements, and even choose the right replacement parts. Remember, knowing when to fix it yourself and when to seek professional help can prevent further damage and ensure that your lamps continue to shine bright for years to come.
In conclusion, why understanding lamp parts is important for repairs cannot be overstated.
0 notes
Text

Ask for Photocell Sensor Light - #SensorLight GIANT IMPEX Auto Day/Night On & Off Photocell, LDR Sensor Switch for Lighting Waterproof Photocell - Sensor 10A
Light turn on in the dark and turn off on daytime, intelligent sensor, no need to operate by manual Fully Automatic Switching On And Off Operation.
Automatic Sensor Light Control Switch/ It can use Street Light, Garden Lights, Incandescent lamp, LED lights. If you have any query feel free to contact us. Quick Sense Innovations Official site.packing is tested before dispatched so that the item reaches to the buyer safely and undamaged.
Working : As shown in the above diagram out of three wire's Red : Load, Blue : Neutral & Brown : Phase.
Connect Red & Blue to Load Application where using (i.e. Lighting) & Brown and Blue to 230 VAC input supply. Now it is ready to operate Day/Night mode. For testing keep torch over to the Photocell load will turn ON
Automatic Sensor Light Control Switch/ It can use Street Light, Garden Lights, Incandescent lamp,
Available in #Amazo and #Flipkart Order Now:
Amazon
Flipkart
Meesho
Visit Our Store: Get 20% Off on Sale price. Use Promo Code 'GIANT20' https://giantimpex.in/smart-lighting/auto-day-night-on-and-off-photocell-LDR-sensor-switch-light
#giantimpex#ecommerce#gurugram#delhincr#onlinemarketing#amazon#flipkart#marketplace#meesho#absorbence#motionsensor#outdoorsensor#outdoorlight#wirelessalarm
3 notes
·
View notes
Text

You've continued to visit the hatch whenever you can, except now you're finally inside. But you can't help but feel just as frustrated as you did before. It feels as though every question that you answer only leads to more questions. You got inside the hatch, and for what? For a stranger to begin talking to you through a computer and start giving you directions and vague explanations. They've told you a few strange things, talking about energy wells and Apollo, and asking you all kinds of questions about other monitoring stations. Any time you ask for an explanation they wave you off. At first you followed blindly, but you've become more and more frustrated as time has gone on. And the worst part, the biggest question they won't answer is….
Heresy: Don't worry about the euthanasia protocol.
Heresy: Can you give me the readout of station 272 please?
You simply stare at the screen in annoyance. For a few weeks now you've been providing the stranger with readouts of the status of the few functional stations. What Heresy does with that, you don't know. You don't even know what they are or why they want to know about them. As time goes on and your questions go unanswered you've increasingly started to feel used.
VitalsStation12B: I want you to answer my questions first.
VitalsStation12B: Why aren't you telling me anything?
Heresy: Because it isn't relevant.Heresy: I'm trying to help you, and you need to trust that I'm doing that.
VitalsStation12B: It's hard to trust you when you aren't explaining what you're doing.
VitalsStation12B: I have no idea what this station is or what the others are, or what you even want to do with that information.
Heresy: Everything will be answered in due time.
Heresy: I really do need the data on 272. Please.
You briefly consider continuing to follow along but you've had enough. You get up from your chair without even sending Heresy a message. Surely there's something else you could be doing to figure out what's going on than trusting a stranger who seems insistent on masking everything from you.
Look around>
The hatch is still in decay but it's in slightly better condition since you started visiting. You have no idea how to fix electronics, so the reflector lamp is still your only source of light, but you've cleaned up the bits of drop ceiling and placed buckets under the leaky pipes. There's not much to see, though. It's a tiny room. You have the DESK behind you, the LADDER in front, and the SIREN and LOCKER to your side.
Look at desk>
You turn back to the desk. The COMPUTER sits in the center. Despite your efforts to clean up, there's still quite a hefty supply of PAPERS scattered about.
Look at computer>
You don't want to use the computer right now. It's not like there's anything useful, anyway. It only has 3 applications.
Look at papers>
You've tried to read the papers but it's hard to understand them. There's a lot of complex diagrams and protocols. Whoever worked here before must have had to undergo quite a lot of training to understand it. It would be hopeless for someone in the dark like you to try and understand it all.
Look at ladder>
You look back at the exit. You suppose you could just leave, you're certainly annoyed enough to consider it. But you want to search for answers instead.
Look at siren>
You really don't know what the siren is there for. You've cleaned it out but without any wiring knowledge it would be hard to know if it even worked. Or if you want it to. If only you had tried learning about fixing electronics with your dad sooner.
Look at locker>
The locker is the only thing in the hatch you haven't investigated in depth. It's held closed with a chain which suggests it's important, but Heresy has waved it off. Maybe they're right, if it's locked up so heavily perhaps its contents are dangerous. But right now you suspect they're just trying to hide it from you. You're going to get inside.
Open locker>
You jostle the chains and the handles of the locker but both are sturdy and hold firm. You'll need a tool to get it open.
Check inventory>
[Inventory]
Bolt cutters
Pocket knife
Equip bolt cutters>
You pick up the bolt cutters you've left leaning against the wall and ready yourself.
Use bolt cutters on chain>
You hold the bolt cutters open around one of the links of the chain and slam it shut as hard as you can. With a satisfying metal snap the chain breaks and falls apart, clanging against the walls on either side of the locker. The door also opens a tad, no longer held shut by the chain. Looks like that was all that was holding it closed.
Open locker>
NEXT
PREVIOUS
10 notes
·
View notes
Text
How to Wire a 3-Way switch
You may be new to electrical installation but wish to wire a 3-way switch.
3 way switch wiring is harder than a single pole. It is the interconnection of two or more switches.
3-way light control helps in hallways and large rooms to turn the lights from two locations.
But it’s harder to install than a single-pole switch
Read this article to learn how to wire a 3-way switch
Components of a three-way switch
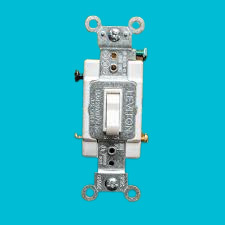
The common
Two traveller terminals
Ground or Earth terminal.
How the 3-way switch works
A three-way switch allows you to control a light fixture like other switches, but they do this from two ends.
When the toggles from both switches are up or down, the circuit is complete and the light will be ON. When they are opposite, the circuit opens and there will be no light. This allows any of the switches to turn on or off the light.
Tools and materials required to wire a 3-way switch.
They include:
Four in one screwdriver
Wire stripper
Plier
Voltage tester
Electrical tape
Utility knife
Materials required
Two 3-way switches
14-3 or 12-3 Romex cable.
Electrical boxes.
Note: Before any electrical installation, ensure that you power off the circuit breaker and also wear your protective glove to prevent electric shock and other hazards.
Steps to Wire 3-Way switches
There are three methods, but all depend on whether the hot wire goes to the switch first or the light fixture.
Whichever way you prefer, installing a 3-way light is easy when you follow our switch wiring procedures.
Turn off your circuit breaker

Locate the circuit breaker that controls the branch circuit and turn off the circuit’s power.
This is to prevent electrocution and other hazards during the installation.
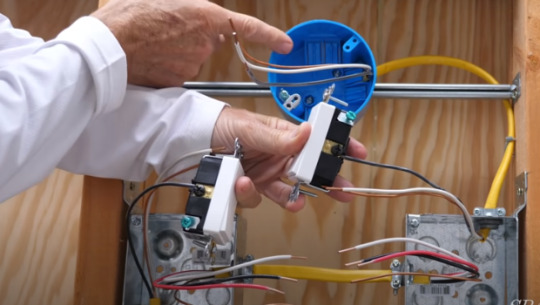
Mount the electrical box
Locate the two places you want to mount your switch and install the metal boxes.
This may be at the entrance and inside of your room, ends of the hallway, staircase, or any place of your choice.
Feed in your cables.

Feed in a lengthy 14-3 NM Romex cable, or 12-3h if you are connecting to a 12-gauge wire. The 14-3 cable is a 14 gauge Romex cable with three insulated conductors, plus a ground wire.
The three insulated conductors are black, red, white, plus the earth wire.
Connect the wires and switches
The 3-way switch comes with 4 terminals, the black or common terminal, two brass colour or traveler terminals, and the green screw “earth terminal”.
Connect the black (hot) cable coming from the power source to the black terminal of the switch
Join the neutral or white wire from the power to the white wire from the NM cable, using a wire nut
Also join the two brown wires together
Fix the bare copper or green earth cable to the metal box and connect it to the green terminal
Connect the black and red traveler wires from the NM cable to the brass terminals on the switch.
Moving to the second switch box,
Join the two white wires
Join the two brown wires too
Connect the black wire that goes to the lamp holder to the black terminal of the switch
Fix the earth wire on the body of the switch box and connect it to the green terminal
Connect the black and red travelers from the first switch to the traveler screws or terminals of the second switch to complete the installation.
Install the lamp holder
Connect the black or hot wire from the second switch to one of the screw terminals, and the white or neutral wire to the second terminal, fix your bulb and test-run your project.
Three-Way Switch Wire Diagrams
In this section, you will see different ways you can wire a 3-way switch
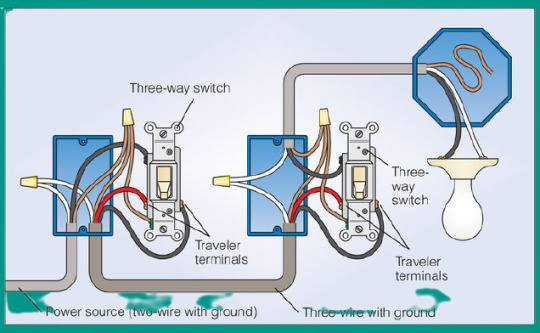
3-way wiring diagram: Power to Light Fixture.

This shows how you can wire a three-way light when the power is coming from the light fixture.
From the diagram, you can see that the power source enters the fixture box
The hot or black wire connects to the common terminal of the second dimmer.
Blue and red wires link the traveler terminals for both switches
We also connected the red wire to the common terminal of the first switch, which moves back to the light.
Three-way switch wire diagram: power to the switch
This shows a 3-way light control when the power enters from the switch.
From the diagram, you can see that we connected the incoming live wire to the common terminal of the first switch.
We then connected the traveling terminals of the two switches with black and red wires before connecting the second common terminal to the bulb.
Note: The neutral (white) wire from the supply moved to the bulb without branching to any switch.
3-way wiring diagram: Power to the junction box.
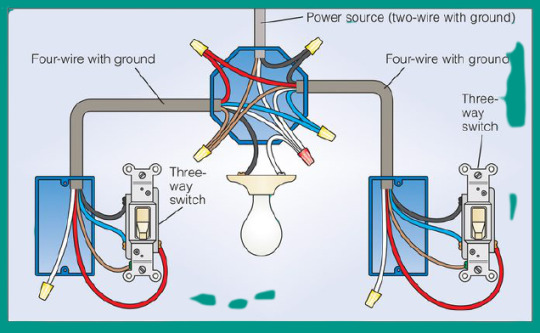
From the above wiring, the supply enters the junction box and connects to the common terminal of the right switch.
Two Romex cables with four wires and an earth cable joined at the junction box to connect the traveler terminal of the two switches and the bulb.
Difference between three-way switches and single poles
A single pole light switch has two terminals and a ground screw while a three-way switch has 3, plus a ground screw.
The toggle switch for a single-pole has ON and OFF while the 3-ways doesn’t have.
A single-pole switch controls a ceiling light from one location while the three-way control light from two different locations.
A single pole is good for small rooms with few light sources, while a multi-way switch is for large rooms and stairwells.
Frequently Asked Questions
Does it matter which wire goes where on a 3-way light switch?
Yes, the black “hot wire” from the power source must connect to each switch’s common screw terminal, to enable it to carry the current from the source to the switches and then to the light fixture.
How many wires are hot in a 3-way switch?
Two hot or black wires. The one from the source which connects to the first switch common terminal, and the second one that runs from the 2nd switch common terminal to the light fixture.
What happens if you wire a light switch the wrong way?
if you wire a light switch the wrong way, the switch will not work properly, and may even lead to electrical hazards.
2 notes
·
View notes
Text
How to Wire a Light Switch? A Guide to 3-Wire Installation
Wiring a light switch is a manageable task when done correctly. This guide will teach you how to wire a light switch safely, covering key tools, techniques, and best practices for long-term efficiency and safety.
What is a Wire Light Switch?
Knowing how to wire a light switch is a valuable skill for homeowners, renters, and DIY enthusiasts alike. Although electrical work may seem intimidating, wiring a light switch is one of the most straightforward tasks when done with care and attention to detail. By learning how to perform this basic wiring project, you'll not only save money on hiring an electrician, but you'll also gain the confidence to tackle other small electrical jobs around your home. This blog is designed to guide you through the wiring process with easy-to-follow instructions, focusing on safety, cost-effectiveness, and best practices for how to wire a light switch. Let’s dive into what it takes to wire a light switch correctly. Using an electrical installation diagram can be helpful while thinking about how to wire a light switch. Understanding the Basics of Electrical Wiring Before jumping into the how to wire a light switch process, it's essential to understand how electrical wiring works in a home. In simple terms of how to wire a light switch, electricity flows through a series of circuits. Each circuit consists of a power source (such as a breaker), wires, and devices like outlets or light switches that control the flow of electricity. A light switch is essentially a "gate" that allows or prevents electrical current from flowing to the light fixture. Key Components of a Light Switch: - Live (Hot) Wire (Black Wire): This carries current from the power source to the switch. - Neutral Wire (White Wire): This completes the circuit, allowing current to return to the power source. - Ground Wire (Green or Bare Copper): This provides an additional path for electricity in case of a fault, ensuring safety. Understanding how to wire a light switch component will help you make the correct wire connections when installing or replacing a light switch. Do You like Home Lamps? Why Vintage Mushroom Lamp is so Popular in Home Decor? Why Sunset Lamp Is Big Trend in Home Lighting? Motion Sensor Lights: How to Avoid Poor home Security? Tools and Materials Needed to Wire a Light Switch Having the right tools and materials on hand is crucial for a smooth wiring process. Here’s a list of the basic tools you’ll need: - Screwdriver (Flathead or Phillips): To remove and install screws on the switch and cover plate. - Wire Strippers: For stripping insulation from the wires before attaching them to the switch. - Voltage Tester: To ensure that no live current is present before starting work. - Electrical Tape: Used to wrap around wire nuts and terminals for added insulation and protection. - Light Switch: Choose the appropriate type of switch (single-pole or three-way). - Electrical Box: If you're installing a new switch, you'll need an electrical box to house the switch and wires. - Electrical Wires (Black, White, and Ground): These will carry current to and from the switch.
What is a 3-wire Switch for Home and Office?
A 3-way switch is a type of electrical switch that allows you to control a single light fixture from two different locations. This is particularly useful in areas like hallways, staircases, or large rooms where a single switch might not be convenient. Unlike a single-pole switch, which has only two terminals (one for the incoming power and one for the outgoing power to the light), a 3-way switch has three terminals. These terminals are typically labeled "common," "traveler 1," and "traveler 2." The "common" terminal is connected to the power source, while the "traveler" terminals are used to connect the two switches. When you flip one of the 3-way switches, it completes or breaks the circuit between the power source and the light fixture. This means that you can turn the light on or off from either location. The key to the functionality of a 3-way switch lies in the way the "traveler" terminals are wired together. When both switches are in the same position (either both on or both off), the circuit is complete and the light is on. However, when the switches are in different positions (one-on and one-off), the circuit is broken and the light is off Source: Angi: What Is a Three-Way Switch and How Does It Work?
Step-by-Step Guide to Wiring a Light Switch
1. Turn Off the Power Safety is the most important factor when working with electricity. Before touching any wires, turn off the power to the circuit you're working on at the main breaker panel. It's crucial to confirm that the power is off by using a voltage tester on the switch and wires before proceeding. Never skip this step guide on how to wire a light switch. 2. Remove the Old Switch (If Applicable) If you are replacing an old switch, start by removing the cover plate. Unscrew the mounting screws that hold the switch in place and gently pull the switch away from the wall. Use the voltage tester again to ensure no current is running through the wires. Once confirmed, loosen the terminal screws and disconnect the wires from the old switch. Tip: Take a picture of the wiring setup before removing the old switch. This will help you remember where each wire was connected. 3. Examine the Wires At this point, you should have three wires exposed: - Black Wire (Hot): Connects to the power source. - White Wire (Neutral): Completes the electrical circuit. - Green or Bare Wire (Ground): Protects against electrical faults. Ensure that the wires are not frayed or damaged. If they are, strip about 1/2 inch of insulation off the ends of each wire using a wire stripper. 4. Install the New Switch Now it's time to install the new light switch. Depending on your needs, you might be using a single-pole switch (for controlling one light from one location) or a three-way switch (for controlling a light from two different locations). Single-Pole Switch Installation: - Attach the black wire (hot) to the brass terminal screw. - Connect the white wire (neutral) to the silver terminal screw. - Fasten the green or bare wire (ground) to the green grounding screw. Three-Way Switch Installation: - Connect the common wire (usually black) to the dark-colored screw. - Attach the other two traveler wires to the brass screws. - Ground the switch by connecting the bare copper wire to the green screw. 5. Secure the Switch After connecting the wires, carefully push them back into the electrical box. Ensure there’s no excessive bending or crimping, which could damage the wires. Once the switch is securely placed in the box, fasten it with the mounting screws. Attach the cover plate to give it a neat finish. 6. Turn the Power Back on and Test Once everything is in place, turn the power back on at the breaker. Test the switch by flipping it on and off to ensure it works properly. If the light turns on and off smoothly, you’ve successfully wired the switch. For your better Rooms: Decorative Light Bulbs: What is Economy Home Decor? How to Install Solar Power Bank: A Useful Guide What is Himalayan Salt Lamp? Best Healing Lamp
Best Practices for Wiring a Light Switch
Wiring a light switch in a home is more than just following the steps listed on how to wire a light switch blog. It’s about ensuring that the installation is safe, efficient, and cost-effective. Below are some best practices to keep in mind: - Always Double-Check the Power: Even if you’re sure the power is off, double-check with a voltage tester before touching any wires. It’s better to be safe than sorry. - Label Your Wires: If you're working on a more complex system (e.g., three-way switches), label your wires before disconnecting them to avoid confusion later on. - Use Wire Nuts and Electrical Tape: Wire nuts should be used to secure wire connections. Wrapping electrical tape around the wire nuts provides extra protection and insulation. - Follow Local Building Codes: Ensure that your electrical work complies with local building codes. If in doubt, consult an electrician to check your work. Wiring a Light Switch: Cost Efficiency One of the primary reasons people attempt DIY electrical work is to save on the cost of hiring an electrician. Installing a light switch is a relatively inexpensive project when done yourself. Here’s a quick breakdown of the typical costs: - Basic Light Switch: $3 - $10 - Electrical Box (if needed): $2 - $5 - Wiring (per foot): $0.20 - $0.50 - Tools (if not already owned): Voltage testers, wire strippers, and screwdrivers range from $10 - $50 Hiring an electrician, on the other hand, can cost anywhere from $50 to $150 for a simple switch installation. Doing it yourself can save you a significant amount of money, especially if you have multiple switches to install or replace. Before you start installing yourself once read this How to Wire a Light Switch blog. Common Mistakes to Avoid Even though wiring a light switch is relatively straightforward, some common mistakes can lead to problems down the line: - Connecting the Wrong Wires: This is the most common mistake people make when installing switches. Always double-check which wire is live and which is neutral to avoid electrical faults. - Over-Tightening Screws: Screws should be snug but not overly tight, as this can damage the wire. - Forgetting to Ground the Switch: Skipping the ground wire can lead to safety hazards, such as electrical shocks. Always make sure the switch is grounded properly. - Ignoring Loose Connections: Loose wire connections can cause flickering lights and even lead to overheating or electrical fires. Ensure all wires are tightly secured under the screws. Use proper electrical tape for safety. Safety Tips for how to wire a light switch - Always Wear Insulated Gloves: Wearing rubber gloves designed for electrical work can protect you from accidental electric shocks. - Work in Good Lighting Conditions: Adequate lighting ensures you can see what you're doing and helps avoid wiring mistakes. - Use a Circuit Diagram if Needed: If you're dealing with multiple switches or more complex wiring setups, consult a diagram to understand how the wires are supposed to be connected. Now about Home Gadgets: What is the importance of Cleaning Tools and Equpment? Electric Fire Pit Buyer’s Guide: What to Check First? Best Washer and Dryer 2024: An In-Depth Analysis
The Importance of Proper Light Switch Installation
Properly wiring a light switch isn’t just about making sure the light turns on and off; it’s also about safety and efficiency. Correct installation: - Prevents Electrical Fires: Faulty wiring is one of the leading causes of electrical fires in homes. Proper installation ensures that your home’s electrical system functions safely. - Enhances Home Value: Well-maintained electrical systems are crucial for the overall value of your property, especially when selling or renting. - Increases Energy Efficiency: Proper wiring can help reduce energy waste and improve the longevity of your lighting fixtures.
Conclusion
Wiring a light switch is a valuable and empowering skill to have. Not only does it save you money on hiring an electrician, but it also allows you to take greater control over small electrical repair tasks in your home. Completing this project successfully provides a sense of accomplishment and may give you the confidence to tackle other DIY projects in the future. However, the key to how to wire a light switch safely is understanding the process and following the necessary precautions. Always make sure the power is turned off on the home electric panel before starting, double-check connections, and follow local electrical codes to ensure your work is safe and compliant. As with any DIY project, safety should always be your top priority. Working with electricity requires a cautious approach, and having the right tools for repair and knowledge makes all the difference. In addition to the satisfaction of doing Wiring a light switch can be more cost-effective than hiring a professional. While the upfront costs for tools and materials are minimal, the long-term benefits are considerable. Whether you're simply replacing a worn-out switch or upgrading to a more energy-efficient system, mastering how to wire a light switch skill can make a lasting impact on your home maintenance routine. Yet not every project is suited for DIY, especially if the wiring in your home is old or complex. If you're unsure about any part of the process or encounter unexpected issues, it's always a good idea to consult a licensed electrician. It's better to be safe than to risk causing damage or injury due to improper wiring. In the end, learning how to wire a light switch is a practical skill that offers both immediate and long-term benefits. By following the steps outlined in this gadget guide, adhering to safety protocols, and understanding your limits, you can confidently complete this project and improve your home’s functionality. These Articles are only for You: How to Use Home Scent Diffuser? Best Aroma Device for Room AC vs. DC Power Cord: Choose the Best for You? Why the Right AC Adapter Need for Your Devices?
Frequently Asked Questions
1 Can I wire a light switch without turning off the power?No, it’s highly dangerous to work with live wires. Always turn off the power at the circuit breaker before working on any electrical project. Failing to do so can lead to electric shocks, burns, or even fatal accidents. Use a voltage tester to double-check that the power is completely off before starting work.2. What is the difference between a single-pole switch and a three-way switch?A single pole switch controls one light fixture from one location. It has two terminal screws plus a grounding screw. A three-way switch, on the other hand, allows you to control a single light from two different locations (like at the top and bottom of a staircase). Three-way switches have three terminal screws and a grounding screw, along with additional wiring for the travelers.3. What if the wires in my electrical box are different colors than expected?While black is typically the hot wire, white is the neutral wire, and green or bare is the ground wire, not all homes adhere to standard color codes—especially in older homes. If you’re unsure, it’s essential to use a voltage tester to identify which wire is hot and which is neutral. If in doubt, consult a professional electrician to avoid making a dangerous mistake. Don't forget to check electrical taping whether they are leaking currents or not.4. Can I install a dimmer switch instead of a standard light switch?Yes, you can replace a standard switch with a dimmer switch as long as the dimmer is compatible with your light bulbs. Dimmer switches are typically used for incandescent, LED, or CFL bulbs, but you must ensure that the wattage rating of the dimmer matches the bulb’s requirements. The wiring process for dimmers is slightly different but still manageable for DIYers.5. How do I know if my light switch is properly grounded?Grounding is essential for safety, especially with modern electrical systems. A grounded light switch will have a green or bare copper wire attached to the green grounding screw on the switch. If there is no ground wire in your electrical box (common in older homes), you should consult an electrician to upgrade the wiring. Proper grounding helps prevent electrical shocks and protects against electrical fires. Read the full article
0 notes
Text
[ad_1] Lighting, additionally often known as luminaires, are available in quite a lot of sizes, shapes, and wattages. The diagram under reveals the principle kinds of devices. Clearly, there are various completely different varieties of every kind of fixture. There are additionally articles discussing varied elements of lighting. So what's a Gentle Fixture? A mild fixture is a lighting meeting that features a number of mild sources and parts designed to distribute the sunshine, place and shield the lamps, and join the lamps to an influence provide. The primary operate of a luminaire is to aesthetically modify the form of the sunshine supply and management the distribution of the emitted mild. A lighting fixture's electrical system offers energy, management, or different electrically-based features, corresponding to wires, sockets, switches, drivers, connectors, circuits, and sensors. Optical parts might embrace diffusers, lenses, prismatic components, waveguides, reflectors, refractors, louvers, and so on. LED lights promise excessive luminous output, power effectivity and lengthy lifespan, making them appropriate for a lot of lighting purposes that had been beforehand the area of lighting. Incandescent or fluorescent lights. The sunshine supply of an LED lighting fixture will be an LED bulb or an built-in LED module. What's the distinction between lighting and becoming lights? Fixtures are objects which can be usually hooked up or mounted to the property, whereas fittings are objects that aren't hooked up to the property aside from nails or screws, corresponding to work or mirrors. How do I select a great mild fixture? When selecting a mild fixture, begin along with your favourite components within the room and discover lighting that enhances them. For instance, you probably have a fashionable couch, clean-lined lighting will make the house stand out. One other tip is to take a look at the cabinetry or door hardware within the room and select fixtures with complementary finishes. What does lighting embrace? Lighting may additionally produce other options, corresponding to a reflector to direct the sunshine, an aperture with or and not using a lens, an outer shell or housing to align and shield the lamps, an electrical ballast or energy provide, and a shade to diffuse the sunshine. Activate a light-weight or level it in the direction of your work space. What do lighting fixtures do? Lighting present mild. They can be utilized as ornamental components in a house or constructing, or they can be utilized for sensible functions, corresponding to offering lighting in areas which can be usually unlit. Lighting may improve security by illuminating darkish areas of a constructing the place individuals might journey on one thing and injure themselves. How do lighting fixtures work? Lighting work by changing electrical energy into mild. They do that utilizing mild bulbs, that are units that comprise an electrical present and produce mild when switched on. The sunshine bulb itself is a part of the fixture that's seen whenever you activate the lights in your house or workplace. The second piece of kit on most lighting fixtures is named an electrical socket (or field), which incorporates all of the wall-mounted electrical retailers you may plug issues into. The place are lighting used? You've got most likely seen it at residence. However the place do the sunshine fixtures really go? There are various locations in your house the place you need to use lighting. For instance, within the kitchen, rest room and bed room, that you must take into account what sort of ambiance you wish to create with every fixture. for instance: 1. Bed room: Use an under-bed lamp with a job lighting function, corresponding to a dimmer swap, to keep away from disturbing others making an attempt to sleep. 2. Kitchen: If it is a brilliant, sunny day exterior and you do not want overhead lighting as a result
of it is obscured by window frames or cupboards, and you are not cooking at evening, ambient lighting will most likely suffice! 3. Lavatory: Darkish interiors might imply the reply is to make use of overhead lighting with a number of bulbs so they do not come on on the similar time when somebody opens the lavatory door. Regularly Requested Questions Are ceiling lights fixtures? Ceiling kind of fixture mounts on to the ceiling and has a glass or plastic shade that obscures the bulb. Ceiling fixtures have been widespread in houses for practically 100 years, typically offering all of the ambient lighting for a room. What's the best peak for kitchen pendant lights? The best peak of your kitchen pendant lights will depend upon quite a lot of components, together with ceiling peak and lighting goal. As a normal guideline, pendant lights ought to be hung about 32 to 36 inches above your kitchen island or countertop. Nevertheless, modify the peak in accordance with your private desire and the particular wants of your kitchen. What's the goal of a lighting fixture? Lighting present mild. They can be utilized as ornamental components in a house or constructing, or they can be utilized for sensible functions, corresponding to offering lighting in areas which can be usually unlit. Can I set up recessed lighting in a kitchen with a low ceiling? Sure, recessed lighting will be put in in kitchens with low ceilings. Nevertheless, it is very important take into account the obtainable house and depth of recessed lighting. To make sure correct set up and keep away from potential clearance points, select shallow or slim recessed lighting designed particularly for low ceilings. [ad_2] Supply hyperlink
0 notes
Text
👉 LED POD Light ✅ Led Light Bar Switch 5Pin Laser 🔥

Nilight LED POD Lights Rocker Switch Led Light Bar Switch 5Pin Laser On/Off switches 20A/12V 10A/24V Switch with Jumper Wires Set for Cars,Trucks,RVs,2 Years Warranty
19% Discount
Sale Price: $8.09
List Price: $9.99
Get Instant 19% Discount >>

Get Instant 19% Discount >>
Product Feature
👉 Easy to install and use: 5 pin on-off rocker switch with SPST design (single pole single Throw), simple installation, freely turn on or off the light
👉 Cool illuminated light: built-in two premium LEDs Emits soft light to illuminate the patterns, easy for you to find the switch in the dark
👉 Sturdy and durable: made of high-quality plastic and well-conductive pins; laser-etched pattern, not easy to fade away
👉 Wide applications: Available for controlling LED light pods, cube lights,LED light bar, LED work lights,spot lights,fog lamps, driving lights, headlights, taillights, off road lights, etc
👉 The package included: 1X 5 pin rocker switch, 1X jumper wires set, 1X wiring diagrams.2 Year Warranty by Nilight.
Get Instant 19% Discount >>
#LEDPODLight#Review#Reviews#Brand#GoodorBad#Amazon#Features#Price#Inboxing#Works#amazongoods#amazon#amazonfinds#amazondeals#amazonproducts#marketing#affiliatemarketing#onlinemarketing#amazonprime
0 notes
Text
Turn Signal and Hazard Button
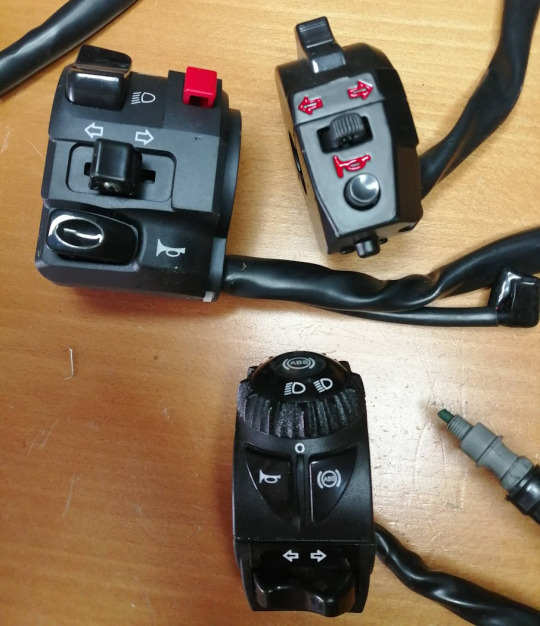
When I bought the motorcycle, I had already identified a few things I wanted to address. But in real use, what I found the most annoying was the left turn signal and hazard button.
The turn signal button looked more like a bedside lamp switch than an essential component you use all the time. The only solution I see is to replace the entire switch assembly.
So, I decided to:
Add a hazard button because I mainly use this motorcycle in the city.
Give up on the ABS control and display because I don't plan on doing intensive off-roading.
Remove the clutch switch because it's particularly ugly and only used to prevent starting without the clutch engaged. So this switch is just a possible source of trouble without added value.
I was torn between different models... The one on the right in the photo is nice, minimalist, with a retro and off-road style, but the buttons are not pleasant to use, and it lacks a hazard button. So, I opted for the larger left-hand unit, which is less elegant.
When you buy a switch, the connector is never the same as the one on the vehicle. So, rewiring a connector is necessary. I could have cut the harness of the original connector, but I wanted to keep it intact.
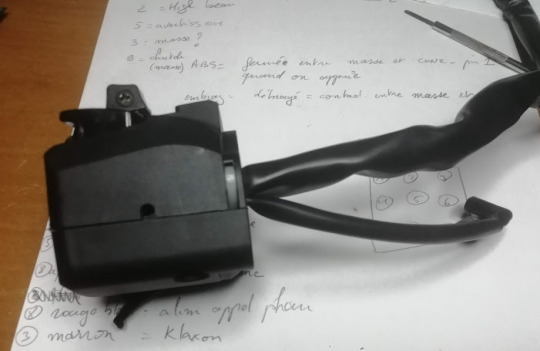
The switch I chose also has a connection for a clutch sensor, but I will cut these wires and short them out. This makes for a cleaner control setup and eliminates a potential failure point.
The original switch uses a DJ7021 9-pin connector. I ordered such a connector, pre-wired here, and it mounted on the switch without any particular issue.
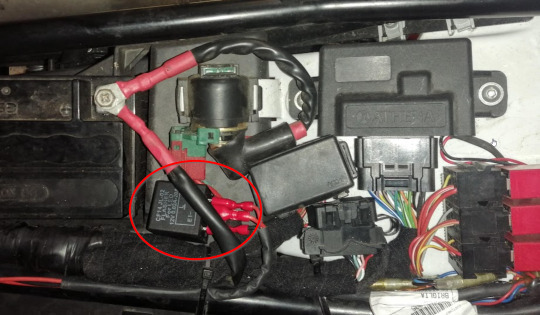
The remaining question is whether the flasher relay can handle controlling all four turn signals simultaneously for the hazard function. However, it is not shown in the motorcycle's wiring diagram, and I have never spotted it on the bike. Strange.
I try it anyway, and once mounted on the bike, everything works perfectly, except for the turn signal that doesn't flash. That's when I realized that the flasher relay is integrated into the original switch. This is the first time I've seen this. Checking the website of the spanish supplier LEONELLI [link] , it's confirmed from the catalog [link] that states : "Central de intermitencia incorporada / Incorporated flashing unit".
When changing the switch, you must therefore add a separate flasher relay. You should choose a 3-wire relay so that the flashing frequency is independent of the type and number of turn signals. But where to place this relay? There really isn't any free space. I thought about putting it near the regulator, but it's too hot, and there's not enough space under the tank. Eventually, the relay found its place under the seat with the electrical components.
In the end, I now have a standard and pleasant turn signal control, easily accessible headlight and horn buttons, and the addition of hazard lights. But I admit it's not very aesthetically pleasing.

For more tips, tricks, improvements, and comments on the Fantic Caballero, you can find them [here]
0 notes
Text
(technofilth)
I am so sorry for the grimes
I beg your pardon for the antiseptic
an impolite existence, oh I am sure:
Forgive me for taunting you as a while outline from beyond the fog,
for burning widely-visible all the way up in the air.
My apologies for existing just beyond the precipice,
for you to look out on, though the ground gives out before your feet
could safely be carried there, not without a price
It truly wasn’t my intention, you see.
It’s just that
there was this grand glass-front, sharp-shaped structure,
and a lone figure looking on down from behind its many windows
there was a long wide alchemical instrument of distillation,
with many chambers, like a digestive tract.
It’s just that there was this sensual steampunk device,
so many cables that the hard marble of old Galathea could not connect with,
be she though your wish
If it weren’t for the cracked mirrors,
showing pitch-caked ruins,
tangled insect limbs and members, around the lower piping of the city,
and the most archetypical dweller in the metropolis,
neon-lamp-woman wrapped in cables,
looking on with her disturbed, half-living eyes
at an ever-tarnished, gas-mask summer, in dresses and in uniform,
tears of face pressing through the ridges in the warehouse.
My curious, hunngry gazes peering out from within my eyeballs,
discerning machinery posed above concrete,
ever ready to descend.
And if that happens to you, well, then,
you come to wish for the six-limb of an insect,
for gecko-feet ready to conquer any terrain.
You feel the sharpness and the undulating of rock and conception,
the surreal three-dimensionality, the many chambers in the rock,
pointing up like onion spires,
like model universes in theoretical physics diagrams
surreal, open’d world-lines,
cesarian bellies now stiched back together
yet bursting with tentacle and bizarre creative assemblies from doll-limbs
universes, in the potential,
like long dead urns,
like hedgehog beings,
made of pure hate, repulsive the sting into every direction.
You could not kiss without cutting yourself.
The cable-laden thing crawling forgotten on the lab-floor,
the uniform’d watcher holding the switches
and the metal walls themselves,
it all becomes me.
All becomes held within me.
Waiting and sitting in this surreal void here.
And if that happens to you, well then,
all the green glow of the workshop can’t saved you.
I never asked to be like this.
I never asked to look down and find these blackened hands.
Yet, when your soul does that,
it becomes the soul of a monster, rotten and wicked
repulsive and rejected, marked by the sign
that there is something in here that ought to be avoided.
That you should not draw near:
I beckoned you only with insect’s claws,
to soil a lilly white abdomen with insectiod juices,
I called in your USB drive, vanishing amid a tangle of cables,
when a computer virus still meant something potential and romantic
and not just this endless stream of malware.
I lured with the bacon smell of something that isn’t piglet upon this pike,
ready for you to rend and take.
You let me. I let you.
Devastate me.
The bits representing our hearts hung upon long wires in the art installation
dumbly clacking together
past exposed ribcages.
The animatronic peeled nude like a banana,
for the mechanics to work its oily insides.
I’m saying cut me.
Look inside of me.
Slice right in and taste the void.
Can you see my uglyness?
Do you like my inner emptiness?
Will you suck and lick the juices and go lapping them all the way up.
Blood and semen.
Wound secretions soaking through.
I’m asking will you come close and be soaked in my grunge?
0 notes
Text

Ask for Photocell Sensor Light - #SensorLight GIANT IMPEX Auto Day/Night On & Off Photocell, LDR Sensor Switch for Lighting Waterproof Photocell - Sensor 10A
Light turn on in the dark and turn off on daytime, intelligent sensor, no need to operate by manual Fully Automatic Switching On And Off Operation.
Automatic Sensor Light Control Switch/ It can use Street Light, Garden Lights, Incandescent lamp, LED lights. If you have any query feel free to contact us. Quick Sense Innovations Official site.packing is tested before dispatched so that the item reaches to the buyer safely and undamaged.
Working : As shown in the above diagram out of three wire's Red : Load, Blue : Neutral & Brown : Phase.
Connect Red & Blue to Load Application where using (i.e. Lighting) & Brown and Blue to 230 VAC input supply. Now it is ready to operate Day/Night mode. For testing keep torch over to the Photocell load will turn ON
Automatic Sensor Light Control Switch/ It can use Street Light, Garden Lights, Incandescent lamp,
Available in #Amazo and #Flipkart Order Now:
Amazon
Flipkart
https://www.flipkart.com/giant-impex-auto-day-night-off-photocell-ldr-sensor-switch-set-2-6-one-way-electrical/p/itm9ef4c23304823?pid=SCHGGJEYPWHYPAMR&lid=LSTSCHGGJEYPWHYPAMRBPZ4KK&marketplace=FLIPKART&q=giant+impex&store=search.flipkart.com&srno=s_3_102&otracker=AS_Query_HistoryAutoSuggest_2_3_na_na_na&otracker1=AS_Query_HistoryAutoSuggest_2_3_na_na_na&fm=search-autosuggest&iid=3d41270a-6c44-4ae4-a59c-b911c3cb6d93.SCHGGJEYPWHYPAMR.SEARCH&ppt=sp&ppn=sp&ssid=b8wf8pvk8w0000001731326711893&qH=852d7bd6eb84a156
Meesho
Visit Our Store: Get 20% Off on Sale price. Use Promo Code 'GIANT20' https://giantimpex.in/smart-lighting/auto-day-night-on-and-off-photocell-LDR-sensor-switch-light
#giantimpex#ecommerce#gurugram#delhincr#onlinemarketing#amazon#flipkart#marketplace#meesho#absorbence#motionsensor#outdoorsensor#motionsensorlight#outdoorlight#wirelesssensor
3 notes
·
View notes
Text

You stand over the open door. Anticipation wells in your chest as you look down into the abyss. The door has given way to a dark concrete tunnel with a rusty ladder along the wall closest to you and cage lamps mounted on the wall furthest from you. The cage lamps are off. Maybe they're not working? Even so, the bottom of the tunnel gives way to a small amount of warm light. It seems like there's a room with a light in it that the tunnel gives access to. You gulp. The only thing to do now is to climb down. You take a deep breath, strengthen your resolve, and place your feet carefully on the rungs of the ladder. Slowly, gingerly, you step down, ensuring the rungs will hold your weight until you're too low to grab the edge and save yourself. You look down and then back up, sigh, and continue your descent. As you steadily climb down, you find yourself surrounded by stale and musty air. The air itself feels damp and cold. And the worn-out metal of the ladder against your hands isn't helping. Finally, your foot touches the floor, and you step down, let go and turn around. You're facing a small room, connected to the tunnel through a hefty metal archway. It looks very thick and sturdy. And beyond the doorway is…
.
..
…
….
…..
You are standing inside of the HATCH. It's dark and damp and fallen chunks of drop ceiling crunch under your feet. WATER pools on the concrete floor. The room is dimly lit with a single LAMP, which does little to illuminate the details of the room. Before you sits a small DESK with a COMPUTER sitting on top. A SIREN is mounted to the wall. Similarly, there seems to be a metal CABINET built into the wall right below it. You feel as though the computer is beckoning to you.
Look at hatch>
You look back up the ladder you climbed down. The sun shines down and illuminates a small patch of the floor but quickly cuts off at the entrance to the room. The rungs of the ladder barely even shine due to rust and dulling. The cage lamps of the shaft don't seem to work. There's a small grate on the floor, maybe in case the door is open when it's raining.
Look at water>
You look at the puddle of water that's formed in an uneven patch of the floor. The water ripples with every drop of water dripping from the ceiling. It looks like there's a leaky PIPE somewhere above you. The walls, previously painted white, have now turned green near the bottom of the floor due to the moisture, and is cracking and peeling away.
Look at pipes>
It's hard to see in the dim lighting, but it looks as though above you is a decaying drop ceiling. Patches have fallen, revealing messy patches of wires and pipes, some of which are dripping onto the floor. You can't help but wonder what they're all for.
Look at lamp>
The single source of light in this small room is a light bulb in a conic reflector. Even when the light worked properly, you doubt the room was very well-lit. Regardless, the light is dim and flickers sporadically. Given how ruined the hatch is, you're surprised it even still works.
Look at siren>
The siren is mounted to the wall with heavy bolts, and wires run into the wall and out of sight. Like everything else in the room, the siren is severely degraded, and the metal that it was built with has rusted in patches, the paint chipped and peeling off. The interior is full of dust and spiderwebs.
Look at cabinet>
The cabinet seems to be one of the sturdiest things in the hatch. It's worn and the paint has chipped off, but jostling the doors yields no give whatsoever. Not only is it locked but there's a chain around the handles.
Look at desk>
The desk is extremely simple. It's made of metal but it certainly hasn't fared well over time. The whole surface looks dull and tarnished and the leg nearest to the puddle looks rusty. There's a mess of assorted items and PAPERS sitting around the computer.
Look at papers>
The scattered papers are all old and yellowed. It's hard to make out what most of them say. There are strange diagrams of mechanisms and systems you've never seen before, covered in handwritten NOTES.
Look at notes>
It's hard to understand what any of the notes are referring to, but there is one thing that you can understand; the words "Vitals Monitoring Station".
Look at computer>
The computer is, strangely, perhaps in the best shape of anything in the room. The case is worn, yellowed and covered in a thick layer of dust, but the screen still glows under the dusty layers of years of neglect and abandonment. You wipe away the dust with your hand, cringing a little as you briefly consider how unsanitary is, but find yourself captivated by what's on the screen.
NEXT
PREVIOUS
11 notes
·
View notes
Text
PEEK/PPS/PPSU/PEI/POM/PA Cold Push Bar and Sheet Production Line

PPS plastic (polyphenylene sulfide) is a kind of thermoplastic special engineering plastic with excellent comprehensive performance.The main use of PPS is in the field of electronic appliances, such as making transformer skeletons, high-frequency coil bobbins, plugs, sockets, wiring frames, contactor drum drums and various precision parts. PEI has good flame retardancy, chemical reaction resistance and electrical insulation characteristics. Pei also has low shrinkage and good isotropic mechanical properties. Adding glass fiber, carbon fiber or other fillers can achieve the purpose of reinforcement and modification; It can also form heat-resistant polymer alloy with other engineering plastics, and can be used for a long time at the working temperature of - 160 ~ 180 ℃. Application: because PEI has excellent comprehensive balance performance, it is generally used in industrial departments such as electronics, motor and aviation, and as a metal substitute for traditional products and cultural and daily necessities. Using PEI instead of metal to manufacture optical fiber connector can optimize the component structure, simplify its manufacturing and assembly steps, and maintain more accurate dimensions. It is used in the automotive field, such as manufacturing high-temperature connectors, high-power lamps and indicator lamps, sensors for controlling the external temperature of automobile compartments (air conditioning temperature sensors) and sensors for controlling the temperature of air and fuel mixtures (effective combustion temperature sensors). It can also be used as vacuum pump impeller resistant to high temperature lubricating oil erosion, ground glass joint (socket) of distiller operated at 180 ℃, and reflector of non illuminated anti fog lamp. POM plate and bar (1) POM is a crystalline plastic with good rigidity, commonly known as saigang. (2) It has excellent properties such as fatigue resistance, creep resistance, wear resistance, heat resistance and impact resistance. (3) POM is not easy to absorb moisture and has good dimensional stability in humid environment. It is difficult to control the size during injection molding. The thermal deformation temperature is 172 ℃, and there are two kinds of polyoxymethylene with different properties (polyoxymethylene has better temperature resistance). Main technical specification Model SJZ45/25, SJZ65/28 Material PEEK/PPS/PPSU/PEI/POM/PA Main engine rate of revolution 10-49r/min Main motor power 11KW Capacity 20kg/h Note: The specifications are subject to change without prior notice. Plant equipment diagram Read the full article
#PEEKBarextrusionLine#PEEKColdPushBarandSheetextrusionLine#PEEKplateProductionLine#PEEKSheetextrusionLine#PEEKSheetProductionLine#POMBarandplateextrusionmachine#PPSBarandSheetProductionLine#PPSPlateExtrusionline#PPSUColdPushBarextrusionLine#PPSUSheetProductionLine
0 notes
Photo


ENGINEERS’ MANUAL
A REFERENCE BOOK FOR
ENGINEERS, STUDENTS,
AND INDUSTRIALISTS
By
S. M. IBRAHIM, B.SC. (EDIN.)
EXECUTIVE ENGINEER, M.E.S.
Sometime Members of:
The Institution of Engineers (India)
The Electric Licensing Board, (Bengal)
FIRST IMPRESSION
With over 400 Illustrations
LAHORE:
CIVIL & MILITARY GAZETTE LTD.
THE MALL
#WIRING CIRCUIT DIAGRAM#The C.A.V. BOSCH Nozzle Testing Outfit#Hysons Lamps Better Light Better Sight#W. T. Henley.#Courtesy W. T. Henley.#Burmah Shell.#Courtesy Burmah Shell.#B. T. H.#Courtesy B. T. H.#Babcock Wilcox.#Courtesy Babcock Wilcox.#English Electric Co.#Courtesy English Electric Co.#“Starret” U.S.A.#William Jacks & Co.#Courtesy William Jacks & Co.#Courtesy “Starret” U.S.A.#William Jacks#Courtesy William Jacks#Courtesy Gillanders Arbuthnot & Co. Lahore#Gillanders Arbuthnot & Co. Lahore#Gillanders Arbuthnot & Co.#Courtesy Gillanders Arbuthnot & Co.#Greaves Cotton#Courtesy Greaves Cotton#Courtesy ASSIR#A.S.S.I. Ltd. (Pak.)#A.S.S.I. (Pak.)#Burmah-Shell#Courtesy Burmah-Shell
0 notes
Text
[ad_1] Lighting, additionally generally known as luminaires, are available in a wide range of sizes, shapes, and wattages. The diagram beneath reveals the principle kinds of devices. Clearly, there are lots of totally different varieties of every kind of fixture. There are additionally articles discussing varied elements of lights. So what's a Mild Fixture? A gentle fixture is a lighting meeting that features a number of gentle sources and parts designed to distribute the sunshine, place and shield the lamps, and join the lamps to an influence provide. The primary operate of a luminaire is to aesthetically modify the form of the sunshine supply and management the distribution of the emitted gentle. A lighting fixture's electrical system gives energy, management, or different electrically-based capabilities, similar to wires, sockets, switches, drivers, connectors, circuits, and sensors. Optical parts might embrace diffusers, lenses, prismatic parts, waveguides, reflectors, refractors, louvers, and so on. LED lights promise excessive luminous output, vitality effectivity and lengthy lifespan, making them appropriate for a lot of lighting purposes that had been beforehand the area of lighting. Incandescent or fluorescent lights. The sunshine supply of an LED lighting fixture will be an LED bulb or an built-in LED module. What's the distinction between lights and becoming lights? Fixtures are gadgets which might be typically connected or mounted to the property, whereas fittings are gadgets that aren't connected to the property aside from nails or screws, similar to work or mirrors. How do I select a superb gentle fixture? When selecting a gentle fixture, begin together with your favourite parts within the room and discover lighting that enhances them. For instance, when you've got a trendy couch, clean-lined lighting will make the house stand out. One other tip is to have a look at the cabinetry or door hardware within the room and select fixtures with complementary finishes. What does lights embrace? Lighting may produce other options, similar to a reflector to direct the sunshine, an aperture with or with out a lens, an outer shell or housing to align and shield the lamps, an electrical ballast or energy provide, and a shade to diffuse the sunshine. Activate a light-weight or level it in the direction of your work space. What do lighting fixtures do? Lighting present gentle. They can be utilized as ornamental parts in a house or constructing, or they can be utilized for sensible functions, similar to offering lighting in areas which might be usually unlit. Lighting also can improve security by illuminating darkish areas of a constructing the place individuals may journey on one thing and injure themselves. How do lighting fixtures work? Lighting work by changing electrical energy into gentle. They do that utilizing gentle bulbs, that are units that comprise an electrical present and produce gentle when switched on. The sunshine bulb itself is a part of the fixture that's seen once you activate the lights in your house or workplace. The second piece of kit on most lighting fixtures is named an electrical socket (or field), which accommodates all of the wall-mounted electrical retailers you may plug issues into. The place are lights used? You have most likely seen it at dwelling. However the place do the sunshine fixtures really go? There are a lot of locations in your house the place you should utilize lights. For instance, within the kitchen, toilet and bed room, it's essential contemplate what sort of ambiance you need to create with every fixture. for instance: 1. Bed room: Use an under-bed lamp with a process lighting characteristic, similar to a dimmer swap, to keep away from disturbing others attempting to sleep. 2. Kitchen: If it is a shiny, sunny day exterior and you do not want overhead lighting as a result of it is obscured by window frames or cupboards, and you are not cooking at evening, ambient lighting will most likely suffice!
3. Toilet: Darkish interiors might imply the reply is to make use of overhead lights with a number of bulbs so they do not come on on the identical time when somebody opens the toilet door. Regularly Requested Questions Are ceiling lights fixtures? Ceiling kind of fixture mounts on to the ceiling and has a glass or plastic shade that obscures the bulb. Ceiling fixtures have been widespread in properties for practically 100 years, usually offering all of the ambient lighting for a room. What's the splendid top for kitchen pendant lights? The best top of your kitchen pendant lights will rely upon a wide range of elements, together with ceiling top and lighting function. As a basic guideline, pendant lights must be hung about 32 to 36 inches above your kitchen island or countertop. Nevertheless, modify the peak in response to your private choice and the particular wants of your kitchen. What's the function of a lighting fixture? Lighting present gentle. They can be utilized as ornamental parts in a house or constructing, or they can be utilized for sensible functions, similar to offering lighting in areas which might be usually unlit. Can I set up recessed lighting in a kitchen with a low ceiling? Sure, recessed lighting will be put in in kitchens with low ceilings. Nevertheless, you will need to contemplate the obtainable house and depth of recessed lights. To make sure correct set up and keep away from potential clearance points, select shallow or slim recessed lighting designed particularly for low ceilings. [ad_2] Supply hyperlink
0 notes
Text
Roentgen Rays: Mr. Tesla Before N.Y. Academy of Sciences.

By B.P. Remy
Electrical Review, NY. April 14, 1897.
"On April 6, Mr. Nikola Tesla delivered before the New York Academy of Sciences an address "On the Streams of Leonard and Röentgen, with Novel Apparatus for Their Production." The lecturer began by stating that in 1894, in experimenting to determine the actinic action of phosphorescent light emanating from vacuum tubes, he had found that the atinic power of Crookes tubes varied greatly, and in the most anomalous manner. Thus some tubes emitting a strong light had very little action on photographic plates, while some showing a feeble light acted very strongly on such plates. A large number of these plates, made by Tonnele for the Century Magazine, were stored in Mr. Tesla's laboratory when it was destroyed by fire, and thus he was unable now to examine them for the Röentgen effects. He believed that he had just missed the discovery which made Röentgen famous, and though he was thoroughly familiar with Leonard's work, he did not see far enough.
"Mr. Tesla then reviewed his work in the direction of obtaining a reliable apparatus for generating high-frequency currents, which he recognized as the keynote to the production of vacuum tube lighting. He told how he had met with difficulties at every point; how a small bubble of air would destroy the value of the coil, or how one-quarter of an inch of wire too much or too little would throw a coil out of balance; how one day a coil would run cold and on another day hot, etc. By finally calling to his aid the condenser, Mr. Tesla stated, he had succeeded in obtaining the desired action and now nothing stood in the way of securing millions of vibrations from ordinary circuit. The lecturer then briefly explained the principle of the condenser discharge as applied to high frequency currents, and pointed to various types of apparatus on the lecture table designed to utilize the principle.
"In order to demonstrate the action of high frequency currents, Mr. Tesla attached a circular loop of heavy copper wire to the terminals of a high frequency generator and brought to brilliant incandescence a small lamp connected diametrically across the heavy loop; the illumination of the lamp could be varied by connecting it to various points on the diameter of the loop. Mr. Tesla also lit the lamp by the current induced in a second loop brought in proximity to the first. He explained that the coil accomplishing this work had a resistance of 600 ohms and an inductance of 6 henry's; the coil was connected to the circuit one-half the time and took from the primary circuit only 5 watts.
"Mr. Tesla next showed a vacuum tube lit from the terminals of another high frequency machine. He also showed a coil consisting of a single turn of heavy wire which formed the core, as it were, of a small coil of a few turns wound on a paper cylinder surrounding the heavy wire. When connected to a high frequency generator, this apparatus gave a 4-inch spark with an expenditure of energy equal to that taken by one lamp. Mr. Tesla stated that his high frequency generators were constructed that they could be connected to any existing circuits, direct or alternating.
"Returning to the Röentgen rays, the lecturer stated that he had succeeded in discovering a new source of these rays, far more powerful than any heretofore available, though the difficulty of maintaining it was very great. This new source is the electric arc; not the ordinary arc, however. The arc required for purposes is that maintained between a platinum terminal and an aluminum plate, as illustrating in the accompanying diagram, where A represents the aluminium plate and B the platinum, enclosed in a glass jar.
"Mr. Tesla stated that he had also succeeded in deflecting the Röentgen rays by a magnet. He had proved this by deflecting the rays into a condenser place a long distance from the source of the rays, and which in 5 seconds was charged sufficiently to throw a galvameter needle off the scale."
#nikola tesla#science#history#physics#x ray#electricity#experiments#lecture#ahead of his time#ahead of our time
41 notes
·
View notes