#IrisCamper
Explore tagged Tumblr posts
Text
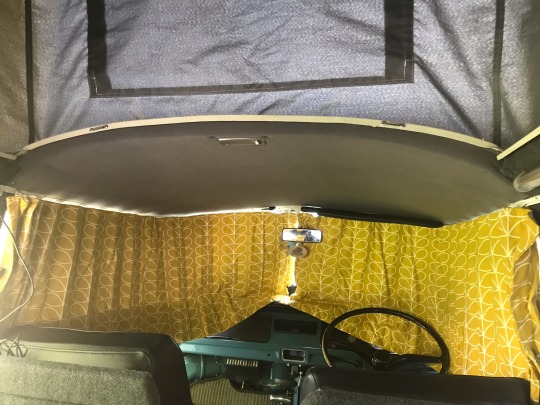
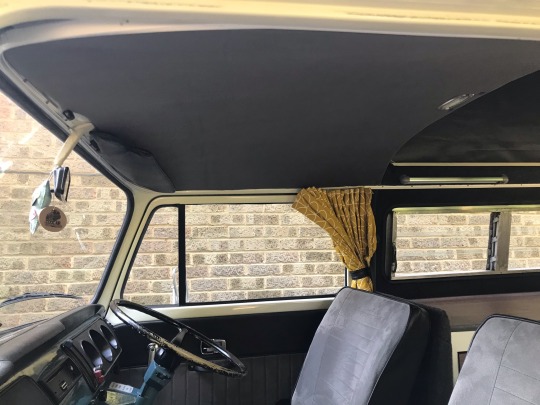
A job that’s been on Iris’ todo list for a few years finally checked off. Carpet lined ply headliner for the cab to match the rear bed boards.


0 notes
Photo

Well what a year it’s been! Looking back to this time last year I was in a mad rush trying to get the van back on the road for the end of March ready for summer. We just about managed it and have had a great year building up the interior and just enjoying using the van again after a long absence, as both our main vehicle and for a few nights away. My main aim with the whole VW thing has always been to not let lack of experience get in the way of me trying to do all the work myself. Time and plain stubbornness always makes up for any lack of skill in my book. So what does the next year hold for us? I’ll be aiming to get the rest of the van finished for spring so we can go on some longer trips away (road trip round Wales anyone?). The baja project has well and truly started and my goal is to try and get most of the welding done over the coming year. Thank you Max for putting up with my obsession. Onwards! #vwt2 #iriscamper #myrtlethebajabug #vwlove #vwbug #vwbaja #vwbaywindow https://www.instagram.com/p/B6wDhyKp4Jj/?igshid=15z2eh3j8q09g
3 notes
·
View notes
Text
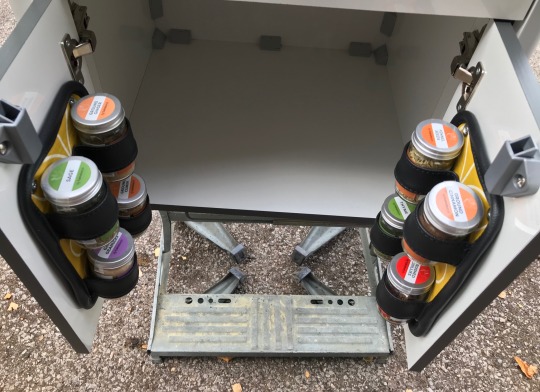
Made the ever important herb and spice racks for the van to mount inside the cooker unit.


3 notes
·
View notes
Text
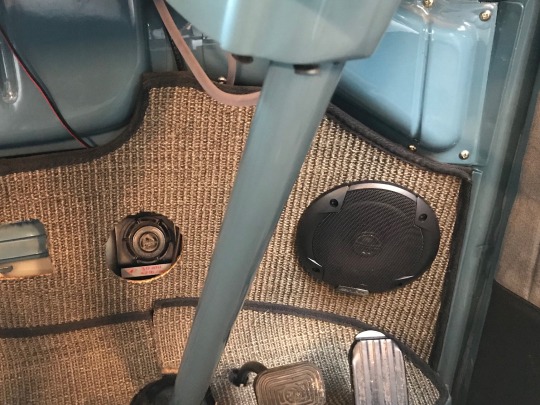
Alpine stereo and front speakers fitted to the van after being sat in the garage for 18 months or so.
Broken in with some Creedence Clearwater!
Rear speakers to follow next month when funds allow.


1 note
·
View note
Text
More lights installed in Iris. Super bright in there now.

1 note
·
View note
Text
A small table made up for Iris. Max came out to do some watercolour while I made a start on the rear cubbies.


1 note
·
View note
Text
Van Upholstry
After fitting the wrong hubcaps to the van I’ve now replaced them with a nice set of stainless steel caps that fit properly:

I got sent an extra one by mistake (ssh!) so fitted it to the front spare:

I’ve been continuing with the van interior over the last month or so. Fitted the rear 3 point belt:

And then started learning how to do upholstery. Lots of practice on cheap vinyl, trying all the seams and techniques I’ll need for the van:


And as a small project, which would provide good practice for the rear bed cushions, I made the dog a cushion for his box:


I made a few mistakes on this first cover so made another which came out much neater:


Good enough for the dog at least!

And then onto the door cards. I made a test piece for the rear hatch to get a better feel for running lots of pleats:

Then moved onto the real thing.
Cutting out the fabric (Schnauzer to hold the fabric still):

Marking out the pleats:

And following a few evenings of sewing and glueing, a complete set of door cards:

I fitted them today. Lovely Jubbly!


10 notes
·
View notes
Text
Roof bed complete and front seat tear down
Continuing with the van upholstery I got the roof bed cushions all made up and installed over the weekend. The rear one is gigantic and interesting to try and man handle around the sewing machine.


B sat and watched the kids on our street for 10 minutes or so. He loves it up there.

I’ve stripped down both front seats now to start making new covers for them.


The frames overall are in pretty good condition, however the drivers back had cracked:

Quick tickle with the welder and good as new:

7 notes
·
View notes
Text
On the Road!!
7 years ago we bought an old VW camper. Don’t think I’d done so much as change a car tire.
3.5 years ago we decided to take it off road to complete a much needed full restoration. I can’t begin to describe the amount of time, effort, patience and money it’s taken to get to this point. My van related posts from the last few years give a bit of an indication of what it’s taken.
Today that 47 year old little camper passed its MOT! I’m super proud of what we’ve achieved.
Thank you Max, for putting up with an eternity of me coming home late at night covered in rust, grease and paint. For keeping me sane, not many others would. For keeping the lights on and our lives moving while I put everything else on hold.
Adventure awaits.


18 notes
·
View notes
Text
Interior beginnings
Since getting the van back on the road last month I’ve slowed down a huge amount with getting bits done on it. I’ve just been enjoying driving it again and having my evenings back. I definitely needed it, but at the same time it’s been a bit of a shock to the system to be honest; feeling a bit lost most evenings. I found this picture from this time last year which just shows how much I got done over 12 months, from a welded up rolling shell to road worthy:

I have however started making some progress on the interior.
Realised I’d forgotten to connect the cold air drain hose. A washing machine pipe from Wickes was the perfect fit:

Got the bed boards and foam in so we can at least sleep in the van:

Made up some membranes for the cab doors to keep the water out:

Fitted the madmatz carpet set to the cab area. I’ve left the cab carpet and kick panels for now as I’m waiting for it to rain again to see if I’ve fixed the leaky windscreen before putting them in:

And I think we’re decided on the fabrics we’ll be using on the upholstry:


Im hoping to start the upholstery next month.
11 notes
·
View notes
Text
Rear bed cushion


Rear bed cushion finished tonight. Put through quality control by Max and B and installed in the van. We’re ready for basic camping now!
#iriscamper#vwt2#vwcamper#vwlove#vwbus#classiccars#jacksewingmachine#sewing#upholstery#barnabyschnauzer
4 notes
·
View notes
Text
Sliding door and front repaint
One of the risks of doing all the paint myself is not quite getting it right the first time round. I sprayed the front panel far too dry when clear coating it, so when I came to cut and polish it I broke through to the base coat.
Flatted back and all masked up:

3 coats of clear later:

Much better:


I’ve already painted the sliding door two times already, but it still didn’t look right. I’d corrected some pinholes the second time, but not done a very good job of blending the repair into the paint, when flatted back you can see the section that sat a bit high:

So I flatted the whole panel and shot the base coat on, only to realise I’d not got all the clear off the panel causing it to bubble up horribly! :( I went home at this point as I’d had enough of it, and felt pretty low.
Back down this morning and I made damn sure I had all of the clear off the panel:

And finally happy with the door. Third times a charm!


Finally got a video of the van running under her own steam too. So satisfying!
youtube
13 notes
·
View notes
Text
Further Interior bits
My Madmatz set arrived this week. Very happy with these, and should look lovely once in:


Fancying a change I’ve moved onto sorting some interior bits. First up transforming it into the International Space Station with some silent coat sound deadening, followed by Dodomat for insulation:


I’ve started carpet lining the living area. We’ve gone with anthacite grey, feels very cosy (ignore the rough edges, I’ve not trimmed it down yet!):

Fitted my slightly nicer fuel pump from heritage too:

I’m having a few issues getting the engine to idle properly. It will quite happily run with a small amount of throttle applied, but when released it fails to idle properly. I’m thinking it may be the idle jet in the carb not working as it should. The carb was one thing I didn’t look at when assembling the engine so I’ve stripped it down and will clean it all out to see if that helps.

15 notes
·
View notes
Text
Floor + Rock ‘n Roll Bed: Pt1
A long bank holiday weekend saw both the floor and bed go in.
After work Thursday I was supposed to be meeting a van and man at the local timber yard to deliver a sheet of marine ply, only to find the place shut at 4 (assume they clocked off early for the bank holiday). Feeling a bit deflated I drove home and remembered Sydenhams is right next to my office, so swung in. Convinced the ply wouldn’t fit in my van (hence the man and van being my original plan), however it slid right through the rear hatch with ease:

Onto Friday and Saturday and we got the closed cell underlay trimmed down and fitted:

Plywood cut to size, sanded and sealed:


One large piece to cover the majority of the floor:

Followed by two smaller pieces towards the rear:

To avoid flexing around the joint I fitted a strip of ply underneath the floor and screwed all 3 pieces to it:

Sunday saw the rest of the cargo area carpet go in.
Stripping the old quarter panels of carpet:

Fitting the new carpet:

And all panels and bulkhead carpeted:

5 notes
·
View notes
Text
Each step is a little closer to being on the road!
Wired up the reversing lights and fuel shutoff valve:

A few bits back from the powder coaters so built up the quarter lights with new seals and powder coated frames:

Powder coated Window wiper arms with new hella blades:

Painted a few bits. Repainted an engine lid hinge I wasn’t happy with (I’d painted it in the open position so when closed had a bit missing paint) and front wheel caps:

Insides of the bumpers and track covers painted (I don’t have enough racks to hang it all from to paint both insides and out):

Front grill and petrol flap:


Max came down over the last two days to help with sorting the brakes and to try and start the engine. The front brakes bled fine, however the rears wouldn’t even produce fluid. There were no leaks in the line so I disconnected the line from the master cylinder. When pumped no fluid was pushed through so it was off with the cylinder for investigation. I ended up stripping the cylinder and I think I’ve tracked down the culprit:

This is the seal between the front and rear pistons in the cylinder so I think the fluid is leaking from the rear piston to the front piston rather than flowing into the rear brake lines. I think I’ll take a look at getting a rebuild kit and repairing this.
We attempted to start up the engine tonight! The starter motor turned over fine which is a great sign, however the engine didn’t kick into life. After investigation it would appear the fuel pump has died (assume the diaphragm has dried out and cracked) so I’ll fit my spare pump I bought a while back to see if that helps. In addition the SVDA Dizzy I fitted wasn’t producing a spark so I’ve put the 009 back on for now. The SVDA dizzy has a pertronix unit fitted to it so I wonder if it’s duff?
13 notes
·
View notes
Text
Bumpers and other bits
A few bits from the last few days.
Poptop canvas re-attached to the van:

Picked up the bumpers, front grill and track covers from the shot blasters. The only bit that needs some further work is the rear bumper. Shot blasting revealed some rot on one side, and some impressive dents:


Luckily it was just isolated to this section so I let some fresh metal in, and got the worst of the dents out with a hammer and dolly:

And there were 5 holes drilled in it (presumably for a towbar?):

I have no need for them so welded them up:

I gave the welded sections a skim of filler, and then into epoxy and high build along with some others bits I had cluttering up the workshop (rear bumper needs some further shaping yet):


12 notes
·
View notes