#I managed a little bit of pattern matching on the back 4 panels and it looks so cool
Explore tagged Tumblr posts
Text
LGBTQ Manga Review – Yuri Is My Job Vol. 1-5

Yuri is a genre deeply rooted in its history and traditions. Dating back over a century, many of the scenes and situations from early "Class S" literature still predominate Yuri titles today. Common elements include senpai-kohai relationships between a bright and cheerful younger girl and an older, more assertive upper-classman. The bonds between the two were not the romantic and sexual love of lesbian narratives, but more sate or "pure" relationships often devoid of lesbian identity or attraction. The presence of S elements ebbed and rose over the past century, but they experienced a surge at the end of the 20th century. Contemporary S literature dominated the Yuri scene for at least a decade, and even now, its effects are still seen in many works today.
Naturally, as with any genre that becomes too entrenched with tropes or clichés, Class S literature became the subject of parody, commentary, and deliberate defiance. And while numerous works have repeated, twisted, rejected, and exaggerated tropes, perhaps none have done so quite as masterfully or as enjoyably as Miman's Yuri Is My Job! The series uses S Yuri's ideas uniquely and masterfully weaves a narrative in and out of them with a layered setting and great characters. The constant balance between and integration of reference, humor, and a strong core narrative had me gleefully enthralled and thoughtfully pouring over every page. I ravenously consumed the series, not just because of the cute cakes and elegant young women, but because I was so invested in the story and intrigued by the manga's premise.

Breaking down every reference is far too daunting a task that frankly deserves its own dedicated article. Still, to briefly overview, Yuri Is My Job! is set primarily at a café themed after an all-girls mission school, Liebe Grils Academy. The servers of the café act as the elite students of the fictitious academy and offer outside visitors, patrons of the establishment, a glimpse into their forbidden world of elegance and sisterly love. The series follows high school student Hime after she starts working at Liebe after accidentally injuring the manager, Mai. The series takes off from there, with Hime participating in the various themed events and navigating challenging relationships with coworkers, including her hostile schwester, the upperclassman who mentors her, and, in the world of the café, partners her.
Yuri Is My Job! is much more enjoyable with an understanding of S literature and themes, as references can slip by readers otherwise. However, particularly after the first volume, the series opens up a little more with an overarching plot that dips in and out of the thematic S material. Even without a grasp of S tropes, readers can enjoy watching server Kanoko struggle with her hidden affection for Hime or get caught up in the excitement and scheming during a popularity competition between the staff.

Throughout the first five volumes, multiple shorter narratives, such as the cook getting sick or Hime learning how to serve guests, are interwoven with the overarching character and relationship-driven story. Although almost every character has plenty of time to shine and distinguish themselves, the main plot revolves around three characters, Hime, Yano, and Kanoko.

Hime, the protagonist, maintains a constant facade of the sweet and beloved princess. However, her adorable and charming act is just that, and only two people in her life know her secret, Yano, and Kanoko. Inside the café, Yano acts as Hime's "onee-sama", holding her close and praising her to the delight of Liebe's patrons. However, she is terse and often angry with the girl, unable to move beyond a misunderstanding in their shared past and her insecurities about Hime's true feelings. Kanoko however, acts as a foil to Yano. She relishes Hime's facade, specifically in that she is one of the few privy to the truth, and harbors an attraction to her; she hides these feelings rather than wear them on her sleeve as Yano does. The dynamic between these three drives much of the "action" in the manga.

The more I read Yuri Is My Job! The more I was able to see and appreciate the distinct patterns of storytelling and how the main plot is woven between three layers. The first, and most prominent, is inside the café, in a world dominated by S tropes. Here, characters play politics and plot against each other using their performance and the audience's reaction. For example, thinking how they will get votes for themselves or others during a contest, or else Hime acting cute and loving around Yano, forcing her to return the affection to maintain their roles as schewstern. Outside the fictional world of the café, elements of the story alternate between more grounded drama and thematic moments featuring Yuri tropes. Miman beautifully navigates the relationship between the plot and the parody, weaving a delightful story in and out of different classic Yuri scenarios.
Miman matches this creative story and setting with excellent artwork. Character designs are distinctive and well constructed. So much, that when characters say something "off-screen", a small sketch of their eyes and mouth in the speech bubble is more than sufficient to identify the speaker. Of course, the robust and developed personalities also assist here, as most lines are easily attributable thanks to solid writing and strong personality. The art also features very creative paneling, with almost every page having an entirely different layout. However, the order is still easy to follow and reads naturally.

Not only is the art pleasing to look at, but it also adds to the manga's setting and parody of Yuri tropes. Panels feature the girls holding each other in dramatic and literally flowery poses, like a shot straight out of Strawberry Panic, complete with a backdrop of lilies. Appropriately, these fantasy-inspired poses occur in the café, often to the pleasure of adoring patrons screaming in celebration (thus mirroring my reactions). Like the other Yuri tropes, these artistic presentations occasionally jump outside of the café in more emotional or poignant moments. However, in a few crucial scenes, those more related to the narrative when it steps outside the boundaries of Class S, feature more grounded, although still dramatic, art. A particular shot in Volume 4 where Kanoko confides her hidden feelings to her senior, Sumika, and is comforted, sticks out in my mind just for this reason. It is a perfect example of art assisting the themes of the narrative and changing to suit the situation.

Yuri Is My Job! focuses mainly on Class S style storytelling, and thus, while it has plenty of traditional Yuri imagery, there is a starkly limited amount of lesbian content. Sure, readers can enjoy a decent number of illustrations featuring girls holding each other in a dramatic pose, but this is the act put on for the cafe, which is copying the "practice" relationships of S literature, themselves devoid of lesbian attraction. It is an imitation of an imitation, not queer content. Of course, this is by design, but it does mean that if readers want a grounded lesbian romance, they will find the series lacking. A bit of lesbian content does exist, Kanoko's crush on Hime exists outside the boundaries of work and S tropes, a relationship told in a flashback was, at least to one of the characters, "real," and there are signs of an eventual romance. However, the lack of lesbian identity should not be a reason to avoid this excellent manga.

Yuri Is My Job! is one of the most brilliant and exciting Yuri works out there. The ways Miman plays with the tropes and expectations of the genre are hilarious, complex, and exceptionally compelling. The characters are exciting and watching their stories weave through different classic Yuri scenes and tropes is as breathtaking as it is enjoyable. My sincere thanks to Diana Taylor, and Jennifer Skarupa and editor Haruko Hashimoto, for so deftly translating this series and preserving the S ties. I cannot wait to visit the students, or rather employees, of Liebe Girls Academy, in Volume 6.
Ratings: Story – 10 Characters – 8 Art – 9 LGBTQ – 3 (Yuri 10) Sexual Content – 1 Final – 9
Review copies provided by Kodansha Comics
Get Yuri Is My Job! digitally and in paperback today: https://amzn.to/3gNNeRt
Buying manga helps support developers and publishers. YuriMother makes a small commission off sales to help fund future content.
#yuri#lgbt#lgbtq#lgbtq+#queer#gay#romance#manga#art#reviews#yuri is my job#lesbian#shoujo#comics#literature#girls love#wlw
394 notes
·
View notes
Text
‘Explorer’ Bag.
Hi Guys, I finally managed to find the time to build the ‘Explorer’ Bag. It may have been my hands that put this together but all Credit for the Original Idea and the Pattern goes to ‘Tony See’ at Dieselpunkro. He makes some amazing patterns and sells them at very affordable prices. Ok, lets go. First I bought the pattern from Dieselpunkro, downloaded it, stuck all the pieces together as required and then cut out and stuck to the 6-7oz leather I chose to use ready to transfer from paper to leather. You don’t want a thin leather for this that will just fall/collapse it’s shape, but you also don’t want it so thick that it’s difficult to bend cut and stitch. I also chose a Veg Tan and dyed it myself, more on that later, but you can buy a factory ready dyed piece if you so choose.
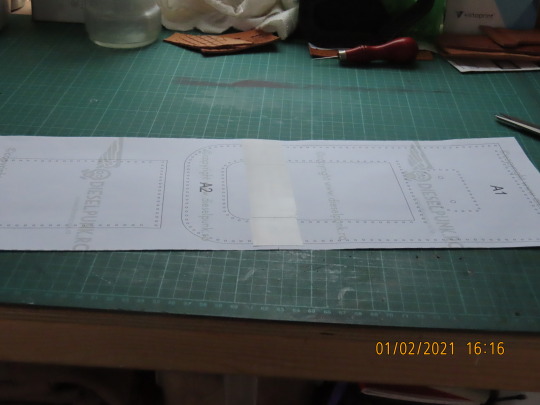
Pic 1 : Stick all the pattern pieces together as required to create the ‘full’ patterns, I use Decorators white / Cream paper tape, it doesn’t mark the leather to any great degree when you take it off.
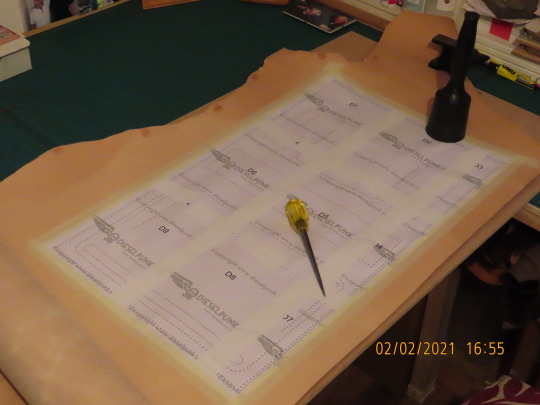
Pic 2 : The patterns come in several pieces, this main boddy section pattern was in about three pieces but just stick them together as shown on the instructional video on YT.

Pic 3 : Here is the main body section after the pattern is removed, the holes are punched through the patterns before removal.

Pic 4 : Here you have one of the side psections with Pattern stuck to the leather with decorators tape and I used a 1.5mm hole punch for the stitch holes and a larger one ( what ever you feel necessary for your rivets to fit ) where necessary.

Pic 5 : All the patterns are treated the same and eventually you will end up with a big pile of cut out and punched pieces as seen here, there were 64 pieces here, the most I’ve ever done.

Pic 6 : Here are the same pieces all dyed ready to start the build. I decided on a Nice walnut color by Fiebings, I achieved this particular look by rubbing harder in certain areas as it was drying and then it was down to a bit of luck. At this point I could not know what the final look would be, but from past experiences I had a ‘hopeful’ idea. Once dyed I coated in ‘Tan Kote’ and wiped it off before buffing to a shine, this also added darker areas here and there.
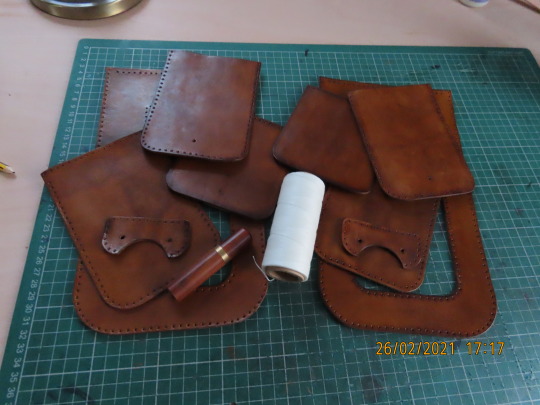
Pic 7 : I started by putting together a side pouch so seperated the pieces of the two. I used a waxed thread and a saddle stitch, which was the stitch I used on all of this bag.

Pic 8 : Somehow I forgot to take pics of the first stitching, which was adding the side to the front piece of a pouch, you can see it through the back piece I’m about to start stitching here. this pic shows me placing the front and side section ‘through’ the hole to stitch the inner edge of the side piece ‘inside, there will also be another piece of leather going over the hole at the back, that makes three layers of leather to stitch through, hence why your hole punching should be done carefully and slowly, if all in their correct place they will match up and make for a reatively ‘easy’ (ish) time of it.

Pic 9 : seen from the back, the stitching joing the three pieces, the front and side pieces now being attached to the side panel and attaching the ‘back’ panel to fully create the pouch, lots of stitching on this Project and you might find your fingers getting very sore, I have a little ‘thing’ I now do which cuts down the number of times I have to pull the thread tight thereby reducing the strain on my fingers considerably. I now stitch forwards four holes pulling them in..but loose after the fourth is in I then pull all four tight, I find It saves my fingers ...oh also, don’t pull so tight like you are trying to strangle it...with all those stitches....’it ‘will’ hold, believe me.
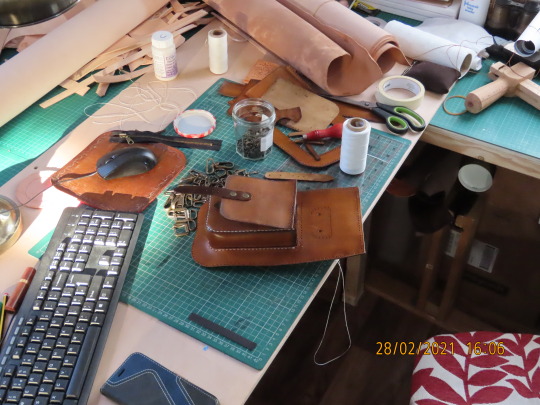
Pic 10 : The pouch is now attached to the actuall ‘side’ section, well...’one’ of them, remember you have to make two of them. You can see the ‘flap’ sitting on top waiting to be attached, if you zoom in you can see the holes in a line where it will attach to.
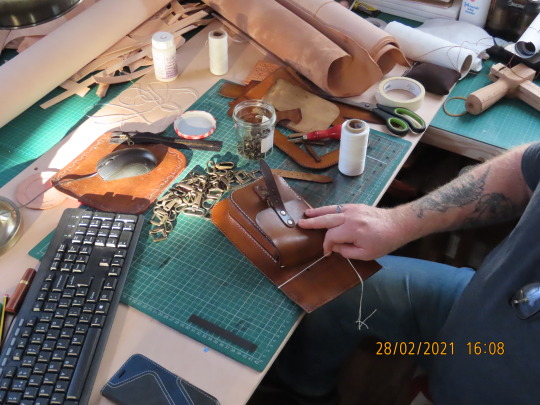
Pic 11 : Holding in position to test fit.
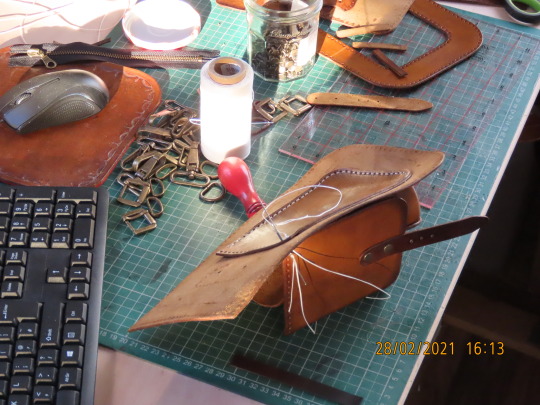
Pic 12 : Here you can see the process, it always seems, no matter how deep I sink the 1.5mm punch for the stitch holes I still have to push an ‘awl’ through each one to open enough to pass the two needles more easily.
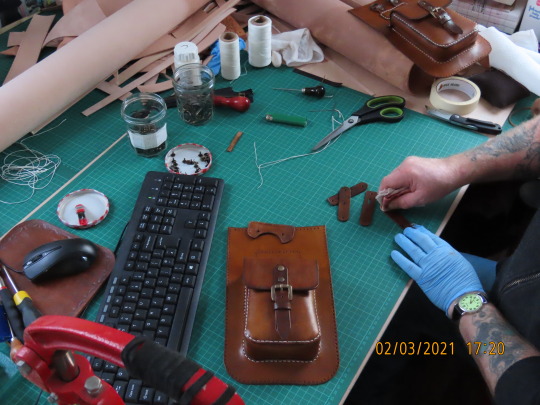
Pic 13 : Ready for the next step, attaching the pices that will hold the D’rings for shoulder strap attachement and attaching the fasten strap and Buckle. Here I’m rubbing hard to darken at the ends, just my touch, if you are making one..it’s your project you go with your own ideas.
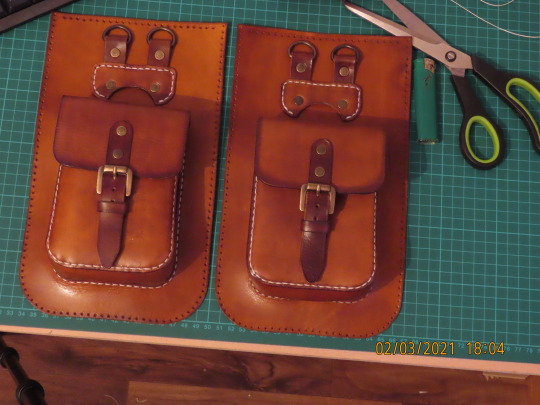
Pic 14 : Both side panels with pouches now ready to stitch the small inner flaps that will prevent things from falling out of the main bag.

Pic 15 : I attached the small inner flaps to each side pouch section using a Saddle stitch.

Pic 16 : I next stitched ( Yup...I said there was a lot . )...the ..errrm, not sure what this bit is called so just for the purpose of moving forward i’ll call it the ‘skirt’ piece...So, I stitched the ‘skirt’ piece to the outside of both side pouch sections as shown here.
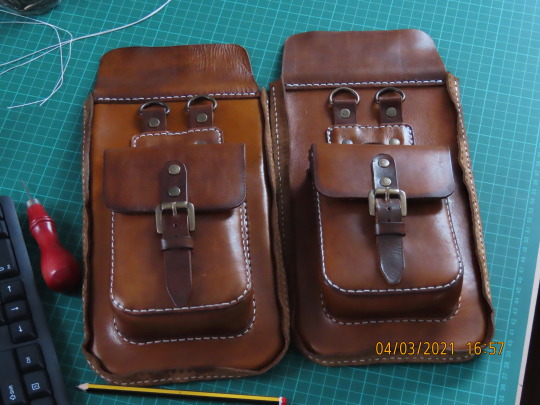
Pic 17 : Ta daaa..looking great. Very impressed with how the color looks, I love the ‘aged’ look on leather.
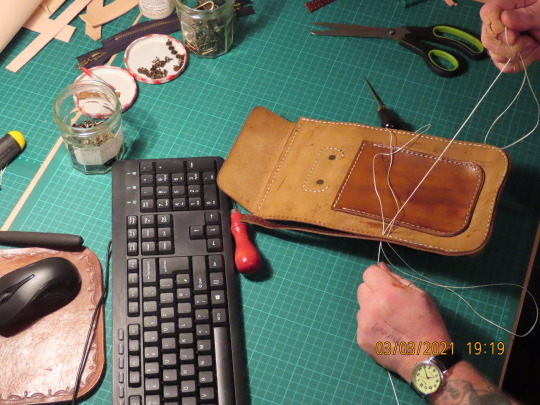
Pic 18 : An extra pic to show it going all the way around and to prove it was my sore hands that did it..hahaha.

Pic 19 : Next I cut the zipper to the required length, glued it into place trying to keep the zip central and then punched stitch holes all around it. I have found, that after marking the hole for the zipper that once cut it leaves very little of the edge of the zipper to attache to the leather...it’s very close to the edge, so I now try to cut the zipper hole less wide than what the pattern says, I find it easier to attach it and punch the holes with more material under and around it. But you will find your own way with it as I have done, if my tip helps you then that’s great.
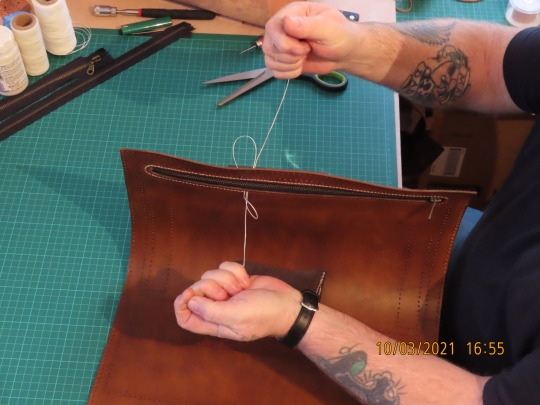
Pic 20 : As well as the contact cement I used to stick it in position I’m also using a saddle stitch and stitching around the zipper for extra strength.
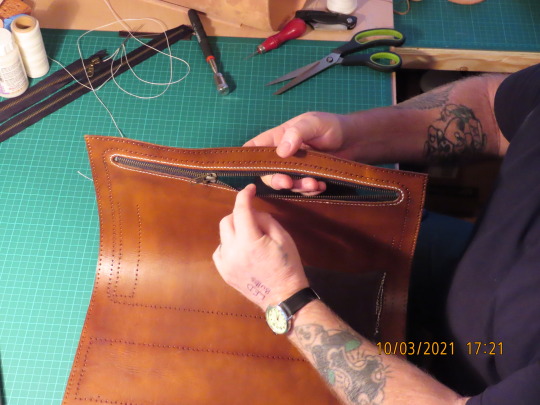
Pic 21 : Done, the zipper works fine.
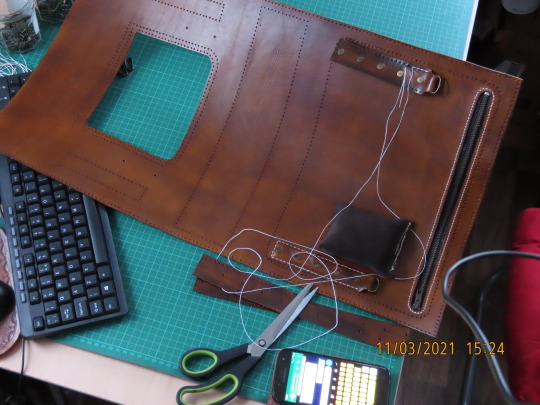
Pic 22 : Now I’m attaching two of the ‘four’ Handle strap holders with D-rings., you can see the positions for the other two on the left.
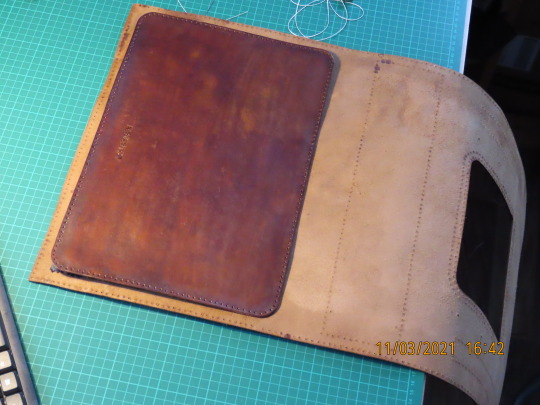
Pic 23 : After adding my ‘Sharman’ mark to the inner back piece I stitched it in place to finish the creation of the zipper pocket.

Pic 24 : Whilst stitching the back to the zipper pocket I had the other side flapping around everywhere so had to get creative and here’s how I resolved the problem, I tied string around the other flap and threw it over a beam in the work shop...worked a treat.

Pic 25 : All four bag handle connectors are now in position as seen here, stitched and rivetted. I’ve chosen to use the Antique rivets, buckles and D-rings for this project and it seems to suit it very well.

Pic 26 : Next I fitted the inner bottom strengthener piece.
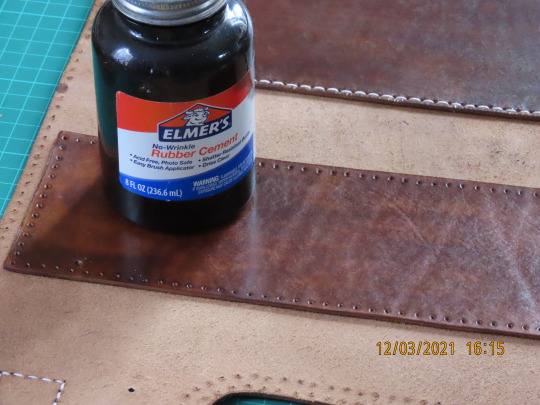
Pic 27 : I used Elmers rubber solution glue to stick the bottom strengthener into position so that I could adjust it if I needed to whilst stitching, as it turned out the holes had lined up really well and the job went smoothly.
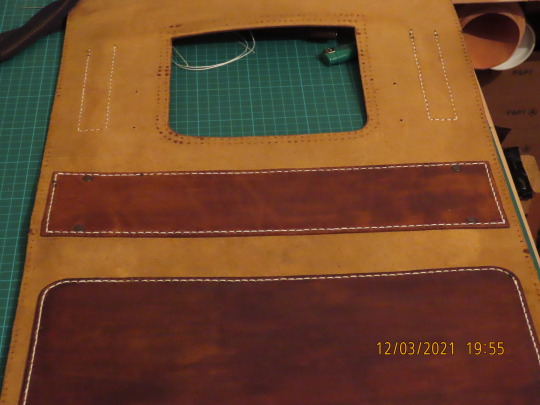
Pic 28 : All stitched in,ready to move forward. Incase I didn’t mention it already I also dyed the flesh side of the leather, the walnut gives it a nice look I think.

Pic 29 : I added rivets too, there’s no chance of this coming off, it’s glued, stitched and rivetted with x4 antique rivets.

Pic 30 : Now I had to put together the outside pouch which will be on the front below the main flap, I did it the same as the side pouches, attached the side to one edge then attached the buckle systems as shown here, after that I stitched the other edge ‘through’ the hole and stitched it underneath to the inside edge at the same time attaching the back section which will finish the creation of the pouch.
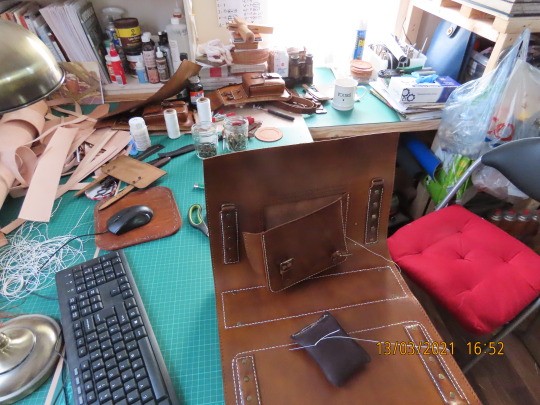
Pic 31 : Attaching the pouch to the front of the main body section. The following pics from 32 to 39 are extras to show the stitching a bit closer.

Pic 32 : the reason to stitch the edge on the inside is to give a much smoother look along the edge when completed.
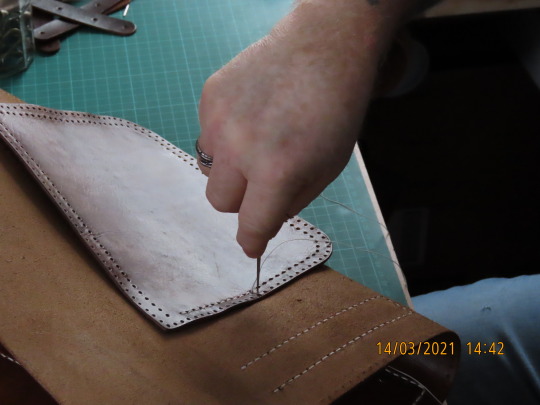
Pic 33 : having to use a stitch awl to widen each hole slightly, I stabbed muself more than a few times, so many that I had to wash my hands and coat in antiseptic cream each night. All that ontop of arthritis and carpul tunnel issues, sometimes it can be a little hard to manipulate the needles, but...if at first you don’t succeed ehy.

Pic 34 : you can see the three layers here the outer, the gusset tucked under and the flesh side of the ‘backing’ piece.

Pic 35 : showing the spike (Awl) that keeps stabbing me.

Pic 36 : Needles come through fine now.
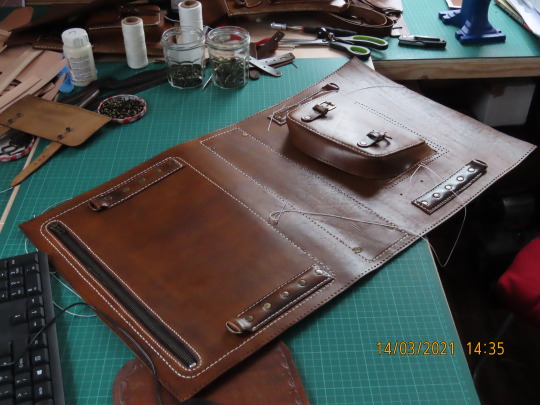
Pic 37 : Another view of the whole thing. It’s starting to make me believe I can actually do this if I just keep going.
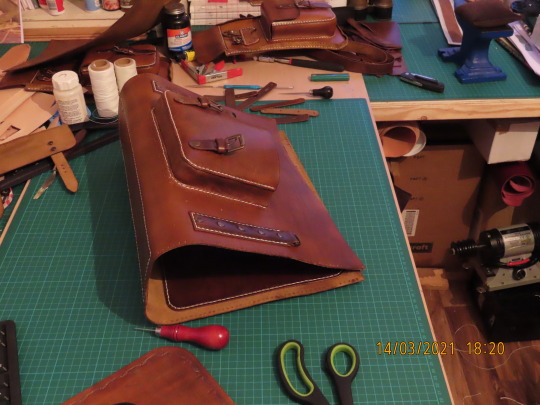
Pic 38 : Pouch attached.

Pic 39 : View of the bottom section now strengthened. I decided later to add some metal ‘Bag feet’..not part of the plan..but Didn’t want to do all this work just to have the bottom get scratched up without at least trying to prevent it. I’ll show that at the end.

Pic 40 : I then realised, I wasn’t quite done with that as the inside backing piece had an ‘outer’ line of stitches as well, as seen here, but if you are someone that gets frustrated easily I would find another hobby, by this point I had been making this for two weeks because real life kept getting in the way and stopping me, very frustrating but hey..what can ya do except suck it up and keep moving forward.

Pic 41 : People wonder why they have the holes so big..well the good thing is they allow two needles to pass through smoothly, if you are doing hundreds of stitches you really don’t want them getting snagged all the time, but anyway not to worry because once done I either lay it on an anvil if it will fit or put a small anvil under it inside on my hand..and tap with a carpenters hammer gently flattening all the thread and closing the holes a bit more. I always tell people, there will always be a point where you will think something bad about the job you are doing...don’t give up, keep going forward and you will be surprised at just how good it ‘ will’ look when ‘Everything’..all the polishing and treatments etc are completed. remember, until it’s fully completed it’s just a W.I.P. ..a work in progress so don’t judge it until it’s done.
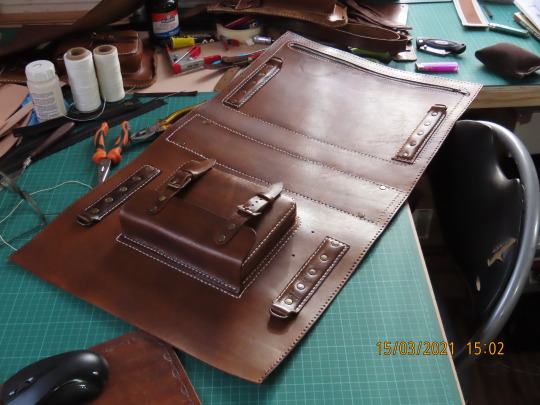
Pic 42 : The front pouch fully attached.

Pic 43 : Here I have sat the side section in place whilst I begin to stitch it to the main body.

Pic 44 : Same thing ..another angle.
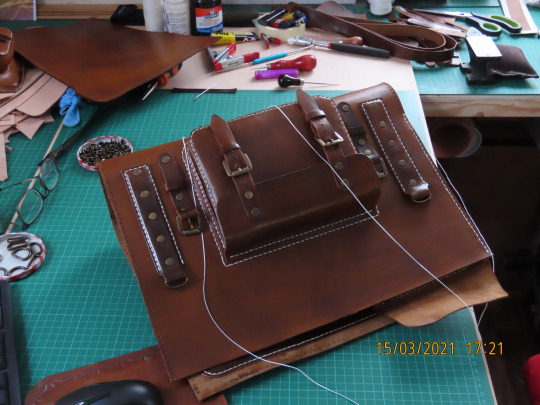
Pic 45 : attaching side panel..Other angle.
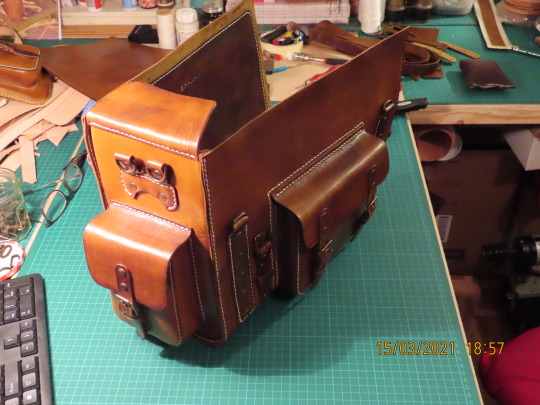
Pic 46 : First side panel attached fully to main body.
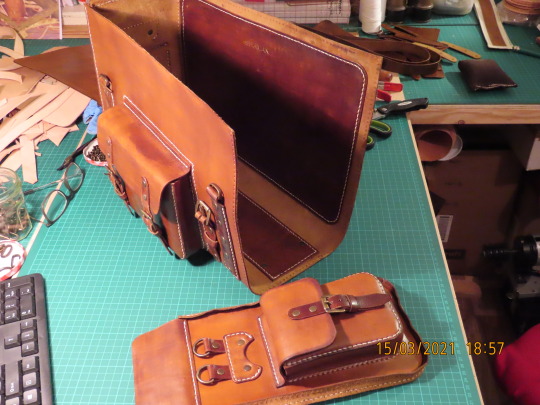
Pic 47 : Other side section ready to fit. The colors are not really as different as the lighting makes them look check out pic 48 for what it really looks like.

Pic 48 : halfway there.
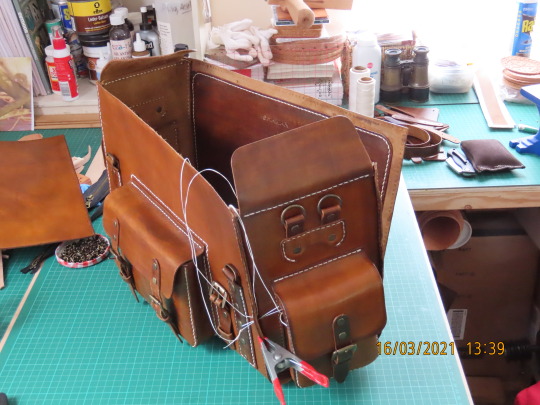
Pic 49 : Clips come in very handy at times like this, the section itself is wanting to fall all the time, ..problem solved.

Pic 50 : Using the Awl to widen the hole, not fun when it catches you...but all part of the game.
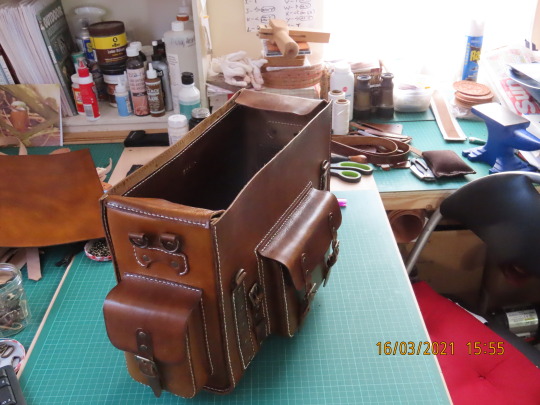
Pic 51 : Done, both side sections now firmly attached and the whole thing is starting to come together.

Pic 52 : Now it needs the main flap, but that needs some work first.

Pic 53 : Different angle.

Pic 54 : View of the back and the zipper pocket.
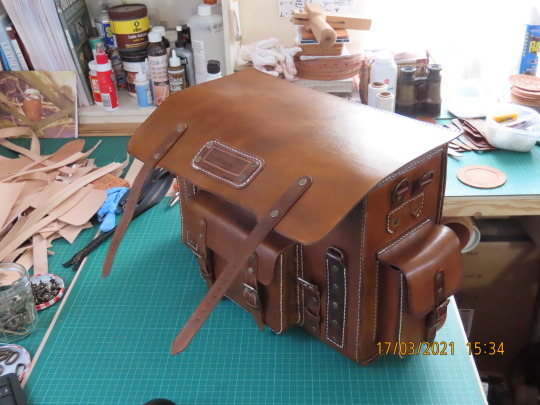
Pic 55 : First I had to attach the closure straps using rivets (Double Cap, you can use single cap but I prefer double.) I also stamped the ‘Shaman’ Mark on the Leather label then riveted that to a back piece and stitched that to the front edge of the main flap as seen here, now..we’re ready.
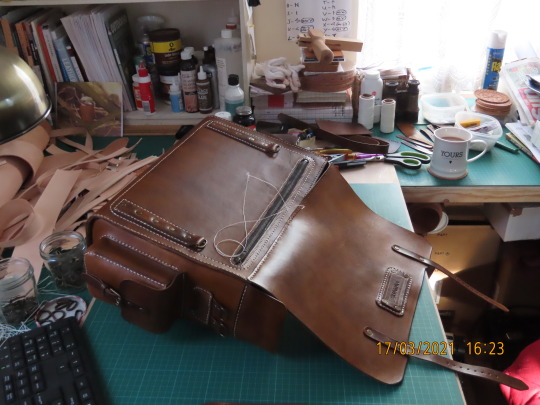
Pic 56 : Again I used a saddle stitch for extra strength, once at the other end ..just because I wanted to...I came all the way back again, no real reason to do that, it’s perfectly fine without the extra, but I ‘m keeping this bag and I wanted it, so I did.

Pic 57 : main flap...Attached.

Pic 58 : Main flap rear view.

Pic 59 : Angle shot shows how well all the colors have matched.

Pic 60 : Now I have to make x2 bag handles.
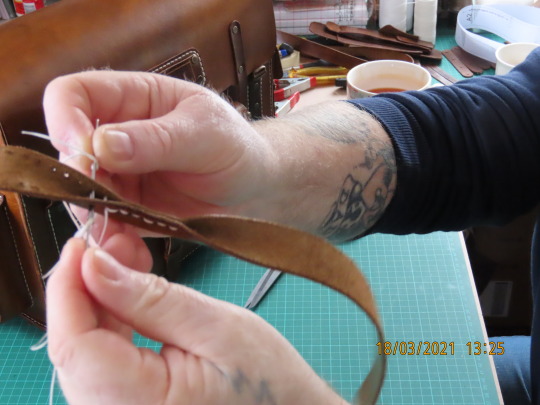
Pic 61 : Using the saddle stitch. All you need to do here is stitch all the holes together pulling the two sides together as shown and make two of these.
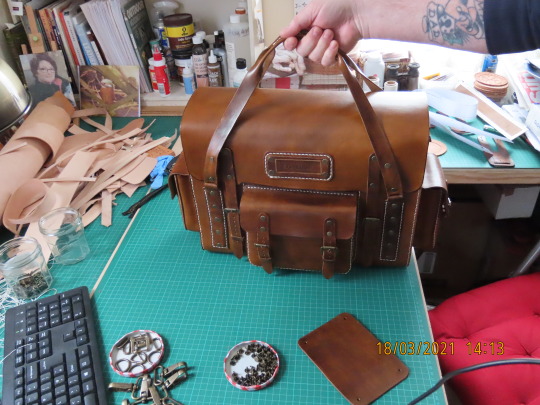
Pic 62 : Connect the bag handles to the D-rings as seen here. I used rivets to fasten them on.

Pic 63 : I attached the clip end sections using rivits and stitching to the main shoulder strap at either end, then the clips were attached, again using rivets.

Pic 64 : Attach the shoulder strap to the side rings.

Pic 66 : As I said earlier, I attached ‘Metal bag feet’ to try to avoid damage to the base from dragging, might not stop everything but should help and looks good I think.

Pic 66 : And we are done. This took me four weeks in the end, but we’ve had a lot of ‘Life’ getting in the way. If I had nothing else to do but this I reckon I could do it in about a week to ten days. I wouldn’t recommend this particular project to a beginner mainly because of the expense, I wouldn’t practice on this one. But there are many more projects out there online and if it suits you to do so you could visit my Blog ‘A Journey into Leather Craft’ and check out my archive, you’ll see the things I’ve made from the very first knife sheath to this amazing bag. I can’t believe I made this, Just shows you never really know what you can do until you try. I look forward to the next project, hope you will come back and check out the next one. To all those who have followed my projects for a long time thank you, hope you enjoy them and hope I have inspired some of you to give it a go yourself. If you are new, thanks for stopping by for a look, hope you liked what you found and hope you will also come back for the next one, maybe tell your friends about my blog, I’d appreciate that. Until then, as always, stay safe and to all the makers out there, Stay Crafty.
#leather#leather craft#leather bags#hand made#hand made goods#posh bags#expensive bags#expensive goods#hell yeah
7 notes
·
View notes
Photo


Embroidery Swatch Development- 26/3-9/4/2021
After I wasn’t fully happy with the embroidery designs I created for the tulle lace and the applique, I went back to try some other designs and materials. One of the thoughts that went through my head was how popular the Art Nouveau movement was at the time of the Women’s Suffrage Movement, and how Art Nouveau embroidery was often used within women’s clothing. This inspired me to create an Art Nouveau inspired design based on the symbols of feminism and Women’s Suffrage. The stem and centre of the design are stylised versions of the female symbol, and the inside depicts the Sunflower. The outside is styled from the Tudor Rose, and represents the roses of Women’s Suffrage. I had initially designed this to be using bright, bold colours, but I used more muted colours in the sample in order to save thread for my final project. I felt that this sample would look the most natural on a satin or silk fabric, so I went through my scrap bin and happily found some poly-satin that worked great for this. My biggest issue when sampling this was that there was a small amount of stretch in the satin that I happened to have, so my design got a bit off kilter, but I still was generally happy with how it turned out. I think it’s visually pleasing, and would make a nice repeat pattern. Unfortunately, this did take quite a long time as there was a lot of satin stitch involved in this design, which makes me less keen on using it for my final project.
My second sample was keeping in mind that I had wanted a slight lace effect on this collar, and I began looking at eyelet lace. I have a LOT of eyelet lace in my own wardrobe, and figured it wouldn’t hurt to try creating my own. I wanted to use the symbols of the Women’s Suffrage Movement, but also incorporate the strong use of geometry within the designs that were used for badges and other propoganda. It took a good couple of hours to plan and then grid the design, but I was happy with how my drawn design looked. I have roses in the middle, a simple design using purple and green surrounding the rose with strong line work, and sunflowers intersecting each motif. I also turned the connecting eyelets into little female symbols. I transferred it to my cotton, with a repeat of four, and began stitching. For this, I did use the brighter colour threads, as I had managed to order more of each colour by this point. I enjoyed the work and surprisingly it went together much quicker than the Art Nouveau design. For reference, each repeat of the motif is about the same size as the Tudor rose on the other design, and the full four repeats took only an hour more than the full Art Nouveau design. What I like about this is that I do have the option to manipulate the repeats of the motif, and the option to play around with pattern matching when I transfer this onto my panels.

Since I have been thinking about making crochet lace trim to go around the outside edge of my collar, I began to look at what samples I had already created and how they would look paired with the embroidery samples I had created, keeping in mind that I was happiest with the eyelet motif. While some of my previous samples looked natural with the Art Nouveau design, I wasn’t happy with how any of them paired with the eyelet motif, so I began creating a few more crochet samples, looking to create a more triangular shape in my trim. I found the simplest one was my favourite, which was good because it also was the most time efficient, working up a longer length in a fraction of the time. Time is always a huge factor for me, especially knowing that I am down to the final few weeks of this project. I had ordered in some gold yarn for this, and decided to sample this in the gold thread, and was incredibly happy with the result. One 10cm length using a 3mm hook took me approximately 15 minutes, so I know I could easily create the full length needed while watching a movie or something. What I also liked about this sample was that it almost looked like a mini Ruth Bader GInsburg collar, which I felt was a fitting association for this project.
5 notes
·
View notes
Photo



Glimmer She-Ra Season 2 Episode: Roll with it TUTORIAL
Pattern and Sewing below
Hello friends!! I know its been so long since I’ve made a tutorial but- it is summer now and I decided to try out doing another tutorial but adding gifs and more pics. I now have a lot more knowledge of sewing and patterning from school so hopefully I can teach you some things too. Okay lets get right to it!
Note: I am putting my own flare on the sleeve. Instead of having the light pink diamond on the sleeve, I’m making it a cut out instead. You don’t have to do this as it is very complicated to sew and it’s not cannon! I am also adding a collar to the top for some flare.
If you have any questions, please dm me on instagram as I don’t check my tumblr inbox very often! @wwhatiss
Materials
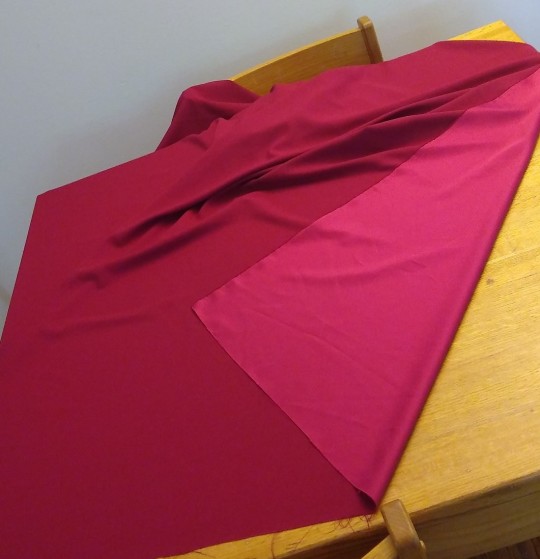
· Pink Fabric of your choosing (make sure it is jacket appropriate. You can also use a different fabric for the lining, but I am using the same fabric for both that and the shell.) I used Stretch Crepe Satin for mine that was $7/yd. I got 3 yards. And I had just Enough. Keep in mind I am also 5’10” and built like an amazon woman so you might not need as much or you may need more.
· Matching Thread
· Large sheets of paper to figure out the pattern (a pad of newsprint works great)
· Ruler/measuring tape
· Scissors
· Sewing Machine
· Hand Sewing Needle
Pattern Making
1.Front pattern
For starters with this, I took a jacket that already fits well and got the measurements of the pattern piece straight from that. Just traced right over it. Work Smarter Not Harder!! I started with the front pattern.
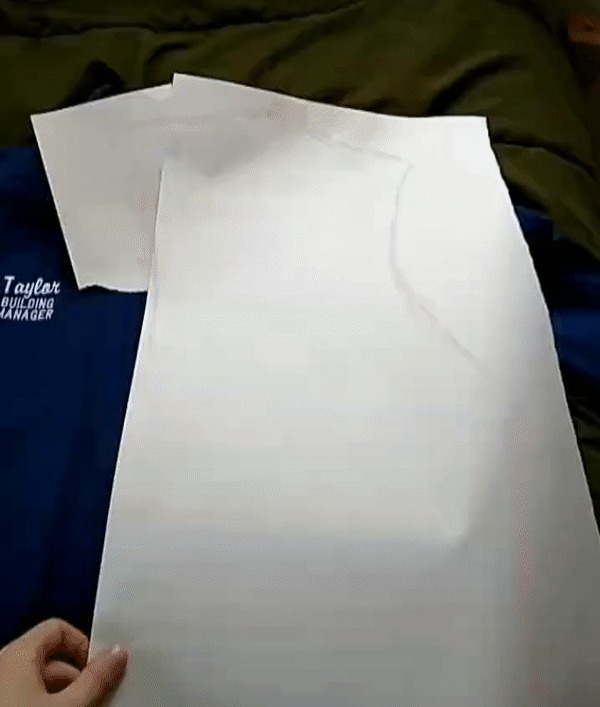
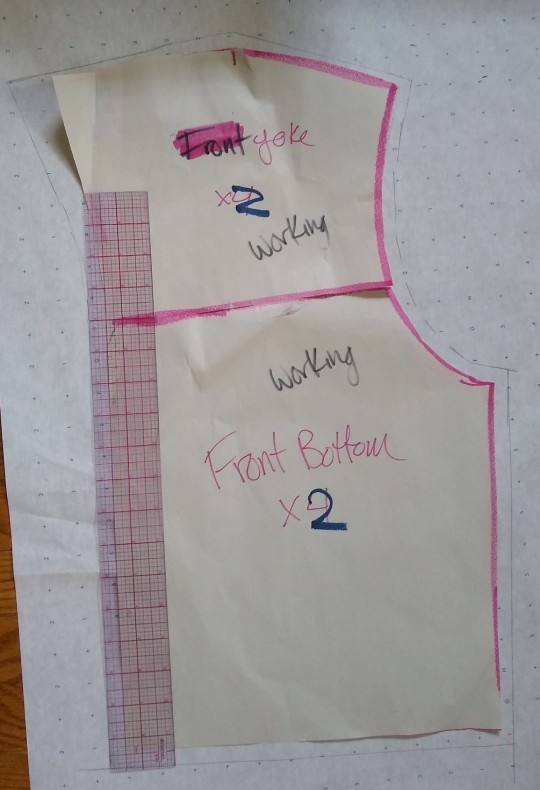
-Now that you have the base pattern of the front of the jacket, you can start altering it. First, I put on the jacket and looked to see where I wanted the hem to end and put a pin to mark it. Glimmer’s jacket ends a little higher than the hips. Then just keep shaping it to where it needs to be. This particular garment has a little flap off the hem at the top so you’re going to have to extend the top a bit like I have shown. I taped an extra piece of paper to the original and drew where I wanted it extended.
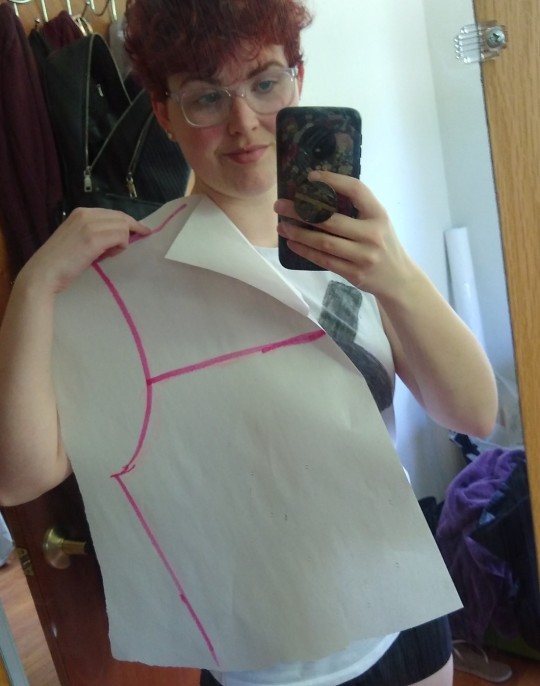
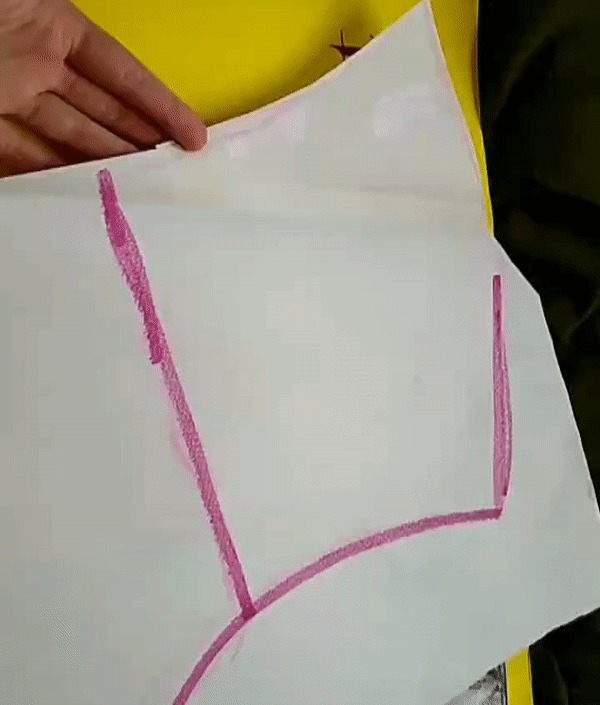
You can also see that I drew the line where there is going to be a seam for detail. Once you have a front piece that you like, cut it out. You can either wait to cut where the decorative seam is going to be or you can cut it now and just tape it together to get your final lining piece.
2.The Back
So you want to start off the same way you did the front and trace the back of the jacket. I only traced half of the back and just wrote on it to cut on the fold. It is very very important that you take your front pattern piece and match it up with the back. Make sure the side seams are the same length as well as the shoulder seams. Trim and extend where needed. You also want to align where the divided seam is located. Measure that from the bottom up because the back will always be different at the top. Below are all of my working patterns.
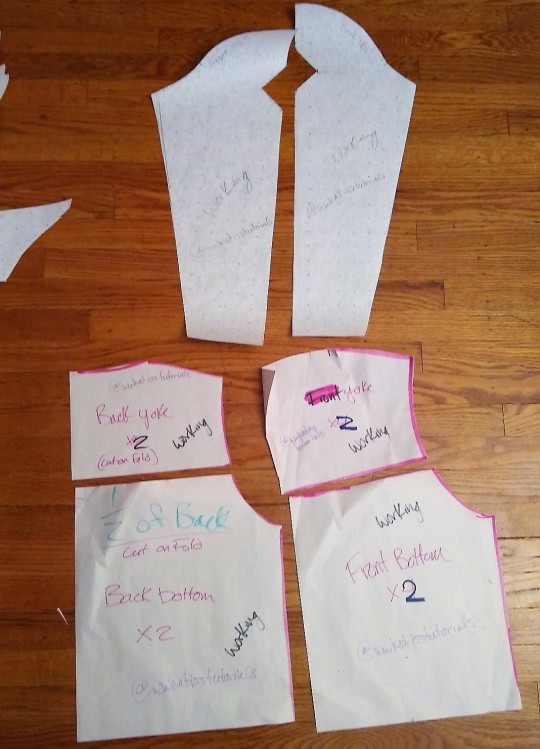
3.Making final patterns
Before we get to the sleeve pattern, you want to add Seam Allowance (SA) to the edges. I always add ½” SA to everything except the neckline at ¼”.
In the picture I have provided, I used both of the front pieces together to make the final lining pattern, but you will also need to do this with the separate pieces.
4. The Sleeve
Alrighty, so there is a lot going on with the sleeve. I will show how I am making this sleeve with the cut out. You do not have to cut out the diamond at all, but you will still need the middle seam because of the pleats.
The same thing as the front and back, we are going to get our information from the reference jacket. Lay it out so that the sleeve is completely flat. The bodice of the jacket will probably need to get bunched to do this. Now you should see a curve in this if done correctly. Get the shape and size of this as well as the length that you want the full arm. Now we will be adding a 1.5” cuff onto the end of this so please keep that in mind. Trace this onto a folded sheet of paper so that you can then make the full sleeve.
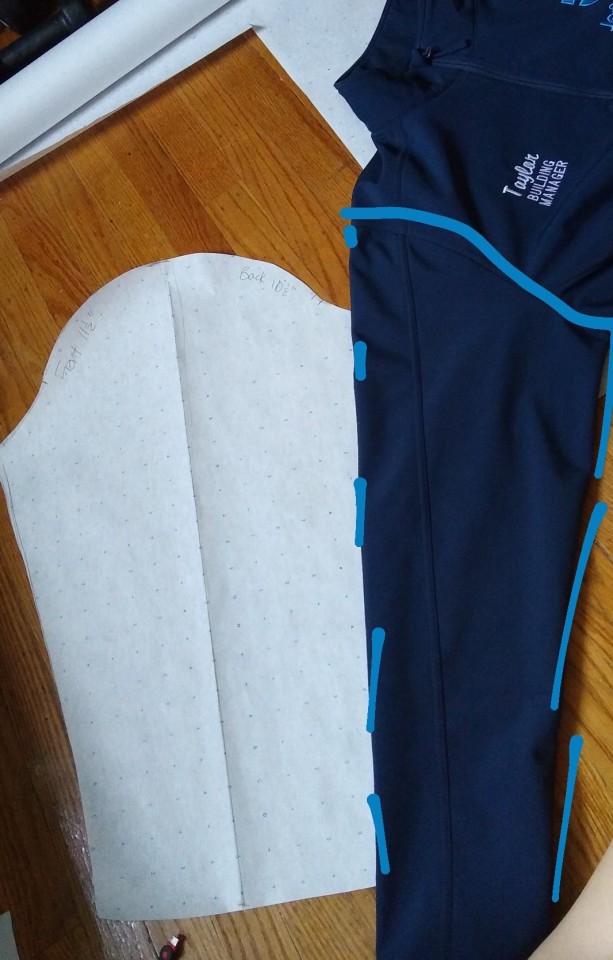
You’ll notice that I have measurements on either side of my pattern. That’s relevant to the sizes of the arm holes of both the front and back bodices. You will want to measure those and adjust the curve to match the measurements. I know it’s a lot but I also know you can do it!!
Once you have that adjusted, If you are doing the arm cut out, you will need to cut out the diamond if you decide to go that route.
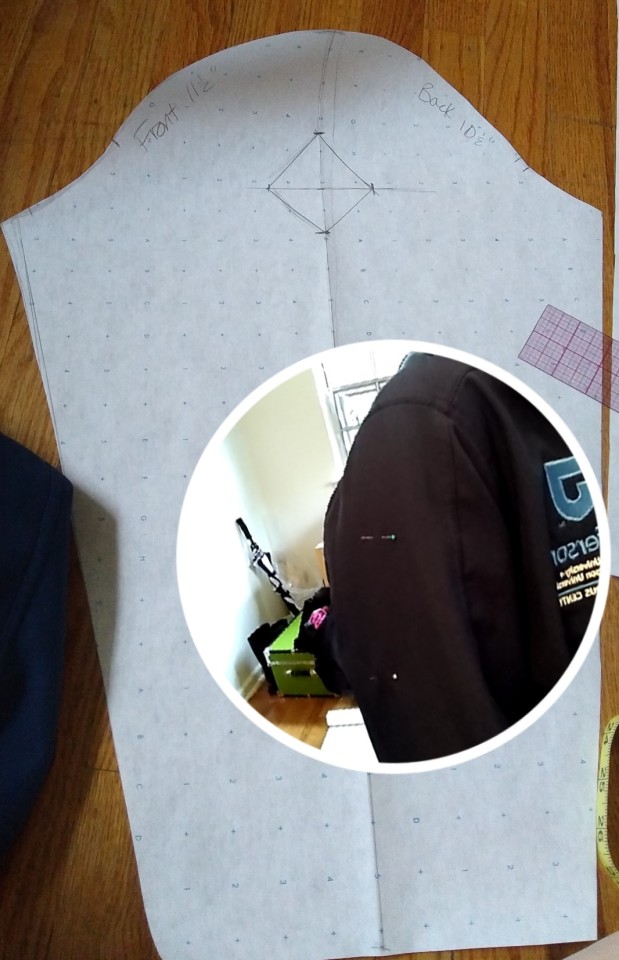
Mark where you want it on your jacket and then transfer the measurements. I didn’t want it too big, but also, I didn’t want it too small either. Go with your best judgement! Make sure it is even on both sides and cut down the middle of the sleeve as you will need a seam here whether you are doing the cut out or the applique. Cut the diamond out as well.
So now that you have your two base pieces for the sleeve, the outer part of the undersleeve is going to need to be extended for the pleats. This is a very chaotic process so just take your time.
First, grab a piece of paper and figure out what size accordion style pleat you like the most. This is how I measured and folded it out. Also keep in mind that you will want the pleats facing down.
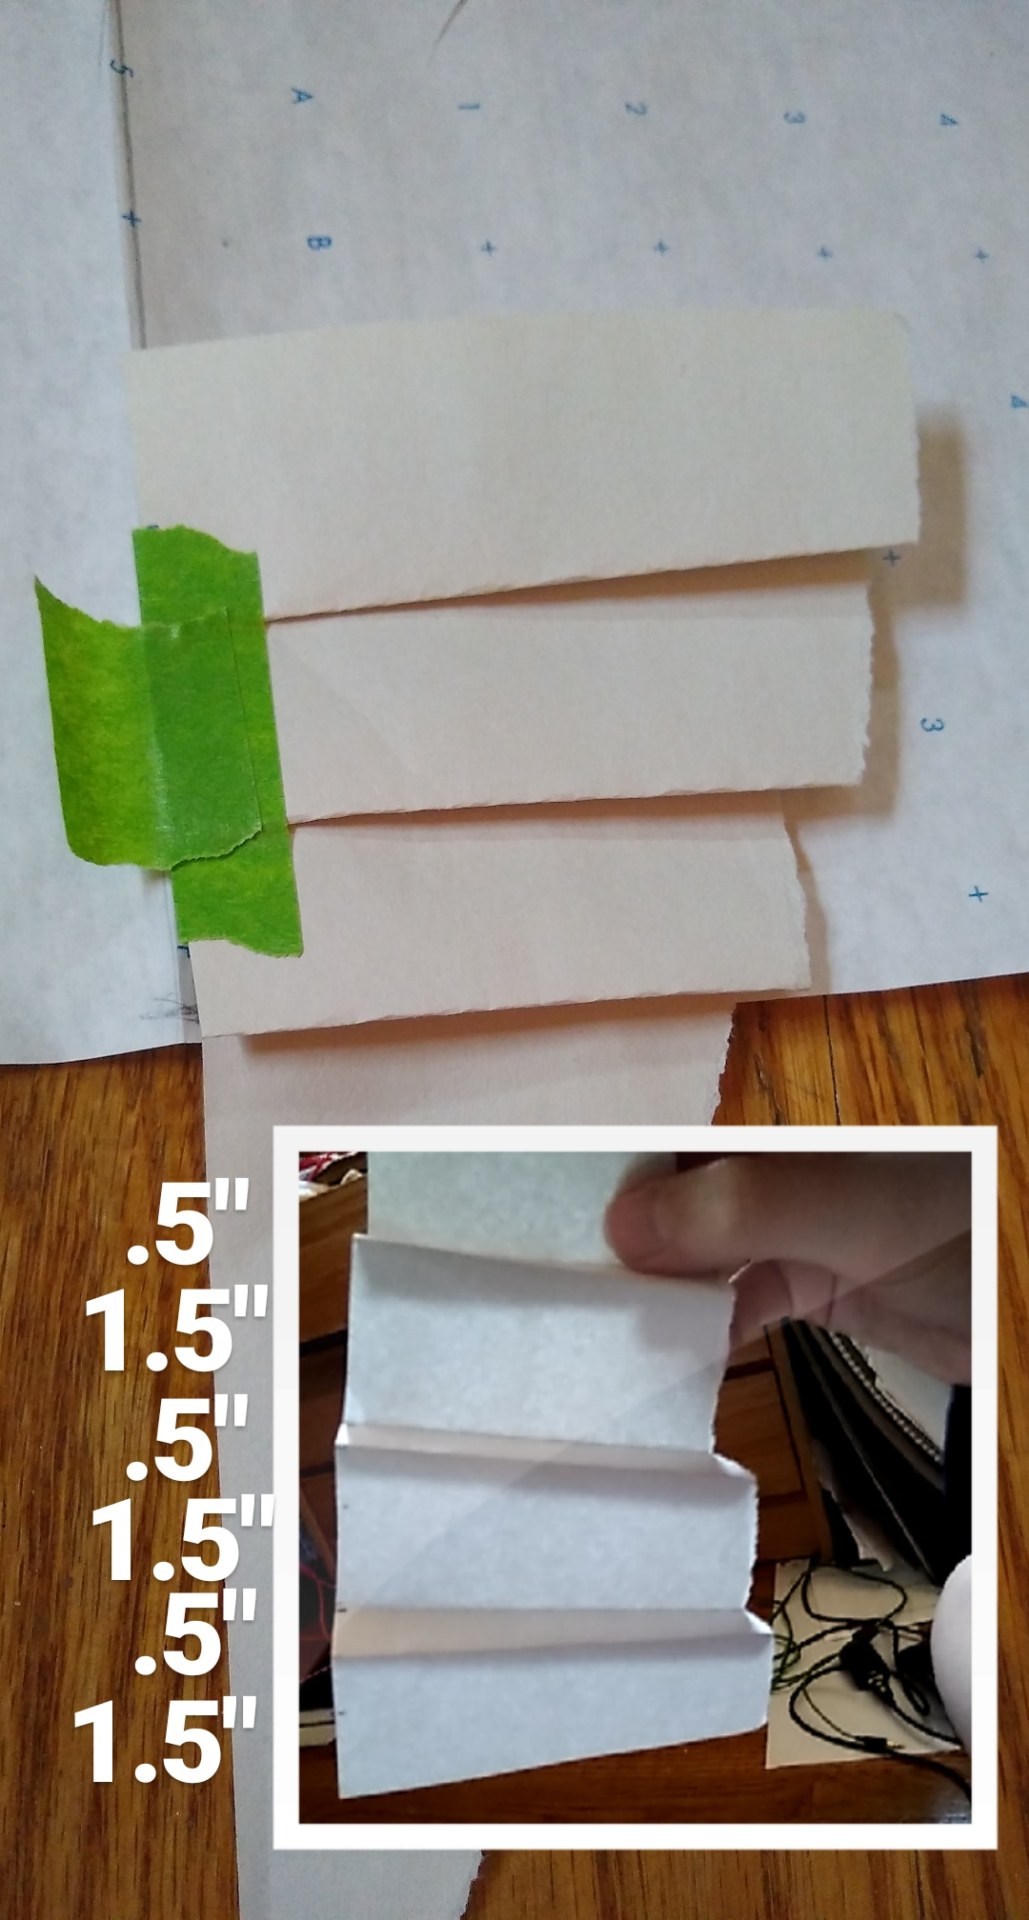
Alrighty! So do not look at the +6 on my image because I realized later that it was wrong! I’m here to make the mistakes you don’t have to haha. Okay so to figure out how much to add to the sleeve, unfold the paper pleats and measure what you have. Then, subtract that by the length of the pleats that was added. This is the length you will add to the sleeve.
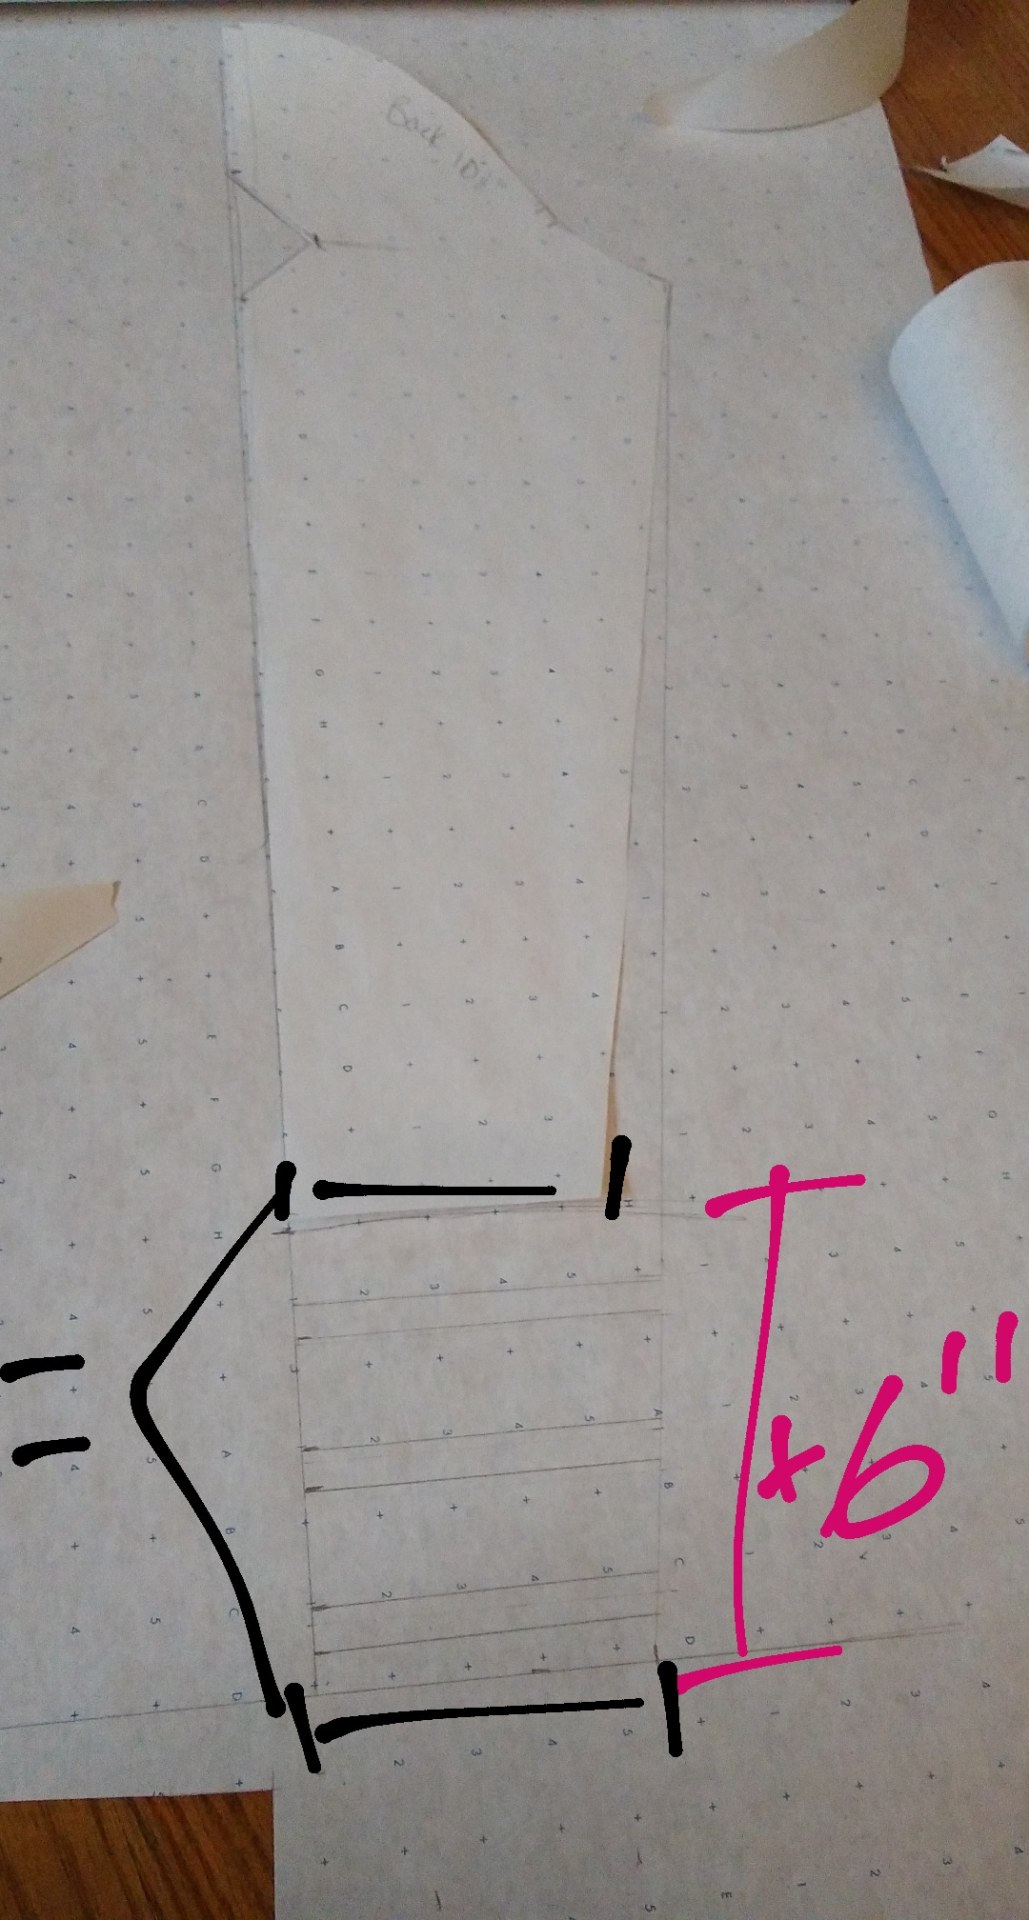
Now, you are going to want the end of the sleeve to still be the same width as the end of the lining piece. From the bottom seam of the arm hole, drop a new line connecting to the extension. Mark the folds as I did with horizontal lines. (When cutting from fabric just make little tick marks within your given ½” seam allowance).
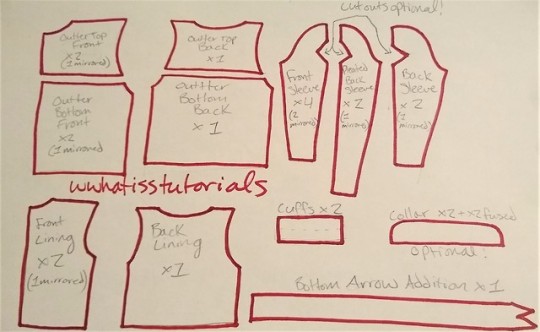
Add your SA of ½” all the way around for your final pattern. You should have a front sleeve final pattern, a back sleeve final lining pattern, and a back sleeve top pattern (the lining will not need to be pleated).
5. The waist band
Alrighty, pull out the original working pattern of the front and back bodice. Measure the bottom x2 and the back x2 to get the full length around the bottom of the jacket. I attached my exact measurements for how I did the little arrow at the bottom. This is added to the hem length that you just got since it sticks out.
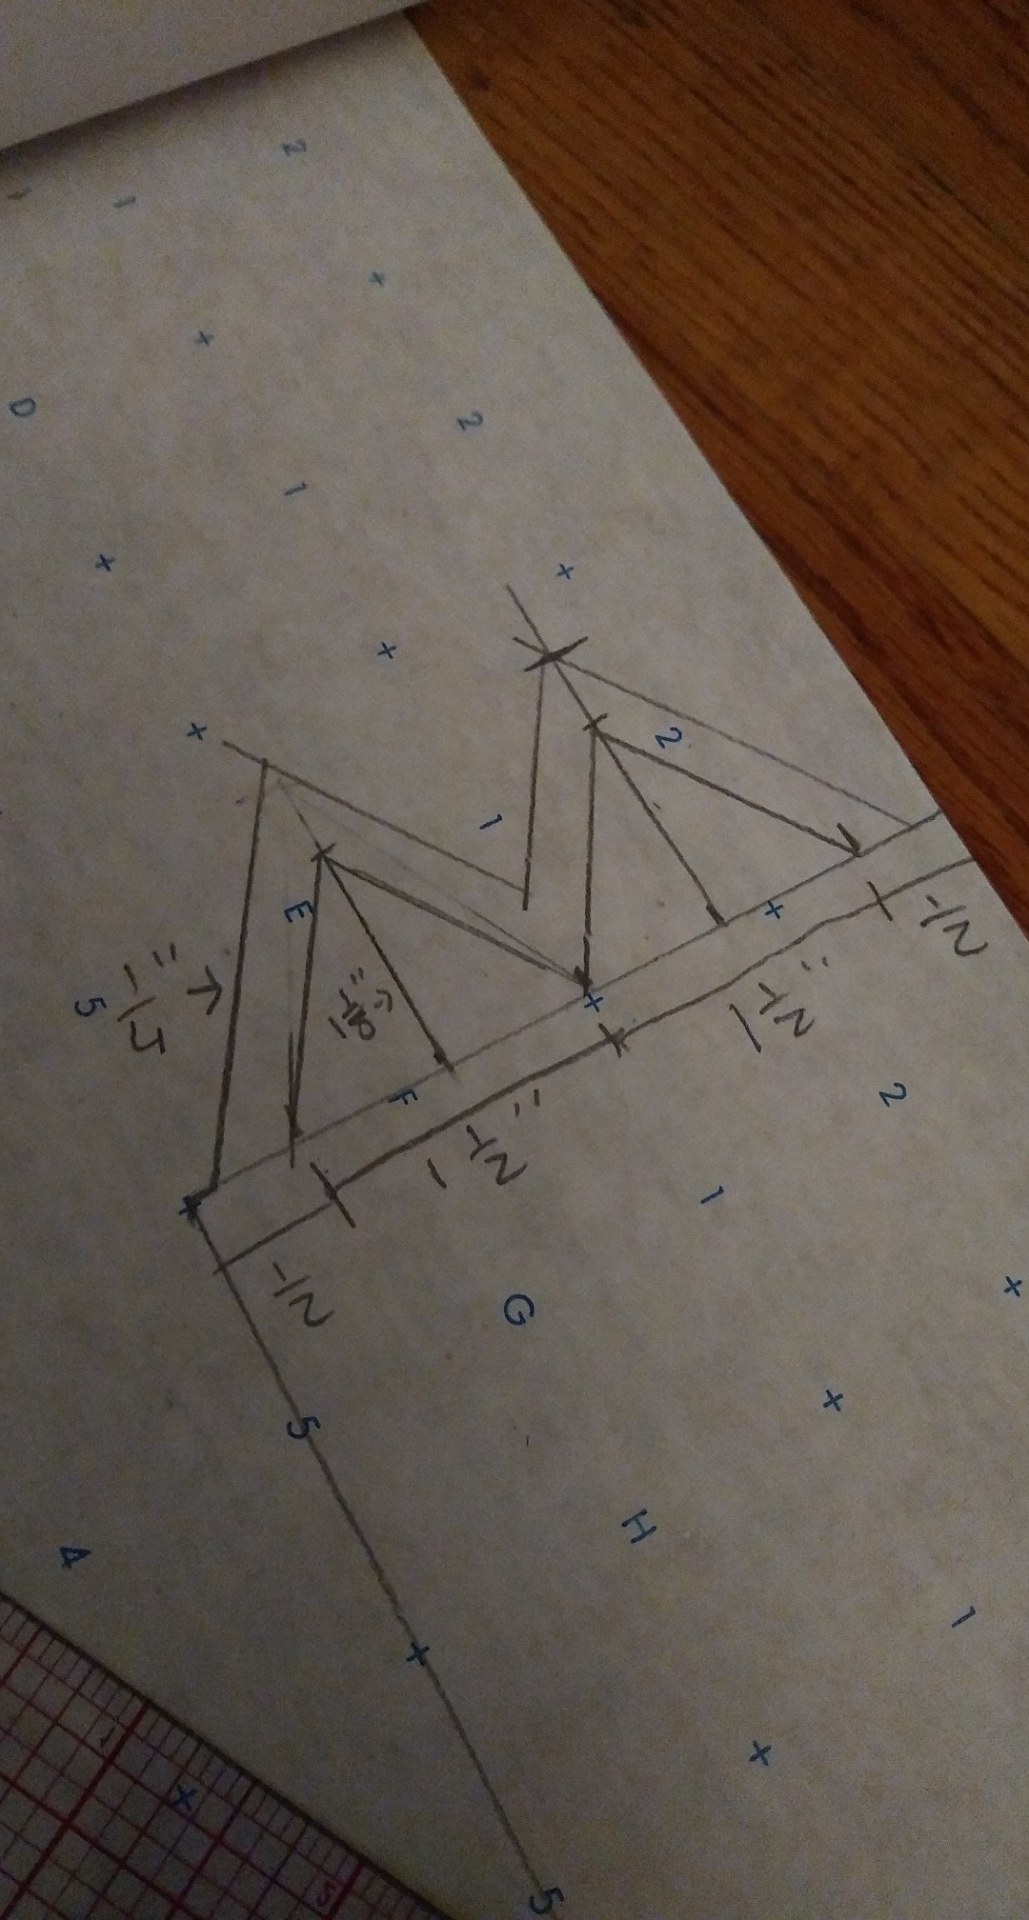
6. Cuff
I decided to add a cuff to this jacket just to finish off the sleeve. I thought It would look nicer. To get the measurement of this, measure the circumference of the end for the length and for the width do which ever you would prefer. I originally measured it for a 1 ¼” extension which you need to multiply by two since its folded over. You may want it to be the same width of the pleats to allow it to flow more. Adjust as you’d like!
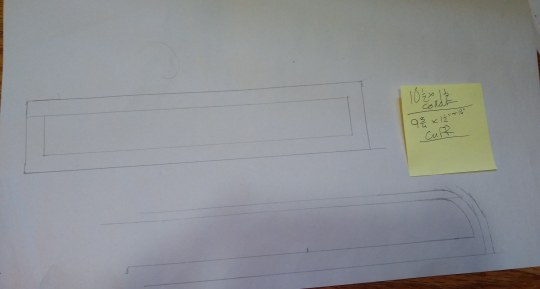
7. Added Collar
Okay so I know the show does not depict a collar on this jacket, but I honestly did not like the way the neckline looked without it. I decided to put this on at the end, but it would probably be easiest to sandwich it in between the inner and outer layer of the jacket. I measured from where the jacket folds back in the front, around to the other side where it folds to get my measurement. I went for a 1 ½” extension and then rounded the ends to be like a mandarin collar.
Sewing the Garment
1.The Bodice
Okay for the outer layer you have the panels with the seam going through them. Go ahead and sew those so that they then match the lining panels. Be sure to iron the seams!
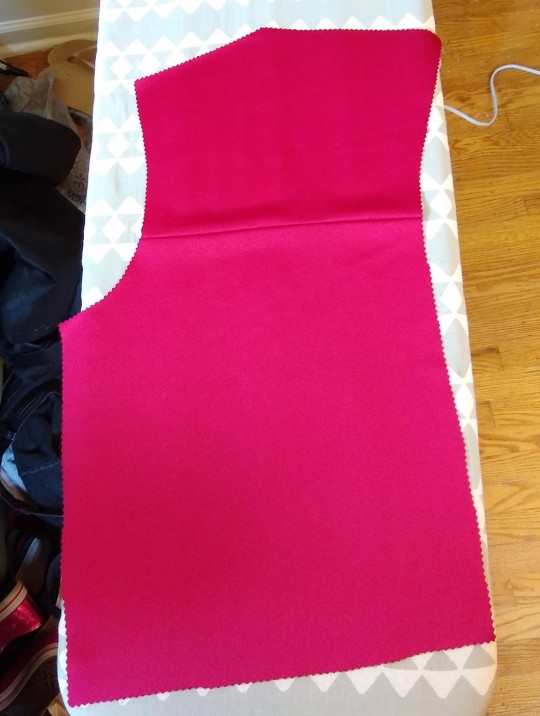
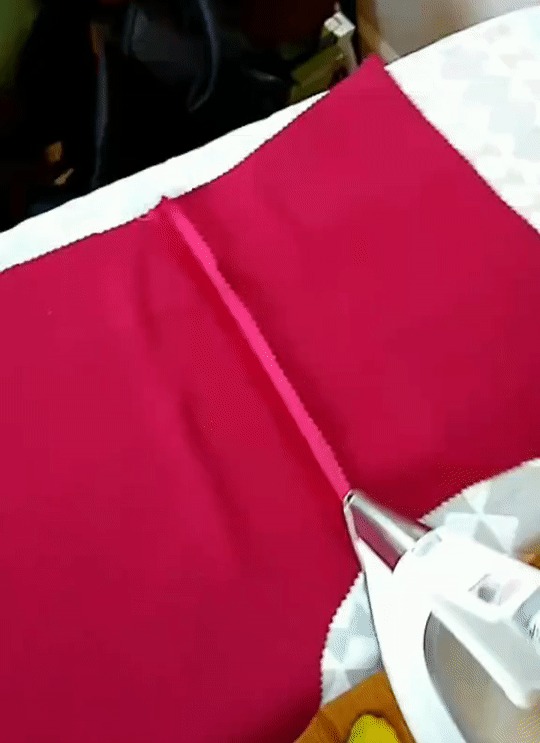
Sew the side seams and shoulder seams of both the outer layer and the lining separately.
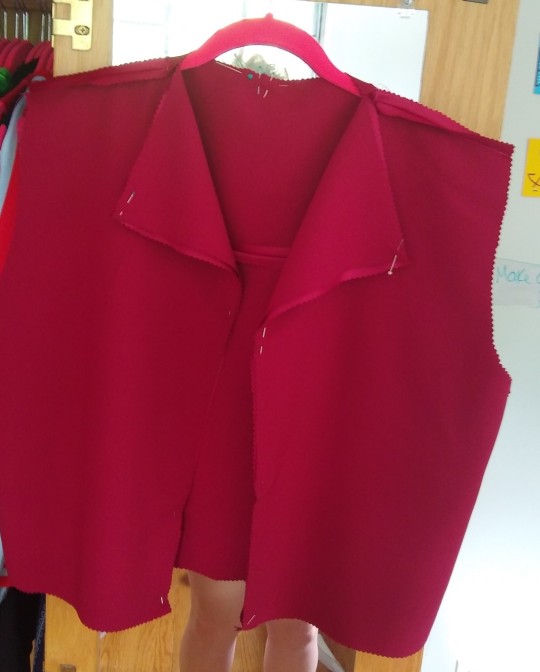
Then match up the two pieces so that you can put the layers together. The right sides are together and the wrong sides should be the only things visible. Sew the front panels all the way around the neck to the other side.
When it gets turned right side out it will look like the picture below. This can be fixed by adding top stitching around where you sewed. I also top stitched the front seams as well as the shoulder seams.
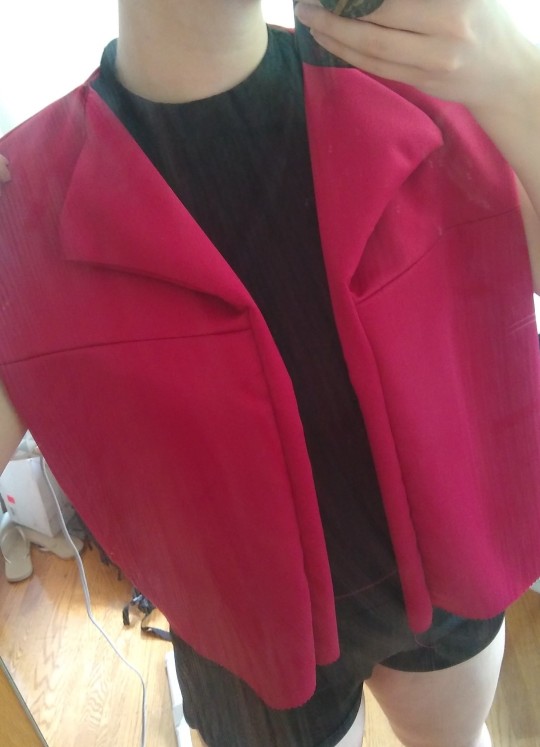
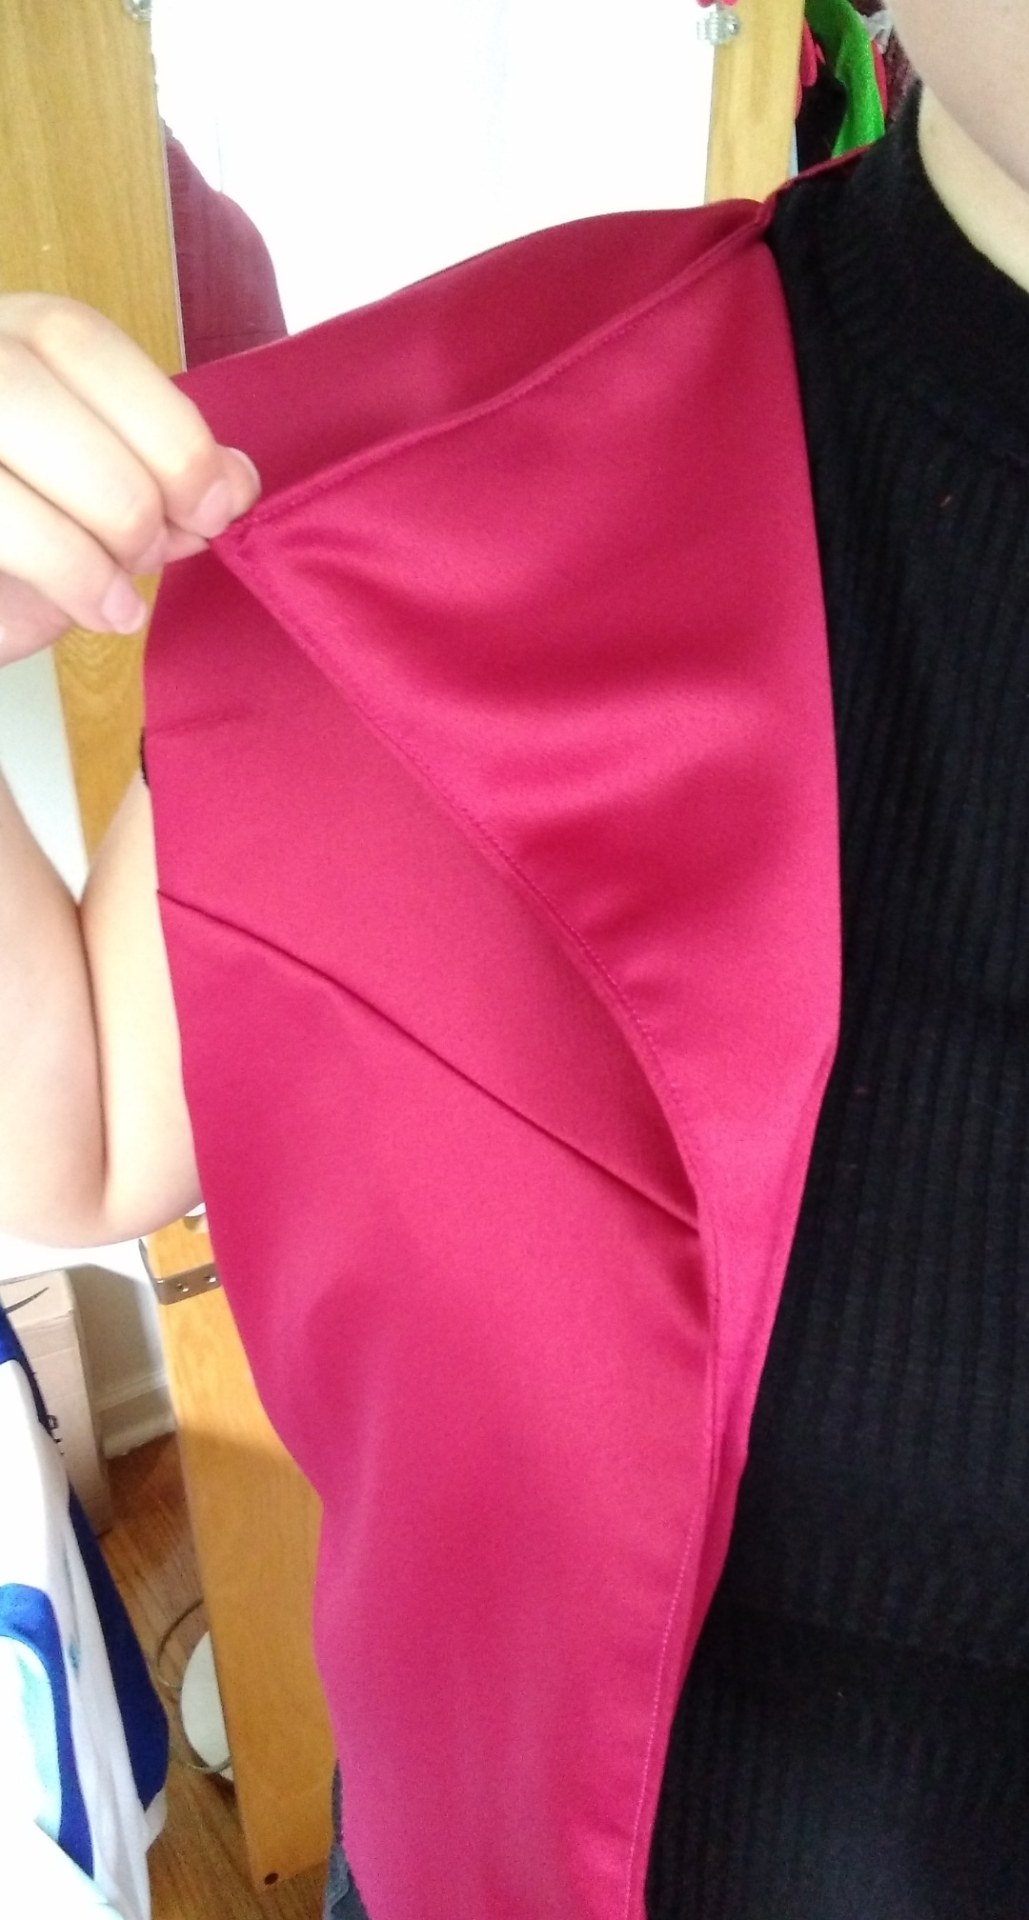
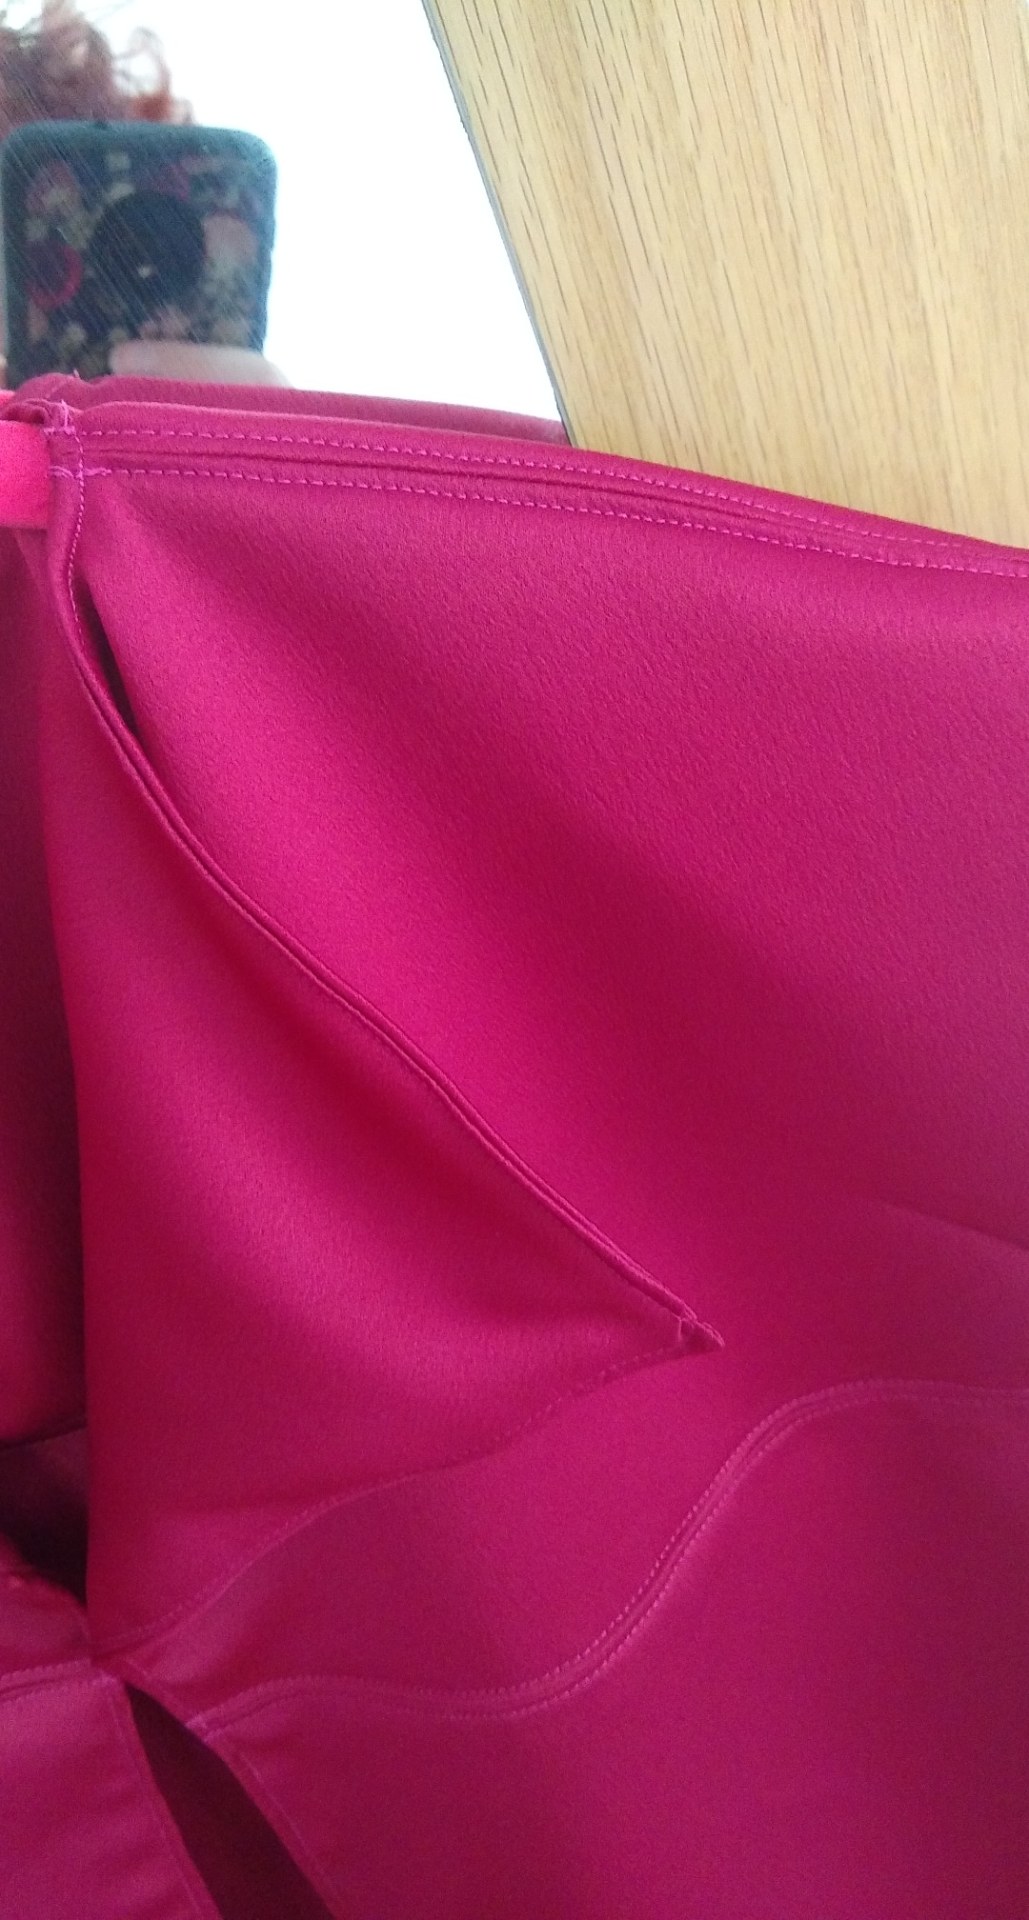
2. The Sleeves: Part 1
The sleeves themselves and attaching the sleeves are very difficult. I managed to have to re-do them 3 times. I am just glad that my fabric is very forgiving when it comes to mistakes.
I hope you still have the paper that you used to measure out the length of the pleats because it will make the next steps so much easier. With the markings on the fabric for measurements, fold out the pleats the same as you did the paper. The inside back piece should now be equal to the length of the folded piece.
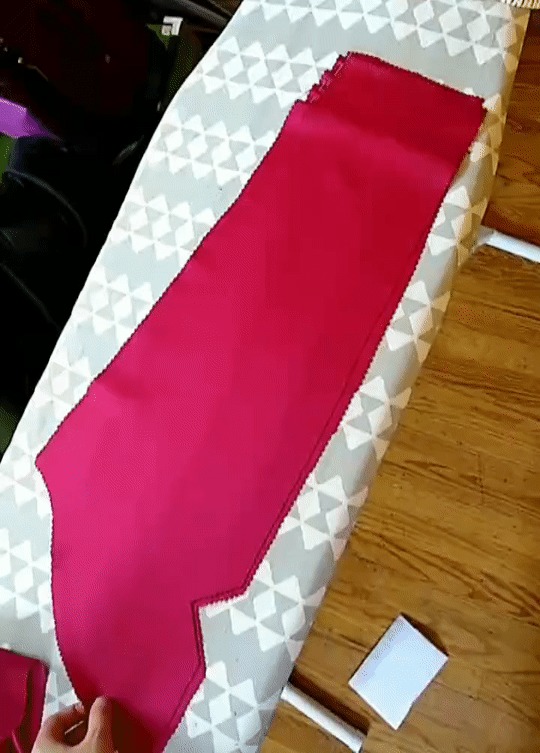
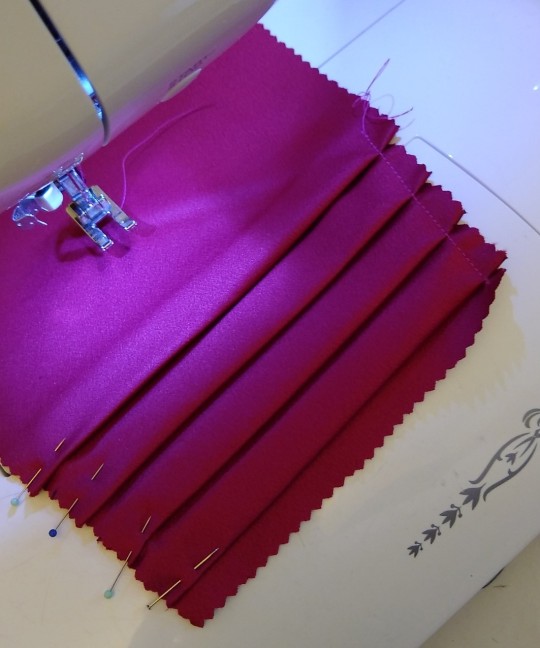
You are going to want to stitch down the side to keep the pleats in place. My sleeve happens to have 4 pleats in this image instead of three because I measured out my sleeve wrong. If you followed the tutorial, it will be right. I later adjusted when I was putting the cuff on.
3. The Sleeves: Part 2
Alright If you do the cut out then you have to do this step. Put the wrong sides together of the front outer and front lining piece. Sew just the cut out at ½” SA. When you are done stitching it, snip at the corner until right up against the stitching.
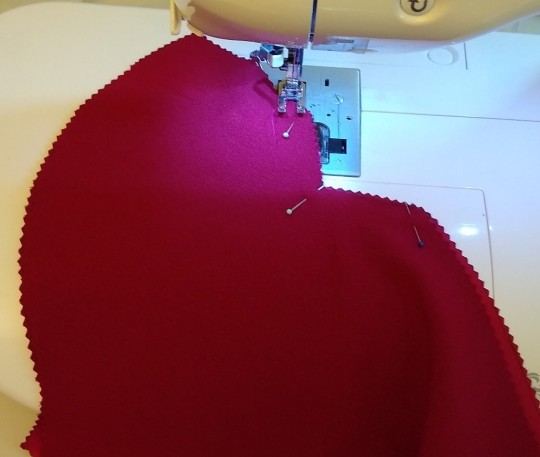
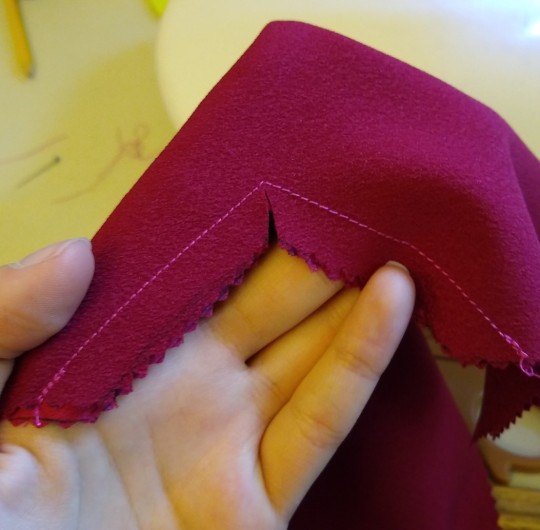
Do the same for the back lining and the back-outer piece. Flip it out so it looks clean and iron.
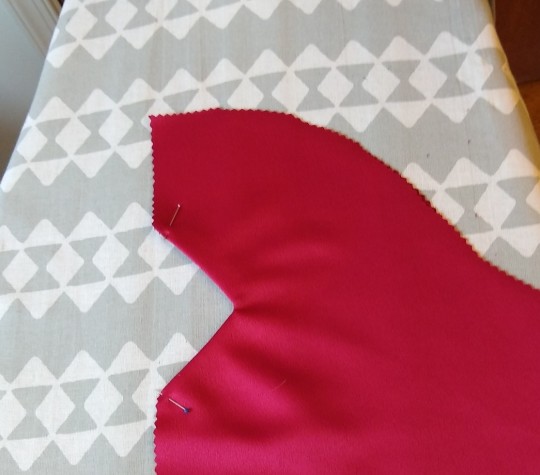
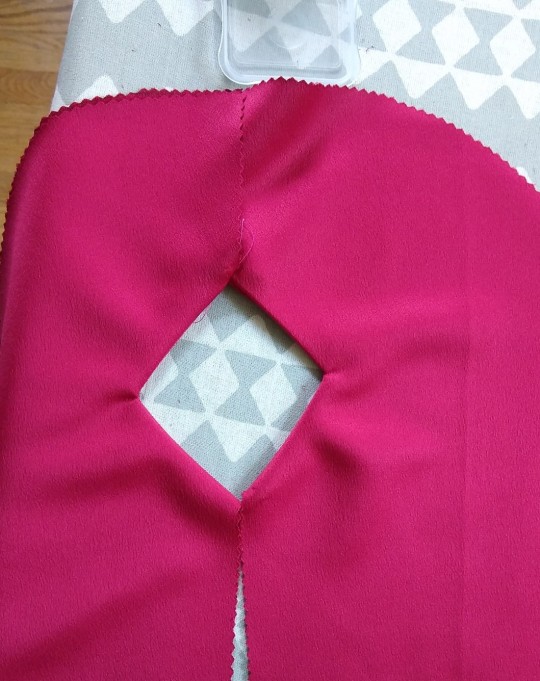
Next we will be putting together the two pieces above. I have both a gif and image on how it will look. The top middle seam will be sewn together as well as the bottom middle seam.
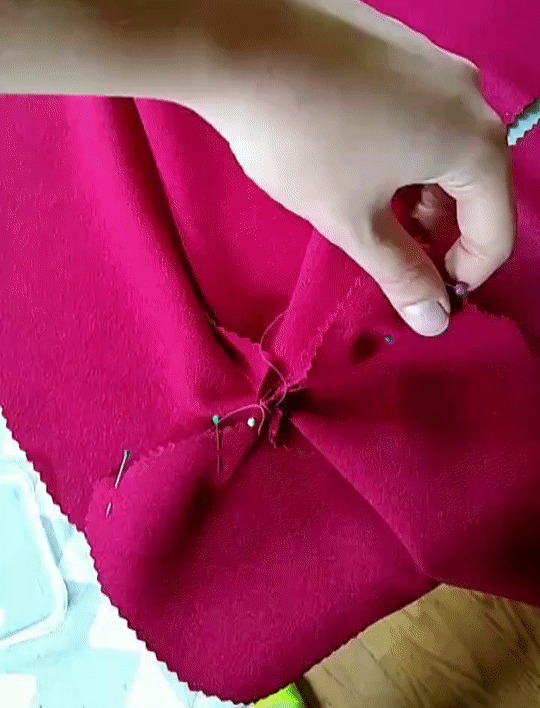

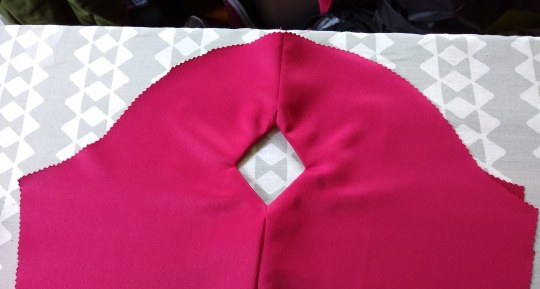
I then added top stitching to my sleeve as well. Try to make the top stitching the same through out the whole piece unless it’s a designer choice.
Next to get the whole thing together and still have it be clean on the inside we have to sew each layer separately for the underside seam. Just match up the sides of the outer layer and the sides of the inner layer. Refer to the image and the gif below.
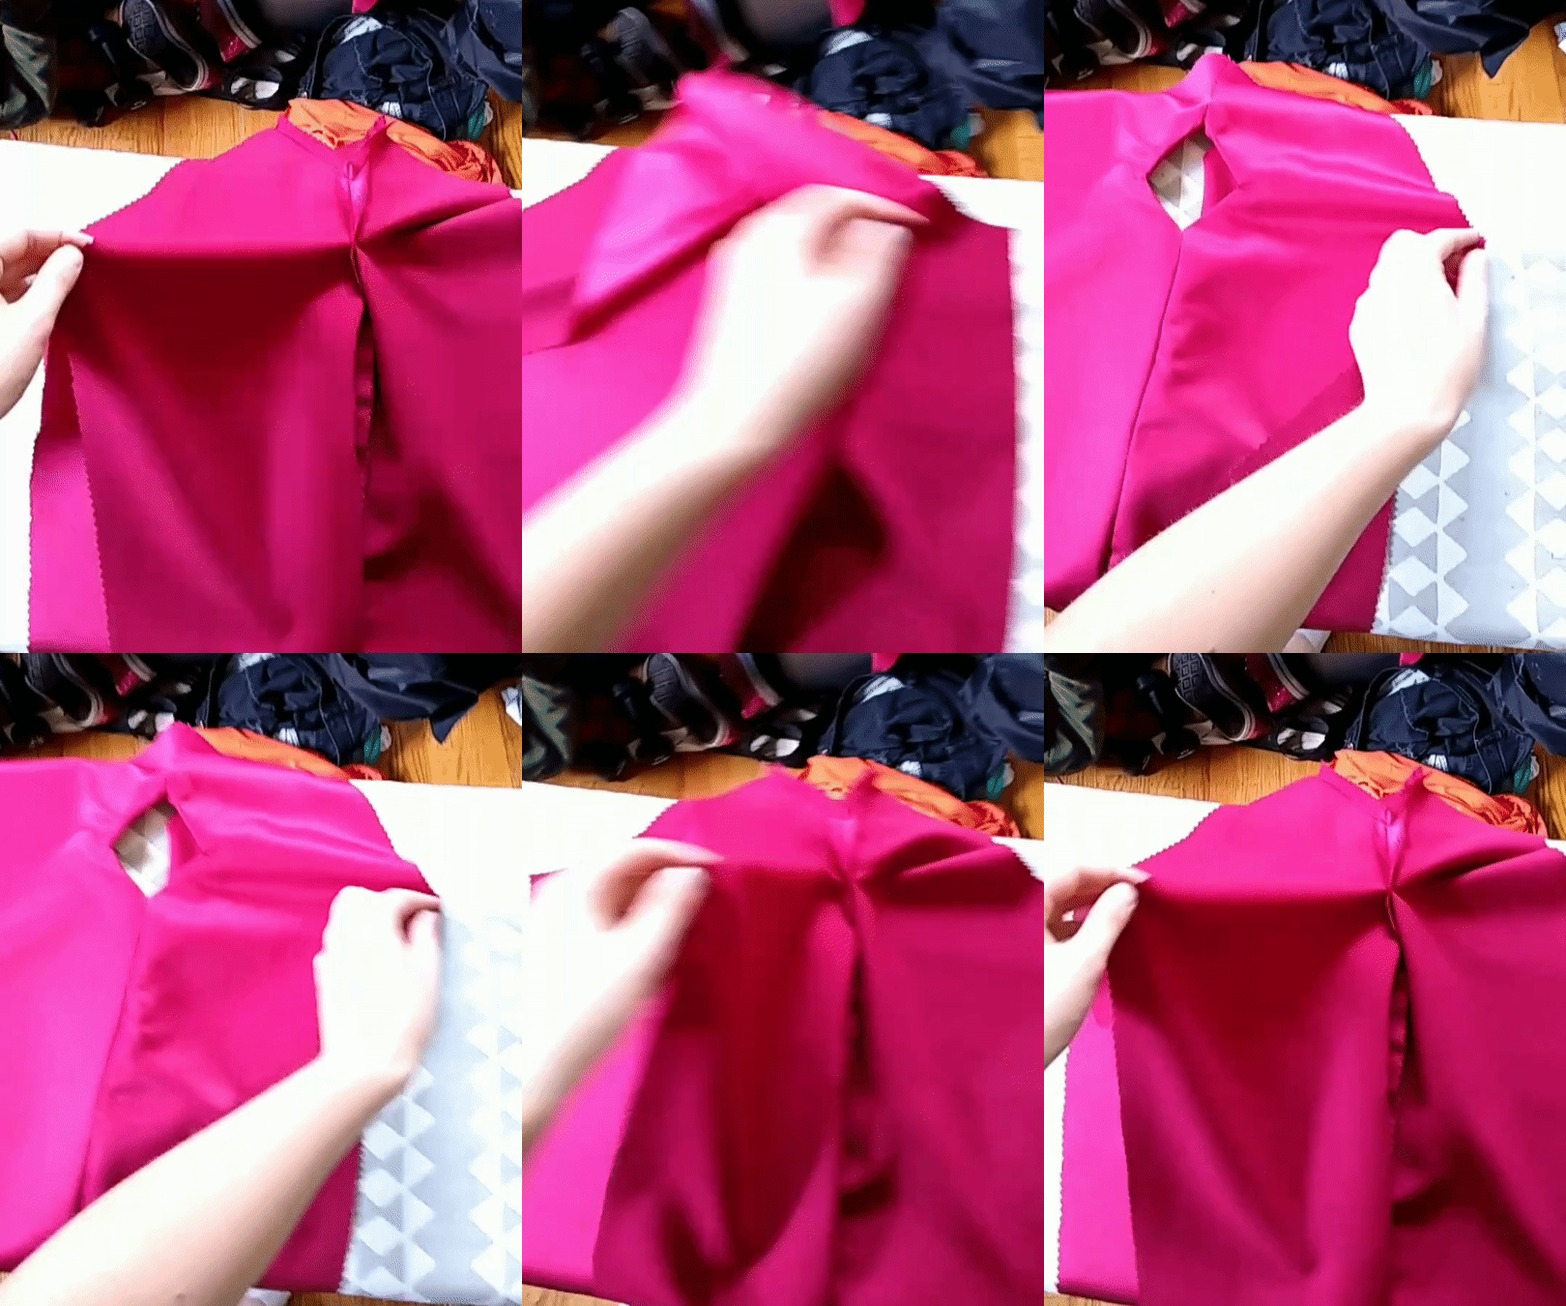
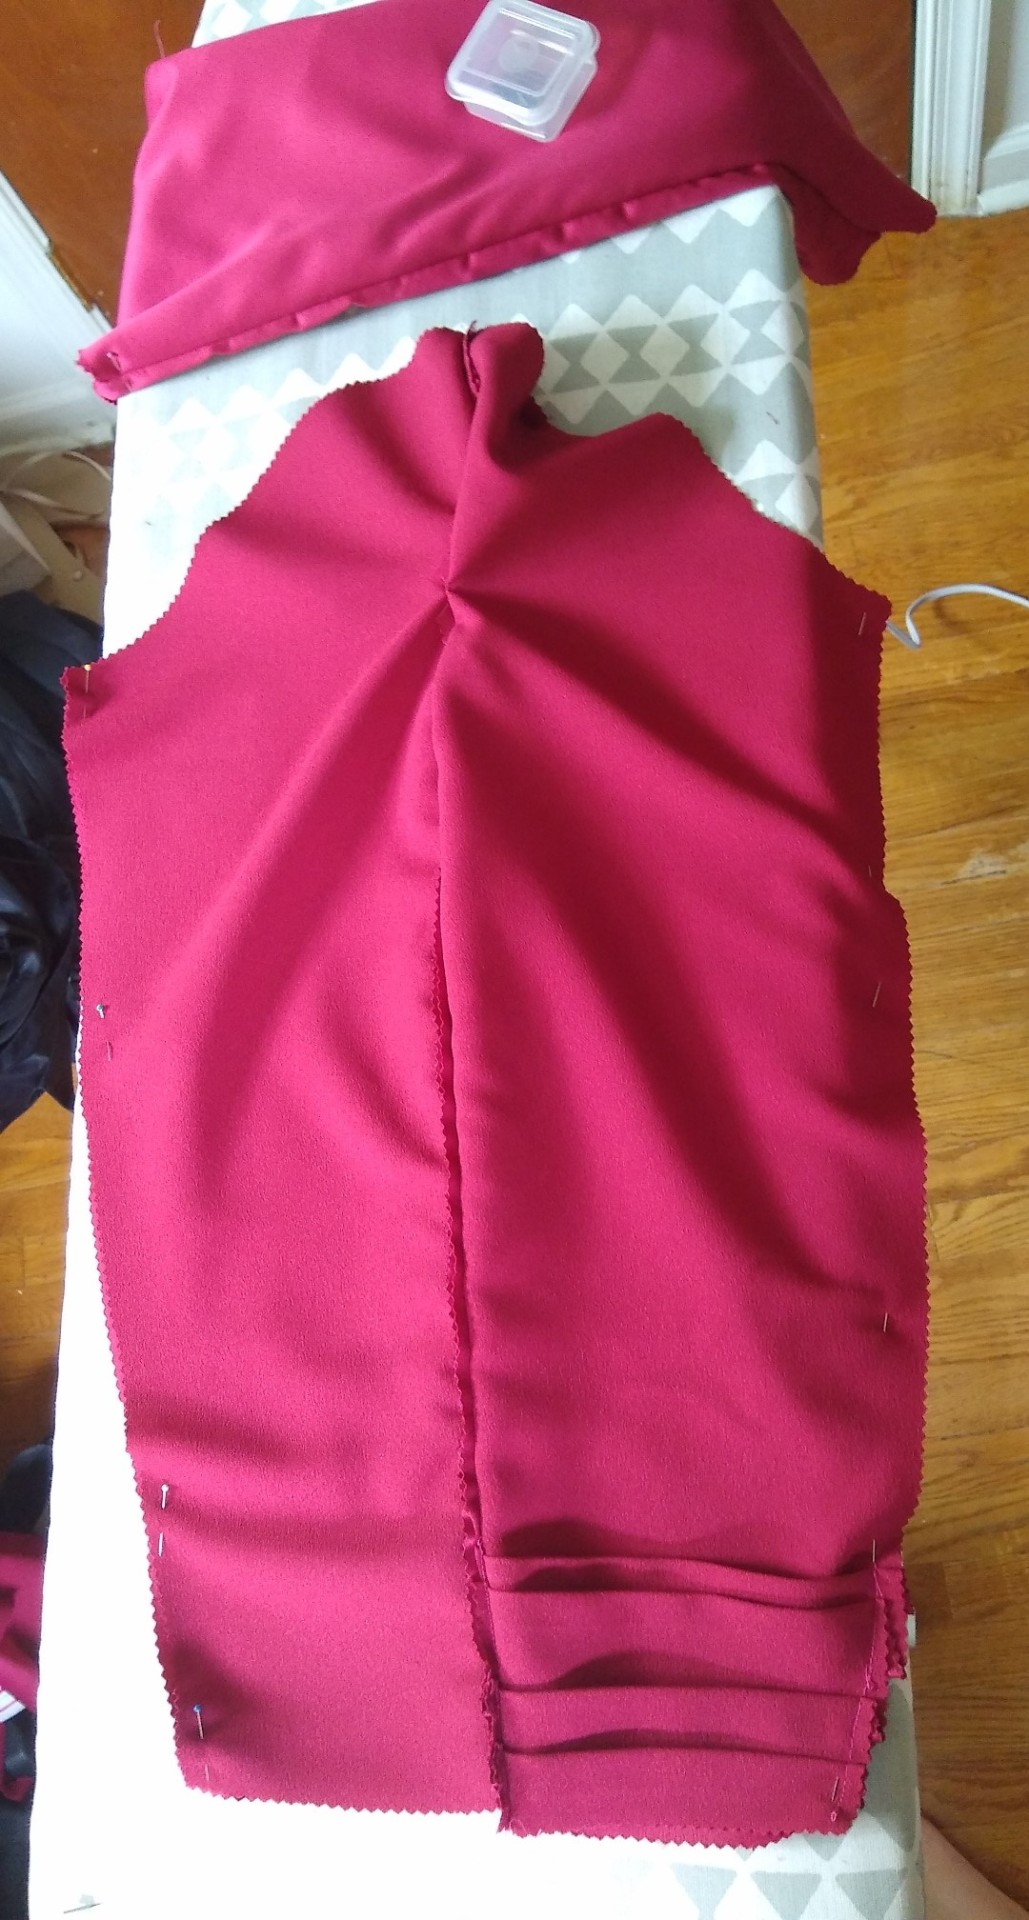
While it is in this state, I highly recommend you iron open the seams so that it lays nicely on the inside.
Okay, then you have to turn it right side in. to do that, put your arm through the opening with the pleats. Hold onto the end closest to your hand and use your other arm to pull it back over the sleeve until its completely turned right side in. Gif for Reference.
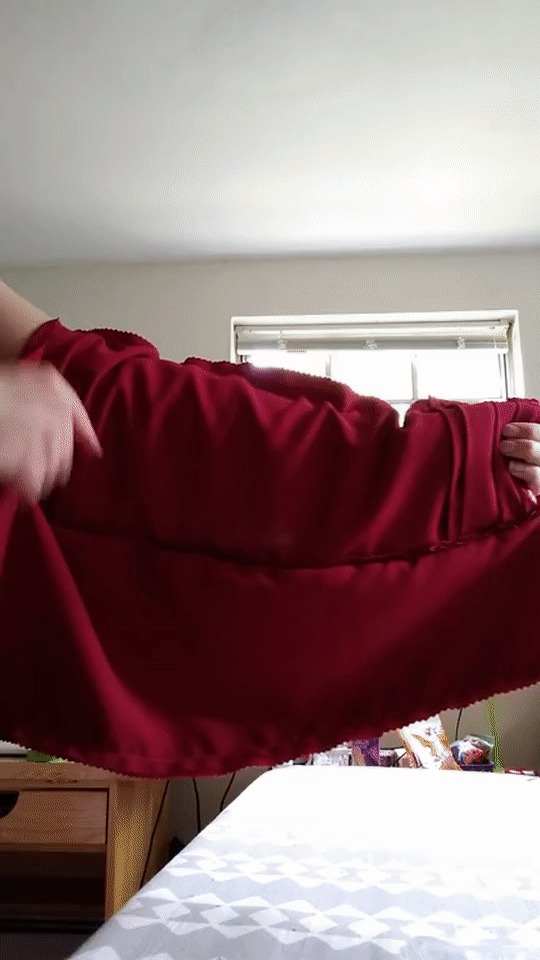
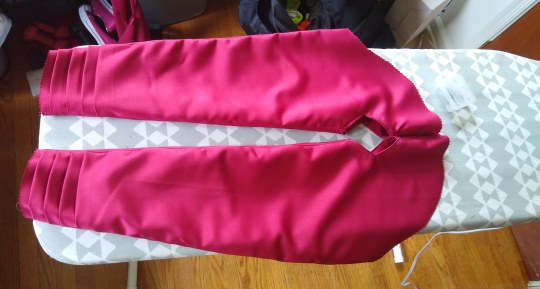
BAM! SLEEVES.
4. The Sleeves: Part 3
Okay so there are a few things going on when attaching the sleeve. A) You don’t want to have an unfinished edge in your jacket so I did a french seam. Here is a good video reference to how to do that. And instead of each at ½ SA, you will do ¼ both ways https://www.youtube.com/watch?v=YYa86gQbN6c
B) We are working with a Set in Sleeve so there are a few steps to that. https://www.youtube.com/watch?v=9E1_NcRrDB8
Here is another good video reference for further help. For this project you will want to use the first suggestion used.
You have to ease the arm whole which means along the top of the sleeve you will baste it and then when you are connecting the sleeve to the bodice you can pull the stitching tighter to bunch the fabric to fit. BE CAREFUL AS YOU DO NOT WANT FOLDS AT ALL. Don’t worry, It will work. Another tip is to try to get as much fullness in at the top by the shoulder seam rather than the sides because it lays nicer and gives some extra space.
Now we gotta combine these two things. I HIGHLY HIGHLY HIGHLY suggest testing this out first before using the actual sleeves. The number of times that I had to seam rip the whole thing apart will haunt me. I do tests all the time and it usually saves me the headache later, but I decided that I would be fine and went for it. A mistAKE. Your fabric may not be as forgiving as mine either. It doesn’t have to be a whole sleeve either. Just practicing being able to ease the arm hole while also french seaming serves the purpose!
The image below is pinned to do the second run of the French Seam.
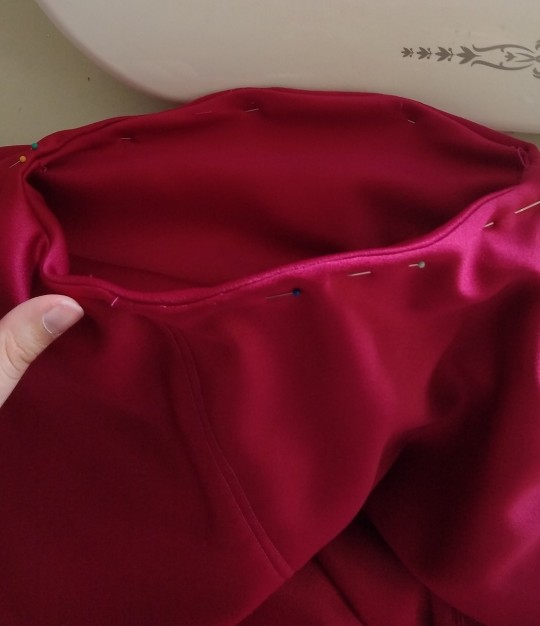
Bam. Progress pic

5. The Cuffs
For the cuffs, I apologize but at the end here I neglected to take photos. In a lot of ways though putting some videos on here will probably help you much more.
https://www.youtube.com/watch?v=g0V1jpvxC0c
The picture below shows the inside of the cuffs and the arrows show where I hand sewed the inside together so that the outside looked clean. Add the topstitch then as well.
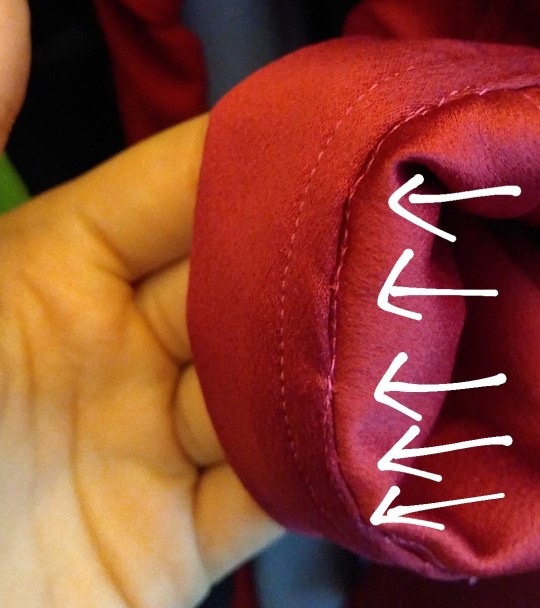
6. The Bottom Arrow Addition
Sorry its not directly on the jacket. I made a sample to make up for it. It would be very hard to understand otherwise.
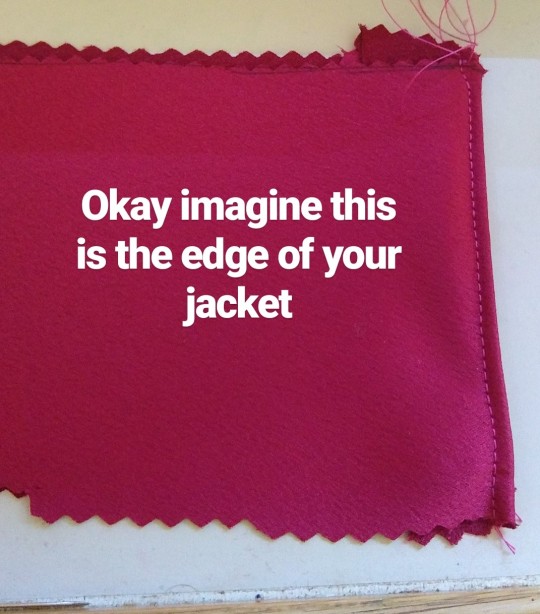
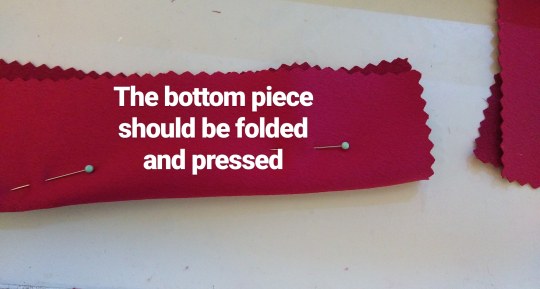
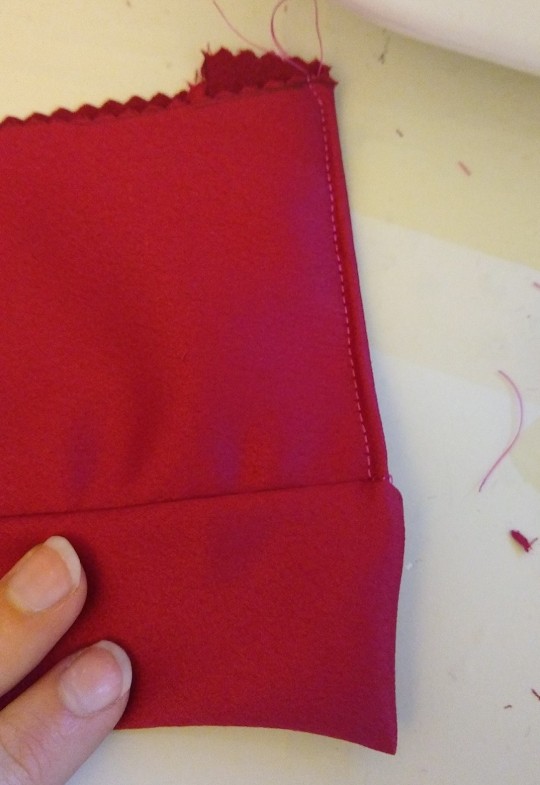
Now when you go to attach the bottom be sure to off set it by a half inch. You are going to “pillow case” it later. The part of the jacket that is going to be seen from the outside should have the clean machine stitching.
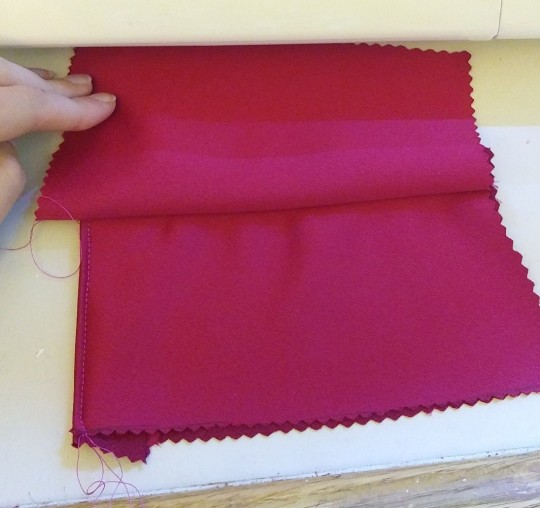
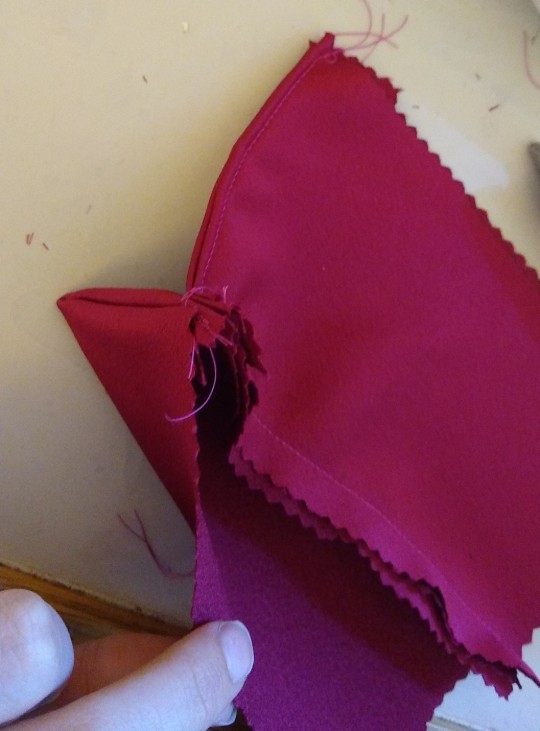
This is where the pillow casing comes in. since you offset it by a half inch you can do the usual half inch seam with the good sides facing each other. The image above is what the bottom end of your jacket should look like currently.
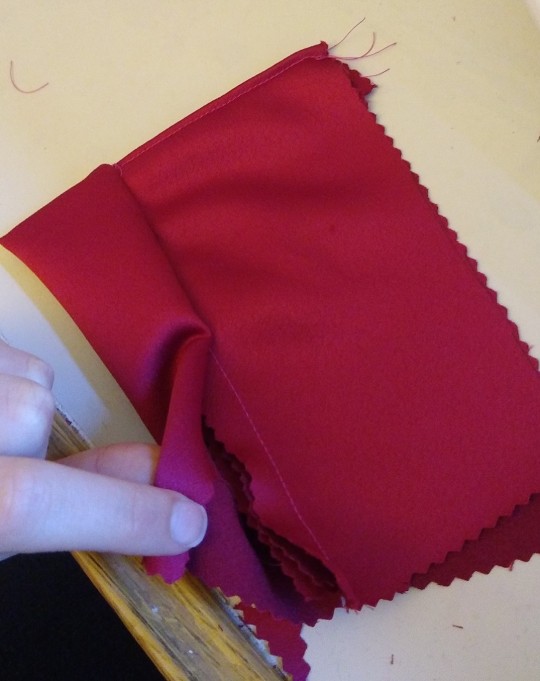
Okay now the most chaotic thing to do now is what we call burritoing to get a good clean finish on the ends. You are going to fold the jacket inside the addition to where you end up in 3 being able to machine stitch it at half inch SA. You will not get the whole jacket done this way, only a few inches but it does look nice. The rest of the middle will have to be hand stitched but it’s worth it. I promise.
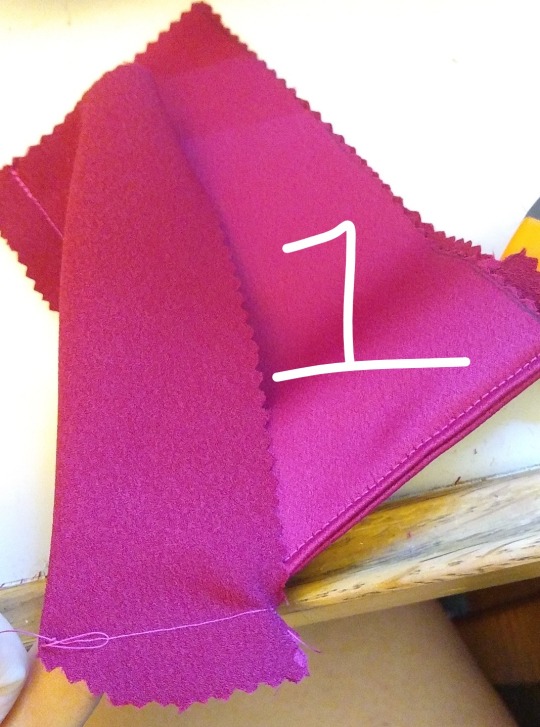
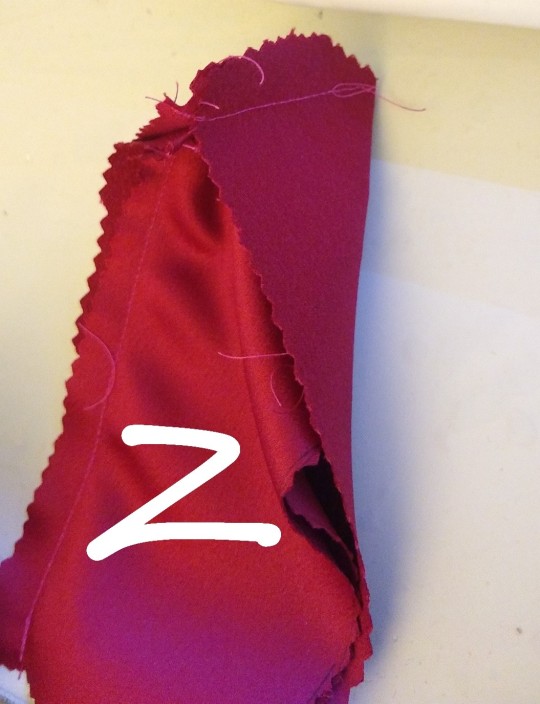

This is what the finished end looks like.
Below is a perspective of the inside before it gets hand sewn
Do the same with the Arrow end but it is just a bit more complicated
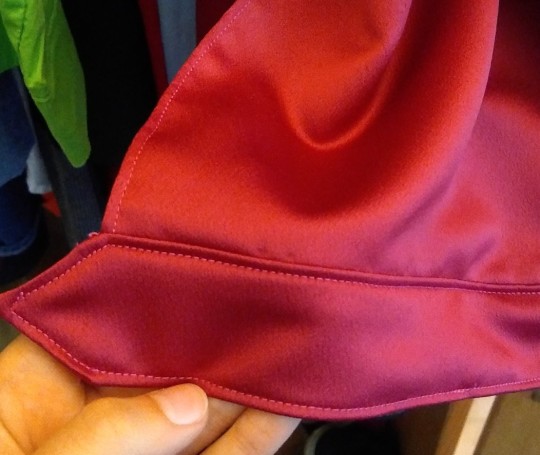
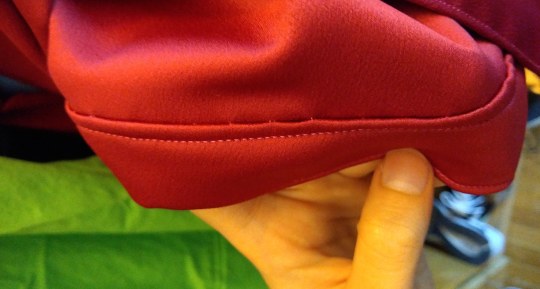
You can see above where I hand stitched the inside before I top stitched it.
7. The Collar
Alrighty. Admittedly I hated the way my neckline turned out. I decided to add a little mandarin collar around the top to cover it up. It was a very good decision in my opinion. I’ll show how I did it but IF YOU DECIDE YOU WANT THE COLLAR FROM THE BEGINNING THEN SANDWHICH IT BETWEEN THE LINING AND OUTTER LAYER.
You will need to fuse the collar pieces if you want them stable to stand up. Cut out 2 pieces, one of them being mirrored.
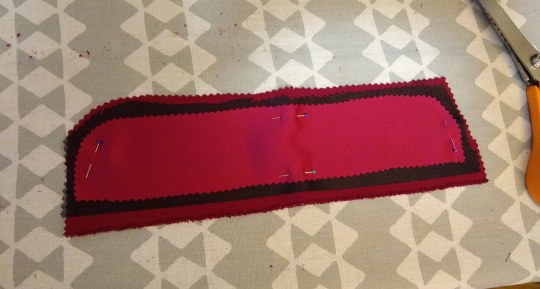
When I added the collar on top, I sewed the basic collar, leaving about a half inch along the bottom unsewn on the sides. Much like the cuffs and bottom of this jacket, you want to sew the whole outward facing layer with the machine and then unfortunately, it may be best to hand stitch the inside collar to the rest of the jacket. I then added Top Stitch.
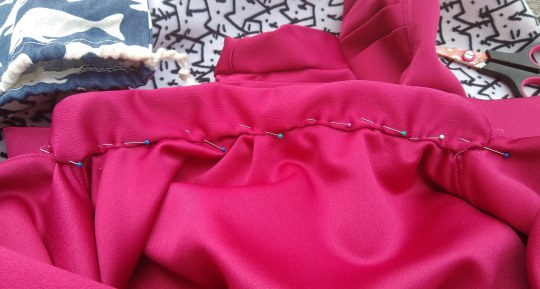
8. The Buttons
I used my Singer sewing machine function for my button holes. Since I did that, I first laid out the buttons to where they were even and marked with pins where the middle of the button was and where the top and bottom ended so I knew where to turn my machine.
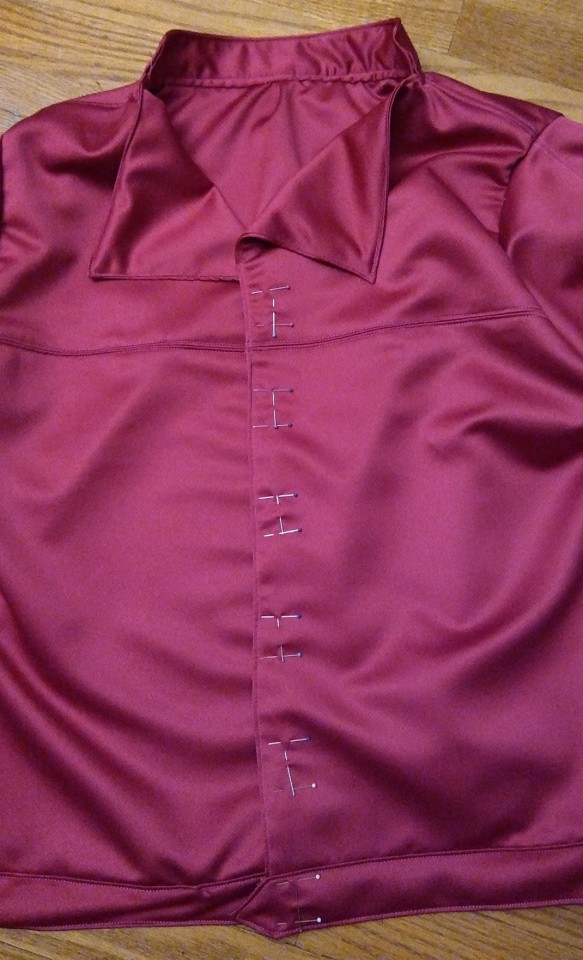
Congratulations if you made it though this tutorial. I know it was a LOT but the ending product is pretty rad.

#cosplay#cosplay tutorial#shera#she ra#glimmer#glimmer shera#she ra and the princesses of power#sheracosplay#glimmer cosplay#shera cosplay#She-ra#tutorial#jacket tutorial#Shera season 2#shera season 3#She ra spoilers#she ra cosplay#fashion#sewing#sewing references#sewing tutorial
226 notes
·
View notes
Text
Best Simple Wooden Sofa Sets – My Favorite Couches, Chairs, and Tables!
Decorating my living room is my favorite and least favorite thing to do. I love it because it is easy to come up with tons of ideas but it is hard to put them all together. If you want to be good at living room designing, you have to go through a lot of layouts and then try to figure out why they wouldn’t work. This gives you the best shot at finding something that you love and will work in your home.
One creative layout I have been working with is simple wooden sofa sets and classic style chairs and recliners. The combination works great if you know what you’re looking for and what to put around your new furniture. Today I am going to be going through some of my favorite tips and how I recently re-designed my entire living room using simple wooden furniture to get the look I have wanted for a long time.
Wooden Sofa Sets
There are two types of simple wooden sofa sets that you normally see in living rooms or family rooms. The first kind is the traditional set; this set uses lighter wood and is bulkier in size. We don’t see any high rising arms, extravagant lines or much outside the sense of pure simplicity. Another thing I have noticed is that you don’t see these types of sofa sets in homes that often. You might see one here and there, but people tend to stay away from them. This could be because they are harder to design around and when you do decide to choose one it can be a truly defining layout that you are now stuck with.
What I find people don’t see is how beautiful these types of sets can be in non-traditional ways. We usually think of a living room to be amazing if there are huge windows and sleek furniture with the latest TV and fireplace, but that doesn’t have to be the case. A lot of people love simpler layouts, especially in smaller homes and condos where you don’t want to super modern furniture.
Simple Traditional
Sofa Set #1

Looking at simple sofa set #1 you will see a lot of different things that pull the room together. It is even more amazing when you realize there isn’t a whole lot in the room. As we talked about above, the lighter colored wood is the key here because dark colors require more depth to their surroundings to look better than lighter and simpler tones.
The chairs, sofa, and tables all have simple wooden curves on the sides and a very straight structured composition to them. There is a teapot set on the table and small green plants on each table and to the side with a cute rug in front of the table. All these things add to the simplicity of the sofa set, and it is capped off with the cream-colored couches and seats, along with the white walls. Counting all the items outside of the sofa set, there are 4 things in total! The teapot collection, plants, and rug! But, when you look at the whole picture, it seems like a calming environment to be in. You don’t need a whole lot to make it all work, and this sofa set is a perfect example of using simple straight structure and minimizing the surrounding items to get the environment you want.
Sofa Set #2

In our second simple sofa set, you will see a completely different layout and theme. Here we see a much more traditional American style home layout. We have a few paintings on the wall with a very simple coffee table and round peg legs for the chairs. The arms are slightly curved and have wooden panels in between the arms and the lower portion of the chair, but that is advanced as it gets. What makes the traditional style look come alive is the pattern of the back and seat cushions. This truly touches on my main point that you can still have creative direction with simpler sofa sets. Imagine instead of those green striped cushions you had a light pin and instead of paintings on the walls that followed the green and white layout you had more abstract and contemporary paintings. That would change the game up!
What I love the most about this sofa set is the increased cushioning on the chairs. This is what traditional style sets were about, having comfortable seating that was simple but did the job right! We also see a larger plant creeping in from the left side of the photo, and this also adds to the classic style look. This would have been an absolute must look in the late 70s and early 80s, and it is something that you can still use today because you play around with the back padding and surrounding simplicity.
Simple Contemporary
Sofa Set #3

When I look for the best wooden design for modern living rooms, I want to see a few things. Number one, I want to see how the wood is carved and made out. I don’t want to have to deal with crazy shapes and structures if they only get in the way. Just because there are more curves or weird shapes to a sofa or chair doesn’t mean it is better! I can’t stress this enough!
For these reasons and more, I loved sofa set #3! The high rise arms don’t get in the way of anything since they are tucked into the chair. Long wooden cuts in the high rise panel give it that cool look otherwise the chairs would look bulky and ugly. The sofa itself is very simple and has a slight curve on the arms that is manageable. You don’t want unmanageable furniture, it becomes a nightmare! The side table has a completely flat surface with wooden legs that are designed to go outwards; this is a neat touch for the high rise arms. Last, the table is small and cute with two drawers to put your stuff in.
Sofa Set #4

Our last simple wooden sofa set has a lot in it, so we are going to have to unpack this part by part. It comes with 2 sofas, 2 chairs, and 4 tables. First off, this is a lot of furniture so if you don’t have the space it becomes an automatic no. Secondly, you need to actually have some purpose and design for this, and that is why I always imagine these types of wooden sets to be placed in larger homes with open layout concepts that don’t require you to have the same theme throughout the house.
What I love about this set is that it is simple but complex at the same time. The sofas look average in their appearance and nothing seems to be out of the norm which is the great simplicity behind it. But then the side has a pull out drawer that you put stuff in and that is just fabulous! You can store all your kid’s toys, your magazines and any other junk you might need to clean up before people come over. Moving onto the chairs, they are simple standard chairs with medium sized arms and thick cushion padding that looks incredibly comfortable.
Tables
When we look at the tables, we see a number of things that are both simple and complex. The giant table with the massive curve almost seems like it is unnecessary, why do you need a second main table to go with your sofa set? Especially considering its wooden and the general idea is to keep things simple. But again, it works with open layout houses that are bigger. What I don’t like is the drawers on the ends of the curved table, I feel that the table would be better if it curved out without the drawers, how many drawers do you really need?
The main coffee table in the middle is stunning! It is wide and long which I absolutely love and it doesn’t have anything sticking out (you guys can probably tell by now, that I am big on that).
All in all, it is a great simple wooden sofa set but I would remove the drawers on the curved table or get rid of it all together. I know that is there to add a little flare which is what the room is all about. I mean how could it not be about that? The elegant light, 3 piece panel painting, giant plant, and maroon rug all scream a modern setting.
Recliners


I’ve always found recliners to be the new replacement for normal chairs. If you really think about it, a recliner is just a much better version of a chair. For God sakes, it lets you lay down as if you are in a bed! How does it get any better than that? When pairing recliners with wooden sofa sets, I’ve found that contrast works best. Also, if you think about it, how comfortable could a wooden recliner be? When you look at the Recliner #1 picture, it doesn’t look like it would be the most comfortable chair to kick back in. Recliner #2, on the other hand, is much better but it is way too low to the ground for me, there aren’t any legs and that can ruin the experience.
That is why when I have wooden sofa sets or furniture I like to pair them with comfier color matched recliners. I’ve always felt that recliners should be plush and soft, that is how they were meant to be used. I found some great recliners that Laywayback reviewed, that go well when you are contrasting simple wooden sofa sets. I like to find a recliner that has that soft fabric feeling and then color match it with my sofa set. It is different but that is what this article is all about.
Simple Wooden Chairs


Finding traditional side piece chairs is a bit difficult because they almost always have a distinct look to them that is hard to pair with established sofa sets, especially if they are wooden. Lately, we have seen a bit of a change with this idea. If you look at the three single wooden chairs I have added, you can see that they are all sleek but are still very different. You can use chair #1 for a much more contemporary and modern living room and you could easily pair chair #2 with a simple layout. And chair #3 can work in both style rooms and that is why I included it. Even though these chairs aren’t the classic traditional chair, I would consider them to be better because they are more versatile.
That does it
After this long piece, I hope you guys have a better understanding of what some the best simple wooden sofa sets have in common and what makes each of them great individually. Wooden curves and crazy complex designs are fun to look at but they aren’t practical if you don’t have the space to make it work.
Honestly, this is the most I have written in God knows how long. I don’t think I’ve ever written this much since college but it is all for you guys (and my kids). Decorating is something you all know I am passionate about and it pushes my creativity. Thanks for reading guys, see you next time!
#wooden#simple#sofa#sofa set#wooden sofa#wooden furniture#chair#wooden chair#wooden table#interior decorating#interior design
2 notes
·
View notes
Text
Make A Tunic - With Pictures! : P1
Okay, here it is–the moment all two of my followers have been waiting for. I’m finally posting… A tutorial!
Breath of the Wild Link was the only costume I managed to finish this year, and it’s composed of a large number of parts and props which would all need their own detailed tutorial, but I figured I’d start with what is undeniably the most important element: The Hero’s Tunic. I’ve got a lot of experience making tunics by now, having done Link for the last 4 years. Hopefully this will be easy to follow, but if you’ve got any questions feel free to hit me up!
Without further ado, let’s get started.
Materials
- I am 5″ even and about 130 lbs. I needed 4 yds of turquoise fabric to make this tunic. You should always estimate on the generous side to provide for mistakes. I had to remake a sleeve. I recommend a cotton or muslin for this tunic. - No less than 2 (though ideally 3) spools of a matching thread. Nothing sucks more than running out halfway through. - White outdoor acrylic. You can find it at Michaels. Once it’s dry it’s impossible to remove even in the washing machine, and it moves very flexibly so it’s better than fabric paint imo. - Patterning Paper. Depending on the type, it can be as cheap as $35 per roll. Dutch paper is a personal favorite because it behaves like fabric, so you can baste pieces together without worrying about tears. - A Pencil - Adhesive bias tape - An iron and board - White bias tape (or similar item to lace the collar) - A washable marker in an easy color to see - A sewing machine and needles - A couple paperweights - Measuring Tape (or your measurements) - 4 Grommets (optional, I just made button holes for the lacing) - A zipper, min. length 14″ - Acetone - Q-Tips - Broad and fine tip brushes
So first things first, you need to take your measurements. You need the following from the chart below (excuse my terrible figure drawing):

The measurements are alphabetized, and there are a LOT of them. Here’s what you need:
WIDTH A. The width from shoulder to shoulder B. The width of one “strap” (the section before you attach the sleeve) C. The width of the square neckline D. The width of the the notch (I typically go 3″ at the widest point) E. The width of your arm–the sleeve holes (Sewing hack: you can get this measurement off the sleeves of a tee shirt too!) F. The width of your bust G.The width of your waist H. The width of your hips I. The width of the edge of the tunic, I usually go about 4″ wider than the hips
LENGTH (Don’t forget to add seam allowances! J. The length from your shoulder to the top edge of your armpit K. The length from your shoulder to the widest point of your bust L. The length of the sleeves M. The length from your bust to your waistline N. The length from your waist line to the widest point of your hips O. The length from the hips to the edge of the tunic, about 4-5″ up from the knee *P. (I nearly forgot) The length of the notch in the neckline (again, I usually do a 3x3″ equilateral triangle)
Now that you’ve got the measurements down, I have a tip for you. Make sure you save/write down the product number of your thread!

In the event that you have to run out and get more, or you mess up a project and have to start over, you want to know what thread you used! You should also write down the name and serial # of any fabrics you buy for the project. It’s awful to run out of fabric, only to realize you don’t remember what you got and have to explain it to a confused retail associate.
Anyhow, moving along. Get out your patterning paper, because using the measurements you just took you’re going to cut out some shapes like these:

Two tips:
1. Add seam allowances to your measurements BEFORE you cut the pattern out. Double, triple check your math. Adding in fractions of inches gets dicey.
2. Put as many pieces on a folded edge as you possibly can. Cutting symmetrical shapes is much easier this way. Don’t forget to cut your measurements in half when you do this though.
So here’s what mine looked like when I was done cutting it out:

The Front

The Back

The Sleeve
The washable marker is useful at this stage to draw the lines. I usually pick a contrasting color so it’ll stick out. The marker will come out if you run the fabric through the washing machine, even on a gentle cycle.
Now, there are two pieces on the last diagram that I haven’t mentioned yet. They’re the interfacing. This is a method of hiding the raw edges on the neckline of the tunic without having to double the entire tunic (which I what I did on my first tunic, it takes forever and uses way more fabric). Essentially, what you gotta do is cut out a shape with a matching neckline–for both front and back-, and careful not to make it too short–and sew it to the neckline. Then, you’ll flip that inside out and place the adhesive bias tape between the two layers. This will keep the fabric from flapping around. The you need to iron it down to activate the adhesive.

Cutting the shape
So now that you have all your shapes in order, I’m going to let you in on how I avoid excessive fraying in my fabrics. This works with virtually every fabric except maybe stretchy stuff, but it may be that I just don’t have enough experience with that yet. What I do is I set my machine to either a stitch between numbers 14-19, set a tight seam width, and just sew it right up the very edge of the fabric pieces like so:

Using stitch #19 at 2.5 cm stitch width

Stitching the edge

Clean edges
So your edges should look a bit like the above picture. It makes it much easier to work with them.
Now, there are two pieces on that diagram I didn’t mention. The little neckline things are interfacing panels. What you’re gonna do is cut them out and stitch them to the necklines–one each for the front and back tunic panels, and careful not to cut them too short–and you’re gonna stitch the directly to the neckline, but ONLY THE SIDES THAT ARE CONNECTED TO THE NECKLINE. You don’t want to stitch them to the chest or the shoulder edges. You should only be stitching 3 lines (and the notch on the front).
Another warning: whichever side you stitch the interfacing to is going to become the inside. It doesn’t matter which side you stitch them too, provided your fabric doesn’t have a knap. This is because after stitching, you want to turn them inside out. On the front tunic panel, be sure to push the corners of the notch out. I ironed them down after this to flatten them out and make the shape more stable.
The next thing you need to do is cut some strips of the fusible bias tape and lay them carefully between the tunic panel and interfacing layer. I did one each for the long edge next to the shoulder and then three on each side of the notch. I did almost the same thing on the back one. The tape shouldn’t stick out past the interfacing and it doesn’t have to go all the way to the edge. Once you’re done laying them out, you gotta iron the places where you set them to activate their adhesive properties. The end result will look like the image below:

Ignore the painting, that is literally the last step.
Clean neckline! Goodie. The next thing you want to do is sew the shoulders of the front and back panels, including the interfacing, together. This will make what looks like a tabard. We’re already almost done with the sewing aspect.
Sadly, I have reached the limit for images in a post so we’ll have to make this a 2-parter. The good news is, I’ve already written it. I just need to draw a few more diagrams bc I definitely did not take enough pictures of the process.
If you have any questions about part one, please let me know and I will explain or take a picture or draw a diagram–whatever works for you.
Thank you for reading and following! I can’t wait to post more of these.
#tutorial#the legend of zelda#zelda#cosplay#link#botw#botw cosplay#link cosplay#tunic tutorial#hero's tunic#sewing tutorial#cosplay tutorial#zelda cosplay#p1#part one#make a tunic#link tunic
5 notes
·
View notes
Text
5 Breathtaking Facts About Online Marketing
As long as you have an internet connection, you can legitimately earn money online from throughout the world. In this post, we're sharing all of our best ideas to help you do simply that. Instead of utilizing the internet to browse Facebook, stalk your ex on Instagram, or discover what type of bread you are through a Buzzfeed test, you can do something more efficient with your time! Whether you're a remain at home mommy, an university student, or simply working part-time, you can take advantage of even the smallest window of opportunity to earn money online. Our team searched the web, wrecked our brains, and sought advice from other side hustle specialists to assemble this genius list of concepts so you can earn money online beginning today. 1. Participate in Marketing Research (Approximately $100+ Monthly). Market research companies like to collect data on consumer interests, and spending habits, so brands can find out how to mlm their products. They mainly do this research study this through online surveys, and they're always on the lookout for new survey individuals. And yes, they'll pay you. If you've ever hung out taking paid online surveys, you understand that you can earn money online every month while sitting in the house in your PJs. If you're a novice survey taker, we suggest starting with Survey Junkie.
How to generate income online
No-risk matched wagering. Hands down the quickest method to make a great deal of money. Online studies. Spent for searching the web. Online market trading. Start your own website. Evaluation websites & apps for money. The 'Disney Vault' trick. ' Get Paid To' websites. Here's how Study Addict works:. Take Surveys: Develop your profile (takes less than 5 minutes) and you'll be matched with surveys. Make Rewards: Complete studies and make virtual points. Earn Money: Redeem virtual points for Paypal money deposits or e-Gift cards. DollarSprout's Study Junkie Review. 2. Make The Most Of Money Back Signup Benefits. Desire $15 for a few minutes of your time? Naturally you do! Lucky for you, there are sites like Ebates and DOSH that are using cash incentives for individuals like you to join their sites.

What's the catch? None, actually. Money back apps act as affiliates for many online merchants, which suggests that whenever you make a purchase through one of the apps, they get a little commission-- however then, they provide you a portion of that commission as "money back". For instance, if I purchase a pair of Nike shoes through the Ebates app (or site) and spend $75, Ebates may get a $10 commission but then they'll pass $7 back to me. It's basically a way to get sale prices on things that isn't on sale! Ebates: $10 signup bonus offer after making $25 of certifying purchases within 90 days. DOSH: $5 reward released quickly after you connect a credit or debit card to the app. (Note: In some cases they bump the signup bonus offer to $10). Considering that they're totally free, we suggest signing up for both. Whenever you are online shopping, simply compare offers in between the apps to find the best one. 3. Open a High-Yield Online Savings Account. Do you have money sitting in a savings account that's paying.05% interest? If so (or if you don't have a savings account at all), it deserves your time to spend a few minutes opening an online savings account. Here's why:. Online savings accounts normally come with crazy good interest rates to assist you grow your money much faster (regular in-person banks can't offer rates as high). We're fans of CIT Bank and Discover Bank (to name a few) since their interest rates are frequently over 25 times the nationwide average. That means the money in your savings account will grow 25 times faster than the rate it's more than likely growing at now. Truly, however, you can't go wrong with pretty much any online savings account that offers over 1.50% APY. 4. Earn Money by Enjoying Videos on Your Phone. I discussed Swagbucks earlier as a trustworthy study website, however it ends up that's not the only thing they'll pay you for. You can likewise earn money online with Swagbucks by watching brief videos in whatever classification you pick, like home entertainment, news, or fitness. $ 5 Signup Bonus offer for brand-new users. Select videos to view on your computer system, tablet, or smart phone. Hundreds of terrific videos from leading content sites. DollarSprout's Swagbucks Evaluation. 5. Download the Nielsen App and Collect $50 Per Year. Have you become aware of Nielsen, the business that tracks TELEVISION scores? Ends up they collect information on a lot more than simply TV. One area they're really into is internet usage research study. What does that mean for you? It means Nielsen will pay you $50 a year to keep their app on your preferred internet browsing device. The app itself collects data on your internet use anonymously, so you never have to stress over any information being connected to you. And the very best part is, the app takes up hardly any space and does not decrease your phone or tablet at all! Here's how Nielsen Computer & Mobile Panel works:. It is noninvasive and won't impact device efficiency. After you've set up the app, simply use the internet as normal. You'll earn $50 for the first year you have the app set up. 6. Generate Income Online by Surfing the Web. InboxDollars is another marketing research company that pays you to use their search engine instead of some of the more popular ones like Google and Bing. The idea here is that they will discover more about individuals search routines and reveal patterns that may be valuable to companies attempting to much better comprehend consumers. InboxDollars isn't a get-rich-quick scheme, however if you're wondering how to make money online for free, you may also make a couple of extra bucks for searching the web like you usually would. Here's how InboxDollars works:. $ 5 Signup Bonus for new users. You get $0.15 for every 4 certified searches you complete. Get $0.05 each time you complete 4 or more searches in a week. See our full InboxDollars evaluation. 7. Make Money to Evaluate Websites. Site testers provide their viewpoints on sites, including the design, quality, and ease of use of a website. This enables companies to make changes to their websites in order to provide a better experience for their users (and ideally increase sales). Naturally, they are willing to pay for your feedback, which makes this one of the simplest ways to mlm without paying anything yourself. UserTesting: $10 for every single 10-15 minute test finished. No web cam needed. WhatUsersDo: $8+ for 15-20 minute tests. You'll need a microphone. UserTest: $10.50 per study. Begin in as low as 5 minutes. 8. Freelance Writer. The term "starving artist" certainly does not use here. There are many effective freelance authors out there who've used their organisation to change their full-time task. You do not need a background in English or writing to make it as a successful freelance author. For instance, Holly Johnson from Club Thrifty started doing independent composing on the side with no genuine background, and now makes over $200,000 per year from her writing! She recently put together a totally free workshop where she teaches others how to get going generating income online with writing. See below:. How to Build a Six-Figure Composing Profession [Workshop]:. Find out the methods Holly's utilized to build her writing earnings to over $200,000/ yr. Tips to get your foot in the door and increase your income gradually. Register here free of charge. 9. Freelance Proofreader. Put your eagle eyes to great usage by earning money as a proofreader. Caitlin Pyle of Proofread Anywhere made $43,000 in her first year checking while working part-time studying abroad. Remarkable, right? As soon as she understood the need was so high for proofreaders-- far expensive for one proofreader to fill-- she created an online course to assist others begin their own checking business. She likewise has totally free workshops nearly every day. In Caitlin's Free Workshop, you'll learn:. What a successful proofreader does (and doesn't do)! How to raise your abilities to end up being a FANTASTIC proofreader. How to utilize among the most popular checking tools out there ... and where to a find clients!
10. Virtual Assistant (VA). Composing and checking aren't for everybody. Some people choose more administrative or data-oriented jobs, which is precisely the function of a virtual assistant. Organisations use virtual assistants for things like booking travel, responding to e-mails, social networks management, email management, and more. As a virtual assistant, you can select which services to offer clients and at what rates. The more value you can offer, the more you can charge. Some stats about VAs:. The average North American virtual assistant makes $35 to $50 per hour. There has been a 95% increase in demand for VAs in the last 3 years. There are over 150 different services you can offer as a VA. 11. Online English Teacher. Have you heard of VIPKID? Here's a bit from their website:. VIPKID offers an international knowing experience to children in China in between the ages 4-12. Headquartered in Beijing, the company uses fully immersive one-on-one English language instruction provided online by extremely certified instructors. The curriculum is based on the U.S. Common Core State Standards and utilizes a flipped-classroom approach to promote creativity and crucial thinking abilities. For just 90 minutes a day, you can easily make over $500 per month. All you require is a Bachelor's degree and English classroom experience. More info on VIPKID:. VIPKID instructors make $14-22/ hr. All classes are taught online by means of webcam. Bachelor's degree required for all instructors. There is a five action application procedure to become a teacher. 12. Site Designer. If you have a propensity for computer systems and an eye for style, you can easily make $1,000 or more a month by developing websites for services. Want evidence? We paid a designer over $6,000 to customized design our theme! There is lots of money to be made in freelance website design work. If you aren't quite sure where to begin, take a look at this short article by Creative Market on how to become a web designer. If you are wanting to make major income online, you might want to think about going for it and beginning your own online business.
How to make passive earnings online
Invest in Crowdfunded Real Estate. Property can be a fantastic way to generate income while you sleep. Dividend Earnings. Peer-to-Peer Financing. Leave Debt. Open a High-Yield Account. Write a Book. Rent out a Space in Your Home. Affiliate Marketing. In most cases, owning an online company won't assist you get rich overnight-- it'll need genuine abilities as well as a significant time financial investment (and most likely some cash investment, too). Here are a couple of choices that can eventually result in a full-time earnings online. 13. Start a Blog site. Do you feel like you have a message to the world, however you do not have a platform to deliver it? Perhaps it's time for you to begin a blog. DollarSprout started out just as 2 college buddies who liked to talk about money. A couple years later, and now we have a growing group of entrepreneurial money-nerds on board to help spread our message. What began as an online side hustle has turned into a full-blown service! Here are some manner ins which bloggers make money online:.

Offering internet marketing area on their blog site. Promoting affiliate products and making commissions. Offering their own products and courses. and more! Beginning a blog is easy, but turning your blog site into an effective organisation-- that's difficult! If blogging is the side hustle OR full-time business of your dreams, we've put together a valuable guide to help you start. Here's a fast rundown of the procedure:.
youtube
- Find your specific niche: something you have an interest in blogging about (you do not need to be a world class professional). - Establish your blog site: We suggest Hostgator for new blog writers (expenses just $2.75/ mo). - Start composing material that assists readers resolve a problem. - Develop an audience. Pinterest is a terrific starting point. - Monetize. Ads, affiliate marketing, items-- it's up to you! 14. Start a Drop Shipping Website. The drop shipping business design is taking the internet by storm today, and for good factor. It's a genuine method to make money online, and needs extremely little start-up expense. What is drop shipping? In the words of Shopify,. Dropshipping is a retail satisfaction method where a store does not keep the items it offers in stock. Rather, when a store offers an item, it acquires the item from a third party and has it shipped directly to the customer. As a result, the merchant never sees or manages the item. If blogging isn't your thing but you still want to start an online service, starting an e-commerce site might be your best option. Similar to any new company, there is a lot to learn. Shopify offers free workshops all the time that are created to teach you all the basics. 15. Produce and Offer How-To Courses. If you have expertise in a certain location, bundle up your understanding into an online course and offer it. This has ended up being a popular company design for online business owners over the past numerous years, and will most likely just continue to grow in popularity. The very best aspect of selling online courses is that as soon as you do the up-front work in producing the course and setting up your mlm strategy, you can get paid again and again once again for work you do once. The products in this section all require an up-front money investment, however provide the opportunity for your money to make you even more money-- all online. If you are financially able to, building up passive streams of income is an essential part of building up wealth. 16. Rent Your Car While You're Not Using It. Just how much downtime would you state your cars and truck has every week while you're taking a trip, at work, sleeping, or just hanging out at home?
According to Getaround, the majority of cars and trucks in the U.S. sit idle for as much as 22 hours per day. Now, you can utilize that time to put your vehicle to work and digital marketing by sharing your trip. As a Getaround car owner, you get access to premium parking as well as a $50 regular monthly rental credit. And with $1 million insurance protection, you can feel confident your property is in good hands. Not to mention, fewer cars on the road means less contamination, less traffic, and more parking for everybody. That indicates you'll earn money online while adding to a greener world. It just takes a couple of clicks to put your car to work with Getaround. Simply register for a complimentary account, call your car, set the location and availability, and enter a description. If you choose to stick to Getaround after the 30-day complimentary trial, you'll be charged a one-time fee of $99 for a Connect ™ installation along with a flat charge of $20 monthly. The Connect ™ enables occupants to locate and open your car directly from the app so you do not need to deal with lost or taken secrets. It also comes with added security features like tamper detection, GPS tracking, and engine lock. Obviously, you get a digital secret so you can access your vehicle whenever and unlock it from your phone. If you ever have problems, Getaround is there for you with 24/7 roadside help and client assistance.
How to generate income on internet
Open an Etsy shop. Total surveys online. Earn money to browse the Web. Assess online search engine. Start a blog site. Compose and publish an eBook. Become a freelance author or editor. Enter into affiliate marketing. Rental revenues accrue on a month-to-month basis and are paid on the 15th of the following month. Getaround keeps 40% of all revenues to cover the costs of insurance, 24/7 assistance, and other benefits. 17. Peer-to-Peer Financing If you've got some money on hand and are looking for a high interest rate financial investment (more than an online bank), think about putting some money into peer-to-peer financing (aka P2P Financing). What is peer-to-peer loaning? It's a financial system that matches prospective borrowers with financiers that are willing to fund their loans. It's like traditional loaning, however without a bank as the middle male. As an investor, essentially you are serving as the bank (and collecting interest payments at the same time). Just how much money can you make? It depends upon what types of loans you invest in and just how much money you invest with. If you play it safe, you can anticipate to make 2-5% each year, whereas riskier loans can pay as high as 12% or more. Lending Club is among the largest online P2P Financing marketplaces: Open an account and transfer just a $0.01 minimum initial deposit. Develop your portfolio: Buy a variety of loans in increments as little as $25. Make money: Receive regular monthly payments as customers repay their loans. 99% of Loaning Club financiers with a 100+ note portfolios make favorable returns. 18. Invest in Crowdfunded Realty

Many people consider realty investing as one of the very best methods to build up wealth. The issue is, it usually takes a great deal of money to begin, which puts it out of reach for many individuals. Luckily, there's a way to purchase realty without purchasing whole homes yourself. Introducing: Realty Investment Trusts (REITS). A REIT is a swimming pool of money, managed by financial specialists, that goes towards investing in real estate. Financiers put money into the REIT, the REIT purchases properties, and the returns are disbursed back to financiers. The very best part? You do not have to stress over managing the property manager tasks. The majority of REITS still require a hefty financial investment to get in, but we discovered a location that has just a $500 minimum financial investment. With Fundrise you can get access to dozens of solid, value-producing assets. Here's how Fundrise works:. Invest straight in a property portfolio that a group of experts determines, obtains, and manages on your behalf. 8-- 11% expected annual returns. 9. Generate income as an Airbnb Host. If you wish to get your feet wet in the renting organisation, Airbnb is an excellent website to get started. If you own your home or your property manager allows it, you can earn money online by sharing your house with others. Here's how it works:. Create your totally free listing: Explain your area, how many visitors you can accommodate, and include images and details. Pick your cost: What you charge is always up to you. Make money: You can be paid by means of PayPal, direct deposit, or wire, to name a few ways. DollarSprout's Complete Guide to Profitable Airbnb Hosting. 20. Invest in Dividend Paying Stocks. It's been stated that the average millionaire has 7 streams of income. Dividend stocks are normally among them. What are dividend stocks? Usually when you buy stocks, you do it with the intent to buy low and offer high. Dividend stocks work the same way, however with one other benefit: just for owning the stock, you are paid a small portion of the company's incomes. So with dividend stocks, you earn money when the stock increases in worth, and when dividends are paid. If you are aiming to start with dividend investing (or any type of stock market investing), think about checking out Acorns. This is a beginner-friendly app that can help you start with investing using just your mobile phone. You can read our full Acorns Review here. It's a new age, and there's never been more chances to work from house and generate income online. But you can't just leave your laptop computer in the corner of your room and anticipate your checking account to blow up. Unless you have money to invest, you're going to need to put in some old-fashioned effort. One last thing to remember: If you are attempting to make money on the internet, opportunities are you will not get it right on your very first try. That's alright. Keep experimenting, keep finding out, keep putting yourself out there, and ultimately you will find the right online money making chance for you.
0 notes
Text
Four Beautiful Facts About How To Make Money On Internet
As long as you have an internet connection, you can legitimately generate income online from anywhere in the world. In this article, we're sharing all of our best ideas to assist you do simply that. Instead of utilizing the internet to browse Facebook, stalk your ex on Instagram, or find what type of bread you are by means of a Buzzfeed test, you can do something more efficient with your time! Whether you're a stay at house mommy, an university student, or simply working part-time, you can take advantage of even the tiniest window of chance to earn money online. Our team scoured the web, wrecked our brains, and sought advice from opposite hustle professionals to assemble this genius list of concepts so you can generate income online beginning today. 1. Take Part In Market Research (As Much As $100+ Each Month). Marketing research companies like to gather information on customer interests, and costs habits, so brand names can learn how to online marketing their items. They mainly do this research this by means of online questionnaires, and they're always on the lookout for new survey individuals. And yes, they'll pay you. If you've ever hung out taking paid online surveys, you understand that you can generate income online monthly while sitting at home in your PJs. If you're a novice survey taker, we recommend beginning with Study Junkie.
How to earn money online
No-risk matched betting. By far the quickest way to make a lot of money. Online surveys. Paid for browsing the web. Online market trading. Start your own site. Review websites & apps for cash. The 'Disney Vault' secret. ' Make money To' websites. Here's how Survey Junkie works:. Take Studies: Construct your profile (takes less than 5 mins) and you'll be matched with studies. Earn Benefits: Total studies and earn virtual points. Earn Money: Redeem virtual points for Paypal money deposits or e-Gift cards. DollarSprout's Survey Addict Review. 2. Take Advantage of Money Back Signup Benefits. Want $15 for a few minutes of your time? Of course you do! Fortunate for you, there are websites like Ebates and DOSH that are using money rewards for people like you to join their sites.

What's the catch? None, truly. Cash back apps function as affiliates for many online merchants, which suggests that whenever you purchase through one of the apps, they get a little commission-- but then, they give you a part of that commission as "money back". For instance, if I buy a pair of Nike shoes through the Ebates app (or website) and invest $75, Ebates may get a $10 commission but then they'll pass $7 back to me. It's generally a way to get sale prices on stuff that isn't on sale! Ebates: $10 signup perk after making $25 of qualifying purchases within 90 days. DOSH: $5 perk released immediately after you connect a credit or debit card to the app. (Note: Sometimes they bump the signup bonus to $10). Given that they're totally free, we advise registering for both. Whenever you are online shopping, simply compare deals between the apps to find the best one. 3. Open a High-Yield Online Savings Account. Do you have money sitting in a savings account that's paying.05% interest? If so (or if you do not have a savings account at all), it's worth your time to spend a few minutes opening an online savings account. Here's why:. Online savings accounts normally come with crazy excellent rates of interest to help you grow your money faster (routine in-person banks can't provide rates as high). We're fans of CIT Bank and Discover Bank (among others) due to the fact that their interest rates are frequently over 25 times the nationwide average. That means the cash in your savings account will grow 25 times faster than the rate it's more than likely growing at now. Really, though, you can't fail with practically any online savings account that offers over 1.50% APY. 4. Earn Money by Watching Videos on Your Phone. I pointed out Swagbucks earlier as a trustworthy survey site, but it turns out that's not the only thing they'll pay you for. You can likewise make money online with Swagbucks by watching brief videos in whatever category you pick, like home entertainment, news, or fitness. $ 5 Signup Benefit for brand-new users. Select videos to view on your computer system, tablet, or smart phone. Hundreds of excellent videos from leading content sites. DollarSprout's Swagbucks Evaluation. 5. Download the Nielsen App and Collect $50 Per Year. Have you heard of Nielsen, the company that tracks TELEVISION ratings? Turns out they collect data on a lot more than just TV. One area they're really into is internet usage research study. What does that mean for you? It indicates Nielsen will pay you $50 a year to keep their app on your favorite internet searching device. The app itself collects statistics on your internet use anonymously, so you never have to stress over any data being linked to you. And the best part is, the app uses up hardly any area and does not decrease your phone or tablet at all! Here's how Nielsen Computer System & Mobile Panel works:. It is noninvasive and won't affect device efficiency. After you've installed the app, just utilize the internet as typical. You'll earn $50 for the very first year you have actually the app set up. 6. Earn Money Online by Surfing the Web. InboxDollars is another market research company that pays you to use their online search engine instead of some of the more popular ones like Google and Bing. The idea here is that they will find out more about individuals search habits and uncover patterns that might be important to companies attempting to better understand consumers. InboxDollars isn't a get-rich-quick plan, but if you're questioning how to generate income online free of charge, you may too make a few additional bucks for searching the web like you normally would. Here's how InboxDollars works:. $ 5 Signup Perk for new users. You get $0.15 for every 4 qualified searches you total. Get $0.05 each time you complete 4 or more searches in a week. See our complete InboxDollars review. 7. Earn Money to Check Sites. Site testers offer their opinions on sites, consisting of the design, quality, and ease of use of a site. This permits companies to make changes to their sites in order to supply a better experience for their users (and hopefully increase sales). Of course, they want to pay for your feedback, which makes this one of the simplest ways to online marketing without paying anything yourself. UserTesting: $10 for every single 10-15 minute test finished. No web cam required. WhatUsersDo: $8+ for 15-20 minute tests. You'll need a microphone. UserTest: $10.50 per study. Get started in as little as 5 minutes. 8. Freelance Writer. The term "starving artist" definitely does not use here. There are lots of effective freelance authors out there who've utilized their business to replace their full-time job. You don't need a background in English or writing to make it as an effective freelance writer. For example, Holly Johnson from Club Thrifty started doing self-employed composing on the side without any genuine background, and now makes over $200,000 per year from her writing! She recently assembled a complimentary workshop where she teaches others how to get started generating income online with composing. See below:. How to Develop a Six-Figure Writing Profession [Workshop]:. Learn the techniques Holly's utilized to develop her writing income to over $200,000/ yr. Tips to get your foot in the door and increase your earnings over time. Register here totally free. 9. Freelance Proofreader. Put your eagle eyes to good use by generating income as a proofreader. Caitlin Pyle of Proofread Anywhere made $43,000 in her very first year proofreading while working part-time studying abroad. Remarkable, right? Once she recognized the need was so high for proofreaders-- far too high for one proofreader to fill-- she produced an online course to assist others start their own checking company. She also has complimentary workshops almost every day. In Caitlin's Free Workshop, you'll learn:. What a successful proofreader does (and doesn't do)! How to elevate your skills to end up being an EXCELLENT proofreader. How to utilize among the most popular checking tools out there ... and where to a find customers!
10. Virtual Assistant (VA). Writing and proofreading aren't for everyone. Some individuals prefer more administrative or data-oriented jobs, which is precisely the function of a virtual assistant. Companies utilize virtual assistants for things like reserving travel, addressing emails, social media management, email management, and more. As a virtual assistant, you can select which services to offer customers and at what rates. The more value you can supply, the more you can charge. Some stats about VAs:. The average North American virtual assistant earns $35 to $50 per hour. There has been a 95% increase in demand for VAs in the last three years. There are over 150 various services you can offer as a VA. 11. Online English Teacher. Have you become aware of VIPKID? Here's a bit from their website:. VIPKID offers a global knowing experience to children in China in between the ages 4-12. Headquartered in Beijing, the business offers totally immersive individually English language guideline supplied online by highly qualified instructors. The curriculum is based on the U.S. Common Core State Standards and uses a flipped-classroom method to foster imagination and critical thinking abilities. For just 90 minutes a day, you can easily make over $500 monthly. All you need is a Bachelor's degree and English class experience. More information on VIPKID:. VIPKID teachers make $14-22/ hr. All classes are taught online via cam. Bachelor's degree required for all instructors. There is a 5 action application process to become an instructor. 12. Website Designer. If you have a flair for computer systems and an eye for style, you can quickly make $1,000 or more a month by developing sites for organisations. Want evidence? We paid a designer over $6,000 to custom design our theme! There is lots of money to be made in freelance web design work. If you aren't rather sure where to begin, take a look at this short article by Creative Market on how to become a web designer. If you are aiming to earn major earnings online, you might wish to consider going all out and beginning your own online service.
How to make passive income online
Purchase Crowdfunded Property. Realty can be a fantastic way to earn money while you sleep. Dividend Income. Peer-to-Peer Financing. Leave Financial obligation. Open a High-Yield Account. Compose a Book. Rent a Space in Your Home. Affiliate Marketing. Most of the times, owning an online company will not help you get rich overnight-- it'll require genuine skills in addition to a significant time financial investment (and probably some money investment, too). Here are a couple of alternatives that can ultimately result in a full-time earnings online. 13. Start a Blog. Do you feel like you have a message to the world, but you don't have a platform to deliver it? Maybe it's time for you to start a blog site. DollarSprout began just as two college buddies who liked to talk about money. A couple years later on, and now we have a growing team of entrepreneurial money-nerds on board to assist spread our message. What began as an online side hustle has turned into a full-blown organisation! Here are some ways that blog writers make money online:.

Offering digital marketing space on their blog. Promoting affiliate items and earning commissions. Selling their own items and courses. and more! Beginning a blog site is easy, but turning your blog into a successful company-- that's difficult! If blogging is the side hustle OR full-time service of your dreams, we've assembled a valuable guide to help you get started. Here's a fast rundown of the process:.
youtube
- Find your specific niche: something you have an interest in discussing (you do not need to be a world class specialist). - Set up your blog: We suggest Hostgator for brand-new blog writers (expenses just $2.75/ mo). - Start composing content that assists readers solve a problem. - Develop an audience. Pinterest is an excellent starting point. - Monetize. Advertisements, affiliate marketing, products-- it's up to you! 14. Start a Drop Shipping Site. The drop shipping company design is taking the internet by storm today, and for good factor. It's a genuine way to generate income online, and needs extremely little start-up cost. What is drop shipping? In the words of Shopify,. Dropshipping is a retail fulfillment approach where a shop doesn't keep the items it offers in stock. Rather, when a shop sells an item, it acquires the item from a third party and has it delivered straight to the consumer. As a result, the merchant never ever sees or manages the item. If blogging isn't your thing but you still want to begin an online organisation, starting an e-commerce site might be your best bet. Similar to any new business, there is a lot to discover. Shopify provides totally free workshops all the time that are developed to teach you all the basics. 15. Produce and Sell How-To Courses. If you have know-how in a particular area, bundle up your understanding into an online course and offer it. This has ended up being a popular company model for online business owners over the past numerous years, and will most likely just continue to grow in popularity. The best thing about offering online courses is that once you do the up-front work in developing the course and setting up your digital marketing strategy, you can earn money again and again again for work you do as soon as. The items in this area all require an up-front money investment, but offer the chance for your money to make you a lot more money-- all online. If you are financially able to, developing passive streams of income is a key part of accumulating wealth. 16. Rent Your Vehicle While You're Not Utilizing It. How much downtime would you say your vehicle has every week while you're taking a trip, at work, sleeping, or simply hanging out at house?
According to Getaround, a lot of automobiles in the U.S. sit idle for up to 22 hours each day. Now, you can use that time to put your vehicle to work and make money online by sharing your flight. As a Getaround car owner, you get access to premium parking as well as a $50 month-to-month rental credit. And with $1 million insurance coverage, you can feel confident your residential or commercial property remains in great hands. Not to mention, fewer cars and trucks on the road indicates less contamination, less traffic, and more parking for everybody. That indicates you'll earn money online while adding to a greener world. It just takes a few clicks to put your automobile to deal with Getaround. Simply sign up for a complimentary account, call your automobile, set the location and accessibility, and go into a description. If you choose to stick with Getaround after the 30-day complimentary trial, you'll be charged a one-time charge of $99 for a Link ™ setup in addition to a flat charge of $20 monthly. The Link ™ enables occupants to find and open your vehicle straight from the app so you don't need to deal with lost or taken secrets. It also features included security functions like tamper detection, GPS tracking, and engine lock. Of course, you get a digital secret so you can access your cars and truck any time and unlock it from your phone. If you ever have problems, Getaround is there for you with 24/7 roadside assistance and customer assistance.
How to earn money on internet
Open an Etsy store. Complete surveys online. Make money to browse the Web. Evaluate online search engine. Start a blog site. Compose and publish an eBook. Become a freelance writer or editor. Get into affiliate marketing. Rental earnings accumulate on a month-to-month basis and are paid on the 15th of the following month. Getaround keeps 40% of all revenues to cover the expenses of insurance coverage, 24/7 assistance, and other benefits. 17. Peer-to-Peer Financing If you've got some money on hand and are trying to find a high interest rate investment (more than an online bank), consider putting some money into peer-to-peer loaning (aka P2P Loaning). What is peer-to-peer loaning? It's a financial system that matches potential borrowers with investors that are willing to fund their loans. It resembles conventional lending, however without a bank as the middle guy. As an investor, essentially you are serving as the bank (and collecting interest payments in the process). Just how much money can you make? It depends on what kinds of loans you buy and how much money you invest with. If you play it safe, you can anticipate to make 2-5% annually, whereas riskier loans can pay as high as 12% or more. Lending Club is one of the biggest online P2P Lending marketplaces: Open an account and transfer just a $0.01 minimum preliminary deposit. Construct your portfolio: Purchase a variety of loans in increments just $25. Get paid: Receive monthly payments as debtors repay their loans. 99% of Lending Club financiers with a 100+ note portfolios earn positive returns. 18. Buy Crowdfunded Realty

Many people think about realty investing as one of the best ways to collect wealth. The issue is, it usually takes a lot of money to get started, which puts it out of reach for many people. Thankfully, there's a method to invest in real estate without purchasing entire homes yourself. Presenting: Property Investment Trusts (REITS). A REIT is a swimming pool of money, handled by monetary professionals, that goes towards investing in property. Financiers put money into the REIT, the REIT buys residential or commercial properties, and the returns are disbursed back to financiers. The very best part? You do not need to fret about dealing with the landlord duties. Many REITS still require a hefty financial investment to get in, however we found a location that has just a $500 minimum investment. With Fundrise you can get access to lots of solid, value-producing properties. Here's how Fundrise works:. Invest directly in a real estate portfolio that a group of specialists determines, obtains, and manages on your behalf. 8-- 11% anticipated annual returns. 9. Make money as an Airbnb Host. If you want to get your feet damp in the renting organisation, Airbnb is a fantastic website to get started. If you own your house or your property manager allows it, you can generate income online by sharing your home with others. Here's how it works:. Develop your totally free listing: Explain your space, the number of guests you can accommodate, and add photos and information. Choose your rate: What you charge is constantly up to you. Earn money: You can be paid via PayPal, direct deposit, or wire, to name a few ways. DollarSprout's Total Guide to Profitable Airbnb Hosting. 20. Buy Dividend Paying Stocks. It's been said that the average millionaire has 7 streams of earnings. Dividend stocks are normally among them. What are dividend stocks? Generally when you buy stocks, you do it with the intent to purchase low and offer high. Dividend stocks work the same way, however with another advantage: just for owning the stock, you are paid a small portion of the business's incomes. So with dividend stocks, you make money when the stock goes up in value, and when dividends are paid out. If you are looking to get going with dividend investing (or any type of stock market investing), think about taking a look at Acorns. This is a beginner-friendly app that can assist you get going with investing using just your smartphone. You can read our full Acorns Evaluation here. It's a new age, and there's never been more chances to work from home and make money online. However you can't just leave your laptop computer in the corner of your room and anticipate your checking account to blow up. Unless you have money to invest, you're going to have to put in some old-fashioned effort. One last thing to remember: If you are trying to generate income on the internet, opportunities are you won't get it right on your first try. That's all right. Keep exploring, keep finding out, keep putting yourself out there, and ultimately you will find the ideal online money making opportunity for you.
0 notes
Text
11 Great Facts About How To Make Money On Internet
As long as you have an internet connection, you can legally generate income online from anywhere in the world. In this article, we're sharing all of our best ideas to help you do simply that. Instead of utilizing the internet to browse Facebook, stalk your ex on Instagram, or discover what type of bread you are through a Buzzfeed test, you can do something more efficient with your time! Whether you're a stay at home mother, an university student, or merely working part-time, you can utilize even the tiniest window of opportunity to make money online. Our group scoured the web, wrecked our brains, and spoke with opposite hustle professionals to create this genius list of concepts so you can earn money online starting today. 1. Take Part In Market Research (As Much As $100+ Per Month). Market research business like to collect information on customer interests, and spending habits, so brand names can find out how to online marketing their items. They mostly do this research this by means of online questionnaires, and they're constantly on the lookout for new survey individuals. And yes, they'll pay you. If you have actually ever hung around taking paid online studies, you know that you can generate income online every month while sitting in the house in your PJs. If you're a first-time survey taker, we suggest starting with Survey Addict.
How to make money online
No-risk matched betting. By far the quickest method to make a lot of money. Online studies. Paid for browsing the web. Online market trading. Start your own website. Review sites & apps for money. The 'Disney Vault' trick. ' Get Paid To' websites. Here's how Study Junkie works:. Take Surveys: Develop your profile (takes less than 5 mins) and you'll be matched with studies. Make Benefits: Complete studies and earn virtual points. Get Paid: Redeem virtual points for Paypal cash deposits or e-Gift cards. DollarSprout's Study Addict Review. 2. Benefit From Money Back Signup Benefits. Desire $15 for a few minutes of your time? Obviously you do! Fortunate for you, there are websites like Ebates and DOSH that are providing money incentives for individuals like you to join their websites.

What's the catch? None, actually. Money back apps serve as affiliates for numerous online merchants, which implies that whenever you buy through one of the apps, they get a little commission-- however then, they give you a part of that commission as "money back". For example, if I buy a set of Nike shoes through the Ebates app (or site) and invest $75, Ebates may get a $10 commission but then they'll pass $7 back to me. It's basically a way to get sale prices on things that isn't on sale! Ebates: $10 signup bonus offer after making $25 of qualifying purchases within 90 days. DOSH: $5 bonus issued immediately after you link a credit or debit card to the app. (Note: In some cases they bump the signup perk to $10). Given that they're complimentary, we recommend registering for both. Whenever you are online shopping, just compare deals in between the apps to discover the very best one. 3. Open a High-Yield Online Savings Account. Do you have money being in a savings account that's paying.05% interest? If so (or if you do not have a savings account at all), it deserves your time to spend a few minutes opening an online savings account. Here's why:. Online savings accounts generally come with insane excellent rate of interest to assist you grow your money quicker (routine in-person banks can't provide rates as high). We're fans of CIT Bank and Discover Bank (to name a few) since their rates of interest are frequently over 25 times the national average. That indicates the money in your savings account will grow 25 times faster than the speed it's probably growing at now. Truly, however, you can't go wrong with practically any online savings account that offers over 1.50% APY. 4. Generate Income by Seeing Videos on Your Phone. I discussed Swagbucks previously as a credible survey website, but it ends up that's not the only thing they'll pay you for. You can likewise generate income online with Swagbucks by seeing short videos in whatever classification you choose, like entertainment, news, or fitness. $ 5 Signup Benefit for new users. Select videos to view on your computer, tablet, or smart phone. Hundreds of great videos from leading content sites. DollarSprout's Swagbucks Evaluation. 5. Download the Nielsen App and Gather $50 Annually. Have you heard of Nielsen, the business that tracks TELEVISION rankings? Turns out they gather information on a lot more than simply TELEVISION. One location they're really into is internet use research. What does that mean for you? It suggests Nielsen will pay you $50 a year to keep their app on your preferred internet browsing gadget. The app itself collects statistics on your internet use anonymously, so you never ever need to fret about any data being linked to you. And the best part is, the app takes up hardly any space and doesn't decrease your phone or tablet at all! Here's how Nielsen Computer System & Mobile Panel works:. It is noninvasive and will not impact device performance. After you've installed the app, just use the internet as typical. You'll make $50 for the first year you have actually the app set up. 6. Earn Money Online by Surfing the Web. InboxDollars is another marketing research company that pays you to use their online search engine instead of some of the more prominent ones like Google and Bing. The idea here is that they will find out more about people search habits and reveal patterns that may be valuable to companies trying to better understand consumers. InboxDollars isn't a get-rich-quick scheme, but if you're wondering how to generate income online totally free, you might also make a few extra bucks for searching the web like you normally would. Here's how InboxDollars works:. $ 5 Signup Reward for new users. You get $0.15 for every 4 qualified searches you total. Get $0.05 each time you complete 4 or more searches in a week. See our complete InboxDollars evaluation. 7. Make Money to Evaluate Websites. Site testers give their viewpoints on sites, including the design, quality, and ease of use of a site. This allows companies to make changes to their websites in order to offer a much better experience for their users (and hopefully increase sales). Obviously, they want to pay for your feedback, that makes this one of the most convenient methods to make money online without paying anything yourself. UserTesting: $10 for every single 10-15 minute test finished. No cam required. WhatUsersDo: $8+ for 15-20 minute tests. You'll need a microphone. UserTest: $10.50 per research study. Get going in as little as 5 minutes. 8. Freelance Writer. The term "starving artist" certainly does not apply here. There are lots of successful freelance writers out there who've used their business to change their full-time job. You do not require a background in English or writing to make it as a successful freelance writer. For example, Holly Johnson from Club Thrifty started doing self-employed writing on the side with no genuine background, and now makes over $200,000 each year from her writing! She just recently assembled a complimentary workshop where she teaches others how to start earning money online with writing. See below:. How to Build a Six-Figure Composing Profession [Workshop]:. Learn the methods Holly's used to construct her writing income to over $200,000/ yr. Tips to get your foot in the door and increase your earnings in time. Register here totally free. 9. Freelance Proofreader. Put your watchful eye to great use by making money as a proofreader. Caitlin Pyle of Proofread Anyplace made $43,000 in her very first year checking while working part time studying abroad. Remarkable, best? As soon as she recognized the demand was so high for proofreaders-- far too expensive for one proofreader to fill-- she created an online course to help others begin their own proofreading business. She also has free workshops nearly every day. In Caitlin's Free Workshop, you'll find out:. What an effective proofreader does (and does not do)! How to raise your skills to end up being a FANTASTIC proofreader. How to use among the most popular proofreading tools out there ... and where to a discover clients!
10. Virtual Assistant (VA). Writing and checking aren't for everyone. Some people prefer more administrative or data-oriented tasks, which is exactly the role of a virtual assistant. Companies utilize virtual assistants for things like scheduling travel, responding to emails, social media management, e-mail management, and more. As a virtual assistant, you can select which services to offer customers and at what rates. The more worth you can provide, the more you can charge. Some statistics about VAs:. The typical North American virtual assistant earns $35 to $50 per hour. There has actually been a 95% increase in demand for VAs in the last 3 years. There are over 150 various services you can provide as a VA. 11. Online English Teacher. Have you become aware of VIPKID? Here's a bit from their site:. VIPKID supplies an international learning experience to kids in China between the ages 4-12. Headquartered in Beijing, the business provides totally immersive one-on-one English language direction offered online by highly certified instructors. The curriculum is based on the U.S. Typical Core State Standards and uses a flipped-classroom method to promote imagination and vital thinking abilities. For just 90 minutes a day, you can quickly make over $500 monthly. All you require is a Bachelor's degree and English classroom experience. More info on VIPKID:. VIPKID instructors make $14-22/ hr. All classes are taught online through cam. Bachelor's degree required for all teachers. There is a five step application process to become an instructor. 12. Website Designer. If you have a knack for computer systems and an eye for style, you can easily make $1,000 or more a month by building sites for organisations. Want evidence? We paid a designer over $6,000 to custom-made style our theme! There is lots of money to be made in freelance web design work. If you aren't quite sure where to start, take a look at this article by Creative Market on how to become a web designer. If you are seeking to earn major income online, you might want to think about going all out and beginning your own online company.
How to make passive income online
Buy Crowdfunded Property. Property can be a great way to generate income while you sleep. Dividend Income. Peer-to-Peer Lending. Leave Debt. Open a High-Yield Account. Compose a Book. Lease a Room in Your House. Affiliate Marketing. In most cases, owning an online organisation won't help you get rich overnight-- it'll require genuine abilities along with a substantial time financial investment (and probably some money investment, too). Here are a couple of choices that can eventually lead to a full time income online. 13. Start a Blog site. Do you seem like you have a message to the world, however you don't have a platform to provide it? Perhaps it's time for you to begin a blog site. DollarSprout started just as 2 college buddies who liked to talk about money. A couple years later on, and now we have a growing team of entrepreneurial money-nerds on board to help spread our message. What began as an online side hustle has developed into a full-blown company! Here are some ways that bloggers make money online:.

Offering make passive income space on their blog site. Promoting affiliate products and making commissions. Offering their own products and courses. and more! Beginning a blog site is easy, however turning your blog into a successful business-- that's tough! If blogging is the side hustle OR full-time organisation of your dreams, we've assembled an useful guide to assist you get started. Here's a fast rundown of the procedure:.
youtube
- Discover your specific niche: something you are interested in writing about (you do not need to be a world class expert). - Set up your blog: We advise Hostgator for new bloggers (costs as low as $2.75/ mo). - Start composing content that helps readers solve an issue. - Build an audience. Pinterest is an excellent starting point. - Monetize. Ads, affiliate marketing, items-- it depends on you! 14. Start a Drop Shipping Website. The drop shipping company design is taking the internet by storm today, and for good reason. It's a genuine method to generate income online, and needs very little start-up cost. What is drop shipping? In the words of Shopify,. Dropshipping is a retail satisfaction approach where a shop does not keep the items it offers in stock. Rather, when a shop sells an item, it buys the item from a third party and has it delivered straight to the consumer. As a result, the merchant never sees or handles the item. If blogging isn't your thing however you still want to begin an online business, starting an e-commerce website might be your best choice. Just like any new organisation, there is a lot to discover. Shopify uses totally free workshops all the time that are created to teach you all the basics. 15. Develop and Sell How-To Courses. If you have proficiency in a certain location, package up your knowledge into an online course and offer it. This has actually ended up being a popular company design for online entrepreneurs over the past several years, and will most likely simply continue to grow in appeal. The very best feature of offering online courses is that once you do the up-front operate in creating the course and establishing your mlm strategy, you can make money over and over once again for work you do when. The items in this section all require an up-front money investment, however provide the chance for your money to make you even more money-- all online. If you are financially able to, building up passive streams of income is an essential part of building up wealth. 16. Rent Out Your Cars and truck While You're Not Using It. Just how much downtime would you say your cars and truck has each week while you're traveling, at work, sleeping, or simply hanging out at house?
According to Getaround, most cars and trucks in the U.S. sit idle for up to 22 hours each day. Now, you can utilize that time to put your vehicle to work and make passive income by sharing your ride. As a Getaround vehicle owner, you get access to premium parking as well as a $50 monthly rental credit. And with $1 million insurance coverage, you can feel confident your home is in great hands. Not to mention, fewer cars and trucks on the road indicates less contamination, less traffic, and more parking for everyone. That suggests you'll make money online while adding to a greener planet. It just takes a couple of clicks to put your cars and truck to work with Getaround. Just register for a complimentary account, name your automobile, set the area and schedule, and get in a description. If you choose to stick to Getaround after the 30-day free trial, you'll be charged a one-time charge of $99 for a Link ™ setup in addition to a flat charge of $20 each month. The Link ™ enables occupants to find and unlock your automobile directly from the app so you do not need to deal with lost or stolen keys. It likewise comes with added security features like tamper detection, GPS tracking, and engine lock. Of course, you get a digital secret so you can access your cars and truck any time and unlock it from your phone. If you ever have problems, Getaround is there for you with 24/7 roadside help and consumer support.
How to make money on internet
Open an Etsy shop. Total studies online. Earn money to search the Web. Evaluate search engines. Start a blog. Write and release an eBook. Become a freelance author or editor. Get into affiliate marketing. Rental earnings accrue on a regular monthly basis and are paid on the 15th of the following month. Getaround keeps 40% of all revenues to cover the expenses of insurance, 24/7 assistance, and other advantages. 17. Peer-to-Peer Lending If you've got some cash on hand and are trying to find a high rates of interest financial investment (more than an online bank), think about putting some money into peer-to-peer financing (aka P2P Loaning). What is peer-to-peer lending? It's a monetary system that matches potential debtors with investors that want to money their loans. It's like traditional financing, however without a bank as the middle guy. As a financier, essentially you are functioning as the bank (and collecting interest payments while doing so). How much money can you make? It depends upon what types of loans you invest in and how much money you invest with. If you play it safe, you can anticipate to make 2-5% annually, whereas riskier loans can pay as high as 12% or more. Lending Club is one of the biggest online P2P Lending marketplaces: Open an account and transfer just a $0.01 minimum preliminary deposit. Construct your portfolio: Purchase a range of loans in increments as low as $25. Earn money: Receive monthly payments as borrowers repay their loans. 99% of Lending Club financiers with a 100+ note portfolios make favorable returns. 18. Buy Crowdfunded Realty

Many individuals consider real estate investing as one of the best methods to accumulate wealth. The issue is, it typically takes a lot of money to get started, which puts it out of reach for many individuals. Fortunately, there's a method to invest in property without purchasing entire residential or commercial properties yourself. Presenting: Property Investment Trusts (REITS). A REIT is a swimming pool of money, handled by financial experts, that goes towards investing in realty. Investors put money into the REIT, the REIT purchases homes, and the returns are disbursed back to financiers. The best part? You do not need to worry about handling the proprietor duties. A lot of REITS still require a large financial investment to get in, however we discovered a place that has just a $500 minimum financial investment. With Fundrise you can get access to dozens of solid, value-producing assets. Here's how Fundrise works:. Invest straight in a realty portfolio that a team of experts identifies, acquires, and manages in your place. 8-- 11% expected annual returns. 9. Generate income as an Airbnb Host. If you wish to get your feet damp in the leasing business, Airbnb is a fantastic website to get started. If you own your house or your landlord allows it, you can make money online by sharing your home with others. Here's how it works:. Create your complimentary listing: Describe your space, the number of guests you can accommodate, and include pictures and information. Choose your price: What you charge is constantly up to you. Get paid: You can be paid through PayPal, direct deposit, or wire, to name a few methods. DollarSprout's Total Guide to Profitable Airbnb Hosting. 20. Purchase Dividend Paying Stocks. It's been said that the average millionaire has 7 streams of income. Dividend stocks are typically one of them. What are dividend stocks? Generally when you buy stocks, you do it with the intent to purchase low and offer high. Dividend stocks work the same way, but with one other advantage: just for owning the stock, you are paid a small portion of the company's revenues. So with dividend stocks, you earn money when the stock increases in value, and when dividends are paid out. If you are looking to begin with dividend investing (or any kind of stock market investing), think about checking out Acorns. This is a beginner-friendly app that can help you get going with investing using simply your smartphone. You can read our complete Acorns Evaluation here. It's a new age, and there's never been more opportunities to work from home and make money online. However you can't simply leave your laptop computer in the corner of your room and expect your bank account to take off. Unless you have money to invest, you're going to need to put in some old-fashioned hard work. One last thing to bear in mind: If you are attempting to earn money on the internet, possibilities are you will not get it right on your first try. That's alright. Keep experimenting, keep learning, keep putting yourself out there, and ultimately you will find the right online money making opportunity for you.
0 notes
Text
Thirteen Spectacular Facts About Digital Marketing
As long as you have an internet connection, you can legitimately earn money online from throughout the world. In this post, we're sharing all of our best ideas to help you do just that. Instead of utilizing the internet to search Facebook, stalk your ex on Instagram, or discover what kind of bread you are by means of a Buzzfeed test, you can do something more productive with your time! Whether you're a remain at home mommy, a college student, or simply working part-time, you can leverage even the smallest window of opportunity to make money online. Our group scoured the web, wrecked our brains, and spoke with other side hustle professionals to create this genius list of ideas so you can earn money online starting today. 1. Take Part In Market Research (Up to $100+ Each Month). Marketing research companies like to collect data on consumer interests, and costs practices, so brands can discover how to mlm their items. They mainly do this research study this via online questionnaires, and they're constantly on the lookout for new survey individuals. And yes, they'll pay you. If you have actually ever hung out taking paid online studies, you understand that you can earn money online on a monthly basis while sitting in your home in your PJs. If you're a novice survey taker, we recommend starting with Survey Addict.
How to earn money online
No-risk matched betting. Hands down the quickest method to make a lot of money. Online studies. Spent for searching the web. Online market trading. Start your own website. Evaluation websites & apps for cash. The 'Disney Vault' trick. ' Get Paid To' websites. Here's how Study Junkie works:. Take Studies: Develop your profile (takes less than 5 minutes) and you'll be matched with surveys. Earn Rewards: Total studies and earn virtual points. Get Paid: Redeem virtual points for Paypal money deposits or e-Gift cards. DollarSprout's Study Addict Review. 2. Benefit From Cash Back Signup Bonus Offers. Want $15 for a few minutes of your time? Naturally you do! Lucky for you, there are websites like Ebates and DOSH that are using cash incentives for individuals like you to join their websites.

What's the catch? None, really. Cash back apps act as affiliates for lots of online merchants, which indicates that whenever you purchase through among the apps, they get a small commission-- however then, they offer you a part of that commission as "money back". For instance, if I buy a set of Nike shoes through the Ebates app (or website) and invest $75, Ebates might get a $10 commission however then they'll pass $7 back to me. It's generally a method to get price on stuff that isn't on sale! Ebates: $10 signup reward after making $25 of qualifying purchases within 90 days. DOSH: $5 reward issued quickly after you connect a credit or debit card to the app. (Note: Often they bump the signup reward to $10). Given that they're complimentary, we recommend registering for both. Whenever you are online shopping, simply compare deals between the apps to find the best one. 3. Open a High-Yield Online Savings Account. Do you have money sitting in a savings account that's paying.05% interest? If so (or if you don't have a savings account at all), it deserves your time to invest a couple of minutes opening an online savings account. Here's why:. Online savings accounts normally featured insane great rates of interest to assist you grow your money much faster (routine in-person banks can't offer rates as high). We're fans of CIT Bank and Discover Bank (among others) since their rate of interest are typically over 25 times the nationwide average. That means the money in your savings account will grow 25 times faster than the speed it's most likely growing at now. Truly, however, you can't go wrong with practically any online savings account that uses over 1.50% APY. 4. Make Money by Watching Videos on Your Phone. I mentioned Swagbucks earlier as a reliable study site, but it ends up that's not the only thing they'll pay you for. You can likewise make money online with Swagbucks by watching short videos in whatever classification you choose, like home entertainment, news, or fitness. $ 5 Signup Perk for new users. Select videos to view on your computer system, tablet, or mobile phone. Numerous terrific videos from leading content sites. DollarSprout's Swagbucks Review. 5. Download the Nielsen App and Gather $50 Each Year. Have you heard of Nielsen, the company that tracks TELEVISION rankings? Turns out they collect data on a lot more than just TV. One area they're really into is internet usage research study. What does that mean for you? It indicates Nielsen will pay you $50 a year to keep their app on your favorite internet browsing device. The app itself collects statistics on your internet use anonymously, so you never ever have to fret about any information being linked to you. And the very best part is, the app takes up hardly any area and does not decrease your phone or tablet at all! Here's how Nielsen Computer & Mobile Panel works:. It is noninvasive and will not affect device performance. After you've set up the app, just use the internet as regular. You'll make $50 for the very first year you have the app set up. 6. Generate Income Online by Surfing the Web. InboxDollars is another marketing research business that pays you to utilize their search engine instead of a few of the more prominent ones like Google and Bing. The concept here is that they will find out more about individuals search routines and uncover patterns that might be important to business attempting to better comprehend customers. InboxDollars isn't a get-rich-quick plan, but if you're questioning how to make money online for free, you may too make a few extra bucks for searching the web like you usually would. Here's how InboxDollars works:. $ 5 Signup Perk for new users. You get $0.15 for every single 4 qualified searches you complete. Get $0.05 each time you complete 4 or more searches in a week. See our complete InboxDollars evaluation. 7. Make Money to Evaluate Websites. Website testers give their opinions on websites, including the style, quality, and ease of use of a website. This permits companies to make changes to their sites in order to provide a much better experience for their users (and ideally increase sales). Of course, they are willing to pay for your feedback, which makes this one of the simplest methods to mlm without paying anything yourself. UserTesting: $10 for every single 10-15 minute test finished. No cam needed. WhatUsersDo: $8+ for 15-20 minute tests. You'll need a microphone. UserTest: $10.50 per research study. Begin in as little as 5 minutes. 8. Freelance Author. The term "starving artist" definitely does not apply here. There are many effective freelance authors out there who've utilized their organisation to replace their full-time task. You do not need a background in English or writing to make it as a successful freelance author. For example, Holly Johnson from Club Thrifty began doing independent writing on the side without any real background, and now makes over $200,000 annually from her writing! She just recently assembled a free workshop where she teaches others how to get started earning money online with writing. See below:. How to Develop a Six-Figure Composing Career [Workshop]:. Find out the techniques Holly's utilized to construct her writing earnings to over $200,000/ yr. Tips to get your foot in the door and increase your earnings with time. Register here for free. 9. Freelance Proofreader. Put your watchful eye to great usage by generating income as a proofreader. Caitlin Pyle of Proofread Anyplace made $43,000 in her first year checking while working part-time studying abroad. Excellent, best? Once she recognized the need was so high for proofreaders-- far too expensive for one proofreader to fill-- she created an online course to help others start their own checking business. She also has free workshops almost every day. In Caitlin's Free Workshop, you'll discover:. What an effective proofreader does (and doesn't do)! How to raise your abilities to end up being a FANTASTIC proofreader. How to utilize one of the most popular proofreading tools out there ... and where to a discover customers!
10. Virtual Assistant (VA). Composing and proofreading aren't for everybody. Some individuals choose more administrative or data-oriented tasks, which is precisely the function of a virtual assistant. Businesses utilize virtual assistants for things like booking travel, responding to emails, social media management, email management, and more. As a virtual assistant, you can select which services to offer clients and at what rates. The more worth you can provide, the more you can charge. Some statistics about VAs:. The typical North American virtual assistant earns $35 to $50 per hour. There has been a 95% increase in demand for VAs in the last three years. There are over 150 various services you can provide as a VA. 11. Online English Instructor. Have you become aware of VIPKID? Here's a bit from their website:. VIPKID offers a global knowing experience to children in China in between the ages 4-12. Headquartered in Beijing, the business provides completely immersive one-on-one English language guideline provided online by highly certified instructors. The curriculum is based upon the U.S. Typical Core State Standards and utilizes a flipped-classroom technique to cultivate creativity and critical thinking skills. For simply 90 minutes a day, you can easily make over $500 per month. All you need is a Bachelor's degree and English classroom experience. More details on VIPKID:. VIPKID instructors make $14-22/ hr. All classes are taught online via cam. Bachelor's degree needed for all instructors. There is a five step application process to become an instructor. 12. Website Designer. If you have a propensity for computer systems and an eye for style, you can easily make $1,000 or more a month by constructing websites for organisations. Want evidence? We paid a designer over $6,000 to custom-made style our theme! There is serious money to be made in freelance web design work. If you aren't rather sure where to start, check out this article by Creative Market on how to end up being a web designer. If you are looking to earn major income online, you might want to think about going for it and beginning your own online business.
How to make passive income online
Invest in Crowdfunded Real Estate. Property can be an excellent method to earn money while you sleep. Dividend Earnings. Peer-to-Peer Loaning. Leave Debt. Open a High-Yield Account. Write a Book. Lease a Room in Your House. Affiliate Marketing. In most cases, owning an online service won't assist you get rich overnight-- it'll need real abilities along with a significant time financial investment (and probably some cash investment, too). Here are a couple of alternatives that can ultimately cause a full-time income online. 13. Start a Blog. Do you feel like you have a message to the world, but you don't have a platform to provide it? Possibly it's time for you to start a blog. DollarSprout began just as 2 college friends who liked to discuss money. A couple years later, and now we have a growing group of entrepreneurial money-nerds on board to assist spread our message. What began as an online side hustle has become a full-blown company! Here are some manner ins which bloggers earn money online:.

Offering make money online area on their blog site. Promoting affiliate products and earning commissions. Selling their own products and courses. and more! Beginning a blog is simple, but turning your blog site into an effective company-- that's hard! If blogging is the side hustle OR full-time service of your dreams, we've assembled an useful guide to assist you begin. Here's a fast rundown of the procedure:.
youtube
- Discover your niche: something you have an interest in blogging about (you do not need to be a world class specialist). - Establish your blog: We advise Hostgator for brand-new bloggers (expenses as low as $2.75/ mo). - Start writing material that helps readers resolve an issue. - Develop an audience. Pinterest is a fantastic starting point. - Monetize. Advertisements, affiliate marketing, items-- it's up to you! 14. Start a Drop Shipping Site. The drop shipping business model is taking the internet by storm today, and for good reason. It's a legitimate method to earn money online, and needs really little start-up expense. What is drop shipping? In the words of Shopify,. Dropshipping is a retail satisfaction technique where a store doesn't keep the products it sells in stock. Rather, when a store sells an item, it purchases the item from a third party and has it shipped straight to the client. As a result, the merchant never sees or manages the item. If blogging isn't your thing but you still wish to start an online company, starting an e-commerce website might be your best bet. Similar to any new service, there is a lot to discover. Shopify provides totally free workshops all the time that are created to teach you all the essentials. 15. Develop and Sell How-To Courses. If you have expertise in a specific location, package up your understanding into an online course and offer it. This has actually become a popular service design for online business owners over the past a number of years, and will probably just continue to grow in appeal. The best feature of offering online courses is that as soon as you do the up-front operate in developing the course and setting up your mlm method, you can get paid again and again once again for work you do as soon as. The products in this section all need an up-front cash investment, however provide the chance for your money to make you even more money-- all online. If you are economically able to, building up passive streams of income is an essential part of accumulating wealth. 16. Lease Your Cars and truck While You're Not Using It. Just how much downtime would you state your automobile has every week while you're taking a trip, at work, sleeping, or simply hanging out at house?
According to Getaround, most automobiles in the U.S. sit idle for up to 22 hours daily. Now, you can use that time to put your vehicle to work and digital marketing by sharing your ride. As a Getaround cars and truck owner, you get access to premium parking in addition to a $50 regular monthly rental credit. And with $1 million insurance protection, you can rest assured your residential or commercial property is in excellent hands. Not to mention, less cars on the road means less contamination, less traffic, and more parking for everyone. That indicates you'll generate income online while contributing to a greener planet. It only takes a couple of clicks to put your automobile to work with Getaround. Simply register for a free account, name your cars and truck, set the area and accessibility, and go into a description. If you decide to stick to Getaround after the 30-day complimentary trial, you'll be charged a one-time fee of $99 for a Link ™ installation in addition to a flat cost of $20 each month. The Link ™ allows tenants to find and open your automobile directly from the app so you don't need to handle lost or stolen secrets. It also includes added security functions like tamper detection, GPS tracking, and engine lock. Naturally, you get a digital secret so you can access your cars and truck whenever and unlock it from your phone. If you ever have problems, Getaround is there for you with 24/7 roadside support and consumer support.
How to earn money on internet
Open an Etsy shop. Complete studies online. Get paid to browse the Web. Examine online search engine. Start a blog site. Write and publish an eBook. Become a freelance writer or editor. Enter into affiliate marketing. Rental profits accrue on a month-to-month basis and are paid on the 15th of the following month. Getaround keeps 40% of all profits to cover the costs of insurance, 24/7 support, and other advantages. 17. Peer-to-Peer Financing If you've got some cash on hand and are trying to find a high rates of interest financial investment (more than an online bank), consider putting some money into peer-to-peer financing (aka P2P Loaning). What is peer-to-peer lending? It's a financial system that matches potential debtors with financiers that want to fund their loans. It resembles conventional loaning, but without a bank as the middle male. As an investor, essentially you are acting as the bank (and gathering interest payments while doing so). How much money can you make? It depends upon what kinds of loans you invest in and how much money you invest with. If you play it safe, you can expect to make 2-5% per year, whereas riskier loans can pay as high as 12% or more. Lending Club is among the biggest online P2P Loaning markets: Open an account and transfer just a $0.01 minimum preliminary deposit. Develop your portfolio: Buy a variety of loans in increments as low as $25. Earn money: Get monthly payments as customers repay their loans. 99% of Loaning Club financiers with a 100+ note portfolios make favorable returns. 18. Buy Crowdfunded Property

Many people think about realty investing as one of the very best ways to accumulate wealth. The problem is, it typically takes a lot of money to start, which puts it out of reach for many people. Luckily, there's a method to invest in property without buying entire homes yourself. Presenting: Realty Investment Trusts (REITS). A REIT is a swimming pool of money, handled by financial specialists, that goes towards investing in realty. Financiers put money into the REIT, the REIT purchases homes, and the returns are disbursed back to financiers. The best part? You don't need to fret about dealing with the landlord duties. The majority of REITS still require a large investment to get in, but we found a place that has simply a $500 minimum investment. With Fundrise you can get access to dozens of solid, value-producing assets. Here's how Fundrise works:. Invest straight in a real estate portfolio that a team of specialists recognizes, obtains, and handles on your behalf. 8-- 11% expected annual returns. 9. Earn Money as an Airbnb Host. If you wish to get your feet damp in the leasing business, Airbnb is an excellent website to start. If you own your house or your proprietor permits it, you can generate income online by sharing your house with others. Here's how it works:. Produce your free listing: Describe your area, how many visitors you can accommodate, and include pictures and information. Select your cost: What you charge is always as much as you. Make money: You can be paid through PayPal, direct deposit, or wire, to name a few methods. DollarSprout's Total Guide to Profitable Airbnb Hosting. 20. Invest in Dividend Paying Stocks. It's been stated that the typical millionaire has seven streams of earnings. Dividend stocks are typically one of them. What are dividend stocks? Usually when you buy stocks, you do it with the intent to buy low and sell high. Dividend stocks work the same way, however with one other benefit: just for owning the stock, you are paid a small portion of the business's incomes. So with dividend stocks, you earn money when the stock goes up in worth, and when dividends are paid. If you are seeking to get going with dividend investing (or any kind of stock exchange investing), think about checking out Acorns. This is a beginner-friendly app that can assist you begin with investing utilizing just your smart device. You can read our complete Acorns Evaluation here. It's a new age, and there's never ever been more opportunities to work from home and make money online. However you can't just leave your laptop computer in the corner of your space and anticipate your savings account to blow up. Unless you have money to invest, you're going to need to put in some old-fashioned hard work. One last thing to keep in mind: If you are attempting to make money on the internet, possibilities are you will not get it right on your very first try. That's okay. Keep experimenting, keep discovering, keep putting yourself out there, and eventually you will discover the best online money making chance for you.
0 notes
Text
Can you Game in VR on a Budget?
virtual reality or VR has been hailed as the next paradigm for gaming an immersion ever since it rolled out then rolled over back in the late 90s with early implementations like Sony's Glastron being described by John Carmack as like looking through toilet paper tubes fast forward to 2016 though and the tech was awesome but it still had a big problem the price because on top of the headset gamers in particular needed to shell out for much more powerful hardware than they would need to play the same game in flat mode but there's some good news since that time oculus who sponsored this video has dropped the price of the rift and continued development on some pretty neat invisible mechanisms that work in the background to make VR run on even relatively modest machines and we spent the last week testing to see just how modest a machine you can use and I think you'll be surprised [Music] let's begin with some of the efficiency improvements that are handled by your graphics card because in theory every frame of an image in VR needs to be rendered twice once for each I so technologies like Nvidia's single pass stereo make it so your PC only needs to setup the scenes geometry once and their lens matched shading actually cuts off any pixels which would not be visible anyway due to how the lenses in the headset work pretty neat then we've got the headset specific tech like oculus is asynchronous time warp and space warp which kick in anytime your machine can't maintain the steady 90 frames per second that's required to prevent motion sickness by generating synthetic preemptive frames that act like a sort of suspension mechanism to smooth out the low FPS bumps getting this tech working right was quite a bit of work because GPUs are designed for high throughput but not pre-emptive frame guessing so oculus worked with both GPU manufacturers as part of invidious VR works and AMD's liquid VR initiatives so it's more than a catchy slogan now let's introduce our bare minimum system so we paired up where is it here is a core i3 8100 quad-core processor and a gtx 1050 Ti and ran future marks VR mark which has a neat feature both the rifts minimum and V are ready performance requirements are baked into the results craft and what we found was that even our bottom of the barrel actually managed to meet the minimum spec bar so there you go video done peace out right no yeah no wrong so upon further analysis we actually found that while our rig was outputting 90 frames per second in the basic orange benchmark which matches up with the refresh rate of the head-mounted displays in the rift the actual target is 100 9 frames per second this is because aside from the graphics going on on the screen in VR the system also needs to read sensors and do a bunch of stuff in the background so with the overhead of VR the calculation is that a hundred and nine frames per second in flat mode should correspond to 90 frames per second in VR and superposition basically said the same thing so that setup was only good enough for like the very barest minimum spec so we do need to go a little higher but do we go for CPU or GPU well we were watching our CPU load pattern during the runs and our processor even though it's a measly core i3 well it is a quad core and it didn't look that busy so we bumped our graphics up to a GTX 1060 to see where that would get us usually people would pair such a card with an i-5 class chip but we're focusing on VR here and even with all the trickery it is still mostly GPU bound and check this out so it turns out that I 3 + 10 60 combo here actually looks good to go with a super rating in VR Marc orange room and a full bar in superpositions optimum preset so that puts our total system cost at just over nine hundred US dollars and bear in mind but that is including the Windows 10 home operating system which microsoft recently jacked up to a hundred and forty bucks so if you already have windows or whatever then now you can subtract that of course though those are synthetics so the next step is to go lab rat mode and put this to the test now normally I game in VR at home on a gtx 980ti so i will be able to tell the difference if this doesn't manage to stay as smooth so let's fire up the oculus performance profiler analysis tool and head-up display which should help us pinpoint the cause of any framerate drops that we experience oh cool okay so this is Aki redesigned home interface thing now you've got this control panel here that you can move to wherever it is that you want it to go and then you can go ahead and decide well you know which menu do you want to see oh close them so there's my library there's my explore tab here then you can kind of adjust this one over here Oh neat you can interact with the desktop as well oh that's trippy let's go ahead and look at the other monitor the one that's not capturing my experience right now ah yes hey you can mess with Ivan hey Ivan I am opening your Start menu what are you gonna do about it in fact you oh wait I probably shouldn't open fraps oh that just glitched it out I don't know I don't know what this thing is yeah thank you let's get our you monitors different sizes yep one is 4k one is 1080 dang it Ivan game now right walk around the place somewhere because she didn't mean it social so you can invite people to come over to your virtual home friends currently zero friends online thanks that's why you wanted me to open that isn't it alright what's next I've played VR shooters dang it yeah it's really fun all right well I think that's good I think that's all the evidence I need this is working awesome so for our last trick we're trying out the climb kind of the crisis of VR if you think about it that way like the graphics in this game or especially when it was first released are pretty incredible compared to what else there is now what I just alright oh that's a long way to fall huh this is maximum settings yeah go go go go look at me I'm like Superman oh-oh-oh Superman falls sometimes ok so actually that went surprisingly well but still the point remains that in a massive surprise to no one just because a benchmark gives you a good score and you can run many VR games well on a relatively inexpensive budget does not automatically mean that you can run any game maxed out in VRS I mean same ideas in flat mode right so just like flat mode if you do have some more budget and you're buying a VR gaming rig it wouldn't be a terrible idea to bump your specs a little if you want to play VR versions of flat games like fallout 4 and Skyrim since VR is more demanding but frankly I've actually found that the most fun that I've had is in games that were designed for VR and what's cool is that the climb in my opinion is more of a tech demo than an actual game and that one still ran decently and most of the VR games out there that I've tried some of which are good and free like Robo recall are not nearly as demanding because it's in the developers best interest to reach as many customers as possible with their games so our PC right here and of course we're not factoring in some of the RGB nonsense and stuff like that in our in our cost 4 but our PC here can enable a ton of awesome VR experiences exactly the way it is so thanks to you guys for watching thanks to oculus for sponsoring this video if you guys dislike this video you can hit that button but if you liked it hit like get subscribed or maybe consider checking out where to buy the stuff we featured at the link in the video description also down there is our merch store which has cool shirts like is anyone wearing an LT t-shirt not no one where's your team spirit like the LT t-shirts that we have and also our community forum which you should totally join
https://youtu.be/8ZG3e_Nn2ps
0 notes
Link
Hi r/Entrepreneur,My name is Kevin and I design, develop, and market a series of light show apps for iOS and Android under the Light DJ brand. 2 years ago, I made a post about my journey into Entrepreneurship which you can find here. Today I’d like to provide an update on my business and answer any questions that you may have about my methods.From 2017-2018 I had few major projects. My first priority was to update the Android app to match the effects of the iOS version. Previously I had decided to build these as two native apps rather than a hybrid app and that’s resulted in two slightly different feature sets between the apps as they’ve grown at different paces. Now the apps produce the same lighting effects and I intend to maintain effect parity going forward. I still think having two native apps is the right option for my purposes. Using native tools and support makes it easy to integrate third-party libraries and debug on Stack Overflow when things go awry. I develop on iOS first because it’s easier to prototype with Swift, then I port the feature to Android/Java from there. Writing the code the second time isn’t too bad since going from Swift to Java is fairly simple, plus translating it forces you to do a thorough review of your own code. I’ve fixed more than a few bugs this way.Nanoleaf Aurora support was another focus this period. The hardware had just been released and I was excited to branch out from bulb-based effects to panels. Integrating with new third-party hardware is risky and exponentially increases testing time so I have to be selective as to who I integrate with. I chose Nanoleaf because I could see the potential of the product and because they have mass-market availability in Apple Stores and Best Buy. I’ve had the pleasure of meeting Nanoleaf's CEO Gimmy Chu and his team a few times. They’ve been great to work with, open to suggestions, and are just really cool people. My latest version includes support for the new square Canvas tiles too and I’ll continue to update the code as new shapes are released.In September 2017 I released a moonshot app called Light DJ Studio which presents a new concept in mobile light shows. Users record a light track guitar-hero style, in sync to any Apple Music track. They can save the track for later playback or (as of Oct 2018) share it with the Light DJ community so that others can enjoy it too. Currently the app is completely free while the library of user-submitted tracks slowly grows (currently ~40) and anyone that submits a track gets free access for life if I ever do monetize it. I designed the light recordings so that they work with any light setup, so even if the creator makes their light recording on Hue it will still work on Nanoleaf or LIFX or vice-versa. There’s a ton of potential in this app and I hope to one day work with DJs and other musicians to release exclusive light shows for the app.In January 2018, Philips Hue announced its Hue Entertainment API, which provided an opportunity for my app to stand out from the other entertainment apps for Hue. Hue Entertainment allows games and other media to stream real-time effects to your living room. For me, this meant high-performance effects like faster strobes and smoother waves that travel across the room. I spent about 2 months redesigning all 40+ effects in my app to work with the new API and Light DJ was one of the first apps to have this support. While the performance improvements were astounding, sales were not. Since my business model was "pay-once, get everything” the power users who really wanted this feature got it for free, but users who were new to Hue or my app didn’t care or know what it was, so it did not add much apparent value. Add to that the traditional spring slump that happens as people start getting outdoors more around April & May and my daily proceeds started to dropping to double-digits. Clearly drastic changes were needed to save my business.I considered creating more in-app purchases for new hardware support, but I really hate nickle-and-diming users for every little thing and it results in a ton of extra code to handle all the extra limitations. If my business is to be successful then consistent recurring revenue is a must and so in the end I decided that the only rational option was to move to a subscription model. This has provided many benefits:Recurring subscription revenue is easier to predict. That makes me more comfortable hiring people to help me grow my business and helps me sleep at night.I can afford to pay for marketing since the average revenue per user is higher.Users are more engaged. Average time-in-app is up, and so are daily/monthly active users. The theory is that users who pay more for an app value it more and are more likely to use it.I can continue to add features and hardware support freely without having to be concerned with things like selling a certain feature then moving/merging it later and having to figure out how to continue to give partial access.50% reduction in Apple fees on subscriptions over 1 year.Ability to support cross-platform subscriptions (coming soon).There were a few downsides to moving to subscriptions, however. The move was not popular with users who were used to the previous freemium model and hadn’t upgraded, resulting in negative reviews. Previous purchasers received free lifetime updates, so they are not a source of revenue. The price of the Android subscription started the same as iOS even though it had fewer features so I lowered the price after a month of dismal sales. Though the subscription includes a 7-day free trial, users were hesitant to sign-up so I introduced a preview period for users to try out the app for a bit before committing. Additionally in order to sell auto-renewable subscriptions on the App Store you need to sell something “of substance”. For me, that means I’m obligated to produce and provide 2 bonus effects per month to users as part of the subscription (abstract promises like “future updates” won’t cut it). I make the effects in batches of a dozen or so and it takes me a few weeks to create and test them for both OSs. While I generally enjoy making these it’s still a task that I’ll be required to do every 6 months or so for as long as the app is producing revenue.Metrics:Ok, so here’s why a lot of you clicked. The truth is that I don’t spend all day staring at my metrics looking for incremental improvements. My focus is always on finding the best way to add value to my service and creating a valuable service is what will drive good numbers. I follow the Valve Manifesto as I believe that it’s a better way to create a quality product.Of note in the sales data: New Years Eve continues to be the biggest day for downloads and sales of the app. Subscriptions were introduced July 1, resulting in 1 week of no sales (there was a last chance sale on June 30). In addition to subscriptions I continue to offer a fully unlocked version of the app in both app stores (at a higher price) for users that don’t want to deal with the subscription.Sales data (viewable for a limited time): https://lightdjapp.com/sales (password: ilovereddit)Daily Active Users: ~1,200Monthly Active Users: ~33,000Subscription conversion: 59%Subscription retention: 74%Outlook:For 2019 my focus is on improving retention by increasing the value of subscriptions through new community features including pattern and sheet sharing, cross-platform subscriptions, cloud-backed settings, and a web portal where users can purchase and manage subscriptions. Nanoleaf Canvas support will be a big help when it comes to marketing content creation since the square panels are easier to work with than the triangles. Aside from that I have a whole laundry list of app features that I’ve been wanting to create and a dozen or so unfulfilled user requests that will keep me busy. I’ll also be on the lookout for any new hardware that could work with the app.I hope this post provides a bit of insight into my business and helps encourage future developers to give it a shot on the App Store. I'd love to answer any questions you have about my business or development practices.Cheers,Kevin
0 notes
Text
NorCal Mopar Collection Includes 4 Hemi Cars, 2 of Which Were Bought New
Godfather of Soul James Brown was known for crooning, “It’s a man’s world.” That’s generally true in the world of muscle cars, but then again, he never met Janice Sutherland. She’s a lady with four Hemi-powered Mopars: a 1970 Superbird, 1969 Road Runner, 1966 Satellite, and an exacting 1969 Charger Daytona “re-creation.” There’s a 440-powered Superbird in her collection, too. And she has owned two of them, the Hemi Superbird and Satellite, since brand new. That’s far more muscle than we can pack into one feature, so we’ll highlight the Hemi Superbird and Road Runner here, along with a few words about the Daytona, and peel out from there to bring you the other cars in a later issue.
Janice’s muscle car saga began back in 1966, when she and her then-husband Les, a Dodge mechanic by trade, bought the yellow Satellite for racing. They tore up the tracks around Ukiah, California, but that wasn’t enough for her. Lightning struck when Janice saw a 1970 newspaper article about Buddy Baker busting the 200-mph barrier in an outrageously antisocial, winged Daytona.
“That’s the kind of car I wanted,” Janice recalls. “It was my forever car.” Truth be told, she actually mistook the Charger Daytona for a Superbird. The two are somewhat similar, with a few differences in the nosecone, body, and rear sail panels, so her confusion was somewhat understandable.
Mopar history buffs already know that the 1970 Plymouth Superbird was a follow-up to the 1969 Dodge Charger Daytona, the first American car with a body developed in a wind tunnel and by computer analysis. (Prior to that, automotive aerodynamics were analyzed by taping tufts of yarn to the body and filming the car at speed.)
The Superbird took this digital design approach to even greater lengths. The nose on both models added 19 inches to the base car’s overall dimension, but the rear sections were not the same. While the Charger had a flat window covering over the rear tunnel, on the Superbird the rear sail panels (C-pillars) were extended for better airflow. This modification resulted in all Superbirds having a vinyl top to cover up the rough, improvised metalwork (due to production being done at furious clip, 2,000 units in only two months).
The tall aluminum rear wing, mounted on struts on the trunk, increased downforce. Reportedly it really only needed to be about a foot in height to serve its purpose, but one retired Mopar engineer claimed that it was elevated 23 inches to allow the trunk lid to open all the way. Supposedly Richard Petty liked the extra height solely for the intimidation factor.
Smitten by the winged monster she saw in the newspaper, Janice promptly made a beeline for the Ukiah Mopar dealership to put in an order. But the sales manager emphatically refused, fearing any warranty claims. Little did he know just how well Janice would take care of her much beloved Hemis in the coming decades.
Loaded and Then Some Fortunately, a dealer further south, in Pittsburg, California, was far more accommodating, and she was able to grab the last Hemi Superbird in the state. The car came fully loaded, with every possible option and then some. Besides the automatic transmission and Rim-Blo steering wheel (just squeeze the edge to sound the purple beep-beep horn), it also had an eight-track player, plus a center console and a six-way adjustable driver’s bucket seat (most came with a bench seat). At the time, all of these items would be surprising to find on a Road Runner given its reputation as a stripped-down muscle car (as you will see in the B5 Blue companion car).
One more odd thing popped up on the build sheet: a rear speaker. Although technically not available as an option, with no box to check on the order form, it somehow made it onto the car from the factory.
Janice says she did a bit of street racing in her Limelight Green Superbird against her husband in the yellow Satellite, mostly the usual stoplight drags and Saturday night antics. But right after the Interstate 5 freeway opened up, she hit the fresh pavement to run her Superbird up to 150 mph. (The street gearing was too low, however, to duplicate Buddy Baker’s 200-mph feat.)
She also used the Superbird as a daily driver to take her kids to school and run errands. What a sight that must’ve been, seeing such a colorful car tooling around town, and her getting groceries in a NASCAR-derived ride. She even occasionally used it to tow a horse trailer, and also a flat-bottom drag boat from Ukiah to Lake Shasta! (More about what happened to the Hemi in that boat later.) It was like putting a thoroughbred to the plow.
Eventually the kids grew tired of being teased about their Mom’s “upside-down Hula Hoe garden tool,” and they asked her to drop them off a block away from their schoolmates. As they grew older, though, they came around and asked if they could drive the Superbird to high school. How cool was that?! Was she worried about putting a Hemi in the hands of a hormonal teenager? Not really.
“We all have lead feet,” she laughs. “We were not the kind of parents that most parents would like to see their kids with.” Usually the cops would pull over her son Les because they just wanted to check out the car, and he’d get away with only a warning and a knowing smile. (On the other hand, Janice admits that she’s always one ticket away from losing her driver’s license.)
Over the next 15 years of regular use, Janice’s Superbird went through three restorations. The original Hemi engine never required more than a mild refresh (new gaskets and seals). Larry Snow, who oversees her collection to a remarkably meticulous degree, and has an impressive knowledge of Mopar technical details, works with Dan Laughlin Customs. Dan has worked on all of Janice’s cars, and corrected a number of factory defects in the body, ranging from orange-peel paint to uneven panel gaps.
“We never could paint it black,” Janice admits. “The body was too crooked.” That was later fixed, and even though the body is now smooth as glass, they stuck with the original Limelight Green hue, updated from the factory lacquer and acrylic enamel to a base/clear coat.
Not surprisingly, when the car is displayed at shows, it typically takes home a Best of Show trophy (about 15 in all, thus far). And both Janice and Larry get quite a few insistent offers to buy it, not to mention a few snide remarks from the testosterone-fueled side of the muscle car aisle about how it is that a woman owns a Hemi-powered Superbird. But she takes it all in stride and just says it’s her forever car.
Healing a Broken-Down Road Runner
The background of Janice’s B5 Blue bomber is far more troubled than any of her other Mopars. It all started innocently enough, when a man approached her at a local car show. Knowing about her collection, he asked, “You want to buy another Ukiah Hemi car?” Her immediate reply: “You could twist my arm.”
Well, it might have taken a lot more than arm-twisting when she first saw the 1969 Road Runner. “It was in just rotten condition from the headlights down,” she relates. How did such a valuable car get so neglected?
There’s a sad tale behind it all, but basically the owner parked it in a field after suffering a personal tragedy. Larry, with the skills of a forensic investigator, took a careful look at the VIN and realized what a find it was, since the engine markings all matched up. Clearly this lost treasure was worth recovering. “That car was saved by its numbers,” he says.
Larry took the decaying mess to their trusty restorer, Dan Laughlin, who had quite a bit of surgery to perform. He repaired the front and rear fenders, which had been cut out for racing tires, by fabricating new sheetmetal using patterns off a 1969 Satellite as a guide. The doors and inner fender wells also had to be replaced. The only metal worth saving on the body were the trunk, the roof, and the rear window area, which is unusual for an old Mopar. In all, it took 10 months to smooth out the Road Runner’s ruffled feathers.
Looking at Janice’s collection overall raises the question: Why so many Hemis? Partly because she wants to leave a car to each of her eight grandchildren. (No, she’s not looking to adopt, in case you were wondering.) But more important, “If every one of my cars had a Hemi,” she muses, “I’d be happy.” Now that’s a lady with some wings.
At a Glance 1970 Superbird
Owned by: Janice Sutherland, Red Bluff, CA
Restored by: Dan Laughlin, Anderson, CA
Engine: 1970 426ci/425hp Hemi V-8
Transmission: 727 TorqueFlite 3-speed automatic
Rearend: 8 3/4 with 3.54 gears and Sure Grip
Interior: Black vinyl bucket seat with center console
Wheels: 15×7 Rallye
Tires: F60-15 Goodyear Polyglas GT
With a 19-inch nosecone and Coronet front end grafted onto a Road Runner body, Janice Sutherland’s Superbird is so long she can barely fit it in her garage.
While the overly tall wing increased downforce, it was not to everyone’s taste when Superbirds were sold in 1970. It’s been said that some dealers actually converted some of them to regular Road Runners to make a sale. For Superbird fans, that’s tantamount to sacrilege.
While the 426 Hemi was rated at 425 hp by the factory, actual output was likely about 100 horses more. The Hemi in Janice’s Superbird never needed more than mild freshening over the years.
Most Superbirds came with a bench seat rather than the buckets seen here, in keeping with the Road Runner’s stripped-down nature.
Janice’s granddaughter Alyssa squeezed the Rim-Blo steering wheel to demonstrate how to sound the famous beep-beep horn.
At a Glance 1969 Road Runner
Owned by: Janice Sutherland, Red Bluff, CA
Restored by: Dan Laughlin, Anderson, CA
Engine: 1969 426ci/425hp Hemi V-8
Transmission: 727 TorqueFlite 3-speed automatic
Rearend: 8 3/4 with 3.55 gears and Sure Grip
Interior: Black vinyl bench seat
Wheels: 15×6 steel with hubcaps
Tires: G70-15 Firestone
For the 1969 model year, the Road Runner was lightly face-lifted with a restyle grille. The cartoon bird decals were finally in color, too.
The Road Runner’s taillights were also revised for 1969.
When the Road Runner was introduced in 1968, the list price for a base model with a 383 was less than $2,900. The extra charge for a 426 Hemi was only $715, a screaming deal in hindsight.
Bare-bones Road Runner was all business. Well, except for the grinning bird on the horn emblem.
The Air Grabber option first appeared on the 1969 model. The Carb Air lever under the dash actuated a pair of rectangular vents in the hood, ducting air directly into the engine bay.
Duplicating a Daytona While Muscle Car Review generally covers all-original rides, we make an exception here because this Hemi-powered Charger Daytona is virtually identical to the authentic item in every possible sense.
In August of 2013, Janice Sutherland came across this makings of this project in Reno, Nevada, at Hot August Nights. It had already been poorly converted from a Charger 500 into a Daytona with a steel nose and solid aluminum rear wing. Looking at the car’s salt damage, Larry Snow, who oversees Janice’s collection, commented that the restorer “should have been a gardener, not a body man.”
Even so, Janice forged ahead. Once she got the car back home, strange things started to fall in place. A local resident approached her at a tire shop and said, “You’re the Superbird lady.”
She nodded, somewhat warily, until the local revealed a surprising tidbit. Turns out he had an original, hollow aluminum wing in his pump shed, salvaged from his wrecked Daytona. Now it could go to a better home.
Larry proceeded to go to extreme lengths to ensure that no aftermarket conversion parts would be used on the car, be they cables, wiring, power steering unit, or brackets. Even the trunk has an extra bottle jack, since a conventional one won’t fit under the long nose. He claims that if he taped over the VIN tag, nobody could tell it’s not an original Charger Daytona.
But what about the engine? It had a 440 in it when Janice acquired the car, so Larry suggested pulling the Hemi out of the drag boat she used to tow around with her Superbird. He figured that, “if it’s going to have the wrong engine, it might as well be the right wrong engine.”
All that was required was some detuning from the drag specs to street duty, so it now delivers about 460 horses at 5,800 rpm. The buildup turned out so well that some very particular judges at a Mopar show created a special class for it as a “Restified Wing Car.”
Preview of Coming Attractions What makes Janice Sutherland’s collection all the more spectacular is that she’s owned two of her Hemi cars since new! Her 1966 Satellite was modified for competition, and later driven on the street, sometimes against her Hemi Superbird. We’ll bring you more coverage on the rest of her collection in an upcoming issue.
The post NorCal Mopar Collection Includes 4 Hemi Cars, 2 of Which Were Bought New appeared first on Hot Rod Network.
from Hot Rod Network https://www.hotrod.com/articles/norcal-mopar-collection-includes-4-hemi-cars-2-of-which-were-bought-new/ via IFTTT
0 notes
Text
{DIY} Turning a Cupboard Into a Pantry

It's been a while since I properly updated the blog on some of our DIY and renovations - and that's because we've been working away from our home, in another home. Yep, we're doing bits and bobs for someone else's renovation; Grant's parents renovation. Actually, I'm not sure I can call it a renovation just yet, but as I mentioned a while back, we'll be tackling their kitchen later this year - and in order to do so, we needed to sort a few smaller areas of their home first. With the first job being the old boiler room.
Last year, we started prepping for this and organised for their boiler to be replaced and moved upstairs, which became an essential after their water tank collapsed; and we also organised their dodgy sliding door to be replaced at the same time. With those two expensive bits out the way, we took a bit of a break and have since been planning the rest of the work that needs doing. Now it's getting warmer again, we're back on the project, DIYing and turning a cupboard (the old boiler cupboard!) into a pantry.

This is the cupboard I'm talking about. It sits right behind a wall in the kitchen and is incredibly narrow at just 80cm wide and around 2m long. From the outside it's an 'extension' to the kitchen; although actually, the kitchen is the extension to it. We think it may have perhaps been an old coal storage room, or even an outside loo. We're not sure, but it's separate to the kitchen, has a lower independent roof and is shorter is length - it's not something that could have easily been knocked through into the kitchen and since budgets are slim, we're doing a more 'mend and make do' project rather than re-design and re-build. It's location in the kitchen makes it the perfect room to become a pantry!


{The Plan}
So Grants parents didn't really a plan or design they wanted from the room, just 'something with character' was their input. I really wanted the room to feel more spacious, be practical, offer a ton of storage space but at the same time appear organised, look pretty and hopefully convince Grants parents to de-clutter a little (they have a lot of stuff!). My plan was to include painted panelling, a patterned floor and rustic shelves. Three simple materials that would hopefully add bags of style and character to this room.
{Repairing Brickwork}
The room had been covered in some kind of old manky boarding, which was barely attached with just a helping of nails. The ceiling had begun to fall down, the floor was just muck, it was dark, gloomy and did not feel like a 'room' at all. We set about ripping everything out to see exactly what we were dealing with.


Turns out there were missing bricks (quite a few of them!), some seriously shoddy mortar work, roof beams on the wonk and a floor that looked almost burnt by the boiler that had once been on it.

We started by filling in the brickwork with new bricks (luckily there was plenty hanging about in their garden) and we also heightened the brickwork on the end wall so that it covered across the multiple vents at the top. Why that wall was only half bricked up, I don't know - but those vents were creating a major breeze and were only there for the purpose of the boiler, which had now gone. We'll probably need to remove them eventually, but we can do that at a later date from the outside. Here's a before and after:


{Plasterboard & Plastering}
As I mentioned, a part of my design involved use some mid-height panelling, so to save on plasterboard, we only plastered the top part of the wall and the ceiling. Grant fitted the boards and plastered it himself - I've written in detail about he learnt to DIY plastering before, so you can check that post out here if you want - It wasn't the most straightforward job as you can see we had some pipes to box around and quite a few angles to cut thanks to the sloping roof, but he did a really good job with it!


{Panelling}
To affix the panelling, we attached batons across the wall horizontally, which would be the fixing point for us to nail the panelling into. For the most part we were able to reuse the timber we had originally ripped out of this room; so only had to buy a few extra lengths. As well as horizontal batons, we also attached a few vertical ones too. These were strategically placed so that when it comes to fitting the shelf brackets, we can screw right into them without the faff of wall plugs.


We made sure the batons were deep enough to recess the pipe into, so that it would be hidden underneath the panelling. The only exception is the kitchen wall, where the pipe just stuck out far too much. With a bit of paint though, we thought it would look fine and blend in unnoticed. We made sure to take measurements of where the gas pipe is located so that there wont be any drilling accidents in the future.

On the opposite side where the pipes from the old boiler were, we created a corner boxing. Annoyingly the pipes stuck out the wall quite a bit, so a triangular boxing seemed the best way to take up as little space as possible. It was much harder to do than a simple square boxing, but I think looks much better this way.

We then nailed the panelling into the batons, in the same way I had done previously in this post. This is actually the exact same panelling I used in our conservatory seating, just a taller version (1.8m). It's from B&Q (found here) and cost £12 per pack of 10. We needed 5 for this space, but I always recommend buying one pack extra because you do get a few imperfect planks per pack.


The nails were sunken into the panelling, poly-filled over, sanded and then I painted it in Valspar Premium v700 blend wood paint, colour-matched to Lamp Room Grey, which will also be the colour of the kitchen eventually. I really like Valspar paint, especially their wood paints (I actually prefer these to any other brand I've tried!) and it's perfect for a kitchen, because it's easy to wash and scrub down, which is pretty vital when food is involved - and it doesn't stain too! We added a top trim to finish it off, and left this raw. Oh and the walls are just plain trade paint white.


{Flooring}
So, onto the flooring! I mentioned patterned tiles were going to be one of the main features in this room and you might have seen a glimpse of them already - they are some absolutely beautiful and simple Laura Ashley tiles. They're patterned, but not an in-your-face kind of pattern or a make-your-eyes-go-crazy kinda pattern. Just simple and pleasing on the eye. Being Laura Ashley though, they did come at a bit of a price-tag, but for such a small room I thought it was worth it (and not too drastic!).

DIY tiling is something I've now done many many times, and I still haven't written a full how-to post yet, can you believe? It's on the agenda though! I'm not going to do one here or this post will be about 100,000 words long. BUT I'll show you a little bit of how it's done.

So the guys at Vitrex did very kindly gift me a bunch of tiling tools for this project - some of which were new replacements for Vitrex tools we already owned and some were upgrades. Vitrex basically make everything you need when it comes to tiling; Ffom cutters, to sponges, to spacers, grout smoothers, the whole shebang. Because we're using ceramic tiles and this room is pretty square, a manual cutter is all we needed to cut the tiles (if you have particularly complex cuts or are using natural stone, you'll need a wet tile cutter!). I did a dry-fit first, which means cutting everything before you affix it down. I have to say, having a new decent manual tile cutter made this job SO much easier - and I can definitely recommend this one.


I spend the adhesive across the floor, setting the tiles on-top, making sure they're level (if you've used self-levelling first as we've done this should be fairly easily, otherwise you can use some levelling spacers to help) and you want to make sure the tile has full contact with the adhesive as well.


Once it had dried overnight I went on with the grout. We decided go for a light grey coloured grout to almost match the tiles - the one we actually used was Mapei in 'Ash Grey' which I picked after demanding to see every packet of grout in Screwfix so I could compare greys, ha! Luckily I'm a regular there, so my excessive DIY spending probably kept them sweet ;) I'm really glad with my pick though, I think it's the perfect colour!


{Rustic Shelving}
So in order to save money, we wanted to use reclaimed wood to make the shelves. Pine furniture board is seriously expensive and MDF is even more so. We live near(ish) to a farm that sells 2m pallet planks for 70p, so I managed to pick up 15 for under £11 and that was all I needed to shelf-up the whole room. Can you get more affordable than that?!
However, of course the downside of saving money on reclaimed wood is that you do in fact need to spend A LOT of time sanding it back (muddy was not the look I was going for) and de-nailing it. It took me about 3 hours in total to sand all 15 planks to 'rustic perfection'. I used my new random orbital sander, starting off with a coarse 50 grit and then finishing with a 120 grit. In the end, all the planks looked really good! Some are a little more rough and ready than others, but they all have their own invidividual character to them - and Grants parents did say they wanted character right?! ;)

As for the shelf brackets, Grant DIYed those himself from some simple planed timber, that cost £1.60 a length. We used 3 of those, so bagged 12 DIY-made brackets for just a little over £4! To buy these new would have cost us £24 at the cheapest place I could find. You can see why we DIY stuff when you look at those kind of savings!! It also allowed us to make them to our own bespoke size too, which was essential for this narrow room. I'm going to do a DIY bracket tutorial separately I think, or this will be one very long post. But here's a little sneaky peak, so you can get the gist of how they're made.

When it came to putting everything together - it was pretty simple. Thanks to the fact we'd carefully measured and planned the location of the brackets way back when we did the batons, we could simply screw everything straight through the panelling and into those. We'd left little markers on the panelling too - so we knew where everything was. We planned for 4 shelves, each with 3 brackets. We've kept the shelves quite slim (around 16cm deep) so that it's still easy to manoeuvre in this already narrow room.


At the end of the cupboard, we'd planned deeper shelves to be supported with planed timber running around the wall. It means these shelves will be much stronger. Again, we'd already attached batons in the right locations so we could also screw these straight into place too.


{Finishing Touches}
This room originally had a wall light (it was just a lightbulb with a makeshift fitting) but because it's so narrow, I just didn't feel it was working. All the best designs I looked at stuck out far too much and I didn't think it would really light the space sufficiently. We couldn't change the wiring, so instead I decided to buy a regular ceiling light with a long length cable and attach it up to the ceiling with a hook. It actually works really well and I think just adds to the quirkiness of this room! The light is from eBay (found here) it's quite similar to ours in the kitchen at home, but with a brushed metal shade and it's the perfect size for this room!


Looking pretty different right?! We finally added a little ledge to that corner boxing, attached some skirting and VOILA, room done.


{A Final Look}
OK, so I feel like this is becoming a very long post. Thankfully, we're at the end! After six weeks off on/off work, it's DONE. Well, we actually have a door (and door trim) to potentially attach at some point. And there's one small piece of wood missing along that little ledge. But hey, I'm calling it done. Those things can wait, right?! It's an incredibly difficult room to photograph, so I haven't been able to use my DSLR camera because the lens is too zoomed in (yep, I'm not pro enough to have multiple lenses!) so apologies for the iPhone pics, but hopefully you get the idea. It's obviously not our house, so I haven't 'styled' the shelves, nor have I properly added food - that's something they'll have to figure out over time (pretty labelled jars would totally be my go-to!) but I think it looks blooming' amazing and so freaking different to the 'before'!


I think it's definitely got character - in fact, tons of it! I think the floor and wall panelling combo works SO well and I'm actually incredibly jealous this isn't in my house right now. So that's how we turned an old ugly cupboard into a Pantry. I love it and I think Grants parents are pretty pleased too. It's such a better use of space and I'm certain will fit everything they need and more in there. So, what do you think? Fancy turning one of your cupboards into a pantry?
Total Costs
(rounded to the nearest pound)
New Tools Purchased:
None
Materials Used:
Panelling (B&Q) £70
Tiles (Laura Ashley, Homebase) £60
Screws £5
Plasterboard £30
Mortar £10
Plaster £5
Timber for Batons £10
Nails £5
Self-Levelling £30
Tile Adhesive £13
Grout (Ash Grey, Screwfix) £8
Timber for all Brackets/Shelf Support £13
Skirting £20
Pallet Planks £11
Light Fitting (eBay) £26
Total: £316 with materials to spare
*Both the Valspar paint and Vitrex Tiling tools were sent to me for review and feature within this makeover. I only ever recommend products I would genuinely buy and all words and opinions in this post are my own. Thank you for supporting the brands who support this blog!
from Home Restoration News http://www.kezzabeth.co.uk/2018/05/turning-cupboard-into-pantry-diy.html
0 notes
Text
Sewing for Saber
Modifying Patterns to Get what you Need
As most cosplayers could probably tell you, it is not always easy to find the right sewing pattern for your project. If you're lucky and making a particularly popular character, it's possible the big pattern companies will have something based on the character. However, sometimes that is not the case. If you can't find a pattern that works you can draft your own pattern, or you can modify one. I did a little of both when making Saber's dress.
I already talked about the details of Saber's costume in my costume breakdown post, so I'm not really going to be discussing what the different layers of her dress look like and what features they have here. Instead, I'll walk you through how I picked my patterns and what changes I made to them to get the finished result.
How I find patterns
When I'm looking for a pattern I know I'll have to modify I make a mental list of things that will be easy to change and things that won't. This lets me figure out what things will immediately knock a potential pattern off the list and what things I can work around. For example, skirt or sleeve length is really easy to change. Neckline or sleeve style is a little more complicated but still very possible. Changing the overall silhouette of a garment is harder and at least for me, you're changing the main thing you get out of a pattern which is that you know it's been tested to fit a body correctly. At that point you should probably either draft your own pattern or pick a different one to modify.
White Dress
For Saber's white underdress I managed to find a pattern that I barely had to modify. This is probably partly because you can't see most of it under her blue dress so I didn't have to match as much of it to what the anime shows. I used the halter top view of Simplicity 8127.
I took out the lacing embellishments and did the whole thing in white instead of using a contrasting color. I actually made the skirt less full because I wanted it to sit over my hoop skirt without too much extra fabric. To do that I trimmed a little width off of each skirt panel below the waist. The biggest changes I made were adding a button placket in the center front of the bodice and adding the decorative trim along the hem. I made the trim separately and just attached it instead of hemming the skirt the way I normally would. The last change I made was adding a flap that hangs from the bottom of the bodice at the center front. I added it because I knew the skirt would lace there but I didn't want the laces to show. The flap hangs over them and covers the laces.
Blue Skirt
I made the pattern for the blue skirt myself. It's pretty simple.
The skirt is open at the front. It has a waistband that laces and four panels making up the skirt. It also has pockets! All I really needed to do to make the pattern was figure out the measurements for the waistband, the hem, and the length. The only tricky part was that I almost forgot that with the opening in the front I couldn't just cut 4 panels the same size if I wanted the side seams to actually be on my sides (which was important for pockets). I had to do a bit of calculation to redistribute things.
Blue Top
For the blue top, I started with McCall's 7373. It's one of Yaya Han's patterns for a coat. I actually really like the coat so I made sure to save the pieces I cut out of the patterns in case I want to make it someday.
The blue top had much more significant modifications than the white dress. First, it has that open window at the front. I lined the pattern pieces up and figured out where to cut to get the window to be the size I wanted. I also sewed the center front seam shut below that level instead of having an opening there.
I made the hem shorter than any of the coats from the pattern and made it pointed in the front and back. To do that I sewed all the pieces together and then measured how long I wanted them to be and trimmed the points.
The most noticeable change is the shoulders. Saber's dress has some pretty impressive shoulders. To make them, I sewed buckram (which is a super stiff fabric used to make hats and things) into the shape I wanted. Then I covered it with my fabric. I sewed normal sleeves onto the top and then sewed my giant shoulders on top of the sleeves.
I've had so much fun making Saber. I'm going to do a few tutorial posts on how I did all the decorative trims for her outfit. I'll also do a few more talking about other aspects of the costume.
0 notes
Text
Consuming Disorder Pigeon And also Friends.
While the particular relationship between sleeping and physical exercise is actually still not clear, a number of research studies advise sleep starvation can easily possess a substantial adverse impacts on functionality and also healing. The sport for advancement community is actually resolving these variables by developing pro-social, pro-inclusion settings, and safe places for kids to play; most of these courses are purposefully designed and also furnished along with trains which recognize effective ways to deal with as well as include youth that have had damaging childhood experiences. For instance, you could possibly have lengthy walks (golf), pattern, dancing, or even play any sort of sporting activity you are actually comfy and pleased along with. Previously, safety and security for food product packaging has actually focused on factors like holograms, colour switching ink or even intricate bottle tops. When beginning to get healthy and balanced and fit, that seems to be actually the hardest thing for folks (particularly females) to know. If your child did certainly not nourish themselves properly with carbs prior to method or even a game, simple carbs while playing (like sports alcoholic beverages) may aid improve their endurance until they may refuel along with a more filling treat or even meal afterward. This is an organized 4 full week strategy as well as collection of video recordings that will really help you comprehend the essentials of Pilates - like correct form, suitable breathing, mind-body relationship. Pandya pointed out doctor at his center notification younger athletes not only possessing troubles in their sports yet additionally with their research and also socializing. Protection training performs supplies the glaze on your muscular tissue mood yet it is actually still the mix from much better meals and also drink selections, motion and attitude that makes you experience excellent. I likewise understand a female who belongs to OA. She takes her very own food with her to social events, so she doesn't inadvertently consume off her actual inflexible program. I'll be actually finishing college a month after guide comes in, therefore this will definitely be actually perfect to remove university for enduring in the actual without the delicious, well-balanced eating hall food items provided around the Claremont Colleges. Microwave sausage on a newspaper plate covered with a newspaper towel for 2 moments, or up until crispy. The death from BMX legend Dave Mirra highlights the threat of upsetting brain accident and also its own possible long lasting effects for action sporting activities attendees. Next off, raise airborne and change lower leg postures, flexing both knees again when your shoes contact hold back. Additionally, if you're tracking after that you'll understand if you have the PointsPlus readily available for a particular food items. However this year I graphed, and also researched, and found all sort of appealing factors that helped me to understand _ my _ special style, which might unsuitable someone else's, or some diet regimen guru's. Without officially analyzing for lifestyle fit," there is actually yet another technique employers may obtain the same results: break lifestyle accommodate down in to additional concrete, assessable parts. On that keep in mind, Tim Ferriss satisfy always keep discussing your brand new sporting activities health and nutrition finds on social media. I simply buy much less as well as much less meals in published deals, unless that's dairy or nut milks, entire grains, frosted freggies, or even sauces/dressings that possess just a few ingredients. Fruits are actually not goodie bars or soda, which are actually almost an ONE HUNDRED% sugar with little bit of or no nutrient value. I loved my physical exercise and rather than binging or even weight loss I lastly had a well balanced relationship with food items. I mean, it was four months, however I'm still amazed that that brief amount from exercise might relocate me into the match type. As these complications spread out around the globe various other diseases very soon adhere to: heart disease, cancer cells, consuming disorders and also food addiction, hypertension, HYPERACTIVITY, clinical depression and on and on. Essentially, if a child is zealous regarding soccer and also nothing else sporting activity or even task, they are actually possibly much better off playing football than being inactive and also alone. Our experts are actually disconnected along with where our food items comes from as well as are actually completely unaware from the wellness impacts from dangerous elements that prevail in foods our company eat each day! In any case, tomorrow I will definitely be actually going to buy a lot of chx, meat, veggies, as well as beans as well as appear foward to the weight loss. Title 9: This girls's sports wear business only brings in catalogues from sustainably-managed woodlands that are certified by the Forest Stewardship Council, and also they assist lots of charitable associations like Boost forever, which helps young women with knowing specials needs obtain engageded in sporting activities and schoolwork. Yet http://entendrelabeaute.info looking for by researchers off Norwegian College of Scientific research and also Technology and also the College of Queensland proposes resting for over 7 hours a day might not essentially be actually so harmful if you are actually fit. The Fit Application is designed for those who are simply entering the fitness sector and also need an effective technique in order to get begun. Hope Johnson: I've begun developing my personal weeds, as well as I possess my own compost container due to the fact that I'm a huge enthusiast in meals misuse being a major concern, so I am actually definitely attempting to confine my meals refuse. This is an incredibly effortless drink to create, considering that you merely must put the elements in your food processor and also combination for a couple of secs. Obviously, sports are actually satisfying and give a lot of chances for effective sportsmens, but there has to be actually a better motive power that leads competitors that will never ever be actually leading professional athletes to contend as well as devote notable volumes of your time training. There is actually a food daily record, workout organizer, a prospering information panel neighborhood and also personal web pages. When individuals inform me the food seems mundane, I welcome all of them over to my house for supper! Myth 4: Youngsters which devote their time finding out one sport as a youngster are actually very likely to stay active throughout their lifestyles. A microplane benefits carefully cutting the ginger root, else you could possibly lessen your personal in a little food processor. To keep myself motivated to relocate, I have actually been setting up little bit of difficulties for me to finish via my FitBit. CoachBase: An iphone platform that aids generate on-the-fly sports participates in, suggested for in-game usage through coaches. Allow's finally give darts a rest and also make an effort an additional crazy pub sporting activity like ping pong.
First, this technology seems like that will simply be actually accessible to individuals along with a solid amount from funds to purchase it. I don't know any poor people which possess KitchenAid or ThermoMix items in their kitchen spaces, and also I do not picture they'll be aligning to get 3-D food laser printers either. When folks inform me the meals is actually monotonous or as well dull, I regularly state this is actually considering that your tastes are actually made less sensitive as a result of all the sodium, sweets, as well as oil present foods and that you"ll start sampling genuine food if you persevere for a number of full weeks. Though fast food might be actually extra costly in the end, this doesn't feel like that in the moment.
0 notes