#How to get adobe reader to print in sets
Explore tagged Tumblr posts
Visit Tumblr Blog
Explore Tumblr blogs with no restrictions, modern design and the best experience.
Last Seen Tumblr Blogs


Fun Fact
Tumblr has a low social media market share in South America.
Text
Writing Notes: Book Cover

“Don’t judge a book by it’s cover!” We’ve all heard the phrase and we all know that’s impossible. Because the cover of a book is the first thing a potential reader sees—it should stop them in their tracks. It’s a very powerful marketing tool; having a well-designed book cover is crucial.
Tips for Making a Great Book Cover Design
Using more than two to three typefaces on a cover is discouraged, as it can look really messy.
Keep things simple. Your cover will be in a sea of other covers so try to keep your design from getting muddy and make sure it stands out.
Show your designs to people who have a design eye and/or you trust. It’s great to get feedback.
If you hire a professional designer, write a brief and send them info. Be really clear on what you want. Designers usually do a certain number of design rounds included in the agreed upon fee and any extra rounds of design will be extra.
If you hire a professional designer, they will likely have ideas about printing and may have connections to printers. They are a resource so don’t forget to ask questions.
Don’t forget: a book cover is an important part of selling any book. Whether you decide to do it yourself or collaborate with a professional, pay special attention to this part of the process, as a great cover goes a long way.
6-Step Guide: Professional Book Cover
STEP ONE Generate Ideas. Look around at book covers you like. Go to a bookshop and peruse what’s currently happening in book cover design. Take notes of what elements you like on the cover image. A certain typeface? Color? Do you prefer an image or an illustration or something purely typographic on the cover? Another option is to create a mood board. You can use a platform like Pinterest or Evernote, or create a folder on your desktop, and pull book cover inspiration from the web. While you’re gathering inspiration, keep in mind what genre your book is and what kind of book design feels appropriate.
STEP TWO Find a Designer (Who Could Be You!). Do you have design skills? If so, your next step is to begin layouts and mock-ups of the covers. You should use whatever software program you are comfortable with. Most professional book cover designers use a program from the Adobe Creative Suite:
InDesign. InDesign is a multi-page design platform but can also be used for single page design.
Photoshop. Used to manipulate and experiment with photography.
Illustrator. Illustrator is a vector-based program, which means you can create graphic art that can be scaled up or down without loss of quality.
Photoshop and Illustrator. These can also be used together as you can bring your Photoshop file into Illustrator to set the type after you have worked with your cover image.
If you don’t have design skills, now is a great time to hire a book cover designer. The first step is to figure out what kind of budget you have for this. A designer’s fee will range depending on their expertise. Get a figure in mind and then write a design brief which should include the book specs:
Size
Print-run
Intended audience
Where and how the book will be published
Anticipated publish date
You should also include a summary of what the book is about and what you are looking for in a cover. Also share the inspiration you’ve gathered with the designer.
If you don’t have design skills but want to create the cover without the help of a professional, there are a few software programs you can use, such as Canva or 100 Covers, design tools that allow you to DIY the cover (for free or a fee).
STEP THREE Decide on the Dimensions. If you’re self-publishing and printing with a local printer you can work with them to make sure your book dimensions will fit on their printer (remember a book prints front, back, and spine in one sheet of paper). It’s also a good idea to find examples of books whose size you like and feels good to hold. Use that as a jumping off point for your book.
Book Cover Dimensions List. If you are printing for a specific market, from print to ebook, here is a handy list:
Amazon Kindle Direct Publishing File Format: JPEG or TIFF Cover Size (Recommended): 2560x1600 pixels Cover Size Requirements: between 1000x625 pixels and 10,000x10,000 pixels (one side must be at least 1000)
Apple iBooks File Format: JPEG or PNG Cover Size (Recommended): 1400x1873 or 1600x2400 pixels Cover Size Requirements: at least 1400 pixels wide
Barnes & Noble File Format: JPEG or PNG Cover Size (Recommended): Rectangle height and width, at least 1400 pixels Cover Size Requirements: Min. 750 pixels height and width
Kobo Books File Format: JPEG or PNG Cover Size (Recommended): 1600x2400 pixels Cover Size Requirements: Min. 1400 pixels width
Smashwords File Format: JPEG or PNG Cover Size (Recommended): 1600x2400 pixels Cover Size Requirements: Min. 1400 pixels width Draft2Digital
File Format: JPEG Cover Size (Recommended): 1600x2400 pixels Cover Size Requirements: Tall rectangle
STEP FOUR Choose Your Style
Photo-based cover. If you’re creating an photo-based book cover, you’ll need to source stock imagery. There are lots of great resources online to find stock imagery including ShutterStock, Getty Images, and Adobe Stock. (Keep in mind: most photography archives require payment to use their images. Always investigate the copyright of images you’re interested in using.) Look for images that convey or allude to your book’s genre. You can use programs like Photoshop to manipulate your image, making it black and white instead of color or cropping it in a certain way.
Illustration-based cover. If you’re considering a more graphic approach to your cover, Illustrator is the tool to use. You can bring hand-drawn drawings into it and outline them to create scale-able, high-res illustrations which you can manipulate within the program. You can also create shapes, patterns, experiment with typography within illustrator and play with color, transparency, size and much more.
Typography-based cover. Finally, many successful book covers use typography as the main graphic device. This takes some skill and knowledge of typefaces, the historical context of a typeface, and how to manipulate it thoughtfully. That said, using type as a graphic can be very impactful.
STEP FIVE Pick a Typeface (Font). No matter what kind of cover you are designing, you are going to need the title of the book and the author’s name on the cover. As mentioned above, picking an appropriate typeface is very important. You want to pick something that feels right for your book—is it a sans serif or serif? A heavy weight or lighter weight? You want to make sure it’s not something with a lot of baggage, like Comic Sans or Papyrus. It is a good idea to actually do a little research on when, where, and who your typeface was designed by to give you context and feel out if it will be right for your book. You might also consider using up to two different typefaces, one for the title and one for your name. A serif and sans-serif mix can give a bit of contrast and visual interest. There are some typefaces that pair really well together. Check out the website TypeWolf to get ideas of what fonts pair well together.
STEP SIX Test, Tweak, and Repeat. Once you have a few versions of your cover, print them out on your home printer and take a look with a critical eye. Does the type size feel chunky? Too bold? Too small? How does your image look? Is it cropped right? Are the lines of your illustrations too thin and not showing up? Go back and refine your design and then repeat! Don’t forget to look at your book cover as a small thumbnail as well. People are on their mobile phones and you want to make sure your cover still stands out and is impactful.
Book Cover - serves as your first impression with potential readers—and though book covers don’t always look the same, they do tend to contain the same essential elements.
Design standards may be different in the world of traditional publishing than they are in self publishing, and book cover templates for physical paper books may differ from those of ebooks—but they all serve the same purpose.
Some Functions of a Book Cover
A book’s cover provides essential information. At its most elemental, a good cover includes a book’s title, the author’s name, the publisher, and the price.
A good cover offers clues about your book’s content and tone. Your cover design indicates whether your book is a work of high-minded literary fiction, a pulpy page turner, or a compelling work of non-fiction.
A front cover reveals a book’s genre. You can usually tell if you’re holding a thriller, a memoir, a sci-fi epic, or a nineteenth century classic just by looking at a book’s cover art and typography.
A back cover offers broader context. It may feature quotes from reviewers and fellow authors. Softcover books may contain a plot summary or author biography on the back; those summaries and bios are typically moved to the inner flaps of a hardcover book.
How to Hire a Professional Book Cover Designer
Book covers are marketing materials, and a well-designed professional cover can make your book stand out among the competition. If you want someone with expertise in the realm of cover design to work on your book, you may want to hire a professional book cover designer. Here are some steps to consider when hiring creatives to design your book cover:
Hire a cover artist. A cover artist produces the cover art and imagery that will appear on your book cover, either on their own or with heavy input from an author or publisher.
Hire a graphic designer. Certain graphic designers specialize in layout; they incorporate cover art that you provide them—whether that’s an original illustration, photograph, or even a stock image—into the overall design of the cover.
Find a cover designer online. Reedsy is one of a number of online resources for independent authors, self-publishers, and anyone connected to the world of books. Many professional book designers list their services on Reedsy.
Use your personal network. Seek out writers’ groups, either locally or on Facebook. In these groups, people share professional referrals and help support one another when a member has a new book in the works. A group of like-minded individuals can be an invaluable resource when creating your own book cover for the first time.
When to Call a Pro:
You have a budget (a designer’s fee will vary depending on experience and location).
You have enough time to work with the designer.
You have a clear idea of what you want or at least what you don’t want.
You don’t have any design skills.
You don’t want to invest in the design software.
Your book isn’t selling.
How to Design a Book Cover Yourself
If you don’t have the budget for a pro designer or just have a DIY itch you want to scratch, it is easier than ever to design your own book cover. While it may not be quite as rudimentary as when you covered your textbooks in a brown paper bag back in fifth grade, modern technology has made cover image design accessible to anyone with a computer. Here are some tips:
Use a template. There are numerous websites that offer book cover templates and step-by-step tutorials covering basic cover design skills. Some even have a free book cover creator tool, along with cover ideas, design tips, pre-made design templates, and digital cover image tools.
Use standard design software. Book covers can also be made using standard home computing software including Photoshop, Microsoft Word, and even (with a little sweat equity) Google Docs. This is particularly easy if you are importing a pre-made cover image from another source.
Make a prototype. The process for assembling a book is straightforward and satisfying. If you want to test out how your book will appear in print, you can learn to bind a copy yourself.
When to DIY:
You don’t have any budget for design.
You have design skills to do it yourself.
You have the design software.
You have a template and know exactly what you want.
You have people with an eye for design that can guide you.
How to Make a Hardcover Book
So you’re ready to bind your own book. Here’s what you’ll need:
Content, of course.
Uncoated printer paper for book pages
Decorative paper for endpapers, such as wrapping paper or cardstock
Davey board (aka bookbinder’s board), thin chipboard, or cardboard for the book covers
Craft knife
Polyvinyl acetate (PVA) glue such as Elmer’s glue
Hot glue gun and glue sticks
Ruler or straight edge
A long stapler
Thin fabric or book cloth for cover
Binder clips
Thick decorative paper (optional, for dust jacket)
Paper trimmer (optional, for trimming book pages)
Paintbrush (optional, for spreading glue)
There’s more than one way to bind a book, and you’ll find tons of great tutorials online for making homemade books, including Japanese bookbinding and perfect bound softcover books. The most popular style of hardcover book binding is called case binding, which is traditionally done by stitching pages together with thread. Here is how to make a hardcover book step-by-step—no sewing or special materials required:
Assemble the content. The number of pages and the type of paper you work with depends on whether you’re binding a novel, a full-color photo book, or a sketchbook. Familiarize yourself with the format by taking some hardcover books down from your bookshelf and observing how they were made.
Format your pages. If you’re creating a blank book, you can skip this step. If you’re printing a book with text, you'll need to format the text so that you can print it into a book. You can get help with this at a copy shop, or you can download book design software and print at home. Eventually, you’ll end up with a PDF with a page count. This page count has to be divisible by four so that your book can be bound as folios made up of eight sheets of paper (32 pages) each. You may need to add some blank pages at the end of the book to keep your page count correct for the folios.
Print and fold. Once all of your pages are printed, fold pages in half and stack eight within each other, making sure the pages are in the correct order. Staple the folios together in the folds, alternating the location of the staples so that you don’t end up with a bulge in the spine.
Bind your folios together. Arrange all of the folios in the correct order and flatten them between heavy books. Once your folios are flat, it’s time to glue them together. Hold the folios together with binder clips and use a glue gun to glue the folios together along the stapled edge. This will become your book’s spine. Be careful not to overdo it on the glue: Use just enough to keep the folios together. Before the glue cools, use a thin piece of fabric to cover the spine only.
Even out the pages. Carefully trim the edges of the pages with a paper trimmer or craft knife, if needed.
Make the hardcovers. Cut two pieces of cardboard for the front and back covers of your book. For the spine, cut a piece of cardboard that is the same height as the front and back covers, with a width equal to the thickness of the spine plus the front and back covers.
Attach the hardcovers. Paint the cardboard (both covers and the spine piece) with a thin layer of PVA glue and attach to the cloth you’ll use to cover your book, leaving a space between the covers and the spine equal to one and a half times the thickness of the cardboard. Let dry.
Assemble the book. Use PVA glue to attach the fabric-lined spine of your bound folios to the cardboard spine. Keep the book propped up between other books while you wait for it to dry.
Attach the endpapers. Trim the paper lining so that it’s twice the size of the first page and fold it in half. Paint glue onto the inside of the front cover and the front page, and attach paper lining. Repeat with the back cover.
Make the dust jacket. If you’d like to cover your book with a dust jacket, measure a piece of thick decorative paper as tall as your book and as wide as the entire book, plus a few extra inches to fold over the edge of the cover. Fold the dust jacket over the bound book. Lay another heavy book on top of it to help the dust jacket keep its shape. This is the place to add a cover design, if you’d like.
Sources: 1 2 3 4 ⚜ More: Notes & References ⚜ Writing Resources PDFs
#books#book cover#writing tips#writeblr#booklr#literature#writers on tumblr#writing reference#dark academia#spilled ink#writing prompt#creative writing#bookblr#writing inspiration#writing ideas#writing advice#on writing#light academia#writing resources
113 notes
·
View notes
Text
The Woes of Formatting
I am… 22 hours into formatting ENNS for print (now ebook) and am making this post for posterity’s sake to say: Formatting is so. Tedious. I had to start over thanks to Amazon going “ha you didn’t set your margins properly,” and also some last-minute changes to the text. Yesterday (7/24/24) after a full day of work, I worked on Book from 2:30pm to 11:30pm. Today is probably going to be about the same.
My neck hurts from staring at my monitor, my pinkie hurts from the strain of holding a computer mouse in one position since 6am. I have forgotten to cook lunch and dinner, but I did have breakfast.
It doesn’t even feel real yet. I am exhausted. But you know what feels great? Eliminating widows and orphans on the pages to erase the page count only by one. If you don’t know, those are the little hanging words on the bottom line of a paragraph or the top of a page that can be resized to fit on the line above it.
Getting to the last page of the chapter and realizing there’s only 3 or 4 lines of text left eating up an entire piece of paper, and then scrolling back through the chapter like a madwoman to nudge other paragraphs around to eliminate that extra page… I was literally cheering in my room in satisfaction.
For the record it shouldn’t take you this long, but I wanted it to be pretty, and Amazon is incredibly precise with their formatting requirements down to 0.001inches. So I had to reformat the cover art, which took a while. Then I had to fix the margins at least 3 times until no more errors showed up. Then I had to reread the entire book for last-minute changes. Then I had to format the chapter header pages.
Before that, though, I had to make the art for the chapter header pages. And re-learn how to do all of the formatting on InDesign.
So here I am, 22 hours in, finally onto the ebook that will be done tonight goddamn. And I just want to say, if it’s within your power to do as much of the work yourself as you can, fucking do it.
I’d be losing my mind with stress if I was waiting for a cover artist to make adjustments whenever they deigned to find my order a priority. Or the person I’d be paying to format this book. Losing. My. Mind. Maybe after the ridiculous goose chase I have been on with editors for this book has completely murdered my faith in paid beta readers to do shit in a timely manner (ENNS' first draft was written in 31 days, it took from 2/25/24 to 6/10 for my tiny army of betas and the AWOL failed betas to deliver, then 6 weeks for the professional copy edit). Anyway.
Yeah it’s taken me a long ass time, on top of two full corporate-nonsense workdays, but the satisfaction I have felt hammering this project out isn’t comparable to paying someone to do it for me. I got the manuscript back from my copy editor and I wasn’t excited, I was like “I needed this 10 days ago thanks” (in my head) and then got right back to work. Copy editor is necessary, don’t get me wrong, it’s absolutely necessary, but the catharsis that I have now was definitely absent then.
So. Yeah. This is rambly and I’m not sorry. Even after the ebook is up for preorder there’s still work to be done and money to be spent. But I’m forcing myself to take a break, pause, breathe, appreciate the work I have already done.
I am hours away from launching my first published novel. Hours.
It doesn’t feel real. August 25th, 2024, Eternal Night of the Northern Sky's official release date. Gahhhhhhh.
—
For anyone curious:
Cover was done in Photoshop (I have the Lightroom student package for $9.99/mo)
Formatting was done in InDesign (%#&%# $35.99/mo after 7 day trial choke on rocks, Adobe)
Formatting did not need to be done in ID, but other one-time fees were either more expensive when I can cancel my subscription after the month is up, or the free versions were too limited and constricting in their capabilities.
I’m far too nitpicky to not have complete creative freedom and control over my work, with all the hours I have put in. So Adobe it is.
Back to work!
#writing#writing a book#writing tools#writeblr#editing advice#book formatting#adobe photoshop#adobe indesign#book launch
7 notes
·
View notes
Text
Bookbinding Tips for Beginners by a Beginner.
Trouble Shooting edition.
As I am redoing- and reprinting a text block from scratch. I learned some stuff that may help along the way. This will be brief. I am still compiling all of the photos I need for the potential last post of this little series of mine.
But some trouble shooting.
Printing
Printers are by nature a horrendous beast. Once you think you have them figured out they will either throw a temper tantrum to end all temper tantrums, fuck up the print, or make you grovel by their perch pleading for them to read the file.
"I have single handedly gotten my grandmother, and my mother to realize that there isn't a Nigerian Prince that needs their help. I have recovered corrupt files, and gotten that 90s VCR to work for some inexplicable reason but hell it made ma happy... I am the biped in this equation.... Now print you son of a bitch!"
I can't trouble shoot those moments but I can help make misprints a little less "Void your spine and your soul" at the same time.
This is me advocating for JS Binder- and getting your pdf broken up for the pure simple reason you can track the pages easier. I have had my printer pull two pages at a time and print on one side of one page, and print on the other side of the other page. The easiest thing to do is to pull the pages that have printed, and pull the pages that have misprinted. Stand them up so they're noticeable and allow the rest of the printing to conclude.
Now with adobe you can select what pages you need to reprint from the document in question, and there is a small section around the middle/bottom that has the page count. To reprint only the pages you need track the document number down for the ease of use:
The page count for Adobe looks similar to this.
For the ease of this example I'm just going to say that my printer fucked up the first and second page of the print.
Hit print:
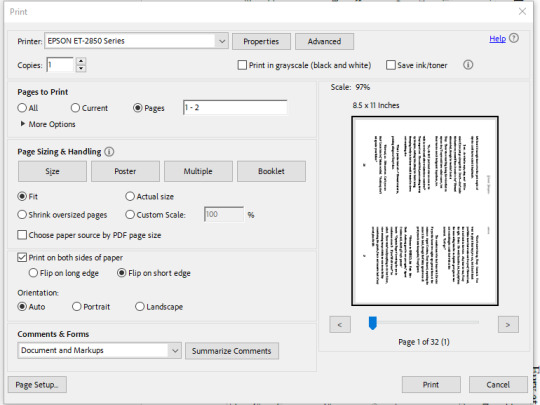
The layout for Adobe PDF reader will look as such.
In the "Pages to be Printed" Section near the top hit "Pages" and manually type in the page numbers. For this example One (1) and Two (2).
Also remember to flip everything on the short edge or else you will be having right-side-up and up-side-down pages alternating. We don't want that. Always ALWAYS make sure to flip on the short edge.
What if the printer misses a few pages? Similar concept but a few more steps before we get back to the print stage.
Best I can say- is if there are a massive amount of missing pages or they just don't look gook.
Check your ink levels. If it's not the ink, do a head cleaning usually there's a setting for that built into the software or on the printer itself. I can only speak to inkjet printers, if you have a toner printer.... damn lucky. Toner printers print damn fast and are quieter and more reliable than inkjet.
Anyway, once the cleaning has been accomplished and it looks like everything is as it should- see above or grin and bear the whole reprint for that section of your bind.
Usually I've gotten away with just going through the software for ink head cleanings. In extreme cases you might have to manually clean the heads. I know certain older printers are like that. Best I can say is find the manual and see how it goes.
IF that doesn't work still....
Invest in a toner printer if you can and borrow your friend's inkjet if you're printing colour covers for your books.
#bookbinding#fan binding#Troubleshooting#DIY#bookbinding for beginners by a beginner#This is short#May be expanded upon later#but unlikely
7 notes
·
View notes
Text
:(((((
using mum’s old printer, trying to see if I can print signatures from the pdf just like. in the print settings, cs adobe reader can do magic things I’ve been told
Adobe reader might still be able to do magic things, idk, but it wasn’t printing and there were no screen pop-ups or nothin, so I thought is it not printing cs it’s from this programme instead of libre office (that does not make sense, I know, but I am not a printer person at all. never ask me to scan something, for the love of god.) so I thought, this printer has never been connected to my internet, I just plug it in to my laptop and tell it and it goes, so I thought I’ll try that instead
Connected to my internet fine, then big horrid pop-up saying smth about “Cartridge cannot be used until printer is enrolled in HP Instant Ink”
mild panic, idk what that is
do I just need to change the ink? is that what it means?
There’s a sticker here says 3 month free trial to get your ink delivered, is that. is that what the instant ink thing means? but why would that stop the cartridge working tho
waugh i hate this
I’m gonna. swear a lot. and try to figure out where the new ink goes in (I have a cartridge, and I sorta know how it goes, I’ve just never done it before)
6 notes
·
View notes
Note
Hiii! I saw the post on you making a paper copy of “you’re divine” by onionchiver and was wondering how you did it?
So, Az is amazing and has a pdf file available to download here.
I brought that into Word and added a few things like, the review page and table of contents and such. Then I followed this video to get the formatting right to print it (including some page settings in word to make sure they were the right size.)
Then I followed this video to bind the pages together, and this video to make the cover.
I made my own cover art for mine, but Az has some really great options available to download for that as well!
It was a super fun project. I highly recommend giving it a shot. It seems like a lot up front but was honestly not too bad, at all. I'm definitely planning on doing some more binds soon.
Supplies I used:
Book binding kit
Book corners
Chipboard
Heatbond
Adobe Reader (to print pages correctly)
The rest of the stuff I used were things I already had like the fabric and some iron-on vinyl. And for the dust cover I printed on 19in long paper.
4 notes
·
View notes
Text
Staple Booklet Printing The Complete Step-by-Step Guide
By SEO Rank /
Saddle stitching (staples) booklet printing is one of the most often used techniques for booklet printing. I’ll cover all you need to know about printing staple booklets in this tutorial. This covers the benefits and drawbacks, how to get your booklet ready for printing, selecting the appropriate size, options for paper and covers, advice on design and layout, how to print, typical mistakes to avoid, and answers to frequently asked questions.
What is staple booklet printing?
The process of creating a booklet by folding paper sheets in half and then stapling them together along the fold is called saddle stitch booklet printing, or staples booklet printing. This process is frequently employed in the production of periodicals, brochures, and booklets. By inserting the staples into the booklet’s spine, all of the pages are held together by a sturdy and reliable binding.
Saddle stitch booklet printing has the advantage of being an affordable and speedy method of producing booklets. Because it might be challenging to bind thicker books using this approach, it is also a fantastic alternative for printing booklets with a modest page count. However, spiral binding or perfect binding can be a better option if you need to print a booklet with a lot of pages.
How to get the artwork for your booklet ready for printing
There are a few things you should do to get your booklet ready for printing before sending it to the printer. The following advice will assist you in preparing your booklet for saddle stitch booklet printing:
Organize your content
You should arrange your material before you start producing your booklet. This will assist you in figuring out how many pages your booklet will require and what content belongs on each page. The arrangement of the content in the booklet should also be taken into account.
Select appropriate software
You will need to utilize software that supports saddle stitch booklet printing in order to design your booklet. While Adobe InDesign is a widely used program for booklet design, there are other solutions as well.
Set up your document
Choose the appropriate page size and orientation when formatting your work. For your design to print effectively, you should also set up your gutters, bleeds, and margins.
Create your pamphlet.
You may start designing your booklet as soon as your document is set up and your material is arranged. Make sure to utilize crisp photos and graphics, as well as easily readable fonts and colors.
Review and proofread your booklet artwork
Before sending your booklet to the printer, be sure to review and proofread it carefully. Check for spelling and grammar errors, as well as any formatting issues that may have been overlooked.
Selecting the appropriate size for printing stapled booklets
When printing saddle stitch booklets, selecting the appropriate size for your booklet is crucial. A few conventional sizes that are frequently utilized for booklets are as follows:
5.5″ x 8.5″
8.5″ x 11″
6″ x 9″
A4
Take into account both the intended use of the booklet and the quantity of content you must contain when determining its size. For instance, you might want to go with a larger size when publishing a catalog so that it can hold more product descriptions and photographs.
Options for covers and paper types for printing stapled booklets
Selecting the right paper and cover options is important when printing a stapled booklet. These are a few of the most popular choices:
Interior paper options
80gsm,105gsm,128gsm,157gsm coated paper,etc
Your goal will determine the style and feel you want your paper to have. A booklet with a lot of photos should be printed on coated paper; booklets with huge text (black and white printing) should be printed on uncoated paper.
Cover options
200gsm,250gsm,300gsm coated paper,etc
The first thing readers will see when they open your booklet is its cover. Therefore, it’s crucial to pick a cover that conveys the booklet’s message and is aesthetically pleasing.
Common mistakes to avoid when printing booklets
The process of printing a booklet can be difficult, and numerous mistakes can be made. When printing your staples booklet, keep in mind these typical mistakes:
Not organizing your content properly
Choosing the wrong size for your booklet
Using low-quality images or graphics
Choosing fonts and colors that are difficult to read
Failing to proofread your booklet before printing
Making the incorrect paper or cover selections
Conclusion
Producing booklets rapidly and affordably is possible with staples booklet printing. This guide contains recommendations and tips that will help you make sure your booklet appears professional and is printed appropriately. Saddle stitch booklet printing is a fantastic choice to take into consideration whether publishing a catalog, brochure, or report.
0 notes
Text
I figured why 90's game ads were so weird
Screen resolution, it's because of screen resolution.
So I put attention to the little captures of the game screen and wonder "why are they so small?" and then it hit me. So back at the 90's computers were still in thier infancy, right?
One of the things they couldn't do was enlarge images the way we can now. software like Adobe Id has special setting for that, enlarging with photoshop was a difficult task for most of the time the software existed.
Screen resolution is 72 dpi, print resolution starts at 150 dpi but for best results anything over 300 dpi is recommended.
The screenshots you could get from game companies were probaly super small and enlarging them was going to pixel them, so making a full-page game ad featuring game screenshots was very impossible.
Though not completely impossible, you could always use 3D software to render game assets in a higher size to match the 300 dpi resolution. But this is the 90's, and rendering that would take hours.
And even then you had the problem of how to output the images of the game since I doubut this was before the screenshot tool of microsoft existed. Outputting images from a game probably involved a special setting of the game engine or other fuckery tat was not just taking a screenshot when playing the game.
So, whatever images the marketing dept. could get were not enough to cover a full page, so they had to get creative. Buy why the weird flashy style of ads? probably because it was the easiest way to get a reader's attention. The esthetics and theme of the game were secondary, the main task wat for the kid or teenager to open the magazine and be shocked by a strange or suggestive ad
0 notes
Text
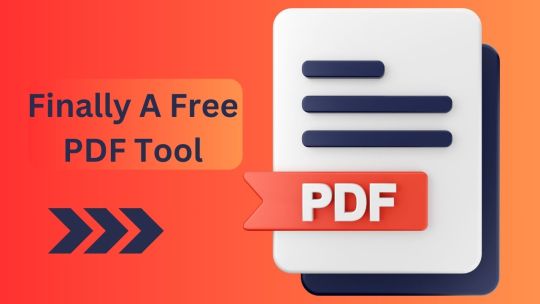
Finally A Free PDF Tool
These days, PDFs are used for everything from presentations and eBooks to essential paperwork. However, working with PDFs may be a pain without the proper tools. Fortunately, there are lots of helpful PDF utilities available. Discover which tool can best fit your needs as we delve into the realm of PDF tools.
Well-known PDF Tools and Their Functions
Adobe Reader DC: The Industry Standard
The first solution the majority of people think about when they consider PDF files is indeed Adobe Acrobat Reader DC. It is a reliable and trustworthy tool for reading, printing, signing, and leaving comments on PDF files. Also, the basic operations are covered by the free edition. However, you will have to pay to get access to more refined functionality like editing and converting PDFs. Merging, converting, and editing PDFs is now easier with Adobe Acrobat.

Pros:
Trusted and widely used.
Packed with features in the paid version.
Cons:
The free version is pretty limited.
Advanced features can get pricey.
PDFescape: The Online Editor
PDFescape enables you to edit, annotate, and fill out PDF forms online. It is excellent if you are required to make prompt modifications to your document. Also, you can create digitally fillable forms while downloading them easily and safely without the need to install an application. PDFescape lets you edit and customize your PDF files according to your demands. With PDFescape you can add shapes, images, text, etc. to your files based on your demands.
Pros:
Completely free for basic editing.
No download is needed.
Cons:
Editing capabilities are somewhat basic.
The online version has file size limits.

Small PDF: The Quick Fix
An easy-to-use and practical web application that provides multiple document management features. It enables users to edit PDFs online in their browsers without the need to install any apps. Users can mark files by their preferences or add text, images, or comments. The user-friendly interface of Small PDF facilitates the completion of forms and the digital gathering of comments, making these jobs simple. Additionally, it preserves the quality of the PDF file to improve accessibility and readability for users.

Pros:
Simple and intuitive interface.
Offers essential PDF tools for free.
Cons:
Limited free tasks per day.
Some advanced features require a subscription.
PDF Candy: The Easy Way Out
This useful tool allows you to modify PDF files with many parts. With PDF Candy, users can rapidly split, convert, edit, compress, merge, or combine PDF files thanks to its user-friendly interface. Even those with little technological know-how may quickly browse the available alternatives and upload the document from local storage or cloud storage to resume editing. Also, it can convert PDF files to and from a variety of formats, including Word, Excel, PowerPoint, and others. guaranteeing interoperability amongst devices.

Pros:
Offers a wide variety of PDF tools like compressing editing, etc.
User-friendly interface that is easy to operate.
Cons
The free version has limited features.
Advanced features are restricted to the paid version.
PDF-XChange Editor: Feature-Rich for Windows Users
PDF-XChange Editor is a powerful PDF tool offering a rich array of features suitable for both basic and advanced PDF tasks. For anyone in need of powerful PDF editing and management tools, it's a great option despite its watermarks in the free edition and steep learning curve for novice users. Its extensive features and effective performance complete the picture. PDF-XChange Editor offers the features required to efficiently manage a broad range of PDF-related tasks, regardless of your user status: business professional, student, or casual user.
Pros:
Rich feature set with advanced editing options.
Fast and efficient performance.
Cons:
Can be overwhelming for beginners.
The free version watermarks some features.

Sejda PDF Editor: Multipurpose and User-Friendly
Sejda PDF Editor is a universal platform that can be operated by users of different skill levels. It has functions including editing, dividing, merging, compressing, and converting PDFs. Sejda PDF Editor is a vigorous and flexible PDF management application that may be used for a variety of purposes. Thus, it is a good option for both periodic and regular users due to its broad toolset and ability to be accessed both online and offline.
Pros:
Comprehensive and easy to use.
Available both online and offline.
Cons:
The free version has a limit on daily tasks.
Advanced features are restricted to the paid version.

PDFElement: Versatility and Ease
To help both professional and individual users with their PDF-related duties, a broad tool known as PDFelement was created. You can easily produce, annotate, convert, and edit PDF files with Wondershare's feature-rich PDFelement platform. With PDF files' easy-to-use interface, you may quickly operate a wide range of components and alter the document with relief. With PDFelement, you can edit or highlight text, images, and pages in PDF files along with adding e-signatures, remarks, and notes.
Pros:
User-friendly interface with intuitive editing tools.
Offers advanced features like OCR technology for efficient text recognition.
Cons:
Some advanced features may require additional payment or upgrades.
Occasional compatibility issues with certain operating systems or file formats.

Why ILovePDF 2 Stands Out

Among various PDF editor applications, ILovePDF 2 is a feature-rich tool that distinguishes itself by having an easy-to-use interface that facilitates choice navigation. It is a large platform that provides users who frequently work with PDFs with a variety of features at no cost. It provides fundamental tools like splitting, merging, converting, or altering PDF files while serving a broad audience with a variety of demands. Users can use refined functions such as optical character recognition (OCR).
ILovePDF 2 Tools and Their Uses
Imagine having a magic wand that lets you do everything with your PDFs. With I Love PDF 2, you can:
Convert PDFs: Change your PDFs into Word, Excel, PowerPoint, or image formats, and vice versa in your desired layout.
Merge PDFs: Merge numerous PDF files into one tidy document. Also, you can include images in your documents while consolidating them.
Split PDFs: Extract, separate, or split PDFs by page ranges or extract all pages to separate PDFs.
Edit PDFs: Edit text, add images, and annotations, and rotate pages to make your PDFs truly yours.
Compress PDFs: Reduce file sizes without compromising on quality giving you all the access to control your files.
Interface That's Easy to Use
The user interface of ILovePDF is incredibly simple to use, like a breeze on a sunny day! You'll feel perfectly at home whether you're a tech wiz or are just getting started with PDF editing. The design is clear and well-structured, making it easy to go through each tool. Eliminate confusion caused by intricate menus or obscure functionalities. ILovePDF makes it easy and clear for you to get where you need to go.
Ending Note
There are various choices accessible when it comes to PDF tools, and each has advantages and characteristics of its own. While they are all capable of providing useful features, some possess unique characteristics. These programs offer many solutions for efficient PDF management, with an emphasis on feature-rich functionality, an easy-to-use interface, and adaptable accessibility. Be it a professional, student, or casual user, these solutions provide the dependability and adaptability required to manage your PDF documents efficiently and effectively.
0 notes
Text
ARTS246 Blog Post 5
Week Recap:
After being assigned our newest project, I began doing research and gathering materials. I selected the Dr.Seuss book “My Many Colored Days” to base my zine off of. I then took to dafont.com to look for a typeface that I felt fit the book’s personality. After some searching, I selected Cocogoose by Zetafonts. The typeface has the childlike nature of a kid’s book without being too overbearing. After sketching a first draft and setting up my grid system, I went to work in Adobe InDesign. Placing the text first helped me to think of ideas for background imagery. I more based the colors and shapes off of the cadence of the poems. After getting some base designs in, I did my first print of the zine and folded it. Here I found a lot of errors with formatting and margins. I intend to edit these and include a white border to help remedy this. The next week will be spent refining this rough draft and working on the 11x17 version.
Weekly Reading:
This week’s reading in chapter four of the textbook explains grid systems as we know them in graphic design. As designers, I feel we tend to disregard a grid system from a mathematical standpoint as they are able to be incorporated automatically in most systems. I appreciate the explanation of such systems in detail. I also noticed how grids can be essential in guiding the reader’s eye along the page depending on what material they may be reading. They are meant for tools of organization and can be adapted for an infinite number of stylizations. I also read about improvisational structures, which I think are an extremely fascinating and creative way to assemble material. There are even grid systems specific to web design that I hadn’t considered, but I see are essential when designing for such a large area like a computer screen. I feel notes like this are helpful as I continue my journey in understanding how to apply grid systems to my work.

0 notes
Text
#I want an fpp pattern for this so bad. someone please take my money!!#inspiration#foundation paper piecing
Hi! im not sure if this is exactly what youre after, but im more than happy to share my resources on how im making this! (i plan on doing a full write up on this project when i finish, but that'll be a while yet)
i feel i should preface this one by saying im not really a quilter, so apologies if some of my terminology is off/this isnt exactly what your looking for, i hope what im saying makes sense! (im also not a digital pattern maker- this whole project is full of firsts for me!)
i made the pattern for this one myself by tracing the lines from my inspiration image, and i also made myself a colour chart version. the colours in the chart arent necessarily 100% accurate, more to indicate sections i planned to make the same colour.

all the black numbers are the colour numbers and the green are the pattern piece numbers.
i ended up moving a few things around based on what fabrics i could get my hands on :)

Heres the same render as above, but as lineart- i used this to make my paper pattern! If you know about printing large pictures you can probably skip most of this, but i wanted to offer a little more explanation because its ~involved~
I printed my picture through adobe, essentially following this tutorial- in the past when trying to print to scale ive done it the paint way but adobe was WAY easier.
Download the image, convert it to pdf (i went with same as image) open it up in adobe acrobat reader and go into print settings.
Heres where youre gonna need to decide the size of your quilt. Youre gonna mess around in the tile scale box until the preview is the size you want (what i loved about this method is it gives you dimensions so you have an idea of actual size)
For my quilt, i had it scaled at 214%- this was as big as i could possibly get it across 7 sheets of A4 (and 3 rows) which after sticking it all together left me with a quilt of around 145cm long and 70cm wide. (I also printed a smaller copy of the pattern that i could use as a guide)
I went back through and labelled it as id done on the render (i didnt want to include them on the print in case the scaling made it harder to read)
essentially from there i just.. cut along the lines to make the pattern pieces to cut out my fabric- thats about where im up to now!
the nice thing about doing it like this for me is it gave me total freedom to make this whatever size i wanted- i probably wouldnt recommend much smaller than this though, because some of the little pieces are already TINY. feel free to mess around with any of these resources however you like though! add more seams, lose some pieces, chop her up, whatever you want to do!
for fun heres the latest update on mine- im still messing around with colours but ive got most of the blank spots filled now :)
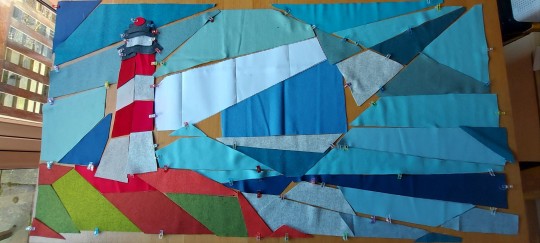
ok and. here she is. a first look at what this quilt is gonna look like
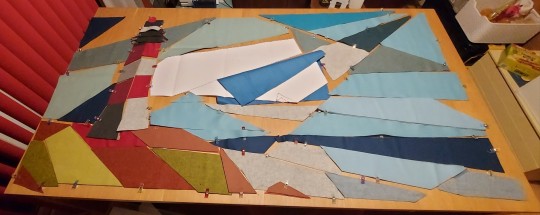
she is SO big it is near impossible to photograph but... im so happy with how its coming together??
most of the spaces left open are colour 3, which i do have a fabric picked out for i just need to bring it home. aside from that my one problem area is obviously in the center- i have a colour i like for one of them, but not a big enough piece, and i dont currently have an option for the other.
obviously there are still some things to shuffle around and i need to look at it again in the daylight but. its beginning to me something
#i feel i should clarify that i am op im just running sewing stuff on a side blog now#i just copied the printing instruction stuff from the write up im making so its. a lot whoops#hopefully at least a bit of this was useful to you! if theres any other questions i can answer i am happy to :)#lighthouse painting quilt
27 notes
·
View notes
Text
How to get adobe reader to print in sets

How to get adobe reader to print in sets how to#
How to get adobe reader to print in sets pdf#
How to get adobe reader to print in sets password#
How to get adobe reader to print in sets pdf#
Even Scanned PDF documents can be easily edited and printed again like an original file. Whether for professional work, as a study or simply for sporadic use, the truth is that printing PDF files is the most common. With the OCR technology, users can choose any language before printing the PDF document. The use of PDF files has become more and more common. Also refer the article for related registry fix: HiDPI, Retina display support. Set the Taskbar properties to hide the taskbar so you can select the Print button. You can also set ‘Print Quality’, ‘Scaling’ and other minor settings. In the Properties dialog box, select Auto-hide the Taskbar, then click OK. It printed just right I think the margin was imposed by my printer (I had had a similar issue printing from LibreOffice) and the greyed-out 25mm margin setting made me think it was added by Reader. Use the ‘Printer Properties’ to adjust these settings or click ‘Advanced’ option to go for more settings. Comment faire pour supprimer les fichiers en double comment faire pour supprimer les fichiers en double supprimer les fichiers en double facilement avec le logiciel recommand par microsoft r. I tried setting borderless to On, and just tried again to print my A5 booklet from Reader DC. Moreover, you can also specify other settings like ‘Copies’, ‘Orientation’, ‘Color’, ‘Printer’, ‘Page Size’, ‘Page Range’ or ‘Print mode’. You can go to the ‘File’ option in the menu and select ‘Print’ option to start printing.Īlternatively, you can click ‘Quick Print’ icon at the top-left corner of the main interface.Īlso, press "Ctrl"+"P" to start print process quickly.Īfter enter the print interface, choose the "Wondershare PDFelement" in ‘Printer’ option and specify ‘Page size’, ‘Page Mode’ along with other options and click ‘Print’ to start printing. Microsoft Windows: Add, View and Manage Your Devices and Printers. Adobe Help: Change the System Default Printer. Adobe Reader lists your system's default printer as its own default printer. Launch the PDFelement and open the PDF file or document which needs to be printed. Click 'File' and 'Print' to open the Print dialog box.
How to get adobe reader to print in sets how to#
Users can modify the printer settings with its any changes which will be explained further.įollow these steps to print your files into PDF format with Wondershare PDFelement: How to print a PDF the best way Learn how to set up double-sided printing, duplex batch printing, secured PDF printing, printing PDFs with comments, adjust print settings, and explore other cases.
How to get adobe reader to print in sets password#
Users can easily design a form, digital sign or password protects the PDF’s too. You can also adjust settings and modify the documents before printing. Surprisingly, it prints any type of images without any compromise with the quality. PDFelement works like a charm when you want to print any PDF file or document. How to Print to PDF with Adobe Reader Alternative
0 notes
Note
Help how do i fucking print the dam pages, i know how to do everything ellse. But im fucking crying trying to get my pc to print the pages in to signatures!
Hi anon!
This of course is going to be dependent on what size book you are trying to make. I'm going to write these instructions as if you are trying to print out a book that is laid out for half-letter pages.
Getting the pages into the right order to print for a book is called "imposing". There are many ways that you can impose a pdf file, but this is the way that I've found to reliably work for me.
Decide how many pages each signature will have in it. The rule of thumb is that each signature should have about 4-5 sheets of paper in it, which works out to 16-20 "pages" of your layout. The size of your signatures will depend on how many pages your book is; try to pick the one that divides best for the number of pages you have. You might be left with a smaller or slightly larger signature at the end.
Take the PDF and split it into sections based on the size of your signatures. There are various free programs you can use to do this; googling "split pdf" should get you something that works. You're going to have lots of little PDFs. I recommend making sure that you save each split as a copy so that you have an original, whole PDF still
Open up each "piece" in Adobe Acrobat Reader. Click "Print". When the dialogue box pops up, look for the "page size and handling" section. Click the "booklet" tab, Adobe will automatically impose that section for you.
Before you click print, make sure that your printer is set to print on both sides of the paper and that you have checked "flip on short side"!!! This is very important!!
Print! See if it works! I recommend printing on some test paper before your real paper to make sure it's working properly so you don't waste your good paper.
Repeat for every signature.
Alternatively, the extremely helpful @simply-sithel has done an extraordinary amount of work to perfect this imposing program on github! It even works for weird tiny sizes!
I haven't used it yet so I don't have any guide or tutorial for you about it, but I am told it's very helpful!
Hopefully this is everything you needed.
30 notes
·
View notes
Note
I'm also thinking of binding an English copy of TGCF (I also supported the author via more official channels!) and I was wondering - how did you get the pages to print in a bindable order? There's just so many of them lol
There are a LOT, haha. So I started from the translator’s file, which I already had it in Calibre, which is the free software I use to manage ebook files between my computer, phone, and kindle (the built-in interfaces are just... frustrating). Calibre also has the ability to wrangle ebook metadata and do file conversions, for like if you have a mobi and need an epub, things like that, so I strongly recommend it in general. It also has a file conversion function, and just to see if it would work, I turned the whole file into a .docx.
Microsoft word has its problems, but it’s the word processing software I’m most familiar with, and has been the software I use for basically all of my printing. There are both more fancy and more free versions of the software (I know LibreOffice has the ability to handle most microsoft office file formats), but word was one of the first investments I made when I decided I wanted to really dig into this hobby.
And the conversion did work! The images and tables of contents got a bit wonky, which I expected, and I ultimately cut those out of the document. Tbh, my book interiors are less pretty than the translators’ file, because I wasn’t sure this project would work and wanted to spare my poor printer in case things didn’t pan out. I left things with mainly just the book text and chapter headings. I added a text-only title page and pseudo-copyright page later with credits and metadata, but that’s all I added to the proceedings.
Then, I’m used to the word formatting game for books at this point, so I first applied a body text style to the whole document (iirc, I used georgia font at about nine point, with some first line indent and some spacing between paragraphs). And I went into page layout and selected booklet mode, with 24 page signatures. After that, I went and split the file into six parts and added page breaks for chapters and applied a different style to the chapter headings, little formatting things like that.
Now, once you have a file in booklet mode, word will display the pages in straightforward order on the screen, but it will take care of printing order for you, based on your selected signature size. It’s a GODSEND. I don’t usually print directly from word, I print to pdf, then use acrobat reader to make sure my pages look like they’re going to come out in the correct order (and make sure it’s set to print in landscape mode, flipped on the short edge), and print from there. It’s easier to run test prints from adobe reader, or to reprint short sections if something goes a little wonky.
Now, I’m not sure if LibreOffice has that booklet mode functionality built in, but it seems likely that they do. And either way, if you have a linear document you can go into adobe reader and select a booklet mode in there as well. NOW. From that point, it’s a bit harder. They don’t let you choose a signature size. So if you wanted 20-page signatures, you would need to print ‘booklet mode, pages 1-20′ then ‘booklet mode, pages 21-40′, etc. I’ve done that, it’s tedious but not terrible, but it’s easier if you have word processing software that uses a booklet mode in the first place. Now, if you’re trying to go straight from the translators’ pdf to printing, your pages won’t be in the BEST aspect ratio for half-letter printing, and I have no idea how font size and pictures will play out. It’s theoretically possible, but I wouldn’t recommend it if you have another option.
I’m not a pro at the typesetting aspects of bookmaking and don’t typically get too fancy (especially for a project like this, where I wasn’t even sure I was going to do it until l accidentally half the novel), but that’s how I tackled the project! I don’t want to like... support microsoft office, but it’s not a bad tool for this kind of work, especially for a project the size of this one. And it’s a tool that’s well-known enough that there are other resources out there with more detailed information on how to use it well. So my teal deer is calibre > word > adobe reader > print. I hope that helps a little!
21 notes
·
View notes
Text
!!!!!!!!!!
@yeoldebearmaid asked (edit: not asked said they would like it) and I like to info dump so heres a long post about book binding things,,,,,,,,,, the first half is about how I do things, and where I learned, and all that, and then theres some pics at the end of some of the things I've done!
Videos that I really like:
Honestly for a basic understanding, just watch Sea Lemon’s playlist about how to do different book binding methods (https://www.youtube.com/playlist?list=PL2F704E01F80BA1E9) but here are the videos that have helped me out the most:
Book Press DIY - https://youtu.be/nTeg8MH0PtI
Kettle Stitch Textblock - https://youtu.be/9O4kFTOEh6k
How to Put a Hardcover on a book (though this isn’t my preferred method, and I don’t even do the paperback the way she does, I’ll explain that in my ‘my method’ section) - https://youtu.be/Av_rU-yOPd4
Bookbinding Spacers & Corner Cutters (the reason I am adding this video is because she talks about how she updated the size of hinge width she uses from her previous videos). https://youtu.be/lHkU1eSVyR8
And, I feel like I should plug in omgreylo, who has a whole youtube channel and tiktok (omfgreylo) dedicated to just fanfic book binding.
Typesetting:
The majority of the fics that I have printed and bound have been just pdfs straight from ao3 and I use adobe acrobat pdf reader (https://www.adobe.com/acrobat/pdf-reader.html). Now a days I use Microsoft Word to actually typeset and layout the fanfic so it looks like an actual book (I do not edit anything out or in). But this isn’t all that necessary, and it is pretty expensive to buy word, but it’s definitely worth it for me, cause its fun to me. I don’t really know how to talk about typesetting, cause I made it up as I went, and I’m still learning how to do a lot of things in Word.
Printing:
I do 5 page signatures, some people might think that’s a small amount, and it might be, but I think the book lays the flattest and looks the nicest with five pages per signature. For that, you have to do 1-20, 21-40, ect. The only reason I’m saying anything about this, is cause it took me too long to figure out that when your doing the next signature you are still doing 20 pages even though it doesn’t seem like it.
You want to use the pdf reader, and click print, cause its the only reliable one that can print a booklet without flipping the page and making half your book upside down.
Wow I worded that completely wrong at first sorry: I meant to say, click print and set it up to print a book let. Your gonna want to do 20 pages to create a five page signature.
If you have a good printer that prints both sides it’s worth it, I know some people just flip their signatures themselves, but it can be a pain.
My preferred method:
When I make my textblock, I sew the end pages in to it, instead of gluing them on. It feels more stable to me. I also put all the tails of thread on the inside because; Instead of having a hard cover or wrapping the entire thing in thick paper, I use a thick cardstock, and cut that to match the size of my textblock. I then wrap those pieces of paper in my cover paper, and I stick it to my text block. I like the open spine look, and it makes the books lay completely flat. Its also just super easy. And instead of glue, I use scor tape (https://www.amazon.com/Scor-Pal-SP202-Scor-Tape-0-25-27-Yard/dp/B001RQ55ZQ/ref=asc_df_B001RQ55ZQ/?tag=hyprod-20&linkCode=df0&hvadid=167153351039&hvpos=&hvnetw=g&hvrand=11233711634846837940&hvpone=&hvptwo=&hvqmt=&hvdev=c&hvdvcmdl=&hvlocint=&hvlocphy=9023416&hvtargid=pla-312053086465&th=1) to stick the covers together and to the end pages.

This is how it ends up looking! I like it (more examples at the end)
My Equipment:
I use adobe acrobat pdf reader, Word, and an old thinkpad laptop. I get all the fics from ao3, since you can download them.
I have a homemade book press that my dad help me make.
I use ppa glue (which I can’t even find anymore and I’m almost out of, so I’ll probably try actual archival glue).
I don’t have an awl, I use this old paper poker thats meant for getting paper out of die cuts, and I’ve used it for something it’s not meant to be used for for so long that it’s started shedding bits of metal……… I need to get an awl lol.
I have a Brother toner printer, I don’t remember which one it is off the top of my head, and I don’t want to get up right now (covid SSUUUCCCKKKKS). But toner is much cheaper then ink (fuck the ink industry really) and with tn760 you get 3000 prints. It’s worth it if this is something you like to do a lot.
I have a bone folder for folding things (I still think of mbmbam).
And scor tape.
Other than that, of course is all the paper you need, for the textblock, for the end pages, and for the cover.
And now! Some of my work:
The first one I ever did:
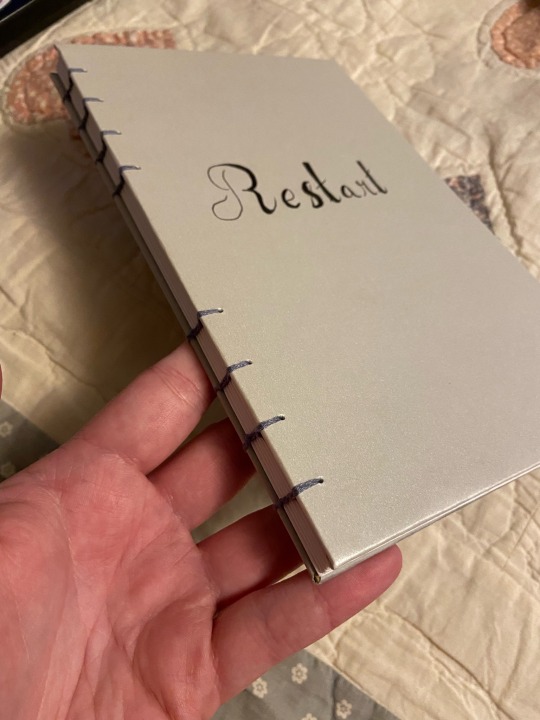
This is Restart by Boomchick, but it’s the incomplete version, from before they came back and finished it.
The one that took the longest:

F.O.X.E.S. Decision - a_case_for_wonder. It’s 269906 words long. My back was killing by the end lol.
The first of my preferred method:

Quelque Chose de Nouveau - tierfal, I messed up the og cover I had planned, didn’t have ANY thing else and ended up with this style. I really love it. And I’ve been meaning to reread this fic too👀
I tried something new with this one:
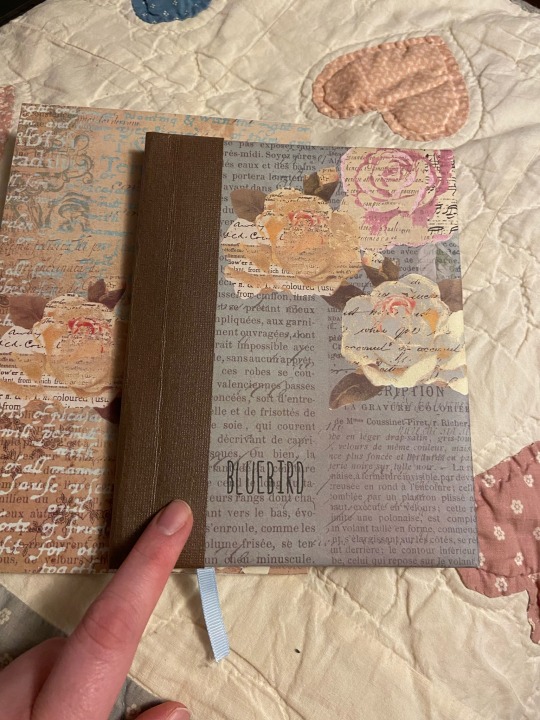
Bluebird - I put the above fic so you can see that I cut it down. And I don’t think I’ll do that again lol.
The one I’ve read the most:

i’m giving you a nightcall - clariedearing. This is. Hands down, one of my favorite books. It’s legit in my top five favorite books of all time, there’s just something about it that holds my heart.
My favorite cover:
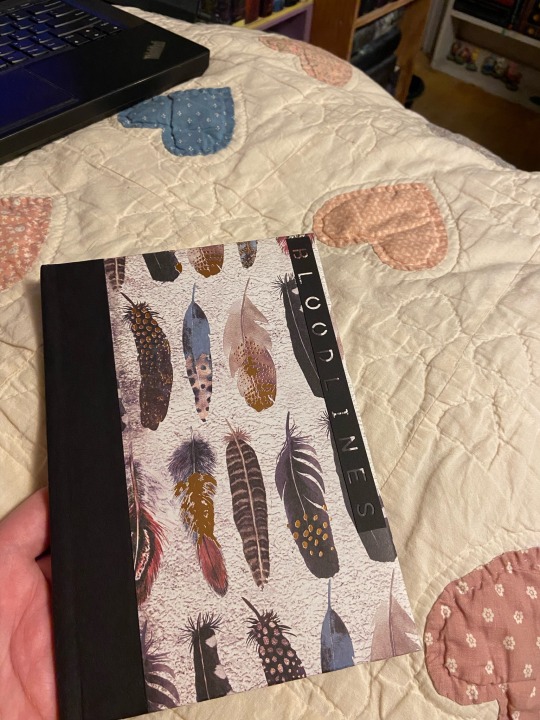
Bloodlines - chibi_nightowl. It’s just, perfect? I used a we r memory keepers punch board thing for the title.
My favorite Hard Cover:

Way the world goes - magicities.
My favorite paperback:
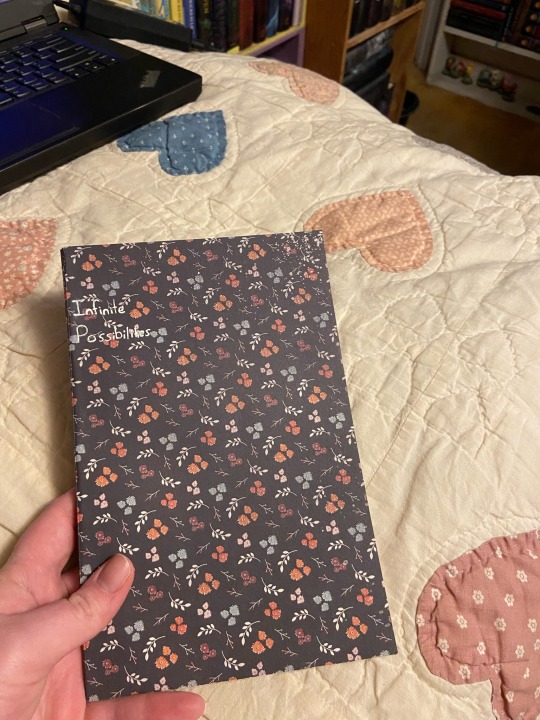
Infinite Possibilities - Kalloway. I legit only have two paper backs. And this was the first one I did lol.
My Best work (In my opinion):

begin the end - dustofwarfare. It actually opens perfectly!! Like!!!!! And the cover fits it right and everything!!
I actually really want to start streaming book binding on twitch, but I don’t have any equipment oof.
If there’s anything else you want to know, just ask away!
2 notes
·
View notes
Text
Deploying Windows 10 Enterprise using MDT for Ensign Pensions
So users were running a very old HP EliteBook 840 G1 with 4GB of memory. Users were complaining of slowness as well as freezing applications such as Excel
The business decided to capex approve 120 laptops to be built and swapped out with users old laptops. We decided to go for the HPs 15inch FQ2016 laptop which had come with a Windows 10 Enterprise, i5, 8GB memory. For finance, they decided that intel core i7, 16GB memory was required due to them working on heavy data within Excel.
I decided the best for this was to use the Microsoft Deployment Tool kit to deploy Windows 10.
The first thing I did was download the following -Windows PE add-on for the ADK and also the -Windows system image manager -MDT tool
I Installed the following tools in order on the base image -ADK tool -Windows PE tool -MDT tool
I then created a share on our file and print server for our deployment share. Once this was done I configured this in the deployment workbench in the deployment share. This was also going to be our MDT server.
I then created a deployment share and left all the defaults. I then had to add Windows 10 operating system from an ISO and gave the name of Windows 10 x64.
I then had to create a packages path and then created a selections profile path. I then assigned the Windows 10 x64 folder to the selections profile.
I then had to create the applications package and got the MSI for the following software -Google Chrome -Firefox -7zip -Symantec Endpoint -Firefox -Office 2016 (Word, Excel, PowerPoint, Outlook, Teams) -Adobe Reader
Once this was done I placed all the applications on our MDT server. I then added the applications to the Applications folder in the deployment workbench to deploy with my Windows 10 x64 operating system. For configuration, I decided to take the silent installs approach for all applications.
I then had to create a task sequence for the installation of Windows 10 enterprise and I enabled windows updates. I also created an application group in the task sequence to install the company applications I configured in the deployment workbench.
I then had to get windows updates from the windows update catalogue website and placed them as a package on the deployment workbench. I then had to deploy the deployment share and edit the bootstrap for the location of the deployment share. I also edited the rules to set answers to the questions to the OS answer file.
Once this was all done I had to re-deploy the deployment share to generate a 64bit ISO image which will be used for the pixie boot. I also added the x64 PE boot in my boot images.
I then tested the image on one machine and only had to change the hostname and do firmware updates as the MDT task sequence had done the rest. Once this was done I had picked a pilot test user to use the laptop. I then got a sign from the user that the machine was working perfectly.
We then ordered 120 laptops to replace and had trained and did documentation for the service desk on how to image the machine and swap it out with users old machines.
Known issue There is an issue when deploying Windows 10 XML file it flags up errors. To work around this Microsoft provided updateWSIM.cmd to fix this error.
1 note
·
View note
Link
MORE INFORMATION: Quickly achieve an Insta-worthy bujo and get planning immediately with this printable Christmas planner spread! Printable bullet journal pages like this one are ideal for this busy time, when you still want a beautiful bullet journal set up, but don't have the time to do all that drawing yourself. This printable planner template is perfect for you to insert into your A5 journal, and adapt by filling in your own lists, ideas, and information. The design here features space for you to write a list of who you send your Christmas cards to, inspiration for gift-giving, and a list of the things you've recieved. Interested in more Christmas planner pages? I've got some Weekly Spreads, Day Planners, and a Bundle for you! Look on my shop for more: https://www.etsy.com/uk/shop/WhoopsItsHannah. INCLUDED: With this purchase, you recieve a PDF, which includes: - A Cards to Send spread - A Gift inspiration spread - A Present tracking spread SIZE: A5 = 148 x 210 mm / 5.8 x 8.3 inches The file(s) are designed to print on A4 paper, and will fit most standard A5 notebooks, including the Leuchtturm 1917, the Dingbats A5 notebook, and the Archer and Olive A5 bullet journal. Please measure the pages of your journal or send me a message before purchasing if you’re unsure. HOW TO USE: 1. Purchase this listing. 2. When the payment is confirmed, download the file(s) directly from Etsy by visiting https://www.etsy.com/uk/your/purchases, and save the file(s) to your computer. 3. Print your file(s) on your home printer, or at your local print shop. 4. Fill in the spreads and get planning! PLEASE NOTE: - This listing is for an instant digital download, and no item will be emailed or shipped to you. Etsy has an article offering more info about digital downloads. If you’d like some help, click here: https://help.etsy.com/hc/en-gb/articles/115013328108?segment=shopping. - The colours of the printed version may vary from what you see in pictures on your phone, tablet, or computer, because of differences in the colour calibration of your monitor or printer, as well as the quality of the device, ink, and/or paper you use. - You will need a PDF reader to open the file(s). The latest Adobe Acrobat Reader can be safely downloaded (for free!) right here: https://get.adobe.com/uk/reader/ RETURNS POLICY: As per Etsy’s policies, there is no way to ‘return’ a digital item. As a result, I am not able to offer cancellations, refunds, or exchanges of any kind. TERMS OF USE: All of the printable files I sell on Etsy are for personal use only. Once purchased, you may print as many copies as you need for your personal use, but you do not have my permission to resell or reproduce my designs. You are not permitted to distribute my files either electronically or as a physical product, and you may not profit from my designs. © All designs are the copyrighted property of Hannah Jayne Usher of the store Whoops It’s Hannah.
#bullet journal#bujo#bullet journal inspo#bujo inspo#bullet journal inspiration#bujo inspiration#bullet journal ideas#bujo ideas#bullet journal community#bujo community#bullet journal spread#bujo spread#bullet journal spreads#bujo spreads#bullet journal page#bujo page#bullet journal pages#bujo pages#etsy#etsy shop#etsy store#etsy seller#etsy sellers
2 notes
·
View notes