#FutureworksXB2002
Explore tagged Tumblr posts
Visit Tumblr Blog
Explore Tumblr blogs with no restrictions, modern design and the best experience.
Last Seen Tumblr Blogs


Fun Fact
The Tumblr office adopted Tommy, an 11-year-old Pomeranian.
Video
youtube
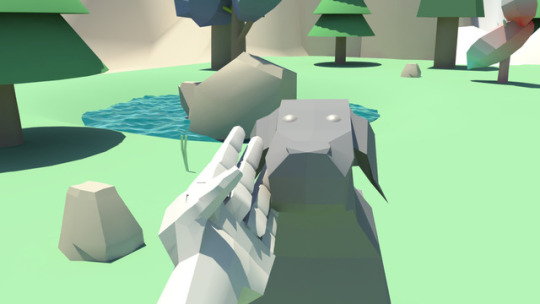
XB2002 Assignment Three - Environment Art
The Environment Art Scene Fly Through and Trailer:
For my final development milestone of my low poly environment, I created a flythrough/reveal trailer for the whole environment scene itself.
For the trailer, my main focus was to capture the majority of the environment within the Unreal project and have a seamlessly smooth transition throughout the whole thing for the camera’s projectile path it takes.
For the camera and video itself, the video was captured on a matinee keyframe animated camera, and upon completion of the matinee’s route rendered out the Matinee’s movie projected path at a 1080p 60 frames per second video at the MP4 format.
From here it was the case of taking the Unreal matinee movie and importing it into Adobe Premiere Pro and adding visual effects such as the transition to white in the title and credits scene and adding the soundtrack Floating Home over the video.
Within Adobe Premiere Pro I also compressed and rendered the video from its initially slow speed Unreal video file, and from here was able to acquire the smooth flow of movement visible in the video above.
I am very satisfied with the final version of the reveal trailer for the whole low poly environment scene, as it has allowed me to develop my 3D modelling, environment art, and Unreal materials skillsets.
One of the design challenges I faced within the video creation process of the project was creating the right visual effects for the video to make it more professional, as my creative milestone aim for this video was to create a fly through that resembles that of an actual game reveal trailer.
Overall I believe the trailer video manages to good a good job of showcasing the environment itself and capturing the emotional feeling of the visually displayed environment and it’s narrative and matches that of the initial concept idea I had for the environment from the beginning of the project.
#FWXB2002#XB2002#XB2002FW#XB2002Futureworks#FutureworksXB2002#Futureworks#BAGDYear2#LowPoly#EnvironmentArt#Gamedev
2 notes
·
View notes
Photo


XB2002 Assignment Three: Environment Scene:
Upon completion of all the models needed for the low-poly island environment scene, I began the process of placing all the meshes in Unreal upon importing their FBX files into organised folders.
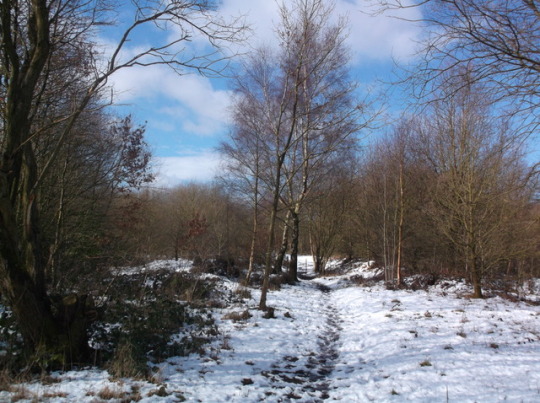
I began the process of creating the environment by first selecting the type of lighting, originally my initial concept idea for the lighting in the scene was to have the scene set at night with a snow particle system being present throughout the environment.
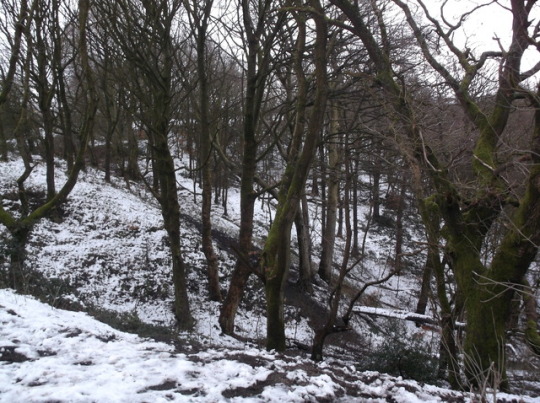
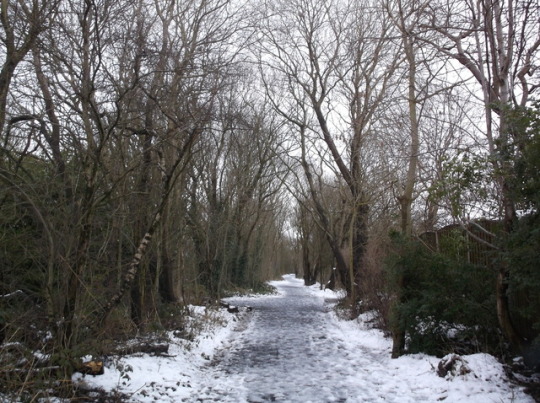
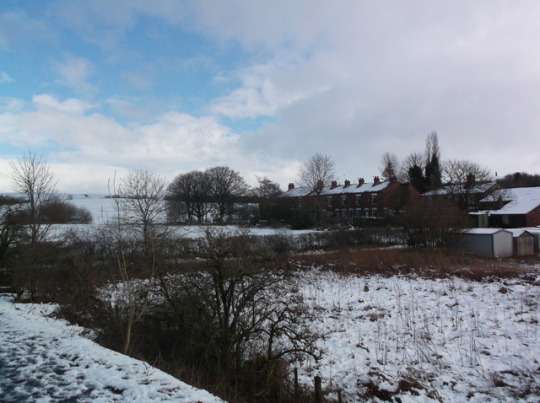
However, upon looking back at the snowy countryside photography photographs I had taken for environment set piece placement reference, I saw how the different lighting of both sun and cloud can affect a heavy snow environment, one example is the photography photo’s of the snowy forest in this post, in the first image we can see the general white skies often associated with snowy weather patterns and the transition from this to a clear sunny sky and how both alter and affect the lighting patterns within the environment the light casts onto.
Thus upon examining actual lighting caused by snowy weather, I chose to create a sky that combined the snowy clear pink skies often seen after the snow has finished falling within an area and the clear blue sky of the sun creeping through the clouds type of lighting effect that comes once the colour palette of a snow sky begins to fade.
As you can see in the screenshots above I have managed to create a sky sphere and lighting that combines both the clear blue weather sky lighting and pink snowy lighting together into a nice contrast with no clear horizon line showing, allowing me to have an environment with a seamless skydome lighting texture that manages to suit the environmental narrative of the whole scene taking place high up in the sky.
In the screenshots above you can also see that at this stage I have begun the process of asset placement within the scene using my photography reference photo’s you can see I placed assets such as tree’s and snow clumps within similar spots to that of my photo’s, I have placed the assets in such a manner as this has allowed me to create a forest environment that resembles that of an actual organic forest, as the spacing of both the tree’s and the snow is based on that of actual fallen snow and the spacing of it and actual forest trees.
One of the key development milestones that I aimed to tackle with this environment scene was to whilst maintaining the low-poly art style create organic and realistic geography for the organic mesh asset placement and through the use of the photography photo references I believe I have been able to hit this milestone of the development cycle of the environment scene.
In terms of additional lighting to add to the low poly atmosphere and art style I deleted the original sun within Unreal Engine and created my own low poly sphere mesh and created a luminate sun yellow material for the mesh, this as a resulted managed to create the nice light yellow lighting present within the screenshots, and manage to create an atmosphere of winter now coming to an end and summer beginning to set in.
You can also see I have created and placed a large number of different low poly cloud meshes within the scene, I chose to do this as a milestone I hit whilst creating the lighting for the environment was that although I managed to get the colour palette for the sky I wanted the Unreal default clouds within the environment were no longer visible, thus to tackle this milestone I created a module pack containing several variations of low poly cloud that could be placed within the environment that suit the art-style of the project, upon examination of the environment I believe I was able to achieve this milestone whilst also managing to stay on track with my project timetable.
1 note
·
View note
Video
tumblr
XB2002 Assignment Three: Environment Scene:


Floating Rocks & Hot Air Balloon animations:
Above is a small video clip of the floating low poly rock and hot air balloon animations that are present within my low poly environment for XB2002 and are what I shall be having present within my final trailer for the project.
One of the key characteristics and visual attractions present within my low poly environment for XB2002 is the floating low poly rocks present within the atmosphere surrounding the island, I chose to include these meshes within the environment as they are a visual aid in communicating to the player the narrative of the high altitude they are in within this environment, and having the rocks float through the air within the viewer's perception with the low poly earth planet in the distance will add emphasis on the environment being within a location far from planet earth.
For the animations present within the environment, I have used Unreal matinee’s as primary way for crafting the specific animations and movements I desired, I used matinee’s for the balloon and rocks as matinee would allow me to create different movements the further down the matinee’s timeline for the meshes, thus through this I could have all the rock meshes move within unique ways around the atmosphere to simulate that of realistic zero gravity environments.
As you can see in the video the rocks that are floating within the environment are all moving within unique pathways of each other and no rock repeats the same pattern and the hot air balloon moves away from the environment into the sky in a natural pattern as if it is being blown away by the course of the wind within the environment high altitude, the results seen within, the video were achieved by manually crafting the pathways of each movable object within the scene as you can see within the screenshots above.
Overall I am pleased with the outcome of the of the animations of the moveable objects within the environment as it has allowed me to create some additional visual narrative that will help strengthen the engagement of the final project video trailer.
References:
Music used within this video was produced by Futureworks Training Limited, Music Production student Martyn Stonehouse for this project and its end of project trailer.
Soundtrack: XB2002 Environment Art Soundtrack - Floating Home, Artist - Martyn Stonehouse.
0 notes
Photo


XB2002 Assignment Three: Environment Scene:
Continuing to develop my low poly environment for XB2002 Environment Scene I have created several meshes that I aim to have present within the environment and that match the low poly art style I am basing my environment around aesthetically.
As you can see I have modelled three new type of tree, the top tree screenshot was a branching type of low poly tree I aimed to create for this scene, for the actual tree’s themselves I created a platonic primitive and used the smooth function to round the shape to a spherical shape, followed by hardening the edges and then reducing the poly count of platonic shape to get the rounded shape of the tree, from here it was a simple matter of using the scale, vertex and reduce tools to create different types of low poly tree sphere shapes for the tops of the tree meshes.
The Windmill mesh was an asset I had previously made that I decided to use for the project, the only change from the original windmill mesh is that I placed a stand in the middle by creating a cylinder primitive and removing the line segments from it and hardening the edges to acquire the low poly shape, style and geometry.
From here I placed the shape in the centre of the windmill tower mesh and created some cubes to act as the leg supports for the windmill and placed them around the windmill stand to create structural authenticity and realism for the structure.
For the wood log’s I created a cylinder primitive mesh and reduced it’s line segments to eight with an applied hardened edge to the mesh to obtain the low poly art style, from here I simply applied a Blinn wood brown material to the mesh and overall I am pleased with how the colours collide well with each to create a true low poly appearance for the not only just the wood log’s but also all the meshes present within the screenshots above.
0 notes
Photo


XB2002 Assignment Three: Environment Scene:
For my low poly environment art scene the key central model throughout the whole environment is the low poly island itself.
Above you can see some early renders and screenshots of the overall shape I am creating for the island, for the shape of the island I constructed it using a cube primitive mesh, then added multiple line segments to it, then used the triangulate and reduce mesh function on the island mesh to reduce the polygon count to achieve the triangular low poly art style look that I aim to have the environment possess in terms of aesthetics.
Although this an early development version of the model you can see that I have begun the process of including characteristics that I designed within my initial concept art sketch of the island mesh such as rocks being layered on top of the base rock and rocks surrounding the island itself.
These characteristics are being implemented into the final environment model itself to add the sub-narrative of the island breaking apart.
My future design plans for this are too develop this island mesh to a point where a snow terrain can be placed over the islands base and then potentially another island will be crafted with a low poly bridge mesh being used to keep the two islands linked from a gameplay standpoint.
0 notes
Photo

XB2002 Assignment Three: Environment Scene:
This concept art sketch is an initial concept idea I currently have for my low poly sky island snowy environment scene for XB2002.
Initially when sketching the shape of the island I wanted to create something that would allow be able to possess the low poly art elements of low poly art but also allow me to create an island that’s shape will create the established narrative that it is had been breaking apart.
I will cement this narrative within the actual environment itself by using already built low poly rocks by having them floating around the environment in Unreal through most likely the use of a Matinee animation and by potentially having the low poly rocks be moulded into the base shape of the island itself.
For the low poly tree’s due to already creating them XB2001 Level Design I shall be re-using these assets but will be adding an additional snow layer texture to the mesh through either face selection and applying lambert materials or through manually painting the snow texture on them in Unreal or Substance Painter.
For the windmill model this is also another pre-built asset I have created, I have decided to add this into the scene for aesthetic purposes and will re-create the UV map for the mesh to a much better quality standard, I may also potentially have the turbines on the windmill performing a rotation animation by having the turbines as separate meshes and by using a matinee in Unreal Engine to animate them.
For the cabin itself I plan to create a simple low poly red wood cabin mesh that will be applied with low poly wood textures to match the rest of the low poly environments theme, I may also have light rays emitting from the windows to add the narrative and characteristics that someone is living on the island in the sky.
For the lake flowing off the island at the moment this is pure initial concept idea, if later in the project I have the development time to develop this aspect of the environment I shall pursue it as getting a working low poly water material to work and flow off an island may take serious development time out of the project timetable.
For the bulk of the low poly models I will most likely use standard Lambert or Blinn materials existing in Autodesk Maya already as they from previous low poly work capture the art style of low poly quite well and any other texturing software may add too much detail to what is essentially simple textured stylised models.
0 notes
Photo


XB2002 Assignment Three: Environment Scene:
Above are screenshots of previous low poly assets, modelling and environment scenes I have created within my spare time.
As you can see when learning and developing my low poly modelling creative skillsets I have created a wide variety of different locations and assets to suit the theme, and I will be using similar workflows to help construct my low poly environment low poly sky island scene for XB2002.
Assets such as the low poly tree’s and rocks from these projects will be being used within the Environment scene and for XB2001 Level Design I am also creating a low poly level and any assets I create for low poly purposes for XB2001 I shall also use within my environment scene should the assets suit the scene itself.
0 notes
Photo

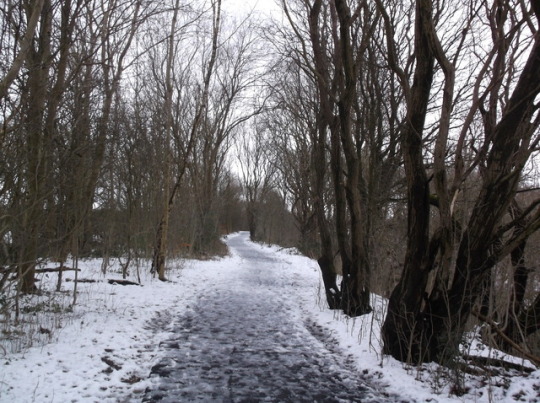
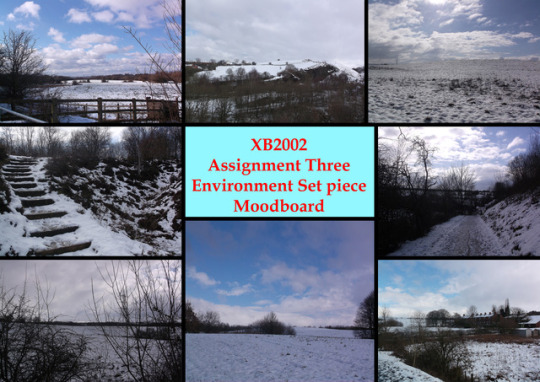
XB2002 Assignment Three: Environment Scene:
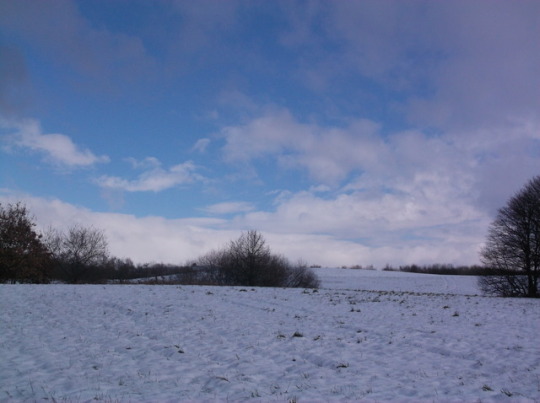
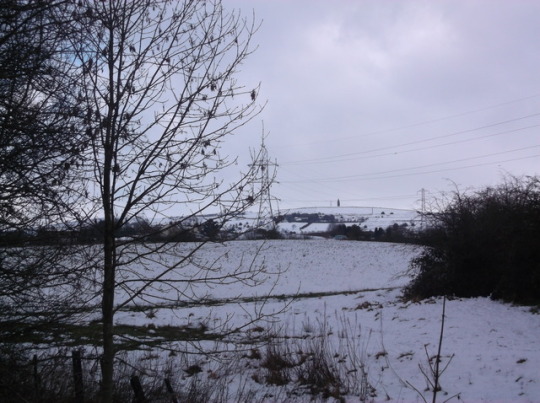
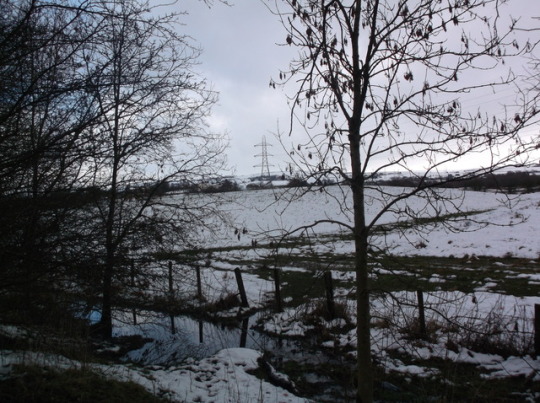
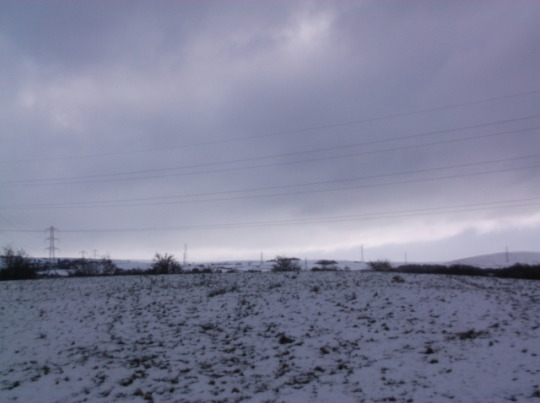
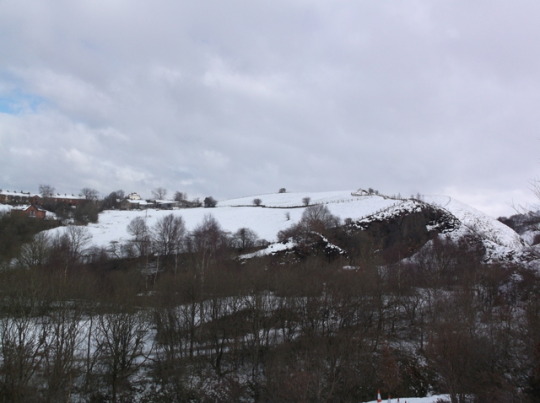
For my environment scene for XB2002 I decided to do some photography for reference sources when planning on creating my low poly snowy sky island environment for the project.
I will be using the folder of snowy countryside photography images as a reference source for three main aspects of the environment scene for when it is imported into Unreal Engine, lighting, terrain, and snow materials.
As you can see from the images I have taken I have captured the different types of countryside terrain types and different sky lighting and how it affects the snow it blankets.
These types of photography shots will be reference point for how I use lighting such as the skyphere in Unreal Engine to affect the painted on snow material that will blanket the surface of the low poly island itself.
These images will also be assisting me in what type of snow texture I aim to create as a paintable texture through the use of Unreal paint tool, as you can see the snow itself adapts and changes to suit the tye of countryside terrain it landed on, in some areas pockets of grass break through and in others it completely blankets the terrain it lands on where only the sheet of snow is visible.
It’s this type of terrain and snow placement I aim to have present on my low poly island surface although the art style of the model will be stylised low poly I wish for the snow texture itself to appear organic and natural in appearance to add a bit more “realism” and authentic to the environment scene itself and to make the video presentation of the scene more visually pleasing for the viewer.
0 notes
Photo

XB2002 Assignment Three: Environment Scene
For assignment three of XB2002 Environment Scene my initial concept idea is that I am going to create a low poly floating sky island with a snowy terrain blanketing the island with a low poly cabin on the island.
I have chosen to go with this theme as over the last few months I have been developing my 3D modelling skillset to different types of surface modelling, and one the different modelling art styles I have grown to enjoy and wish to develop further is low poly stylised modelling.
I have also chosen to go for this scene as due to the current time frame to finish the project I believe trying to create a scene that is high detailed would require large amounts of develop time that would be very difficult to do within the project time scale.
I have also chosen to model this specific piece of environment art as it would allow me to not only create a scene that would be visually appealing but also allow me to create a decorative environment pan video and potentially open up opportunities for sound implementation and music production.
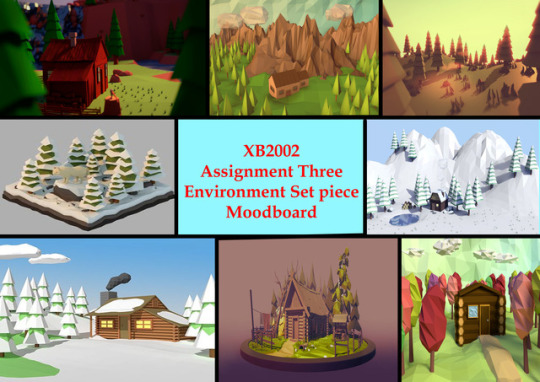
Above are three different mood boards I have produced with the inspiration and influences that will be behind my low poly environment art scene and 3D models.
The first mood board contains reference images of low poly islands themselves, due to low poly and artistic nature of low poly art itself low poly islands can come in many vary shapes and sizes but these images will be serving as the reference source of point for the overall mesh shape and material types I wish for my low poly island mesh to possess.
The second mood board contains reference images for the type of terrain and the type of cabin mesh I aim to create that will be present on the floating island, my creative aim is to have snow blanketing the whole island with the terrain hopefully possessing a few mountains and low poly snowy tree’s also present throughout the whole island mesh.
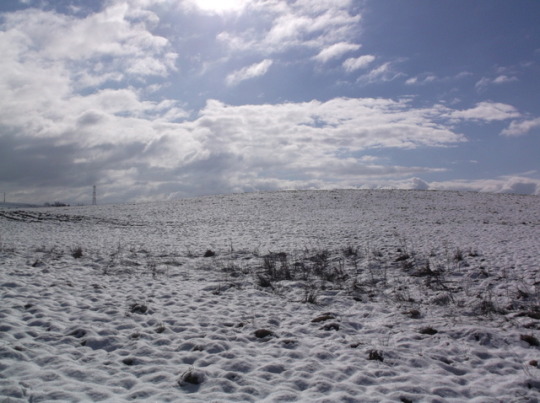
The third mood board contains self-took photography images of snowy terrain, to capture these images I went into the snowy countryside and hillside near my home and took photography images of the different types of forest terrain and how snow lands on this terrain and positions itself.
I also chose to capture these reference images as it will allow me to look at what type of snow texture to create when painting snow around the trees and terrain, these images are also serving as inspiration for how I plan to tackle the technical element of lighting was the environment scene has made the process of being imported into Unreal as to make the lighting match the atmosphere of the snowy scene and to ensure to create lighting that brings out the colourful aspects of low poly environment itself.
0 notes
Photo


XB2002 Assignment Two: High Poly Blunderbuss model:
Lever and Poweder Chamber texture:
For the gun powder lever and chamber my aim was to create a steel texture that would look freshly added but have some wear and tear on the component from active combat.
Thus I chose to use a diffrent steel texture from that of the firing chamber as I did not wish for this component to appear battered and wornout, thus for this mesh I chose to use a steel stained material within Substance Painter and change the base colour of the material and make it the same colour as the chamber steel material.
Through the use of the rotation of the textures UV’s I have been able to place scratches on the lever of the mesh thus making it look like it has recieved some roughness on a freshly applied metal.
0 notes
Photo


XB2002 Assignment Two: High Poly Blunderbuss model:
Telescope Leather Texture:
The telescope has been a big design aspect that I have dedicated some development time to texturing as it is a massive component that the player can use should this model be used as a firearm within a video game.
With one of my design aims being to make the Blunderbuss look like it has been heavily modified and look like it could be associated with nobility thus I wanted the metal and leather on the telescope mesh to have the apparence of being built with quality materials.
With the telescope from a game design in game perspective being a detachable component of the gun and being able to be used by the player, I wanted to make the telescope look well maintained despite the wear and tear of combat situations, thus the leather was a material that would have to appear top quality.
Thus to first capture a fine leather texture on the telescope I downloaded a Leather Fine Aged material from the Substance Painter website and applied it to this section of the mesh through the use of the colour picker.
From here I changed the base colour of the texture to a dark brown the colour I originally designed for the leather texture within my concept sketch, and rotated the UV’s to get the finer detail parts of the texture to appear on the top of the telescope where the player can see the details.
0 notes
Photo


XB2002 Assignment Two: High Poly Blunderbuss model:
Firing Chamber Steel Texture:
To make the firing chamber of the Steampunk Blunderbuss more authentic towards the 16th Century Eglish Civil War counterpart it is modeled off, I decided that I wished to use a texture and material that would have been used within the construction of a Blunderbuss within the 16th century and is common within metal throughout the Steampunk genre.
The metal I chose to apply was steel as steel and iron were the two common metals within the construction of Blunderbuss within 16th century England and steel is common meterial used within the construction of 3D gun models in steampunk games such as Dishonored thus it was the material I decided to use for the firing chamber.
For the actual texture of steel I chose to go with the material Steel Scratched as the previous steels applied to the mesh were too clean for a weapon mesh who’s characteristics I wished to display that the gun had seen usage within a battle of some kind thus having scratches visible on the chamber, adds the characteristics of the weapon being used for an extended period of time.
Upon applying the scratched steel to the firing chamber I altered the UV rotation and UV Scale to make the steel appear more worn and detailed as seen in the screenshots above, making these slight alterations allowed me to create a nice clean worn steel effect on the side of the chamber whilst a few scratches remain on the barrel to add the characteristics of being worn out over time.
0 notes
Photo


XB2002 Assignment Two: High Poly Blunderbuss model:
Textures – Wood
When creating the wood texture for the Blunderbuss stock I chose the colour of the Wood Walnut texture provided in Substance Painter as the overall wood grain texture within the material is the type of wood I wished to create for the stock as one of my design aims for the model was to create a Blunderbuss stock that looks like it could either be well maintained or freshly applied.
Thus upon applying the texture I applied some UV changes to the texture Wood Fibers layer, this directed the wood in the direction of the front of the stock in a way that actual wood is formed around wooden weapon stocks on Blunderbuss and Flintlock rifles thus making the rifle more authentic as a high poly model.
0 notes
Photo


XB2002 Assignment Two: High Poly Blunderbuss model:
Upon completion of the UV Mapping and packing, I began the process of baking the detail of the high poly Blunderbuss model onto the low poly version of the model and it’s components by importing the model into Substance Painter and selecting the Bake Textures option in the Additional Maps.
As seen in the screenshots above it is displayed that the baking process for the model worked very successfully and each mesh became smooth and very few baking issues occurred with the few being off spots where materials did not apply, but this was quickly rectified by painting over these areas with the selected materials.
The biggest issue I faced within the baking as the leather strap on the left side of the gun, with the UV for the leather strap being two separate UV’s the Leather Sofa texture applied to the mesh became more stretched out in the center thus being less textured than the right and left sides of the leather strap and texture.
Overall I am pleased with how the baking process has proceeded as I have faced very few issues with the baking, meaning I have created more development time for myself for the models textures and Substance painting, ensuring I can now develop the textures for the model and make them much more detailed overall when reaching the end of the project.
0 notes
Photo


XB2002 High Poly Blunderbuss model, Assignment 2:
Upon completion of my high poly Blunderbuss model I began the process of creating both a high poly and low poly version of the model to import into Substance Painter for baking the high poly materials onto the low poly version of the model who’s total poly count will be 20,000 polygons.
For lowering the poly count of the high poly mesh I began by creating a duplicate of the mesh and then removing line segments of all the mesh’s components to reduce the polygon count on the overall mesh.
To reduce the poly count I first created a duplicate of each mesh and then reducing the mesh’s geometry enough so that both meshes line up enough on both the high and low poly version so that the detail of the high poly version of each mesh can be baked onto the low poly version.
I have now finished the conversion of the high poly detail on the low poly models and all models are now within a state and are lined up with their high poly ounterparts so that their detail can be baked onto them and be painted within Substance Painter.
0 notes