#DCI-P3
Explore tagged Tumblr posts
Visit Tumblr Blog
Explore Tumblr blogs with no restrictions, modern design and the best experience.
Last Seen Tumblr Blogs


Fun Fact
Tumblr posted its first advertisements in May 2012 and subsequently earned $13M in revenue.
Text
Saw a tip online that unchecking "Imbed ICC Profile" when exporting a .png in Clip Studio would help fix my issues with incongruous colourspace. But it seems to not have worked. There is no setting in Clip Studio for a smart phone colour space DCI-P3 or similar either. :-/ Are my colours just doomed to be different on different devices? I want my art to be the same no matter where someone sees it. Especially for my comics.
#colour#colour space#colourspace#colour management#art#rgb#srgb#dci-p3#clip studio#icc#icc profile#saturation#colouring#png
1 note
·
View note
Text
Handheld LCD Shader Projects
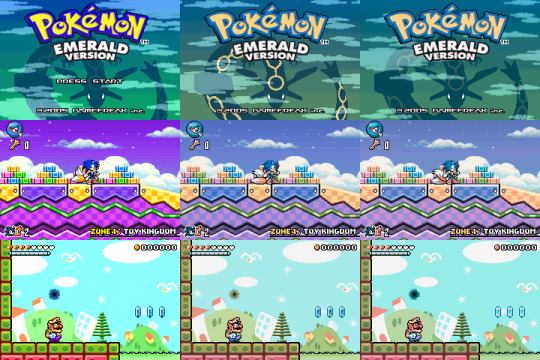
Welcome to the introduction of a collection of the handheld LCD shaders that emulates the colorspace and LCD metrics from the offical handheld gaming consoles. Ranging from Gameboy Color to the PSP being the main focus for emulating the displays from their colorspace to specified gamma and color temperatures. Most users would be playing Gameboy Color and Gameboy Advance in raw RGB on emulators as well as on the Gameboy Player, and that's totally cool. Playing these games on the backlit displays have been much easier to see the game you're playing than ones without any light on the LCDs. Heck, even having much better contrast that gives off darker blacks, or even perfect blacks from OLEDs. However, once you start playing some of those games, you can really see something off from those games from your childhood handheld consoles, most prominent, the Gameboy Color and the Gameboy Advance. Those screens are really different from modern displays we use on a daily basis, on every single specifications. GBC and GBA would look too saturated and odd color hues in a lot of games, under raw RGB picture. In GBA's case, a lot of games can have lighter gamma that looks overbrightened in raw RGB, since those were only calibrated for the old GBA screens that has darker gamma. Oversaturation from those games were also calibrated for these older displays that has less saturation. This project is meant to replicate the colors and gamma from the real console model, to any project, such as emulators, Gameboy Interface, scalers like the Retrotink 4K, LCD mods, and HDMI/FPGAs projects. It would allow users to pick any shaders or LUT textures to replicate the LCD color display to your preferred way to play games beyond pure original hardware. Of course, there is also Nintendo DS from the first model, the DS Lite, Gameboy SP AGS-101 (Backlit version), Gameboy Micro, and the PSP on its first model, as of current. The project is also meant to preserve the display data and metrics from those handhelds.
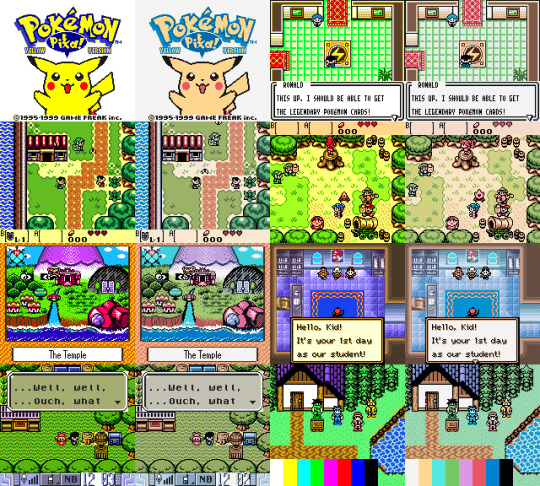
(GBC shader preset with default settings)
(GBA shader preset with default gamma, and LUT set to "2" for colder greyscale)
(NDS shader preset with default settings)
(PSP shader preset with LUT set to "2" for PSP's known colder greyscale)
Downloads:
Instructions: If you haven't already installed shaders, do so inside retroarch under slang shaders. After downloading my package, extract the zip file to "shaders_slang" inside Retroarch's shader folder. It can be implemented inside libretro's shader once the slang shader pack gets updated. I suggest loading the shaders by presets, under .slangp, in both Handheld and Reshade folder (latter being under the handheld-color-LUTs folder). Presets inside handheld folder has switchable settings, including presets containing LCD shaders. Presets inside reshade only loads in LUT textures rather than just shaders. Useful for emulators or projects that only loads in LUT textures as their only filter.
The shaders is based on HunterK's shader, Color-Mangler from the misc folder in slang shaders from Libretro, which was made from a help for my project. It defaults to sRGB on the shader's option for many average users. A shader preset from Handheld folder has LUT choices to change the greyscale color temperature replicated from the real handheld console. GBA one can adjust the gamma to make the image darker, while GBC and GBM has gamma option to brighten or darken. In Reshade, it only had adjustable greyscale temperature except for GBA_GBC variant. The shader supports DCI-P3 and Rec2020 colorspaces on its option to use on your display that may support either of those to reach better color saturation to present more accurate blue primary color from my shaders that common sRGB colorspace is limited from. The GBA and GBC have external gamma options to adjust the gamma on the greyscales if not using any LUT shader preloaded.
Developer notice: For developers of any GB/GBA (or any handheld) projects involving emulators, FPGAs, or screen mods, shall take some advices when it comes to implementing the shader or color filter to your projects. To implement as a shader, the gamma has to be lower first by 1/2.2 (Can be used to change the GBA gamma itself to darken the screen), then use my color values from the shader to change the color primaries, and then revert the gamma by 2.2 afterwards to have great color correction while respecting luminance and color tones. Also I prefer if you take color values from white balance correction that are outside of GBC/GBA shader. For only LUT texture, a more easy approach for devs, I prefer using the non-cold variants if preserving the greyscale color tone. GBA and GBC LUTs have their gamma and greyscale adjusted to emulate the screen's default gamma. If you only want just the color gamut correction as an LUT, use the GBA_GBC variant inside Reshade's LUT folder. -If you decide to implement a basic GBC or GBA colorspace to the emulator, use the sRGB data. The gamma change must happen before the color correction. -If the project is aimed for TV such as Gameboy Interface or GBA Consolizer, use the sRGB LUT shader, since SD and HDTV resolutions aim for sRGB colorspace. -If the FPGA such as Analogue Pocket, IPS screen mods, or emulation device uses a display gearing towards sRGB colorspace, use the shader, color filter, or LUT accordingly. -If the OLED screen mods or emulation devices have its native colorspace target around 100% DCI-P3 Volume, use any filter accordingly. -If implementing the shader to your emulation project, do port the shader to your shader or filter libraries. The shader and LUTs are in public domain after all, to spread about the color correction regarding GBC/GBA displays. -If using a professional scaler like Retrotink 4K with either GBA Consolizer or Gameboy Interface without any filters used, play with its gamut matrix settings for both GBC and GBA as "Red: 0.4925 0.3100" "Green: 0.3150 0.4825" "Blue 0.1625 0.1925" to emulate the color correction, and can be used on SDR or HDR mode to give out consistent image. Gamut info for other consoles below.
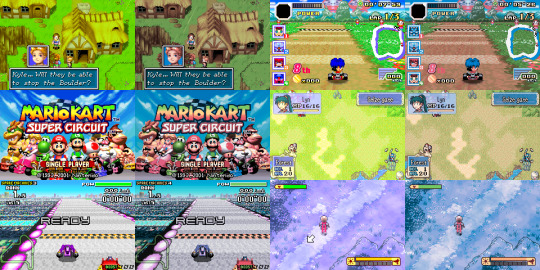
(Raw RGB, Gameboy Micro, and GBA shader with darken set to 0)
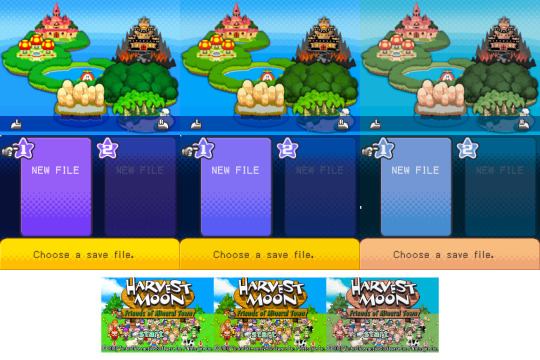
(Top: NDS; Raw RGB, DS-Lite, and NDS Phat)
(Bottom: GBA; Raw RGB, GBA-SP AGS-101, and GBA with darken set to 0)
Note: While DS-Lite and SP-101 are really close to sRGB that developers don't really need adjustments, it is shown to preserve on how far they reached from older models to newer ones in mid to late 2000s.
Story:
So when did I start the project and why I was invested in doing this? It was back in August 2014 when I first saw a forum on someone wanting to desaturate the GBA and mentioned the filters from emulators like VisualBoyAdvance, or VBA-M, as well as NO$GBA that has options to emulate the colorspace that is close to the real hardware. I was reminded how the latter emulator has those options when I used it long time ago. I mostly use unfiltered colors as that was how close it looks on my GBA-SP with "Better Screen" than the GBA. Yeah I actually have the backlit version of GBA-SP known as AGS-101. The display was a huge jump from old GBA to GBA-SP, as well as the Nintendo DS Phat under GBA. However, I had good amount of memories of playing my old GBA with the lights around me and I do remember the color saturation being very different overall. So I wanted to take a look on how to replicate the VBA-M's colorspace.
(Link to the forum I created of my histories of re-creating the GBA colors)
I first decide to use simple desaturation with a mix of shaders by playing with saturation and contrast levels. At first, it looks very similar to how VBA-M's attempt looked. That is, until I saw the blue color has a different hue, being more torqourise in VBA-M's recreation. Then a LUT shader appeared in libretro forums and I first used that for my photoshop to use crazy amount of filters to recreate the whole thing, even though it wasn't perfect, but close. Then I tried to replicate the original NDS model that I have for many years, and also played with the LUT textures from Photoshop. Yeah I just simply tried to copy the colors from the console, without any tools, on my uncalibrated old LCD TN panel screen, because I had such no experience on how colorspaces work, but it was worth a try. Then in 2015, I somehow found a shader that plays with RGB and I got help with Hunterk, a contributor on Libretro who has been involved with a lot of shaders for Retroarch. He made an amazing color mangler shader for me to put data of colors and gamma on the shader itself than just using a LUT texture. Then in May of 2015, I found another GBA on my house that was not used by a family for a long time. Yeah I lost my GBA somehow as a kid from another family, but a long story to tell. Thankfully I was allowed to use another GBA for full use just for this project. This was just the beginning of my progress on grabbing screen data starting with just a flashlight with my old LCD monitor. The only issue I always have is the common sRGB screens don't have deep blue colors that is needed for both GBA and NDS (and more), so I always had issues replicating the blue primary color. That's what got me to start learning about colorspace and what sRGB and color gamut means. And that's where my progress to get the right tools begins. I then later got a superior IPS 1080p monitor, the GBC, Colormunki Display, using DisplayCal and HCFR, Colormunki Photo, the PSP, GBA Micro, a 4K monitor, and a portable light to use on GBC and GBA. Now in 2024, I have really progressed with help of such tools I need, have become much better way of getting the LCD data from the handhelds to contain the color gamut, the greyscale, gamma, and color temperature.
So now the story is out of the way, here are the tools I used to gather infos from the handheld screens.
Samsung S80AU - A 4K IPS Monitor that supports DCI-P3 colorspace with great Delta Error scores especially for sRGB colorspace. It's also used to test out LCD shaders on a high DPI display. Colormunki Display - A Colorimeter that calibrates your display and gathers color data from your target screen. Colormunki Photo - A Spechrometer that behaves the same as Display, except gathers the white colors temperatures more accurately regardless on any type of LCD or OLED displays. It's used to make profiles for the Display to be calibrated for a specific monitors as the Display reads data much faster than Photo as well as reading darker blacks better. Displaycal has infos on colormeter matrix correction to add in why this combo is best used for serious color calibration. It's also used primarily for handheld console displays to sample color data. DisplayCal - Used to completely calibrate my monitor and other screens to give off pure sRGB colorspace with 6500K whitepoint. It's also used with its own ICC Profile creator to make .icc with given data from ColorHCFR for a specific Handheld Console display to emulate from. It's 3DLUT tool was also used to generate LUT textures to check the color and luminance on primary and secondary colors. ColorHCFR - A free alternative for Calman. It's used to gather data on the greyscale, the color gamut, and tons more info to check how your targeted display looks. It shows you graphical images of the screen's color gamut on the CIE diagram. MCH2 - A tool that used your generated DisplayCal monitor calibration data to create an .icc profile made for Windows 11 to convert the entire screen to your targeted colorspace such as sRGB and DCI-P3. G2 Pocket RGB Camera Light - A portable light that shoots out lights to use on handhelds that lacks any light, such as the Gameboy Color and Gameboy Advance. It toggles between RGB and pure whitelights with color temperature adjustments. It's used to match the whitepoint on both GBC and GBA to match my monitor's whitepoint as the closest. It's much better tool than me previously using my collection of phones to use the flashlight for color sampling, as GBC and GBA suffers from rainbowing, no adjustments on white balance, and less saturation by a flashlight, unlike proper lights like the G2 Pocket that eliminates those issues. 240p Test Mini - The handheld version of the well known 240p Test Suite. Used to check RGB, greyscale, motion flickering, and color scrolling on real hardware. https://github.com/pinobatch/240p-test-mini EZ Flash Jr - A GB/GBC Flashcarts to load ROMs and Homebrew for GBC and GBA. EZ Flash 3-in-1 Expansion Pack NDS - A GBA Cartridge to load in a ROM and homebrew in to load inside GBA and NDS. Used NDS to insert a ROM on its NOR memory. GIMP - A Photoshop-like image editor that is used to check generated LUTs from 3DLUT to check on the color values to adjust the shader. Retroarch - Using mGBA and Sameboy emulator core to check out the games while using the shaders I created for color correction. It also loads in image files for my best way to check out my shaders during adjustments.
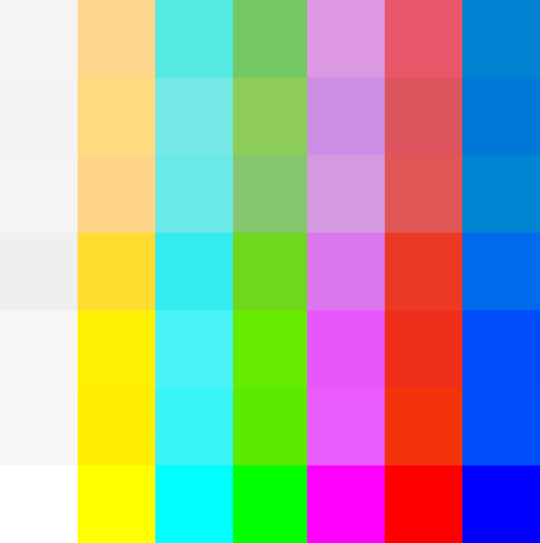
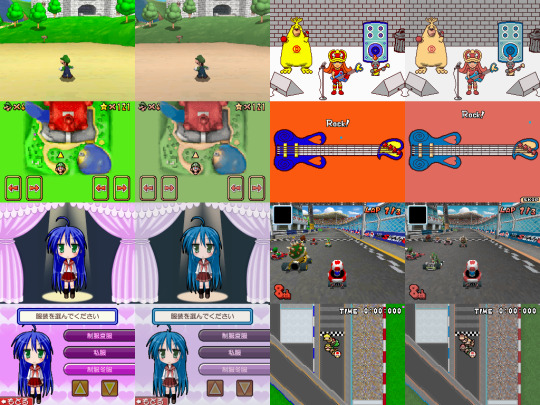
(Top to Bottom: gba-color & gbc-color, gbMicro-color, nds-color, psp-color, DSLite-color, SP101-color, and raw RGB, all in sRGB)
Note: Why the white color is darker is due to clipping on the yellow color because of how color correction works with the blue color being out of sRGB gamut. Also, sRGB can't display those handhelds blue saturation due to it. Will soon post DCI-P3 and Rec2020 variants for displays that can see more saturation without internal color adjustments.
List of handheld consoles I owned to create shaders out of: Gameboy Color Gameboy Advance Gameboy Advance SP (AGS-101) Gameboy Micro Nintendo DS Nintendo DS Lite PSP (1000)
Nintendo Switch Online emulates GBC and GBA with their own color filters. GBA only desaturates the screen in more simple manner for sRGB, which was easy to implement. GBC, was very hard to do in shaders currently, so to use full experience, the LUT version can only be used to fully emulate the effect for other emulators.
I also found someone's Switch OLED data from a youtube video. The colorspace is taken with bigger saturation than even DCI-P3 when using vivid mode. Here's a link to the video by GamingTech:
youtube
I also made Palm Treo 700p shader long time ago by taking DisplayMate's data long ago while trying to translate the gamut pin points to HCFR since I don't have those in possession. I only made it for experiment long ago and only archived.
Replicating existing filters from emulators or dev tools such as No&GBA and VBA-M for GBA image replication, and GBC tools like Gameboy HiColour Converter V1.2 for GBC image replications. Even No$GBA and No$GMB docs had mentioned the LCD color differences:
(HiColour Convertor)
My Handheld LCD review datasheet and showcase for each platform (Coming Soon):
Gameboy Color Gameboy Advance Gameboy Advance SP AGS-101 Gameboy Micro Nintendo DS (Phat) Nintendo DS Lite PSP-1000
Handheld consoles I plan on getting and make data out of: PSP-3000 or GO PS Vita Nintendo 3DS (Owned, but not yet examined)
Handhelds I don't plan on getting or reviewing: Gameboy or Gameboy Pocket (Many have made their own shaders and filters out of their monochromic display) Gameboy Advance SP AGS-001 (Uses the same exact display as the original GBA except with frontlight added) Knockoff GB Boy Colour (I only allow any official handheld consoles for my project) PSP-2000 (Same colorspace and data as PSP-1000, except brighter screen) PS-Vita 2000 (Uses LCD instead of OLED, with less color gamut than original PS Vita) Nintendo NEW 2DS XL/3DS (or XL) IPS displays (Hard to find and a lottery to obtain; not common) Nintendo Switch (Owned and targets sRGB and its gamma well; whitepoint can vary between units)
Notes: On GBA, A lot of games are calibrated for the GBA's gamma due to how dark its screen's gamma looks. For some games, often Nintendo and a couple of companies with closest relationship to Nintendo, are adjusted for its colorspace. Certain games, often SNES ports, may have its original palettes on its setting. On GBC, many games were made for the screen during its run. It's unknown which amount of games weren't calibrated for the screen. Although certain games like Link's Adventure DX were completely adjusted for the screen on colorspace, gamma, and color temperature, which made purple-grey colors looks more grey overall. On both NDS and PSP, pretty often the first few years of games can be adjusted for those screens. Those are until both NDS-Lite and PSP-3000 have colorspace that closely aims for sRGB where no adjustments can be made. Many multi-ports for PSP of the same game from home consoles are very likely not calibrated for the first two PSP models. I didn't make a Switch OLED preset (from Vivid mode) with LCD shader, since the Switch OLED is not LCD, its RGB pattern is very different, and either original LCD or OLED are too high resolution to notice its RGB patterns. It's best to use only the shader to use with Reshade on a Switch emulator to emulate the OLED's vivid mode, but preserved in Libretro to see its effect. While I explain what the shaders are meant to use for, it's also your preference on using the shaders or just using the Raw RGB colors that fits your needs. You can use other color shaders on a GBA or GBC emulator, such as using NDS, Micro, or PSP shaders to your preference. The PSP shaders have much more saturation than any Gameboy line or NDS Phat, while preserving its hue.
To end off on this page, I would also like to give respect to other projects that tried their attempt to create their own color correction. While I prefer the best accuracy of the color correction from my shaders, many of their color corrections are pretty impressive with varying degree levels of accuracy, and they all motivate me to continue with the project to give out the best quality of color correction. Their blogs have pretty interesting ideas on how displays work on GBC and GBA.
(BGB's "Reality" Color Correction filter)
(GBCC's page on GBC screen tech notes)
(Bsnes/Higan Color emulation page)
(Gameboy Interface having their own Color Matrix correction, and including our shaders and filters alongside)
youtube
(Nintendo showing their GBC and GBA color correction under Virtual Console from Nintendo Switch Online, the former having bigger difference)
#gameboy advance#gameboy color#nintendo ds#playstation portable#gbc#gba#nds#psp#colors#handheld#shaders#libretro#retroarch#emulation#emulators#gameboy micro#color correction#colorspace#nintendo switch oled
7 notes
·
View notes
Text
Acer Predator Z57 with Curved OLED and MiniLED Monitors!

Acer Predator Z57 Technical Specs
For devoted customers, Acer has expanded its selection of gaming monitors with the addition of four premium models. Wide curved displays, superb picture quality, and smooth operation are features of these models that increase the immersiveness of gaming. Among the new variants are two MiniLED displays with 2304 zones.
The two flagship versions are the Predator X34 V3, which has a 34-inch panel a highly desired size for PC gamers and the Predator Z57, which is the largest of the lot with a 57-inch DUHD (7680×2160) at 120 Hz display. Furthermore, the dazzling OLED displays of the powerful 39-inch Predator X39 and 34-inch Predator X34 X offer fluid and captivating visual experiences with a refresh rate of up to 240 Hz and a lightning-fast 0.01 ms pixel response time.
Predator Z57: Win Hardest Battles on 57-Inch DUHD Display
The massive 57-inch Predator Z57 is a gaming giant that can win even the most fierce confrontations thanks to its 120 Hz DUHD (7680×2160) resolution. It provides outstanding brightness and picture clarity while presenting dark scenes with black backgrounds by leveraging the 2304-zone MiniLED technology. The big 32:9 aspect ratio and 1000R curvature increase the user’s field of vision when playing or working, drawing them closer to the game world.
Furthermore, the top-tier VESA DisplayHDR 1000 certification makes it possible to achieve brightness levels of up to 1000 nit, produce incredibly accurate colors, and optimize light and dark contrast to illuminate minute details. Having this qualification has a significant influence on intense gaming sessions. The Predator Z57’s lifelike visuals, complemented by a wide DCI-P3 98% color gamut, will astound even the most seasoned gamers.
Multitasking is easy with its ultra-wide viewable region and productivity-boosting capabilities like picture-by-picture and picture-in-picture. The Xbox Series X and PlayStation 5 include two HDMI 2.1 and one DisplayPort 1.4 port for fast, dependable connectivity. The Predator Z57 foundation is sturdy, sleek, and adjustable for height, tilt, and swivel. The base of the Predator Z57 is robust, elegantly streamlined, and customizable with height, tilt, and swivel settings to suit individual tastes. Additionally, it may be hung on a wall to free up desk space because it is VESA-compliant. To improve sound effects, this model also has two powerful 10 W speakers.
Ultrawide QHD Display Gives Predator X34 V3 an Edge
A 34-inch curved MiniLED monitor and 21:9 extremely wide QHD (3440×1440) quality let professionals compete and perform smoothly on the Predator X34 V3. DCI-P3 94% colorful gamut and VESA DisplayHDR 1000 rating make titles bright and vibrant, while 1500R curve improves engagement and peripheral vision. Fast 180 Hz pace and 1 ms (G-to-G) response time enable ghost-free gameplay.
Two HDMI 2.0 connections and DisplayPort 1.4 provide outstanding connection capabilities, allowing players to connect to a broad variety of sources. The Predator X34 V3 boasts features such as height, tilt, and swivel adjustments, making it ideal for wall mounting to optimize viewing enjoyment. Moreover, it features two 5 W speakers that deliver excellent audio for games, music, and movies. Because it has a wall mount, it is ideal for console gamers.
OLED Models of the Predator X39 and Predator X34
Two of Acer’s newest OLED models, the 39-inch Predator X39 and the 34-inch Predator X34 X, combine high contrast for incredibly vivid graphics along with incredibly fast refresh rates and reaction times for the smoothest possible performance. They also allow precise viewing at narrow angles of up to 178 degrees. Both provide UWQHD (3440×1440) quality with a frame rate of up to 240 Hz and a pixel response time of 0.01 ms, ensuring lag-free and fluid gameplay.
The 800R curvature improves the line of sight and widens the field of vision to boost interaction. A huge DCI-P3 99% color gamut supports a wide range of hues and tones, and VESA DisplayHDR True Black 400 ensures that no details are lost by bringing out characteristics that are commonly hidden by shadows. These new versions are certified as Eyesafe 2.0 and come with an image retention update by default to help reduce eye strain.
Crucial Components of Each New Model
All new models come equipped with AMD FreeSync Premium, a feature that smoothly depicts fast-paced action scenes without tearing or flickering the screen. They also have a USB Type-C 90 W PD connector that permits simultaneous display, data transfer, and device charging, as well as an integrated KVM switch that lets you swap sources without having to reconnect peripherals.
Read more on Govindhtech.com
#AcerPredatorZ57#CurvedOLED#MiniLED#Monitors#PredatorZ57#DUHDDisplay#QHDDisplay#AMD#technews#technology#govindhtech
2 notes
·
View notes
Text
i don't ever fuck with the colors in my gifs, what are y'all *doing*? whether i'm using my big pricey professional compressor, a quick web tool or my phone's automated process that only understands it's working part of the time, the results are pretty much the same and i very rarely use the full 256-color palette. whichever dithering i use, the result is pretty much dead on. i refuse to recolor anything, even my own original shot sequences, on conversion, and it's always dead on.
videos aren't recolored for phones and tv sets are much less bright than a movie projector – in a cinema, a daylit scene can be bright enough to read by in the back row (and just for kicks, i used to) but no tv set of any era or technology ever could. between the cine and home release, there are changes – consumer screens mostly don't render the full DCI P3 gamut so they'll be recolored for rec709, the standard for HD video. your phone renders it exactly as well as a tv set or monitor does, and so watching the exact same file on a tv screen as on your monitor or phone is gonna yield pretty much the same result. anyone tells you different is lying to you and you can test for yourself.
we're also not all looking at tumblr or these gifs or other gifs on our phones.
this isn't to say nobody should recolor sequences before making gifs – do what you want! have fun! – just that nobody ever *has* to. gif-making is already so much work just to fit the sequences we want into a very inefficient image format from the '80s and end up with a file small enough to post.
I’m convinced if ppl on this site knew how crappy gifs look before you color them properly, they would appreciate editors more
199K notes
·
View notes
Text
Price: [price_with_discount] (as of [price_update_date] - Details) [ad_1] From the brand Xiaomi SmartHome Xiaomi Ecosystem Latest from Xiaomi Resolution : 4K Ultra HD (3840 x 2160) | Refresh Rate : 60 Hertz | Viewing angle : 178 degrees Connectivity: Dual Band Wi-Fi | 3 HDMI | 2 USB ports| Optical port| AV port| Ethernet port | 3.5 mm jack | Bluetooth 5.1 Sound: 40 Watts Output | Dolby Atmos | DTS-X Smart TV Features: Google TV, Built-In WiFi, Chromecast built-in, 2GB RAM, 16GB ROM, Supported Apps: Netflix, Prime Video, YouTube, Zee5, etc., Ambient Light Sensor, Far Field Microphone, ALLM (Auto Low Latency Mode), Hands Free Voice Control and Google Assistant Operation Display: 4K Dolby Vision IQ | HDR10+ | HDR 10 | HLG | Reality Flow MEMC | Vivid Picture Engine 2 | Wide Colour Gamut- DCI-P3 94% (typ) Warranty Information: 1 Year Warranty on Product and 2 Years Warranty on Panel provided by the brand from the date of purchase Additional information: Brand Warranty can be availed using amazon invoice and User manual can be accessed from brand website [ad_2]
0 notes
Text
빔프로젝터 추천 구매가이드

빔프로젝터는 일상 속에서 다양한 용도로 활용할 수 있는 멀티미디어 기기입니다. 영화 감상은 물론, 교육, 업무 프레젠테이션, 게임, 심지어 캠핑에서도 그 활용도가 점점 넓어지고 있습니다.
하지만 제품을 선택할 때는 단순히 크기나 가격만 고려해서는 안 되며, 사용 목적과 환경에 따라 체크해야 할 요소들이 있습니다. 이 가이드는 빔프로젝터를 처음 구매하려는 분들이 쉽게 이해하고 올바른 선택을 할 수 있도록 도와드리기 위한 정보들로 구성되어 있습니다.
1. 💡 안시루멘(ANSI Lumen)
빔프로젝터를 선택할 때 가장 먼저 확인해야 할 중요한 항목은 바로 '안시루멘(ANSI Lumen)', 즉 밝기입니다. 빔프로젝터는 주변의 빛을 그대로 받는 방식이기 때문에, 밝기가 충분하지 않으면 화면이 흐릿하거나 잘 보이지 않을 수 있습니다. 따라서 빔프로젝터의 밝기는 실제로 사용자가 콘텐츠를 얼마나 선명하게 볼 수 있는지를 결정짓는 매우 중요한 요소입니다.
어두운 공간에서 사용하는 경우 암막 커튼을 설치하거나 조명이 거의 없는 방처럼 빛을 철저하게 차단할 수 있는 환경에서는 2000 안시루멘 이상의 밝기를 가진 제품이면 충분합니다. 이 정도 밝기만으로도 어두운 공간에서는 영상이 충분히 선명하게 보이며 몰입감도 높습니다.
조명이 있는 일반적인 환경 거실처럼 일정 수준의 조명이 있거나 자연광이 들어오는 장소에서는 최소 3000 안시루멘 이상의 밝기를 제공하는 프로젝터를 선택하는 것이 좋습니다. 밝은 환경에서도 화면의 색감과 선명함을 유지할 수 있기 때문입니다.
밝은 회의실이나 교실처럼 조도가 높은 공간 형광등이 켜진 회의실, 강의실, 교실처럼 외부 조명이 강한 환경이라면, 3500~4000 안시루멘 이상의 고휘도 프로젝터를 선택해야 자료나 영상이 흐릿해지지 않고 잘 보입니다.
📌 TIP: 빔프로젝터의 밝기를 나타내는 단위는 ‘안시루멘(ANSI Lumen)’이며, 루멘(Lumen)이나 LED 루멘과는 측정 방식이 다르므로 제품 사양서를 꼼꼼히 확인하는 것이 중요합니다.
2. 🖼 해상도
해상도는 화면에 표현되는 픽셀의 수를 의미하며, 프로젝터에서 출력되는 영상의 선명도와 디테일을 결정합니다. 용도에 따라 적절한 해상도를 선택하는 것이 매우 중요합니다.
Full HD (1920×1080 해상도) 현재 가장 많이 사용되는 표준 해상도로, 가정에서 넷플릭스, 유튜브 등 OTT 서비스를 즐기기에는 충분한 품질을 제공합니다. 60~100인치 크기의 스크린에서도 화면의 선명도를 잘 유지할 수 있으며, 가격 대비 효율이 좋아 입문자용으로 적합합니다.
4K UHD (3840×2160 해상도) 보다 큰 스크린(100인치 이상)에서 고해상도의 영상을 감상하고 싶다면 4K 지원 빔프로젝터가 적합합니다. 4배 더 많은 픽셀 수로 더 섬세한 디테일과 뛰어난 색감 표현이 가능하며, 영화관에 가까운 시청 환경을 구현할 수 있어 홈 시네마 구축에 적극 추천됩니다.
8K UHD (7680×4320 해상도) 현재 상용화된 콘텐츠는 많지 않지만, 미래를 고려한다면 8K 해상도를 지원하는 고급형 제품도 고려해볼 수 있습니다. 특히 전문적인 영상 작업이나 고화질 콘텐츠 제작 용도로 사용된다면 향후 활용 가능성이 높습니다.
🎯 결론 용도와 예산에 따라 선택 기준이 달라집니다. 단순한 동영상 감상용이라면 Full HD면 충분하고, 고화질 대형 화면을 원한다면 4K UHD 이상을 고려하세요.
3. 🎨 색상 구현력
프로젝터의 화질을 결정짓는 또 다른 중요한 요소는 바로 ‘색상 표현력’입니다. 아무리 밝고 해상도가 높아도 색상이 부정확하면 화면이 인위적으로 보일 수 있습니다. 빔프로젝터는 색역 범위(색공간) 표현에 따라 화면의 생생함이 달라지며, 각 제품은 아래와 같은 색역을 지원합니다.
sRGB 색역 일반적인 웹 이미지나 문서 작업에 많이 사용되는 색역으로, 가볍게 콘텐츠를 감상하거나 프레젠테이션용으로 사용하기에 적합합니다.
Rec.709 색역 방송 및 영상 제작에 기준으로 사용되는 색공간으로, 영상 시청 시 좀 더 사실적이고 안정적인 색감을 제공합니다. 대부분의 중급형 프로젝터가 이 색역을 지원하며, 일반적인 영화 감상용으로 충분한 퀄리티를 구현합니다.
DCI-P3 색역 헐리우드 영화 제작 기준으로 쓰이는 극장용 색역입니다. Rec.709에 비해 약 25% 더 넓은 색 영역을 표현할 수 있으며, 보다 깊고 생동감 있는 색감을 제공하여 영화 감상이나 영상 편집용으로 적합합니다.
📌 TIP: 영상 중심의 사용 목적이라면 Rec.709 이상의 색역을 지원하는 프로젝터를 선택하세요. 색감에 민감한 사용자라면 반드시 DCI-P3 색역 지원 여부를 확인하는 것이 좋습니다.
✅ 정리 요약
항목권장 사양적합한 환경 및 용도안시루멘2000~3000 이상어두운 실내, 거실, 캠핑 등해상도Full HD ~ 4K UHD영화 감상, OTT, 홈 시네마색상 표현력Rec.709 이상일반 영상 감상, 교육용색상 표현력DCI-P3 지원고급 영화 감상, 영상 제작
📝 마무리 조언
빔프로젝터는 단순히 화면을 보여주는 도구가 아니라, 일상 속의 공간을 특별하게 바꿔주는 매개체입니다. 영화 한 편도 더 몰입해서 즐기고 싶다면, 수치 하나하나가 큰 차이를 만들어냅니다. 구매 전에는 자신의 사용 목적(예: 영화 감상, 업무용, 야외 활동 등), 공간의 밝기, 감상 거리 등을 꼼꼼히 고려하고, 위 항목들을 기준으로 자신에게 맞는 제품을 선택해보세요.
부가적으로 고려할 사항으로는 다음과 같은 것들이 있습니다:
자동 키스톤 보정 기능(화면 왜곡 자동 조정)
무선 미러링/스크린쉐어 기능
내장 스피커의 음질
렌즈 수명 및 유지관리 용이성
크기 및 휴대성
출처
아이티리뷰
리얼한리뷰
갓성비
#미니빔프로젝터#프로젝터매니아#가정용빔프로젝터#휴대용빔프로젝터#소형빔프로젝터#엡손빔프로젝터#미니프로젝터#뷰소닉빔프로젝터#샤오미빔프로젝터#프로젝트빔#epson빔프로젝터#제우스빔프로젝터#알리빔프로젝터
0 notes
Text
Some tech reviewers will go through the effort of finding the best settings possible for your monitor or TV or whatever, too! rtings.com does a ton of in-depth testing, which includes out of the box color accuracy for both sRGB and DCI-P3 color spaces, sometimes more. They also usually do some calibration, which isn't exactly perfect for every monitor (because tolerances) but it can be a GOOD starting point for dialing your color in.
If you can find one (either to own or to loan from someone) a proper hardware calibrator with the appropriate software is like. Exactly what you want. Going by your vision is persnickety, but proper calibrator tools can dial it WAY in.
fucked up how colors look different depending on what screen you’re looking at them on. that should be illegal I think
208K notes
·
View notes
Text
High-definition LED display: Defining the vision of the future
With the continuous upgrading of display technology, high-definition LED display screens are becoming the core display carrier in various commercial displays, performance stages, conference systems and smart city construction. Compared with traditional LCD and projection equipment, high-definition LED screens have won the favor of the global market with seamless splicing, high brightness, high refresh rate and super adaptability. This article will systematically analyze its important value in the digital era based on the technical definition, market trends, core advantages and purchasing suggestions of high-definition LED displays.
A. What is a high-definition LED display?
High Definition LEDDisplay refers to a video-level display with a resolution of 720p (1280×720) or even 1080p (1920×1080). Its clarity is mainly determined by the "PixelPitch". The smaller the point spacing, the higher the pixel density, and the more delicate the picture. For example:
P1.25, P1.56, and P1.86 are typical high-definition indoor small-pitch LED models;
P2.5~P4 is often used in medium and large scenes with high requirements for image quality.
In occasions where close viewing and fine picture display demands are strong, such as conference rooms, control centers, studios, etc., small-pitch high-definition LED screens become the first choice. What is a fine pitch LED display?
B. Global high-definition LED display market trends
According to market research firm MarketsandMarkets, the global small-pitch LED (point spacing ≤2mm) market is growing at a rate of nearly 20% per year, and the market size is expected to exceed US$10 billion by 2028. The main factors driving this trend include:
Commercial display demand has been upgraded (especially in the retail, banking, education, and medical industries);
The demand for high-definition video and remote conferencing has skyrocketed under 5G;
The construction of smart cities brings high-resolution display needs such as security and dispatching centers.
In China, the United States, Europe, South Korea and other regions, high-definition LED screens are gradually penetrating from high-end conference systems to consumer fields such as commercial retail and home theaters. Provide you with a wholesale guide for Chinese LED display screens.
C. Core advantages of high-definition LED display
Seamless splicing, complete and consistent picture
Compared with the frame gaps in LCD splicing, the LED display adopts modular seamless splicing technology, which supports customization of any size, and has excellent visual integration effect.

High brightness and color restoration ability
LEDs have self-luminous characteristics and have a wide brightness range (adjustable from 600~6000nits), which can remain bright and clear even in strong light environments. It also supports wide color gamut standards such as DCI-P3 and Rec.709, and restores the color truthfully. Here is a knowledge about nit brightness.
High refresh rate, adapted to multiple signal inputs
High-definition LED screens usually have a refresh rate of ≥1920Hz or even 3840Hz. The screen has no jitter or shadowing. It supports various high-definition signals such as HDMI, DVI, SDI, etc., and is suitable for video conferencing and live broadcast requirements.
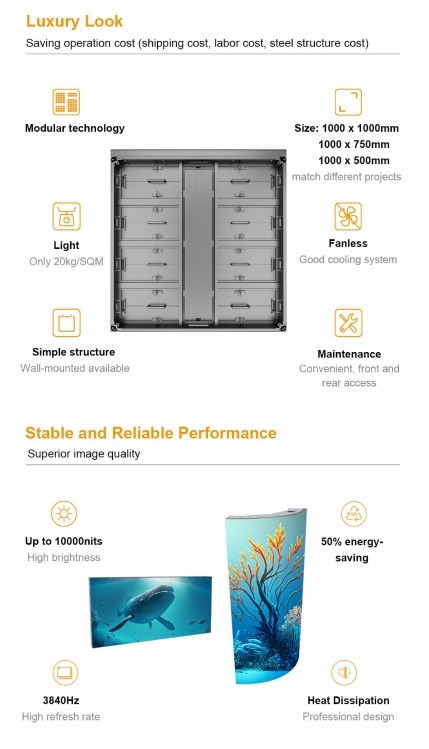
Long service life and low maintenance cost
The life of high-quality LED lamp beads can reach ≥100,000 hours, supports front/rear maintenance design, modules, power supply and control systems can be replaced independently, and the operation and maintenance efficiency is high.
Support HDR display technology
Many high-end high-definition LED screens have supported HDR (high dynamic range) technology, with richer dark details and highlight levels, and more realistic and impactful pictures. Analyze the three major differences between HDR and SDR of LED displays for you.
D. Practical suggestions for purchasing high-definition LED displays
Select the distance between points according to viewing distance
Recommended formula: Minimum visual distance (meter) ≈ point spacing (mm). For example, P1.25 is suitable for viewing scenes within 1.5 meters, and P2.5 is suitable for viewing distance of 2~3 meters.
Focus on brand and after-sales service
High-definition LEDs have high requirements for power stability and control system compatibility. It is recommended to choose suppliers with rich project experience, such as SoStron, Leyard, Unilumin, Samsung, LG, etc. How to choose: Top LED brands vs Emerging brands?
Confirm the installation environment and maintenance method
It is recommended to use a silent fanless design indoors to ensure quiet operation; choose a pre- or post-maintenance plan according to the installation location to improve operation and maintenance efficiency.
Reserve system compatibility and upgrade space
Nowadays, 4K/8K video content is gradually becoming popular. It is recommended to configure a 4K input control system and a video processor to leave enough bandwidth for future content playback.
Conclusion
High-definition LED displays are not only the product of technological progress, but also the "carrier" of digital transformation in various industries. It is evolving from a simple advertising display tool to an important medium for conference communication, data visualization, and cultural communication. Against the backdrop of the continuous deepening of global LED display applications, high-definition LED screens will become the key to improving visual expression and user experience.
In the future, with the continuous breakthroughs in MicroLED and COB packaging technologies, the resolution, contrast and integration of high-definition LED screens will reach a new level, helping to create a clearer, more realistic and smarter visual world.
Thank you for watching. I hope we can solve your problems. Sostron is a professional LED display manufacturer. We provide all kinds of displays, display leasing and display solutions around the world. If you want to know: Shopping mall advertising: How does LED display become an eye-catching tool? Please click read.
Follow me! Take you to know more about led display knowledge.
Contact us on WhatsApp:https://api.whatsapp.com/send?phone=+8613510652873&text=Hello
0 notes
Text
LG 27UP650K-W - Màn hình máy tính IPS 4K UHD (3840 x 2160) 60Hz, 5ms, DisplayHDR 400, chế độ đọc, cổng HDMI, DisplayPort, điều chỉnh độ nghiêng, chiều cao và xoay linh hoạt.
LG 27UP650K-W 27 inch 4K QHD (3840 x 2160) Màn hình máy tính, 60Hz, 5ms, DisplayHDR 400, Chế độ Reader, Flicker Safe, HDMI, DisplayPort, Tilt/Height/Pivot có thể điều chỉnh Chất lượng hình ảnh tuyệt đẹp trong màn hình 4K-Màn hình IPS UHD 4K (3840 x 2160) 27 inch tái tạo hình ảnh rõ ràng và màu sắc rực rỡ với biểu thức gam màu DCI-P3 lên tới 95%. Trải nghiệm hòa mình trực quan với tất cả các…
0 notes
Text
VPL-GTZ380 4K SXRD Laser Projector
10,000 lumens of brightness deliver D65 industry-standard color balance and the DCI-P3 color space without any reduction in brightness.
Price:-$80,000.00

0 notes
Text
Transform Your Living Room with Optoma Home Entertainment Projectors
When it comes to creating a cinematic experience at home, nothing beats the power of a high-quality projector. Optoma Home Entertainment Projectors offer an immersive, theater-like viewing experience — right from the comfort of your living room. Whether you’re streaming your favorite movies, playing the latest video games, or enjoying live sports, Optoma delivers stunning visuals, vibrant colors, and impressive sound that take home entertainment to the next level.
Why Choose Optoma Home Entertainment Projectors?
Optoma has been a global leader in projection technology for years, offering cutting-edge solutions that combine performance, innovation, and design. Here’s why Optoma stands out:
🎥 Crystal-Clear Picture Quality
With Full HD, 4K UHD, and HDR-enabled options, Optoma projectors ensure razor-sharp resolution and lifelike clarity. Whether you’re watching an action movie or a nature documentary, every frame is rich in detail and color accuracy.
🌈 Cinematic Color Performance
Optoma projectors are engineered with advanced color technology to reproduce vivid and accurate colors. Some models support Rec.709 and DCI-P3 color gamuts, ensuring a truly cinematic color experience.
🕹️ Gaming-Ready Performance
Love gaming? Optoma offers low input lag and high refresh rate models that provide smooth gameplay with zero delay. Connect your console and enjoy gaming on the big screen like never before.
🔊 Built-in Audio
Many Optoma home entertainment projectors come with powerful built-in speakers that deliver clear and rich sound — no external sound system needed (though it’s easy to connect one if desired).
🏠 Flexible Installation & Compact Design
From short-throw options for small rooms to portable models for outdoor movie nights, Optoma projectors are designed to fit every space and lifestyle.
Popular Optoma Home Entertainment Models
Here are a few top-rated projectors from the Optoma home entertainment series:
Optoma UHD55–4K UHD, HDR10, high brightness, and gaming features
Optoma HD146X — Full HD, perfect for movie nights and casual gaming
Optoma GT1080HDR — Short-throw design with low input lag, ideal for gamers
Optoma Cinemax Series — Premium ultra-short throw projectors with 4K and smart features
Explore the full range here: 👉 Optoma Home Entertainment Projectors
Make Every Night a Movie Night
Whether you’re upgrading your entertainment setup or building a home theater from scratch, Optoma offers a projector for every need and budget. Enjoy larger-than-life visuals, brilliant color performance, and seamless connectivity — all packed into sleek, modern designs.
✨ Bring the big screen home with Optoma. 🛒 Visit www.optoma.co.in to find the perfect home entertainment projector for you.
0 notes
Text
The Ultimate On-the-Go Display: A Deep Dive into the VCHANCE 13.3-Inch OLED Portable Monitor

VCHANCE 13.3 Inch OLED Portable Monitor Touchscreen 1920x1080 1ms 10bit 100%DCI-P3 Office Travel Display Extender for Laptop Mac
👍👍Buy now: https://www.technical-info.com/vchance-13-3-inch-oled-portable-monitor
🔥🔥 DISCOUNT: 55% 🔥🔥
The Ultimate On-the-Go Display: A Deep Dive into the VCHANCE 13.3-Inch OLED Portable Monitor In a world that’s increasingly mobile, the boundaries between work, creativity, and leisure are constantly blurring. We demand technology that is not only powerful but also portable. For the modern professional, the digital nomad, the avid gamer, and the creative artist, the ability to extend one's digital workspace beyond the confines of a traditional office is paramount. This is where the VCHANCE 13.3-inch OLED Portable Monitor enters the scene, not just as an accessory, but as a game-changing tool that redefines productivity and entertainment on the move.
This isn't just another portable screen. The VCHANCE 13.3-inch model stands out with a remarkable combination of cutting-edge features: a vibrant 1920x1080 OLED panel, responsive touchscreen functionality, a blistering 1ms response time, true 10-bit color depth, and 100% DCI-P3 color gamut coverage. But what do these specifications mean in the real world? Let’s embark on a detailed exploration of how this portable monitor can revolutionize your mobile experience.
A Feast for the Eyes: The Unparalleled Beauty of OLED At the heart of the VCHANCE portable monitor lies its most captivating feature: the 13.3-inch Organic Light Emitting Diode (OLED) display. Unlike traditional LCD screens that rely on a backlight to illuminate their pixels, each pixel in an OLED panel produces its own light. This fundamental difference is the source of OLED's legendary image quality.
True Blacks and Infinite Contrast: Because individual pixels can be completely turned off, OLED panels deliver absolute blacks. This creates an infinite contrast ratio, making colors pop with incredible depth and detail, especially in dark scenes. Whether you're editing a high-resolution photograph with intricate shadows or watching a cinematic masterpiece, the level of realism is simply breathtaking.
Vibrant and Lifelike Colors: The VCHANCE monitor takes this a step further with 100% DCI-P3 color gamut coverage. DCI-P3 (Digital Cinema Initiatives – Protocol 3) is a much wider color space than the more common sRGB. This means the monitor can display a far greater range of colors, resulting in incredibly rich, accurate, and true-to-life visuals. For photographers, videographers, graphic designers, or anyone working with color-critical applications, this level of color accuracy is invaluable, ensuring your work looks exactly as you intended.
Superior Viewing Angles: OLED displays maintain their color accuracy and brightness even when viewed from extreme angles. This is crucial for collaborative work or when presenting to a small group, as everyone will see the same pristine image.
Performance That Keeps Up with You: 1ms Response Time and 10-bit Color In the fast-paced digital world, speed and accuracy are non-negotiable. The VCHANCE portable monitor is engineered to deliver on both fronts.
Blazing Fast 1ms Response Time: A 1ms response time means that the pixels on the screen can change color in just one millisecond. For gamers, this is a critical advantage, as it virtually eliminates motion blur and ghosting in fast-paced games, providing a smoother and more responsive experience. For everyday use, this translates to fluid video playback and seamless scrolling.
A Billion Colors at Your Fingertips: The monitor's 10-bit color depth allows it to display over a billion colors, a significant leap from the 16.7 million colors of a standard 8-bit display. This results in smoother color gradations and a more nuanced and realistic image. When combined with the 100% DCI-P3 color gamut, the result is a visual experience that is nothing short of spectacular.
The Power of Touch: Intuitive Control and Enhanced Productivity The VCHANCE portable monitor isn't just for viewing; it's for interacting. The responsive touchscreen adds a new dimension of functionality, turning your extended display into a hands-on workspace.
Effortless Navigation and Control: Pinch to zoom, swipe to scroll, and tap to select – the intuitive touch controls make navigating your work and entertainment more natural and efficient. For creative professionals, the touchscreen can be a game-changer, allowing for direct manipulation of images and designs in applications like Adobe Photoshop or Illustrator.
A Perfect Companion for Creatives: For digital artists and designers, the combination of a high-fidelity display and a responsive touchscreen offers an unparalleled creative canvas. Sketch, draw, and paint with precision, and see your creations come to life in stunning color and detail.
Designed for the Modern Nomad: Portability and Versatility Despite its powerful features, the VCHANCE 13.3-inch OLED portable monitor is designed with portability in mind. Its slim and lightweight profile makes it an easy addition to any laptop bag, allowing you to set up a dual-screen workspace wherever you go.
Seamless Connectivity: With both USB-C and HDMI ports, the monitor offers versatile connectivity options for a wide range of devices, including laptops, Macs, smartphones, and gaming consoles like the Nintendo Switch, Xbox, and PlayStation. In many cases, a single USB-C cable is all that's needed to deliver power, video, and touch functionality, keeping your setup clean and hassle-free.
The Ultimate Travel Companion: For the frequent traveler, this portable monitor is a productivity powerhouse. Imagine being able to have your research on one screen and your document on another while working from a hotel room or a coffee shop. Or, unwind after a long day of meetings by connecting your gaming console for an immersive gaming session.
The Verdict: A Must-Have for the Discerning User The VCHANCE 13.3-inch OLED Portable Monitor is more than just an external display; it's a statement. It's a commitment to uncompromising quality, performance, and portability. For the professional who demands a productive mobile workspace, the creative who needs a color-accurate canvas, and the gamer who craves an immersive experience, this monitor delivers on all fronts.
While the premium features may come with a higher price tag than basic portable monitors, the investment is justified by the significant leap in image quality, performance, and functionality. If you're looking to elevate your mobile computing experience and unlock new levels of productivity and entertainment on the go, the VCHANCE 13.3-inch OLED Portable Monitor is an exceptional choice that is sure to impress.
#gaming_monitor#portable_monitor#monitor_pc#monitor_screen#display_monitor#desktop_monitor#laptop_monitor#pc#laptop#phone#xbox#ps4#ps5#gaming_display#monitor#youtube#video#home
0 notes
Quote
Nintendo Switch 2の平均応答時間は33.3ミリ秒(ms)という結果になった。 この数値がどれほど深刻なものか、他のディスプレイと比較すれば一目瞭然である。 ・初代Nintendo Switch(2017年製LCD): 約21.3ms ・一般的なPC向けゲーミングモニター(LCD): 約5〜6ms ・有機EL(OLED)ディスプレイ: 約0.3ms 信じがたいことに、Switch 2のディスプレイは8年前に発売された初代Switchの液晶パネルよりも約56%も応答が遅いのである。 「Switch 2の液晶は、2017年のSwitchのディスプレイよりも明らかに劣るブラー特性を持っている」 今回の問題は、Switch 2が欠陥品であることを意味するわけではない。応答速度を犠牲にした一方で、解像度、輝度、そしてDCI-P3カバー率98%というプロ向けモニターに匹敵する広色域など、「静的な画質」は確実に向上している。
なぜSwitch 2の画面はぼやけるのか?初代より50%遅い応答速度の真相と、任天堂の「苦渋の選択」 | XenoSpectrum
0 notes