#Chevrolet Corvette 2-Rotor
Explore tagged Tumblr posts
Visit Tumblr Blog
Explore Tumblr blogs with no restrictions, modern design and the best experience.
Last Seen Tumblr Blogs


Fun Fact
The Tumblr app for Google Glass was released on May 16, 2013.
Text

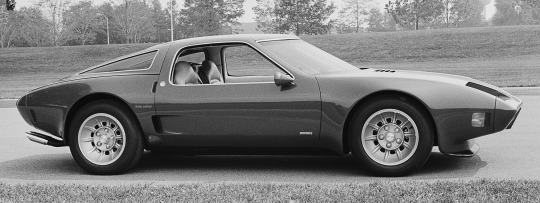


Chevrolet Corvette XP-897 GT Two-Rotor Concept, 1973. Presented at the IAA in Frankfurt 50 years ago this week, a prototype for a rotary-powered mid-engined Corvette that had been made by Pininfarina. The concept had been built over the platform of a Porsche 914 and fitted with a 2-rotor version of GM’s Wankel engine. The project went no further as General Motors abandoned their rotary engine program and it would be another 46 years before a mid-engine Corvette would go on sale
#Chevrolet#Chevrolet Corvette#concept#prototype#Pininfarina#design study#mid engine#rotary engine#General Motors#IAA#1973#50 years ago#Frankfurt Motor Show#Chevrolet Corvette XP-897#Chevrolet Corvette 2-Rotor#IAA73
591 notes
·
View notes
Photo

New Post has been published on https://www.vividracing.com/blog/top-8-best-modifications-for-the-chevrolet-c8-corvette/
Top 8 Best Modifications For The Chevrolet C8 Corvette
For model year 2020, Chevrolet had initially aimed to produce 40,000 C8 Corvettes but with chip shortages and other constraints, they managed just over 20,000 units. Despite this, the C8’s flew off the lots faster than a set of New Balance 605’s on Macy’s Father’s Day Sale… except they were everything but ‘On Sale’.
The Chevy Corvette has held its position as the quintessential American sports car since its debut in 1953, minus its 1983 skip year. While the C8 represents a significant departure from previous Corvette designs, it maintains one consistent aspect—delivering impressive performance at a relatively accessible MSRP.
In the world of C8 modifications, we’re delving into must-have enhancements that won���t break the bank if you’re one of the unfortunate souls that paid Mclaren prices for your Chevrolet. These Top 8 modifications are easily accessible and sure to make sure you stand out from the other vettes at your local Cars & Coffee.
1. Wilwood Drilled & Slotted Brake Kit and Pads
Chevrolet’s OE options for the Corvette braking system have always been plentiful and designed to be direct swaps designed to fit all trim levels with minor modification. However, the secondhand asking price has been the Achilles Heal of the OEM upgrades since the C5. Luckily, Wilwood recognized this and offers a very impressive OEM+ upgrade.
Despite its impressive stopping power, the factory brake pads tend to produce a substantial amount of dust, particularly noticeable on non-black wheeled C8 Corvettes. While it is not a major performance concern, aesthetically, you can do much better for that level of performance.
The Willwood SX6R Front Brake kit features directional staggered vane 15” rotors and a 6 piston Caliper that bolts up to the factory spindle and doesn’t compromise the factory ABS system.
Featured Product: Wilwood SX6R Big Brake Dynamic Front Brake Kit SRP Drilled & Drilled Rotor Red Caliper Chevrolet Corvette C8 2020+
Part Number: #140-17004-DR
2. Auto Addict LED Sequential Taillights
When the C7 dropped, the room was split in terms of Chevrolet’s lighting decisions. While the circular tails had become a sort of Corvette key identifying feature, the C7 would feature U-shaped runners that many would describe as Ferrari inspired.
Chevrolet unapologetically continued this trend into the C8, but with the extreme body lines and sweeping side scoops, the U’s took more of a C shape, and our friends at Auto Addict decided to enhance that third dimension, smoke them out, and fix them “in sequence”.
Featured Product: Auto Addict USA Euro Smoke Style LED Taillights Amber Sequential Pair Corvette C8 2020-2024
Part Number: #AA_CORVT_TL_EUR_C8
3. Vorsteiner VPX-101 Wheel 20×9 | 21×12
With the C8, Chevrolet took a couple of setps backwards with the wheel design, making them appear to be more of an afterthought than a deliberate part of the design. We were spoiled with C6 and C7 factory wheel options, so much so that when the C8 was revealed, the wheels were noted for lacking any depth, appeared too small, and ultimately looked budget.
Vorsteiner VPX-101 wheels are the answer to the C8’s aesthetic shortcomings. Available in your choice of finishes, the VPX 101 utilizes T6-6061 aerospace grade aluminum that is TUV rated for safety. This means, you get a 1-Piece Forged Monoblock that not only increases your diameter and mechanical grip for hard launches, but also lowers the C8’s unsprung weight for the corners.
Featured Product: Vorsteiner VPX-101 Forged Monoblock Wheel Set 20×9 | 21×12 Liquid Smoke Chevrolet Corvette C8 2020+
Part Number: #VOR-VPX-101-Corvette
4. Eventuri Air Intake
The factory C8 intake is impressive, but is designed more around comfort and emissions, meaning it could be better. This Eventuri system boasts double Venturi Housings, offering the largest internal intake volume in the market, supporting power outputs exceeding 800hp. Due to OEM trunk panel limitations, Eventuri reimagined the OE intake system, crafting it from clear Polycarbonate to display the carbon intake when the trunk is open. By expanding the intake volume, high-powered builds can maximize performance gains of up to +18whp & +17lb ft. of torque! It also looks incredible.
Featured Product: Eventuri Black Carbon Intake System Chevrolet C8 Corvette Coupe
Part Number: #140-17004-DR
5. Borla ATAK Catback Exhaust
Getting optimal performance from your Corvette is essential. Upgrading your exhaust system not only enhances the car’s sound but can also unleash additional power. Among mid-engine, high-performance vehicles, the C8 Corvette tends to lean towards a less aggressive sound. However, we knew shortly after GM announced the C8, our friends at Borla would be firing up the welders and starting on adapting their ultra-aggressive ATAK cat-back for the C8 platform. While it won’t be as aggressive as Matt Field’s Borla Exhaust C6 or the upcoming C8 Formula Drift Cars, Borla can proudly claim to have one of the most aggressive muffler systems in existence for the C8 Corvette and Vivid Racing can proudly state that we have them in stock.
Featured Product: Borla ATAK Cat Back Exhaust System
Part Number: #140839
6. ProCharger
Woah woah woah! Everything up to this point has been relatively bolt-on, relatively relatable, and relatively mild. We can’t just jump straight into forced induction, right? Wrong. The 6..2L LT’s, while different in terms of injection strategy are no different than the tried and true LS’s in that they LOVE boost… and so does ProCharger! The mid-engine setup of the C8 Corvette provides excellent weight distribution, yet it posed complexities for various typical aftermarket performance enhancements frequently seen in Corvettes, notably supercharger additions. The unique layout of the LT2 engine presented a challenge, one that ProCharger took on willingly. After extensive research and development, they’ve devised a comprehensive DIY C8 blower kit, allowing you to inject a substantial surge of boosted power into your LT2-powered C8 Corvette!
7. RCS ST Aero Kit
Like many, while I was stoked for the release of the C8, I was not too impressed with the Aero from factory. After seeing Chip Foose’s rendition of the C8, I knew I could never look at it the same way again. That was, until RCS released their C8 Aero Kit. Unlike a majority of what’s available on the market, RSC didn’t just stop at the front lip. Their C8 Kit, known for it’s premium quality and lack of fiberglass components, is a comprehensive full carbon fiber aero kit that features a front splitter, high wing spoiler, side skirts, rear diffuser, hatch vents, Engine intake side vents, mirror covers, front intake vents, and B-pillar covers all finished in a gloss carbon fiber to complete the C8’s supercar look and feel.
Featured Product: RCS ST Aero Kit C8 Corvette 2020-2023
Part Number: #RSCVETST
8. Headers
As the factory Engine Control Unit (ECU) remains locked, tuning a C8 to optimize gains from bolt-on upgrades is hardly repeatable. Additionally, where in previous generations of Corvette the catalytic converters have been the killer of gains, the C8’s factory high flow cats are barely a hindrance at all. And, while a few companies have risen to the challenge, Kooks has released their highly anticipated 3” Collector, 1-7/8” primary Super Street Series Headers that works in harmony with the factory systems, but helps evacuate and scavenge the exhaust gasses GM missed. While known for the work in the American Muscle world, I’m kind of hearing a more exotic tone accompanying Kooks exhausts recently, which could mean they have something in development for future C8 trims.
Featured Product: Kooks 3″ 1-7/8 Super Street Series Headers
Part Number: #21801400
There are dozens of other great ways to modify your C8 Corvette. Let our performance specialists help you decide what’s right for you by calling 1-480-966-3040 or emailing [email protected].
5 notes
·
View notes
Photo

1995 Chevrolet Corvette Coupe for Sale in Merrifield, VA 22116
This 1995 Chevrolet Corvette is Powered by a 5.7L V8 Engine Paired with an Automatic Transmission. This Corvette is Shown in Torch Red w/ Black Leather Interior and 26,100 Original Miles. This Corvette has been Garage Kept and the Owners are Non-Smokers.
Features:
6-Way Power Adjustable Driver / Passenger
Black Leather Seats
2 Tops + Targa
Chrome Z06 Style Wheels (on Car)
Refinished Original Wheels
All Original Equipment, except Battery, Tires, Fluids / Filters & Shocks
Torch Red Paint ~ Black Leather Interior
Traction Control
Both Factory Tops: Blue Tinted & Painted (Never Used)
Additional Top: Black Tubular Targa Bar $400.00 Value
Dual Electric Heated Mirrors
Halogen Fog Lamps
AM/FM Stereo Cassette w/Clock
Air Conditioning
Analog / Digital Instrumentation
Electronic Speed Control
Intermittent Wipers
Power Door Locks
Rear Window Defogger
Power Windows w/ Driver Side Express Down
Remote Glass Rear Hatch Release
Performance Axle Ratio
Ceramic Coated Paint
Nitto Tires with less than 5000 miles
Centex Drilled & Slotted Brake Rotors with Ceramic Pads
Magnaflow Mufflers
Have Laminated Bowling Green Build Sheet
Laminated Original Window Sticker
2 Sets of Keys w/ Remote
Owner’s Manual
Literature & Receipts for Maintenance
Video: https://youtu.be/cfIwGMht1tc
For assistance with Financing, Transportation, or Inspections please phone Customer Support at:
(402) 502-8385
ATTENTION BUYERS *Caveat Emptor* Please Remember to Inspect Vehicle Prior To Purchase!
1 note
·
View note
Photo

1966 Chevrolet Impala SS facts ⤵️⤵️⤵️⤵️⤵️⤵️⤵️⤵️ Engine: ZZ502 Deluxe crate Displacement: 502 ci Compression Ratio: 9.6:1 Bore: 4.470 inches Stroke: 4.000 inches Cylinder Heads: Aluminum oval port, stainless 2.25/1.88 valves, 110cc combustion chambers, 290cc intake ports, 110cc exhaust ports, screw-in rocker studs Rotating Assembly: Forged steel crankshaft, shot-peened connecting rods, forged pistons Valvetrain: Stamped steel 1.7:1 rocker arms, 3/8-inch pushrods Camshaft: Hydraulic (0.527/0.544-inch lift; 224/234-deg. duration at 0.050-inch), roller lifters Induction: Oval port dual-plane intake manifold, FAST 2.0 injection throttle body, Walbro 450-lph in-tank pump Ignition: FAST CDI, HEI distributor, MSD primary wires Exhaust: Sanderson headers, 1 7/8-inch primary pipes, Flowmaster 40 mufflers, custom 3-inch system by American Muffler Ancillaries: Be Cool radiator, SPAL fans, Tanks, Inc. steel fuel reservoir, Painless wiring install Output: 508 hp at 5,200 rpm, 580 lb-ft at 3,600 rpm Transmission: Chevrolet Performance Supermatic 4L85E, 2.48:1 Low gear, 3,000-stall Supermatic torque converter Rear Axle: GM 12-bolt, Eaton differential, 3.73:1 gears, Inland driveshaft Front Suspension: 2-inch drop spindles, OE control arms/springs, Hotchkis antisway bar, Monroe shock absorbers Rear Suspension: Hotchkis upper and lower links, antisway bar, adjustable Panhard bar; Delco shock absorbers Brakes: Baer 13-inch rotors, six-piston calipers, front; Baer 12-inch rotors, four-piston calipers, rear; Baer proportioning valve, GM master cylinder Wheels: Halibrand Sprint II 18×7 front, 18×8 rear Tires: Continental ExtremeContact DW 245/45 front, 255/55 rear Steering: ididit column, Flaming River box, Budnik wheel Shifter: OE in conjunction with a TCI paddle shifter and FAST controller Instrumentation: Dakota Digital Audio: RetroSound head unit, 2×100 amps by Eric Sorenson HVAC: Vintage Air Bodywork: Bob Stapleton w/ Rich and Tony at Perfection Auto Works Paint: BASF Diamont Marina Blue Pics: @grantcoxphoto 🔵🔵🔵🔵🔵🔵🔵🔵🔵🔵🔵 #v8 #502 #zz #classiccar #hotrod #musclecar #chevy #chevrolet #impala #camaro #corvette #ss #super #sport #mopar #ford https://www.instagram.com/p/BpincbRhQXD/?utm_source=ig_tumblr_share&igshid=cgas5fswtg8b
#v8#502#zz#classiccar#hotrod#musclecar#chevy#chevrolet#impala#camaro#corvette#ss#super#sport#mopar#ford
163 notes
·
View notes
Text
Fren Diski En Ucuz ve Garantili Urunler
Fren diski
📷
Renault Fren diski genellikle dökme demirden yapılır, ancak bazı durumlarda takviyeli karbon-karbon veya seramik matrisli kompozitler gibi kompozitlerden yapılabilir. Bu, tekerleğe ve/veya aksa bağlıdır. Tekerleği yavaşlatmak için, fren kaliperine monte edilmiş fren pabuçları şeklindeki sürtünme malzemesi, diskin her iki tarafına mekanik, hidrolik, pnömatik veya elektromanyetik olarak zorlanır. Sürtünme, diskin ve bağlı tekerleğin yavaşlamasına veya durmasına neden olur.
Dağ bisikleti disk frenleri, basit, mekanik (kablo) sistemlerden, yokuş aşağı yarış bisikletlerinde yaygın olarak kullanılan pahalı ve güçlü, çok pistonlu hidrolik disk sistemlerine kadar değişebilir. Gelişmiş teknoloji, hızlı dağ inişlerinde ısının solmasını önlemeye yardımcı olmak için tanıtılan, otomobillerdekine benzer dağ bisikletlerinde kullanım için havalandırmalı disklerin oluşturulmasını gördü. Daha az yaygın olmasına rağmen, diskler, öngörülebilir frenleme ile tüm hava koşullarında bisiklet sürmek için yol bisikletlerinde de kullanılır, ancak disklerin bazen büküldüğü kalabalık parklarda hasar vermesi daha zor olduğu için kampanalar bazen tercih edilir. Çoğu bisiklet fren diski çelikten yapılmıştır. Peugeot Fren diski Paslanmaz çelik, paslanma önleyici özelliğinden dolayı tercih edilmektedir.[39] Diskler incedir, genellikle yaklaşık 2 mm'dir. Bazıları iki parçalı yüzer disk stili kullanır, diğerleri ise tek parça katı metal rotor kullanır. Bisiklet disk frenleri, rotoru her iki taraftan sıkıştıran iki pistonlu bir kaliper veya önce rotora temas eden ve ardından rotoru hareket etmeyen balataya doğru iten bir hareketli pedli tek pistonlu bir kaliper kullanır.[40] Bisikletlerde enerji verimliliği çok önemli olduğu için, bisiklet frenlerinin yaygın olmayan bir özelliği, fren bırakıldığında kalan sürtünmeyi ortadan kaldırmak için balataların geri çekilmesidir. [açıklama gereklidir] Buna karşılık, diğer frenlerin çoğu, en aza indirmek için serbest bırakıldığında balataları hafifçe sürükler. ilk operasyonel seyahat.[açıklama gerekli]
En yaygın kaliper tasarımı, bir silindir içinde hidrolik olarak çalıştırılan tek bir piston kullanır, ancak yüksek performanslı frenler on iki adede kadar kullanır. Modern otomobiller, güvenlik önlemi olarak her bir tekerlek setindeki frenleri harekete geçirmek için farklı hidrolik devreler kullanır. Hidrolik tasarım ayrıca Volkswagen Fren diski kuvvetini artırmaya yardımcı olur. Bir kaliperdeki piston sayısı genellikle 'tencere' sayısı olarak anılır, bu nedenle bir araçta 'altı pot' kaliper varsa bu, her bir kaliperin altı piston barındırdığı anlamına gelir.
Tarihsel olarak, fren diskleri tüm dünyada, Avrupa ve Amerika'da güçlü bir konsantrasyonla üretildi. 1989 ve 2005 yılları arasında, fren disklerinin üretimi ağırlıklı olarak Çin'e göç etti.
1963 yılında Studebaker Avanti disk frenlerle yapıldı. [21] (Bendix sistemi diğer Studebaker modellerinin bazılarında isteğe bağlıydı[22]). Ön disk frenler 1965'te Rambler Marlin'de[23] (Bendix üniteleri tüm American Motors'un Rambler Classic ve Ambassador modellerinde[24] isteğe bağlıydı) ve ayrıca Ford Thunderbird'de[25] ve Lincoln'de standart donanım haline geldi. Kıta.[26] 1965 yılında Chevrolet Corvette Stingray'de dört tekerlekli Audi Fren diski sistemi de tanıtıldı.[27] Çoğu ABD arabası, 1970'lerin sonlarında ve 1980'lerin başında ön kampanalı frenlerden ön disk frenlere geçti.
Otomobiller için birçok erken uygulama, frenleri tahrik milinin iç tarafında, diferansiyelin yanında konumlandırırken, günümüzde çoğu fren tekerleklerin içinde yer almaktadır. Bir iç konum, yaysız ağırlığı azaltır ve lastiklere bir ısı transferi kaynağını ortadan kaldırır.
- Yeterli korumanın kullanımından kişisel veri kılavuzu, Kanun'da belirtilen hallerin görünümünde (Kanun'un 5. hazırlaması ile 6. sınıfta 3. eğitimde gerekli) yeterli korumalarında yazılı olarak gösterilen ve Kurul'da gerekli olan kişiler, durum bilgilerinin yazımı olarak yetiştirilir. gerçekleşebilir. Kişisel Verilerin Sistemi güvenli ilan edilecek.
Arabanızın tekerleklerine takılı olan Mercedes Fren diski, fren balataları ile birlikte çalışarak sürtünme uygulayarak aracınızı yavaşlatır. Arızalı fren diskleri, siz ve diğer yol kullanıcıları için ciddi bir risk oluşturabilir - bunları değiştirmeniz gerekirse, size en yakın Euro Car Parts mağazasına gidin. Ayrıca, yedek fren balataları satın alınıp takıldığında Fit It For Me hizmetimiz aracılığıyla fren diski montajı da sunuyoruz.
0 notes
Text
XTOOL OBD2 Products Software Upgrade Notice - April 2021
Xtool is a younger car tool brand when comparing with Autel, Xhorse, but it is increasingly become competent one in the OBD2 tool market. It has all kinds of easy-to-use, professional and cost-efficient car diagnostic scanners.
Currently of extreme competence key programmer tablet in OBD2 market are there tools like Xtool X100 PAD3, Xtool A80 Pro, etc. They are great tools and have got high praise from the customers worldwide, especially in the European area.
Here below is the page link of XTOOL car professional products in cardiagtool.co.uk e-shop:https://www.cardiagtool.co.uk/wholesale/brand-xtool/
📷
1.MAJOR CAR DIAGNOSIS TOOLS UPDATE
HONDA – HONDA V11.40
New special functions for engine, anti-lock, four-wheel drive and smart key in new modes to further improve special function coverage and fix fault codes and data flow problems in the Accord, CRV and Odyssey.
New special function "Motor rotor position correction" for the engine system.
New action test “regulator venting” and special functions “brake pressure sensor group”, “sensor group”, “steering angle sensor neutral setting” and “bleed warning system” for the anti-lock brake system. steering angle sensor neutral point setting” and “bleed warning system”.
Adaptive cruise control system with new action tests “throttle opening angle”, “brake booster 1”, “brake booster 2”, “brake booster 3”, “brake booster 4”, “brake booster 5” and “brake booster 6”. Brake Booster 3”, “Information Display”, “CMBS Brake” and “Indicator Check”.
4WD Free Control System new actuation tests “Shift solenoid oil pressure test”, “Drive train test” and special functions “Drive train calibration”, “Drive train calibration”, “Drive train calibration” and “Drive train calibration”. “Drive train calibration”, “Drive oil life Resett” and “Calibration data clear”.
Smart key entry system with new special functions “Ignition knob change”, “All keys lost”, “Add 1 key”, “Resett key” and “Custom key”. key setting” and “customization”.
New special function “ECM/PCM Resett” for the electronic cable control system.
7、The FCVSCM system has a new action test “H2 line pressure release mode”.
8、The CAN gateway system has a new action test “F-CAN bus connection unit check”.
New special functions "High voltage battery diagnosis", "SOC pResettting” and “IMA ECU replacement” for the electric drive system.
New special functions for the instrumentation system "Maintenance reminder device (US market)" and "Maintenance reminder device (European market)".
New special function “PAWS unit replacement” for the precision four-wheel steering system.
Hyundai – KIA V13.0
New Hyundai Elantra, MISTRA, Encino, Fiesta Pure Electric and other new models with basic features, further leading model coverage
Add 3 new models: MISTRA (DU2) 2021, 7th generation Elantra (CN7C) 2020, MISTRA electric (DU2 EV) 2021, etc. Read fault codes, clear fault codes, read data stream, action test, version information and other basic functions.
New: Encino electric (OSC EV) 2021, Sonata X (DN8C) 2021, Fiesta electric (SQ EV) 2021, New generation ix25 (SU2) 2021, MISTRA (DU2) 2021, 7th generation Elantra (CN7C) 2020, MISTRA electric (DU2 EV) Special features for engines, transmissions, anti-lock, power steering, etc. for the 2021 model year.
New special features for engines, transmissions, anti-lock, power steering, etc. for K3 EV (BDC EV) 2021, K5 (DL3C) 2021, new generation KX3 (SP2C) 2021, etc.
VW - All models V12.10
New system unprotection functions for Skoda models 15 airbag system, 09 central electrical system, 56-radio, etc.
New system unprotection functions for some Volkswagen Audi models 56-radio, 57-TV tuner, 84-night vision system, 8F-left front seat belt tensioner, etc.
New system unprotection for Skoda models 15 airbag system, 09 central electrical system, 56-radio, etc.
New system unprotection functions for some Volkswagen Audi models 56-Radio, 57-TV tuner, 84-Night vision system, 8F-Left front seat belt tensioner, etc."
FORD - FORD USA/FORD EU/FORD AUS/FORD CHANGAN/Lincoln V12.90
Ford Diagnostics new model upgrades to 2021.
Ford offline programming upgrade to 2020.
New Ford 2021 new model year basic features.
New Ford 2018-2020 new vehicle model programmable module installation features.
New Ford Taurus (Taurus), Fiesta (Fiesta), Lincoln MKX and other models Smart Link programming, RF keypad learning process, ATC barcode input, cable adjustment mode, EVAP test and other special features.
SAIC GM - BUICK/Chevrolet/Cadillac V15.00
The first to release a VIN number repair function.
New CANFD models (New Corvette, GLU, Encore, Genesis) diagnostic basic functions and special functions.
New one-touch brush hidden frame number repair function, including engine, body
instrumentation, power steering, electronic brake and airbag modules.
New one-touch repair function for hidden transmission hardware number."
Changan - Kuayue V5.10
New X1, X3, X5, D5, KY5, new KY5, KY5MINI, KY10, mini3 models
V3, V5, T3 models, some basic functions modified, new special functions Add” New X1, X3, X5, D5, KY5, new KY5, KY5MINI, KY10, mini3 models, support Changan Kuayue(China National Ⅵ Emission Standard) diagnosis
DONGFENG - XIAOKANG/FENGGUANG V7.60
New diagnostic support for C51, C52, Ruichi EC31, Ruichi EC35II, Ruichi EC35III and Ruichi EK07S
First release of DONGFENG Fengguang brand
New support for reading version information, reading fault codes, clearing fault codes, reading data streams, reading freeze frames, action tests and special functions for the following models: C51, C52, Ruichi EC31, Ruichi EC35II, Ruichi EC35III, Ruichi EK07S
New DONGFENG Fengguang"
CHERY – KARRY V9.52
New support for Karry pickups
New Karry pick-up truck (first release)
2.MAJOR KEY PROGRAMMING UPDATE
SAIC Maxus V26.32
Support all smart keys to read the anti-theft password
Add pin code reading for all models with smart keys
BAIC – SENOVA X55/ D70/ BJ40L/ EC3/ EC200/ EU400/ EU5/ EU7 V27.10
Add pin code reading
GEELY - BOYUE/BOYUE PRO/XINGYUE/BINYUE/ HAOYUE/JIAJI/ NEW YUANJING V27.24
Add pin code reading
DONGFENG - FENGXING S50EV/ S500EV (2017)/ S50EVD (2018)/ S50EVB (2018-2020)/ S50 EVC (2018-2020)/ CM5EV (2017)/ CM5EVA (2018)/ CM5EVB (2019-2020)/ SX1EV (EX1) V26.51
Supports key matching for EV models
Add pin code reading for models after 2017
Chery – EQ5/ XINGTU TX V27.21
Support all key lost
Add key matching for DAMAYI(EQ5) smart keys
Add key matching and ECU matching for XINGTU TX smart keys
JMC -YUHU 5/ YUHU EV/Teshun L500EV V26.31
Add remote key matching for YUHU 5/YUHU EV/TESHUN L500EV
JAC – Sailor/ Gallop V27.03
Add remote key matching for Sailor T6
Add remote key matching for Gallop
Toyota V26.75
Support all key lost
Support all key lost for Toyota Chip 88 smart keys
Toyota US - RAV4 V26.16
Support all key lost
Add key matching for 2019 all key lost
BMW – All Models V27.71
Support part F chassis gearbox wipe reset
MEVD174K, MEVD17KW engine: Read ECU information/Read & write ISN/Write VIN
DME8FF_R engine: Backup & reset code
8HP transmission for F series chassis: Reset & update EGS
M35080(Odometer for E series chassis): Read & write data, mileage correction
M35128(Odometer for F series chassis): Read & write data, mileage correction
M35160(Odometer for F series chassis): Read & write data, mileage correction
MSV90 engine: Read ISN
EWS IMMO system: Key enable & disable
Hyundai/ KIA V27.26/ V27.36
Support password-free reading of 8A chip after 2019
Add pin code reading for 8A chip after 2019(KIA K3, etc.)
GM - Buick Velite 6/ Chevy Blazer V27.83
Support all key lost
Add smart key matching
Instrument Cluster – Trumpchi/ Nissan/ Ford/ Land Rover/Maserati V30.00
Add mileage correction for GAC Trumpchi GS7/GS8/GM8 digital display(35XX)
Add mileage correction for 2019- Nissan Altima digital display
Add mileage correction for 2017- Ford Mondeo dual digital display
Add mileage correction for 2017- Range Rover Sport full LCD display
Add mileage correction for 2005-2006 Maserati Quattroporte and 2018- Ghibli/Levante/Quattroporte
KC501 – Honda/ GM/ BMW V10.06
Supports BCM reading for 2019- Honda Civic
Supports BSM3 reading for GM
Supports CAS1 reading for BMW
Supports footwell module reading for E series chassis
Supports reading & writing for M35080/M350160 chip
3.MAJOR SPECIAL FUNCTIONS UPDATE
Maintenance Light Reset (America) - CADILLAC V28.05
Add 2020 CT4, CT 5 Maintenance Light Reset function
Maintenance Light Reset (America) - CHRYSLER/GM V28.10
Add Maintenance Light Reset and auto scan function for CHRYSLER/Jeep/Dodge
Add Maintenance Light Reset function for Chevrolet Onix (2020 model), Tracker (2021 model), Chuangku (2021 model)
Maintenance Light Reset (China) - GWM/CHERY/GEELY V29.10
Add Maintenance Light Reset function for JOLION, ORA Good Cat
Add Maintenance Light Reset function for CHERYEQ5
Add Maintenance Light Reset function for Haoyue
Maintenance Light Reset (China) - DONGFENG Glory/MAXUS V29.10
Add Maintenance Light Reset function for ix7, ix5, E3
Add Maintenance Light Reset function for EG50, T70, V90, EV90, EV30, EXTENDER, G20, EUNIQ5, EUNIQ5 PLUS-IN, EUNIQ6, EUNIQ6 PLUS-IN, EV30 OVERSEAS
Maintenance Light Reset (China) – GWM V29.11
Add Maintenance Light Reset function for Haval third generation H6, tank 300, Haval big dog
SAS reset (China) - GWM/GEELY/ CHERY V8.43
Add for JOLION, ORA Good Cat.
Add SAS reset function for GEELY Hao Yue
Add SAS reset function for EQ5
SAS Reset (China) - GWM/CHERY/JMC/BAIC MOTOR/SAIC MG/ROEWE/JAC/Hunter/DONGFENG FENGXING/CHANGAN V8.43
Add SAS reset function for GWM.
Add SAS reset function for CHERY New Tiggo 7, New Energy ArrizoE
Add SAS reset function for new JMC tiger, tiger 5
Add SAS reset function for new SENOVA brand new D50, brand new D50 (China National VI).
Add ZS yaw rate sensor calibration function for MG6 (2014).
Add SAS reset function for MG EZS, EMG6, IP32P_CN6
Add steering wheel calibration function for ROEWE 360 (1.5L)-.
Add yaw rate sensor calibration function for ROEWE i5, ei5, i6, ei6, RX3.
Add SAS reset function for ROEWE ei6 Plus, Marvel X "
Add JAC Refine M3-1.8VVT, Heyue A30 GCC, Pickup T8, Micro Card X200SAS reset function.
Add electronic stability system for Refine M4, M6
Add hunter X5, X5 pure electric SAS reset function.
Add SAS reset function for DONGFENG FENGXING DONGFENG FENGXING CM5EV (2017-2020), SX1EV(EX1), S50EV/S500EV (2017), S50EVB/S50EVD (2018), S50EVB (2019-2020), S50EVC "
Add SAS reset function for CHANGAN Ruicheng CC
DPF - HONDA V6.70
Add DPF for Honda
DPF - Benz /GWM /JMC /GEELY /MAXUS V6.60
Add DPF function for Mercedes-Benz hatchback SPRINTER 906, Mercedes-Benz hatchback VITO/VIANO (VITO/VIANO) 639, Mercedes-Benz hatchback VITO/V (new Vito/V-class) 447 (after 2016), Mercedes-Benz hatchback SPRINTER 909
Add DPF function for GWM car Fengjun 5 (China National VI), Haval H2 (China National VI) and other models
Add the DPF function of JMC cars N800HP China VI and N806 models
Add the DPF function of GEELY Automobile National VI
Add DPF function for MAXUSD60 and other models
EPB Reset (America) - GM V23.56
Add EPB Reset for Chevrolet (China) Chuangjie, Sail EV, CADILLAC (China) CT4, CT5. Chevrolet Corvette, Cheyenne, SS, Spark EV, Lumina, CADILLACELR, Holden Capaci 5, Capaci 7
EPB Reset (China)- GWM/ROEWE/MAXUS V23.87
Add EPB function for Hover Big Dog, JOLION, Tank 300, ORA Good Cat
Add EPB function for new energy ei6 Plus
Add EPB function for D60, G10, G20, G50, V90, EV80, FCV80, EUNIQ5 (pure electric), EUNIQ5 PLUG-IN (hybrid), EUNIQ6 (pure electric), EUNIQ6 PLUG-IN (hybrid), EUNIQ6 PLUG-IN( Hybrid).
Gearbox Match – KIA /GWM V16.35
Add Gearbox Match function for Haval CHULIAN
New Asia car series Kia K5 (2020-2021) Gearbox Match
Throttle Match (Asia) - KIA V28.47
Add throttle matching function for Freddy (ND), K4 (PFC), K5 (JFC)-(2020 models)
Add throttle matching function K2(UC)-(2019-2020 models)
Add throttle matching function K3 (BDC), K5 (DL3C), KX5 (QLC)-(2021 models)
Add throttle matching function K3 PHEV (BDC PHEV), K5 HEV (JFC HEV), K5 PHEV (JFC PHEV), KX1 (QE), KX7 (QMC), PEGAS (AB)-(2020-2021 models)
Add throttle matching function for a new generation of KX3 (SP2C)-(2019-2021 models)
Add throttle matching function for Kaizun (VG), Witkey (VQ), Cee'd (ED), Cerato/Fredi (TD), Ophelias (GH), Far Ship HEV (TF HEV), Far Ship (TF), Picanto (TA), Shuer (AM), Hybrid (TF HEV), Opitma (TF/QF), Maxima (JB), Sorento (XMA)
Add throttle matching function Cerato/Freddy (YD)-(2014-2017 models)
Throttle Match (Asia) - Proton/SUZUKI/SSANGYONG V28.47
Add throttle matching function for Proton ARENA/JUMBUCK, GEN2, EXORA, PERSONA, PERSONA ELEGANCE(DOM), SAGA, SAGA BLM, SAGA FL, SATRIANEO, SATRIANEO GTI, WAJA CAMPRO/IMPIAN, WIRA/PERSONA EXPORT, EXORA BOLD, PREVE, SAGA FLX, SUPRIMA S, INSPIRA
Add throttle matching function for Suzuki EQUATOR, LANDY C26, LANDY C27, Tianyu SX4
Add throttle matching function for Ssangyong KORANDO, TIVOLI-XLV, REXTON W, RODIUS-STAVIC II
Throttle Match - DONGFENG XIAOKANG/DONGFENG Glory/ MAXUS /GWM /JAC /JMC /GEELY /SOUEAST V28.57
Add throttle matching function for XIAOKANG D51, D52
Add throttle matching function for Fengguang 580PRO, IX5 power upgrade version, S560 (2019 model), IX7
Add throttle matching function for MAXUSD60, EUNIQ5 PLUG-IN (hybrid), EUNIQ6 PLUG-IN (hybrid), G50, G20, T60 (D20 engine), G10 (D20 engine), D90, G20, T70, EXTENDER (Thailand version T70), V90, V80
Add throttle matching function for GWM JOLION
Add throttle matching function for Xingrui, Heyue A30 GCC
Add throttle matching function for classic Yuhu, new Yuhu, Baodian series, Baowei series diesel C63 system, Yuhu 5, Yuhu 7, Yuhu 9, Baodian series (new) and light truck series N600HD5, N720, N806
Add throttle matching function for GEELY Vision X3 (2019 models), Vision X6 (20 models-Type 2), Vision S1 (2019 models-China V), new Vision (2019 models), Emgrand GS-15TD, Emgrand S1 (2019 models)
Add throttle matching function for Throttle Match matching function for Delica and Futura
Throttle Match - GWM/ JAC V28.58
Add throttle matching function for GWM Harvard Big Dog, WEY Tank 300
Add throttle matching function of JAC Jiayue X7 and Si Hao X7/X8
Throttle Match - CHERY V28.58
Add throttle matching function for X70, X70M, X70 COUPE, X70S, X90, X95
Don't forget to contact us at:
Email: [email protected] Skype: cardiag.co.uk Whatsapp: +86 15002705698
Or leave a message at https://www.cardiagtool.co.uk/
to tell us what suggestions or questions you have about our products.
Source:http://blog.cardiagtool.co.uk/xtool-obd2-products-spftware-update-notice-april-2021/
1 note
·
View note
Photo


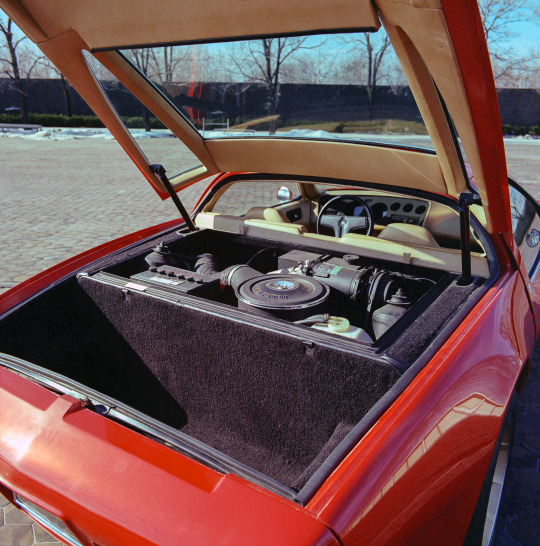
Chevrolet Corvette 4-Rotor, 1973. A development of the earlier XP-882 mid-engined Corvette prototype fitted with 2 of GM’s twin rotor engines that were destined for the Vega. After GM abandoned its rotary engine project the 4-Rotor lost its Wankel engine and became the Aerovette fitted with a V8
424 notes
·
View notes
Photo

1955 Chevrolet 210 Facts ⬇️⬇️⬇️⬇️⬇️⬇️⬇️ Engine: 2012 Year One crate Displacement: 350 ci Compression Ratio: 9.7:1 Cylinder Heads: Ported 23-degree Dart Iron Eagle, 76cc combustion chambers, 1.94/1.50 stainless steel valves Rotating Assembly: Cast-iron crankshaft, Eagle forged steel connecting rods, hypereutectic pistons, SRP ring packs Valvetrain: Premium springs, locks, retainers, studs, guideplates and seals; 5/16-inch pushrods, 1.6:1 stamped steel rocker arms; Billet Specialties rocker covers Camshaft: Year One hydraulic roller Induction: Pro Products Crosswind dual-plane manifold, Quick Fuel 750-cfm carburetor, Speedway Motors air cleaner Ignition: MSD, MSD primary wires Exhaust: Doug’s long-tube tri-Y, 1 5/8-inch primaries, 2.5-inch system, Flowmaster 40 mufflers Ancillaries: Dynamat insulation, Griffin aluminum radiator Output (at the crank): 415 hp at 5,800 rpm, 406 lb-ft at 4,900 rpm Transmission: Muncie M21 four-speed, Centerforce flywheel and clutch assembly, Gear Vendors Under/Overdrive Rear Axle: 9-inch type, 4.11:1 gears, limited-slip differential, Moser 31-spline axleshafts, shortened prop shaft Front Suspension: CPP 2-inch drop spindles, lowering kit, springs/shocks, antisway bar Rear Suspension: CPP springs/shocks Brakes: CPP 13-inch rotors, four-piston calipers, front; CPP drums, rear; ABS Power Brakes master cylinder/booster Wheels: Wheel Smith 15×5 front, 15×8 rear Tires: Classic All Season 165/80 front, Mastercraft Avenger GT 255/70 rear Seats: ProCar front Steering: Flaming River tilt column, CPP power steering conversion, Con2R wheel Shifter: Hurst Dash: Stock w/ Danchuk insert Instrumentation: Classic Industries HVAC: Vintage Air Paint: Custom Green Mist blend with Pearl Grille: Danchuk stainless steel Bumpers: Danchuk Smoothies front and rear Pics: @timsuttonphoto 2️⃣1️⃣0️⃣2️⃣1️⃣0️⃣2️⃣1️⃣0️⃣2️⃣1️⃣0️⃣ #chevy #chevrolet #belair #210 #camaro #chevelle #corvette #impala #ford #v8 #mopar #classiccar #hotrod #musclecar #car #vintage #sleeper
#v8#camaro#chevy#classiccar#car#210#belair#mopar#hotrod#musclecar#sleeper#impala#vintage#chevrolet#corvette#ford#chevelle
119 notes
·
View notes
Text
Berikut Sejarah dan Spesifikasi Mobil Chevrolet Corvette Grand Sport yang Saat ini Semakin Canggih
Berikut Sejarah dan Spesifikasi Mobil Corvette Grand Sport yang Saat ini Semakin Canggih dan Memiliki Fitur Lengkap - Di dunia Corvette, nama "Grand Sport" memiliki bobot. Ini mewakili garis keturunan mobil yang, pada satu waktu atau yang lain, telah mendominasi jalan dan trek. Ini dimulai sebagai mobil balap, tetapi hari ini adalah trim paling populer dari C7 ‘Vette. Tetapi apa yang membuat mobil ini begitu istimewa bagi dunia Corvette? Owners Pemilik Vette terkenal dengan baik di mobil mereka dan terkenal bersemangat tentang mobil sport top Chevy. Jadi mari kita lihat apa yang membuat Grand Sport menjadi artikel kasih sayang kolektif mereka.
Sejarah Pertama
Legenda Grand Sport dimulai secara rahasia. Insinyur Corvette terkenal Zora Arkus-Duntov merasakan ancaman Shelby Cobra, dan ingin membuat versi ringan Corvette untuk menyaingi itu. Hasilnya adalah salah satu ettes Vette yang paling didambakan di planet ini. Duntov menciptakan bingkai tubuh "birdcage" yang unik, membungkusnya dengan aluminium yang lebih tipis, dan menempatkan tenaga 550-tenaga kuda 377 inci kubik V8. Begitu GM GM mengetahui program itu, mereka menutupnya. Dari 125 mobil yang direncanakan, hanya lima yang dibangun. Mereka sebentar berpacu, dengan satu bahkan menang di Watkins Glen pada tahun 1963.
Tampilan Ikon
Chevy Corvette Grand Sport hadir dalam banyak kombinasi warna. Seperti C4, dua garis menandai bagian atas fender depan. Selain sentuhan yang dikenali itu, Grand Sport memiliki garis balap besar yang dimulai di tengah kap mesin dan menjalankan panjang mobil. Jika Anda menginginkan sesuatu yang lebih istimewa, Edisi Kolektor Grand Sport hadir dalam Watkins Glen Gray dengan garis-garis biru Tension di fender. Ada juga paket desain suede Twilight Blue, Spice Red, dan Jet Black untuk lebih meningkatkan tampilan Grand Sport Anda.
Mesin
Meskipun Grand Sport memiliki fitur mesin Corvette standar, Grand Sport memiliki fitur sistem knalpot dual-mode yang dapat beralih dari tenang menjadi sangat panas dengan menekan sebuah tombol. Dan ingat saja bahwa Corvette standar tidak bungkuk, mengeluarkan 460 tenaga kuda dan torsi 465 pon kaki Mesin ini juga dilengkapi dengan bah kering dari edisi Z51. Sistem oli bah kering menggunakan reservoir oli terpisah dan bukan oli yang terletak di bawah mesin, seperti pada "sistem bah basah" yang lebih umum. Di tikungan keras di tempat basah, minyak akan tumpah, tetapi dengan tempat kering, minyak tetap berada di tempatnya. Anda bisa mendapatkan Grand Sport dengan manual tujuh kecepatan (dengan pertandingan putaran aktif) atau transmisi otomatis delapan kecepatan. Otomatis memiliki Z51's 2.
Ukuran yang Lebih Luas
Grand Sport berukuran 3,5 inci lebih lebar dari Corvette standar, dengan lebar total 77,4 inci. Ini adalah lebar yang ditetapkan untuk Corvette Z06. Dengan ban besar yang mencengkeram jalan, Corvette sebenarnya terasa lebih lebar dari itu. Ketika berbicara tentang menikung dan menangani, lebar itu bagus, tetapi itu hanya satu komponen untuk mobil sport yang sukses. Anda memerlukan beberapa perangkat keras yang serius juga.
Keunggulan Sistem Canggih
Semua versi Corvette memiliki sistem peredam Magnetorheological inovatif (juga dikenal sebagai MagneRide), yang dapat menyesuaikan dengan kondisi jalan dan memungkinkan untuk mode drive yang berbeda. Tetapi tidak semua sistem kontrol pengendaraan magnetik (lebih mudah untuk dikatakan dan dieja) diciptakan sama. Dengan sistem ini, ada banyak, banyak tuning potensial. C7 standar memiliki versi yang lebih lunak, dan Z06 tingkat atas memiliki versi paling tegas. Penyesuaian Grand Sport ada di suatu tempat di tengah.
Roda, Rem, dan Ban
Grand Sport memakai desain unik, serba hitam (19 inci di depan dan 20 inci di belakang) yang dibalut ban Michelin Pilot Sport Cup 2. Ini memberikan cengkeraman yang intens dan membuat kesan yang hebat terus bergulir. Anda juga bisa mendapatkan paket Z07 opsional, yang membawa beberapa gigi dari Corvette Z06, termasuk rotor rem karbon-keramik besar dengan diameter 15,5 inci di depan dan 15,3 di belakang.
Buka Tape Game
Grand Sport tersedia dengan Performance Data Recorder. Fitur ini dapat merekam audio dan video dari mengemudi Anda, dengan 30 titik data berbeda, dan diaktifkan dengan menekan satu tombol. Data disimpan pada kartu SD, yang bisa Anda bawa dan tonton di rumah sehingga Anda bisa menyempurnakan teknik balap Anda. Ini adalah bagaimana pro belajar bagaimana meningkatkan keahlian mereka!
Sistem Pelengkap
Grand Sport dulunya pembalap Spartan, tapi sekarang dilengkapi dengan teknologi seperti mobil mewah modern. Corvette Grand Sport memiliki panel instrumen yang dapat disesuaikan, serta tampilan kepala yang menampilkan informasi pengemudi yang penting. Itu juga dilengkapi dengan Chevy MyLink, yang merupakan salah satu sistem infotainment yang lebih intuitif dan mudah digunakan di pasaran. Ini fitur tata letak yang dipikirkan dengan sangat baik, dan juga menyertakan dukungan Apple CarPlay / Android Auto. Anda juga dapat mengatur Corvette sebagai hot spot 4G LTE.
#SEJARAH MOBIL CHEVROLET#CHEVROLET CORVETTE GRAND SPORT#MOBIL TERBARU#MOBIL TERCEPAT#MOBIL SUPERCAR#PRODUSEN CHEVROLET
0 notes
Text
Clássicos: Mazda RX-7 arrancava suspiros dos japoneses nos anos 90

Nelson Piquet foi um dos ilustres donos do RX-7Christian Castanho/Quatro Rodas
A década de 90 foi marcada pela intensa disputa entre o mundo e a indústria automobilística japonesa.
Chevrolet Corvette, Porsche 964, Ferrari 348 e Lotus Esprit sentiram o peso da concorrência formada por Honda NSX, Mitsubishi 3000 GT, Nissan 300 ZX e Mazda RX-7.
A história do RX-7 começa em 1961, quando a Mazda firmou contrato com a alemã NSU para aprimorar o motor rotativo criado por Felix Wankel.
O conceito consiste em um rotor triangular que gira no interior de uma carcaça oval, movimento contínuo e suave devido à ausência do sobe e desce presente nos motores a pistão.
Após o encerramento da produção do sedã NSU Ro 80, em 1977, a Mazda tornou-se o único fabricante de larga escala a produzir automóveis com motor Wankel.

Maçanetas embutidas na moldura dos vidros: estilo e aerodinâmicaChristian Castanho/Quatro Rodas
Em função do menor número de componentes, o Wankel é bem menor e mais leve que um motor convencional, ponto de partida para o desenvolvimento do RX-7.
Chamado Savanna RX-7 no Japão, ele foi apresentado em março de 1978.
Desenhado por Matasaburo Maeda, era um dos esportivos mais leves do mercado, com pouco mais de 1 tonelada distribuída igualmente entre os eixos (50/50).
Os 105 cv do motor 12A com dois rotores e 1,1 litro bastavam para levá-lo de 0 a 100 km/h em 9,5 s.
A máxima de 190 km/h era favorecida pelo bom perfil aerodinâmico. O câmbio manual de quatro marchas era de série, com opção manual de cinco marchas ou automática de três.
O sucesso no Japão foi imediato: sua alta potência específica contornava a política tributária do país, que penalizava motores com mais de 1,5 litro.

<span class="hidden">–</span>Christian Castanho/Quatro Rodas
Com injeção eletrônica, o motor 13B de 1,3 litro e 135 cv foi adotado em 1983. Para conter o desempenho, as quatro rodas aro 14 receberam discos de freios ventilados e pneus 205/60.
Pouco depois, veio o Savanna RX-7 Turbo: com 165 cv, o revitalizado motor 12A antecipou o nível de performance que estava por vir.
Nitidamente inspirada no Porsche 944, a segunda geração apresentada em 1986 foi desenvolvida em torno das preferências do mercado norte-americano.
Nesse período, o RX-7 tornou-se consideravelmente mais pesado, mas incorporou avanços importantes como a caixa de direção com pinhão e cremalheira e a suspensão traseira independente.

<span class="hidden">–</span>Christian Castanho/Quatro Rodas
O motor era sempre o 13B, aspirado (146 cv) ou turbo (182 cv). Ambos ficaram mais potentes após a reestilização de 1989: ganhou coletor de admissão variável para atingir 162 cv.
Os 203 cv faziam a versão Turbo ir de 0 a 100 km/h em 6,3 s e a máxima de 240 km/h deu uma ideia do que a Mazda guardava para a terceira geração.
O mais belo RX-7 surgiu em 1992, com linhas fluidas e atemporais. Sua maior novidade era o motor 13B-REW de 255 cv com dois turbos sequenciais desenvolvidos em parceria com a Hitachi.
Com 1.300 kg, a terceira geração foi testada pela QUATRO RODAS: chegou a 239,6 km/h após acelerar de 0 a 100 km/h em 6,12 s.

<span class="hidden">–</span>Christian Castanho/Quatro Rodas
“O que mais impressionou foi o tamanho do motor 13B-REW, pouco maior que uma caixa de sapatos”, conta o jornalista Douglas Mendonça, responsável pelo teste na pista de Viracopos.
Veja também
NotíciasClássicos: Dodge Dart, o carro com o maior motor V8 já feito no Brasil13 dez 2019 - 07h12
NotíciasClássicos: Fiat Uno 1.5 R, o esportivo nacional mais acessível dos anos 806 set 2019 - 07h09
NotíciasClássicos: VW Gol GT, o carro que converteu o fracasso do hatch em sucesso28 jun 2019 - 10h06
“O RX-7 usava o que havia de melhor, mas infelizmente a Mazda não eliminou os problemas do motor Wankel, mesmo após vencer as 24 Horas de Le Mans com o protótipo 787B.
Devido ao alto consumo e às normas de emissões cada vez mais rígidas, o RX-7 deixou o mercado americano e britânico em 1996. Chegou até os 280 cv, limite definido por acordo entre as marcas japonesas.
A produção foi encerrada em 2002, para tristeza dos fãs dos motores Wankel.
Ficha Técnica:Mazda RX-7 1993Motor:dois rotores, 1.308 cm3, biturbo; 255 cv a 6.500 rpm; 30 mkgf a 5.000 rpmCâmbio:manual de 5 marchasCarroceria: fechada, 2 portas, 2 lugaresDimensões:comprimento, 429 cm; largura, 175 cm; altura, 123 cm; entre-eixos, 242 cm; peso, 1.300 kgDesempenho:0 a 100 km/h em 6,12 segundos; velocidade máxima de 239,6 km/h (dados oficiais)
Clássicos: Mazda RX-7 arrancava suspiros dos japoneses nos anos 90 publicado primeiro em https://quatrorodas.abril.com.br/ Clássicos: Mazda RX-7 arrancava suspiros dos japoneses nos anos 90 publicado primeiro em https://carangoslegais.com.br/ Clássicos: Mazda RX-7 arrancava suspiros dos japoneses nos anos 90 publicado primeiro em https://carangoslegais.com.br/ Clássicos: Mazda RX-7 arrancava suspiros dos japoneses nos anos 90 publicado primeiro em https://carangoslegais.com.br/ Clássicos: Mazda RX-7 arrancava suspiros dos japoneses nos anos 90 publicado primeiro em https://carangoslegais.com.br/ Clássicos: Mazda RX-7 arrancava suspiros dos japoneses nos anos 90 publicado primeiro em https://carangoslegais.com.br/ Clássicos: Mazda RX-7 arrancava suspiros dos japoneses nos anos 90 publicado primeiro em https://carangoslegais.com.br/
0 notes
Text

1974 Chevrolet Corvette 1974 corvette new brakes,rotors and calipers. New gas tank and carb.10000 miles http://rover.ebay.com/rover/1/711-53200-19255-0/1?ff3=2&toolid=10039&campid=5337982659&item=352993396316&vectorid=229466&lgeo=1&utm_source=dlvr.it&utm_medium=tumblr
0 notes
Text
The Death Of San Diego Interior Painter - San Diego Interior Painter

The San Diego International Auto Appearance is a ablaze advertise of the cartage we allegation (the circadian drivers), the cartage we should be absorbed in (the blooming and amalgam choices) and the accusable pleasures of achievement cars — and this year’s crop is in a application battle.
6 Criteria for Hiring an Interior Painter in San Diego - san diego interior painter | san diego interior painter Here is a attending at some of the appearance standouts:Cadillac will be aback in the show, and amid its featured displays will be a CT6-V, its better and best able sedan, with all-wheel drive. Amid its accreditation are a 550-horsepower, “Blackwing” twin-turbocharged 4.2-liter direct-injection V-8 and 10-speed automated transmission. With 640 foot-pounds of torque, Cadillac cites 0-60 dispatch in 3.8 seconds.V-design differences accommodate the ample dark-mesh grille, accumbent LED headlights, a trunklid addle-brain and wind-cheating aerodynamic apparatus and appearance atramentous ancillary trim. Behind its 20-inch admixture auto with summer-only achievement tires are Brembo brakes at the advanced with 14.5-inch rotors.The council acknowledgment and Magnetic Ride Control abeyance accept been distinctively calibrated. And the “active” bankrupt arrangement has airy aback burden for a signature sound.The CT6-V is a “limited edition” of 275 congenital for the U.S. market. Appraisement starts at $97,170, including the $995 bales allegation and $1,300 gas-guzzler tax.The midengine Corvette Stingray has the best application and torque for any access Corvette, the aggregation says.(Chevrolet)

Interior Home Painting San Diego: Which Paint Sheen Should I .. | san diego interior painter America’s sports car was redesigned as a midengine, rear-wheel-drive two-seater auto with a ascent roof console or as a retractable-hardtop convertible. Production is accepted to activate in February at the bulb in Bowling Green, Ky.The artlessly aspirated LT-2 V-8 has 495 application and 470 foot-pounds of torque at 5,150 rpm, with the alternative achievement exhaust. It is the best application and torque for any access Corvette, the aggregation says.Corvette claims 0-60 dispatch in beneath than 3 abnormal and a top acceleration of 194 mph. The eight-speed automated chiral chiral has up to six drive modes.Named the 2020 Motor Trend Car of the Year, auto starting prices ambit from $59,995-$71,945. Convertible appraisement ranges from $67,495-$78,945.2020 Dodge Charger SRT Hellcat Widebody. The big sedan’s anatomy amplitude was continued by 3.5 inches with chip fender flares and new advanced and rear fascias.(FCA US LLC)Dodge says its 2020 Charger SRT Hellcat Widebody is the best able and fastest banal auto in the world. And it has two versions: the “standard” archetypal with 707-hp or the Daytona 50th Anniversary Copy with 717-hp. The abject archetypal will be on affectation in San Diego.

Painters San Diego Ca Kitchen Cabinet – songdownload | san diego interior painter With 650 foot-pounds of torque from the supercharged 6.2-liter Hemi Hellcat V-8, Dodge says the 4,587-pound Charger Widebody hustles to 60 mph in 3.6 seconds, passes the division mile in 10.96 abnormal and has a top acceleration of 196 mph. Ammunition abridgement ratings are 12 mpg city, 21 artery and 15 mpg accumulated on the appropriate premium.The big sedan’s anatomy amplitude was continued by 3.5 inches by the new advanced and rear fascias with chip fender flares.The fatter flanks additionally accustomed 20-inch wheels, 11-inches advanced with 305/35 ZR-rated Pirelli P-Zero achievement tires. Traction is aided by SRT-tuned Bilstein three-mode antagonism dampers. And added ability appropriate bigger brakes: 15.4-inch Brembo two-piece rotors with six-piston advanced calipers.Pricing starts at $71,140 or $75,635 for the Daytona edition, including the $1,495 bales allegation from Brampton, Ontario, Canada.Honda expects the CR-V amalgam to accomplish a 50 percent access in burghal breadth compared with the gasoline model.(Honda)Honda’s newsmaker will be the 2020 CR-V Hybrid, a new alms but not on auction until after this spring. The CR-V has been a abiding top agent in the bunched segment, of which there are at atomic 10 accepted contenders.

House Painting San Diego Painter - MM Painting of North .. | san diego interior painter Not a lot of capacity are accessible yet, but the amalgam will accept a two-motor electric powertrain and accepted on-demand all-wheel drive. Official fuel-economy ratings are not yet available, but Honda expects the amalgam CR-V to accomplish a 50 percent access in burghal mpgs over the gasoline model, which has a burghal breadth appraisement of 27 mpg.Also accepted will be the Honda Sensing apartment of assurance and driver-assistive technologies, including automated blow acknowledgment braking, alley abandonment acknowledgment with council abetment and lane-keeping assist.Pricing has not been appear but the top-line gasoline Touring with AWD starts at $35,845.The Venue has a auto brand but a ample cabin.(Drew Phillips)Hyundai’s newest and aboriginal SUV has aloof gone on sale, aimed at young, burghal drivers. While the Venue has a auto footprint, it has a ample berth with a alpine 39.4 inches of advanced allowance and a thrifty but not button 121-hp, 1.6-liter four-cylinder with six-speed chiral chiral or alternative “Intelligent” capricious automatic. Its ammunition abridgement ratings are 27 mpg manual, 35 artery and 30 mpg accumulated with the chiral or 30/34/32 mpg automatic.Standard assurance technologies accommodate advanced collision-avoidance abetment with banal apprehension and lane befitting assist.

American Painting - American Painting - san diego interior painter | san diego interior painter Sold in three front-wheel-drive trim levels, starting prices ambit from $18,345 with chiral chiral (add $1,200 for the automatic) to $23,045 with automatic. The top-line Denim archetypal has such account as smart-key locking and pushbutton, six-speaker audio system, acrimonious advanced seats and blind-spot blow admonishing with rear cross-traffic blow warning. The Death Of San Diego Interior Painter - San Diego Interior Painter - san diego interior painter | Welcome in order to my personal website, in this occasion I am going to explain to you concerning keyword. And after this, this can be the primary picture:

Interior painting san diego - san diego interior painter | san diego interior painter Read the full article
0 notes
Photo

@ls3_velle LS3 1970 Chevrolet Chevelle - “Orange Juice” Facts⬇️🍊⬇️🍊⬇️🍊⬇️🍊 Drivetrain: Chevrolet Performance LS3 6.2. It makes a claimed 525 hp to the flywheel. The internals are all stock, including the hydraulic roller camshaft with a 0.0525-inch lift, Nodular iron crankshaft, and aluminum block. T56 Magnum Transmission and LS7 clutch. Holley’s Retrofit oil pan to clear the A-body’s crossmember, cast-iron headers that dump into a 3-inch Black Widow exhaust, and accessory drive system. He also installed a complete wiring system from American Auto Wire. Rearend: Cook’s Machine Works custom driveshaft with a full-floating Currie Enterprises 35-spline FAB9 rear axle with 3:89 gears. Suspension: Full tubular UMI Stage 5 suspension. The spindle height is raised 1.4 inches via taller upper and lower ball joints. He installed ATS 2-inch dropped C6 spindles and Viking Crusaders double-adjustable coilovers to replace the springs. Wheels: Three-piece CCW Classics wheels. They measure 18×10.5 inches all around, but the front wheels have a 5.5-inch backspacing and the rears have 6-inch backspacing. The tires are Falken 315/30-18s. Brakes: Wilwood C6 Corvette four-piston calipers all around, with 14-inch rotors in the front and 13-inch rotors in the back. A Wilwood line-lock proportioning valve and an off-the-shelf master cylinder. 🍊🍊🍊🍊🍊🍊🍊🍊🍊🍊🍊 #chevy #chevrolet #chevelle #ls #orangejuice #camaro #corvette #impala #classiccar #musclecar #v8 #hotrod #ford #mopar #car #vintage
#car#musclecar#hotrod#ford#orangejuice#chevy#impala#camaro#chevelle#mopar#v8#ls#vintage#chevrolet#corvette#classiccar
71 notes
·
View notes
Text
FINALLY: After 70 Years, We Reveal Our Love of Corvette
What do you call a myth that finally comes true? Well, you can call it the cover story of our special 70th anniversary issue, on newsstands August 2. After decades of our theorizing and Chevrolet’s teasing, the Corvette quits banging on the limiters of a grand touring platform and upshifts into the realm of mid-engine supercar.
Seventy years of MotorTrend means, at minimum, 840 covers, not counting special editions or different versions of issues for newsstands and subscribers. We have a feature on the staff’s favorite covers over the years, and this exercise led me to count up the number of times we’ve prominently featured a Corvette on our most prized page, with either an image, headline, or other callout.
The love we’ve given the Chevrolet Corvette is astonishing and frankly a bit embarrassing; in 70 years, MotorTrend has featured Corvette on the cover 177 times, including this one. Put another way, we’ve devoted greater than 20 percent of our most precious real estate to one single car. Two issues out of every 10 means longtime readers reliably see a Corvette cover on average twice a year, but the frequency in more recent years has been much greater.
Interested in the 2020 Chevrolet Corvette? See our comprehensive coverage HERE.
The first issue of MotorTrend was September 1949. Corvette made its debut in 1953, but our first cover mention of Corvette was in June 1954, in a photo alongside a Ford Thunderbird. How MotorTrend survived those first 58 issues without Corvette remains a mystery to this day, because after its debut, we never looked back. In the ’60s and ’70s, there were a couple of years here and there with covers sans Corvette, but not by the ’80s. The banner year was 1985, the first time that fully half of the year’s covers made some mention of Corvette. We never published more than six ’Vette covers in a calendar year, but we managed half a dozen in 1992 and 2005, and we had many years in between when the Bowling Green boulevardier made the cover four or five times.
Our (and apparently your) fascination with Corvettes was both real and imagined. The bulk of our reporting included discussions of style, first driving impressions, and lots of comparison tests. In the early days, Ford T-Birds and high-test Mustangs made up the bulk of our shootouts.
Later on, our focus would shift to Shelby Cobra and the odd foreigner, until the rise of Corvette’s archnemesis, the Porsche 911 Turbo. Countless artful pairings and terrible puns positioned Turbo vs. ZR-1. Then the Dodge Viper entered the fray. We spilled gallons of ink on it, as well as Corvette tuners from Hennessey to Lingenfelter, and pulled off top-speed tests and cross-continent road trips. As Corvette (and Porsche) engineers began to push the performance envelope into the supercar space, so did we with comparisons involving Lamborghini, Ferrari, and some newcomer called GT-R.
In the imagined space, we devoted pages to what stunning new tech would push Corvette performance past the jet age. Gas turbine engines? Four-rotor Wankels? Hybrid-electric? And then, of course, were the cover stories focused on the imminent arrival of the mid-engine Corvette.
I chuckled to myself while tabbing through the folder of 800-plus covers and jotting down instances of C1–C7. What on earth were my forebears thinking with all of this Corvette lust and mid-engine lunacy, especially in the late ’80s through the ’90s? Had everyone lost their minds? Then I got to 2014, my third year as editor-in-chief, and discovered that I, too, was guilty: Six issues with Corvette on the cover, including one all-caps skyline blurb atop the Nov 2014 issue: MID-ENGINE CORVETTE PG 20.
Pictured: The June 1970 cover of MotorTrend.
Now that the mid-engine Corvette is finally here and we’ve blown out the candles on our 70th anniversary cake and tipped over the last bottles of champagne, I’m feeling a bit empty. What will we splash across our covers in the decades yet to come?
All-electric, 250-mph, all-wheel-drive Corvette, anyone? You read it here first.
Editor’s Note: At the first planning meeting for this issue, more than a year before we went to press, I opened with the statement, “I hate anniversaries,” and then tasked Miguel Cortina, Scott Evans, and Christian Seabaugh to come up with a plan to create retrospective stories you would all want to read and enjoy. Huge thanks that trio, along with Alisa Priddle and Frank Markus in Detroit, and our entire family of photo, copy, production, and online pros. We went out of our way to revisit the stories MotorTrend used to tell, and we wrangled vehicles from across seven decades, all to give you a taste of state-of-the-art, way back when. I hope you enjoy the issue.
More from Ed Loh:
Are the Best BMWs Now Super-Sized SUVs?
Ride-Hailing vs. Cabs
Drift This!, Head 2 Head, and NEW Shows Are Heading Your Way
Countdown to Our Electric, Autonomous Future: How Soon Is Now?
Why Toyota’s Supra-Z4 Partnership With BMW Makes Sense
The post FINALLY: After 70 Years, We Reveal Our Love of Corvette appeared first on MotorTrend.
https://www.motortrend.com/news/chevrolet-corvette-after-70-years-we-reveal-our-love/ visto antes em https://www.motortrend.com
0 notes
Text
2016 GMC Truck Acadia AWD V6-3.6L Technical Service Bulletin # 00-05-22-002L Date: 090326
2016 GMC Truck Acadia AWD V6-3.6L Technical Service Bulletin # 00-05-22-002L Date: 090326
Brakes- Disc Brake Warranty Service And Procedures
INFORMATION
Bulletin No.: 00-05-22-002L
Date: March 26, 2009
Subject:
Disc Brake Warranty Service and Procedures
Models:
1999-2010 GM Passenger Cars and Light Duty Trucks
2003-2010 HUMMER H2
2006-2010 HUMMER H3
1999-2004 Isuzu Light Duty Trucks (Canada Only)
2005-2009 Saab 9-7X (Canada Only)
1999-2010 Saturn Vehicles (Canada Only)
EXCLUDING 2009-2010 Chevrolet Corvette ZR1
Supercede:
This bulletin is being revised to inform you that due to improvements in vehicle brake corner and wheel design, assembly plant build processes and
dealership required tools like the On-Car Lathe, measuring for Lateral Run Out (LRO) is no longer a required step when performing base brake
service. Due to this change, you are no longer required to enter the LRO measurement on the repair order or in the warranty system failure code
section. The bulletin information below and the base brake labor operations have been updated accordingly. Due to this change it is more important
than ever to properly maintain your brake lathe (per the Brake Lathe Calibration Procedure in this bulletin). Please discard Corporate Bulletin
Number 00-05-22-002K (Section 05 - Brakes).
For your convenience, this bulletin updates and centralizes all GM's Standard Brake Service Procedures and Policy Guidelines for brake rotor and
brake pad service and wear. For additional information, the Service Technical College lists a complete index of available Brake courses. This
information can be accessed at www.gmtraining.com > resources > training materials > brakes courseware index. In Canada, refer to Service Know
How course 55040.00V and Hydraulic Brake Certification program 15003.16H.
Important
PLEASE FAMILIARIZE YOURSELF WITH THESE UPDATES BEFORE PERFORMING YOUR NEXT GM BRAKE SERVICE.
The following four (4) key steps are a summary of this bulletin and are REQUIRED in completing a successful brake service.
1. Measure and Document Pre-Service Rotor Thickness* (REQUIRED on Repair Order) - determine rotor clean-up/refinish/replace
2. Properly clean ALL brake corner mating surfaces - hub, rotor and wheel
3. Properly clean-up/refinish rotor, measure and document post-service rotor thickness (REQUIRED on Repair Order)
Important
If it is determined the rotor needs to be refinished, verify lathe equipment is properly calibrated.
4. Properly reassemble the brake corner using proper torque tools, torque specification and torque sequence - wheel lug nuts.
* The bulletin refers to Minimum Thickness specification as the minimum allowable thickness after refinish. Always refer to SI to verify the
spec stamped on the rotor is the minimum thickness spec after refinish and not the discard spec.
2016 GMC Truck Acadia AWD V6-3.6L Page 187
Bulletin Format
***REPAIR ORDER REQUIRED DOCUMENTATION
2016 GMC Truck Acadia AWD V6-3.6L Page 188
Important
When using any one of the brake labor operations listed in this bulletin (except for H9709 - Brake Burnish), the following two rotor measurements
(1. Original Rotor Thickness, 2. Refinished Rotor Thickness are required and MUST be written/documented on the repair order, or for your
convenience, complete the form (GM Brake Service Repair Order Documentation for Required Measurements) shown above and attach it to the
repair order. If the Warranty Parts Center generates a request, this Documentation/Form must be attached to the repair order that is sent back.
Important
Documentation of brake lathe maintenance and calibration as recommended by the lathe manufacturer must be available for review upon request.
Repair Order Documentation - Rotor Original And Refinished Thickness - REQUIRED
When resurfacing a brake rotor or drum, the ORIGINAL thickness (measured thickness before refinish) and REFINISHED thickness (measured
thickness after refinish) MUST be written/documented on the repair order hard copy for each rotor serviced. If a rotor replacement is necessary, only
the original thickness measurement needs to be recorded.
Repair Order Documentation - Explanation of Part Replacement - REQUIRED
If replacement of a brake component is necessary, proper documentation on the repair order is required. See the following examples:
^ Brake rotor replacement - Customer comment was brake pulsation. Rotor was refinished on a prior brake service. After rotor measurement, it
was determined that refinishing the rotor again would take it under the Minimum Thickness specification.
^ Brake pad replacement - Customer comment was brake squeak noise. On inspection, found pads contaminated by fluid leak at caliper.
TOOL INFORMATION
CORRECTION PLATE PART INFORMATION
Refer to TSB 01-05-23-001 for the Brake Align(R) application chart.
For vehicles repaired under warranty, Brake Align(R) Run-Out Correction Plates should be submitted in the Net Amount at cost plus 40%. Brake
Align(R) Run-Out Correction Plates are available through the following suppliers:
- Dealer Equipment and Services
- Brake Align(R) LLC (U.S. Dealers Only)
* We believe this source and their products to be reliable. There may be additional manufacturers of such products. General Motors does not
endorse, indicate any preference for or assume any responsibility for the products from this firm or for any such items, which may be available from
other sources.
2016 GMC Truck Acadia AWD V6-3.6L Page 189
WARRANTY INFORMATION
2016 GMC Truck Acadia AWD V6-3.6L Page 190
WORKSHEET - BRAKE LATHE CALIBRATION
Important
Brake lathe calibration should be performed and recorded monthly or if you are consistently measuring high LRO after rotor refinishing.
Disclaimer
GM Brake Service Procedure
GM BRAKE SERVICE PROCEDURE
1. Remove the wheel and caliper.
2. Measure rotor thickness. In order to determine if the rotor can be refinished, do the following steps:
Important
If performing routine Brake Service for worn pads only, and the rotors are not damaged and measure within specification - DO NOT
REFINISH ROTORS.
1. Remove the rotor(s).
2. Measure the rotor for original thickness using a brake micrometer. Multiple measure points should be taken and the lowest measurement
2016 GMC Truck Acadia AWD V6-3.6L Page 191
should be recorded.
3. Reference the Minimum Thickness specification stamped on the backside of the rotor or SI for Minimum Thickness specification/other. In
most cases, the rotor should be refinished unless the measurement taken makes it obvious that refinishing the rotor would take the
measurement under the Minimum Thickness specification (then replacement is necessary). DO NOT use any other manufacturers rotor
specifications.
3. ***Record the lowest ORIGINAL rotor thickness measurement on the repair order hard copy as noted in the "Repair Order Documentation -
Rotor Refinish" section of this bulletin.
4. Clean all of the mating surfaces between the hub, the rotor and the wheel using the J 42450A - Wheel Hub Cleaning Kit and J 41013 - Whiz
Wheel(R).
If rotors are not to be refinished - Go To Step 8.
Important
Cleaning all mating surfaces and making them free of corrosion, burrs and other debris (which includes removal of Hubless rotors) is
critical and MUST be performed whether using an On-Car or Bench Lathe Refinish Procedure.
5. Be sure to follow the appropriate refinishing procedure listed below for the type of lathe you are using.
Important
Only replace the rotors if they do not meet the Minimum Thickness specification.
Important
DO NOT REFINISH NEW ROTORS.
Important
Only remove the necessary amount of material from each side of the rotor and note that equal amounts of material do not have to be removed
from both sides on any brake system using a floating caliper.
Important
Prior to making the cut, install the recommended clip-on style disc silencer supplied with the lathe. Use of this silencer is critical to prevent
chatter from occurring during the cut.
Bench Type Lathe
1. Refinish the existing rotor on an approved, well-maintained lathe to guarantee smooth, flat and parallel surfaces.
2. Check for clean and true lathe adapters and make sure the arbor shoulder is clean and free of debris or burrs. For more information, see the
"Brake Lathe Calibration Procedure (Bench-Type)" section in this bulletin.
3. On the outboard area of the rotor, position the cutting tools one eighth of an inch into the brake pad area of the rotor. Feed the cutting tools
into the rotor until they cut the rotor to new metal, a full 360 degrees. Zero each dial and back off a full turn
4. Move the cutting bits to the middle of the rotor and do the same procedure. If zero is passed during the process, reset zero. Back off a full
turn.
5. Position the cutting bits one eighth of an inch inside the inboard (closest to the hub) edge of the brake pad contact area. Do the same
procedure. If zero is passed during the process, reset zero.
6. Back off a full turn and position the cutting bits all the way inboard in preparation to refinish the full rotor surface. Advance both tool cutters
to the zero setting plus just enough to clean up the entire rotor surface.
7. After completing the refinish, sand both sides of the rotor for approximately one minute per side using a sanding block and 130-150 grit
sandpaper to obtain a non-directional finish.
On-Car Type Lathe
1. Reinstall the rotor(s).
Important
When using the On-Car lathe on vehicles equipped with limited slip (or posi-trac) rear system, it is critical that the rear drive shaft is
disconnected/disengaged prior to operation of the On-Car lathe. Remember to mark and re-index the drive shaft correctly on re-assembly
to prevent creating driveline vibration. Whenever the lathe drive motor is being switched on, the operator MUST keep their body out of
the wheel well area until the machine has reached its normal operating RPM.
2. Refinish the existing rotor on an approved, well-maintained lathe to guarantee smooth, flat and parallel surfaces.
Important
2016 GMC Truck Acadia AWD V6-3.6L Page 192
When raising the vehicle on the lift, be sure to have it at a good working height (waist high is average) to accommodate mounting the
On-Car lathe. Optimally, the center piston on the lathe trolley will be mid-travel. If the lathe trolley center piston is completely compressed
(bottoming out) or inversely fully extended and hanging off the vehicle hub, this could affect the calibration time of the lathe.
3. Select the correct adapter for the vehicle you're working on and mount it to the hub with the vehicle lug nuts. Hand tighten 34-41 Nm
(25-30 lb ft) the nuts using equal torque. DO NOT use impact wrenches, excessive torque will damage the adapter.
Important
Ensure the adapter sits flush on the rotor hat surface. Be sure to remove any rust, rotor retaining clips, etc. that may preclude the adapter
from sitting flat on the mounting surface.
4. Connect the lathe to the adapter, turn on the lathe and activate the computer to compensate for run-out in the hub.
5. Once the computer indicates the compensation process was successful, on the outboard area of the rotor, position the cutting tools one
eighth of an inch into the brake pad area of the rotor. Feed the cutting tools into the rotor until they cut the rotor to new metal, a full 360
degrees. Zero each dial and back off a full turn.
6. Move the cutting bits to the middle of the rotor and do the same procedure. If zero is passed during the process, reset zero. Back off a full
turn.
7. Position the cutting bits one eighth of an inch inside the inboard (closest to the hub) edge of the brake pad contact area. Do the same
procedure. If zero is passed during the process, reset zero.
8. Back off a full turn and position the cutting bits all the way inboard in preparation to refinish the full rotor surface. Advance both tool
cutters to the zero setting plus just enough to clean up the entire rotor surface.
9. After completing the refinish, sand both sides of the rotor for approximately one minute per side using a sanding block and 130-150 grit
sandpaper to obtain a non-directional finish.
10. Dismount the lathe, but leave the lathe adapter attached to the vehicle.
6. Once the rotor has been properly machined, wash the rotor with soap and water (use a mild dish washing soap) or wipe it clean with GM
approved brake cleaner, P/N 88862650 (Canadian P/N 88901247).
Important
Thoroughly cleaning the rotor will prevent the possible transfer of finite metal dust left as a by-product of machining to the pad material
during the seating process, thus reducing the opportunity for squeaks or other noises to occur.
7. ***Record the REFINISHED rotor thickness measurement on the repair order hard copy. Refer to the "Repair Order Documentation - Rotor
Refinish" section of this bulletin.
8. Setting up to measure for Lateral Run Out (LRO):
Important
Measuring for Lateral Run Out (LRO) (steps 8 - 15) is no longer required however, these steps are being left in the overall procedure as a
good check to be performed in the case of a repeat pulsation complaint. If you are not checking for LRO, go to step 16.
Bench-Type Lathe
1. Ensure that the mating surfaces of the rotor hat section and the hub mating surface are clean and free of debris.
2. Mount the new, original or refinished rotor onto the vehicle hub.
Important
Always hold the rotor on the bottom half so any debris that may be dislodged from the vents will fall out instead of falling into the
mounting area. Any movement or jarring from the rotor falling over on the studs can release rust from the vents on the rotor.
3. Tilt the top of the rotor in towards the vehicle so you can see the studs and ease the rotor onto the studs.
4. Slide the rotor all the way to the hub and hold it in place until you have placed one of the conical washers (with the tapered hole side
facing out) and run the first lug nut up tight by hand so the rotor doesn't move when you release it.
5. Place the conical washers on the rest of the studs (with the tapered hole side facing out), start and snug the lug nuts by hand.
6. Using the one half inch drive impact wrench and a torque stick (J 39544) or equivalent, start with the lug nut opposite of the one you first
tightened by hand and tighten the lug nuts using a star pattern until they touch the hub but do not completely torque. Then again, starting
with the first lug nut you tightened by hand, tighten all the lug nuts in a star pattern to the specific vehicle torque specification.
7. DO NOT reinstall the caliper or the wheel at this time.
2016 GMC Truck Acadia AWD V6-3.6L Page 193
On-Car Type Lathe
1. Leave the On-Car adapter on the wheel.
2. Proceed to Step 9.
9. Fasten the dial indicator to the steering knuckle so that the indicator needle contacts the rotor outboard friction surface approximately 6.35 mm
(0.25 in) from the rotor's outer edge. The stylus should be perpendicular to the friction surface of the rotor.
Important
Make sure the dial indicator needle tip is screwed tight, a loose tip could cause false readings.
10. Measure for LRO. Follow the procedure below to determine if the LRO is within specification (0.050 mm (0.002 in) or LESS).
1. Rotate the rotor and locate the point on the rotor where the lowest dial indicator reading is indicated and set the dial indicator to zero.
2. Rotate the rotor from the low point and locate the point with the highest dial indicator reading (rotor "high spot"). Note the amount and
mark the location of the "high spot" on the rotor and mark the closest wheel stud relative to this location. If the high point falls between
two studs, mark both studs. In instances where the vehicle has "capped lug nuts" you should mark the hub.
11. If the Lateral Run Out (LRO) measurement is 0.050 mm (0.002 in) or LESS, no correction is necessary. Go to Step 15 if this is the first rotor
completed. Go to Step 16 if this is the second rotor completed. If the LRO is GREATER than 0.050 mm (0.002 in), go to Step 12.
12. If the LRO measurement is greater than 0.050 mm (0.002 in), use the following procedure to correct for LRO:
Important
If the LRO measurement is over 0.279 mm (0.011 in), determine the source or cause of the LRO and correct it (i.e. verify drive axle nut torque
specification, refinished rotor is source of LRO due to a lathe qualification issue - see "Brake Lathe Calibration Procedure").
Hubless Rotor
1. Remove the rotor and using the Brake Align(R) application chart (found in TSB 01-05-23-001B), choose the correct plate to bring the
rotor LRO to 0.050 mm (0.002 in) or less. The plates come in 0.0762 mm (0.003 in), 0.1524 mm (0.006 in) and 0.2286 (0.009 in)
compensation. For more information on proper plate selection, see the instruction video/DVD included in the "Brake Align(R)" kit or TSB
01-05-23-001B.
2. Align the V-notch of the selected Brake Align(R) correction plate to the marked wheel stud ("high spot") or between the two points
marked (if the "high spot" is between two wheel studs).
Important
IF Brake Align(R) Correction Plates are not available for the vehicle being serviced, refer to SI Document - Brake Rotor Assembled
Lateral Runout Correction for correcting LRO.
Important
Per Brake Align(R) manufacturer, NEVER attempt to stack two or more Correction Plates together on one hub. NEVER attempt to reuse a
previously installed Correction Plate.
3. Reinstall the rotor using the same method and precautions as the first time - found in Step 8. Make sure to index the rotor correctly to the
marks made in step 10, otherwise LRO will be comprised.
Hubbed / Captured / Trapped Rotor
1. Measure the rotor thickness.
2. Refinish or replace the rotor (see Service Information for further details).
13. Use a Dial Indicator to measure the rotor to verify the LRO is within specification.
14. If using,
BENCH LATHE - DO NOT remove conical washers and lug nuts at this time.
ON-CAR LATHE - You must remove adapter and install conical washers and lug nuts to retain rotor position.
Important
For Hubless rotor design, while removing the adapter, you must hold the rotor tight to the hub and install the top conical washer and lug nut
first to ensure no debris falls between the surface while removing the adapter. Then, install the remaining conical washers and lug nuts.
Otherwise, LRO will be comprised.
2016 GMC Truck Acadia AWD V6-3.6L Page 194
15. Perform Steps 1 through 7 on the opposite side of the vehicle (steps 1-12, if performing LRO).
16. Reinstall the rotors on both sides of the vehicle and perform the following steps:
1. Reinstall the calipers and pads.
2. Pump the brakes to pressurize the calipers.
3. Remove the lug nuts/conical washers.
4. Install and properly torque the wheels.
Important
It is critical to follow the star pattern wheel torque procedure and use the proper tools (torque stick or torque wrench) as referenced in SI.
17. Road test the vehicle to verify the repairs.
Brake Lathe Calibration Procedure
BRAKE LATHE CALIBRATION PROCEDURE
Calibration of the brake lathe should be performed and recorded monthly or whenever post-service brake rotor LRO measurements are consistently
reading above specification.
BENCH-TYPE LATHE
Use the following procedure to calibrate a Bench-type brake lathe:
1. After refinishing a rotor, loosen the arbor nut and while holding the inside bell clamp to keep it from rotating, rotate the rotor 180 degrees.
2. Retighten the arbor nut and set the dial indicator on the rotor using the same instructions as checking the run out on the vehicle.
3. Rotate the arbor and read the runout.
4. Divide the reading by two and this will give you the amount of runout the lathe is cutting into the rotor.
Important
If there is any runout, you will need to machine the inside bell clamp in place on the lathe (this procedure is for a Bench type lathe ONLY, DO
NOT machine inside the bell clamp on an On-Car type lathe).
Machining the Inside Bell Clamp (Bench Type Lathe Only)
Any nicks or burrs on the shoulder of the arbor must be removed. An 80-grit stone can be used to accomplish this. Spray WD-40(R) on the shoulder
and with the lathe running, hold the stone flat against the shoulder surface using slight pressure. When the burrs are gone, clean the surface. Burrs
must also be removed from the hub of the inside bell clamp. This can be accomplished with the stone and WD-40(R). Keep the stone flat on the hub
while removing the burrs. After removing the burrs, clean the hub.
Place the bell clamp on the arbor of the lathe and use the small radius adapters first and then spacers to allow you to tighten the arbor nut to secure
the bell clamp to the lathe. Position the tool bit in the left hand of the rotor truer so you can machine the face of the bell clamp. Machine the face of
the bell clamp taking just enough off of it to cut the full face of the clamp the full 360 degrees. Before you loosen the arbor nut, match mark the hub
of the bell clamp to the arbor and line up these marks before machining a rotor. A magic marker can be used to make the match marks. Machine a
rotor and recheck the calibration. Repeat this procedure on all Inside Bell Clamps used.
Important
If runout is still present, contact the brake lathe supplier.
ON-CAR TYPE LATHE
Use the following procedure to calibrate an On-Car brake lathe:
1. Connect the lathe to a vehicle using the appropriate adapter.
2. Attach a vise-grip dial indicator to a fixed point in the wheel well and bring the dial indicator to a flat surface on the cutting head.
3. Turn on the lathe and press the "start" button so the lathe begins to compensate.
4. Once compensation is complete, note the runout as measured by the dial indicator. Measured runout at this point is overstated given that it is
outside the rotor diameter.
2016 GMC Truck Acadia AWD V6-3.6L Page 195
5. If runout is in excess of 0.1016 mm (0.004 in) (0.050 mm (0.002 in) as measured within the rotor diameter), calibration must be tightened.
Follow manufacturer's instructions for tightening the calibration of the lathe. This information is found in the manual supplied with the lathe.
Important
If the machine is taking a long time to compensate during normal use, prior to checking the lathe calibration, it is recommended that the
machine be disconnected from the adapter and the adapter (still connected to the vehicle) is rotated 180 degrees and the machine reattached.
This will accomplish two things: - It will re-verify the machine is properly attached to the adapter. - It will change the location of the runout
(phase) relative to the machine and thus possibly allow for quick compensation as a result of the position change.
The following information has been added as a reference to ensure your Pro-Cut PFM lathe provides a consistent smooth surface finish over long
term usage.
Cutting Tips / Depth of Cut / Tip Life
The cutting tips must be right side up. Reference marks always face up. The cutting tips may not have chips or dings in the surface of the points. Cuts
of 0.1016-0.381 mm (0.004-0.015 in) will provide the best surface finish and the optimal tip life. When cleaning or rotating the cutting bits, make
sure that the seat area for the tip on the tool is free and clear of debris.
Cutting Head
On each brake job, the technician must center the cutting head for that particular vehicle using one of the mounting bolt holes on the slide plate.
Once the head is centered, it is vital that the technician use one hand to push the head firmly and squarely back into the dovetail on the slide plate
while using the other hand to tighten the Allen-Hex bolt that secures the head. Failure to do this could result in chatter occurring during the cut.
Tool Holder Plate (Cutting Head)
The tool holder plate is the plate that the cutting arms are attached to. It can bend or break if a technician accidently runs the cutting arms into the
hub of the rotor while the rotor is turning. (Cuts of more than 0.508 mm (0.020 in) can also bend this plate). Once bent, the lathe will most likely not
cut properly until the tool holder plate is replaced. In order to verify the condition of the tool holder plate on a machine that will not cut right,
remove the mounting bolt and remove the cutting head from the slide plate. With the cutting head titled at an angle, lay the long edge of the tool
holder plate down on the flat part of the slide plate. If any gap can be seen between the edge and the slide plate, the tool holder plate is bent and the
source of vibration. Also check to ensure that the cutting arms are lying flat on the upper side of the tool holder plate. If the mounting arm post is
bent, it will show itself by having the back of the cutting arm lifting off the surface of the tool holder.
Gib Adjustment / Loose Gib
As wear occurs between the slide plate and the box it rides on, you must take up the slack. You do this by way of a moveable wedge, which we call
the gib. Your lathe manual details adjustment process, which you should perform when required after monthly checks or whenever surface finish is
inconsistent.
Brake Pulsation
BRAKE PULSATION
Brake pulsation is caused by brake rotor thickness variation. Brake rotor thickness variation causes the piston in the brake caliper, when applied, to
"pump" in and out of the caliper housing. The "pumping" effect is transmitted hydraulically to the brake pedal. Brake pulsation concerns may result
from two basic conditions:
1. Thickness Variation Pulsation is Caused by Lateral Run Out (LRO). LRO on a brake corner assembly is virtually undetectable unless
measured (with a dial indicator after the brake service) and will not be detected as brake pulsation during an after brake service test drive. If
the brake corner is assembled with excessive LRO (greater than 0.050 mm (0.002 in), thickness variation will develop on the brake rotor over
time and miles. Excessive LRO will cause the brake pads to wear the brake rotors unevenly, which causes rotor thickness variation. Pulsation
that is the result of excessive Lateral Run Out usually develops in 4,800-16,000 km (3,000-10,000 mi). The more excessive the LRO, the
faster the pulsation will develop. LRO can also be induced when uneven torque is applied to wheel nuts (lug nuts). Improper wheel tightening
after tire rotation, spare tire usage, brake inspection, etc. can be the cause of brake pulsation. Again, it usually takes 4,800-16,000 km
(3,000-10,000 mi) AFTER the service event for the condition to develop. The customer does not usually make the connection between the
service event and the awareness of the pulsation. The proper usage of torque wrenches and/or torque sticks (torque limiting sockets) will
greatly reduce or eliminate the pulsation conditions after wheel service events. The improper use of impact wrenches on wheel nuts greatly
increases the likelihood of pulsation after wheel service.
The following are examples of pulsation conditions and reimbursement recommendations:
- If the customer noticed the condition between 4,800-16,000 km (3,000-10,000 mi) and it gradually got worse, normally the repair would
be covered. The customer may tolerate the condition until it becomes very apparent.
- If a GM dealer performed a prior brake service, consider paying for the repair and then strongly reinforce proper brake lathe
maintenance.
- If the customer had the brake service done outside of a GM dealership, normally GM would not offer any assistance.
- If a customer indicated they had wheel service, ask who performed the service. Then;
2016 GMC Truck Acadia AWD V6-3.6L Page 196
- If a GM dealer performed the service, consider paying for the repair and then strongly reinforce the use of torque sticks at the dealer.
Two common size torque sticks cover 90% of all GM products. Each technician needs to use torque sticks properly every time the
wheel nuts are tightened.
- If the customer had the wheel service done outside of a GM dealership, normally GM would not offer any assistance.
2. Thickness Variation Pulsation Caused by Brake Rotor Corrosion - Rotor corrosion is another form of thickness variation, which can cause a
pulsation concern and can be addressed as follows:
- Cosmetic Corrosion:
In most instances rotor corrosion is cosmetic and refinishing the rotor is unnecessary.
- Corrosion - Pulsation Caused by Thickness Variation (Lot Rot / Low Miles - 0-321 km (0-200 mi):
At times more extensive corrosion can cause pulsation due to thickness variation. This usually happens when the vehicle is parked for long
periods of time in humid type conditions and the braking surface area under the pads corrodes at a different rate compared to the rest of the
braking surface area. Cleaning up of braking surfaces (burnishing) can be accomplished by 10 - 15 moderate stops from 56- 64 km/h (35 -
40 mph) with cooling time between stops. If multiple moderate braking stops do not correct this condition, follow the "Brake Rotor
Clean-Up Procedure" below.
- Corrosion - Pulsation Caused by Thickness Variation (without rotor flaking / higher mileage - 3,200-8,000 km (2,000-5,000 mi):
In some cases, more extensive corrosion that is not cleaned up by the brake pad over time and miles can cause the same type of pulsation
complaint due to thickness variation. In these cases, the rotor surface is usually darker instead of shiny and a brake pad foot print can be
seen against the darker surface. This darker surface is usually due to build-up, on the rotor material surface, caused by a combination of
corrosion, pad material and heat. To correct this condition, follow the "Brake Rotor Clean-up Procedure" below.
- Corrosion - Pulsation Caused by Thickness Variation (with rotor flaking / higher mileage - 8,000 + km (5,000 + miles) :
At times, more extensive corrosion over time and miles can cause pulsation due to thickness variation (flaking). This flaking is usually a
build up, mostly on the rotor material surface, caused by a combination of corrosion, pad material and heat. When rotor measurements are
taken, the low areas are usually close to the original rotor thickness (new rotor) measurement and the high areas usually measure more than
the original rotor thickness (new rotor) measurement (depending on mileage and normal wear). To correct this condition, follow the
"Brake Rotor Clean-up Procedure" described below.
Important
In some flaking instances, cleaning-up this type of corrosion may require more rotor material to be removed then desired. Customer
consideration should be taken in these situations and handled on a case by case basis, depending on the amount/percentage of rotor life
remaining and the vehicle's warranty time and miles.
Brake Rotor Clean-Up Procedure
BRAKE ROTOR CLEAN-UP PROCEDURE
Clean-up the rotors on an approved, well-maintained brake lathe to guarantee smooth, flat and parallel surfaces. Check for clean and true lathe
adapters and make sure the arbor shoulder is clean and free of debris or burrs. For more information see the "Brake Lathe Calibration Procedure"
section in this bulletin.
1. On the outboard area of the rotor, position the cutting tools one eighth of an inch into the brake pad area of the rotor. Feed the cutting tools
into the rotor until they cut the rotor to new metal, a full 360 degrees. Zero each dial and back off a full turn.
2. Move the cutting bits to the middle of the rotor and do the same procedure. If zero is passed during the process, reset zero. Back off a full turn.
3. Position the cutting bits one eighth of an inch inside the inboard (closest to the hub) edge of the brake pad contact area. Do the same
procedure. If zero is passed during the process, reset zero.
4. Back off a full turn and position the cutting bits all the way inboard in preparation to refinish the full rotor surface. Advance both tool cutters
to the zero setting plus just enough to clean up the entire rotor surface.
5. After completing the refinish, sand both sides of the rotor for approximately one minute per side using a sanding block and 130-150 grit
sandpaper to obtain a non-directional finish.
Important
Only remove the necessary amount of material from each side of the rotor and note that equal amounts of material do not have to be removed
from both sides on any brake system using a floating caliper.
Important
In many of these instances, such a minimal amount of material is removed from the rotor that customer satisfaction is not a concern for future
brake services. This procedure is intended to "Clean-up" the rotor surface and should be conveyed to the customer as such - not as "cut",
2016 GMC Truck Acadia AWD V6-3.6L Page 197
"refinish" or "machine", which tends to be terms understood as a substantial reduction of rotor material/life. If the brake lathe equipment being
used is not capable of removing minor amounts of material while holding tolerances, further lathe maintenance, repair, updates or equipment
replacement may be necessary.
Brake Noise
BRAKE NOISE
Some brake noise is normal and differences in loading, type of driving, or driving style can make a difference in brake wear on the same make and
model. Depending on weather conditions, driving patterns and the local environment, brake noise may become more or less apparent. Verify all
metal-to-metal contact areas between pads, pad guides, caliper and knuckles are clean and lubricated with a thin layer of high temperature silicone
grease. Brake noise is caused by a "slip-stick" vibration of brake components. While intermittent brake noise may be normal, performing 3 to 4
aggressive stops may temporarily reduce or eliminate most brake squeal. If the noise persists and is consistently occurring, a brake dampening
compound may be applied to the back of each pad. This allows parts to slide freely and not vibrate when moving relative to each other. Use Silicone
Brake Lubricant, ACDelco P/N 88862181 (Canadian P/N 88862496) or equivalent.
The following noises are characteristics of all braking systems and are unavoidable. They may not indicate improper operation of the brake system.
Squeak/Squeal Noise:
- Occurs with front semi-metallic brake pads at medium speeds when light to medium pressure is applied to the brake pedal.
- Occasionally a noise may occur on rear brakes during the first few stops or with cold brakes and/or high humidity.
Grinding Noise:
- Common to rear brakes and some front disc brakes during initial stops after the vehicle has been parked overnight.
- Caused by corrosion on the metal surfaces during vehicle non-use. Usually disappears after a few stops.
Groan Noise:
A groan type noise may be heard when stopping quickly or moving forward slowly from a complete stop. This is normal. On vehicles equipped with
ABS, a groan or moan type noise during hard braking applications or loose gravel, wet or icy road conditions is a normal function of the ABS
activation.
Key Points - Frequently Asked Questions
KEY POINTS - FREQUENTLY ASKED QUESTIONS
- Q: How do on-car lathes react to Axle Float? Does the play affect the machining of the rotor, either surface finish or LRO?
A: Because the Pro-Cut on-car lathe adjusts in a live mode while spinning the hub/rotor, the dynamics of a floating axle are effectively
eliminated. Once the lathe is compensated, there is no difference in the cutting/surface finish and LRO are just the same as with a non-floating
axle.
- Q: Which lathe is essential for performing brake work, the bench or on-car?
A: Dealers must have a well maintained bench lathe and well maintained on-car lathe. These lathes need to be calibrated on a monthly basis.
BOTH lathes are essential to providing quality brake service.
- Q: What is the expected tip life for an on-car lathe?
A: The geometry and composition of the Pro-Cut tips are designed for "single pass" cutting. When using the Pro-Cut the cutting depth should
be set to take all material needed to get below rust grooves, eliminate all run-out and resurface the entire disc in a single pass. Cuts of
0.1016-0.381 mm (0.004-0.015 in) will provide the best surface finish and the optimal tip life. No "skim cut" or "finish cut" is needed. Failure
to follow this procedure will shorten tip life. The Pro-cut tips will last between 7-12 cuts per corner. With three usable corners, a pair of tips is
good for at least 21 cuts.
- Q: Why does GM recommend the use of single pass (referred to as "positive rake") bench and on-car brake lathes?
A: GM Service and GM Brake Engineering have performed competitive evaluations on a significant number of bench and on-car brake lathes.
These tests measured critical performance characteristics such as flatness, surface finish and the ability of the lathe to repeat accuracy over
many uses. In each test, single pass lathe designs out performed the competitors. Single pass brake lathes are more productive requiring less
time to perform the same procedure.
- Q: Is it okay to leave the caliper/pads installed while cutting rotors using an on-car lathe?
A: On-car lathes should never be used with the pads and calipers installed on the vehicle. The debris from cutting the rotors can contaminate
the brake pads/calipers which can lead to other brake concerns and comebacks.
2016 GMC Truck Acadia AWD V6-3.6L Page 198
- Q: What information needs to be documented on the Repair Order?
A: Any claim that is submitted using the labor operations in this bulletin, must have the Original Rotor Thickness and Refinish Rotor
Thickness (if refinished) documented on the repair order. For more information, refer to the "Repair Order Required Documentation" section
of this bulletin.
All Warranty Repair Orders paid by GM, are subject to review for compliance and may be debited where the repair does not comply with this
procedure.
Brake Warranty
BRAKE WARRANTY
Brake Rotors:
- Brake rotor warranty is covered under the terms of the GM New Vehicle Limited Warranty. Reference the vehicle's warranty guide for
verification.
- Rotors should not be refinished or replaced during normal/routine pad replacement.
- Rotors should not be refinished or replaced and is ineffective in correcting brake squeal type noises and/or premature lining wear out.
- Rotors should not be refinished or replaced for cosmetic corrosion. Clean up of braking surfaces can be accomplished by 10-15 moderate
stops from 56-64 km/h (35-40 mph) with cooling time between stops.
- Rotors should not be refinished or replaced for rotor discoloration/hard spots.
- Rotors should be refinished NOT replaced for Customer Pulsation concerns. This condition is a result of rotor thickness variation, usually
caused by LRO (wear induced over time and miles) or corrosion (Lot Rot).
- When rotor refinishing, only remove the necessary amount of material from each side of the rotor and note that equal amounts of material do
not have to be removed from both sides on any brake system using a floating caliper.
- Rotors should be refinished for severe scoring - depth in excess of 1.5 mm (0.060 in).
Important
If the scoring depth is more than 1.5 mm (0.060 in) after the rotor is refinished, it should be replaced.
- It is not necessary to replace rotors in pairs. Rotors may be replaced individually. However, caution should be exercised, as a variance in
surface finish may cause a brake pull condition.
- New rotors should not be refinished before installation. Original equipment rotor surfaces are ground to ensure smooth finish and parallelism
between mounting and friction surfaces. If a new rotor has more than 0.050 mm (0.002 in) Lateral Run Out (LRO) when properly mounted on
the hub, correct it using one of the following methods:
1. For hubless rotor designs, use the correction plate procedure found in the "GM Brake Service Procedure for Hubless Rotors" outlined in
this bulletin.
2. For hubbed/trapped/captured rotor designs, refinish the rotor using an On-Car lathe and the procedure outlined in this bulletin.
- Never reuse rotors that measure under the Minimum Thickness specification. In this instance, the rotor should be replaced.
Important
If the Minimum Thickness specification is not visible on the rotor, reference Service Information (SI) for the specific vehicle application. DO
NOT use any other manufacturers rotor specifications.
Brake Pads:
Important
When determining the warranty coverage (as an example) - if all four front or four rear brake pads are excessively worn evenly, that would
NOT be covered under warranty since this type of wear is most likely due to driving habits or trailering. However, if the brake pads are
excessively worn un-evenly, side-to-side or same side/inner-to-outer pads, then consideration should be given to cover this under warranty
since this type of wear is most likely due to poor operation of other braking components.
- Consideration should be given for covering brake pads up to 39,000 km (24,000 mi) (excluding owner abuse, excessive trailering, or the
situations that would not be considered normal use).
- Installation of new rotors does not require pad replacement. Do not replace pads unless their condition requires it - excessively worn, damage
or contaminated.
2016 GMC Truck Acadia AWD V6-3.6L Page 199
Brake Wear:
Several factors impact brake lining wear and should be taken into account when reviewing related issues:
- heavy loads / high temperatures / towing / mountainous driving / city driving / aggressive driving / driver braking characteristics (left foot or two
feet)
The following are conditions that may extend brake lining wear:
- light loads / highway driving / conservative driving / level terrain
from Blogger https://ift.tt/2CDdagI via IFTTT
0 notes
Text
Clássicos: Mazda RX-7 arrancava suspiros dos japoneses nos anos 90

Nelson Piquet foi um dos ilustres donos do RX-7Christian Castanho/Quatro Rodas
A década de 90 foi marcada pela intensa disputa entre o mundo e a indústria automobilística japonesa.
Chevrolet Corvette, Porsche 964, Ferrari 348 e Lotus Esprit sentiram o peso da concorrência formada por Honda NSX, Mitsubishi 3000 GT, Nissan 300 ZX e Mazda RX-7.
A história do RX-7 começa em 1961, quando a Mazda firmou contrato com a alemã NSU para aprimorar o motor rotativo criado por Felix Wankel.
O conceito consiste em um rotor triangular que gira no interior de uma carcaça oval, movimento contínuo e suave devido à ausência do sobe e desce presente nos motores a pistão.
Após o encerramento da produção do sedã NSU Ro 80, em 1977, a Mazda tornou-se o único fabricante de larga escala a produzir automóveis com motor Wankel.

Maçanetas embutidas na moldura dos vidros: estilo e aerodinâmicaChristian Castanho/Quatro Rodas
Em função do menor número de componentes, o Wankel é bem menor e mais leve que um motor convencional, ponto de partida para o desenvolvimento do RX-7.
Chamado Savanna RX-7 no Japão, ele foi apresentado em março de 1978.
Desenhado por Matasaburo Maeda, era um dos esportivos mais leves do mercado, com pouco mais de 1 tonelada distribuída igualmente entre os eixos (50/50).
Os 105 cv do motor 12A com dois rotores e 1,1 litro bastavam para levá-lo de 0 a 100 km/h em 9,5 s.
A máxima de 190 km/h era favorecida pelo bom perfil aerodinâmico. O câmbio manual de quatro marchas era de série, com opção manual de cinco marchas ou automática de três.
O sucesso no Japão foi imediato: sua alta potência específica contornava a política tributária do país, que penalizava motores com mais de 1,5 litro.

<span class="hidden">–</span>Christian Castanho/Quatro Rodas
Com injeção eletrônica, o motor 13B de 1,3 litro e 135 cv foi adotado em 1983. Para conter o desempenho, as quatro rodas aro 14 receberam discos de freios ventilados e pneus 205/60.
Pouco depois, veio o Savanna RX-7 Turbo: com 165 cv, o revitalizado motor 12A antecipou o nível de performance que estava por vir.
Nitidamente inspirada no Porsche 944, a segunda geração apresentada em 1986 foi desenvolvida em torno das preferências do mercado norte-americano.
Nesse período, o RX-7 tornou-se consideravelmente mais pesado, mas incorporou avanços importantes como a caixa de direção com pinhão e cremalheira e a suspensão traseira independente.

<span class="hidden">–</span>Christian Castanho/Quatro Rodas
O motor era sempre o 13B, aspirado (146 cv) ou turbo (182 cv). Ambos ficaram mais potentes após a reestilização de 1989: ganhou coletor de admissão variável para atingir 162 cv.
Os 203 cv faziam a versão Turbo ir de 0 a 100 km/h em 6,3 s e a máxima de 240 km/h deu uma ideia do que a Mazda guardava para a terceira geração.
O mais belo RX-7 surgiu em 1992, com linhas fluidas e atemporais. Sua maior novidade era o motor 13B-REW de 255 cv com dois turbos sequenciais desenvolvidos em parceria com a Hitachi.
Com 1.300 kg, a terceira geração foi testada pela QUATRO RODAS: chegou a 239,6 km/h após acelerar de 0 a 100 km/h em 6,12 s.

<span class="hidden">–</span>Christian Castanho/Quatro Rodas
“O que mais impressionou foi o tamanho do motor 13B-REW, pouco maior que uma caixa de sapatos”, conta o jornalista Douglas Mendonça, responsável pelo teste na pista de Viracopos.
Veja também
NotíciasClássicos: Dodge Dart, o carro com o maior motor V8 já feito no Brasil13 dez 2019 - 07h12
NotíciasClássicos: Fiat Uno 1.5 R, o esportivo nacional mais acessível dos anos 806 set 2019 - 07h09
NotíciasClássicos: VW Gol GT, o carro que converteu o fracasso do hatch em sucesso28 jun 2019 - 10h06
“O RX-7 usava o que havia de melhor, mas infelizmente a Mazda não eliminou os problemas do motor Wankel, mesmo após vencer as 24 Horas de Le Mans com o protótipo 787B.
Devido ao alto consumo e às normas de emissões cada vez mais rígidas, o RX-7 deixou o mercado americano e britânico em 1996. Chegou até os 280 cv, limite definido por acordo entre as marcas japonesas.
A produção foi encerrada em 2002, para tristeza dos fãs dos motores Wankel.
Ficha Técnica:Mazda RX-7 1993Motor:dois rotores, 1.308 cm3, biturbo; 255 cv a 6.500 rpm; 30 mkgf a 5.000 rpmCâmbio:manual de 5 marchasCarroceria: fechada, 2 portas, 2 lugaresDimensões:comprimento, 429 cm; largura, 175 cm; altura, 123 cm; entre-eixos, 242 cm; peso, 1.300 kgDesempenho:0 a 100 km/h em 6,12 segundos; velocidade máxima de 239,6 km/h (dados oficiais)
Clássicos: Mazda RX-7 arrancava suspiros dos japoneses nos anos 90 publicado primeiro em https://quatrorodas.abril.com.br/ Clássicos: Mazda RX-7 arrancava suspiros dos japoneses nos anos 90 publicado primeiro em https://carangoslegais.com.br/ Clássicos: Mazda RX-7 arrancava suspiros dos japoneses nos anos 90 publicado primeiro em https://carangoslegais.com.br/ Clássicos: Mazda RX-7 arrancava suspiros dos japoneses nos anos 90 publicado primeiro em https://carangoslegais.com.br/ Clássicos: Mazda RX-7 arrancava suspiros dos japoneses nos anos 90 publicado primeiro em https://carangoslegais.com.br/ Clássicos: Mazda RX-7 arrancava suspiros dos japoneses nos anos 90 publicado primeiro em https://carangoslegais.com.br/
1 note
·
View note