#Blender 2.8
Explore tagged Tumblr posts
Visit Tumblr Blog
Explore Tumblr blogs with no restrictions, modern design and the best experience.
Last Seen Tumblr Blogs


Fun Fact
The most popular pages on Tumblr are about Minecraft, GIFs, and David J. Peterson.
Text

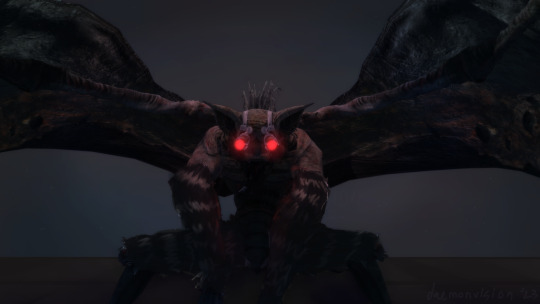
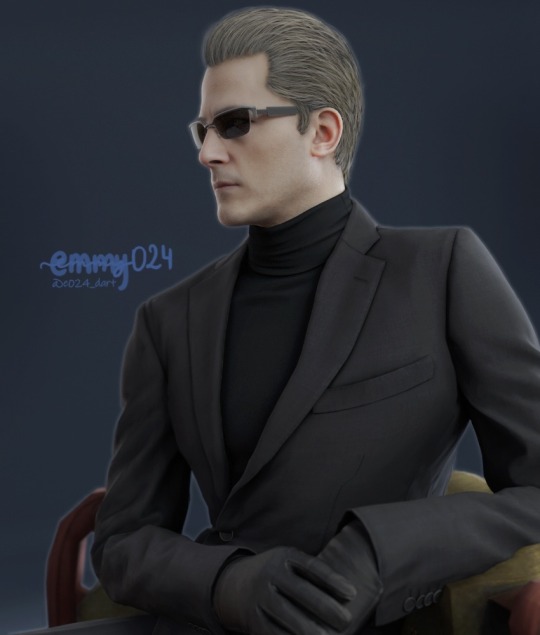
Made this render to get out of my artistic comfort zone, and I'm very much proud of the results ✨ (also one of my dearest friends said she loved her so here we are lol)
#resident evil#blendercycles#photoshop#blender#render#blender3d#resident evil 7#ethan winters#fanart#shadows of rose#rose winters#fanmade#resident evil fanart#resident evil fan#digital#digital art#digital illustration#art#blender3dart#blender 2.8#blender render#blender art#mia winters#capcom videogames#videogame#resident evil village#artists on tumblr
50 notes
·
View notes
Text

LITTLE SPARROW
The idea of this sim is that shes an Edith Piaf cover artist, thats it.
Some more of her in cas under the cut :P


#sims 4#s4mm#maxis match#maxis match cc#the sims 4#sim render#simblr#sims 4 render#blender#s4mm render#blender 2.8#sims#sims 4 screenshots#my sims#sims 4 cc#the sims#sims community#the sims community#ts4 simblr#ts4#ts4 screenshots#retro sim#sims 4 60s#vintage sim#sims 4 story#sims 4 blender#ts4 blender#sims render#ts4 render
35 notes
·
View notes
Text
What a fucking tool. Love him for that.
First serious blender endeavor! Only did the posing and whatnot in blender though. Edited in MediBang bc the fur on his arms looked really messed up and I still don’t really know what I’m doing,, also used it to add the bg since I’ve yet to download any scenery based models or figure out how to add backgrounds.
Still I think it turned out better than expected. Constructive criticism and tips for using Blender are appreciated. The computer I have blender on can only work with 2.8 and this is an XPS imported model if that helps, and the unedited version is below the cut
Please don’t repost!

#the house of the dead#house of the dead#blender#sega fanart#sega#hangedman type 041#house of the dead scarlet dawn#the house of the dead scarlet dawn#my art#blender 2.8
7 notes
·
View notes
Text
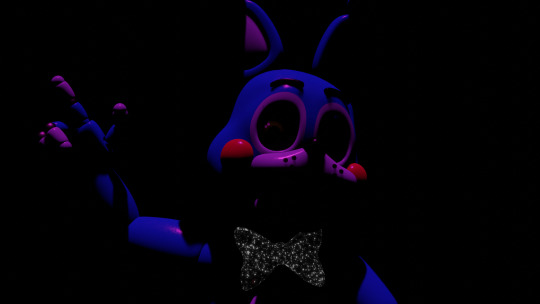
About a full year after downloading blender, I've finally done my first render. This is literally the most advanced thing I've done there. It's sad but also I don't hate this
OG model by D1GQ and Stormy_Blend3D
#fnaf#blender#render#blender beginer#unintentionally spooky#toy bonnie#i hate blender so damn much#you have no idea#and the options all lead to error messages#blender 2.8
4 notes
·
View notes
Text
literally why the fuck did they make the blender ui n shortcuts ten times worse for every update ive never wanted to kill so many hostages at once in my life
#trying to use 2.8 n every so often i press a normal fuckinmf button and it sends my mesh flying to goddamned narnia please someone explain 2#me tf am i doing wrong#im gon na kill someone#blender 2.8
1 note
·
View note
Text
What the fuck is going on
#shit cop apologist nonsense meets a hatred of disabled people = the politics of arcane. apparently#sorry just watched 2.8 and it had fucking baffling politics#its like they took the first drafts of each individual writer on the show. put them in a blender. and then spat out a script#with no eye for coherence or character development#arcane critical
18 notes
·
View notes
Text
I need sucrose and Kaveh to interact in game to fulfill the silly friendship I’ve made up in my head for them. Like hear me out, they both have references to paradise and are chasing a dream of making a place based on a part of their childhood they want to relive (home for Kaveh and sucrose’s paradise for her), they are both sort of awkward nerds who light up when they talk about their chosen field. Most importantly they are just my favs and it would cater to me specifically
#genshin impact#a ramble#I’ve been using them on the same team and got ✨brain worms✨#kaveh#sucrose#can we pull a 2.8 and just put a random group in a metaphorical blender again
20 notes
·
View notes
Text

I MADE DONUTS 🗣️‼️‼️‼️
(funfact: my friends drool over this)
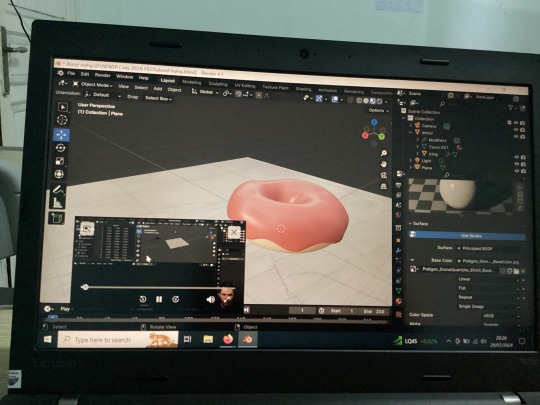

#blender#the canon event of making donuts in blender#I used blender since 2018 but lost halfway around 3-4 years and have to relearn everything#especially the version I used to use is 2.8 ish and now it’s ver 4.1???#with the whole 6 years it’s supposed to be expected for me lol#tropicalmonitor
0 notes
Text
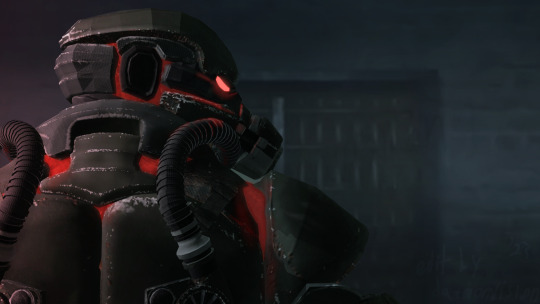
✨ Some Albert Wesker for y’all ✨
#resident evil#blendercycles#photoshop#blender#render#blender3d#fanart#fanmade#albert wesker#resident evil fan#resident evil 4#resident evil 4 remake#digital art#blender 2.8#blender render#blender3dart#blender art#lightroom#capcom videogames#leon s kennedy#ada wong#ashley graham#jack krauser
72 notes
·
View notes
Text

surprise i’m posting for once
cute lil magazine render of 2 of my gyaru sims, inspired by egg magazine !!! was meant to be more but the rendering for just this picture took 10 hours?? way more than normal ahaha

#gyaru#gyaru magazine#egg magazine#sims 4 cc#sims 4#s4mm#the sims 4#sims 4 maxis match#gyaru sims#sims 4 gyaru#s4mm gyaru#sim render#sims magazine#sim magazine#sims 4 render#s4mm render#blender#blender 2.8#blender render#ts4 render#sims render
341 notes
·
View notes
Text
ANOTHER ONE!! chariot!! A very interesting fellow.
For this one I took a screenshot of a playthrough and used it as the bg bc I did not want to draw one. I wanted these to be renders w/ backgrounds in the first place but there’s no way to download any scenery files yet >_<
I think I’ll post the timelapse soon too…stay tuned!!
Please don’t repost to other accounts/sites! Likes and reblogs are both appreciated.
#the house of the dead#house of the dead#chariot type 27#the house of the dead scarlet dawn#my edits#my art#blender#blender 2.8#blender 3d#id#sega fanart
3 notes
·
View notes
Text

Working in blender and the animation and audio keep desyncing. AV Sync is on, start frame is set, FPS is matching. When I look up the problem, it seems that it's in video editor but I'm not working in video editor, I'm in animation. I'm so so normal and okay with all this happening. I LOVE when the problem seems almost exclusive to me. That is SO COOL
1 note
·
View note
Text
Another WIP animation before I get started on a major project. There's something rather therapeutic with animating in Blender in 3D over drawing everything in a 2D App. Well, I have 40 Years of Content related to 2D Animation so its finally time I switch up after four decades. I have also been storyboarding and writing a lot related to the Neo-Fureza Series behind the scenes so something is in the works related to the 20 Anniversary of the series.
#artists on tumblr#original concept#original content#original character#furry art#original story#furry oc#3d modeling#3d art#3d render#blender#lowpoly#animation#rokoko studio#motion capture#furry animation#blender3d#blender 2.8
0 notes
Text
How to work with exported Sims 4 Studio exported rigs in Blender 2.8+:
I'm not sure why S4S never got updated to work with newer versions of Blender, but hey, I won't judge. Blender made some changes from 2.79, and one of them were the UI icons for visibility and selectable buttons. These right here:

On Blender 2.8+, go to the top right of the screen, click on the Filter button and check the little screen and cursor icons.

The screen is for disabling stuff in the viewport. It kinda works the same as hiding stuff. The cursor makes stuff selectable. So once you have them checked on the Filter menu, you'll see this on the top right:

See how those icons are unchecked for the rig? Click on them to make the rig selectable and unhide it.

And now you'll see a bunch of little dots on top of the mesh. That's our armature! Now all that's left to do is proceed with the same process you'd do on Blender 2.79.
So if you click on one of the shoulders, it will automatically switch to Pose mode, like so:

And if you want to rotate it, you can either press R, Y and then enter 45 (or -45 depending on which side of the mesh you are on) to lock the rotation to 45 degrees rotation on the Y axis, oooor if you prefer using gizmos, press this little icon on the top:

And you'll be able to rotate it using the gizmo. The green line is for the Y axis, red for X axis and blue for Z axis. Click and drag the green line and hold to rotate it, type 45 or -45 to lock to that exact degree rotation and then release the click.

That's for the shoulders, of course. If you're familiar with the process, you should know how to do it for the elbows too.
Once you're done posing the rig, export it as an obj file. Maybe delete first the skin areas in Edit mode, all the usual stuff you'd do on Blender 2.79. Hope it helps! If you have any other issues, let me know :D
Blender 4.1 question! How do I select the shoulders, elbows, etc? The layout is so different from older versions that didn't work on my dead laptop, and the tutorials all seem to use older versions.
26 notes
·
View notes
Text
Self-use Sims 3 CC Tutorials List
Here is a list of tutorials from which I learn to convert/create sims 3 cc in a few months (and as a poor English speaker). I think it might help someone who also wants to try making things for sims 3 but doesn't know where to start, though it's been 15 years from the game release and even Inzoi is coming hahah.
The list covers objects, clothes, hairs and eyes. I know there're lots of tutorials not listed here, that's because I haven't tried them in my projects by hand. But The list will be updated with new things I learn. Most tutorials are in English. Thanks to all these creators for sharing their precious knowledge!
Sorry for the miserable format, cuz I wrote them in Patreon and paste here. You can also read it there, free of course.
Where I find tutorials
sims 3 tutorial hub
ts3 creators cave and its discord
Mod the sims tutorial wiki and the forum
pis3update tutorials tag
General
CC basic concepts by nightosphere (for clothes, most knowledge is shared with objects)
Tools
TSRW guide by apple (for objects, most knowledge is shared with clothes)
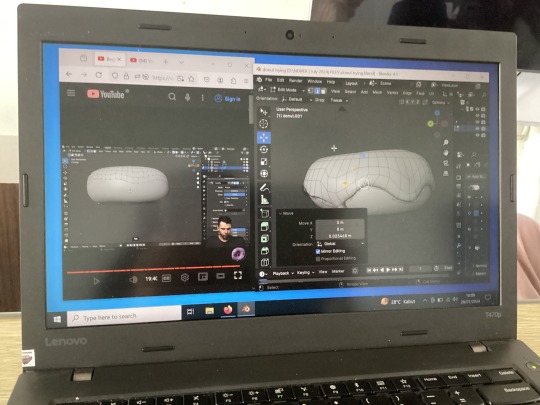
Blender
shortcut by Blender Guru
beginner tutorial for version 2.5, 2.8, 3.0, 4.0
3.5入门教程 (youtube / bilibili)
设置切换语言快捷键 change language shortcut settings
图片取色器网站
Mesh ToolKit with Seam Fixer for all ages
Topaz gigapixel AI guide / higher quality texture
Texture
Nicer bake / bake in blender 2.78
Bake in blender 2.93
Make normal map
small size blank texture
Reasons for black blocks on baked image
Adjust texture color without losing quality
Object
clone obejcts with S3OC
4t3
Functional Objects
Functional bed
TSRW setting
Combining Textures for Objects with Multiple Textures
Add normal map to objects
Introduction to slot categories
Add slots in TSRW
Edit in-door shadow or occluders in TSRW / Talks about 3 kinds of in-game shadow by Pocci
Clothes
4t3 by nightosphere
Reduce polycount / fix seams, holes, shadows or normals
Bone reference rule
Avoid milkshape workflow / adjust bone assignment and morphs in blender
Manually fix bone in blender
Convert between ages/body meshes
TSRW check list
Fix long clothes clip with body
Fix holes on morphs (easier in blender)
Extrude collars
Create texture in PS
Avoid TSRW workflow / CTU tutorial
Hairs
Avoid milkshape and TSRW workflow / delete backfaces / handmade morphs / DABOOBS guide
Keys pointing to in-game blank textures to save file size (for DABOOBS not TSRW)
Reduce polycount
4t3
Fix weird seam lines on hairs from s4s
Fix pigtail issue
Eyes
Convert contacts to default eyes
187 notes
·
View notes
Text


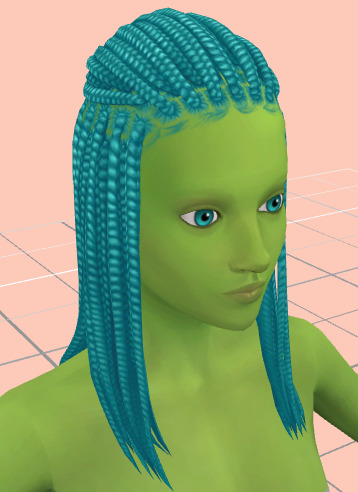
DL (mediafire)
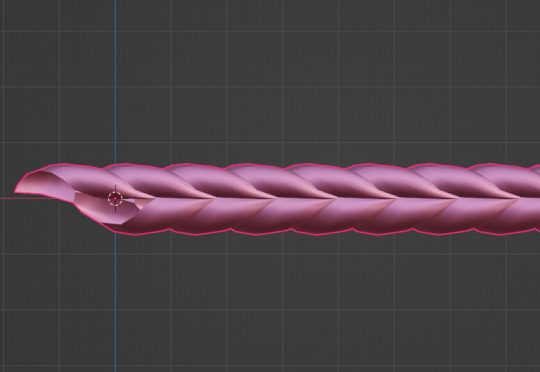
Today I bring you not cc, but a small collection of .blend files for making cc a little easier. If you've ever wanted to quickly put a braid into a custom hair without completely obliterating your poly count*, then these might be able to help.
*braids will still add a LOT of polygons to your hair, but since every single polygon is visible** on these tiling braids, at least you know they're all being put to use, whereas if you were to physically braid 3 strands of geometry, lots of those polygons would wind up inside the braid, just adding to your count without contributing anything to the look
**if some polygons end up inside of other meshes, you may want to delete them to reduce the poly count further. The boolean modifier may be able to help you, but I haven't tried
These are completely hollow, tiling braid "facades". They just look like a braid, without being anything more than a stylized tube. Available in 9 shapes (which are all pretty similar, more or less, but have different 'vibes', and one of them technically doesn't resemble a braid, but if you squint it looks close enough) and 3 polygon counts to hopefully fit in with your project.

TOU: Same as my cc. Read it here. I obviously don't own this concept, so feel free to reverse engineer, make your own braid tiles, etc. Just don't use mine for anything commercial (using them in commissions is fine, just not paywalled final products!)
You will need to be using one of the newer versions of blender, I believe 2.8 and up. These were made in blender 3.6, so the files will not be compatible with old versions like 2.7x.
Quick start guide:
Open your hair wip's .blend
In object mode, 'Append' the 'BraidTile' object of your choice
Select 'BraidPath' and, in Edit mode, position it however you like
Additional info under the cut, because I tend to ramble, and these require a little bit of a primer before use, probably. Unless you for sure know what you're doing, in which case, feel free to just take these and run with them.
THIS IS NOT A TUTORIAL ON MAKING HAIR, OR HOW TO USE BLENDER. Seek that information elsewhere.
Before appending braids, you may want to open up the blender file and look at all the shapes, to decide which one you want to use.
When you first append your braid, or open the blend files, you may notice it does not look like the preview images above, and instead looks like a shiny pink slug. This is intentional! For previews and development work, I use @/simandy's base textures, but your hair will probably be using a different texture, so I have not included a texture at all.
Simply switch the material of the 'BraidTile' to the same material your hair is using, and adjust the uv map accordingly. I'm going to assume if you are making hairs that you know how to do that, so it will not be explained here.
Once you have your braid appended, and have edited the UV Map of the 'BraidTile' piece to your liking, you can also try scaling the tile in the X, Y, and Z axes to change up the look a little. Make sure you select all of the vertices before scaling, to make sure it still tiles. This should be safe to do, and not mess up the tiling at all, but make sure you do it in Edit mode, not Object mode. (If you mistakenly do it in Object mode, you just have to press ctrl+A and select 'scale', and that should fix it)
When you have your braid adjusted, switch over to the 'BraidPath' object, and use edit mode to move the points around however you want. This is just like any other hair strand, if you're used to making hairs with paths and curves then this should already be familiar to you. All the same controls should work.
And, if you already have a curve in your hair that you'd like the braid to snap to instead, you can select the 'BraidTile' object, locate the curve modifier, and switch the curve object to any other curve in your .blend. You'll want to change the curve in the array modifier to the same one, most likely.
If you haven't used curves to make a hair before, here's a couple quick controls you might like to know:
ctrl+T will let you Twist the object around the selected point(s) alt+S will let you Scale the object around the selected point(s) selecting the first or last point of the 'BraidPath' and pressing E will Extrude a new point, making your braid longer
Remember to do all of your positioning on the 'BraidPath' object! You do not need to edit the 'BraidTile' at all once you've set up the UV map and adjusted the scale!
It should tile, twist, etc. with little issue, and should get longer or shorter according to the length of your curve with no issue. If it doesn't, make sure both the array and curve modifiers of your 'BraidTile' object are using the same curve. They should be using the 'BraidPath' object by default, but if you changed this manually, ensure that both modifiers match for best results.
Unless you know what you are doing, I do not recommend messing with any other settings in the modifiers, or adjusting the 'BraidTile' mesh in any way besides scaling the entire object at once. Otherwise you could end up with gaps and holes in your braid.
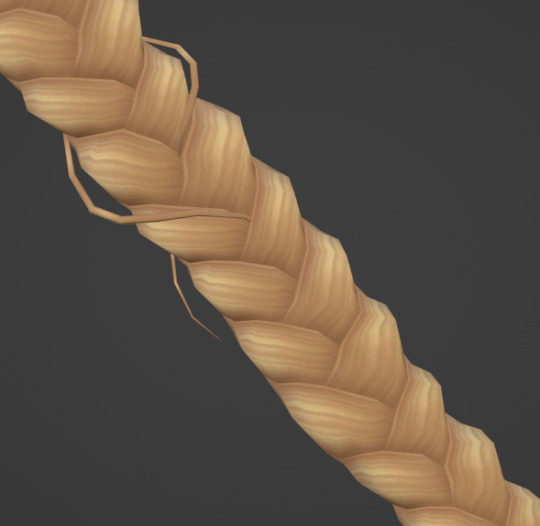
When you are done posing your braid, you can apply the modifiers to turn the whole thing into a regular mesh. I like to make a copy of my 'BraidTile' and 'BraidPath' first, just in case I want to go back and change the shape later. After converting it to a regular mesh, I'd recommend going in with proportional editing turned on and randomly scale and move a few of the pleats just a little, to make the braid look a little more organic. You can even add a couple strands to make it look messier, if you dont mind adding to your poly count even more. But this comes down to your preference and style. The braid below has had some half-assed editing done to demonstrate the concept. (Note: This is actually the low-poly version of this particular braid shape)
Ultimately, it is up to you to decide how you want to blend the braid in with the rest of your hairstyle. I can't tell you how to do that, as it is ultimately going to come down to your own personal preference, workflow, and the hairstyle you are making.
How do I know if I should use Hi, Mid, or Lo poly?
This is largely due to personal preference, and how you're using the braids in your project. I have included the three different poly versions to try and be mindful of the overall poly count of your poor poor meshes, but even a lo-poly braid is going to add an easy couple thousand polygons to your project. Keep that in mind! If you plan on having a LOT of braids, something like this EA hairstyle, for example:
You will probably want to follow their example and use a very simple mesh and just apply a braid texture instead of using these. EA's braids here appear to be a simple box shape painted to look like braids.
If you only plan on having one, maybe two braids in your entire project, especially if they are very large braids, then you might want to go with the hi-poly option. They're the smoothest, roundest choice.
If your braid has a very small diameter, you can probably get away with just using the lo-poly option, and save some polygons you won't need anyway.
The mid-poly version exists as a sort of happy medium. They aren't quite as pointy as some of the lo-poly shapes, and they won't inflate your poly count as much as the hi-poly models, so you may find you prefer them for your applications.
It's all very subjective.
I think that's pretty much everything I wanted to say. If you have specific questions, my inbox is open.
Keep in mind I am not very skilled in blender! There's probably some optimization that can be done if you know what you're doing, and I welcome you to tweak these meshes to your heart's content, if that's you! I made these for me, but I figure they could make someone else's life a little easier too, so here you go.
If you make anything using them you are welcome to tag me! If you don't end up making anything with these then I hope you at least have some fun playing with them!
#simoleon#THIS IS NOT CC DO NOT DOWNLOAD THINKING ITS CC#im going to the store now if anyone has any questions ill answer them later#dl#(as in 'download' not 'delete later')#i dont wanna put this in my cc tag but i also dont wanna lose track of it yknow
254 notes
·
View notes