#65mm Manual Lens
Explore tagged Tumblr posts
Visit Tumblr Blog
Explore Tumblr blogs with no restrictions, modern design and the best experience.
Last Seen Tumblr Blogs


Fun Fact
The Tumblr office adopted Tommy, an 11-year-old Pomeranian.
Text
THE MATER PLOT ON BERKELEY ROAD AND ECCLES STREET
Quote from Ulysses by James Joyce: "Quick warm sunlight came running from Berkeley road, swiftly, in slim sandals, along the brightening footpath. Runs, she runs to meet me, a girl with gold hair on the wind."
ALSO KNOWN AS THE FOUR MASTERS PARK Quote from Ulysses by James Joyce: “Quick warm sunlight came running from Berkeley road, swiftly, in slim sandals, along the brightening footpath. Runs, she runs to meet me, a girl with gold hair on the wind.” The Four Masters’ Park is a small green park on Berkeley Road in the heart of the North inner-city; one of the very few. The space was given by the…
View On WordPress
#65mm Manual Lens#BERKELEY ROAD#Berkeley Street#celtic cross#Eccles Street#four masters park#high cross#Public Art#Sculpture#Sony FX30#Streets Of Dublin#The Mater Plot#voigtlander
0 notes
Text
Price: [price_with_discount] (as of [price_update_date] - Details) [ad_1] Description: 10-15M (IR& White LED) Day and Night Vision Support Auto Tracking and Alarm Tone Function Support wireless WIFI connection Support Two-Way Audio Talk Speak Real Time Support Pan 355 degree/ Tilt 90 degree Support TF Card Max 128 GB memory card Support humanoid intelligent alert double light Support to Preset Position/Alert Voice and Alarm Bell/Cruise function Remotely View via the App TuyaSmart/ Smart Life or on Smartphone Specifications: Type : IP camera APP?TuyaSmart/ Smart Life High Definition : 1080P(Full-HD) Lens (mm) : 3.6mm Color : White Sensor : CMOS Megapixels : 2MP Alarm Action : telefon Alarm Video Compression Format : H.264 Power Supply : E27 Minimum Illumination(Lux) : 0.1 Connectivity : IP/Network Wireless TF Card : 128G TF Card?Not included? Viewing Angle : 360°?Level?/90°?Vertical? Waterproof rating: IP66 Network cable protocol : Wi-Fi/802.11/b/g Night mode: infrared night vision + LED full color Supported Mobile Systems : Android/ios Size: 150*65mm Weight: 290g Package Included: 1 X IP camera 1 X E27 Socket 1 X installation kit 1 X Manual Remote Control and View Everywhere: Once the light bulb camera connect WIFI, the living stream can be accessed via iOS/Android mobile phone, you can control it on the APP. It support multi cameras display at the same time and multi users share. Motion Detection and Two Way Audio: This bulb security camera will push alert notification to your cellphone real time when it detects movement, you can set the time that needs to be detected as you like. This bulb surveillance camera allows you to communicate with the camera side whenever you want, convenient and practical. The TF card slot allows you to insert a 128GB Micro TF card, which means you can save images and videos for later viewing. Meanwhile, the large memory allows you to record everything you want without missing a moment. EASY INSTALLATION AND SIOVS CUSTOMER SUPPORT- No need for any installer. Simply put the adapter in power source and get camera live in 5 minutes . Call SIOVS customer care number(provided on camera box) for stepwise installation and any query. [ad_2]
0 notes
Video
Crepe Myrtle Seed Pods by Bernie Emmons Via Flickr: Lens: Laowa 65mm Dreamer 2X Macro - 15 Second Exposure Each pod is approximately .375" diameter. Since this is a totally manual lens, it doesn't record the f/number of the shot, but based on the exposure time, it must have been f/11.0 or higher.
#Laowa CF 65mm F/2.8 Macro 2X#Laowa#Laowa Macro#Sony a6400#Seed Pods#Seeds#Black Background#Black#Macro#Macro Photography#Macro Dreams#Macro Photo#Macro Shot#Crepe Myrtle#Crepe Myrtle Seed Pods#flickr
1 note
·
View note
Text
Helicon remote stackshot

Helicon remote stackshot driver#
Helicon remote stackshot manual#
Helicon remote stackshot full#
The guys at Cognisys are very nice people, you might consider calling them to see if they would be willing to sell you the present (non-USB) version of StackShot and allow you exchange your controller for the updated controller in the future when it becomes availalbe. It wouldn't be so easy if I needed to drag along my laptop PC too. A lot of my Macro photography is done outdoors, so this is a real advantage for me. However, there are some real advantages of using the StackShot system as it is now confirgured.įor example, StackShot will easily run on 12DC (small external DC battery) which allows you to take StackShot and your camera into the field to shoot flowers, bugs, whatever.all easily controlled by the small and easy to use StackShot LCD-based controller. I have not tried Helicon Remote yet and controlling StackShot with it (in the future) using a PC sounds pretty cool.
Helicon remote stackshot manual#
I love my Canon 100mm Macro USM lens for up to 1x shooting, but if you're using a manual focus Canon MP-E 65mm Macro lens (1x-5x) as I am, using the StackShot macro rail to physically move the camera and lens is a great advantage. They set the dist/step to 0.15mm (due to the DOF of the MP-E 65mm Macro lens), set the beginning and ending of your stack with a few quick button presses, and then the controller does the rest (a stack of 58 separate photos with a 3 second "settle time" between each photo in this example). Check out the video on the Cognisys web site showing how they stack focus an ant using the Canon MP-E and a 7D camera. My next test of StackShot will be using their "Auto-Distance" mode. No shutter cable is required if used with Helicon Remote. The shutter cable is required if using StackShot stand alone (with no computer) or with Zerene Stacker. Just wondering, what would be the advantage of using a USB version of StackShot? (I just can not think of one - please enlighten me!) It allows the StackShot controller to control your camera to make the image capturing process completely automated. They are uncropped and minimal PP just a bit of sharpening. Here's my first attempts at using Helicon Remote v1.9 with the 100mm Macro f2.8. As it is, I'm told the extra USB port increases the price of the StackShot package by $50/. As I anticipate using this system mainly on a desktop, this would be ideal especially if it could be made cheaper. Helicon Remote displays the LiveView so you can easily set start/end distances, the increment between shots, etc. Both the Stackshot and the camera are tethered to the computer via USB. Helicon Remote to control the Stackshot and the camera.
Helicon remote stackshot driver#
What I've suggested to Cognisys (they say they have this on their wish-list) is to offer a PC only version with just a simple USB/Stepper driver interface between PC and StackShot rail which could be run from an iPod or small netbook. Stackshot automated macro rail for focus stacking.
Helicon remote stackshot full#
The nice thing about HR is the live-view similar to the one Canon bundles with the DPP.Ĭognisys tell me that HR v2.0 won't give the full functionality of the hardware controller but more functions will be added in later releases. I suppose it just gives people the extra flexibility of controlling the StackShot rail from the PC using Helicon Remote v2.0 (about to be released) OR the hardware controller direct.
0 notes
Text
Focus stacking for landscape using helicon remote

#Focus stacking for landscape using helicon remote manual
#Focus stacking for landscape using helicon remote full
#Focus stacking for landscape using helicon remote series
In the world of macro photography, it can be a significant problem when trying to blend the images. This is not something you’d notice with the naked eye. When you change the focus, you’re also affecting the size of the image on the sensor by a small amount. This is particularly obvious in the background and foreground. But there is a change in the size and position of each component from one photo to the next. The camera and subject remained fixed in position. You’ll notice it’s not only the focus that changes from one image to the next. In this example, I’ve covered the area with four images.Ī four image sequence showing how the image magnification varies as the focus is adjusted. The number of photos you need will depend on the depth-of-field.
Take the next exposure and repeat until you’ve reached the furthest extent.
Re-focus the lens to this point to overlap the old depth-of-field with the previous one. Then examine the result on the back of the camera.
Focus on the foreground as shown above and take the first exposure.
Use a small aperture – try your lens’ sweet spot.
#Focus stacking for landscape using helicon remote manual
Set the camera to manual focus and manual exposure.
#Focus stacking for landscape using helicon remote series
We need a series of images that sweep the focus into the image. But the more distant components at the top of the frame are out-of-focus. Even at f/16, there is insufficient depth of field. The problem is that even at f/16, the depth of field is too shallow. But you can get a more interesting result by shooting at a low angle close to one edge of the board. This would mean most of the components would be a similar distance from the camera and in focus at the same time. It may have been easier to take this photo square onto the board. Take, for example, this macro photo of a printed circuit board. In practice, there’s more involved than blending a series of images. This ‘stack’ will produce a single sharp image where the whole subject is in sharp focus from front to back. Once you have a series of images, you can combine the focused areas from each photo. These will range from the nearest to the farthest point on your chosen subject. Alter the focus of each exposure to capture a succession of sharply focused ‘slices’. To bypass the DoF limitations, take several photos of the same subject. How to Use Image Stacking to Get Around the DoF Limitations At this angle and small distance, you will have trouble getting the whole subject in sharp focus. An auto reversing ring allows you to get very close to your subject. Instead, you need a more sophisticated approach – and that is what image stacking provides. There’s only so far you can go with camera and lens adjustments.
#Focus stacking for landscape using helicon remote full
But it has a depth of field at full magnification of 40 microns. Canon��s MP-E 65mm macro lens is capable of x1 to x5 magnifications. And a very shallow depth of field when shooting at the max aperture.Įven with the optimal aperture, the depth of field can still be small. Even when using a small aperture.įor the sharpest results, set your lens aperture to around the middle of its range. It’s quite common for the resulting macro depth of field to be only a few millimeters. You can use a small aperture to maximize the depth of field. Obtaining a large image of a small object on your sensor means getting the camera very close to the subject. This presents a particular difficulty in macro photography. But this will go down as you move the camera closer to the subject. You might have enough depth of field for a normal subject such as a person several meters away. But it won’t be by the amount you might expect. The same adjustments will change the depth of field in macro photography as well. If your camera lacks a depth of field preview button, take a test shot. Particularly if you switch your camera to live view without exposure simulation. More of the scene is in focus at smaller apertures. To preview the effect, use your camera’s depth-of-field preview button if it has one. But you don’t see the effect a lower aperture has on depth of field while composing a shot. Modern DSLRs don’t shut down the lens aperture until the moment you take the photo. What Is Depth of Field and What Does It Have to Do With Image Stacking
0 notes
Text

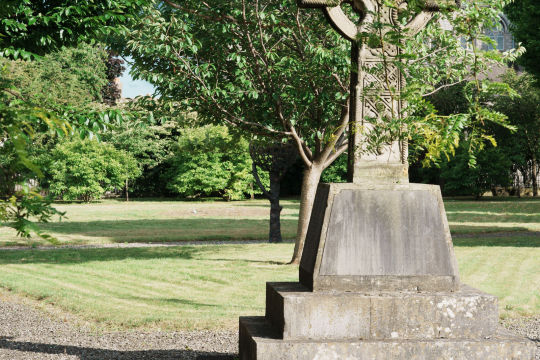
Test day: A few days ago I had acquired the Laowa 65mm, macro lens with manual focus. From the photo you can understand how your father wants to use a macro lens, as an all-around lens. An evil genius. Here I tried to create a frame with the two trees and wait for a subject in the center. Dad could have done better.
Giorno di test: Da qualche giorno ero entrato in possesso del Laowa 65mm, lente per la macro, con messa a fuoco manuale. Dalla foto puoi capire come tuo padre voglia usare una lente per la macro, come lente all-around. Un genio del male. Qui ho cercato di creare una cornice con i due alberi e al centro aspettare un soggetto. Papà poteva fare di meglio.
#test day#street#park#people#trees#frame#look for#subject#foliage#basket#family#fujifilm xt4#laowa 65mm 2.8 macro#classic chrome
0 notes
Text
Bronica Rf645 For Sale

BRONICA RF645 FOR SALE MANUAL FOCUS CAMERA
Bronica Rf645 For Sale Manual Focus Camera
For Sale - Sold Bronica Zenzanon-S 150mm /3.5 bokeh lens & new adapter. The 135mm proved problematic if near impossible to focus accurately, so Bronica release an 100mm F.4. Bronica made a few Zenzon-RF lens for it including a 45mm F4 which is the most common and was often bundled as kit with the body, a 65mm F4 plus an exceptionally rare 135mm F4.5. The Bronica RF645 is manual focus camera with its own lens mount.
...


I agree with you that triggering the shutter causes a significant amount of movement and this also happen when using the grip shutter release. Apparently the camera prevents you for removing the back without a slider when there’s film inside but it doesn’t do so when you try to open the back. For example despite its many security/fail-safes, the other day I accidentally openned the film back and ruined an almost entirely exposed roll of FujiPro400.
Not sure if they are not perfectly focused or blurred by the release shake. Great pics by the way however some of your people’s shots seem to me a bit soft. I bought the camere to be used both handheld (for street shots) and with the tripod but after the first rolls I decided to use it on tripod all the more often just to play safe.
Enjoy your camera, definitely it’s a capable machine to yield excellent images. Still it might be my wrong impression.
1 note
·
View note
Text
Week 9 - Thursday
Talk with Jonathan
Unfortunately, I didn't have much to show as I've been slack and struggling with motivation so I know it was hard to give me feedback.
Get out there and get shooting
Circus guy is a great start
Consider going to Courtenay place as well as Cuba street
LIGHTING WORKSHOP IMAGES
RGB67 workshop
6x7 film
Need a tripod (medium -> Use the gold pin)
Pull bit at top up -> should see something through it
Big knob on side to focus through
Grey button to open up magnifier
90mm lens fixed - can get out 50mm, 65mm (wide angle) or 127mm, 140mm, 180mm, 250mm (telephoto)
120 film - kodak portra
Must book a camera, light meter, lens and tripod
Shutter is within lens
First ring - floating lens -> white is metres (set it for how far away your subject is), use infinity for more than 10m or less than 1m just set at 1m
Second ring - Shutter speed -> T = anytime you want (use your hand)
Third ring - f stops
Black button closes iris - DOF preview (you won't use this) B - bulb - need a cable release X - flash - need a sync cord M up - Mirror up - need cable release -Always want this on N for normal - older lenses + on the x
Lever on the side can manually bring mirror back down (this helps if you can't see anything when you first open it up)
Silver button is shutter
Knobs on side are focus
Order of taking a photo and reloading film Shutter -> Lever -> Wind at top
Table on the side -> Helps you decide what f stop to use (1st ring)
Take dark slide out when ready to shoot -> put on side by lever or in case and it goes back into camera between the 2 white lines
Loading film
Raised rectangle bit by dark slide - pull top and bottom ride will open up the back
Core comes out -> Push silver things down -> Put core on right side so you can wind it
Break paper ring and throw it out - Don't unroll it!
Push silver thing down and put in top
Black on black -> put film around back
Goes in slot and wraps around -> use your finger and wind film -> stop at big arrow just before silver bit
Slot in back - close clips
Wind up til number one
Checklist
Book tripod, meter, and camera
Put on tripod
Focus on subject
Set DOF ring (1st)
Meter reading
Check ballows factor
Take dark slide out
Push button
Lever
Wind film
Keep winding film after 10 til you can't wind anymore and when taking film out try fold end underneath
Light meter: Sun mode and adjust ISO
0 notes
Text
Price: [price_with_discount] (as of [price_update_date] - Details) [ad_1] Description: 10-15M (IR& White LED) Day and Night Vision Support Auto Tracking and Alarm Tone Function Support wireless WIFI connection Support Two-Way Audio Talk Speak Real Time Support Pan 355 degree/ Tilt 90 degree Support TF Card Max 128 GB memory card Support humanoid intelligent alert double light Support to Preset Position/Alert Voice and Alarm Bell/Cruise function Remotely View via the App TuyaSmart/ Smart Life or on Smartphone Specifications: Type : IP camera APP?TuyaSmart/ Smart Life High Definition : 1080P(Full-HD) Lens (mm) : 3.6mm Color : White Sensor : CMOS Megapixels : 2MP Alarm Action : telefon Alarm Video Compression Format : H.264 Power Supply : E27 Minimum Illumination(Lux) : 0.1 Connectivity : IP/Network Wireless TF Card : 128G TF Card?Not included? Viewing Angle : 360°?Level?/90°?Vertical? Waterproof rating: IP66 Network cable protocol : Wi-Fi/802.11/b/g Night mode: infrared night vision + LED full color Supported Mobile Systems : Android/ios Size: 150*65mm Weight: 290g Package Included: 1 X IP camera 1 X E27 Socket 1 X installation kit 1 X Manual Remote Control and View Everywhere: Once the light bulb camera connect WIFI, the living stream can be accessed via iOS/Android mobile phone, you can control it on the APP. It support multi cameras display at the same time and multi users share. Motion Detection and Two Way Audio: This bulb security camera will push alert notification to your cellphone real time when it detects movement, you can set the time that needs to be detected as you like. This bulb surveillance camera allows you to communicate with the camera side whenever you want, convenient and practical. The TF card slot allows you to insert a 128GB Micro TF card, which means you can save images and videos for later viewing. Meanwhile, the large memory allows you to record everything you want without missing a moment. EASY INSTALLATION AND SIOVS CUSTOMER SUPPORT- No need for any installer. Simply put the adapter in power source and get camera live in 5 minutes . Call SIOVS customer care number(provided on camera box) for stepwise installation and any query. [ad_2]
0 notes
Text
Sigma Unveils 90mm f/2.8 and 24mm f/2 Primes for E- and L-Mounts
Sigma has expanded its series of primes categorized under its I-series line with the 90mm f/2.8 DG DN and the 24mm f/2 DG DN lenses. Both will be available in Sony E-mount and Leica L-mount.
Sigma says that both lenses have been designed with the idea of balancing performance with compactness as have all the lenses in the I-series line. The two new primes join the 24mm f/3.5, 35mm f/2, 45mm f/2.8, and 65mm f/2, bringing the total number of lenses in the I-series to six.
“Built to the mechanical and operational standards of Sigma Cine lenses, in compact mirrorless form, the I series have outstanding feel and tone in the hand,” Sigma says. “The feel of the manual focus ring, aperture ring, and switches embody true functional beauty.”
Sigma 90mm f/2.8 DG DN Lens
This mid-telephoto length lens is the longest in the I-series but Sigma says it remains remarkably compact despite this and is fully optimized for mirrorless systems with a fast and accurate autofocus system, high image quality, and smooth bokeh. The bokeh is further enhanced thanks to the lens’s nine-bladed aperture.
The 90mm lens is 64mm (about 2.5 inches) in diameter and 59.7mm (about 2.4 inches) long and weighs 295 grams (about 10.4 ounces). The lens uses an all-metal construction using what Sigma describes as precision-cut aluminum.
It is constructed of 11 elements in 10 groups and that includes five SLD glass elements to reduce axial chromatic aberration to help it achieve high resolution and clear images with no color bleeding. It also has a single molded aspherical lens to again aid in the rendering of high-resolution images.
Sigma says that the lens utilizes the camera’s optical correction functionality, which it says is an advantage of mirrorless systems, so that its optical designers were able to concentrate on correcting aberrations that can only be corrected by the optical design, thereby improving rendering performance and reducing the size and weight of the lens.
The lens has a minimum focusing distance of 50 centimeters (about 19.7 inches) and a maximum magnification ratio of 1:5. The aforementioned high-speed autofocus system is made possible thanks to the integration of a stepping motor. The lens also has an aperture ring, focus mode switch, a magnetic metal lens cap, and is dust and splash resistant.
Sigma 24mm f/2 DG DN
As is the case with the 90mm f/2.8 and the other lenses in the I-series, the 24mm f/2 lens is extremely light and compact. It weighs 365 grams (about 12.8 ounces) and is 70mm (about 2.7 inches) in diameter and 72mm (about 2.8 inches) long.
The 24mm f/2 lens is constructed of 13 elements in 11 groups which includes two SLD glass elements and one FLD glass element to correct axial chromatic aberration, which Sigma says is a particular concern with fast lenses. It also incorporates two high-precision glass-molded aspherical elements which the company says has enabled the total number of lens elements to be kept down and the size and weight of the lens to be reduced without sacrificing the ability to correct for those aberrations. The aperture diaphragm is made up of nine blades.
The lens has a minimum focusing distance of 24.5 centimeters (about 9.7 inches) and a maximum magnification ratio of 1:6.7.
As is the case with the 90mm lens, the 24mm uses a stepping motor for fast and accurate autofocus performance. Also like the 90mm (and all the other lenses in the I-series), the 24mm uses an all-metal, splash and dust-resistant construction. It should be noted that the same metalwork is used in Sigma’s cinema line of lenses.
The cover ring between the focus ring and the aperture ring has hairline processing that is also used for the rear cylinder of the Art line. This covering functions as a finger hold when attaching or detaching the lens.
Offered for L-mount and Sony E mount cameras, the Sigma 90mm f/2.8 DG DN Lens and 24mm f/2 DG DN will each be priced at $639 and will be made available for purchase beginning in late September.
from PetaPixel https://ift.tt/3niGwsz
0 notes
Text
A Unique Option for GFX! Mitakon Speedmaster 65mm f1.4 Lens Review
Combine this with Classic Chrome for a beautiful look.
For more stories like this, please subscribe to the Phoblographer. In a world where the quest for technical perfection has led to clinical staleness, the Mitakon Speedmaster 65mm f1.4 lens is a breath of fresh air. It arrived on my doorstep in a small, unassuming brown box. Inside was a surprising luxury feeling black box padded with foam which housed a very standard-looking manual focus lens.…

View On WordPress
#Bokeh#build quality#color rendition#Fujifilm GFX lenses#fujifilm lenses#lens character#Mitakon 65mm f1.4#Mitakon Speedmaster 65mm f1.4#Mitakon speedmaster 65mm f1.4 lens#Portrait Lens#sharpness
0 notes
Text
What a name. What a lens.
This lens was a weird find. Had not heard of it online. Had not seen any press releases. Had not seen any reviews. Never heard of it. This was found by the power of the local camera shop. It sat there under glass staring at me every time I stopped through until one day I threw it on my camera. This happened.
And that was it. I was hooked.
Tried to fight it. Went on for a couple of months. Ultimately futile. In the end, I traded it for a bit of “sensible” gear that had sat unused for most of last year. And I am glad I did. Why? Glad you asked. LArgely purchases fall into one of three categories for me.
Worse than I thought.
Either in technical performance or real-world usefulness.
About what I thought.
No more. No less. Often times boring.
Better than I thought.
Far more useful or far better performing than expected.
No amount of research can predict real-world personal experience with 100% accuracy. The lens I traded fell somewhere between 1 and 2. While it performed as expected I did not have near as great a need for that performance envelope as I had expected. As a part of this process, a new mantra was formed, “No more boring lenses.” A boring lens can be a perfectly good lens that simply does not generate many keepers. A gauge I use os my own cloud and flickr keepers. If I delete files created during the editing process, whether due to imperfections or lack of interest, or I do not post many that do survive that lens is likely doomed. Lenses that do not bore me are lenses that regularly generate results that perform beyond my expectations regardless of price point. While I no longer shoot MFT an all-time bargain champion for me is the Olympus 40-150mm. This lens costs peanuts, but generated some of my all-time favorite photos. Two of the shots below (Bronx basketball court and Butterfly) won a photo contest at UNC (2 of 4 all together) and hung on the walls of our IT offices for years until we moved. The third is a favorite candid hip shot of a couple in Central Park.
OLYMPUS DIGITAL CAMERA
OLYMPUS DIGITAL CAMERA
OLYMPUS DIGITAL CAMERA
Solid number 3 lens. This Voigtlander is also a solid 3. Which is saying something because I expected a lot just based on the in-shop test.
Sharpness.
Colors.
Ease of use due to the chipped manual focus lens that triggers magnification and peaking when you turn the focus wheel.
Aesthetics and material build quality above reproach.
Nice portrait length and very nice macro capabilities.
Focus and aperture rings had a very nice feel.
Then I took it for a spin.
So sharp that it can nearly imitate a zoom by cropping later. For example:
Aperture ring becomes only control for camera aperture and is also retained in EXIF information along with lens name and other information…
Ok. Forget everything I said above. Things change.
Found another lens that was recently released that has blown me away. The Tamron 28-75mm f/2.8 Di III RXD. Everything I said about the Lanthar is true and more. But for reasons that will be explained in a later post it proved a better and even more flexible solution than this lens.
For now I will say that the Lanthar is the sharper lens. Have seen nothing sharper and no one looking for an impeccable example of no holds barred imaging perfection could ask for more. But for me very near as good performance in macro, sharpness, and color wins the day.
Recently I decided to abandon the Pokemon “gotta catch them all” mentality when it comes to camera gear that I had slipped into. This includes weeding out focal length redundancy unless there is a very compelling reason to do so. No boring lenses are allowed, however. Exceptions will be made in cases of exceeding flexibility. That is not boring. The Tamron 28-75mm f/2.8 Di III RXD is one of those exceptions. In fact the banner photo for this post was taken with it.
Welp. Here is a sample gallery and below are a few shots from that gallery.
Happy shooting.
-ELW
Voigtlander APO-Lanthar 65mm f/2: Loved the lens, but was displaced by another before the review was done What a name. What a lens. This lens was a weird find. Had not heard of it online.
1 note
·
View note
Text
Macro
Macro photography is anything that has been magnified at a ratio of 1:1 or higher. Example if the subject you are taking a picture of is half an inch then it would take up half an inch of the camera sensor.
Macro photography started of a scientific pursuit. Scientist would attach a camera to a microscope to achieve macro photography. Forensic also use macro photography in crime scenes to get close up and detail images.


Kit
· Camera
· Macro lens rule of thumb,
45-65mm product photography and small object.
90-105mm insect, flowers objects comfortable distance
150-200mm insect/small animals working at distance.
· Tripod
· Light source
Depth of Field
Depth of field is very small, a small aperture like f16 or 22 is often use to make a slightly bigger DofF. This means that you need to have good lighting to keep the shutter speed fast enough and the ISO low to get clean images. Using a flash Often white LEDs ring flashes can help with lighting and allow you to have higher F number . You can also focus stack your images to increase the
depth of field. You take a few photos of with different part of the image in focus and use photoshop to combine them so you have a sharp
image. This can work well but only if your subject does not move! Another way to get more depth of field is by using a tilt shift lens but this option is very expensive and not all can do 1:1 ratio often the ratio is 1:2.
Focusing
Focusing can be very difficult. Auto Focusing is not really an option unless the subject does not move, but even still some camera still struggle, and manual focus is the way forwards. If you are shotting on a tripod and your subject does not move, then turning the focus ring will work fine but if your subject moves like an insect this method is maybe not the best. Another way is to set the focus and put your camera on a monopod and slow move the camera millimetre at a time to achieve focus and take the photo when the photo is in focus.
https://en.wikipedia.org/wiki/Macro_photography
https://www.adorama.com/alc/top-10-macro-photography-tips/
https://photographylife.com/macro-photography-tutorial/3
https://photographylife.com/macro-photography-tutorial/2
0 notes
Text
Venus Optics launches Laowa 11mm F4.5 lens for Canon RF mount, 65mm F2.8 2X Macro lens for Nikon Z mount
Venus Optics launches Laowa 11mm F4.5 lens for Canon RF mount, 65mm F2.8 2X Macro lens for Nikon Z mount
Venus Optics has announced it’s adding new mount support for two of its Laowa lenses. The Laowa 11mm F4.5 FF RL (full-frame rectilinear) lens is now available for Canon RF mount camera systems and the Laowa 65mm F2.8 2x Ultra-Macro APO is now available for Nikon Z mount camera systems. The Laowa 11mm F4.5 FF RL lens is a manual lens constructed of 14 elements in 10 groups with an aperture range…

View On WordPress
0 notes
Link
The MP-E 65mm f/2.8 1-5x Macro Photo Lens from Canon is a unique manual focus lens specifically for macro photography that provides extreme close-up imaging from a 1:1 (life-size) magnification ratio to a 5:1 ratio. The lens mounts to all Canon EOS DSLR and SLR cameras.
#Buy Canon MP-E 65mm#Canon MP-E 65mm#Camera Lens#Best Camera Lens#Online Electronics Store#Electronics Store In UK#Canon Lnes#best Canon Lens#UK#justclik
0 notes