#5-axis image stabilization
Explore tagged Tumblr posts
Text
youtube
#Panasonic LUMIX FZ1000 II#20.1MP#Digital Camera#1-inch sensor#4K video#Leica DC Vario-Elmarit lens#5-axis image stabilization#Low light photography#WiFi#Bluetooth#High-quality images#High-quality videos#Full HD#Slow-motion video.#Youtube
0 notes
Text
Mariner program
The Mariner program was conducted by the American space agency NASA to explore other planets. Between 1962 and late 1973, NASA's Jet Propulsion Laboratory (JPL) designed and built 10 robotic interplanetary probes named Mariner to explore the inner Solar System - visiting the planets Venus, Mars and Mercury for the first time, and returning to Venus and Mars for additional close observations.
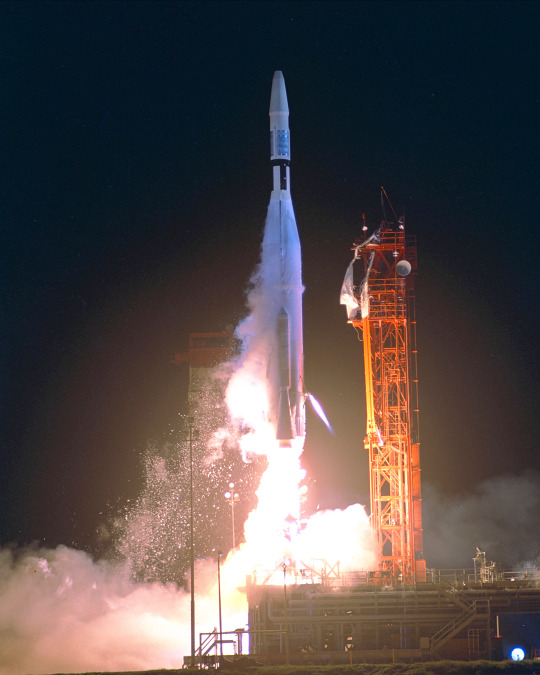
The program included a number of interplanetary firsts, including the first planetary flyby, the planetary orbiter, and the first gravity assist maneuver. Of the 10 vehicles in the Mariner series, seven were successful, forming the starting point for many subsequent NASA/JPL space probe programs.
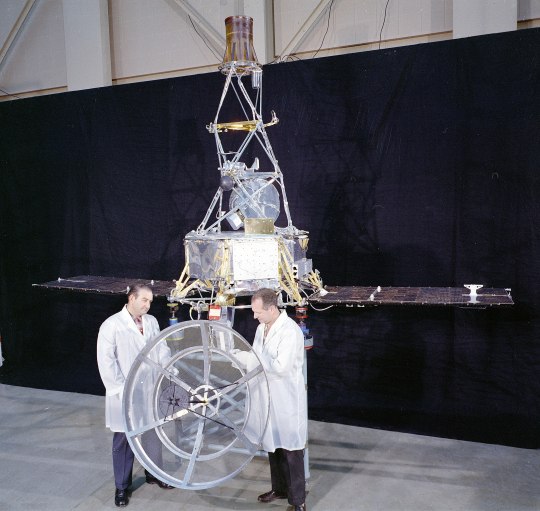
The name of the Mariner program was decided in "May 1960-at the suggestion of Edgar M. Cortright" to have the "planetary mission probes ... patterned after nautical terms, to convey 'the impression of travel to great distances and remote lands.'" That "decision was the basis for naming Mariner, Ranger, Surveyor, and Viking probes."

Each spacecraft was to carry solar panels that would be pointed toward the Sun and a dish antenna that would be pointed at Earth. Each would also carry a host of scientific instruments. Some of the instruments, such as cameras, would need to be pointed at the target body it was studying. Other instruments were non-directional and studied phenomena such as magnetic fields and charged particles. JPL engineers proposed to make the Mariners "three-axis-stabilized," meaning that unlike other space probes they would not spin.

Mariner 1 and Mariner 2
Mariner 1 and Mariner 2 were two deep-space probes making up NASA's Mariner-R project. The primary goal of the project was to develop and launch two spacecraft sequentially to the near vicinity of Venus, receive communications from the spacecraft and to perform radiometric temperature measurements of the planet. A secondary objective was to make interplanetary magnetic field and/or particle measurements on the way to, and in the vicinity of, Venus.
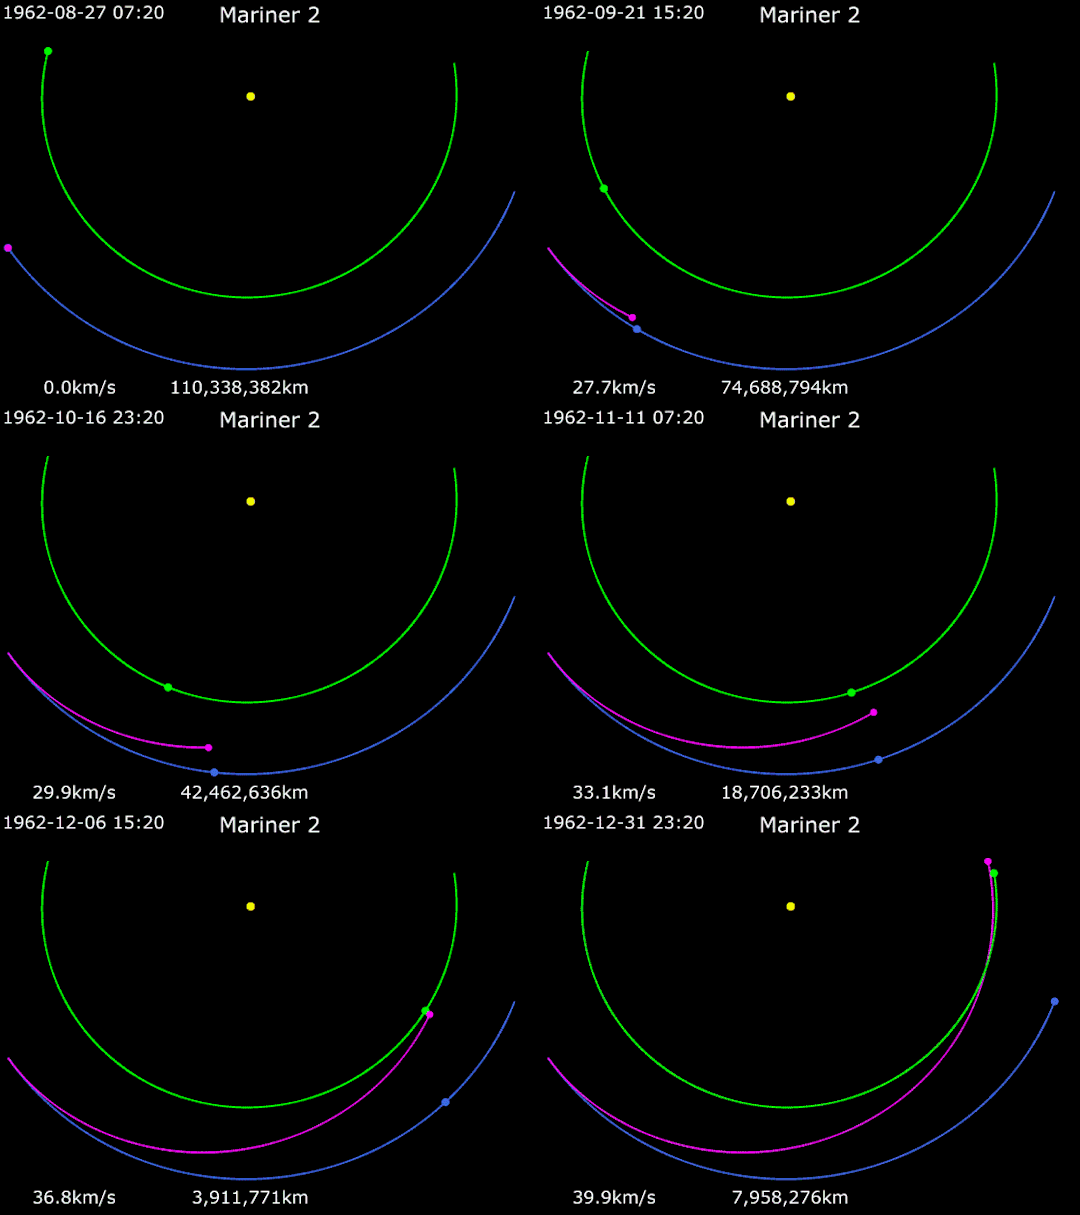
Animation of Mariner 2's trajectory from August 27, 1962, to December 31, 1962. Mariner 2 · Venus · Earth.
Mariners 3 and 4
Sisterships Mariner 3 and Mariner 4 were Mars flyby missions.
Mariner 3 was launched on November 5, 1964, but the shroud encasing the spacecraft atop its rocket failed to open properly and Mariner 3 did not get to Mars.
Mariner 4, launched on November 28, 1964, was the first successful flyby of the planet Mars and gave the first glimpse of Mars at close range
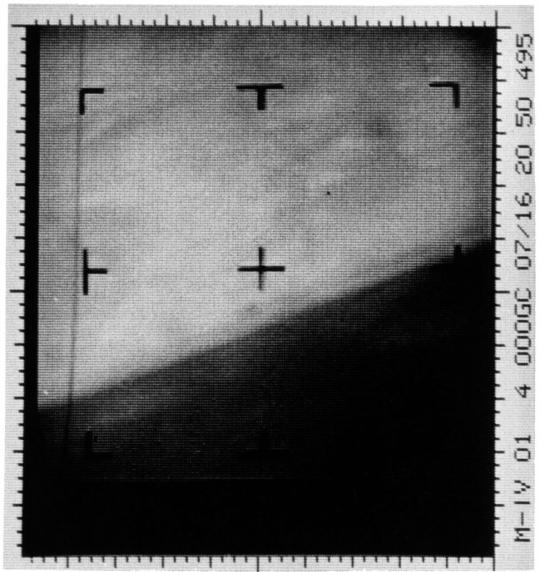
This archival image is an enhanced contrast version of the first Mars photograph released on July 15, 1965. This is man's first close-up photograph of another planet -- a photographic representation of digital data radioed from Mars by the Mariner 4 spacecraft. Data was either sent to Earth immediately for acquisition or stored on an onboard tape recorder for later transmission.

The pictures, played back from a small tape recorder over a long period, showed lunar-type impact craters (just beginning to be photographed at close range from the Moon), some of them touched with frost in the chill Martian evening.
Mariner 5

The Mariner 5 spacecraft was launched to Venus on June 14, 1967, and arrived in the vicinity of the planet in October 1967. It carried a complement of experiments to probe Venus' atmosphere with radio waves, scan its brightness in ultraviolet light, and sample the solar particles and magnetic field fluctuations above the planet.
Mariners 6 and 7

Mariners 6 and 7 were identical teammates in a two-spacecraft mission to Mars. Mariner 6 was launched on February 24, 1969, followed by Mariner 7 on March 21, 1969. They flew over the equator and southern hemisphere of the planet Mars.
Mariners 8 and 9

Mariner 8 and Mariner 9 were identical sister craft designed to map the Martian surface simultaneously, but Mariner 8 was lost in a launch vehicle failure. Mariner 9 was launched in May 1971 and became the first artificial satellite of Mars.
Mariner 10

The Mariner 10 spacecraft launched on November 3, 1973, and was the first to use a gravity assist trajectory, accelerating as it entered the gravitational influence of Venus, then being flung by the planet's gravity onto a slightly different course to reach Mercury. It was also the first spacecraft to encounter two planets at close range, and for 33 years the only spacecraft to photograph Mercury in closeup.

Venus in real colors, processed from clear and blue filtered Mariner 10 images

Mariner 10's photograph of Venus in ultraviolet light (photo color-enhanced to simulate Venus's natural color as the human eye would see it)

This mosaic shows the planet Mercury as seen by Mariner 10 as it sped away from the planet on March 29, 1974.
source x, x | images x
#mercurio#mercury#venus#mars#marte#astronomy#astronomia#space#solarsystem#sistemasolar#universe#universo#mariner#mission#space exploration
267 notes
·
View notes
Text
Looking for the Best Camera for Video? These Are the Top Choices for 2025!
In 2025, the world of videography continues to evolve, with cameras becoming more powerful, portable, and capable of capturing breathtaking footage. Whether you're a professional filmmaker, a content creator, or an amateur enthusiast, choosing the right camera for video is essential. With so many options on the market, it can be overwhelming to determine which one is best suited to your needs.
This guide will walk you through the best cameras for video in 2025, from cutting-edge mirrorless models to professional-grade cinema cameras. We’ll explore the standout features, performance, and price points of each, so you can make an informed decision and start shooting high-quality videos.
1. Why Choosing the Right Camera Matters
When it comes to videography, not all cameras are created equal. The best camera for video needs to offer crisp image quality, smooth frame rates, and advanced video-centric features like high dynamic range, autofocus, and stability. It’s important to know what to look for, whether it’s 4K/8K resolution, fast autofocus, or professional-grade audio options.
Key factors to consider:
Resolution: The higher the resolution, the sharper the footage.
Frame Rate: Higher frame rates ensure smoother motion, especially for action shots.
Low-Light Performance: Cameras with great ISO performance will excel in darker environments.
Stabilization: In-body or lens stabilization can make or break handheld shots.
Lens Compatibility: Choosing a system with versatile lenses is crucial for different shooting needs.
2. Sony Alpha 1 – The All-in-One Powerhouse
Sony continues to dominate the camera market, and in 2025, the Sony Alpha 1 is still one of the best cameras for video enthusiasts and professionals alike. With 8K recording capabilities at 30 fps, this mirrorless camera is a beast in terms of video performance. Its Real-time Eye AF for video ensures that subjects stay sharp even in fast-moving environments.
Key features:
8K 30fps and 4K 120fps video recording.
15-stop dynamic range for rich details in highlights and shadows.
Full-frame sensor for superior low-light performance.
Dual CFexpress card slots for extended recording times.
3. Canon EOS R5C – The Hybrid Marvel
For those who want a camera that excels in both photography and video, the Canon EOS R5C is a top choice in 2025. It offers cinema-grade video performance with 8K RAW recording and comes with advanced cooling for extended video shoots. The R5C bridges the gap between Canon's cinema line and its mirrorless systems, making it perfect for hybrid shooters.
Key features:
8K RAW at 30fps and 4K 120fps.
Dual Pixel CMOS AF for incredibly fast autofocus.
C-Log 3 for extended dynamic range in post-production.
Compact and lightweight design ideal for on-the-go shoots.
4. Panasonic Lumix GH7 – The Best for Content Creators
For content creators who need a more budget-friendly option that doesn’t compromise on quality, the Panasonic Lumix GH7 is a go-to camera. Known for its Micro Four Thirds sensor, the GH7 offers excellent video performance in a compact form factor. It’s perfect for vloggers, YouTubers, and those who need a camera that can shoot high-quality video without the bulk of larger systems.
Key features:
6K video recording at 30fps.
5-axis in-body stabilization for smooth handheld shots.
10-bit 4:2:2 internal recording for professional-grade video quality.
Versatile, lightweight design ideal for travel and vlogging.
5. Blackmagic URSA Mini Pro 12K – The Cinema King
When it comes to professional cinema cameras, the Blackmagic URSA Mini Pro 12K is a game-changer in 2025. Offering 12K resolution, this camera provides an unmatched level of detail for film and high-end production work. With RAW recording and color science, it’s the ideal choice for filmmakers who need the best in image quality and post-production flexibility.
Key features:
12K Super 35 sensor with 14 stops of dynamic range.
Built-in ND filters for shooting in various lighting conditions.
Dual CFast and SD card slots for extended recording.
Blackmagic RAW format for ultimate flexibility in post.
6. Fujifilm X-H2 – The Stylish Performer
For videographers who love Fujifilm’s color science, the Fujifilm X-H2 is a standout model in 2025. It offers 8K video recording in a stylish and retro-inspired design, making it a great choice for videographers and photographers alike. With its APS-C sensor, the X-H2 delivers excellent detail while remaining compact.
Key features:
8K video recording at 30fps and 4K at 120fps.
F-Log2 for a higher dynamic range.
Film Simulation modes for unique color profiles straight out of the camera.
In-body stabilization for steady handheld footage.
3 notes
·
View notes
Text
Price: [price_with_discount] (as of [price_update_date] - Details) [ad_1] The E-M10 Mark IV is a high-end camera combining a stylish body with technical sophistication. The body is equipped with the OM-D series’ first flip-down LCD monitor allowing for easy to shoot selfies and additionally supports high-angle and low-angle shootings. Inside the body you will find a 20 megapixel Live MOS sensor for crisp-clear images and the 5-Axis Image Stabilization guarantees pin-sharp handheld photos. The processor Truepic VIII delivers high image resolution in low-contrast areas especially when shooting at low ISO sensitivity. With Wi-Fi and Bluetooth built into the camera body, the dedicated smartphone app OI.Share can be used to easily and instantly import recorded photos and videos to a smartphone or for sharing on social media. Needless to say that this Olympus model offers you highest mobility thanks to its extremely low weight of the ultra-compact design, in fact the E-M10 Mark IV is Olympus' smallest OM-D. Ultra compact and lighter than any previous OM-D camera The first OM-D with flip-down touchscreen for easy to shoot selfies and integrated Wi-Fi and Bluetooth to share valuable moments instantly with family and friends 5-Axis Image Stabilization, a high-resolution 20 megapixel sensor and the Truepic VIII processor for professional images Dedicated smartphone app, which also provides new content to help learn photography techniques 4K video shooting and various Art Filters support your creativity [ad_2]
0 notes
Text
Symmetry + Balance : Creating a Sense of Calm
Symmetry and balance are fundamental principles in design that play a crucial role in creating spaces that evoke calmness and serenity. These elements are not only visually appealing but also contribute to a sense of order and stability, fostering an environment where relaxation and well-being are prioritized. Understanding and applying these principles can transform a space into a harmonious sanctuary that nurtures both the mind and body.
In this blog post, we'll explore how symmetry and balance contribute to a calming atmosphere and provide practical tips for incorporating these design principles into your home.
The Psychology of Symmetry and Balance
Symmetry and balance are deeply rooted in human psychology, influencing our perception of beauty and harmony. They create a sense of order and equilibrium, which can significantly impact our emotional and mental state.
Impact on Mood and Perception:
Visual Harmony: Symmetry creates a pleasing sense of order by mirroring elements on either side of a central axis, leading to a visually harmonious environment.
Psychological Stability: Balanced design fosters a sense of equilibrium and calm, reducing feelings of disarray and stress.
Aesthetic Appeal: Both symmetry and balance are often associated with beauty and sophistication, enhancing the overall appeal of a space.
Functional Comfort: Balanced layouts contribute to practical and efficient use of space, promoting ease of movement and usability.
Key Elements of Symmetry and Balance in Design
Achieving a sense of calm through symmetry and balance involves thoughtful consideration of various design elements. Here are the essential aspects to focus on:
1. Symmetrical Layouts
Mirror Imaging: Arrange furniture and decor items in a mirrored fashion around a central focal point to create visual symmetry.
Central Axes: Use a central axis to guide the placement of elements, ensuring that each side of the space is evenly balanced.
Proportional Elements: Maintain proportionality in the design by balancing large and small items to create a cohesive and organized appearance.
2. Asymmetrical Balance
Visual Equilibrium: Achieve balance through asymmetry by arranging different-sized or differently styled elements in a way that creates visual equilibrium.
Weight Distribution: Distribute visual weight across the space using varying textures, colors, and shapes to maintain a sense of harmony without strict symmetry.
Intentional Variation: Use asymmetry intentionally to create dynamic and interesting spaces while still maintaining overall balance.
3. Color and Texture Balance
Color Coordination: Balance colors by using complementary or analogous color schemes to create a harmonious palette that soothes the senses.
Textural Contrast: Introduce varied textures to balance visual interest and tactile comfort, ensuring a cohesive and inviting environment.
Accent Pieces: Use accent pieces strategically to provide focal points and balance out larger design elements.
4. Architectural Features
Focal Points: Design architectural features, such as fireplaces or windows, to serve as focal points that anchor the space and create symmetry.
Ceiling and Flooring: Ensure that ceiling and flooring treatments are aligned with the overall design scheme, contributing to a balanced and unified look.
Structural Elements: Incorporate structural elements like columns or beams to enhance the sense of balance and support in the design.
5. Lighting Design
Even Illumination: Distribute lighting evenly throughout the space to enhance symmetry and balance in both functional and decorative aspects.
Layered Lighting: Use a combination of ambient, task, and accent lighting to create a balanced and soothing atmosphere.
Symmetrical Fixtures: Select lighting fixtures that complement the symmetry of the space, contributing to a cohesive and calming effect.
6. Furniture Arrangement
Balanced Placement: Arrange furniture in a balanced manner to facilitate easy movement and create a sense of order.
Functional Zones: Designate functional zones within the space to ensure that each area is well-organized and contributes to the overall balance.
Proportional Sizing: Choose furniture pieces that are proportionate to the size of the room, ensuring a harmonious and functional layout.
7. Decorative Elements
Art and Accessories: Position artwork and decorative accessories symmetrically or in balanced arrangements to enhance visual appeal and create a sense of calm.
Patterns and Designs: Use patterns and designs that contribute to the overall balance of the space, avoiding overwhelming or chaotic elements.
Natural Elements: Incorporate natural elements such as plants or water features to add a soothing and balanced touch to the design.
Incorporating Symmetry and Balance: How Architects Can Enhance Calmness
Architects play a pivotal role in applying symmetry and balance to create serene and harmonious spaces. Here’s how these principles can be effectively integrated into your home design:
Strategic Layout Planning: Design layouts that emphasize symmetry and balance, ensuring that spaces feel organized and inviting from the moment you enter.
Harmonious Color Schemes: Develop color schemes that enhance visual balance and contribute to a calming environment, using complementary or analogous colors.
Functional Architecture: Create architectural features that serve as focal points and support the overall symmetry of the space, enhancing both aesthetics and functionality.
Balanced Lighting Solutions: Implement balanced lighting designs that provide even illumination and support the overall mood and atmosphere of the space.
Thoughtful Furniture Arrangement: Arrange furniture and decor in a way that promotes balance and functionality, ensuring that every element contributes to the overall harmony.
Design Cohesion: Maintain a cohesive design approach by integrating symmetrical and balanced elements throughout the home, ensuring a unified and serene environment.
Personalized Touches: Incorporate personalized design elements that reflect your style while maintaining the principles of symmetry and balance, creating a space that is both calming and uniquely yours.
Conclusion
Symmetry and balance are essential elements in creating spaces that evoke tranquility and harmony. By understanding and applying these principles, architects can design environments that not only enhance visual appeal but also foster a sense of calm and well-being.
At Spire Architecture Inc., we specialize in crafting luxurious and balanced spaces that reflect your unique style and promote serenity. Our expert team is dedicated to designing homes that provide lasting comfort and aesthetic pleasure.
Ready to transform your space into a serene sanctuary? Contact us today to schedule a consultation and discover how we can bring balance and calm to your home.
For more insights on luxury home design and architecture, explore our blog and follow us on social media for the latest updates and inspiration.
Spire Architecture Inc. is a boutique architectural design-build firm based in northern California.
0 notes
Text

Principles of Layout and Composition
In the realm of design, whether it be graphic, web, or print, or when learning from a graphic design institute, the principles of layout and composition are fundamental to creating visually appealing and effective designs. These principles guide designers in organizing visual elements to convey messages clearly, captivate audiences, and ensure functionality. Mastering layout and composition is not only about artistic expression but also about enhancing communication through design.
1. Balance
Balance refers to the distribution of visual weight in a design. It ensures that no part of the layout overpowers another, creating a harmonious composition. There are three main types of balance:
Symmetrical Balance: Elements are evenly distributed on either side of a central axis, creating a mirror-like reflection. This approach conveys stability and formality.
Asymmetrical Balance: Visual weight is distributed unevenly using contrast, color, or size, resulting in a dynamic and modern look.
Radial Balance: Elements radiate from a central point, drawing the viewer's eye inward. This is commonly seen in designs like mandalas or circular infographics.
2. Alignment
Alignment is the arrangement of elements along a common axis or line, ensuring cohesion and order. Proper alignment creates a clean and organized design, making it easier for the viewer to navigate and interpret the content. Designers use alignment to:
Establish relationships between elements.
Create visual connections.
Enhance the overall structure of the layout.
For example, aligning text, images, and graphics along a grid system maintains consistency and professionalism.
3. Proximity
Proximity involves grouping related elements together to establish relationships and improve readability. By placing similar items close to each other, designers can:
Reduce clutter.
Guide the viewer’s attention.
Make the design more intuitive.
For instance, in a brochure, contact details like phone numbers, emails, and addresses are often grouped together to make them easy to locate.
4. Repetition
Repetition reinforces design consistency by reusing elements such as colors, fonts, patterns, or shapes throughout the layout. This principle helps to:
Establish a cohesive look.
Strengthen branding.
Improve recognition and memorability.
For example, using the same header style and font throughout a website ensures uniformity and enhances the user experience.
5. Contrast
Contrast creates visual interest by highlighting differences between elements. It helps to emphasize key aspects of the design and improve legibility. Designers achieve contrast through:
Color (e.g., black text on a white background).
Size (e.g., large headlines with smaller body text).
Shape (e.g., geometric shapes alongside organic forms).
Effective use of contrast draws the viewer’s attention to the most important parts of the composition.
6. Hierarchy
Hierarchy organizes elements based on their importance, guiding the viewer through the content in a logical sequence. This is achieved by manipulating size, color, spacing, and placement. For instance:
Headlines are often larger and bolder than body text.
Call-to-action buttons are designed with vibrant colors to stand out.
Subheadings and bullet points break up content for easier reading.
By establishing a clear hierarchy, designers ensure that the audience receives the intended message effectively.
7. White Space
White space, also known as negative space, refers to the empty areas around and between design elements. It is a crucial aspect of layout and composition because it:
Provides breathing room for the design.
Enhances focus on key elements.
Creates a sense of elegance and simplicity.
For example, minimalist designs often use white space extensively to achieve a clean and sophisticated look.
8. Unity
Unity ensures that all elements in a design work together harmoniously. It gives the composition a sense of completeness and prevents it from looking disjointed. Designers achieve unity by:
Using consistent color schemes and typography.
Aligning elements with a shared visual theme.
Maintaining a consistent tone and style.
A unified design communicates a stronger and more cohesive message to the audience.
9. Emphasis
Emphasis focuses on drawing attention to specific elements within a design. This is achieved by making certain parts stand out using:
Bold fonts.
Bright or contrasting colors.
Unique shapes or sizes.
For example, a sale banner might use a vibrant red background with bold white text to emphasize the discount offer.
10. Grids
Grids are invisible frameworks that guide the placement of elements in a design. They help maintain alignment, consistency, and proportion. Grids are especially useful in:
Web design for responsive layouts.
Editorial design for organizing text and images.
Using grids ensures that the layout remains balanced and visually appealing, even with complex compositions.
11. Movement
Movement directs the viewer’s eye through the design in a deliberate manner. Designers use visual cues such as lines, shapes, and colors to create a sense of flow. For example:
Arrows can guide users to important information.
Curved lines can create a sense of rhythm and dynamism.
Effective movement ensures that viewers interact with the design as intended.
12. Typography
Typography plays a significant role in layout and composition. It involves the selection and arrangement of typefaces to convey messages effectively. Key considerations include:
Legibility: Ensuring text is easy to read.
Font Pairing: Using complementary fonts for headings and body text.
Consistency: Maintaining uniform typography throughout the design.
Typography can influence the tone and personality of the design, from playful and casual to professional and formal.
Conclusion
The principles of layout and composition are the building blocks of effective design. By understanding and applying these principles, designers can create layouts that are not only aesthetically pleasing but also functional and impactful. Whether it’s a website, magazine, or advertisement, these principles ensure that the design communicates its message clearly and resonates with the audience. Aspiring designers should practice and experiment with these principles to develop their skills and create compelling compositions.
0 notes
Text
Videoguys Quick Hits: What Camera is the Right Fit for Your Production - Videoguys
New Post has been published on https://thedigitalinsider.com/videoguys-quick-hits-what-camera-is-the-right-fit-for-your-production-videoguys/
Videoguys Quick Hits: What Camera is the Right Fit for Your Production - Videoguys
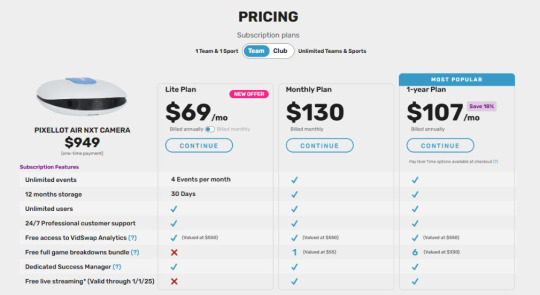
On this week’s Videoguys Live, James is going through 4 camera options that can help elevate your video production! He is discussing the Pixellot Air NXT, Canon XF605, AIR One Robotic Camera, and the RED KOMODO.
youtube
Pixellot Air NXT Camera
Stream Sports Like Never Before
A breakthrough when it comes to value and performance
Next generation of Pixellot Air multi-sports portable camera
Offers livestreaming, better video, improved audio, faster charging, bigger storage
Superior Video Quality: The dual 12MP camera array captures every moment in stunning detail
Enhanced Stereo Audio: Immersive digital stereo audio brings the rich atmosphere of the match directly to you.
Newly Rebuilt AI Technology: Supporting multiple sports types, including Basketball, Soccer, Football, Ice Hockey, Field Hockey, Lacrosse and Volleyball.
Streamlined Live Broadcasting: Stream footage easily over Wi-Fi or 4/5G and share the thrill of the game.
Rapid Charging Capability: 33% Faster-charging to minimize downtime, as well as supporting external power banks.
Expansive Storage Solutions: Up to 512GB of storage, (32 hours of video – for enterprise users) lets you record more games, and practices, worry-free.

Canon XF605 Camcorder
Canon XF605 The XF605 Professional Camcorder is the next-generation XF-series camera providing excellent mobility, connectivity, and superb 4K UHD HDR image quality. $4,299.00 reg.$3,999.00 with Instant RebateExpires 11/30/24
1.0-inch 4K UHD CMOS Sensor
12G-SDI, HDMI, & USB (UVC Support)
On-Screen Display (OSD) Time Stamp Recording
15x Optical 4K UHD L Zoom Lens with 5-Axis Optical Image Stabilization
5-Axis Optical Image Stabilization
9-blade Iris
Independent 3-Density ND Filter
4K UHD 59.94P 4:2:2 10-bit Recording
Latest Firmware Update adds: SRT protocol support, H.264 FHD 25Mbps format, support for the Canon Multi-Camera Control app, improved vectorscope, enhanced Clear Scan shutter mode, Canon 709 and CMT 709 Custom Picture Profiles and more
Advanced Image Robotics AIR One® Robotic Camera Kit and REMI Production Bundle
AIR One – Capture in 4K
AIR App – Control From Anywhere
AIRcloud – Simplify Your Workflow

AIR One gimbal-stabilized robotic head
Z Cam E2-M4 4K camera module
Panasonic 14-140mm lens
Zoom motor and mount
Apple iPad (10th gen) 64GB WiFi
AIR App
Quick release plate
Power supply
PoE dongle for iPad
Custom-fit high-impact carry case
AIRcloud 3-month subscription
RED KOMODO and KOMODO-X

PRODUCT
OLD PRICE
CHANGE
NEW PRICE
KOMODO® 6K
$5,995.00
-$1,000
$4,995.00
KOMODO® Starter Pack
$7,500.00
-$1,000
$6,500.00
KOMODO® Production Pack
$8,500.00
-$1,000
$7,500.00
KOMODO-X™
$9,995.00
-$3,000
$6,995.00
KOMODO-X™ Starter Pack
$11,995.00
-$3,000
$8,995.00
KOMODO-X™ Production Pack (V-Lock)
$14,995.00
-$3,000
$11,995.00
KOMODO-X™ Production Pack (Gold Mount)
$14,995.00
-$3,000
$11,995.00
Interested in the RED KOMODO or other RED products?
We will help you find a local dealer!
We have a network of dealers nationwide!
Call us for a referral (800)-323-2325

#000#4K#5G#ai#air#amp#app#apple#apple ipad#atmosphere#audio#banks#bundle#Canon#Capture#change#connectivity#display#enterprise#filter#firmware#game#games#gimbal#gold#hdmi#impact#ipad#Iris#it
0 notes
Text
Best 6K Camera for Filmmaking: Top Choices & Key Features
When it comes to filmmaking, choosing the right camera is crucial for achieving high-quality results, and a 6K camera offers excellent resolution, dynamic range, and flexibility in post-production. With a 6K camera, filmmakers gain the ability to capture more detail, reframe shots without losing quality, and produce stunning visuals that stand out in professional productions. Below, we’ll discuss some of the best 6K cameras for filmmaking, their features, and why they are popular among filmmakers.

Top 6K Cameras for Filmmaking
1. Blackmagic Pocket Cinema Camera 6K Pro
The Blackmagic Pocket Cinema Camera 6K Pro is a favorite among independent filmmakers for its compact size, advanced features, and image quality. It features a Super 35mm sensor with a native resolution of 6144 x 3456 and dual native ISO for enhanced low-light performance.
Key Features:
Super 35mm 6K sensor with 13 stops of dynamic range.
Dual native ISO up to 25,600 for better low-light performance.
Built-in ND filters and HDR touchscreen for flexible shooting options.
Compatible with Canon EF mount lenses.
The 6K Pro version adds built-in ND filters and a tiltable HDR screen, making it more versatile for various shooting conditions.
2. RED Komodo 6K
The RED Komodo 6K is a compact yet powerful camera that incorporates RED’s renowned image quality and raw recording capabilities. It features a global shutter sensor, which eliminates rolling shutter issues and is excellent for high-action scenes.
Key Features:
6K Super 35mm global shutter sensor.
16 stops of dynamic range.
Compact and lightweight design, ideal for handheld or gimbal work.
Supports ProRes and REDCODE RAW recording formats.
The RED Komodo 6K is perfect for filmmakers who need a portable yet professional camera for diverse shooting environments.
3. Canon EOS C300 Mark III
The Canon EOS C300 Mark III is a high-end cinema camera with a Super 35mm Dual Gain Output (DGO) sensor, which offers exceptional dynamic range and low-light performance. Its modular design makes it highly customizable for various production needs.
Key Features:
Super 35mm DGO sensor with 16+ stops of dynamic range.
4K at up to 120fps and 2K at up to 180fps.
Supports Canon’s XF-AVC and Cinema RAW Light recording formats.
Modular body with interchangeable mounts.
The C300 Mark III is ideal for professional filmmakers working on large-scale projects requiring a robust and flexible camera system.
4. Panasonic Lumix S1H
The Panasonic Lumix S1H is a full-frame mirrorless camera with a strong emphasis on video capabilities. It offers 6K recording in multiple aspect ratios and supports anamorphic shooting modes, making it a versatile option for filmmakers.
Key Features:
24.2-megapixel full-frame sensor with 14+ stops of dynamic range.
6K recording at 24fps and 4K at up to 60fps.
Dual native ISO for improved low-light performance.
5-axis in-body image stabilization.
The S1H’s ability to shoot in multiple formats and support for V-Log makes it a great choice for filmmakers who need flexibility and high image quality.
5. Z CAM E2-S6
The Z CAM E2-S6 offers a Super 35mm 6K sensor and is known for its affordability without compromising on professional features. It supports high frame rate recording and provides excellent image quality in a compact design.
Key Features:
Super 35mm 6K sensor with 10-bit ProRes and ZRAW recording.
6K at up to 60fps and 4K at up to 120fps.
Compact and modular design with HDMI and SDI outputs.
Compatible with EF and PL mount lenses.
The Z CAM E2-S6 is suitable for indie filmmakers and content creators looking for a cost-effective solution that still delivers high-quality results.
What to Look for in a 6K Camera for Filmmaking
When selecting a 6K camera for filmmaking, consider the following factors:
Sensor Size and Type: Full-frame and Super 35mm sensors offer better depth of field and low-light performance.
Dynamic Range: A higher dynamic range captures more detail in shadows and highlights, which is essential for cinematic-quality images.
Recording Formats: Look for cameras that support ProRes, RAW, and other professional recording formats for flexibility in post-production.
Frame Rates: High frame rates are crucial for capturing smooth motion and slow-motion footage.
Lens Compatibility: Ensure the camera is compatible with professional lens mounts like EF, PL, or L-mount.
Conclusion
Choosing the best 6K camera for filmmaking depends on your specific needs, budget, and the type of projects you plan to work on. Whether you opt for the compact and versatile Blackmagic Pocket Cinema Camera 6K Pro, the high-performance Canon EOS C300 Mark III, or the portable RED Komodo 6K, each of these cameras offers exceptional quality and features that can elevate your filmmaking projects.
For more information or assistance in selecting the best 6K camera for your next film, feel free to reach out and get expert advice on choosing the right gear!
🔗Read More: https://royalaffectionmedia.com/best-6k-camera-for-filmmaking/
0 notes
Text
Panasonic Refreshes the LUMIX S5D

If you're a fan of Panasonic's LUMIX S5D, then you might be thrilled to hear that the company has recently announced a newer, refreshed model of the S5D. The newer model comes with some new tricks up its sleeve, and features a newer hybrid full-frame mirrorless design, which according to Panasonic makes it a versatile camera for both stills and video. Set to launch this month, what exactly can you expect with the LUMIX S5D? Let's take a look. Support for DJI LiDAR The new model is based on the design of the LUMIX S5D, and supports DJI LiDAR AF which allows for precise autofocus without the need for internal focusing motors. When paired with the DJI LiDAR Range Finder Module and DJI RS 3 Pro Gimbal, the camera receives distance measurement data via USB and adjusts focus accordingly, removing the need for lens calibration. Other details include a 24.2-megapixel 35mm full-frame CMOS sensor that boasts wide dynamic range and high sensitivity performance, and a maximum ISO 51200 with Dual Native ISO technology. Video and Photo For video, the LUMIX S5D supports shooting configurations including 4K 60p/50p 4:2:0 10-bit and 4K 30p/25p 4:2:2 10-bit internal recording (up to 30 minutes), as well as 4K 60p/50p 4:2:2 10-bit HDMI output and unlimited 4K 30p/25p 4:2:0 8-bit internal recording. There's also a wide range of filming features which include Vector Scope Display, Master Pedestal Adjustment, and SS/Gain Operation for better control over exposure and colour. As for still photography, Panasonic claims that the new S5D is versatile in different situations, even in low-light scenarios. As mentioned earlier, it does pack Dual Native ISO capabilities which allow for reduced noise and better dynamic range for better control in more challenging lighting conditions. There's also 5-axis stabilization onboard, so users can expect sharper-looking photo and video quality, even with telephoto lenses or low light shooting sessions. Pricing and Other Details In addition to its imaging capabilities, the LUMIX S5D also packs a number of other features - this includes a magnesium alloy full die-cast body which is splash and dust-resistant, a large LVF (Live View Finder), a high-precision, high-speed OLED display with a 2,360K-dot high resolution, a 3.0-inch free-angle LCD with support for touch controls, a double SD Memory Card slot with support for both UHS-I and UHS-II (Video Class 90), as well as a built-in battery. Panasonic also announced the LUMIX S 18-40mm, which it claims is the world’s smallest and lightest zoom lens, at just around 155g/0.34lb. It's a compact addition to the LUMIX S Series full frame lens line up, and comes with focal lengths from an ultra-wide angle of 18mm to a standard 40mm. There's also focus breathing suppression onboard for a more stabilized filming experience, a feature found on other recent LUMIX lenses. As for price and availability, S5D will be available from the end of October for £1,399 for the kit which includes the LUMIX S Series 18-40mm F4.5-6.3 lens, and at £1,799 for a bundle which includes the 20-200mm F4-7.1 lens. Read the full article
0 notes
Text
Canon EOS R6 Mark II Mirrorless Camera: The Ultimate Tool for Creators
Introduction
When it comes to capturing stunning visuals, both amateur and professional photographers know that the quality of their equipment makes all the difference. The Canon EOS R6 Mark II Mirrorless Camera (Body Only) is designed to elevate your photography and videography to new heights. As an Amazon Associate, I earn commission from qualifying purchases. With its 24.2 Megapixel CMOS sensor and cutting-edge hybrid capabilities, this full-frame mirrorless camera is the perfect companion for creators who demand both high-quality images and exceptional video performance. Ready to take your creativity to the next level? Learn more about this incredible camera here.
Unparalleled Image Quality and Performance
24.2 Megapixel Full-Frame Sensor
The Canon EOS R6 Mark II boasts a 24.2 Megapixel CMOS sensor, offering incredible detail and clarity in every shot. Whether you’re capturing landscapes, portraits, or fast-moving subjects, this sensor ensures that every image has vibrant colors, sharp details, and minimal noise. Its full-frame capabilities mean better low-light performance, providing you with more flexibility and control in various shooting environments.
Advanced Autofocus System
Equipped with Canon’s Dual Pixel CMOS AF II, this camera provides unmatched autofocus performance, including eye, face, and animal detection. This advanced system allows you to track your subjects with incredible accuracy, even when they are moving quickly, making it ideal for wildlife and sports photographers who need to capture split-second moments with precision.
Versatile Video Capabilities

4K Video Recording
One of the standout features of the Canon EOS R6 Mark II is its ability to shoot 4K video at 60 fps, making it ideal for content creators who want to produce high-quality video content. Whether you’re filming a vlog, a cinematic scene, or a professional project, the camera’s video capabilities provide smooth, detailed footage that truly stands out.
Slow Motion and High-Frame-Rate Options
For those who love creating dynamic videos, the Canon EOS R6 Mark II offers full HD video at up to 120 fps, perfect for slow-motion shots. This high-frame-rate capability allows you to capture moments with an ultra-smooth effect, adding a professional touch to your content.
A Story of Creative Transformation
Amid the vibrant streets of Paris, a passionate photographer found himself struggling to capture the essence of the city with his outdated camera. Frustrated, he decided to try the Canon EOS R6 Mark II Mirrorless Camera. As he focused on a couple dancing in the sunset, the camera’s rapid autofocus locked onto their movements effortlessly. Capturing their graceful steps in stunning 4K detail, he realized that this camera was more than just a tool; it was the key to unlocking his creative potential. The clarity and richness of the images allowed him to see and record moments like never before. If you’re ready to experience the world through a lens of creativity and precision, discover the power of this incredible camera here.
Key Features of the Canon EOS R6 Mark II
1. In-Body Image Stabilization (IBIS)
The Canon EOS R6 Mark II features 5-axis in-body image stabilization, which reduces camera shake for sharper handheld shots, ensuring that your images and videos remain clear and steady even in challenging conditions.
2. Flexible Connectivity Options
This camera supports Wi-Fi and Bluetooth connectivity, allowing seamless transfer of images and videos to your smartphone or computer. This feature is perfect for photographers who need to share their work quickly, whether it’s for social media or client reviews.
3. Dual Card Slots
The camera includes dual UHS-II SD card slots, providing you with flexible storage options, ideal for professionals who shoot in high-resolution formats and need reliable data backup.
Customer Reviews
“A Game-Changer for My Photography!”
“This camera has completely transformed my work. The autofocus is lightning-fast, and the image quality is beyond anything I’ve used before. It’s perfect for both my photography and video projects!”
“Best Investment I’ve Made in a Camera”
“The Canon EOS R6 Mark II is worth every penny. The video capabilities are outstanding, and the stabilization feature allows me to shoot handheld with ease. Highly recommend this camera for anyone serious about content creation.”
“Incredible Low-Light Performance”
“I was amazed by how well this camera performs in low-light settings. The 24.2 MP sensor delivers stunning detail even in dim conditions. This is my go-to camera for both professional and personal use!”
Pros and Cons
Pros:
High-resolution 24.2 MP sensor delivers exceptional image quality.
4K video recording at 60 fps with smooth and detailed performance.
Advanced autofocus system with subject tracking for precise focusing.
In-body stabilization for sharper handheld shots.
Dual card slots for expanded storage and reliable backups.
Cons:
Premium price point, which may be a significant investment for beginners.
No built-in flash, requiring an external flash for low-light conditions.
Why the Canon EOS R6 Mark II is Perfect for Creators
The Canon EOS R6 Mark II is designed with both photographers and videographers in mind. Its versatile features make it ideal for creators who need a camera that can handle everything from high-speed sports photography to cinematic video production. With its superior autofocus, in-body stabilization, and robust build, this camera is built to meet the demands of professional content creation.
Where to Learn More
Ready to elevate your creative journey? The Canon EOS R6 Mark II Mirrorless Camera (Body Only) is available with all the advanced features you need to take your photography and videography to the next level. Discover more about its capabilities and see why so many professionals are choosing this camera here.
Final Thoughts
The Canon EOS R6 Mark II Mirrorless Camera is not just a camera; it’s a creative powerhouse that enables photographers and videographers to produce their best work. Its exceptional image quality, advanced autofocus system, and versatile video capabilities make it a must-have tool for any serious creator. Whether you’re capturing stills or shooting videos, this camera offers the perfect blend of technology and design to help you tell your story.
If you’re ready to bring your vision to life and take your creativity to new heights, the Canon EOS R6 Mark II is the ultimate tool to make it happen. Don’t miss the chance to own this game-changing camera — purchase yours here and start creating like never before.
#CanonEOSR6#MirrorlessCamera#PhotographyGear#CanonPhotography#FullFrameCamera#VideographyTools#ContentCreation#4KVideo#CameraEquipment#CanonLovers#CreativeTools#PhotographyCommunity#TechInnovation#ProfessionalPhotography#CinematicVideo#CameraReview#CanonCameras#PhotoGear#Filmmaking#PhotographyLife
0 notes
Text
Nikon Z8 Body
Discover the power and versatility of the Nikon Z8 mirrorless camera body. This full-frame camera features a high-resolution 45.7MP BSI CMOS sensor and the advanced EXPEED 7 image-processing engine for stunning image quality and fast performance. The Nikon Z mount allows for a wide variety of compatible lenses, while the 5-axis in-body VR provides up to 5.5 stops of stabilization. Capture incredible detail with the 8K UHD video recording at up to 30p and 4K video at up to 60p.
The 3.2-inch tilting touchscreen LCD and 0.5-inch 5.76m-dot OLED electronic viewfinder provide versatile monitoring options. Dual CFexpress Type B and XQD card slots offer flexible storage. With its robust magnesium alloy body and weather sealing, the Nikon Z8 is built for professional use in challenging conditions.
Buy Nikon Z8 Body online at low price in USA.
#Nikon Z8#buy Nikon Z8#Nikon Z8 price#Nikon Z8 in usa#Nikon Z8 price in usa#photography#mirrorless camera#photographers on tumblr#Nikon Z8 body
0 notes
Text
Unleash Your Aerial Creativity with the 4K Professional GPS Drone: 3-Axis Gimbal, 5G Wi-Fi, and 16KM HD Video Transmission
4K Professional GPS Drone: 3-Axis Gimbal, 5G Wi-Fi, and 16KM HD Video Transmission
In the world of aerial photography and videography, the right drone can make all the difference. For those seeking the ultimate in high-definition imaging and advanced flight capabilities, the 4K Professional GPS Drone with a 3-Axis Gimbal, 5G Wi-Fi, and 16KM HD Video Transmission is your go-to choice. Available now at ChoiceSelect.shop, this cutting-edge drone is designed for professionals and enthusiasts alike who want to capture breathtaking footage and achieve stunning results from the sky.
Why Choose the 4K Professional GPS Drone?
1. Superior 4K Camera Quality:
At the heart of this drone is a high-resolution 4K camera that delivers crisp, clear, and vibrant images. Whether you’re shooting stunning landscapes, detailed architectural shots, or high-energy action scenes, the 4K camera ensures that every detail is captured with exceptional clarity. The camera's advanced optics and image processing capabilities guarantee that your footage looks professional and polished.
2. 3-Axis Gimbal Stabilization:
Achieving smooth and stable footage can be challenging, especially when dealing with the unpredictable movements of a drone. The 3-axis gimbal system on this drone effectively counteracts vibrations and stabilizes the camera, allowing you to capture fluid, shake-free video even in challenging conditions. This technology ensures that your aerial shots remain steady and professional, no matter how dynamic the environment.
3. 5G Wi-Fi Connectivity:
Stay connected and in control with the drone’s 5G Wi-Fi technology. This high-speed connection provides a stable and reliable link between the drone and your controller, allowing for seamless real-time video streaming and data transfer. With reduced latency and improved range, you can enjoy uninterrupted control and live feed, enhancing your flying and filming experience.
4. Impressive 16KM HD Video Transmission:
Push the boundaries of your aerial creativity with the drone’s remarkable 16KM HD video transmission range. This extended range allows you to explore and capture footage from greater distances without sacrificing video quality. Whether you’re documenting expansive landscapes or capturing detailed cityscapes, the long-range transmission ensures that you can achieve your vision with precision and clarity.
5. Advanced GPS Navigation:
The integrated GPS system offers precise location tracking and navigation, making it easier to plan and execute complex flight paths. With features like waypoint navigation, return-to-home, and automatic altitude hold, you can focus on capturing the perfect shot while the drone handles the technical details. This advanced navigation system enhances safety and reliability, giving you confidence during every flight.
Key Features to Highlight:
4K Ultra HD Camera: Captures stunningly detailed and vibrant images and videos.
3-Axis Gimbal: Provides stable and smooth footage by reducing vibrations.
5G Wi-Fi Connectivity: Ensures reliable, high-speed connection and real-time video streaming.
16KM HD Video Transmission: Allows for long-range, high-definition video capture.
GPS Navigation: Offers precise control, waypoint navigation, and enhanced safety features.
Why the 4K Professional GPS Drone is a Must-Have:
Professional-Grade Imaging: Capture cinematic quality footage with the drone’s 4K camera and 3-axis gimbal stabilization, making it ideal for filmmakers, content creators, and aerial photographers.
Enhanced Flight Experience: Enjoy the benefits of 5G Wi-Fi and long-range video transmission, which provide a superior flying experience and allow you to explore more extensive areas with confidence.
Advanced Features for Creativity: The GPS navigation and stabilizing technologies open up new possibilities for creative aerial shots, precise filming, and dynamic video content.
Versatility and Reliability: Whether you’re using it for professional projects or personal adventures, this drone delivers performance and reliability, making it a valuable tool for any aerial enthusiast.
Where to Buy
At ChoiceSelect.shop, we’re dedicated to providing high-quality and innovative products that elevate your experience. The 4K Professional GPS Drone with 3-Axis Gimbal, 5G Wi-Fi, and 16KM HD Video Transmission is now available, offering you the ultimate tool for capturing breathtaking aerial footage.
Elevate your aerial photography and videography with the 4K Professional GPS Drone. Explore our selection today and take your creativity to new heights.
#https://choiceselect.shop/4k-professional-gps-drone-with-3-axis-gimbal-5g-wifi-and-16km-hd-video-transmission/#https://choiceselect.shop/
0 notes
Text


Attached Images:
Inspiration image towards marked drawing
Marked Complex Asymmetrical Drawing
Week 5 Exercises and Marked Complex Asymmetrical Drawing Reflection:
In this week's beneficial lesson, we were taught how to utilise a central axis effectively in our drawings, along with the presence of a light grid. Whether it be symmetrical or asymmetrical, it is mainly there to build balance and allow the drawer to make an appropriate assumption towards proper scale, sizing and proportion. This then allows the central axis to divide the drawing in a manner that makes it easier to read and begin drawing the image that is planned as it can obtain the ability to highlight stability and order, which exemplifies an overall cohesive and grounded piece of work.
In a symmetrical drawing, which can be perceived through the warm up exercise of the apple and the human skull, each side of the axis mirrors each other, which allows the drawing to be completed on a more professional level, this allows the image to appear as a visually satisfying equilibrium. Once we were able to draw a solid foundation, we were given the task to increase the complexity, this can essentially include shading and bringing the image to life.
Furthermore, I had selected a car as my choice of a complex asymmetrical drawing, a Porsche GT3, as it remains as one of my most liked cars for its aggressive rear end which can make a statement on the road in person, and digitally, i had hoped to replicate its beauty through a drawing by utilising an axis horizontally and vertically, along with a very light grid. I had then discovered that an axis can also be beneficial for an image that is not mirrored, this is due to the idea that an axis can act as an anchor for reference and allows the overall composition to remain properly scaled. Since the image is asymmetrical, it also allowed me to remain balanced through the presence of the axis although I was given more space to draw with more complexity, rather than having to mirror the opposite side of the drawing.
I had learned that utilising the axis as an anchor exhibited its ability to communicate an effective impact and clarity towards drawing the image, allowing me to refer back to the axis for further assistance in terms of sizing and scale, as drawing a car contains many different aspects that need to be considered otherwise a car can be easily ruined when being drawn.
Link for Inspiration Image: https://www.wrsauto.it/en/372-akrapovic-rear-gloss-carbon-diffuser-porsche-911-gt3-9912-2018-2019.html
1 note
·
View note
Text
Price: [price_with_discount] (as of [price_update_date] - Details) [ad_1] From the manufacturer Upto 7.0 Stops IBIS X-T5 allows for comfortable hand-held shooting even in dark conditions, perfect for those bouts of midnight inspiration. With a 5-axis in-body image stabilization system, X-T5 offers up to seven stops of image stabilization for steady images and video Subject-detection autofocus X-Processor 5 features subject-detection AF that is built using Deep-Learning AI Technology. In addition to providing incredible AF tracking and detection for human faces and eyes, X-T5 can now also automatically detect and track a broad range of subjects, which include animals, birds, cars, motorcycles, bicycles, airplanes, and trains. This allows photographers to concentrate on composition and creativity, confident that X-T5 will track focus accurately. A World of Detail “160MP Pixel Shift Multi-Shot” X-T5 features Pixel Shift Multi-Shot with the help of the Pixel Shift Combiner software, can produce a single, ultra-high-resolution 160MP image with a single touch of the shutter button. Using in-body image stabilization to shift the sensor by a half pixel between each frame, X-T5 precisely makes 20 frames to ensure every red, green, and blue pixel has the same information. The result is a final image with almost no false colors visible Highly reliable, weather-resistant body X-T5 features 56 weather-sealed points for high levels of dust and moisture resistance. It can also operate in temperatures as low as -10°C (14°F). 6.2K/30p 4:2:2 10-bit 6.2K movies can be recorded internally at 30p in 4:2:2 10-bit color, delivering high-definition footage with rich color detail. In addition to F-Log, X-T5 also supports F-Log2, which records an expanded dynamic range of 13+ stops.
* This range is wider than current F-Log, broadening post-production potential. *When recording F-Log2, based on Fujifilm internal testing. When combined with an ATOMOS HDMI device, RAW video output from the X-T5 can be recorded as 12-bit Apple ProRes RAW at resolutions up to 6.2K and frame rates up to 29.97fps. When combined with Blackmagic Design Video Assist 12G, RAW video output from the camera can be recorded as Blackmagic RAW at resolutions up to 6.2K and frame rates up to 29.97fps. ISO 125 standard sensitivity X-Trans CMOS 5 HR has a more light-efficient pixel structure. ISO 125 – previously an extended sensitivity – is now available natively. 1/180,000 sec shutter speed X-T5 has a maximum electronic shutter speed of 1/180,000, an increase of approximately 2.5 stops compared to other X Series cameras. Use it with wide apertures in extremely bright environments for more creative options, or to freeze action at the perfect moment. 557g compact body Enhanced mobility Three dials control ISO, shutter speed, and exposure compensation from the camera’s top-plate. Together with the aperture ring on most XF lenses, all exposure settings can be checked and adjusted before powering on the camera. Create with confidence and concentrate on making an image. Upto 740 shots battery life Thanks to the reduced power consumption of the X-Processor 5, the battery life for still images has been significantly increased from approximately 600 to 740 frames* compared to the X-T4. *In economy mode FILM Simulation The high-resolution 40.2MP X-Trans CMOS 5 HR sensor has an enhanced image – processing algorithm that boosts resolution without compromising the signal-to-noise ratio, delivering astonishing image quality. 20 Film Simulation modes inside of X-T5 digitally replicate the look of the classic photographic film stocks developed by Fujifilm for over 85 years. Reproduce the classic colors and tones that Fujifilm are known for.
X-T5 is packed with many features such as pixel shift which give 160mp image after compiling Shift Multi-Shot|fastest shutter - 1/180000|2x digital teleconverter for photo|wireless tethering|camera to cloud with frame.io|touchtracking and dial operation for photo and video|quick lever to switch from photo to video or otherwise. 6.2K movies can be recorded internally at 30p in 4:2:2 10-bit color, delivering high-definition footage with rich color detail. In addition, you can record 4k 60fps and FHD 240fps. X-T5 is packed with many features such as AI deep learning|high resolution viewfinder|touchtracking|3-way tilting lcd|switch for change focus from single to continuous|intelligent hybrid ai af|micro hdmi type d| dual card slot (dual sdxc uhs-2)|740 frames battery life (cipa standard)|can run on power back (type -c) which makes it perfect hybrid camera for photo and video. X-T5 is a high resolution professional camera suits for every occasion and need be it wedding|fashion|portrait|landscape|wildlife|commercial|filmmaking|documentary|street|travel|lifestyle [ad_2]
0 notes
Text
0 notes