#192khz
Explore tagged Tumblr posts
Video
youtube
Angie - The Rolling Stones (1973) 192KHz/24bit Stereo from Atmos 7.1
48 notes
·
View notes
Video
youtube
Angie - The Rolling Stones (1973) 192KHz/24bit Stereo from Atmos 7.1
20 notes
·
View notes
Note
Hi i may be mistaken but i think you mentioned doing readingd for audio books. Do you mind talking about how you started?
Ooh, it's been a few years since I did audio work lol. It's fun, but it can be incredibly strenuous, and unless you're like a /name/ in the voice acting world it's not going to be Rent Money.
Like with most things in my life, I just happened to be in the right place at the right time. A friend of a friend was looking to expand their press's audio book library and I offered to help. I didn't get paid for my first book, but I was also able to borrow recording equipment and editing software from my prof, so it didn't cost me anything but a little time and effort. Then colleagues and people from other arts programs started asking me to voice their work. I've been reading books aloud for forever to help with my ADHD processing, so I do have a particular tone and cadence that I can keep mostly consistent, and I think that attracted people lol.
MAONO 192KHZ/24Bit is my personal mic, but there are great options for cheaper. I've seen people get decent results even just with their phone mic. The editing software I use is called Reaper. It has a learning curve, but I adore it because you can clip audio without losing whatever you cut off altogether, and the background noise remover is very good. I hate audacity so much. The most challenging part of recording in my experience is finding a place that is quiet lol.
ACX, fivvr, upwork, and direct connections to small indie presses are how a lot of independent narrators make money. If you're just testing the waters, it might also be worth it to sign up to voice act for a game jam project, or some other community-based art project. Having samples of real work you've done is a good first step to actually getting paid lol.
#sorry if this isn't what u were looking for JSJDJDJC#I literally just stumble blithely through life#and things happen to me#saga speaks
9 notes
·
View notes
Text

PCM1840 Quad Input Microphone I2S ADC with Hardware Pin Configuration 🔊🎤🛠️
We looked up this chip in 2021, right before we got smacked with a chip shortage and couldn't get any to prototype with - but we're back in biz and respinning a prototype up. While looking up the TLV320ADC quad microphone I2S ADC, we also bumped into the PCM1840. These chips are similar (almost identical pinout) but have analog-only inputs and no I2C or SPI configuration. Yep, it's completely hardware pin bootstrapped, which makes setup much easier because you can use any I2S driver. It can act as an I2S controller (it clocks all I2S pins out) or the I2S peripheral (I2S clocks input and data is output). We whipped together a breakout to figure out how to get TDM I2S input working without dealing with the I2C setup. Looks awesome for spatial audio algorithms and voice recognition projects. You can pick up the PCM1840 ADC on DigiKey - lots are in stock!
#adafruit#PCM1840#Quad#Input#Microphone#I2S#ADC#digikey#hardwarehacking#embeddedaudio#i2scontroller#audioelectronics#spatialaudio#voicerecognition#electronicsengineering#audiodevices#prototypeboard#makersgonnamake
7 notes
·
View notes
Text
setting my computer's sound output (forgot the term) to 192kHz so when I playback videos or show episodes at 1.5-2x speeds my speakers play the audio back just fine
I haven't done this I think well maybe those settings did coincide at some point, most certainly they did. But I wasn't achieving that goal consciously
5 notes
·
View notes
Text
Lenovo Idea Tab Pro
The Lenovo Idea Tab Pro, unveiled in March 2025, is a versatile 12.7-inch tablet designed to cater to both students and everyday users. It combines robust performance with user-friendly features, making it a compelling choice in the tablet market.
Design and Display
The Idea Tab Pro boasts a sleek and lightweight design, measuring 291.8 x 189.1 x 6.9 mm and weighing approximately 620 grams. Its 12.7-inch IPS LCD screen offers a resolution of 2944 x 1840 pixels, delivering crisp and vibrant visuals. The display supports a 144Hz refresh rate and HDR10, enhancing the viewing experience with smoother transitions and richer colors. An optional anti-reflection coating is available to reduce glare, improving usability in various lighting conditions.
Performance
At its core, the Idea Tab Pro is powered by the MediaTek Dimensity 8300 chipset, featuring an octa-core CPU configuration: one Cortex-A715 core at 3.35 GHz, three Cortex-A715 cores at 3.2 GHz, and four Cortex-A510 cores at 2.2 GHz. This setup ensures efficient multitasking and smooth performance across applications. The tablet comes equipped with 8GB of LPDDR5X RAM and offers storage options of 128GB (UFS 3.1) or 256GB (UFS 4.0), providing ample space for apps, media, and documents.
Camera Capabilities
For photography and video calls, the Idea Tab Pro features a 13 MP rear camera with autofocus and LED flash, capable of recording 1080p videos. The front-facing 8 MP camera is suitable for selfies and virtual meetings, also supporting 1080p video recording.
Audio and Multimedia
Audio quality is a highlight, with the tablet housing four JBL stereo speakers that support 24-bit/192kHz Hi-Res audio. This setup ensures an immersive sound experience, whether you're watching movies, listening to music, or participating in video conferences.
Battery Life and Charging
The device is equipped with a substantial 10,200 mAh Li-Po battery, supporting 45W wired charging. This large battery capacity ensures extended usage, making it reliable for all-day activities without frequent recharging.
Operating System and AI Features
Running on Android 14, the Idea Tab Pro integrates advanced AI capabilities through Google Gemini and features like Circle to Search with Google. These tools enhance user interaction, providing intuitive and efficient ways to access information and perform tasks.
Connectivity and Additional Features
Connectivity options include Wi-Fi 802.11 a/b/g/n/ac/6e, Bluetooth 5.3, and USB Type-C 3.2 with DisplayPort support. The tablet also features a side-mounted fingerprint sensor integrated into the power button for secure and convenient access. Stylus support is available, catering to users interested in drawing or note-taking.
Pricing and Availability
The Lenovo Idea Tab Pro is available in various configurations:
8GB RAM with 128GB storage, including a pen, priced at
8GB RAM with 256GB storage, including a pen, priced at
12GB RAM with 256GB storage, without accessories, priced at
Additional bundles with accessories like a folio case are available at varying price points. Prospective buyers should verify the included accessories with retailers to ensure clarity.
Conclusion
The Lenovo Idea Tab Pro stands out as a well-rounded tablet, offering a blend of performance, display quality, and user-centric features. Its integration of AI capabilities and support for accessories like a stylus and keyboard pack make it a versatile tool for both educational and everyday use.
#Lenovo Idea Tab Pro#Lenovo Idea Tab Pro price#Lenovo Idea Tab Pro price in bamgladesh#Lenovo Idea Tab Pro bangladesh
3 notes
·
View notes
Text
Red wine, vinyl, and chocolate
Those are things I like. Some people do not like those things. That will not affect my opinion of them.
Right now I am only doing one of those things. Red Wine. Well actually the wafer cookie had some chocolate. But not vinyl. I am giving streaming a chance and I could get used to it. But I conclude there is something missing. It is not missing in my vinyl.
That missing thing is something I like. Samuel Barber Adagio is really deep, yet on the stream it is missing some organic factor.
My system is configured to be full lossless Apple Music which is at least CD rebook up to 24bit 192khz. That is pretty damn good. My node DAC thing is supposed to be good and has the right chips. So is what is missing in digital in general, or in some part of the chain of custody of the signal.
I have no idea. I will not condemn the stream concept generally, but there is an issue with my implementation or how my implementation reacts to the source. That assumes what is missing is my fault or that it is something that is pleasant and wrong.
Hey my tube amp is very pleasant and wrong compared to ultimate detail. It has the warm golden light. My transistor amp has the clarity of the midday sun. I like the sound enough to buy the thing and to purchase a full set of new glass.
I suspect that once the ARC goes online I may enjoy streaming more. It may add back enough magic to make the difference. If so that means that two wrongs are making a right. Hmmm.
We shall see.
2 notes
·
View notes
Text
it's so funny to me how lydia tar was being like, an absolute pain in the ass about vinyl pressings but thought that hq mp3s are like, totally fine. i guess that's just boomer behavior but she should have been insisting on 24bit/192khz flac files and a limited streaming run on qobuz and tidal. lydia tar should have owned a dedicated $2k flac player
#i do think it's like probably the case that she's kind of an analog creature in a digital world but that's a 2002-style thought#lydia tar banned from the audiophile subreddit for going nuclear hostile whenever someone suggested 320kbps mp3 is fine for most listeners
3 notes
·
View notes
Video
youtube
Unveiling the UM22C: The Ultimate 32-bit/192kHz USB-C Audio Interface Yo...
2 notes
·
View notes
Text
The fastest way I've found to build up a music library especially if you're coming off the conveniences of music streaming and also don't care about doing a piracy is a qobuz subscription and qobuz-dl... Because it will just straight up download the FLAC file from their servers. I have a cron job to run the python script every 24 hours to just download everything from a playlist. You will need to know, how to operate a basic command line interface and how to fix the 500 song playlist limit or just make a new playlist and add a new line to your auto downloading script after 500 songs but you can also just download whole albums. Whole discographies up to 192khz 24bit FLAC or down to 320kbps mp3. Qobuz itself is kinda the least bullshit music streaming service, cuz you get one algorithmic playlist based on what you listen to, its called "my weekly Q" and it only updates every Friday, it's 30 songs long and it can kinda sucks tbh., but, no radio, no dj. no thing like that. But that's not the point because you get other seemingly actually curated playlists of specific artists, genres, moods, playlists from specific artists, and music labels. the first thing it shows you when you open the app is what new albums came out, not based on an algorithm or what it thinks you might like but just what came out at that time. i will admit, it does suck sometimes. sometimes music will just disappear from your playlist because of some licensing issue and it will be reuploaded to the service with the exact same name and everything but its technically not the same song as the one on your playlist so youll need to re-add it . and while qobuz is very indie friendly and can have a lot of obscure music, there is still a lot missing. but it what i consider to just be the least bullshit option. the closest to just like... accessing a friends plex/jellyfin server but for music. spotify will tell you what to listen. qobuz makes you find what you wanna listen and also kinda steal some of the music on the low cuz thats kinda how it works for some of the specialty hardware and software that works with it anyways im kinda rambling im not sure im cut out for bolging
I hate when I say things like "oh I want an ipod classic but with bluetooth so I can use wireless headphones" and some peanut comes in and replies with "so a smartphone with spotify?" No. I want a 160GB+ rectangular monstrosity where I can download every version of every song I want to it and it does nothing except play music and I don't need a data connection and don't have to pay a subscription to not have ads and don't have popups suggesting terrible AI playlists all over the menus.
Gimme the clicky wheel and song titles like "My Chemical Romance- The Black Parade- Blood (Bonus Track)- secret track- album rip- high quality"
125K notes
·
View notes
Video
youtube
Angie - The Rolling Stones (1973) 192KHz/24bit Stereo from Atmos 7.1
34 notes
·
View notes
Text
分享5款简单高效的小软件
在职场中,简单而高效的工具是我们事业成功的一部分。这五款工具可能会成为你职业生涯中的得力助手。
1.直播推流——OBS Studio
OBS Studio开源直播录制工具,支持多源合成与绿幕抠像,实时混音降低延迟。NVENC编码器4K推流仅占5% CPU,音频采样率192kHz保真。游戏主播构建特效场景,教育机构录制互动网课,企业级视频会议增强。

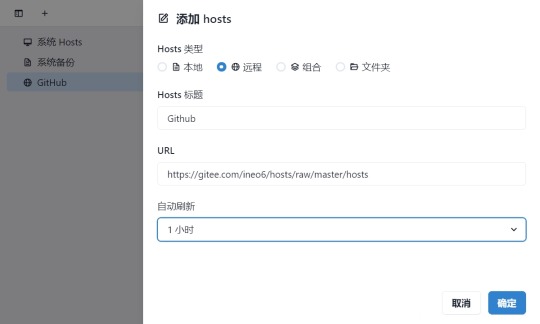
2.主机管理——SwitchHosts
SwitchHosts批量切换系统Hosts规则,支持Git同步与分组标签管理。语法高亮校验防配置冲突,权限检测避免修改失效。开发者调试多环境接口,运维人员切换内网服务,跨境用户绕过DNS污染,规则生效时间<0.5秒。

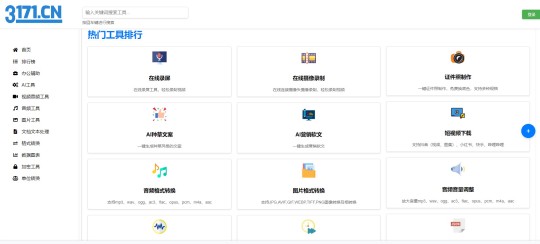
3.在线AI工具箱——3171.CN
3171.cn是一个超级实用的在线工具集网站,它几乎囊括了所有你可能需要的在线工具。这个全能在线工具平台,集视频录制、剪切、音频提取、转换、图片编辑、图表办公及文本处理于一身,简直是办公学习高效助手,同时,它还有小程序版本,可以说是非常非常方便实用,强烈推荐收藏!

4.系统维护——微PE工具箱
微PE集成DiskGenius/Dism++等200+工具,支持UEFI启动与原生NVMe驱动。64位内核6分钟加载完成,数据恢复成功率98%。无痕操作不修改原系统,破解开机密码、重装引导记录、备份固态硬盘数据,应对系统崩溃/病毒攻击场景。

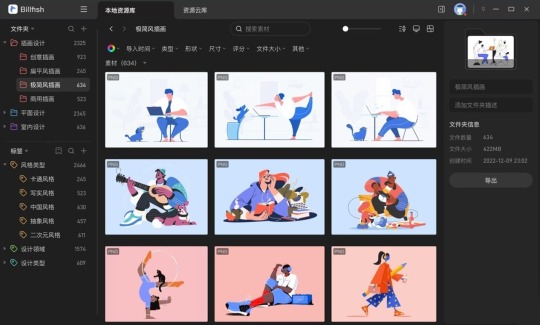
5.素材管理——Billfish
Billfish支持70+格式素材自动标签,AI颜色+构图识别秒级检索。重复文件MD5去重率100%,时间线追溯素材迭代路径。设计团队构建品牌资产库,视频团队管理特效模板,个人用户整理灵感图库,千万级文件检索速度<1秒。

这些小工具如同你工作中的得力助手,或许能让你事业更上一层楼。
0 notes
Text
Price: [price_with_discount] (as of [price_update_date] - Details) [ad_1] Product Description 1 How to connect 2 Connecting on Windows 3 Connecting on MAC 🎛️ [PROFESSIONAL AUDIO INTERFACE] - Studio-quality 24-bit/192kHz audio resolution - 2-in/2-out interface with low-latency performance - Designed for mic and instrument inputs - Delivers high-quality recording & playback 🔌 [WIDE CONNECTIVITY] - 2x Combo XLR/MIC/LINE inputs with 48V phantom power - 2x TRS/TS stereo outputs for PA, monitors, amps & recorders - Supports 1/4" TRS/TS for multiple device types - Ideal for home studios, live setups, and podcasting 🎚️ [SUPERIOR CONTROLS] - Includes 48V phantom power and premium preamps - Independent volume knobs for input/output - Signal & overload LED indicators for precise monitoring - Features quick-fade buttons for fast level adjustments - Perfect for condenser mic recordings, guitars & vocals 🎧 [HIGH-FIDELITY AUDIO] - Powered by AI-04’s high-performance converters - Low-noise balanced outputs ensure clean, clear sound - Detailed headphone monitoring for accurate mixing - Ideal for streaming music via Spotify, Apple Music, Amazon Music 💻 [VERSATILE COMPATIBILITY] - Plug & Play with no driver installation required - Compatible with Mac OS & Windows XP and above - Works with all major DAWs: Pro Tools, Ableton, Cubase, etc. - Compact and lightweight – perfect for on-the-go production 📦 [PACKAGE INCLUSIONS] - 1 x Audio Interface - 2 x USB 2.0 A to C cables - 1 x USB-A to Type-C Adapter for phones - 1 x 3.5mm to 6.35mm Headphone adapter - 1 x User Manual [ad_2]
0 notes
Text

PCM1820 no-firmware stereo analog to I2S ADC 🎶🔧📦
We scrubbed and reordered our PCM1840
breakout - yet another 2021-era leftover - and while we were at it, we also looked at the PCM1820
which is the 2-channel version. This could be very helpful for folks who want to convert an analog design to a digital one. A resident Adafruit'er recommended it for some customer use! We made a quick breakout. We are a huge fan of I2S converters that don't require any firmware / I2C configuration. This one is configured via jumpers, perfect for connecting to an SBC or digital audio path. Coming soon to the Adafruit shop!
#adafruit#PCM1820#analogtodigital#i2sconverter#audiophile#electronicsproject#diyaudio#stereoaudio#audioconversion#embeddedhardware#makerspace#openhardware
4 notes
·
View notes
Text
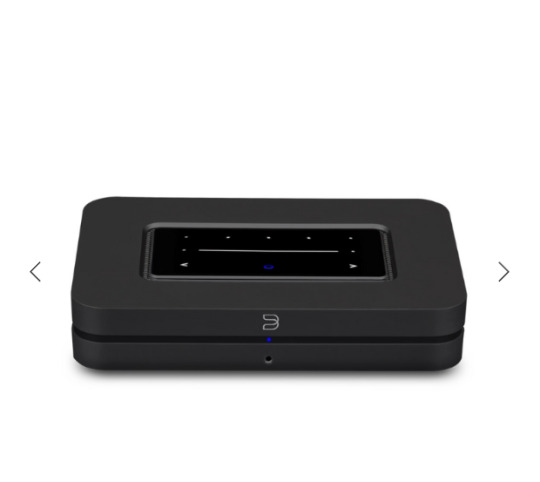
Top Features of the Bluesound Node (Icon) Every Music Lover Will Appreciate

In the world of high-fidelity audio streaming, the Bluesound - Node Icon stands out as a powerful and refined music streamer designed for discerning audiophiles and casual listeners alike. Whether you’re just building your home audio setup or looking to upgrade your existing system, this versatile device offers an impressive range of features that make music streaming simple, seamless, and sonically satisfying.
Let’s dive into the top features of the Bluesound - Node Icon that every music lover will truly appreciate.
1. Studio-Grade High-Resolution Audio Support
The hallmark of the Bluesound - Node Icon is its support for high-resolution audio formats up to 24-bit/192kHz, ensuring lossless playback with incredible detail, clarity, and depth. It’s also compatible with MQA (Master Quality Authenticated) for studio-level sound—ideal for TIDAL users who want to experience music the way artists intended.
This level of fidelity makes it perfect for audiophiles who demand premium sound reproduction, whether streaming from the cloud or playing from a local music library.
2. Seamless Streaming from Popular Services
One of the strongest selling points of the Bluesound - Node Icon is its extensive compatibility with popular music streaming platforms. With built-in support for Spotify, TIDAL, Qobuz, Amazon Music, Deezer, Apple Music (via AirPlay 2), and internet radio stations, it brings your favorite playlists to life effortlessly.
Using the intuitive BluOS app, users can browse, queue, and control playback from multiple streaming services—all from a single interface.
3. Audiophile-Grade DAC Performance
The device features an advanced ESS Sabre 32-bit DAC, known for its low noise floor and high dynamic range. Whether you’re connecting to powered speakers or a dedicated amplifier, the Bluesound - Node Icon ensures that your music is rendered with precision and warmth, free from distortion or compression artifacts.
4. Versatile Connectivity Options
From digital to analog, the Bluesound - Node Icon is built to fit into any audio system. Connectivity includes:
HDMI eARC (for integration with your TV)
Optical and coaxial digital outputs
RCA analog outputs
USB Type-A (for external storage)
3.5mm headphone jack
Subwoofer output
Whether you want to connect it to a stereo amplifier, AV receiver, or a multi-room system, the Node Icon offers unmatched flexibility.
5. Multi-Room Audio with BluOS
For those who love music in every corner of their home, the Bluesound - Node Icon supports multi-room streaming through the BluOS ecosystem. Pair it with other Bluesound or BluOS-enabled devices and stream synchronized music across multiple rooms. It's also compatible with popular home automation platforms like Control4, Crestron, and Lutron.
This makes the Node Icon a perfect fit for modern smart homes seeking seamless whole-home audio control.
6. Voice Control & Smart Home Integration
The Bluesound - Node Icon integrates smoothly with Amazon Alexa, Google Assistant, and Apple Siri (via AirPlay 2) for hands-free control. Simply ask your voice assistant to play a song, change the volume, or skip tracks without lifting a finger. This level of convenience brings smart home audio to a new level of interaction.
7. Compact, Elegant Design
In addition to its powerful features, the Node Icon sports a minimalist, modern design that fits elegantly into any living space. Its intuitive touch-sensitive controls on the top panel add functionality without clutter, while its compact footprint makes it easy to place on a shelf, audio rack, or console.
Conclusion
The Bluesound - Node Icon is much more than just a streamer—it's a gateway to immersive, high-resolution audio that elevates your listening experience. With premium components, wide-ranging compatibility, and cutting-edge streaming tech, it caters to both audiophile purists and everyday music lovers. If you're looking for a powerful and future-ready streaming hub for your home audio system, the Bluesound - Node Icon is one of the smartest and most sonically rewarding investments you can make.
0 notes
Text
Review: ACCUSTIC ARTS Hi-Fi Speaker System with Integrated Headphone Amplifier
It's rare to find an audio system that seamlessly bridges the gap between high-quality speaker performance and dedicated headphone amplification, but the ACCUSTIC ARTS Hi-Fi Speaker System achieves exactly that balance you've been seeking.

When you first unbox this German-engineered system, you'll immediately notice the premium build quality that ACCUSTIC ARTS is known for. The sleek aluminum chassis feels substantial in your hands, while the minimalist design ensures it will complement any modern listening environment you've created.
Your listening experience begins with the impressive speaker output section. The system delivers 50 watts per channel into 8 ohms, providing enough power to drive most bookshelf and floor-standing speakers with authority. You'll appreciate how the Class A/B amplification maintains clarity across all frequency ranges, from tight, controlled bass to crisp, detailed highs that never become fatiguing during extended listening sessions.
What sets this system apart is its integrated headphone amplifier section. You'll find both 6.3mm and 4-pin XLR outputs, accommodating everything from your everyday headphones to high-impedance audiophile models. The headphone section operates independently from the speaker outputs, allowing you to fine-tune your personal listening experience without affecting your main system settings.
Your digital sources connect effortlessly through multiple inputs including USB, optical, and coaxial connections. The built-in DAC supports high-resolution audio up to 24-bit/192kHz, ensuring you'll hear every detail in your favorite recordings. When you switch between inputs, the transition is seamless and silent, maintaining the professional standard you expect.
During testing, you'll notice the system's exceptional noise floor. Even at high volumes, background hiss remains virtually nonexistent, allowing subtle musical details to emerge clearly. The soundstage presentation is particularly impressive – you'll experience precise instrument placement and natural depth that makes your music feel three-dimensional.
Your investment in this system pays dividends in versatility. Whether you're enjoying late-night headphone sessions or entertaining guests through speakers, you won't need to compromise on audio quality. The remote control provides convenient access to volume, input selection, and mute functions from your listening position.
Some considerations include the system's premium pricing, which places it firmly in the high-end market segment. Additionally, you'll need quality speakers to fully realize the amplifier's potential, as the system will reveal any weaknesses in your transducers.
Your search for a dual-purpose audio solution ends here. The ACCUSTIC ARTS Hi-Fi Speaker System with Integrated Headphone Amplifier delivers reference-quality performance in both applications, making it an excellent choice for discerning listeners who refuse to compromise on audio excellence.
#power amplifier online#audio power amplifier#germany made audiophile speakers#stereo power amplifier
0 notes