#...i take it back it was blurry bc i only sharpened the first frame lol
Explore tagged Tumblr posts
Visit Tumblr Blog
Explore Tumblr blogs with no restrictions, modern design and the best experience.
Last Seen Tumblr Blogs


Fun Fact
1,644 Tumblr posts in 1 second.
Text
kmplayer gif tutorial
hello all! i’m gonna show you how i make my gifs! I use kmplayer and avisynth to make gifs, but I’m going to focus on kmplayer for this one. This tutorial is long and quite in depth so if you’re a beginner, this should be good for you!
also! this is purely just a gif tutorial and not a coloring tutorial lol
what you will need:
photoshop (im using cs5)
kmplayer
any video downloader (I use 4k download or savieo)
Screencapping
Okay first find a video and/or a scene that you want to gif. You’ll want to get the highest quality video possible. Don’t download anything under 720p or else your gif will look grainy. Try to get 1080p as much as possible.
Once you get that downloaded, open your video in kmplayer and go to the scene you want. I like to go a few seconds beforehand to make sure i don’t miss any frames. Now on your keyboard press Ctrl + G to open up the screen cap menu.
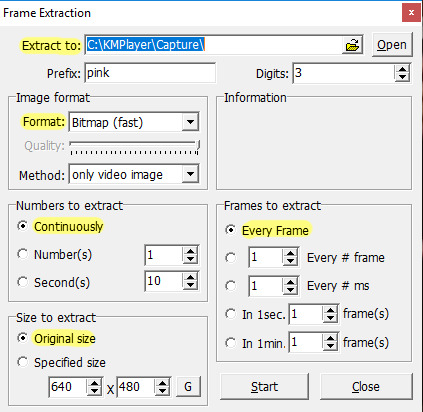
I don’t remember the default settings but here are the settings you’ll want:
Extract to: you’ll want to create a folder to hold your screen caps and then direct that folder here
Format: JPEG and Bitmap are both good options. Bitmap (i believe) is going to be a higher quality image
Numbers to extract: continuously
Size to extract: original size. You want the full size image
Frames to extract: every frame. This ensures that you’re getting every frame and helps your gif look smoother
also the “prefix” is just going to be the first part of the image name, so put whatever you want for this! :)
Once this is done, press Start in the menu and play the video. When the scene is done, press pause on the video. Open the menu again (Ctrl + G) and stop that as well. Now all you want to do is go into the folder with your screen caps and delete the ones you don’t want.
Frame timing and converting to smart objects
Open photoshop: we are now going to start the giffing process! Before you start, make sure you have the animation window and the layers window open. To do this, go to Window > Animation and Layers, if it’s not already showing.
Now, click on File > Scripts > Load multiple DICOM files. Find your screen caps folder and load them in. You’ll see in your animation bar that it only has one image showing.

In order to pull your screen caps from this, go to the top right hand corner of the animation bar and click this button. Click “Make frames from layers”.

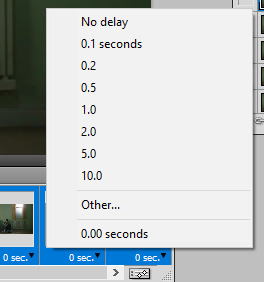
This is so your gif actually plays all the frames and not just the one showing. Next, change the timing of the gif. Personal preference is a big thing in giffing so you’ll want to play around with what works for you. The average timing used by a lot of people is either 0.04 or 0.05 (for screencaps i should say). I find that 0.04 can be a little fast for my liking, so 0.05 is good. To do this, click the “0 sec” and then “Other...” and type in your timing. Make sure you select all the frames before doing this, unless you want to change each frame individually ^.^
P.S. if you ever want to delete a frame in your gif, you can delete the layer in the layer window but in the animation bar, you’ll have to click on the frame and click the tiny trash can next to the bottom scroll bar.
The next step is to click the button in the bottom right hand corner of the animation bar. It looks like it has two sliders on it. It will change your animation from frames to timeline.
Next, right click on a frame in your layers window and select “similar layers”. Then right click again and select “convert to smart object”. This may take a moment btw.

If you see that your animation timeline shortened into one line instead of multiple lines, you’re on the right track! Next thing to do is to crop the part of the scene you want.
Image size, sharpening and canvas size.

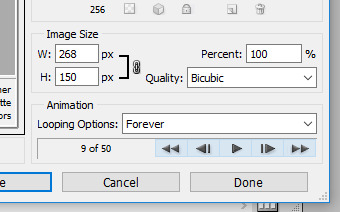
Image size will change the photo size without cropping anything out. Canvas size will change the size without transforming the image. What I like to do is to change the image size to about 5 or so pixels larger than what I actually want for either the width or height. In this case, I want my gif to be 268 x 150. So my cropped photo is going to make my height much larger than I’m going to want it, if that makes sense.
P.S. For sizing, make sure your width is either 177px for 3 panel gifs, 268px for 2 panels, or 540px for a single panel. If you want a 3 panel gifset, make the middle gifs 178 px (i know, it’s a little dumb but if you don’t, it’ll make the middle gif slightly blurry)
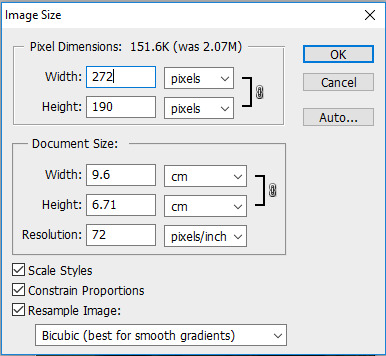
(This is what I’m going to resize my cropped image to)
You can just make the width or height automatically what you want (268 in the width for my case), but I find that after sharpening, a line can form around your image. I prevent this by making the image slightly larger than what I want and then cutting that part out later.
Now I want to sharpen my gif! Again, this is about personal preference, but I think this is what a lot of people use as well. Right click on your smart object in the layers window and select “New Smart Object via Copy”. I’ve seen people select “Duplicate layer” instead but I honestly don’t know what the difference is lkasndfllanslk.
Set the top layer’s opacity to 50% and leave the bottom layer at 100%. To actually sharpen the gif, go to Filter > Sharpen > Smart Sharpen.
For the top layer:
1. Smart sharpen: Amount 500%, Radius 0.4
2. Gaussian blur: 0.3 (its also under filter)
For the bottom layer:
1. Smart sharpen: Amount 500%, Radius 0.4, no gaussian blur

After this, go to canvas size and change it to your actual gif size. For my gif, it will take my 272 x 190 to my desired 268 x 150. Then combine your two smart objects by selecting both of them and clicking “Convert to Smart Object”.
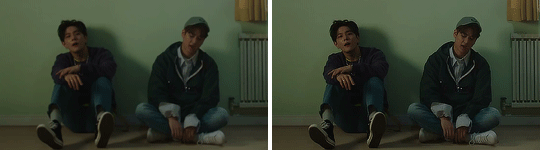
Gif without sharpening vs gif with sharpening
Now you’ll want to edit it to your liking, just make it sure it’s under 3mb for tumblr’s image limits.
I’m not going to get too much into coloring bc it can be a real pain sometimes but! I will say that selective coloring is your best friend, just don’t saturate/over color or the gif will look more grainy.
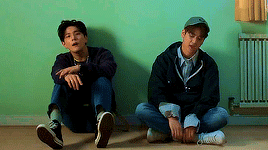
After coloring and such, this is what I get:
We’re almost there! Save your new gif under “Save for web & devices” and not for “Save as”. When it opens, it’ll look really confusing, but all you need to worry about is that the “Looping options” says forever and not once, or else your gif will stop after it plays the first time.
The last step that I didn’t even learn until recently is that you’ll have to open up your gif again in photoshop. When you do this, you’ll find that the timing has changed from 0.05 to 0.07. Idk why it does this, but your gif will look smoother if you change it back. (It might only be for screencap gifs but idk)
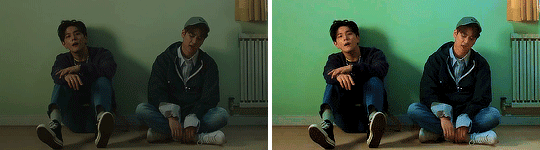
Here’s a comparison of the gif as is vs the gif when i changed the timing again:

And then you go through the process again if you’re making other gifs! I wrote a lot but it really isn’t that hard once you practice a couple times. I’m still learning too! (as you can see since my gifs are still grainy and such) but i hope this was helpful for people who don’t know where to start! Happy giffing!
#text#im not the end all be all but i will say that I know i've improved ever since learning some of these things#if anyone wants to share their knowledge i would lvoe that
13 notes
·
View notes
Note
Hi~~ I'm really sorry to bother you! But I saw your gifs in my dash and they're so pretty! I don't even stan wanna one but I just went through your gif tag for so long cause they're so nice 😍 Would you ever share your sharpen / action / topaz or coloring settings or tips? 😊
ahh omg anon thank you so much for your kind words! you’re so sweet
i think i’ll just share generic tips! From each stage of the giffing process. i still have so much i can improve with in giffing, so i’m sorry if i give you super wrong advice ahhh but i hope this helps a little?it got super long so it’s under the read more!!
Downloading Videos
make sure it’s the highest quality video you can get. 1080p is your friend. ok honestly, when i’ve giffed, i havent really noticed a difference in quality between 2k/4k and 1080p? maybe im doing it wrong but honestly the only thing ive noticed is that 2k/4k just slows down my computer drastically and takes up way too much space on a computer that already has like zero space to begin with. so i tend to stick with 1080p.
Also! if you can get 60fps, thats also nice bc it helps your gifs look smoother.
yaknow how i said 1080p is your friend? well ts files are your best friends/family. if you can torrent them or download the, your gifs will look super pretty. i highly recommend this for live performance gifs. you can find ts files for a lot of shows, but again, since my computer has
kpop24hrs and kpopexciting are two places i go for those live perf ts files! kpop24hrs tends to have more i feel (it’s where i go when i want to gif my rookie groups that dont have too much attention on them)
you can also find torrents on twitter, if you search the right things
Extracting Videos
ok for this, if you have a pc (so like not a mac) i HIGHLY recommend looking into avisynth. there’s this tumblr account named brandinator who i’ve heard gives really awesome tips for avisynth and made it really easy for people to get avisnyth.if youre like me and your stuck with a mac, or if you just want to stick with photoshop then you can read the rest of this
i have photoshop cs5? so my tips are generally based around that.
for youtube videos (so basically mp4/avi format) i use photoshop’s video extraction feature. file—>import–>video frames to layersif your photoshop is like mine for whatever reason and it doesnt want to recognize mp4 files, then what i do is changed the .mp4 extension to a .avi extension (and its super easy to do on mac….i dont have a pc so idk how different that is) the quality doesnt really change either with that simple changing of the ending it sorta just tricks photoshop i guess lol idunno
when youre on the ‘video frames to layers’ window, make sure you don’t hit the ‘limit to every _____ frames’ bc that makes it lose the smoothness quality of gifs. maybe back when the gif limit was like 1mb that would have been important, but we live in a world of luxury now. so for smoother looking gifs, make sure that box is unchecked. other ppl (pc users i think) tend to use other video extraction softwares. i cant remember the name, but all i remember is that for macs, that software cant extract frames so its useless for us. i think it was kmplayer? not sure. like you can download kmplayer on mac but it doesnt have the same features rip.for ts files, i use vlc player (since ps can’t open it) and sit there and capture each and every frame lol.
Actually Giffing
here’s where things get a bit interpretive
(im assuming you know how to make a gif since you’ve asked for specific things like sharpening and stuff)
for coloring,
ive found that not changing the lighting too much of the video youre giffing leads to higher quality stuff…but i also hate not changing the lighting too much which is why a lot of my gifs turn out grainy hahah (my coloring is really centered around how to make the person in the gifs look the most ‘natural’? so that usually involves trying to take out video filters). but yea the gifs in which i didnt change too much with coloring, tended to be my most high quality gifs.
i don’t use other peoples psds and make my own everytime for each gif, and i only usually just adjust ‘curves’ and ‘exposure’ yea.
if there’s an ugly color background that you want to make look more white, when youre in ‘curve’s, go to each color (red green and blue) and drag the little line thing in the top right corner a little to the left. idk what is actually happening there and why it only really addresses the bg but thats a good way to try to make your bg whiter without actually whitewashing the gif.
for sharpening
lol sharpening, my enemy. its what i struggle with the most
i use .4 at 500% for smart sharpen
and then for topaz i make sure clean color is at 0 first of all, and i mess around with ‘overall strength’ and ‘reduce blur’ until i get the quality that i wanted. i nvr go higher than .07 strength.
but an important thing for sharpening i think is deciding when you want to crop the picture? do you crop it before or after the sharpening/topaz? i dunno honestly, but for me ive found that cropping first, and then applying sharpening settings leads to the highest quality (or maybe thats what im used to so it turns out better).
oh yea i dont resize, i crop instead. i’m not sure if that does anything but when i was first starting i found that resizing made my gifs look more blurry…? and that cropping was nicer to my gifs? i’m not sure if that does anything though lol maybe cropping is worse who knows, but its something ive stuck with ever since ive started
save settings
i’ve recently switched over to diffusion! but sometimes that doenst work out so i use the pattern one. i play around with adaptive/selective to see which one looks better or takes up less space haha
last but not least: pray
i spend a lot of my time praying that my gif will come out good haha bc even if you think you did everything right, once you hit that ‘save for web’ button, it’ll look like the ugliest thing in the world it’s really frustrating. like even when i make a gifset from the same video using the same everything (coloring, sharpening, save settings) one gif will look like trash and the other one will be like the best thing ive ever giffed so its like?? pray
#anon#replies#anon i just realized my theme really isnt that pretty if you oepn it on a read more and it actually totally screwed up the entire formatting#oh my god
0 notes