
Don't wanna be here? Send us removal request.
Statistics
We looked inside some of the posts by spottedfire93 and here's what we found interesting.
Average Info
Notes Per Post
910K
Likes Per Post
542K
Reblog Per Post
368K
Reply Per Post
330
Time Between Posts
2 months
Number of Posts By Type
Photo
7
Text
8
Video
1
Note
1
Last Seen Tumblr Blogs


Fun Fact
Tumblr has 4 main sources of revenue.
Photo
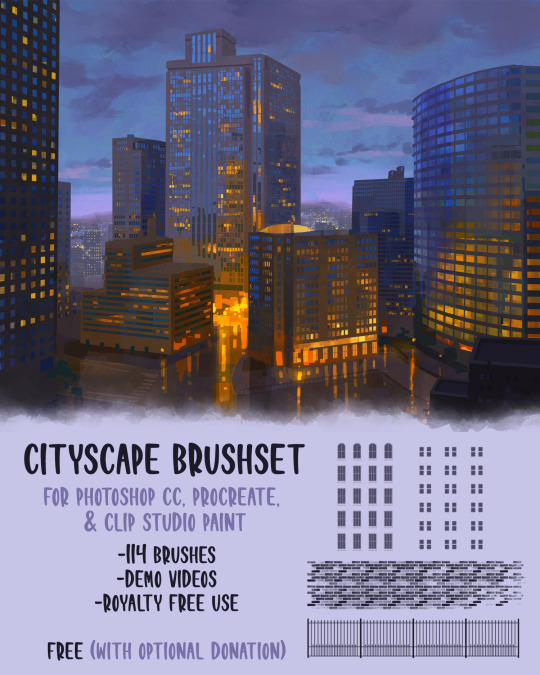

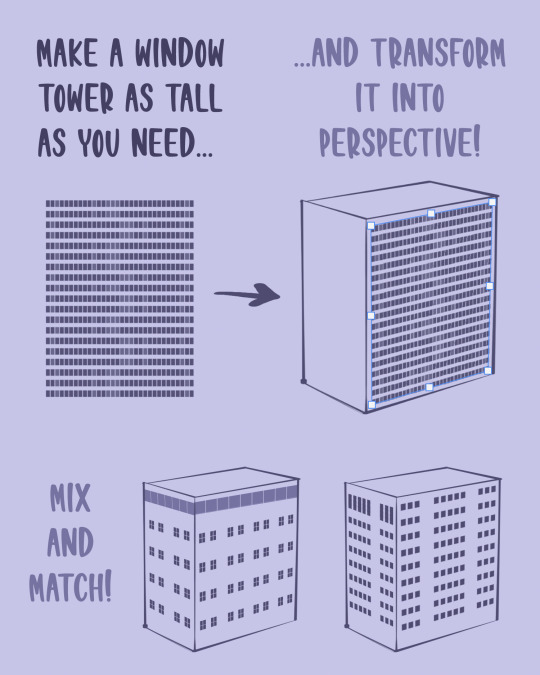


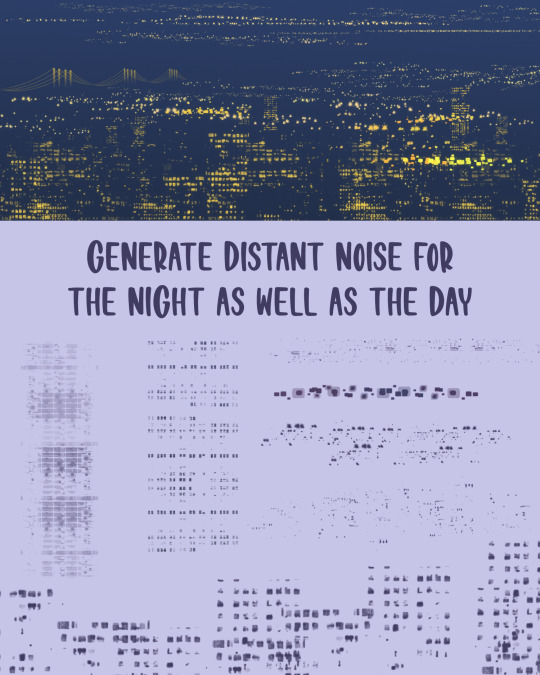

Click here to download the brushset!
Type in 0 to download for free, tips are very much appreciated but not required! Hope you all enjoy these brushes! Please share them with friends if you like them!
47K notes
·
View notes

Photo
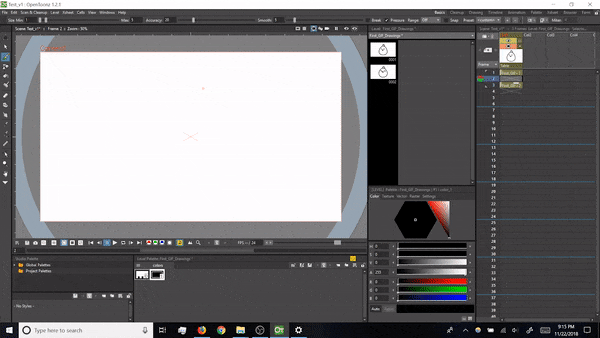
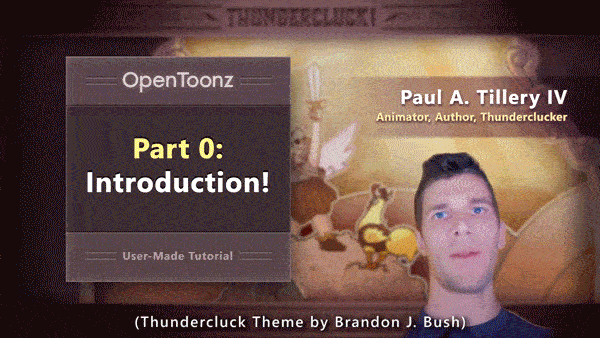
THUNDER THURSDAY #85: OpenToonz Tutorials Are Live!
Hey folks! For those wanting to learn OpenToonz, thanks again for your patience, and behold: my first few tutorials are online! Here’s the introductory collection (~35min total), or check below for links to individual sections :D
youtube
I’ve made a YouTube playlist with individual videos, and here are their separate links (times approximate):
Part 0: Introduction (2min)
Part 1: Installation (2min)
Part 2: The Startup Menu (2min)
Part 3: The Interface (3min)
Part 4: Levels & Drawing (7min)
Part 5: Drawing Frames (6min)
Part 6: The X Sheet (5min)
Part 7: Saving (2min)
Part 8: Exporting a GIF (7min)
ENJOY! And if you have questions, feel free to ask (either here, or in the YouTube comments). Thanks for watching!
Paul
2K notes
·
View notes
Text
So it appears that Autodesk did a thing.

Go nuts, my friends.
204K notes
·
View notes
Text
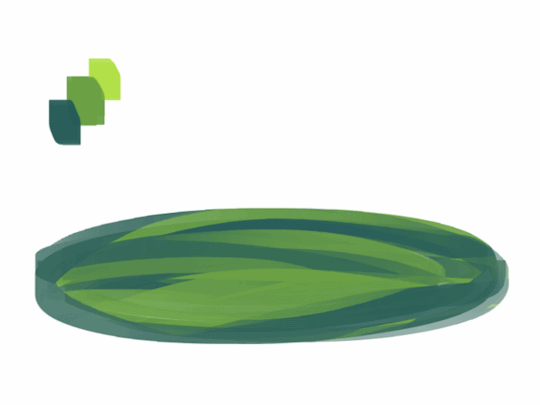
a quick grass tutorial
I’ve never really wrote a tutorial before so apologies if this is bad
1. okay first thing I do is pick three colors, a mid, dark, and light. I like to check the colors in greyscale to make sure there’s enough contrast between each one.
I then plop down a blob of whatever my middle tone color is.
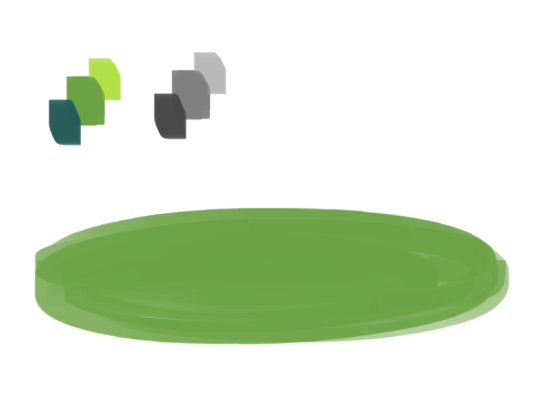
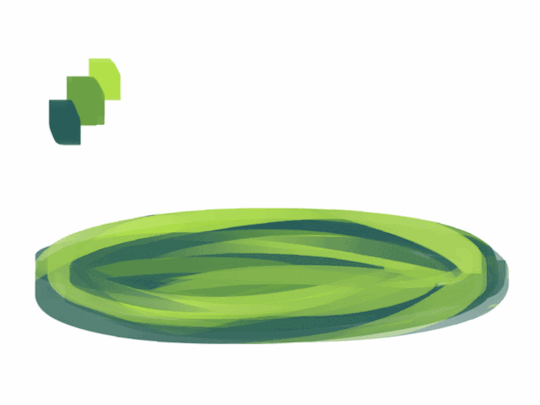
2. next, I take my dark color and just sort of randomly place it around. I try to make sure there’s a good amount of both the mid and dark tones spread throughout. I personally like to keep it kinda messy. I also have pen pressure on for both brush size and opacity, so I can have some blending action going on.
3. for the next step I do the exact same thing as before, except with the light color.
4. aight this is where we start adding details. see how you just have a bunch of colors and edges where two colors meet? use the eyedropper and go to an area where two colors meet, eyedrop a color, and then use that color to draw in your grass blades. I do this at every point where colors meet. should note I personally like to use a square brush, but you can really just use anything.
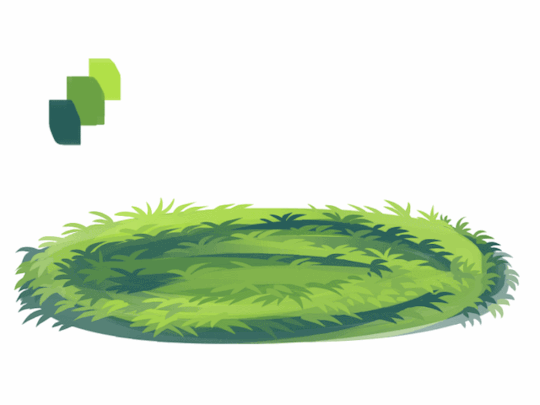
5. you can technically stop at the last step if you’re going for a more simple look, but to add more details I go to the “empty” areas of solid color and just draw in random strokes using a color nearby. it’s just a way to fill up the empty space.

6. basically more of the same idea of eyedropping and drawing. for more variety so things look interesting, I like to add random plant shapes.

7. and so the grass doesn’t look too plain, I add random dots of color and pretend it’s flowers and stuff.
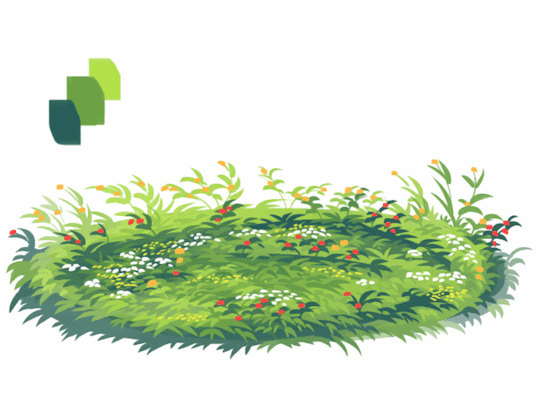
and there you have it, this is how I approach drawing grass.
122K notes
·
View notes

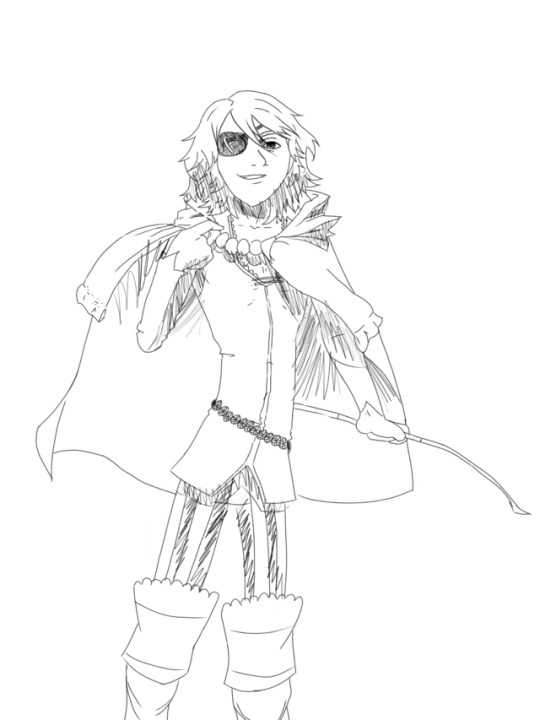
Photo
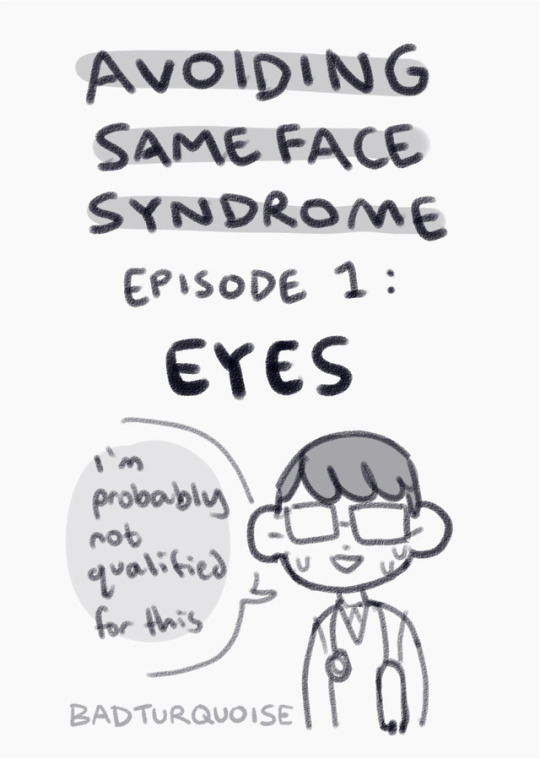
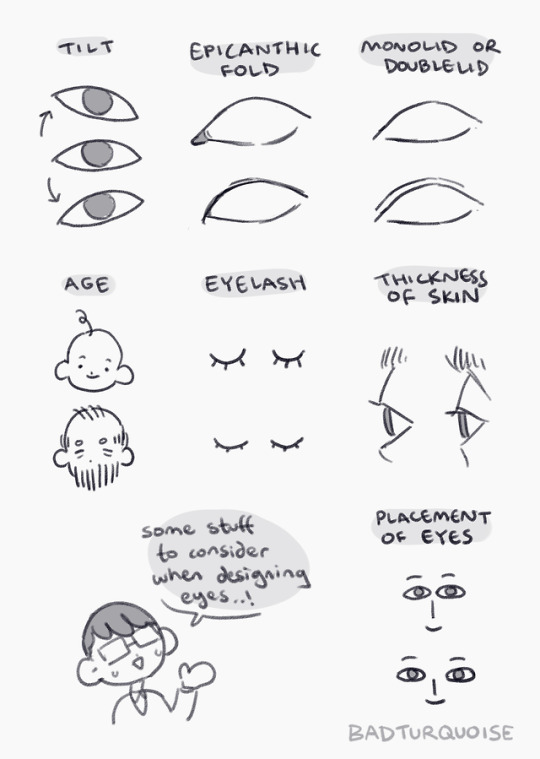
idk if i’ll ever go more in-depth about each of the topics (because,, there’s a LOT of stuff to cover,, o<-<) but for now i just wanted to put this up anyways!! :,-o
6K notes
·
View notes
Photo


Photoshop Tutorial: How to paint water in 10-ish steps. Reblog to save a life.
36K notes
·
View notes
Text
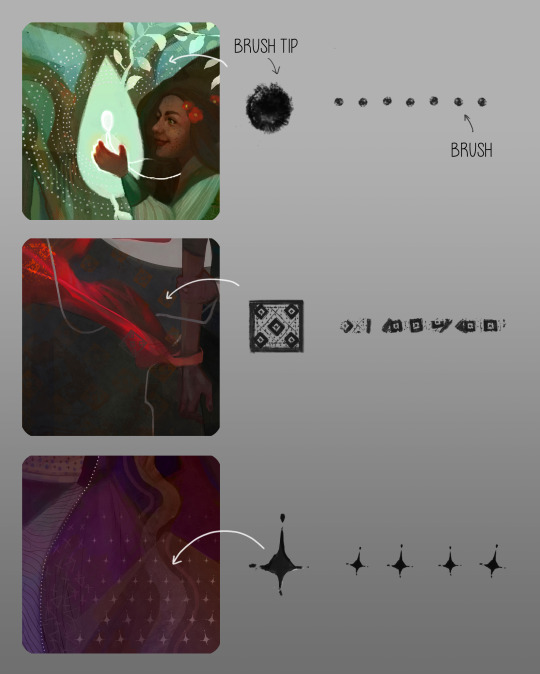
Some Photoshop Tips
I’ve been getting quite a few asks about the process for the patterns in my stylized artworks, so I decided to put together a couple of tips regarding them.
Firstly, what you need are
— CUSTOM BRUSHES —
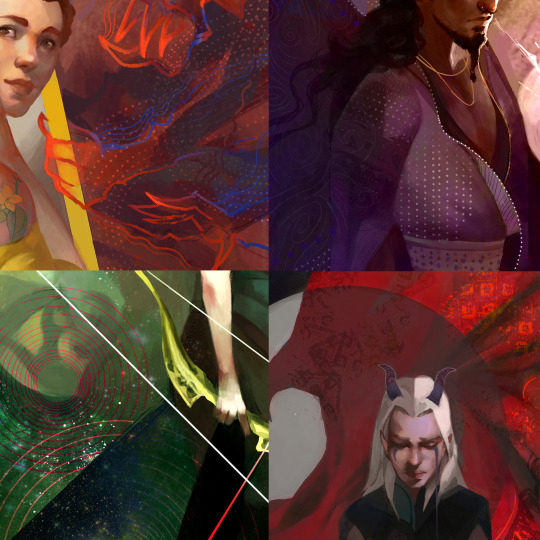
Most of the patterns I use are custom brushes I made, such as those:
For the longest time I was convinced making brushes must be super extra complicated. I was super extra wrong. All you need to start is a transparent canvas (2500px x 2500px max):
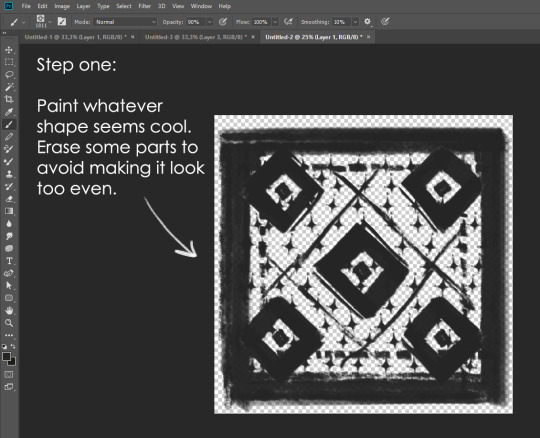
This will be your brush tip. When you’re satisfied how it looks, click Ctrl+A to select the whole canvas and go to ‘define brush preset’ under the edit menu
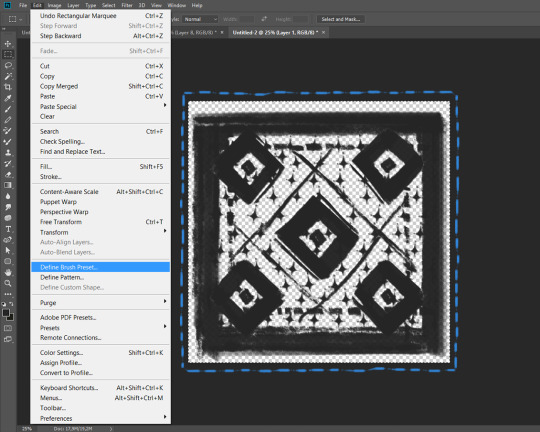
You will be asked to name your new glorious creation. Choose something that describes it well, so you can easily find it between all the ‘asfsfgdgd’ brushes you’ve created to be only used once

This is it. Look at it, you have just created a photoshop brush. First time i did I felt like I was cheated my whole life. IT’S SO EASY WHY HASN’T ANYONE TOLD ME
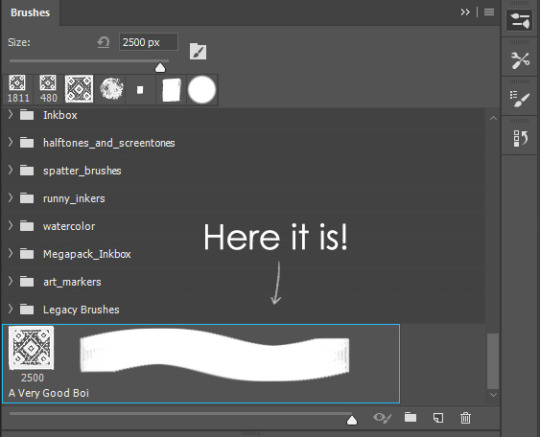
Time to edit the Good Boi to be more random, so it can be used as a Cool Fancy Pattern. Go into brush settings and change whatever you’d like. Here’s a list of what I do for patterns:
- under Shape Dynamics, I increase Size Jitter and Angle jitter by 5%-15%
- under Brush Tip Shape, I increase spacing by a shitload. Sometimes it’s like 150%, the point is to get the initial brush tip we painted to be visible.
- If I want it to look random and noisy, I enable the Dual Brush option, which acts like another brush was put on top of the one we’ve created. You can adjust all of the Dual Brush options (Size, Spacing, Scatter, Count) as you wish to get a very nice random brush to smear on your backgrounds

The result is as above. You can follow the same steps to create whatever brush you need: evenly spaced dots that look like you painted them by hand, geometric pattern to fill the background, a line of perfectly drawn XDs and so on.
BUT WAIT, THERE’S MORE
— PATHS —
But what if you want to get lots of circles made of tiny dots? Or you need rows of triangles for your cool background? Photoshop can do all of that for you, thanks to the magic of paths.
Typically, paths window can be found right next to Layers:

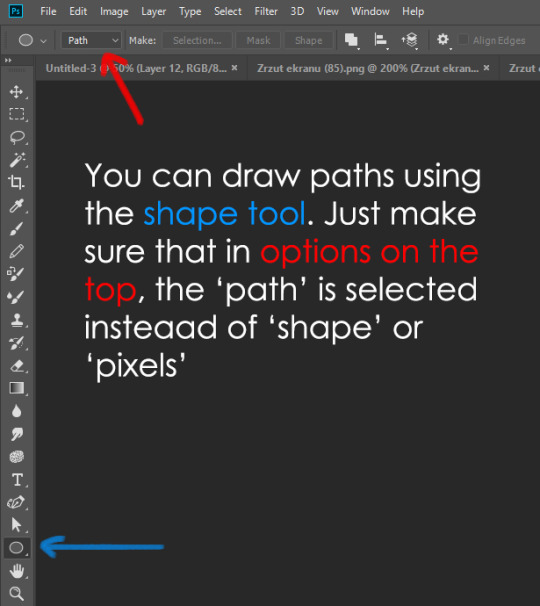
Draw whatever path you want, the Shape Tool has quite a bit of options. Remember, paths are completely different from brush strokes and they won’t show up in the navigator. To move a path around, click A to enable path selection tool. You can use Ctrl+T to transform it, and if you move a path while pressing Alt it will be duplicated.
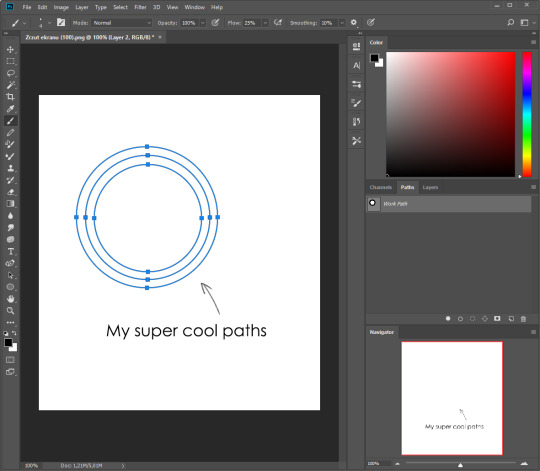
Now, pick a brush you wish really was in place of that path you’ve drawn and go to layers, then choose the layer you want it to be drawn on. Then, click this tiny circle under the Paths window:

Then witness the magic of photoshop doing the drawing for you while you wonder how tf have you managed to forget about this option for the past 2 years
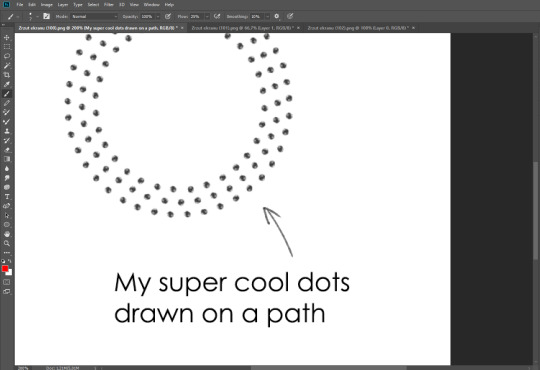
You can combine special brushes and paths for all sorts of cool effects. I mostly use them in backgrounds for my cards, but you can do whatever you want with them.
I hope that answers the questions for all of the people who were sending me inquires about the patterns. If you have any questions regarding this or any other Photoshop matter feel free to message me, I’m always up for complaining about how great and terrible Photoshop is C’:
93K notes
·
View notes
Text
1 note
·
View note
Photo

Hey folks, it’s been a minute! After a lot of recording and editing, quick announcement:
OpenToonz intro tutorials coming soon! (Aiming for this week!)
The above gif captures how I felt when I first launched the program. I’ve learned a lot, and I’m hoping to make it more accessible for aspiring animators. Stay tuned!
- Paul
281 notes
·
View notes
Photo

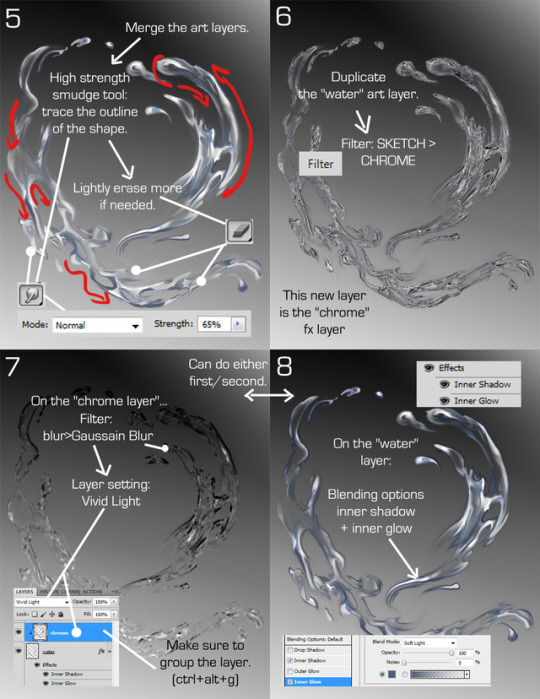
this is how i do sweat drops or just liquids in general
friend asked me to make one
4K notes
·
View notes
Text
when i finally get home and can draw but have no inspiration at all
34K notes
·
View notes
Text
HOLY FREE ART PROGRAMS BATMAN
I’ve had this list sitting around for a while (in case I ever want to try something new) and I thought I’d share it, because why the hell not, everybody loves free stuff. I’ve only used a couple, so for all I know these could be complete shit. BUT YOU NEVER KNOW, RIGHT?
*= available for both windows and mac os
GIMP * - Does a lot of the same stuff as Photoshop.
FireAlpaca * - Similar to Paint Tool Sai, so it’s a good alternative for Mac users.
Autodesk Sketchbook Copic Edition * - Simulates the look of copic markers.
MyPaint * - Basic stuff, nothing fancy.
Pinta * - Drawing program modeled after paint.NET.
Inkscape * - Vector/drawing program meant to be similar to Illustrator.
ArtRage * - Digital painting program; you can get the trimmed down version for free or buy the full version with more features.
Sumo Paint * - In-browser drawing app.
DAZ Studio * - Some sort of 3D model poser thing.
Pencil * - Software for animating.
SketchUp * - Tool for making 3D models. Looks handy for stuff like architectural drawings.
Blender * - Pretty popular 3D software.
escape motions * - Some browser apps, fun to fiddle with when you’re bored (the fluid fire simulation is pretty cool imo).
Twistedbrush (Pixarra) - Seems to be meant for replicating the look of traditional media.
Pixia/Phierha - A popular program in Japan, according to the website.
Krita - This was originally made for Linux and it looks like the developers haven’t ironed out all of the kinks in the Windows installer.
Artweaver - Another trimmed down free thing if you don’t want to buy the full program.
paint.NET - Pretty basic kit, probably good for simple stuff.
Project Dogwaffle - I’m not sure what this one is all about because I couldn’t stop laughing at the terrible website.
Speedy Painter - Lightweight digital painting program.
mtPaint - Originally made for pixel art; simple enough to run on older computers.
Chasys Draw IES - Supposed to be some sort of drawing+image editor thing.
PaintRibbon - Seems to be another plain old basic image editor.
DrawPlus - Looks like it’s made for graphic design and vector stuff.
SmoothDraw - I’m guessing this is a basic thing for people who don’t want to bother with complicated stuff.
145K notes
·
View notes
Note
What are your paint tool sai brush settings? Like lineart and color? I’m sorry to ask ;w;
it’s no bother at all!!

these are the main ones i use! for color i mostly just use the paint bucket and shade with the paint brush or the lineart one and use the blur tool to blend it in ovo//
673 notes
·
View notes