Don't wanna be here? Send us removal request.
Statistics
We looked inside some of the posts by simondriessen and here's what we found interesting.
Average Info
Notes Per Post
10
Likes Per Post
9
Reblog Per Post
1
Reply Per Post
0
Time Between Posts
2 months
Number of Posts By Type
Photo
1
Text
15
Audio
1
Last Seen Tumblr Blogs


Fun Fact
Premium Tumblr themes are available from anywhere between $9 to $49.
Photo

@jannykingzbct @designcreativetechnologies @designcomputing2020 @oscar-randle-bct @eden-rosebct @ncyrocks @colabsx @karenfrombct-blog @krouxbct @qzkevin @eldanbct @belindacreativetech @isaiahnonoybct-blog @pezbct-blog @aimatapittmanbct-blog @prestonbct @hauntedmarket @joshbaxterbct @mel-bct @vaanibct
OK GOOD
0 notes
Text
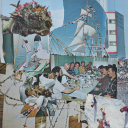
Final studio setup and reflection
So it’s all good to go for submission, and I have to be honest, it’s looking pretty clean (cheer Tim for the black cloth, can never go wrong with black cloth). Oscar put the video onto a looping slideshow with some images and additional information and we’ve got the UI all setup on Tim’s laptop. Oscar also finished up the CDD and printed all of our documentation. Here’s what it looks like:

The TV in the back has the looping slideshow and the laptop has the UI wireframe. It’s all good to go for the crit submission tomorrow and I’m excited to show the lecturers what we’ve come up with.
For open studio we are going to add a couple of things. An additional laptop so more people can have a play with the plugin wireframe, some decorative/promotional posters that will be able to fit behind the TV screen nicely and also some business cards to hand out to any potential employers hopefully! But for now it’s all good to go and I’m really happy with how it has turned out.
Reflections
Project reflection: We have rounded this project off to a satisfactory finish regarding our initial goalposts and objectives. We now sit at a stage where we are comfortable engaging in serious industry inquiries and the actual construction of the software. Thinking critically, a rearrangement of activities and tasks along the timeline of this semester would be appropriate. We were unable to implement some relevant changes due to time constraints caused by an illogical work structure.
Personal Reflection: Easy Stems has pushed me to be critical when analysing and evaluating precedents, it has taught me a multitude of things about the audio industry and I have gained invaluable skills in the field of UI/UX design and wireframing. I’ve also learned to work a lot more effectively in a team, Easy Stems had a great group dynamic and our individual skills all brought something valuable to the team. One thing I could’ve improved on was getting the Xd wireframe done sooner which would have allowed for more refined user testing, as we were working with the basic wireframes for our testing. Also, focusing on the important tasks was somewhat of an issue for us. We would delegate unnecessary time to tasks that weren’t as pressing as others. Although our task delegation was generally good, we could’ve made some improvements.
Overall I have really enjoyed working with my team. Oscar (@oscar-randle-bct) and Tim (@bctims) were both great to work with. They completed all of their set tasks to a high standard and pushed themselves to learn new things and think outside of the square. They never complained about anything, they just got things done and this great group dynamic and positive environment is reflected on the outcome of our project. I’m really happy with how it has all turned out, we’ve created something pretty cool, I just hope we all get some decent job offers thrown our way!
2 notes
·
View notes
Text
Kickstarter video/screencap
After finishing all of the Xd designs, I was able to go ahead and record everything we needed for the Kickstarter video. So I just screen recorded myself for about 3 minutes playing around with the Easy Stems UI, with Ableton in the background. I took a couple of additional recordings to set up the animation of taking a file from Easy Stems and putting it into the DAW. I did this by having the two recordings start and end at exactly the same frame. I then took these recordings and tried to put in the animation in After Effects. But I had no idea what I was doing and I simply did not have enough time to learn a new Adobe program, despite the last one being pretty easy to pick up. Oscar recommended Camtasia, and this actually turned out to be a great tool to use. Yeah, it’s kinda basic compared to a lot of software out there, but it did what I needed it to do perfectly. Essentially, all I ended up doing was putting the two screencaps side by side, and having a still image in between for the animation period. I then took a screenshot of the file, and downloaded a mouse image and simply used an in-built animation tool, and this worked flawlessly. Here’s a clip of the animation (it’s 16 seconds in):
youtube
The animation emulates perfectly well what Easy Stems aims to do.
So with my screencaps and animation all done, Tim and Oscar took them and slotted them nicely into the Kickstarter video and added some nice text overlay. Here’s the final video, I think we’ve all done a great job on it. It looks very professional while sticking with the bedroom producer aesthetic.
youtube
Now we just have a couple of things to touch up before submission. We need to set up the physical installation with the slideshow, documentation and wireframe for people to test. With the UI, it’s all done and I think I’ve done a decent job on it, however, I wish I had got onto it earlier so that every button is clickable. I think this may affect people’s experience. I might try to get it all done for open studio if I have the time.
0 notes
Text
Easy Stems Extended - Blog Hub
See the links below for my Easy Stems process journey:
Easy Stems Semester 2
What we need to do to improve Easy Stems
Storage Logistics
Easy Stems Freeware/Freemium
Subscription model for ES
Updates and ideas for Open Studio
Adobe Xd prototype
Xd progress
Easy Stems Kickstarter
Making everything on Xd work
Kickstarter video/screencap
Final studio setup and reflection
See Easy Stems Semester 1 for posts relating to research and user testing that I did last semester.
0 notes
Text
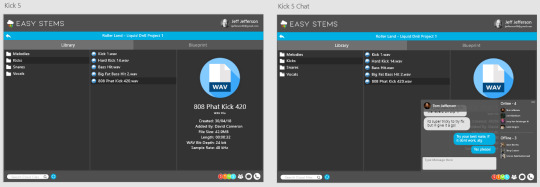
Making everything on Xd work
So before I do the screengrabs and animations for the Easy Stems Kickstarter video, I have to get everything working on Xd. As mentioned in a previous post, I’ve made around 50 artboards, all a different state of the app, a screen for each file selection possibility, e.g. when the 808 snare file is clicked, it goes to an artboard where the 808 snare file is selected, displaying all of the metadata and track details. I’ve finished all of the blueprint pages, which took ages... there are about 40 artboards and I had to make every button clickable: the home screen, back button, links to other pages, etc. I also went through and changed all the file names, as they were just Snare 1, Snare 2, etc. So now I’ve got things like 808 snare and Snare80sDisco. I also went and added bit rate and sample size to each file. The last big task for the Xd wireframe was the chat tool. Tim designed the chat popup in Photoshop and sent it through to me to set it all up in Xd. The problem with a simple popup is that for each screen, I have to create another designated artboard for when the popup is selected, and if I want to add it to each blueprint screen, there will end up being hundreds of artboards, essentially slowing down the user testing link and causing me to spend way more time on a basic wireframe than I really need to. I’d like to spend more of my time working on the video and animations, rather than a small detail in a mockup wireframe.
I initially decided that I was just going to have chat popup artboards for only the main library and main blueprint screens, lessening my workload significantly so that I could help Tim and Oscar with the video. But I then decided to just make the chat popup work on each library screen, and cheat a bit with the blueprint. I ended up with 74 artboards in total, doubling the library artboards, and only adding 2 more blueprint screens.
There’s no point showing all of the page links, it’d just be a page full of blue wires that made no sense, you can get an idea of the links in one of my previous blogs.
The way I did the library chat popups was simply duplicating the library screen and putting the chat window over the top, then linking all of the pages. I did this for each library page so that the chat function is clickable in each library state (again no point showing the links, just a jumbled mess).
I kind of took a shortcut with the blueprint screen. I just added the chat popup to the main blueprint screen and the main blueprint scroll screen (scroll screen is explained in a previous post). I then just made every blueprint/blueprint scroll screen’s chat button link back to the main blueprint/blueprint scroll screen. So say if you have a couple of folders open on the blueprint screen then click the chat button, it’ll just redirect to the home blueprint, closing the folders. This means the chat button on every page is interactable, but the files are closed in the process. Honestly, I don’t think this really matters at all, you hardly even notice it anyway. This shortcut enabled me to cut down the artboards significantly, and it means I can focus on other, more pressing tasks for open studio.
Now Xd is all done, I can say that I’m happy with how it turned out. It’s a very useful program and it’s very easy to pick up. The UI wireframe is at a great state for open studio. I think people are really going to enjoy playing around with our plugin. Looking back now, however, I should have got the wireframe done a lot sooner in the semester so that we could’ve done more user testing throughout the semester. This would have given us far more invaluable feedback that would have informed our design and user interface choices a lot better.
0 notes
Text
Easy Stems Kickstarter
We’ve decided that creating a Kickstarter video would be a pretty good track to go down considering we’ve got a solid idea and having a quick rundown of the program’s features and what it does would benefit us greatly. We are pretty on track with everything else, I’ve pretty much done the Xd program apart from a couple of added menus and some metadata stuff, Oscar has been chipping away at the documentation and Tim has been doing the website design and some additional UI features for me to put into Xd. Aside from these touch-ups, we think that Easy Stems is pretty much ready for pitching/development and showing to the public. We just have to crack on with the video, as it will be a vital part of our open studio presentation.
For open studio we are going to have 2 laptops, one showcasing the interactable wireframe Xd plugin and the other some additional Easy Stems information, design choices, etc. We will also have a TV displaying a slideshow and the Kickstarter video, so it is essential that we get onto this video ASAP. Tim has said that he would edit the video using Premier, while Oscar creates the audio track and does some of the filming. I said that I’d handle the screen grabs of the plugin in action, and an animation of a drag and drop from Easy Stems into Ableton. I think I’ll do this through After Effects.
We each looked into some Kickstarter campaigns to get an idea of how the videos are structured. I came across this random guitar with an inbuilt amp Kickstarter (https://www.kickstarter.com/projects/loog/loog-guitars-built-in-amp-augmented-reality-monsters?ref=section-design-tech-projectcollection-6-tag-newest&fbclid=IwAR3j9Re7sfUhA7kTfL9vAUfkAcRfV36q8CTnRAeRk4U58rN4o-av0SzP-ew) and the video gave me an idea for the potential structure of the Easy Stems video. The idea is to have one person in their bedroom working on a track. The track plays in the background and it is one singular piano or melody line by itself. It then cuts to another bedroom producer working on the track and this is where another layer of the audio track comes in, say drums or bass. And then it cuts to another producer and another layer of the audio track is introduced, as so on. This would really emphasise the collaborative process and the whole bedroom producer theme that Easy Stems is going for. Tim and Oscar liked this idea, so I think we’ll be using it for the video.
So the video will start off with my collaboration idea, then we will cut to Easy Stems in use with producers. We will include some screencaps and animations to emulate Easy Stems working in a DAW (dragging WAV files into the track timeline). We are debating whether to have a voiceover or not. In this case, I think we are best to have overlayed text, as the video is only going to be short, 1-2mins.
I’m going to work on the screencaps and the animation for the video, Oscar will work on the soundtrack and filming and Tim will work on the filming and editing. I also need to finish all of the Xd stuff so that the screencaps show everything. Everything seems on track for now, as we are nearing the end of the semester.
0 notes
Text
Final Setup SIS
So it’s pretty much all done, aside from a couple of glitches here and there (no pun intended...). Kale has done a really great job getting all the hardware and Arduino code working. I am also really happy with how all the glitch tracks have turned out. Here’s a clip of the installation working.
youtube
So yeah a couple of things to touch up before open studio.
N64 still decides to press random buttons. Kale tried to set it so a button has to be pressed 4 times but it still does that.
NES still glitches and doesn’t work with the controller plugged in, not sure what this is.
Crash on the PS1 crashes (hah). Think this is just an issue with the PS1 or the disk.
I believe these issues can be fixed by open studio, so we will spend some time sorting these out over the next couple of weeks. Other than that, I’m really happy with how it has turned out. Great work Tim and Kale.
1 note
·
View note
Audio
Here’s the tracks that @simondriessen and I worked on for SWITCH
2 notes
·
View notes
Text
SIS sound coding with Processing
With the tracks all finished, Tim and I have been looking at the processing code, as touched on in my previous post. We had it so when a button was pressed on the keyboard, a glitch event would be associated with that key. This was a good way to test the code, but it had its limits. The serial communication was key and we were dealing with serial strings so I took on the challenge of setting up the serial string communication from Arduino to Processing. The values that Kale’s code was spitting out from Arduino, were strings. I set up serial communications easy enough so that the strings were being sent to the processing. I then thought it would be as simple as changing the keyboard input values to values received from the serial communication. I set up all of the global variables for the serial comms and the string values and thought it would be as easy as:
if (val == ‘1′) { music stops glitch track 1 plays next song plays and is put on a loop }
This would be repeated 20 times for each glitch transition track. However, this was definitely not the case. It did not work.
So while Tim was working on getting the N64 controller hooked up and Kale was most likely doing some wiring somewhere, I chipped away at this stupid bit of code that had me stuck for a while. I tried multiple things, changing the strings to ints, putting it under different void functions, changing the variables to be local, and nothing seemed to work. After a bit of research, I realized that the values coming in from Arduino had a lot of invisible sub-values (I guess you could call them), so Processing was getting heaps of string values at once. It was weird though because according to the console, I was just getting single values like 15 or 8 or 20 whenever a controller button was pressed, but the code wasn’t working. The whole time I thought it was something to do with the if statement, but it was as simple as: trim(val), which meant the values being sent to the console were just the main string numbers, not the hundreds of other sub-values.
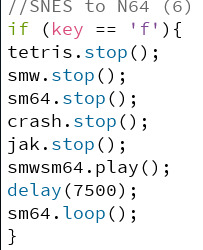
This brought me to the next issue: the glitch tracks kept repeating. When a value was sent to the console e.g. 1 - glitch track 1 would just repeat. This didn’t take as long to solve, it was just a missing pair of curly brackets... Gotta love coding.
INSERT CODE PIC
Finally, I had the Processing code working, and Tim managed to get the N64 controller up and running. With this combined, we managed to get it all working pretty much. Kale’s code would choose which consoles would glitch depending on what button is pressed, then Tim and I’s sound code would choose what glitch track to play.
youtube
We just have a couple of issues to sort out
The N64 controlled randomly decides to press buttons sometimes. We’ve disabled the joystick, but that didn’t do too much. We will have a play around with the code to see if we can disable anything else. Hopefully an easy fix.
The NES crashes. Not too sure about this one. Might be because it’s getting power through the controllers? But then again so is everything else. I’m sure Kale will understand this better.
So everything is almost good to go. I just have to sort out a nice looking installation. This won’t be done for the SIS hand-in but more for open studio. At the moment we are using a wooden plank (which Tim and I laser cut to fit around the plinth), which doesn't actually look that bad. We just have wires everywhere and stools holding the plank up.
Not exactly professional-looking, but again this will look a lot nicer for open studio when it needs to look nice. I’m happy with what we have achieved so far, everything is almost working. Kale has done a great job getting all the hardware stuff working (I couldn’t have done it), and I think Tim and I have made some great glitch tracks, and done well with the coding and installation so far. I’m excited to see how it all ends up, it’s looking pretty good already and so many people are already so intrigued by it, which is a great sign.
0 notes
Text
SIS audio glitch tracks
I’ve finished my 10 assigned glitch tracks. What I did wrong, however, was that all the tracks started and ended with about 10 seconds of non-glitching sounds so I needed to cut this all down. I also had to cut the glitch tracks down to about 9-12 seconds so that they would fit in with the parameters of the code.
Once I had done that I also needed to convert them to WAV files, as these work better in processing, which was very straightforward.
I used a mixture of mostly reversing, duplication and transposing mostly for the glitching, all done in Ableton. Here is a sample of one of the transition tracks:
https://soundcloud.com/user-3542831/sm64smw
So once these were all done, Tim and I worked on the processing sound code together. After much trial and error (and frustration), we came up with a code that plays tracks based on what number is sent from the Arduino. Kale will be setting up serial communication from Arduino to Processing. If a button is pressed on one of the controllers while a game is playing, a certain number will be sent out. E.g. SNES to N64 would be number 6.
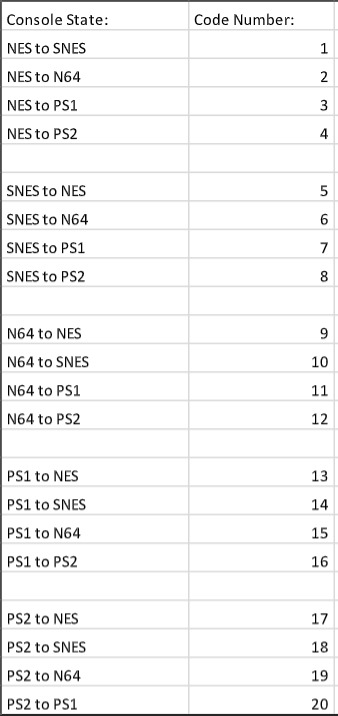
So with these coming in, our code then decides which track to play. So say if it's 6, it’ll stop all tracks, play the SNES to N64 glitch track for 10 seconds, then play the N64 track indefinitely.
We just copied this code 20 times for each event (yes probably a better way to do this with arrays or something, but oh well it works). The code works when we input numbers on the keyboard, which should be easy to transfer over to serial number values from Arduino. We just need to get the controller Arduino code set up then we’re almost there. Kale has been working heaps on the Arduino code and circuit, hence his lack of blogs at this stage. I will reblog his blogs when they come to show what he has been working on because he’d be a lot better at explaining it.
Tim and I have completed our tracks and the code to make the sounds play, so now we can focus on the installation. We are just waiting on Kale to finish the hardware and controller codes so that we can hook it all up. Tim’s been helping out a bit with the soldering so hopefully, it gets done pretty soon. The only issue for us at this stage is getting the soldering and everything done, which is hard when mechatronics isn’t open as much as we need it to be.
1 note
·
View note
Text
Glitching tracks and installation setup
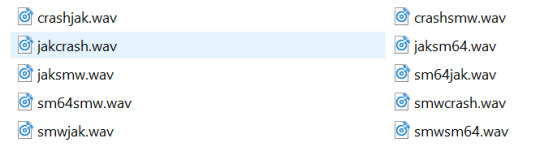
While Kale has been working on the circuits and coding, Tim and I have been working on the 20 glitch transition tracks, making 10 each. We’ve decided to use the actual game sounds, rather than create our own, mainly due to the nostalgia factor, and because it would fit in a lot nicer with the installation. The reason we need to make 20 is that there are 5 tracks that need transitioning between, Tetris for NES, Super Mario World for SNES, Super Mario 64 for Nintendo 64, Crash Bandicoot for PS1 and Jak and Daxter for PS2. I can’t explain the math behind why we need 20 so I’ll just make a list. We need a transition track for every possible transition, which is why we need this many.
NES to SNES, NES to N64, NES to PS1, NES to PS2, SNES to NES, SNES to N64, SNES to PS1, SNES to PS2, N64 to NES, N64 to SNES, N64 to PS1, N64 to PS2, PS1 to NES, PS1 to SNES, PS1 to N64, PS1 to PS2, PS2 to NES, PS2 to SNES, PS2 to N64, PS2 to PS1.
So Tim and I split this in half and are making 10 each. The tracks I am doing are N64 to SNES, SNES to N64, N64 to PS2, PS2 to N64, SNES to PS1, PS1 to SNES, SNES to PS2, PS2 to SNES, PS1 to PS2 and PS2 to PS1.
I’m working on Ableton for these tracks using a few different techniques for the glitching. Clip transposing, reversing and duplicating are the main things that sound the best to me.

I’ve done 2 tracks already and have 8 to go. The main issue I can think of is syncing to the main track after the glitch, but to combat this, I think the best idea would be to make the main tracks a short loop and the end of the glitch tracks transition nicely back into the main track. We also have to be aware of track lengths and sizes for the processing code. We have decided to get number values from Kale for each event, e.g. SNES to N64 would send us the number 6. The number 6 would play the SNES to N64 glitch track once, then the N64 track and loop that indefinitely.
We have the code idea in our head. Tim and I will continue working on the tracks, then work together on the processing code, all while Kale chips away at the Arduino stuff.
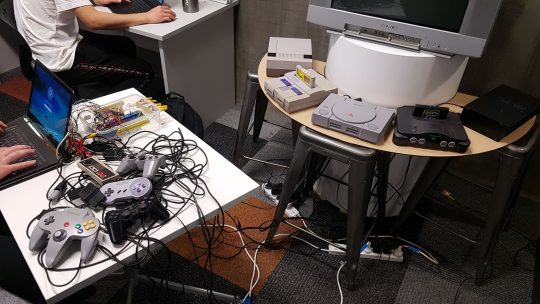
Tim and I will also start work on the installation now because at the moment it’s looking like this:

Our idea for the installation is to have one CRT on a plinth, all the consoles in a kind of cluttered semicircle around the TV, then another plinth with all of the controllers.
I think we are going to be using a lot of black cloth to cover the plinths, which Clint kind of despises, so I’ll be interested to see what he says about that...
0 notes
Text
Lots of old games
Kale has been scoring some old video game consoles, perfect for our installation. We also went on a bit of a road trip down to Thames to pick up 2 CRT TVs. The third CRT we need, we are borrowing from BCT and it’s very decent. It’s an old broadcast TV and would’ve been used for video production back in the day. The other 2 CRTs are pretty standard home TVs.
So now we pretty much have all we need for the installation. We just need to start creating the glitch transition tracks, wiring it all up and getting the installation sorted.

We have worked out that we need to create 20 transition tracks in total. We have 5 different consoles that we will be switching between NES, SNES, N64, PS1 and PS2, meaning 20 different transition tracks. The games we have chosen to use are classics for their console. Tetris for the NES, Super Mario World for the SNES, Super Mario 64 for the N64, Crash Bandicoot for the PS1 and Jak and Daxter for the PS2.
At this point, we have decided to show clips of the games accompanied by retro music that we will be creating. The AV switcher that Kale is working on will change the game and music associated.
Kale has been working on the coding and wiring of the AV switcher. Tim and I are assisting where we can, but it’s more his area of expertise so we are mainly focusing on getting everything else done.
We have been fiddling around with AV ports, changing between different consoles and the CRTs allow 2 inputs at once, which creates a really cool effect.
youtube
So we want to use this effect to our advantage, using is during the transition phase. This paired with the glitched tracks should create a cool retro, steampunk, glitch art thing that fits in well with our theme.
Tim and I will continue to create the glitches and tracks, once that is finished we will work on the physical setup of everything. All while Kale gets the wiring and code all setup. We will assist where we can, but it is mostly up to him at this point.
0 notes
Text
Xd progress
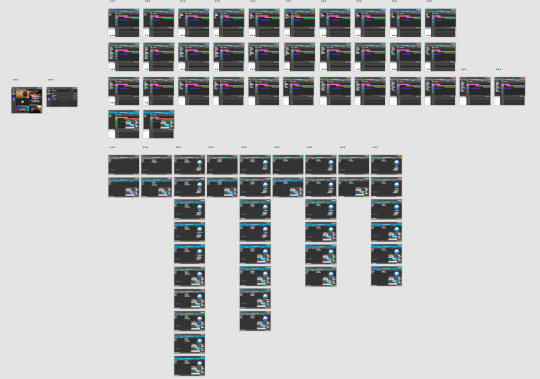
So I have been working on Xd these past few weeks. In my previous post, I brought up a couple of issues that I was having and unfortunately I was unable to resolve them. So I have had to stick with the original plan of creating something like 52 pages. I've linked them all together and made everything scrollable. Every home and back button works and every file and folder is selectable. I have not created the 104 artboards with dropdown menus, I’m debating whether its worth investing my time in rather than focusing on the Kickstarter. At this point, I really don’t think it is necessary, I have the key aspects and links working, dropdown settings menus aren’t really that important at this stage, plus we can include photos of them later on if necessary.
There are a lot of links between pages. Xd is a great program, but there needs to be a couple of improvements with dropdown menus and horizontal scrolling. I’ve enjoyed learning it but it has been a bit of a grind.
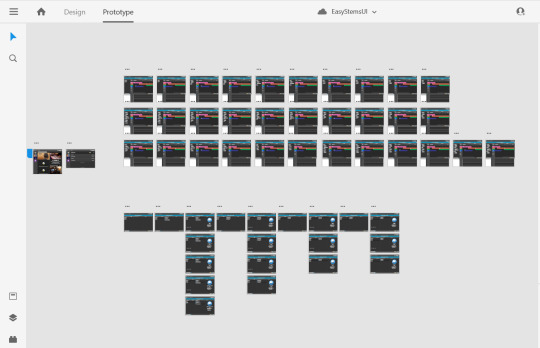
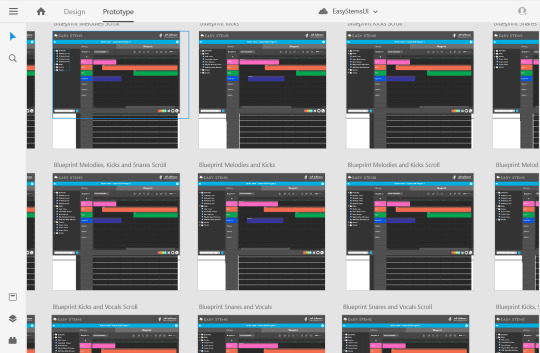
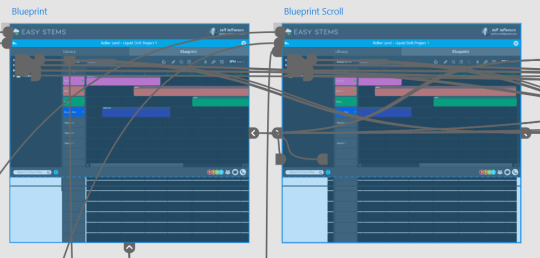
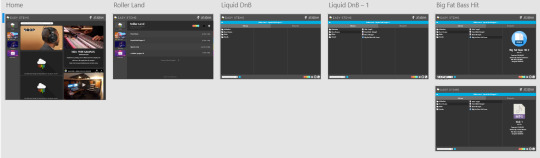
So these are all the artboards at the moment, all 54 of them. The two on the left are the homepage with a scrollable feed and the project picker. The group down the bottom is the library. I had to make a separate artboard for each file selection.
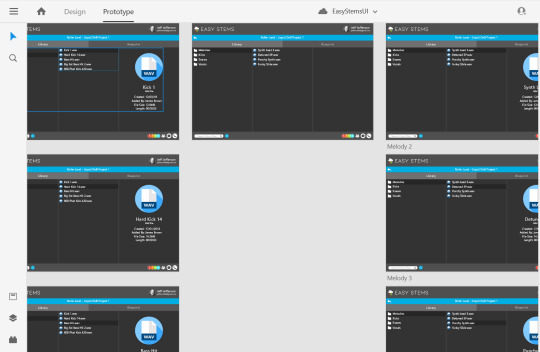
The board on the top of the screen in the first image are for the blueprint. Similar to the library screen, I had to create an artboard for each file selection but do it twice, as there is a scrolled board for each screen (if that makes any sense?). Essentially each blueprint screen requires a normal board, then a board that has been horizontally scrolled. And since there are a lot of blueprints screens, like the library, there ends up being a lot of artboards, 32 to be exact.
Again, I wish there was a more efficient way of doing it, but this is all I could figure out. Tutorials videos were all showing the same techniques that I have been using, but they were all creating more basic wireframes with less interactivity. Xd isn’t designed to create fully functioning programs, rather more basic prototypes and wireframes.
These are all of the links that I had to connect:
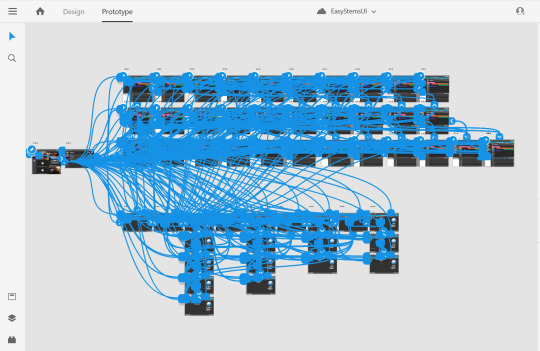
So yeah that took a while. I think I’ll leave it without the dropdown menus and come back and add them if I have time after sorting out the Kickstarter. For now, I just need to touch up the links and test if everything is working. Xd has been a great tool to use for our basic wireframing, but for the more complex stuff, I think I would actually have to code it and use a completely different program, but that is a bridge that we will have to cross when we get to it.
1 note
·
View note
Text
Adobe Xd prototype
I’ve made some pretty good progress on Xd. I’ve figured out how to link pages together, use animations and use the scroll feature.
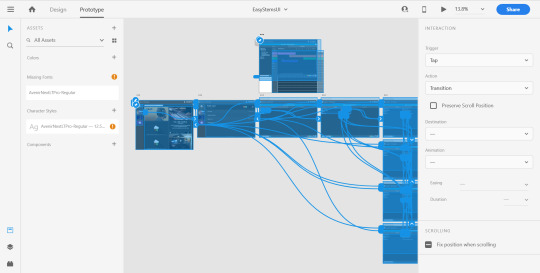
It’s a great tool, I’ve only run into two things that have slowed me down. Firstly, there is no horizontal scroll feature. We need this for the blueprint screen, so what I’ve had to do is add a drag transition between 2 artboards. This means I have to now create 2 artboards for each blueprint screen, the original screen, then the scroll screen. This is easy enough to do, but it adds a bit of extra work.
The second thing has really slowed the process down and may mean that I won’t be able to make everything interactable. This is that you have to create another artboard for each dropdown menu and selection and link them together. What would make it a lot better would be a feature where if a button is clicked, a certain layer pops up. I could then link this layer to each of the pages, rather having to make another complete artboard. For instance, if I want to make a dropdown menu for settings, I have to create a second whole artboard for the specific page. It's hard to explain but pretty much for the library page I have 20 artboards, one for each file selection, and if I wanted to create a single dropdown menu it would mean 40 artboards for just the library page, and that's only for one dropdown menu. If I wanted to make every button interactable, that would be over 100 artboards, and at that point, it becomes very hard to organize and link the boards together.
I’ve also worked out that the blueprint page will require 16 separate artboards for each file selection, then with the scroll pages, it will need 32, and if I am to put a single dropdown menu on the blueprint page, it would bump up to 64. So if I was to just add the settings dropdown on the blueprint and library, this would require about 104 artboards.
I may be doing this all completely wrong, there may be a much easier and more efficient way to do it but I’ve looked at tutorials and each one I’ve seen creates a new artboard for each dropdown menu and different selection.
So I’ll keep grinding this out. I need to create 52 artboards for each selection and scroll and this is without dropdown menus. I don’t think the menus are too important anyway, settings and social tabs are usually pretty similar. The main thing we are showcasing is the file selection and blueprint screen and these will all be functioning.
1 note
·
View note
Text
Updates and ideas for Final Studio
I’ve been pretty busy over the past few weeks hence the lack of blog posts. We’ve decided to change a few things for Easy Stems, mainly that we are going to create a wireframe of the plugin on Adobe Xd and that we are wanting to create a Kickstarter to promote Easy Stems. I’ve decided to take a step back from the research for now, as we have most of the information we need on the admin side of the program. I’ve taken on the task of creating the wireframe on Xd. I have never used Xd before so I’ll have to learn the program quickly so that I can get the wireframe all done by the end of the semester. Xd seems like a pretty intuitive program, so learning it shouldn't be too much of an issue. Tim has been working on a website design for Easy Stems, which I may also put into Xd if we feel like we need to. Oscar has been editing the CDD and other documentation related things ready for hand in, he’s also been assisting with a lot of the UI design.
So our idea for the showcase is to have a couple of plinths with 2 laptops. One laptop will display the Xd wireframe for people to play around on and the other will display the website design and other UI choices and info. We are also hoping to use one of the TVs to showcase our Kickstarter video.
So for now, I’m going to work on getting the wireframe working, hopefully, I can make everything interactable. It might be a bit difficult, as I believe you have to make a separate artboard for every single different screen, dropdown menu, file selected, etc. I’ll see if there is a shortcut but Xd is more for prototyping and wireframing the basic functions of a program, which makes it hard to incorporate more sophisticated things.
What I can do that makes things a lot easier, is drag the psd photoshop files straight into Xd, keeping all the layers, fonts, data and formatting. I can then create links between the different artboards very easily. I’ve got the basics of Xd down, I just need to work out scrolling and see if I can make dropdown menus easily.
I feel like we are very on track. We should definitely have everything done to a high standard before the showcase. We just need to keep going the way we are going and not slack off. I need to get these Xd designs done ASAP so we can all focus on the Kickstarter, the final task for Easy Stems before the showcase.
1 note
·
View note
Text
Pile of e-waste
For our Space, Image and Sound project, Kale, Tim and I have decided to group up and make a pile of e-waste that does stuff. We gathered inspiration from Clint’s initial lecture where an example showed a daisy chain of e-waste products as an installation (We have looked through all of the resources and couldn’t find the link anywhere. We think it's in Clint’s bookmarks, but not in the resources on Blackboard). Kale works at an e-waste recycling plant so gathering resources should be an easy enough task. Our idea is to create a cluster of electronics, kind of steampunk and retro looking, that allows you to experience different eras of retro game consoles.
Throughout the year Kale has been involved in recycling E-waste. This gives our group easy access to a lot of obsolete technology which gives us the potential to create an interesting project in the area of space image and sound. We want to explore the area of obsolete technologies and showcase them in a way that creates a grungy experience that will take people through a timeline to showcase how technology has evolved in a short space of time.
We did some paper prototypes and sketches to get a good idea of the physical installation we are going for.
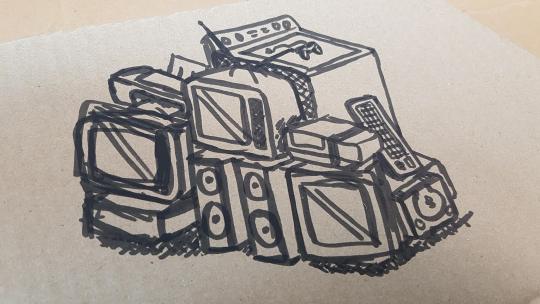
Tim drew this up and its a good representation of what we are looking at doing. Essentially, it is going to be a pile of electronics. The pile will include three CRT TVs that will display the selected era’s video game and speakers that will play the sounds associated. The idea is to look very makeshift, steampunk and cluttered, emphasizing the e-waste aspect. We next made a 3D prototype on cardboard to further our physical design choices.
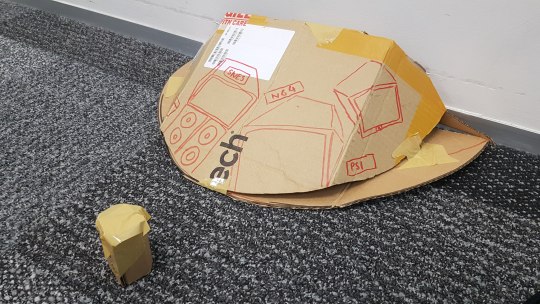
The big cardboard thing is the cluster of electronics. We are picturing it to be in a semicircle so it can be slightly more inviting and organized. The smaller cardboard thing is going to be a plinth with the era selector/switcher on it. This will be a selection of buttons labelled with each era on it.
The sounds and images will be manipulated based on the electronics that are being interacted with. The older electronics will create the quality sounds of their time - 8-bit sound/colour and the newer ones will create 16-bit, 32-bit etc. We plan to influence the output by using the existing hardware’s accessories and functions in conjunction with microcontrollers such as Arduinos and small computers such as the Raspberry Pi. We will create these tracks using 8 and 16-bit sample packs and, arrange the sounds to work with the visuals.
0 notes
Text
Subscription Model for ES
At this point, we have decided that Easy Stems will be freemium with a subscription model to pay for more advanced features/extra data. So I now need to work out suitable subscription prices and features that come with each tier of subscription.
Do we need to make advanced features premium? For now, we are going to make every feature available from the get-go, so you won’t have to pay extra for advanced features. This would be a sensible idea while ES is starting off, kind of like pre-release testing, where everything is free/low cost at the start and we see how it goes. So, for now, we will have users pay for a subscription if they require more storage space, the more they pay, the more data they get.
Splice has a subscription model similar to what we are envisioning, so it would be a good place to start looking. However, to get full access to the program you have to pay a monthly fee, you do get an initial free trial of 14 days.
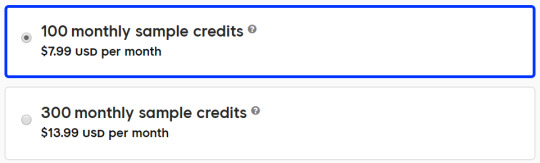
So $8 a month for 100 credits and $14 for 300. I believe that each credit can be used to download a sample, so 100 per month is quite a large amount for only $8. From this, it looks like Splice is very generous with their reasonably low-priced subscription model. The only drawback is that you have to pay to get access to the program, there is no free alternative for using Splice, so they would make up for their low prices with everybody having to pay the subscription. Google Drive is another good one to look at, as you get a free initial 15GB of storage then $3 a month for a massive 100GB, and $4.50 and month for 300GB.
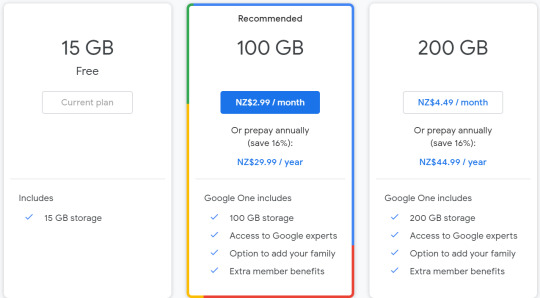
These are huge amounts of data for very little cost, but since Google has so many users, they can afford to offer low priced subscription models. I talked about Noiiz last semester, a program similar to Splice, they offer 1GB of downloads per month for $9.99/month and unlimited downloads for $99 a year, so quite a mixed subscription model with two extremes. 1GB of downloads isn’t too much when it comes to high-quality audio files, so going for the unlimited $99 option would be more appropriate for most users. This program doesn’t have too many options for subscription, either pay monthly for not much storage or pay a yearly, more expensive fee for more data. After looking at this, it makes me realize that more options are better, as users can choose an option best suited to them. With Google, users are given the option to pay monthly or yearly, and there are different tiers of subscriptions. Google is insanely successful, so roughly following its subscription model would be smart.
So for storage space, I have established around 15-20GB would be ideal, as this is what most successful companies offer, and it would allow for a lot of stem downloads. We’ll say 15GB for now (we can always change it). Now, we must offer a lot of options for subscriptions, but not too many, as this may overwhelm the users. This is just our initial subscription model and is subject to change. So for $10/month or $100/year users will get an extra 35GB of data bumping them way up to 50GB, a respectable amount of data. As a rule of thumb, tracks are about 1mb/min which means this would give users about 50,000 minutes of audio, but this would vary greatly, as high-quality tracks would take up a lot more space. The next tier of subscription would be $15/month or $150/year and this would bump users up to 100GB of data and the final tier, $20/month or $200/year for 250GB. We wouldn’t want to offer unlimited storage, as users could abuse this and take up a lot of the storage space that we would be renting out, resulting in a lot of extra costs.
Again, this is just a rough overview of what our subscription model would look like. A good idea would be to ask around and see what people think of this price. It is slightly more expensive than Splice, but that is because most people would be using the free 15GB that we are initially giving. Our aim is to give users the full Easy Stems experience for free but pay for any excess storage that they are using, as renting servers would come at a great cost to us.
References:
(n.d.). Retrieved from https://splice.com/sounds/settings
9 Keys to Building Successful Subscription Business Models. (n.d.). Retrieved from https://www.zuora.com/guides/nine-keys-building-successful-subscription-business/
Bogna, & Knychala. (n.d.). Noiiz Web Application. Retrieved from https://www.noiiz.com/
Sign in. (n.d.). Retrieved from https://one.google.com/storage?i=m
1 note
·
View note