
ShwóŋCast creates a new breed of internet radio broadcasting and monetization platform that helps internet radio professionals increase their listener base, lower their costs, and become successful.
Don't wanna be here? Send us removal request.
Statistics
We looked inside some of the posts by shwoncast and here's what we found interesting.
Average Info
Notes Per Post
2
Likes Per Post
2
Reblog Per Post
0
Reply Per Post
0
Time Between Posts
2 months ago
Number of Posts By Type
Text
3
Last Seen Tumblr Blogs


Fun Fact
Tumblr Inc. is funded by 13 investors.
Text
How to Broadcast Live Radio with Multiple Presenters
This guide focuses on a Windows setup. If you have a Mac please follow this link:
STEP 1: Download VoiceMeeter Banana
Download VoiceMeeter Banana. Voicemeeter Banana is an Advanced Audio Mixer Application endowed with Virtual Audio Device used as Virtual I/O to mix and manage any audio sources from or to any audio devices or applications.
Once installed restart your computer. Open the application in our desktop.
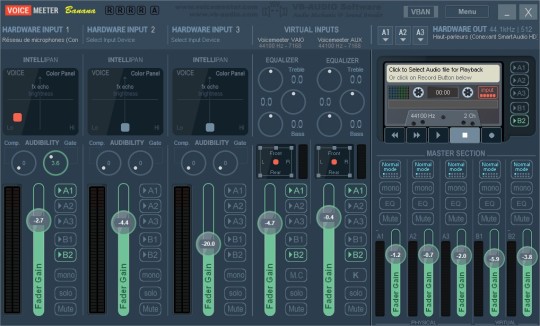
STEP 2: Configure VoiceMeeter Banana
Click on the label “HARDWARE INPUT 1”. You should have a popup list like the following:
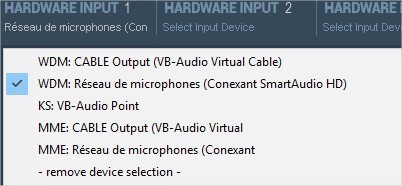
Select your microphone in the list. Here we are using the default microphone provided by the computer.
Note: It’s better to buy a microphone dedicated to your broadcasting.
Now click on the label “HARDWARE OUT” on the box “A1”. You should have a popup list like the following:
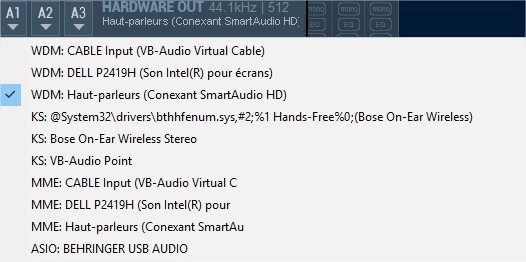
Here I selected my computer speakers as output for the audio.
Now let’s transfer all incoming data from the physical and virtual inputs to the output.
For each input you have the following panel:
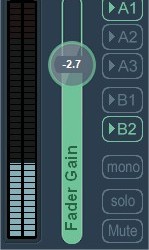
Using this panel you can control the volume of the input and where you want to transfer the audio data of that input.
For example in the above picture, I clicked on “A1” and “B2”. This means that I want to transfer the data of my microphone to the “A1” which is the computer speackers in our case and also transfer the same data to the “B2” which is a virtual output created by “VoiceMeeter Banana”.
You can use the same configuration for all your inputs.
Whe you install VoiceMeeter Banana it creates two virtual inputs like in the picture below:
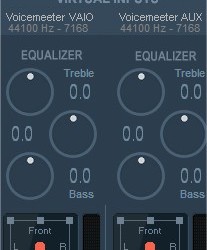
Let’s focus here on the “Voicemeeter AUX Input”. To make it simple, this is the virtual input on which VoiceMeeter Banana will captuer all incoming audio from your computer such as from Media Player or from YouTube on your browser if your are playing a video.
STEP 3: Inviting Guests Using Cleanfeed
Cleanfeed is a free audio streaming service for group chats. The idea is to use it as a group chat to talk with your fellow presenters or guests. Connect two or more people from Mac, Windows, Linux, or Android.

Create your free Cleanfeed account here.
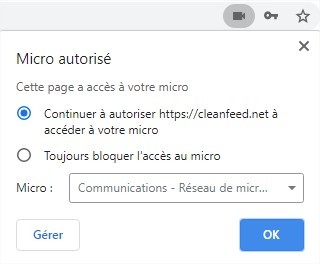
Cleanfeed uses your default microphone. Change this if you want to set it to an external mic by clicking the video camera icon in your URL bar, then choose Manage Media Settings.
Invite guests by selecting “Connect” and filling out your presenter's details.
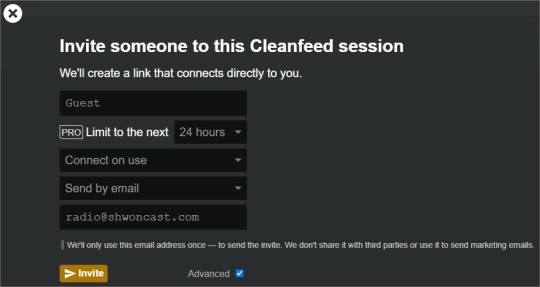
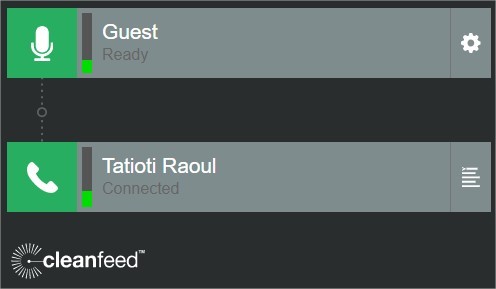
They should get an email with a Connect button, once clicked they will join the chat. You can invite more guests to chat on your radio show and manage their feeds in Cleanfeed.
STEP 4: Broadcast Live Radio with Multiple Presenters Using ShwonCast
Setup BUTT using this tutorial: https://shwoncast.tumblr.com/post/630887583085363201/how-do-i-broadcast-from-my-pc
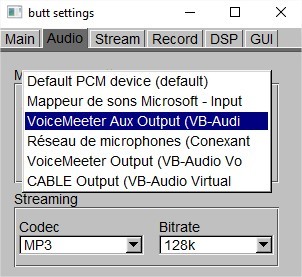
At the step where you have to select the “Audio Device”, select the “VoiceMeeter AUX Output” in the list as shown below:
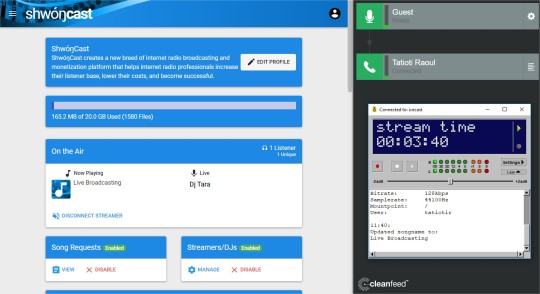
Connect to your station by clicking the play button in BUTT. Your computer's audio and your guest's audio will then be broadcast online.
As audio is grabbed from multiple channels your station will show the previous track info. Update this in BUTT within the Stream tab under Update Song Name Manually.
How did you get on? If you need a little bit of help then get in touch with us at [email protected]. If you're not with ShwonCast.com yet then you can start your station today for free.
#How to Broadcast Live Radio with Multiple Presenters#voicemeeter banana#cleanfeed#butt#How#to#Broadcast#Live#Radio#with#Multiple#Presenters
0 notes
Text
How do I Broadcast from my PC?
In this tutorial, we are going to show you how to broadcast live your radio content to the world through the ShwonCast application.
STEP 1: Download the application BUTT

BUTT is a broadcasting tool available on Mac, Windows and Linux for sending live audio from a source input to external application like IceCast and ShoutCast.
You can download it here: BUTT
STEP 2: Configure BUTT
In the main screen of BUTT click on the button “Settings” on the right. You’ll have the following screen:

In the “Server Settings” pannel, click on the “Edit” button.
You’ll have the following screen:
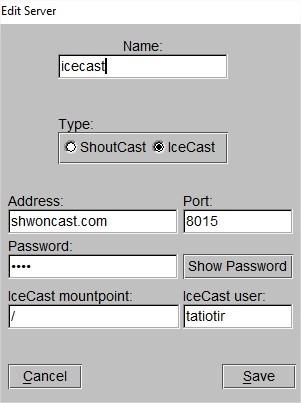
First give a name to the server you’re setting up
Then select “IceCast” in the “Type” section
Then fill the other informations depending on your radio setup at ShwonCast
Then save your changes
Note: The “IceCast” mount point is generally default to “/”.
Now go back to the “Settings” main screen and click on the “Audio” tab. You must have something like this:
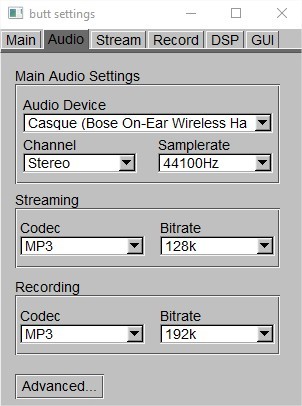
In the “Audio Device” dropdown, select your microphone. You can change the other settings to configure the quality of the audio.
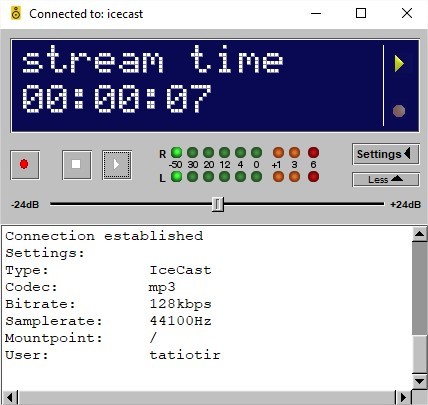
After tha go back to the main screen of BUTT and click on the “Play” button. BUTT will connect your to ShwonCast and you can then start broadcasting your content. Enjoy!
How did you get on? If you need a little bit of help then get in touch with us at [email protected]. If you're not with ShwonCast.com yet then you can start your station today for free.
0 notes
Text
How Do I Start My Own Radio Station?
A frequent question we get asked a lot here at ShwóŋCast.com is “How do I start my own radio station?”. For many, such a question can seem grander than it is like you’re trying to scale a ten ft wall in a single jump, but the reality can’t be further from the truth. Running your own radio station is easier than it’s ever been and we will show you how to get started in no time.
Thanks to advances in technology and a love for all things radio, we’ve designed a quick 5 Step Guide on how you can setup and get broadcasting in minutes. Our all-in-one platform gives you the tools to manage your music, collaborate with fellow DJs, and get heard by potentially millions of listeners online. If you’re eager to get your station up and running, then you can right now! Send us an email at the address: [email protected]
However, we recommend running through these steps first, so you know just exactly what to do. Get to know the equipment you need, how to set up your station, configure your software, and broadcast online.
STEP 1: Get Equipment
Traditionally professional radio studio setups are filled with high-end equipment like mixing desks and microphones, but that’s not the case for today’s current broadcasters. Contrary to what most people believe you don’t need a lot of expensive equipment to get going. What you do need is a computer or laptop, internet connection, and microphone.
Your computer, for example, will need to run relatively quickly to handle your shows when broadcasting live, so if it’s 5 to 10 years old, then it will get the job done. For the most part, ShwóŋCast.com does all the hard work, for example when you’re not live on air from your computer the system will take over. Shows are managed and automated in the cloud, so you can do things like creating and schedule playlists to broadcast at any time.
Your radio setup wouldn’t be complete without a microphone. Luckily there are a lot of different ones to choose from, such as the cost effective Behringer B1 or industry standard Neumann TLM 103. If you’re not quite sure which one is right for you, then we recommend getting some ideas by looking at Best Microphones for Online Radio.
STEP 2: Setup Your Online Radio Station
Before you start broadcasting online, you first need to setup a server. Radio stations live on servers over the internet which acts as a sort of hub for your stream, but they can be difficult to run and maintain by yourself. ShwóŋCast.com serves as an all-in-one solution that sets everything up, so you don’t need to worry about the technical side. Just choose a server and plan that’s right for you here.
Details are sent to your email address, so once you’re ready to get started, you can log in to your dashboard.
As demonstrated it’s straightforward to manage everything from your dashboard. Set your station online by uploading files as shown here, then click on the “Playlist” button in the “AutoDJ” panel in order to create some playlists. Uploaded music will begin playing, tune in to hear your stream live by clicking the play button in your "AutoDJ” panel control.
Amazingly that’s all it takes to broadcast online. Random music will be selected and played 24/7. However, you can organize tracks into playlists and schedule them throughout the day, week, or even month to add some structure to your station.
STEP 3: Configure Your Broadcasting Software
Now that your station is broadcasting you can take over anytime by going live. Connect from your computer using what’s known as “broadcasting software”. It’s a way for you to take whatever you’re playing on your computer and broadcast it live to your station online. Either if that’s talk or music, you can manage media and mix shows together out to your listeners.
There are different levels of broadcasting software available. Some are just encoders like BUTT and Altacast which just push your computer’s audio out to your station. While others like RadioDJ and Mixxx allow you to organize music to have greater control over your shows with features like playlist creation, EQ controls, faders, and DJ decks.
For newcomers, we recommend using BUTT as it’s straightforward and easy to set up. However, you can try Mixxx for a more advanced way to handle your shows. Follow either guide to setup your chosen broadcasting software, once done you’re ready to stream live from your computer.
STEP 4: Play Music & Talk Live to Your Listeners
Your station is set up to handle music for when you’re not around. However, you can take over anytime to play tracks or talk live using broadcasting software. Whichever way you choose, your listeners need to be able to find your station. Unfortunately, chances of that happening are slim unless you run your own radio website and they’re searching for your station name in particular.
A good way to increase your station’s visibility is by getting listed on Internet radio directories. Well established places like TuneIn and Streema have millions of active listeners, so they’re a great place to get discovered. Most directories have mobile apps so listeners can tune in on the move through iOS and Android devices. Alternatively, you can build your own custom apps with ShwóŋCast.com.
STEP 5: Make Money Doing What You Love
Running your own radio station can be a fun hobby, you can even turn it into a full-time business to start earning money. Now there’s no get rich quick or super easy way to cash in on your station as it takes hard work and dedication.
BONUS: Where to Find Music
As a broadcaster, you need places where you can discover music. It’s vital for your station to be up-to-date with what’s out there and to offer listeners new and fresh tracks. Luckily there are loads of places where you can find free to use and paid music.
Free to use for example means you can play tracks on your station as they fall under Creative Commons, so places like Jamendo Music and ccMixter are popular places to start. On the flip side classic tracks from bands like Queen and The Doors aren’t going to be on free to use sites, so you will need to pay for the music. Places like Amazon and Bandcamp are great to discover a broad range of old and new artists. Broadcasting paid for music like this requires some form of licensing or coverage for royalties depending on your country.
Check out ten more places where you can discover both old classics and new music here.
How Do I Start My Own Radio Station Today? With ShwóŋCast.com you can put all of these steps into action today. But don’t take our word for it, see how we’ve helped different types of broadcasters from hobbyists, entrepreneurs, and veterans get on the air here. You too can get up and broadcast in a matter of minutes by sending an email to [email protected].
2 notes
·
View notes