
samharrison99
Sam Harrison Character Modelling
35 posts
Don't wanna be here? Send us removal request.
Last Seen Blogs

fancypantshoodlum
Fancypants Hoodlum

chilean-harowota
The Chilean Harowota

indibebe
Indibebe

fnaf-monkeybread
Bake U in2 pastry

hyde13mr
Myke. EMT/firefighter/drummer, zombie enthusiast
Text
Character Bio Sheet
1. Character Name:Gyro
2. Nicknames/Alias
3. Gender: Male
4. Race: Diminutives
5. Age: 600 Years old
6. Height: 30cm
7. Weight: 5kg
8. Measurements: 10cm wide
9. Sexuality: Acts like a child
10. General Appearance: A rusty old robot, circle head, body made up of basic primitives, bolts and joints made from metal, small logo on chest and “No1” on back. Eyes (either one big or two tiny) grey metal with rust and scratches.
11. Eye Colour White or Blue
12. Hair Colour: NA
13. Hair Length: NA
14. Handedness: Exchanges arms and legs out regularly good with small repairs
15. Tattoos / Birthmarks: Small dent in head
16. Clothing Choices: NA
17. Place of Birth: The Doctors Lab in New York
18. Accent: NA
19. Residence: The ruins of new york
20. Key Relationships: The doctor who created the “robot put name here” but he left as the apocalypse begun, “Robot Name here” 2.0
21. Education: Programmed with 50 different languages and has hundreds of blueprints stored, for humans to create basic structures to rebuild humanity.
22. Skills: Learning AI, blueprint storage, build anything
23. Occupation: Scavenger
24. Role in Game: Main protagonist/ Scavenger
25. Phobias / Fears: Wolves, other scavengers
26. Bad Habits / Vices: Getting into trouble
27. Best Quality: Absolutely adorable, big heart, Cute
28. Worst Quality. Getting into trouble
29. Key Childhood Experiences: Playing with his creator
30. Key Teenage Experiences: Getting attacked by a wolf
31. Key Adult Experiences: Discovering another bot like him
32. Goals Motivations: Bring back humanity
33. Morals and Ethics: NA
34. Additional.
The robot does not speak, The robot is peaceful he is no fighter.
0 notes
Text
Referencing
Websites
Bethesda.net. (2018). Bethesda.net. [online] Available at: https://bethesda.net/en/dashboard [Accessed 25 Sep. 2018]. (Bethesda 2018)
Bestsciencefictionbooks.com. (2018). Robot Science Fiction | BestScienceFictionBooks.com . [online] Available at: http://bestsciencefictionbooks.com/robot-science-fiction.php [Accessed 1 Oct. 2018]. (Unknown 2018)
Borderlandsthegame.com. (2018). Borderlands.com - Home Page. [online] Available at: https://borderlandsthegame.com/ [Accessed 30 Sep. 2018]. (2K 2009)
Coron, T. (2018). Understand Disney's 12 principles of animation. [online] Creative Bloq. Available at: https://www.creativebloq.com/advice/understand-the-12-principles-of-animation [Accessed 29 Jan. 2019]. (Coron 2018)
Fallout 76. (2018). Fallout 76 | Our Future Begins. [online] Available at: https://fallout.bethesda.net/ [Accessed 1 Oct. 2018]. (Bethesda Fallout 2018)
Fallout Wiki. (2018). Yes Man. [online] Available at: http://fallout.wikia.com/wiki/Yes_Man [Accessed 25 Sep. 2018]. (Fandom Fall 2010)
Forbes.com. (2018). [online] Available at: https://www.forbes.com/sites/davidewalt/2011/04/19/what-is-portal-2-and-why-should-you-care/#540e09b62e1d [Accessed 23 Sep. 2018]. (Ewalt 2011)
Filmsite.org. (2018). Movie Robots - Illustrated History of Film Robots. [online] Available at: http://www.filmsite.org/robotsinfilm.html [Accessed 23 Sep. 2018]. (AMC 2018)
Graf1x.com. (2018). Color Meaning and Psychology of Red, Blue, Green, Yellow, Orange, Pink and Violet colors. – graf1x.com. [online] Available at: https://graf1x.com/color-psychology-emotion-meaning-poster/ [Accessed 1 Oct. 2018]. (Grafix 2018)
Half-Life Wiki. (2018). ATLAS and P-body. [online] Available at: http://half-life.wikia.com/wiki/ATLAS_and_P-body [Accessed 23 Sep. 2018]. (Fandom 2018)
IMDb. (2018). Real Steel (2011). [online] Available at: https://www.imdb.com/title/tt0433035/ [Accessed 23 Sep. 2018]. (Levy 2011)
IMDb. (2018). The Iron Giant (1999). [online] Available at: https://www.imdb.com/title/tt0129167/ [Accessed 27 Sep. 2018]. (Bird 1999)
Little White Lies. (2018). Why The Iron Giant is one of the most powerful superhero films ever made | Little White Lies. [online] Available at: https://lwlies.com/articles/the-iron-giant-20th-anniversary/ [Accessed 27 Sep. 2018]. (Bond 2016)
Movies 4 Maniacs. (2016). 3 Reasons Why Science Fiction is Film’s Greatest Genre. [online] Available at: https://movies4maniacs.liberty.me/3-reasons-why-science-fiction-is-films-greatest-genre/ [Accessed 1 Oct. 2018]. (Tordai 2018)
Metro Exodus. (2018). Metro Exodus | Home. [online] Available at: http://www.metrothegame.com/en-gb/ [Accessed 1 Oct. 2018]. (Deep Silver 2019)
Ratchet & Clank Wiki. (2018). Ratchet & Clank (2002 game). [online] Available at: http://ratchetandclank.wikia.com/wiki/Ratchet_%26_Clank_(2002_game) [Accessed 30 Sep. 2018]. (Insomniac 2002)
Stephen Hawking. (2017). Life in the Universe. [online] Available at: http://www.hawking.org.uk/life-in-the-universe.html [Accessed 1 Oct. 2018]. (Author Hawking)
StarWars.com. (2018). StarWars.com | The Official Star Wars Website. [online] Available at: https://www.starwars.com/ [Accessed 1 Oct. 2018]. (Disney 2018)
TV Tropes. (2018). The Iron Giant / Characters - TV Tropes. [online] Available at: https://tvtropes.org/pmwiki/pmwiki.php/Characters/TheIronGiant [Accessed 30 Sep. 2018]. (Tropes 2018)
The Verge. (2014). Making gaming's most obnoxious robot. [online] Available at: https://www.theverge.com/2014/10/21/7020189/borderlands-the-pre-sequel-making-claptrap [Accessed 30 Sep. 2018]. (Webster 2014)
The Hub. (2014). Genre Guide: Post-Apocalyptic Fiction for Teens - The Hub. [online] Available at: http://www.yalsa.ala.org/thehub/2014/10/21/genre-guide-post-apocalyptic-fiction-for-teens/ [Accessed 1 Oct. 2018]. (Hub 2014)
The Conversation. (2015). Philosophy and Fallout 4: what's the appeal of the post-apocalypse?. [online] Available at: http://theconversation.com/philosophy-and-fallout-4-whats-the-appeal-of-the-post-apocalypse-50759 [Accessed 1 Oct. 2018]. (Beard 2018)
2, P. (2011). Portal 2 on Steam. [online] Store.steampowered.com. Available at: https://store.steampowered.com/app/620/Portal_2/ [Accessed 23 Sep. 2018]. (Valve 2011)
Pixar Animation Studios. (2019). Pixar Animation Studios. [online] Available at: https://www.pixar.com/ [Accessed 23 Jan. 2019]. (Pixar 2019)
Pegi.info. (2018). Home | Pegi Public Site. [online] Available at: https://pegi.info/ [Accessed 26 Sep. 2018]. (Pegi 2018)
En.wikipedia.org. (2018). I, Robot (film). [online] Available at: https://en.wikipedia.org/wiki/I,_Robot_(film) [Accessed 23 Sep. 2018]. (Unknown 2018)
Wall-e. (2018). Characters. [online] Available at: https://maskingtapebracelet.weebly.com/characters.html [Accessed 30 Sep. 2018]. (Horsborough 2018)
Moodboard Images
Figure 1
ArtStation. (2018). Scrap, Ricardo Orellana. [online] Available at: https://www.artstation.com/artwork/n3xer [Accessed 25 Sep. 2018].
ArtStation. (2018). Sad Robot, Anwar Ali. [online] Available at: https://www.artstation.com/artwork/ow0Lq [Accessed 25 Sep. 2018].
ArtStation. (2018). March of Robots Challenge , Chris Lincoln. [online] Available at: https://www.artstation.com/artwork/PW1QZ [Accessed 25 Sep. 2018].
ArtStation. (2018). Scrapbots, Conny Nordlund. [online] Available at: https://www.artstation.com/artwork/nEbn4 [Accessed 25 Sep. 2018].
ArtStation. (2018). Dave Arredondo. [online] Available at: https://www.artstation.com/davearredondo [Accessed 25 Sep. 2018].
Figure 2
ArtStation. (2018). Robot Designs for 'Alpha-Ma', Dirk Wachsmuth. [online] Available at: https://www.artstation.com/artwork/qKNkN [Accessed 25 Sep. 2018].
ArtStation. (2018). Fredrik Hägg. [online] Available at: https://www.artstation.com/fredrikjh [Accessed 25 Sep. 2018].
ArtStation. (2018). Rain Robot, Kieran Russell. [online] Available at: https://www.artstation.com/artwork/LzDa0 [Accessed 25 Sep. 2018].
ArtStation. (2018). Wall-E, Linn Pennanen. [online] Available at: https://www.artstation.com/artwork/36vQo [Accessed 25 Sep. 2018].
ArtStation. (2018). Litterbug, Matt Dixon. [online] Available at: https://www.artstation.com/artwork/JXzld [Accessed 25 Sep. 2018].
Figure 3
ArtStation. (2018). Machinarium - Fan Piece, Mike Anciello. [online] Available at: https://www.artstation.com/artwork/3xZX2 [Accessed 25 Sep. 2018].
ArtStation. (2018). M.A.X Maintenance Robot, Perry Aire Senior. [online] Available at: https://www.artstation.com/artwork/ez4GY [Accessed 25 Sep. 2018].
ArtStation. (2018). "... c'mon Man where is that ball?!", Sebastian Belicki. [online] Available at: https://www.artstation.com/artwork/2kqPA [Accessed 25 Sep. 2018].
ArtStation. (2018). P-Nut, Trevor Goodwin. [online] Available at: https://www.artstation.com/artwork/ko3m6 [Accessed 25 Sep. 2018].
ArtStation. (2018). The Iron Giant - WIP, Yoel Pereira López. [online] Available at: https://www.artstation.com/artwork/VzQqZ [Accessed 25 Sep. 2018].
Images
Figure 1
Vignette.wikia.nocookie.net. (2018). [online] Available at: https://vignette.wikia.nocookie.net/half-life/images/9/9d/Atlas_P-body_fhp2.jpg/revision/latest?cb=20110519013122&path-prefix=en [Accessed 23 Sep. 2018].
Figure 2
Vignette.wikia.nocookie.net. (2018). [online] Available at: https://vignette.wikia.nocookie.net/dishonoredvideogame/images/2/25/Dishonored_2_clockwork_soldiers_01.png/revision/latest?cb=20160524002805 [Accessed 23 Sep. 2018].
Figure 3
20th Century Fox. (2018). I, Robot | Fox Digital HD | HD Picture Quality | Early Access . [online] Available at: https://www.foxmovies.com/movies/i-robot [Accessed 23 Sep. 2018].
Figure 4
En.wikipedia.org. (2018). Real Steel. [online] Available at: https://en.wikipedia.org/wiki/Real_Steel#/media/File:Real_Steel_Poster.jpg [Accessed 23 Sep. 2018].
Figure 5
Fallout Wiki. (2018). Yes Man. [online] Available at: http://fallout.wikia.com/wiki/Yes_Man?file=Yes_Man.png [Accessed 25 Sep. 2018].
Figure 6
Slate.com. (2018). [online] Available at: http://www.slate.com/content/dam/slate/blogs/browbeat/2016/09/08/everyone_misunderstood_brad_bird_s_the_iron_giant_which_is_not_about_guns/mv5bmju0odczmtgymv5bml5banbnxkftztgwmde0ntu3nje._v1_sx1777_cr001777818_al_.jpg.CROP.promo-xlarge2._v1_sx1777_cr001777818_al_.jpg [Accessed 30 Sep. 2018].
Figure 7
Vignette.wikia.nocookie.net. (2018). [online] Available at: https://vignette.wikia.nocookie.net/borderlands/images/b/b5/ClaptrapTPS.jpeg/revision/latest?cb=20151004033523 [Accessed 30 Sep. 2018].
Figure 8
Gb.images.s3.amazonaws.com. (2018). [online] Available at: http://gb.images.s3.amazonaws.com/wp-content/uploads/2012/01/WALLE.png [Accessed 1 Oct. 2018].
Figure 9
Filmandfurniture.com. (2019). [online] Available at: https://filmandfurniture.com/wp-content/uploads/2014/05/still-from-luxo-jr-pixar.png [Accessed 23 Jan. 2019].
Figure 10
Sideshowtoy.com. (2019). [online] Available at: https://www.sideshowtoy.com/assets/products/903344-groot/lg/marvel-guardian-of-the-galaxy-vol2-groot-life-size-figure-hot-toys-903344-08.jpg [Accessed 23 Jan. 2019].
Figure 11
Institutoric.org.br. (2019). [online] Available at: http://institutoric.org.br/wp-content/uploads/2012/06/WALL_E-Portal.jpg [Accessed 23 Jan. 2019].
Videos
YouTube. (2019). CGI VFX/3D Promo Spot : "Cute Robot" - by 3D College Denmark & Henrik Bjerregaard Clausen. [online] Available at: https://www.youtube.com/watch?v=4cq-frhj9YY [Accessed 17 Jan. 2019]. (TheCGBros 2016)
YouTube. (2019). CGI VFX Shorts : "Story of R32" - by A robot on a spotless journey encounters a new friend.. [online] Available at: https://www.youtube.com/watch?v=LVMl2ain-Rs [Accessed 17 Jan. 2019]. (TheCGBros 2 2014)
YouTube. (2019). D&W chasing balloons. [online] Available at: https://www.youtube.com/watch?v=WD_rSwkGzpI [Accessed 17 Jan. 2019]. (Wolfmommy 2011)
YouTube. (2019). Young kid chasing butterflies. [online] Available at: https://www.youtube.com/watch?v=q6rInajD9F8 [Accessed 17 Jan. 2019]. (Suzuki 2018)
YouTube. (2019). Guardians of the Galaxy Vol.2 opening scene || Baby Groot dance. [online] Available at: https://www.youtube.com/watch?v=B67TuUwghqE [Accessed 23 Jan. 2019]. (Mathi 2018)
0 notes
Text
Evaluation
Since the start of September I have been working on my character and animation,The idea for this project has never changed, The character I wanted to create has always been a robot. Robots have always took my interest, due to the fact that there is so many different designs which all do so many different things, I wanted to create my own design and come up with its own story. Gyro was created to be a cute robot that is very innocent and hates violence, the design for Gyro had to show this, after looking at many different designs for robots, I discovered that big eyes are key in a successful cute creature or robot for example, WALL-E. Then looking into the style and size of robots, I discovered that lots of robots that are cute are very plain and have limited features for example Baymax. After all the research, I applied this to my character designs to create Gyro. The original designs for Gyro had a more complicated design, the original design had a more humanoid look and was built of scrap parts, after a redesign I believed that the robot needed a more simple look, which I believed made the robot more interesting.

(Original Design)

(Reworked Design)
I took part in many classes that shown the creation of a human base mesh, As I was going for a robot my design would be different but it is important to know how to create all types of base mesh for characters as it may be needed in the future.
I started designing Gyro early as I wanted to get the design right. The design of Gyro is a ball design, Gyro uses ball joints to move different parts of the body, hence the name Gyro. This was a challenge because the joints had to look like they belonged on the character they could not be just placed anywhere it had to look right, after looking at the different joints on the body, I placed joints at the main joints that allow bending and twisting so the wrist, fingers, elbow and shoulder and also the knees and feet. The design had claws to start with on the hands but after looking at the design for the claws I decided that they would be difficult to animate, so I decided to remove the claws and add some hands and fingers to add ease to the animating, but it also added more detail to the robot and made him look more interesting and also give a more imaginary look to the robot.
The biggest challenge for me was the creation of the rig to control the parts of the body. I attended all the necessary classes to complete this rig but I just found it very difficult and complex. However after some help from my tutor and also from a youtube tutorial I managed to complete the rig to a high standard.
What went well for me is the character creation, I was very happy with how the character looked in the end, after texturing in Substance painter the final renders looked very good which I was highly praised for. The animation also went well as I kept adding more and more to push myself as I wanted it to be really good and entertaining and really show the characters personality.
What could of been better is the UV layout for the character, although this was easy to do, the character had a lot of separate parts which were different sizes so the UVs had to fit just right, but it was a struggle to get them to look professional.
If I could change anything about the character I would like to add further detail to the textures, the character is supposed to be 600 years old but only looks around 20 years old. The design needed more rot and rust coming from it but due to time constraints it was difficult. I would also like to add further detail to the mesh adding extra parts such as small weapons and also adding more detail to the ball joints, creating a more complex joint. I would like to add these changes to make the robot look more like a machine, the small details and large amounts of depth, however the final simple design for gyro looks professional and these changes would just be picking at small issues.
This project has helped me improve many skills within software and also my artistic ability. A new software has been used, 3D coat, 3D coat allows for easy manipulation of mesh, it allowed me to add further detail to my character such as dints and broken pieces of mesh, software such as Maya can not add this amount of detail so easily. When designing Gyro I decided to use photoshop and a graphics tablet to create my concepts, this helped me develop my digital drawing skills.
Overall I am happy with the end result of my character and animation, The animation is 32 seconds long which is a lot longer than the minimum 10 seconds and the character design looks professional and well done. I found animation and rigging difficult but I have managed to achieve this in the time I have been given. On a further note I would like to continue character modelling further to explore other character designs and not just robots.
0 notes
Text
Final Renders
Now that the rendering is complete, Each individual render has to be put together to create a video file. To create the video file Adobe Premiere Pro is used. Importing the renders in to Premiere using the image sequence option which adds all the images together and coverts them into a simple video file, once this is done the video is added to the timeline and exported out using the Vimeo preset, once that is done the animation is complete.
0 notes
Text
Rendering #1
This week I have begun to render out the full animation. To do this, I used the render sequence option in Maya and set the images to save to my folder for the renders. The process takes a long time and with my animation being 1200 frames the process had to be started as soon as possible as rendering renders out each frame individually which takes around 3 minutes per image at 1080p quality. This is quite fast because of my computer being high quality. so far it took 5 hours to render out 165 images, over the next 2 weeks I will continue to render the images in sections so that other projects can be worked on. After the rendering is done the images will be put together to make the final animation.
When rendering, the computer uses 90% of its power to render as quick as it can, making the computer usable for anything else. The rendering process is being done when I have to go to work for 5-6 hours, so that progress is made quicker.
0 notes
Text
Adding Textures and Polishing

This week I have had further feedback from my tutor about my animation, some changes had to be made to the hands and detail has been added to the textures.

The main change this week is that the mesh now has textures. After looking into using the animation in unreal, I decided to use Arnold in Maya to render out the animation as it makes the textures look very similar to how substance painter does. To do this I used a shader in Arnold called an AIsurfaceshader which allowed for extra attributes such as roughness maps and normal maps to be added through the use of one shader. The textures for the character were added and then I went back to substance to texture the cardboard box for the character.
After the textures were added I went back through the animation to clean up any unusual movements. The cardboard box had movement when the character jumped out, this was scrapped as it did not fit with the animation.
Now the animation was complete and the textures, i wanted to add some light to the characters emmisve parts so the eyes and chest, to do this, I used an area light to send a blue light from the characters eyes and a locator. A locator is like an anchor objects can connect to it and follow it around. The locator will not render so it is good for animators to use. I parented the lights to the locator and then parented the locator to the bones in the head.

Now that the textures have been added and clean up has finished, only thing left to do is render out the animation.
0 notes
Text
Animation Progress
This week a lot of progress has been made with the animation, the box that the character hides in now has a top that opens when the character collides with it.

The arms and hands have had further poses added to them to stop any strange looking bends in the animation, the goal is to make it look as real as possible.

The camera has also been animated, panning up towards the character when he is climbing from the box and also when he jumps out the box the camera zooms to the character to give the audience a better look at the mesh of the character.


The fingers have also been animated, each scene uses fingers differently, for example the scene in the box has the fingers grab the side of the box making it so it looks like the character has a strong grip so that he can push himself up.


The head and body have been animated now to go along with the rest of the animation, adding spins and crunch movements to make the animation more believable
Now all that is left for the animation is to go through and smooth out some key frames so the whole animation is smooth, then I will be looking at adding the animation into unreal.
0 notes
Text
Adding more detail to the animation

This week I have looked into adding further detail to the animation blockout that was created. First of all I created the animation camera which is what the animation will be filmed through. After a discussion with my tutor I decided to challenge myself further by adding more scenes into the animation. The character was very limited in the box as the audience will not be able to see much of the character that has been created. So now the character will fall into the box and then jump out giving the audience a full view of the character. The character jumps out with his head back to front so the character is confused and then grabs his head and spins it, making the character dizzy. Once the character has grabbed his head and moved it back he looks at the camera and gives a thumbs up.

The key poses for the character have been created and next I will be adding the detail inbertween these key poses to create a more natural and fluid looking animation.
0 notes
Text
Animation Blockout
This week the process for the animation creation has begun. The first stage is to begin the blockout stage, blocking out the key poses for the animation, Once the blockout is complete, any scenes the inbertween will be filled in at a later date. To create the animation in Maya the timeline is used to plot key frames at different times for the key poses.


The fingers and head are not yet animated as these are more detailed parts of the animation and will be sorted at a later date.
0 notes
Text
Final Rig

The rig has now been complete, after removing the FK, the rig is now just an IK set up, using the set driven key, the finger joints were used as a driver to allow the mesh to move around them, 3 main positions have been set up, A fist, a strain and an idle, the attributes started at 0 and went from -10 and 10 so all of the numbers in between can also be used for the animation. All this controllers for the mesh have been placed into the Master CTRL.


The rig is now ready for animation.
0 notes
Text
Finishing my Rig


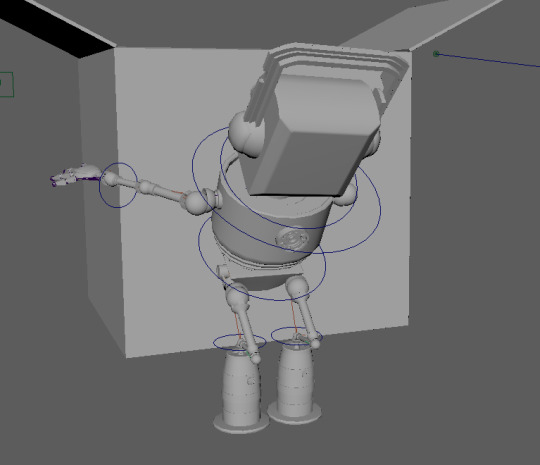
The character rig I have created controls different parts of my characters body. As mentioned in my previous post, I have set up the the IK legs with the controllers to allow easy movement. IK allows for multiple joints to be moved with one movement giving a more realistic look to the character when animating. This week I have set up the final parts for my characters rig, I started with finishing the IK rig setting up the chest controller and the head controller, for this I did not need to set up IK handles, the process was parenting the controller to the joint that controlled the head. I did the same for the hips, and created a spline handle for the spine, which creates multiple points which allow for the bones to bend at different points. Next I moved on to the FK arms, I duplicated my arm so that I would not have to delete the IK set up. Using the grouping method that was discussed in the last post I created the FK rings for 3 different parts of my characters arm, The shoulder, the elbow and the wrist, allowing for more precise control. The FK set up I have created may no be used, the animation that will be created is straightforward and does not require very precise movement, so The rig may just use an IK set up for a detailed animation. Set driven key is an easy way to set up quick animation, a “Driver” mesh is chosen which adds an attribute to the mesh that can control the “Driven” mesh a max number and a min number are used, so all the animator has to do is choose the position for the min and max and then the software fills in the rest. For example, create a cube and a sphere using the polygon primitives and use the cube as the driver, then select the set driven key menu and load up the cube as the Driver and the sphere as the Driven. The mesh allows for the animation to be translated or rotated or scaled, once the movement option is selected, the sphere is keyed at 0 then the control attribute is changed to -10 and the mesh is moved to another position.
0 notes
Text
Rigging Arms and Legs

Over the last 2 weeks, a lot of focus has been on setting up the rig for the arms and legs. For animating the arms, animators use two different types of animation, one called inverse kinematics (IK) and another called forward kinematics (FK). FK gives the animator more control over the different joints that are created, each joint has to be moved individually, the cons of this is that it takes longer to create animations however the pros are that it is more accurate when it comes to trying to animate a certain pose. IK is the opposite, IK allows for quicker set up when rigging and also allows for quicker creation of animation as once the IK is set up on an arm or leg it does not just move a single joint it moves all of them, so for example it allows for legs to bend easily to a crouching position by just pulling the joint down, while with FK, each bone would have to be moved individually.
Creating these controls can be a long process, unlike creating bones, controllers for rigs cannot be mirrored so each controller has to be created separate. To start with FK controls are created. (Duplicate arm) To start with a shape is created that does not use any polygons, a circle is used for this controller, any shape can be used. The shape is then put into a group and called “L_FK_Clavical_CTRL_Offset” then the circle itself is called “L_FK_Clavical_CTRL” then the group is parented to the clavical bone and all of the translations and rotations on the circle are set to 0 and then the control vertex are used to resize and shape the circle to fit around the joint that will be animated. It is important to note that the shape must have translations and rotation at 0, using the control vertex the shape will not change any translations or rotation, but just moving the circle with the normal move and rotation tool it will gain translation and rotations. Once the shape is positioned on the clavical then unparent the group from the clavical bone, then select the bone and the circle itself and use a constraint called “Orient” and apply it and then the clavical will be controlled from the controller.
The IK controller is easier to set up. To start, duplicating the arm and calling it “L_IK__Arm” Hide the FK controls and arms, then use a tool called IK handle click from the shoulder to the wrist and then that has created the handle. Call the handle “L_IK_Arm_handle” and thats the IK handle created.
IK and FK can be switched between easily by creating an attribute to switch between them using the value of 0 and 1, this allows for better looking animations using IK to create a more natural looking movement and FK to tweak and add further detail to the animation.

I have used this process to create IK handles for the legs on my character and also the arms, however I have not set up the FK on the arms yet and I will not be using FK for the legs as the animation will not need it. I also have not set up the switch yet for IK and FK, however my character has now started to be rigged.
0 notes
Text
Story boarding
1.Pixar Takeover

2. Dance Off

3. The Drone

4. Hello

These are the initial storyboards that have been created showing four possible animations that could be created. Each one was different, each one had to show the personality of the character which I believe these animations do. The Pixar takeover was the first idea, however the problem was that it does not show my character very much and focuses more on the Lamp character from Pixar.
Dance Off has a good comedy effect, performing different dance moves that are famous all around the world. However the animation would be difficult, i am not a strong animator so I do not want to be to ambitious with my project.
The Drone, A fun animation however it focuses on the drone to much and also has quite complex animation.
Hello, this animation is the animation that will be progressed further, this animation starts with Gyro hiding in a box and after a few seconds he slowly emerges and reveals himself, the end of the animation has him wave and say his name. I believe this really shows multiple different emotions for the character such as fear and cuteness and loneliness.
0 notes
Text
Character Parenting


This week I have began work on parenting my characters mesh together to create the different joints for the character. So the shoulder bone had to be the main parent which connected the rest of the bones in the arm. The way I remembered it was you cant move your arm without moving your shoulder. Once the shoulder was done the elbow was next. The elbow controlled everything on the arm apart from the shoulder, so from the elbow to the fingers would be one parent and then the wrist to the fingers then down to the joints in the fingers. The same method was used for the legs and the torso had a ball control at the bottom so I had to make sure the rest of the mesh moved around that ball which meant parenting the mesh to the ball. This is what I will be doing for now until I see which aspects of rigging I have to do next.
0 notes
Text
Rigging Practice 2

This week, I have began working on a few different parts of my animation project. First of all I started practicing on a character model, creating different control parts for the character. To make the progress easier, I downloaded a Maya add on (Script) called comet, comet adds new tools to make rigging easier and quicker for artists. To start with I had to create a master CTRL to allow easier movement of the character. Next I created a root CTRL using another circle, this is placed around the characters hips. This rig allows for all the different bones from the character to be moved easy. The pelvis bone set up allows for artists to rotate the hips to create a walking or running cycle. Setting up the spine used a IK (Inverse Kinematics) handle which creates vertex on each bone allowing for easy manipulation of bones, then creating a CTRL for each spine bone this allowed for ease of movement with the different parts of the body, The lower, the middle and the top. The CTRL parts would be parented to the different parts of the skeleton to make the character move. The steps for the spine were also repeated for the rest of the bones in the body.
0 notes
Text
Rigging_001 Bones Practice


This week, I have focused on creating a bone structure in maya for my character. First, to practice I used a free mesh from my tutor and followed how he created the Skelton for the character. The tools i used in maya were tools such as the joint creation tool which allowed me to simply click and select where I wanted bones to be created, once I created a set of bones, I would rename them so when it comes to animating and duplicating it is easier to keep track of what is what. I also had to parent bones to one another so that they connected up correctly. Parenting links bones together so that there is an overall bone that controls the rest so for example the arm would be connected to the arm bones. I also had to remap the axis on the bones so that they would bend and animate in the correct direction. Once that was complete I had to skin my character, to do this I had to create a selection so that it was easier to select the bones that I needed. Once this was done I used the bind skin tool which allowed me to combine the Skelton with my mesh which then allowed me to move the mesh’s arms and legs and so on, however it was not complete, the mesh required further adjusting as it was not very accurate with the binding tool, this week I will work on adjusting this so that the mesh is more accurate.
I also repeated this process on my character in my own time. Since the character is a robot and not human the character was easier to add bones too as the joints are visible making it clear where the robot will bend its arms and legs.
0 notes
Text
Principles of Animation
The 12 basic principles of animation were created by the Walt Disney Studios, Frank Thomas and Ollie Johnston worked for disney during the 1930s. These principles came from reflection over their work and through Disney desire to use animation to express character and personality (Coron 2018).
1. Squash and Stretch- This action gives a look of weight to a character as it moves.
2. Anticipation- Shows the audience the start of an action such as starting to run, jump or change its expression.
3. Staging- A pose or action should so the audience the attitude, reaction or idea of the character as it relates to the storyline.
4. Straight Ahead and Pose To Pose Animation- The Straight ahead animation starts at the first drawing and works on one by one drawing to the end of a scene.
5. Follow Through and Overlapping Action- Follow Through and Overlapping Action When the body of the character stops all the other parts continue to catch up to the central mass of the character, such as long hair and arms. (Coron 2018)
These are just a few examples of the principles of animation. (Coron 2018)
0 notes