
Statistics
We looked inside some of the posts by samarzukibct and here's what we found interesting.
Average Info
Notes Per Post
1
Likes Per Post
1
Reblog Per Post
0
Reply Per Post
0
Time Between Posts
8 days ago
Number of Posts By Type
Text
17
Last Seen Tumblr Blogs


Fun Fact
Total funding amounts to $125.3M.
Text
Digital Fabrication Index
Assignment 2 influence and idea: https://samarzukibct.tumblr.com/post/188485346268/digital-fabrication-assignment-2
Part 1: https://samarzukibct.tumblr.com/post/188485348003/digital-fabrication-2-part-1
Part 2: https://samarzukibct.tumblr.com/post/188485349568/digital-fabrication-2-part-2
Part 2.5: https://samarzukibct.tumblr.com/post/188485350408/digital-fabrication-2-part-2-new
Part 3: https://samarzukibct.tumblr.com/post/188485351208/digital-fabrication-2-part-3
Part 4: https://samarzukibct.tumblr.com/post/188485352078/digital-fabrication-2-part-4
Part 5: https://samarzukibct.tumblr.com/post/188485352963/digital-fabrication-2-part-5
Finished print: https://samarzukibct.tumblr.com/post/188485353913/digital-fabrication-finished-print
0 notes
Text
Digital Fabrication: Finished Print
The final print of my phone stand.


0 notes
Text
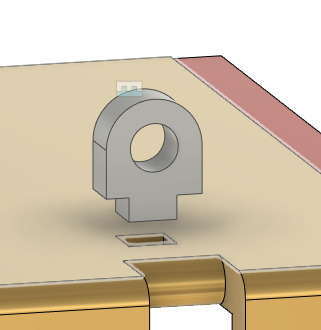
Digital Fabrication 2, Part 5
The second print was successful but I realised the Ring and Joint was way too tight of a fit, which I assume is because of the printer used since it looked like the cylinder on the Ring was slightly bigger than the hole on the Holder.
Another odd outcome was the base printed the same size as the previous attempt, but printed successfully. I decided to also save on cost by using my old parts since thankfully only the base had printing issues, and reprint another Ring component. But once I started printing, I figured that the average customer would probably have a larger phone than my own, so this way, I can have my physical model accommodate to people with bigger phones like the iPhone 11 Pro Max. So I went back to my save history and tried to find a good version before I scaled the model down, when I did I promoted it and then edited the cylinder sketch from 9mm to 9.9mm since I want it to be tight enough, but not too tight like the second print. I then gave just the Ring to Krishna to print, and the final result was a success!


Old Ring Print:

Final Ring print:

0 notes
Text
Digital Fabrication 2, Part 4
I started my first print and gave it to Krishna, unfortunately it was rather large and the print failed with the two holders not printing properly so Krishna shaved it off, and one edge “melted”. I later showed Charles my current physical prototype and he gave me an idea to make the Ring joint have the ability to stay in place where the uses pleases to set it, so I figured since 9mm made the print very loose, maybe having a tight fit can help fix my issue so I decided to make the cylinder fit exactly 10mm in diameter instead of 9.


For the next print I thought of scaling down the size of each component to make it smaller, and started printing again

0 notes
Text
Digital Fabrication 2, Part 3
Before creating joints I moved the two parts out and moved them next to each side of the base. Later I re positioned the hole I made earlier for the Holder, and made more holes as I figured it would be handy and not get in the way if the stand was adjusted to a lower angle. Or for other possible cable management preferences. Afterwards, I did a rigid joint for the Holder into one of the slots, and a revolute joint for the Ring to the hole on the Holder. I realised the Ring itself is rather thin so I decided to add 1 more millimeter of thickness on each side. Afterward I edited the joint restraints and thankfully now nothing is overlapped. I also moved my old joints of the legs to the end of the timeline to also help with printing the model as I was told by Krishna I need the components separated for printing.


0 notes
Text
Digital Fabrication 2, Part 2 (new)
I did a small joint experiment with the revolute joint before finalising my joints after I completed my model, and found out I had problems with the first version of the Ring when i tried to get the parts to rotate, I realise a part of the base for the Ring went into the base of my stand and the cylinder I drew was not centered correctly so I decided to delete it and start from the beginning. This time I created a new plane from the first part to easily get as accurate measurements. From here I created a 20x40 mm rectangle and extruded it out by 5mm. I used the hole from part 1 to create the circle on part 2 to get as accurate as possible for the joints later on. I then filleted the edges near the cylinder to allow freedom of movement when rotating side to side. I then recreated the rectangle for the ring (11x15mm) with the help of the center dotted lines to help make everything symmetrical. Afterwards I extruded it outward (15mm) and then added more thickness to the shape by 1 more millimeter.. Before I created the hole for the Ring, I drew two lines to make sure I drew the circle at the center of the rectangle. Later I deleted the lines and then made the hole for the Ring.


0 notes
Text
Digital Fabrication 2, Part 2
For the second part I created the Ring part of my idea, which started with a base rectangle of 40x20 mm. I then drew a circle of 9mm and then extruded it to 15mm upwards and joined it to the rectangle. I later created another cube which will act as the ring. I tried to “eyeball” approximate how big I can create the cube for the ring as I need space for the holder part to also fit. After measuring I realized the cube can be bigger so I decided to extend the side of the cube making it 15mm wide total. Later I started to fillet the base rectangle to allow it freedom to rotate. I also started shaving off 3mm on each side of the Ring because I thought it was rather thick. I did further tweaking on the Ring part before finally creating the hole (12 mm in diameter) for cables to pass through.


0 notes
Text
Digital Fabrication 2, Part 1
First I started by creating a new place at the back, then creating a cube for the part goes into the base of my case, the cube will have a hole of 10mm in diameter for the second part that will be made later. this hole will also let the ring part to move from side to side at the back of the case. Afterwards I drew another rectangle at the bottom of the part (titled Holder) that was extruded by 5 mm which will connect to the back of the stand. I then extruded more after to create a 5mm hole at the back of the stand. I also filleted the edges of the cube earlier to allow freedom of movement for the Ring later on as well.


0 notes
Text
Digital Fabrication Assignment 2
I decided to add on from my previous project with the smart phone and after much thinking, I wanted to create a removable “ring” at the back like the ones on phone cases (NotSocks, 2019) , but this ring will be for cable management that people could use to lead the charger cable or cables at the back of the case to the phone if it is on landscape, the ring will help lead the cable and possibly also help prevent the cable from getting tugged on other things on the desk, which can result breaking the cable, especially if people have a habit of bending the edge of the cable from head very sharp which can result in damaging the wires inside the charger. I want it to be able to rotate around for people with different needs and can direct cables in as many directions as possible. I also want the ring to be big enough for more than one cable to fit through, for example headphone cables as well. Smart Phone Ring Holder. (2019). Retrieved form: https://www.notsocks.co.nz/smart-phone-ring-holder?gclid=CjwKCAjwxOvsBRAjEiwAuY7L8uHyt0iKv-deMbYMLFVpTXQleuIDzpET_egeOTJTlaTbAOwjYIA2lBoC6yQQAvD_BwE
0 notes
Text
Digital Fabrication, Assignment 1
I originally wanted a phone stand for my phone but most sold are on a fixed angle. So I wanted to create one myself with an adjustable angle. This image helped me think of the basic design of the stand.

I used this image to help me approximate the size of how I wanted my stand to be.

Sage. S. (2012).Full iPhone 5 specifications (specs) in detail. Retrieved from: https://www.imore.com/full-iphone-5-specifications-specs-detail BuffaloCreates. (2018). Cell Phone Stand, 3D Printed, Cell Phone Holder, iPhone Stand, Desk Accessory, Cell Phone Stand for Desk, Tech Savvy, Buffalo Shop. Retrieved from: https://www.etsy.com/listing/624026572/cell-phone-stand-3d-printed-cell-phone
0 notes
Text
CTEC607, Studio III index
An index of all my blog posts this semester related to Studio III:
Research 7 Development: https://samarzukibct.tumblr.com/post/185510624443/smart-boy-research-development
Weeks 1-2: https://samarzukibct.tumblr.com/post/183260450923/the-smart-boy-studio-iii-weeks-1-2-recap
Week 3:
Wednesday: https://samarzukibct.tumblr.com/post/183442059018/studio-iii-week-3-wednesday
Week 4: https://samarzukibct.tumblr.com/post/183694264343/week-4-recap
Week 5: https://samarzukibct.tumblr.com/post/183957246378/week-5-recap
Week 6: https://samarzukibct.tumblr.com/post/183957400828/week-6-mon-thurs
Week 7:
Monday: https://samarzukibct.tumblr.com/post/184069303678/week-7-monday-studio-iii-over-the-weekend-i-bought
Wednesday: https://samarzukibct.tumblr.com/post/184175552138/week-7-studio-iii-wednesday
Thursday: https://samarzukibct.tumblr.com/post/184381918343/week-7-studio-iii-thursday-caleb-and-i-came-into
Weeks 8 & 9: https://samarzukibct.tumblr.com/post/184936180283/week-8-9-studio-iii-recap
Week 10:
Monday - Thursday: https://samarzukibct.tumblr.com/post/184936306068/week-10studio-iii-recap
Friday: https://samarzukibct.tumblr.com/post/185509718163/week-10-studio-iii-friday
Week 11:
Monday: https://samarzukibct.tumblr.com/post/185509733318/week-11-studio-iii-monday
Tuesday -Friday: https://samarzukibct.tumblr.com/post/185509785198/week-11-studio-iii-tuesday-friday
Week 12:
Monday: https://samarzukibct.tumblr.com/post/185509895228/week-12-studio-iii-monday
Wednesday: https://samarzukibct.tumblr.com/post/185509958193/week-12-studio-iii-wednesday
Week 13:
Tuesday: https://samarzukibct.tumblr.com/post/185510049923/week-13-studio-iii-tuesday
Wednesday: https://samarzukibct.tumblr.com/post/185510230363/week-13-studio-iii-wednesday
Thursday: https://samarzukibct.tumblr.com/post/185510278923/week-13-studio-iii-thursday
Friday: https://samarzukibct.tumblr.com/post/185510430633/week-13-stio-iii-friday-open-studio
0 notes
Text
Smart Boy: Research & Development
With the proper funding and connections, these are possible materials that have been looked into to create a more durable and lightweight Smart Boy. Casing Materials:
Carbon Fiber: Carbon Fiber (Oak Ridge, 2015) is a strong lightweight material that could be use as the Smart Boy’s exterior casing replacing ABS plastic. The advantages (ICE, 2015) of using a material such as carbon fiber is that it is lighter yet stronger than titanium. Its high temperature resistance gives an advantage of using the Smart Boy in high temperature areas. Carbon fiber is also a shock resistant material, which will advantage in protecting the hardware within the Smart Boy. Carbon Fiber is also resistant to excessive heat and is also chemical resistant, which gives it an advantage for users in extreme areas. And has low thermal expansion, which can help us avoid the case bending in production like the ABS plastic for the screen. A bonus feature of Carbon Fiber is that there are many ways of producing it, which can result in bespoke patterns on the casing.
Titanium: Titanium is an element as strong as steel (Webelements, 2019) but lighter, which can be used as the inner frame/chassis for the Smart Boy. Titanium is also resistant to very high temperatures and it is resistant to corrosion, which improves the Smart Boy’s build quality and longer lifespan of the product. The metal is also non-magnetic which helps it not attract unnecessary magnetic bits or affect any magnetic hardware.
Zirconium: Zirconium is a slightly stronger yet (Chambers. M, 2017) cheaper metal than Titanium, and more hypoallergenic. It is also capable of withstanding high temperatures and it is also used in places like nuclear industries as it has fewer attracting properties.
Sorbothane: Sorbothane is an industrial material (Sorbothane. Inc, 2019) resistant to fire and chemical solvents such as kerosene. Sorbothane has the ability to absorb more than 90% of shock energy and more than 50% of vibration energy, which can be very useful if used on the Smart Boy for military-grade Armor around the casing, just like how there is rubber around a shock-proof smartphone case. Sorbothane is capable of performing at temperatures as low as -29° up to 72° Celsius. Another advantage of using sorbothane as a shock absorbing material is that it does not support bacterial and fungal growth.
Slimmer: The use of exotic materials like Carbon Fiber as the main body of the Smart Boy will result in a very robust build quality without the disadvantage of the overall product to be bulky and heavy. And with the inclusion of Sorbothane, the hardware inside the Smart Boy will have a very low percentage of damage by external shock
Ergonomics: Strap/Brace Material:
Silicon rubber: Silicon rubber (branca. D, 2013) is a highly inert material that does not react with most chemicals. It is resistant to high temperatures and it is more comfortable and lighter than metal links. Silicon can also be shock absorbent as it is a type of rubber.
What could be better than Silicon is natural rubber which has more tensile strength than silicon.
Expensive divers watch also uses silicon or rubber straps in place of metal links, as it is resistant to low temperatures and can be resistant to water damage. The use of high-quality rubber or silicone can advantage the Smart Boy for grip yet comfort for the user, and its resistant properties gives it an advantage of easy cleaning of the strap if it is in contact with dangerous chemicals, and its high and low temperature resistance allows it to be durable enough to enter areas with moderately extreme temperatures.
Lithium Ceramic Batteries: Jacob shared with the group that a new type of battery called Lithium Ceramic Batteries (LCB) are being tested. When the group looked into LCBs we found out it is a perfect replacement for our current batteries, as it is strong enough to power the Smart Boy, but it is more compact, which means we can fit this type of battery within the enclosure, instead of having a separate battery enclosure. this will also reduce the weight of a future Smart Boy.
Lithium Ceramic Batteries (LCB) is currently a new innovative type of battery that might soon come to market (Dufresne. S, 2018). There are two types of these batteries, flexible (FLCB) and stiff (PLCB) batteries. The biggest advantage of this type of battery is that some are paper thin. The flexible LCB also allows us to possible have the whole battery on the arm strap. Another great advantage of these batteries is that the size of the battery is adjustable by cutting bits from it, like how we trim the edges of paper. Yet after cutting the battery, it will still work.
Colours: colour editing can be a feature to accommodate people with colour-blindness.
Accessibility: a small thumb mouse or trackpad on the arm wearing the Smart Boy to allow access to Smart Boy functions if the other arm is occupied or injured
References:
Oak Ridge National Laboratory. (2015). Carbon Fiber Technology facility. Retrieved from: https://web.ornl.gov/sci/manufacturing/cftf/
Innovative Composite Engineering. (2015). What is Carbon Fiber. Retrieved from http://www.innovativecomposite.com/what-is-carbon-fiber/
Webelements. (2019). Titanium: Uses. Retrieved from https://www.webelements.com/titanium/uses.html
Webelements. (2019). Zirconium: Uses. Retrieved from https://www.webelements.com/zirconium/uses.html
Chambers. M, (2017), Titanium vs. Zirconium. Retrieved from https://titaniumprocessingcenter.com/zirconium-vs-titanium/
Branca. D, (2013). What is the Best Strap? Rubber or Silicone Watch Bands. Retrieved from https://www.luxwatchstraps.com/blogs/lux-watch-straps-blog/lux-what-is-the-best-strap-rubber-or-silicone-watch-bands-blog
Dufresne. S, (2018), TESTING LITHIUM CERAMIC BATTERIES (LCBS), Retrieved from: https://hackaday.com/2018/09/15/testing-lithium-ceramic-batteries-lcbs/
Sorbothane, Inc. (2019). What Types Of Materials Are Best For Shock Absorption. Retrieved from https://www.sorbothane.com/what-types-of-materials-are-best-for-shock-absorption.aspx
0 notes
Text
Week 13, Studio III, Friday: Open Studio
The big day has finally come, and since I arrived first, I went to pick up the printing from Krishna, he told us the bottom of the lit bent a bit overnight due to the cold temperature but fortunately it was a very minor issue and we were able to continue as planned.
As Caleb arrived he assembled the screen casing onto Smart Boy. after the final assembly and Caleb did the finishing touches, we went to plug the Smart Boy in, however the head of the MicroUSB to fit into the microUSB slot in the Smart Boy. So what Caleb was able to do was cut off the head of the USB cable and “hotwire” the smart Boy by connecting wires to the sensor board, which thanks to his design, was able to power on the Smart Boy without any faults.
we all focused on finishing the writeup which took the rest of the day until a few minutes before Open Studio started. Thanks to Jacob’s design skills he was able to create a poster for us, which helped reduce the amount of pages on our draft. We decided the Research and Development list was too much for the draft so we left it out. I also suggested to Caleb to print out a spec sheet of all the components on the Smart Boy for curious visitors to know what specs are on the Smart Boy. After everything was complete we printed everything out and stuck them on our wall.
I also brought in a bunch of cardboard boxes that we could have used to create a stand, but a classmate offered up some leftover wood he found lying around, so I took it as I thought it could help create a stand, and fortunately enough it did. And the overall display looked moderately presentable.
For Open studio itself, lots of people found our idea really cool, and Laurent gave us the idea of having the screen at the bottom of the arm rather than on top as it could be easier for technicians to see the readings while their arms are occupied. We also had a technician very interested in our idea and near the end of the night he left us his email address and mobile number.


1 note
·
View note
Text
Week 13, Studio III, Thursday
In the morning when I arrived in town, I was messaging Caleb about what wall charger we should get, and I made a trip from The Warehouse and see what was available there, but there was nothing too promising. Fortunately the weather held up and I was able to walk to PB Tech and buy the one Caleb really wanted.
For the rest of the day I focused on making the Slideshow for the Smart Boy by filling out my parts for the Research & Development.
I was able to get Caleb to come in today and we decided to buy a black mattress sheet that could be good for covering the plinth we used, so we took a trip to The Warehouse and bought one. What we did not realise after coming back and trying to cover the plinth with it was that it was too small. So later on we went out again to Look Sharp and bought a large table cover, which fortunately was able to just cover most of the plinth. We also made a small hole for the USB charger to pass through for us to power the Smart Boy, and covered the excess hole with black electrical tape.
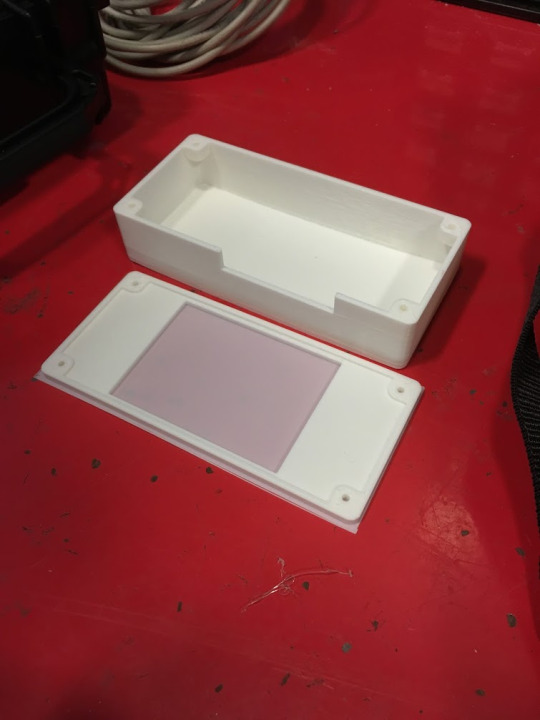
On the printing side, Krishna decided to reprint the case but in white, which we did not expect, but it looked good nonetheless. Caleb had to shave off a bit of the plastic to make it fit properly. The white print was also the reason why we went to buy a black sheet cover for the plinth.
were able to also talk to Jacob as we bumped into him on the way to look sharp, he was going to inform us that he was going to a net cafe close to the repair shop to finish and send the 3D file for the screen casing, which was later sent which Krishna was able to print later that night.
Also later today I showed Caleb the Google Slides file I was working on, and we decided to print all our stuff, so we then thought to put all the information I was able to find within this stressful week and include the research in our group documentation.
Caleb was also working on the final wiring for the sensor board in class and at his desk at home and added needed screws and other things to make the Smart Boy appear more clean.


0 notes
Text
Week 13, Studio III, Wednesday
Today was a rather mess of a day as Caleb was not able to come in due to the terrible storm, and we could not risk the Smart Boy to get water damaged. So in class I was talking to Krishna about the 3D printing, and told him of Jacob’s situation. Fortunately Jacob as able to email Krishna the file to check out, and thanks to Krishna for sending us his email for us to easily send the files over. There were some complications to the design which I did not understand much of, but from what I understood there were overhangs that will not print out properly due to the lack of support in some areas. So before Jacob was able to come in later in the afternoon I made some very rough possible sketches on paper in case we needed a plan B, that roughly was based of the first 3D printing we did, but thankfully we did not need to properly render my idea out. Though we hit a small roadblock where Jacob’s laptop broke down again after repairs yesterday, but thankfully Krishna let Jacob use his PC in the mech lab to tweak things as Krishna was discussing the issues with the model, and eventually the model was able to start printing. Krishna said he would print the model overnight at his place.
Later that night Caleb and I discussed equipment for Open Studio so at night while I and Caleb started typing up for the group documentation, as well as I started filling up the Slides with my research, we were discussing what we needed to buy, which was a wall charger which i plan to buy tomorrow when I arrive into town. We had a small discussion on what was a good one to use as Caleb would understand the specs of it needed to power up the Smart Boy.


0 notes
Text
Week 13, Studio III, Tuesday
The week of Open Studio and from Tuesday onward we all plan to attend class and get everything finalised and prepared. An unfortunate incident happened where Jacob’s laptop has broken down, and we needed it to finish the 3D render ready for printing, however fortunately we used Autodesk Fusion 360 for the 3D render so all the data is fortunately saved on the Cloud. Another problem happened where Caleb’s scooter got a really bad puncture on his tyre, fortunately he was able to mend the punctured tyre. Later in the day Jacob focused on going to a tech shop and get his laptop fixed as it is a priority, so when Caleb arrived into Studio I proposed the idea that we should start seriously planning on the group documentation write-up draft needed for this Friday. So I was reminding Caleb a good amount of times in and out of Studio to get a Google Drive folder set up and shared so we can easily access any online files.


0 notes
Text
Week 12, Studio III, Wednesday
Today I had to contact jacob and Caleb individually to make sure they both meet up, other than that jacob and I had a small discussion in studio on how to present our slideshow or printout. I found a good enough template from Google Slides we could use for information and slides on individual research of materials that I have been looking at for research and development.


0 notes