
Don't wanna be here? Send us removal request.
Statistics
We looked inside some of the posts by rioadelesphotogaphictechniques and here's what we found interesting.
Average Info
Notes Per Post
0
Likes Per Post
0
Reblog Per Post
0
Reply Per Post
0
Time Between Posts
3 days ago
Number of Posts By Type
Text
7
Photo
8
Link
2
Last Seen Tumblr Blogs


Fun Fact
12.7% of mobile users access Tumblr.
Text
Evaluation
During this ‘photographic techniques’ project I have delved into the world of macro photography and studied its techniques and styles. I have learned further skills required to produce an informative leaflet explaining macro photography to an audience that may not have any knowledge on the subject. Accompanied with a personal presentation.
Whilst doing this project we, as mentioned in the weekly journals, were required to produce a series of triptychs. This enabled me to practice both my photography skills, and my presentation skills as we had to present our triptychs to the rest of the class each week. We had live, ongoing feedback with these triptychs. This gave me an insight into the opinions of the audience and could enact the criticism given to produce a better final product.
My research on macro photography allowed me to further my own knowledge greatly on the topic. This, in turn, meant I was confident that I could inform anybody about macro photography and answer any questions anyone would have beyond the information already provided to them. I was particularly intrigued by Don Komarechka’s work and will continue to study his artwork in future.
The photographs I took for the project were good, but I do feel they could be improved. They did require editing in post and didn’t have quite the amount of sharpness required. The subjects were slightly too blurry, but they were still recognisable and certainly weren’t poor quality. This was my first real attempt at significant amounts of macro photography.
Perhaps, with hindsight, taking the photographs outside using the natural light available with reflectors or white card to bounce the light it may have had better exposure. With this said though, I am pleased with the outcome given the circumstances: I was limited with the equipment I had available and limited with where I could go to take images due to Covid-19.
With regards to the leaflet itself, I am extremely satisfied with the outcome. I had prior experience using ‘Canva’ (the platform to create the leaflet). I used this platform to create logos and designs outside of my college work. This gave me a strong starting base to work from.
The layout of the leaflet was very pleasing; the information was concise but not lacking anything. I had also intended to add my own personality into the leaflet, to make it a bit quirky. I feel I did this perfectly and the leaflet wasn’t just a big block of information but was also engaging, colour coordinated with the photographs (the green & white scheme mentioned in the previous journal entry) and well laid out. I deliberately didn’t include all the information from my research as I wanted to leave enough to expand on with the spoken presentation. I also chose to print the leaflet onto card, rather than paper, to give it a more professional feel.
On the topic of the presentation, I was simply elaborating on parts of the leaflet. Expanding on the points I had already made and providing a greater depth of knowledge on the topic. My presentation was three A4 pages long and I managed to cover every facet I felt necessary within this. I am also particularly pleased that I was within the time frame given to present. During the presentation I projected my voice well, changed tone to keep interest and, like the leaflet, added my own personality to it. I was holding the sheets of paper throughout the presentation but managed to avoid simply looking down and reading what was in front of me rather than looking around the room and engaging the audience.
Following the presentation, I was given feedback from the class, all of which was positive.
- “A lot of information but wasn’t super overwhelming which made it easy to follow along”
- “Fantastic, all the information was there to get into macro photography, I have definitely learned something new”
- “Fluent, your images show the inspiration from the artist”
- “Great inspiration” - “The photography is amazing”
- “The leaflet was accurate and down-to-a-tee"
- “If I saw this at a job fayre, I would pick it up”
- “This has really informed me on macro photography”
- “The layout is very pleasing, easy to navigate and flows well”
-“Amazing layout”
This feedback ultimately makes me feel very proud of my work and I honestly feel I have excelled in this project. The feedback vindicates me in this feeling, and I am certainly going to continue taking macro photographs in future and want to hone my skills within. It is a technique I will use not just professionally but for personal use as well.
0 notes
Photo


My final piece
(Macro photography leaflet)
0 notes
Photo

My macro photography
ISO: 100 Aperture: 4.2 to 5.6 Shutter speed: 1/60 to 1/80 White balance: fluorescent Tripod: yes Flash: no
0 notes
Text
Photographic Techniques/Genres Week 5 Journal Entry Wednesday 10th February
During these two weeks we weren’t asked to produce any further triptychs. This allowed me to begin work on my leaflet with the research I had gathered previously. My chosen platform to create the leaflet is www.canva.com. I have paid a fee to get a premium subscription to unlock all the features and enable me to create a better and more aesthetically pleasing leaflet.
I have two thoughts regarding colour schemes: rainbow or green & white. I have paid attention to the colour wheel to try out a few different complimentary colours. Furthermore, I am also considering the placement of the photographs I have taken and the size and spacing of the text. There’s a lot to get into a relatively small area.
To take the photographs themselves I have used a Canon 1300D with a macro lens. Taking inspiration from an artist, Don Komarechka, who I’ve researched and mentioned in my proposal. I have refracted images within water droplets.
All the photography was taken indoors by placing two lanterns either side of a desk and suspending a long, thin piece of bamboo across the gap. I used a paintbrush to dab a mixture of water and oil onto the bamboo to create four individual droplets. These were placed as symmetrically as possible. It took a few attempts to get the droplets to behave.
I set artificial lighting behind myself, meaning it was facing the subjects. There wasn’t enough natural, ambient light entering the room. Most of the subjects were plants, flowers or cacti. This meant all the subjects were refracted, as mentioned previously, within the water droplets on the bamboo.
ISO: 100
Aperture: 4.2 to 5.6
Shutter speed: 1/60 to 1/80
White balance: fluorescent
Tripod: yes
Flash: no
I took several photographs but only six are being used. These were edited in post correcting such things as vibrancy, sharpness and exposure. I didn’t use any focus stacking, despite it being mentioned in the research, because the subject didn’t need to look more 3D as the refracted images in the droplets were the focus of the photograph. This is something I will experiment with in future and have mentioned in the leaflet nonetheless.
I have now completed the leaflet and have started writing the presentation notes to elaborate on many of the points and paragraphs within the leaflet. The week commencing the 22nd of February I will be presenting my leaflet to the class in person. This presentation will take 10 minutes and as such I have practiced with my partner, using a stopwatch, to make sure I am not under or over the allotted time.
0 notes
Text
References
https://petapixel.com/2019/06/05/shooting-water-droplet-refractions-for-magical-macro-images/ Spencer cox. (2019). Everything You Need to Know About Macro Photography. Available: https://photographylife.com/macro-photography-tutorial. Last accessed 12th February 2021.
https://en.wikipedia.org/wiki/Wikipedia:Text_of_Creative_Commons_Attribution-ShareAlike_3.0_Unported_License. (2021). macro photography. Available: https://en.wikipedia.org/wiki/Macro_photography. Last accessed 12th February 2021. Herbert, J. F: Necrology: William Henry Walmsley (Born October 12th, 1830-Died October 22nd, 1905). Trans Am Microscopical Soc Vol 31, No 3, Jul 1912. https://en.wikipedia.org/wiki/Macro_photography https://digital-photography-school.com/a-beginners-guide-to-focus-stacking/ https://www.theartcareerproject.com/careers/macro-photography/ https://www.better-digital-photo-tips.com/macro-water-drop-photography.html
0 notes
Photo
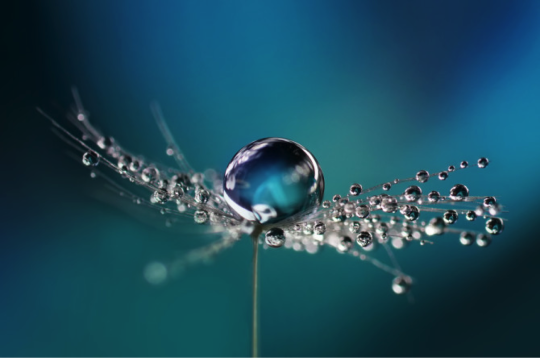
Water droplet photography
Water droplets can add a magical element to macro photographs. There are several moving parts to consider, but the basic concept is simple: a spherical droplet can act like a lens, refracting light from whatever is behind it. Something as simple as a twisted blade of grass covered in fine droplets can make for a fascinating composition, but these photos reveal one of the problems facing all macro photographers: the depth of the field becomes so shallow that it does not reach to the depth of the blade of grass. We realize the rewards of a soft and smooth background, and some images can survive with such shallow depth, but focus stacking is the answer if you want perfect additional details. Focus stacking is a strategy that allows you to stretch your depth of field by moving the focus very slightly, covering an overlapping range of focus. The more additional frames you add, the deeper the depth of the picture. We want the best of all worlds: avoiding a messy background and having the desired sharpness everywhere, while avoiding diffraction problems at the same time. Lighting is another essential factor here - the droplets must "glow." For this reason, off-camera flashes or bright LED flashlights are used to illuminate the background rather than the foreground. The foreground does not have to be entirely silhouette, but for the best performance, a certain degree of control is important. Fortunately, a piece of card will cast a shadow at the right position without disturbing the light of the background. There are some obstacles that need to be established also, the smallest water droplets evaporate very rapidly, they can vanish in less than a minute depending on the relative humidity in which you work. Aligning the camera around the droplets can makes it time consuming and sometimes cumbersome for the tripod.
There are generally two main types of water droplet macro photography.
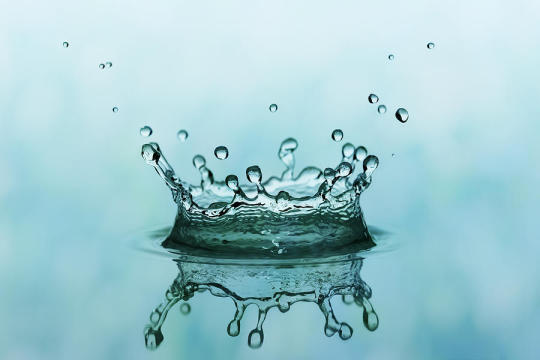
WATER SPLASH PHOTOGRAPHY
HOW TO PHOTOGRAPH WATER DROP SPLASHES
- Use a 100mm macro lens or longer.
- Light with a flash to freeze the motion and a reflector or a second flash.
- Get a flow regulator from an aquarium supply store to help with the right timing.
- Prepare to use patience and persistence as the exact timing for the perfect moment is challenging.
PHOTOGRAPHY OF STATIC WATER DROPS
HOW TO TAKE WATER DROP PHOTOS
- Find a colourful subject for the background and aim your light at it, not the water drop.
- Use glycerine, honey or oil and water mix to form rounder water droplets.
- Get really close with a macro lens, extension tubes, or screw-on filter.
- Use the correct height for your tripod.
0 notes
Photo


Artist Research
Don Komarechka is a nature, macro and landscape photographer located in Barrie, Ontario, Canada. From auroras to pollen, insects to infrared, much of Don’s photographic adventures reveal a deeper understanding of how the universe works. Exploring the world that we cannot see with our own eyes has been a common thread in Don’s career as a professional photographer.
Don teaches workshops in the areas of nature and macro photography, as well as photographic editing and creative compositions. “Photography is about sharing your unique view of the world with others – without using words. Helping others accomplish the same goal is extremely rewarding. I like to see the world through my camera in ways I normally cannot see with my own eyes. Seeing the world beyond vision is a gift that photography gives me.”- Don komarechka Don’s first mass-produced book, Sky Crystals: Unravelling the Mysteries of Snowflakes shows his attention to detail and desire to understand the world around him. He has been featured in an episode of The Nature of Things with David Suzuki. A 2017 limited-edition one-ounce pure silver $20 coin produced by the Royal Canadian Mint features one of Don’s snowflake images. His work with snowflakes was also featured in the Canadian Science and Technology Museum in 2017.
Don worked with BBC to create the title footage for the documentary series “Forces of Nature”. Credited as a macro photographer in the Discovery documentary “Mosquito”, his ultraviolet fluorescence imagery and complex focus stacking was used extensively in the film. Contributions have also been made to the upcoming National Geographic series “One Strange Rock”. Photographing some mosquitos in ultraviolet light can show more detail than they do in visible light. Usually, ultraviolet light is used for forensics purposes. Some species patterns glow and some of their markings glow.
Always science-minded but never formally trained, Don uses photography as a way to explore and understand the world around him. Photographing something unusual or unknown is the perfect excuse to learn something new. Don’s work often pushes up against the technical limitations of modern camera equipment and the physical limitations of light itself. Eyes of Nature
Produced using water droplets on a spider web and holding a flower in behind (anyone know the name of this flower, by the way?), each water droplet acts as a lens and refracts the image of what’s behind it.
He used focus-stacking techniques to get more in focus, I believe this is 12 frames combined to get it sharp across the board.
Nature is always watching! The dark centre of this flower is what makes up the background of the image, providing great contrast against the refracted images. The largest water droplet in this image measures just under 1mm in diameter, the smallest is about 28 microns (0.028mm). Spring Jewel
A single water droplet, suspended in the pedal of Gerbera Daisy, refracts a Chrysanthemum flower placed in behind.
The effect turns the droplet into a jewel, showcasing the beauty of spring. In the smallest place's nature can be wonderful, even while sitting on your kitchen counter. - Don Komarechka
This image was made with an off-camera flash and special attention was paid to avoid the flash reflection in the tiny water droplet.
0 notes
Text
Career paths
A macro photographer may devote the majority of their career to this special form of photography, or may combine these skills with other types of photography careers. Some nature photographers and wildlife photographers, for instance, may use macro photography techniques and equipment to capture some images.
As with other types of photography, a macro photography career typically involves finding and photographing subjects. Macro photography subjects can often be found all around us – on our bodies, outside in the grass, or even floating down from the heavens. A macro photographer will often quickly learn to look a little more closely at the world around them, sometimes squinting if necessary. In order to get great photographs, a macro photographer will typically need to use special photography equipment. This equipment must also be properly maintained and carried for long periods of time.
Macro Photographer Education & Training Requirements
Because of the specialized knowledge needed to be a great macro photographer, formal training is almost always a requirement for anyone seeking a macro photography career. Many macro photographers will begin their education with a 2 or four-year degree program in photography. Besides learning the fundamentals of photography during this type of degree program, students will also usually be able to choose to take several elective photography courses.
Photographers interested in macro photography careers should considering attending a photography school, and choose a photography school that offers courses in macro photography. These courses will often enable students to learn about the special challenges of macro photography and the different techniques and equipment that can be used to overcome these challenges.
Macro Photographer Salary & Job Outlook
Salary
Due to the specialisation of macro photography, data is not collected on an expected or average salary for a macro photographer. However, in the UK, traditional photographers made an average annual salary in private sectors between £17k - £35k. It is worth noting that many photographers' incomes can largely vary, due to commission-based work and many photographers working on a self-employed basis. Job Outlook
In general, the majority of professionals who pursue macro photography careers work as freelancers. They will often shoot interesting macro photographs, in hopes that certain magazines might buy their work. In today's increasingly digital age, the Internet explosion allows macro photographers to sell their work as stock images. Some businesses might also hire particularly talented macro photographers as staff members as well. Scientific journals and magazines or advertising agencies, for instance, might hire macro photographers as staff photographers, either full or part-time.
If you want to start to earn money as a macro photographer you need to get your images out there so people can see them and then buy them and to get your name established. Where and how you sell your images will depend on the types of images that you take because some images will sell better in some areas than others.
The top 7 things that you need to do to start earning money are as follows:
Get a great portfolio or macro shots
Have your website up and running
Brand Your name
Get yourself known in the field
Place your photos where they can be sold
Networking
Professional level equipment.
Where to Sell Your Macro Photography
You can sell your macro photography images in all the traditional places
Stock libraries (online) Stock libraries are still a popular way to sell photos. Due to their popularity, they can become saturated so finding unique images that sell can be difficult but it’s worth exploring.
From your website If you want to you can sell images directly from your website by setting up a payment system.
Clients As a freelancer, your clients can come from any industry or background. You may find yourself and the technological industry taking pictures of microchips or may be asked to take pictures of jewelry or even parts of animals etc.
0 notes
Photo


Equipment
There are many different pieces of equipment that are needed to benefit you in your macro photography journey. Here are some examples of equipment you might need to get started: -Macro lenses Both Canon and Nikon offer macro lenses that can be used both for macro and general photography. They are specifically designed for close-up work, with a long barrel and optimised for high reproduction ratios. These are among the most popular tools for macro photography. Many modern macro lenses can also continuously focus on infinity and have excellent optical quality for normal photography. - Extension tubes Macro tubes are circular elements that link the camera to the lens. The rings do not have any optical components, so they do not take any clarity away from the image. If you want to be innovative, you can also make your own macro tubes using long cylindrical tubes, such as a Pringles can.
- Lens reverse The reversal of the lens is another inexpensive way to obtain macro capabilities. A lens is usually reversed with a reversing ring, but if you're more concerned with fun than consistency, you can try out free lensing. Free lensing is a technique that can be used with any camera that accepts interchangeable lenses. You detach the lens from the camera and focus by tilting the lens in different directions, as well as by moving the lens closer and farther away from the camera body. - Tripod You have a very limited depth of field when you shoot macro, often as narrow as 0.5 millimetres. Every change in the camera to object distance is crucial with that shallow depth of field and can throw the subject into the blurred area so you want to ensure that both the subject and the camera remain still. This can also be beneficial if you are using lower shutter speeds. Macro lenses of different focal lengths find different uses:
Continuously-variable focal length – suitable for virtually all macro subjects
45–65 mm – product photography, small objects that can be approached closely without causing undesirable influence, and scenes requiring natural background perspective
90–105 mm – insects, flowers, and small objects from a comfortable distance
150–200 mm – insects and other small animals where additional working distance is required
Depth of field
Shallow depth of field
Limited depth of field is an important consideration in macro photography. Depth of field is extremely small when focusing on close objects. A small aperture (high f-number) is often required to produce acceptable sharpness across a three-dimensional subject. This requires either a slow shutter speed, brilliant lighting, or a high ISO. Auxiliary lighting (such as from a flash unit), preferably a ring flash is often used.
Like conventional lenses, macro lenses need light, and ideally would provide similar f/# to conventional lenses to provide similar exposure times. Macro lenses also have similar focal lengths, so the entrance pupil diameter is comparable to that of conventional lenses (e.g., a 100 mm f/2.8 lens has a 100 mm/2.8 = 35.7 mm entrance-pupil diameter). Because they focus at close subjects, the cone of light from a subject point to the entrance pupil is relatively obtuse (a relatively high subject numerical aperture to use microscopy terms), making the depth of field extraordinarily small. This makes it essential to focus critically on the most important part of the subject, as elements that are even a millimetre closer or farther from the focal plane might be noticeably blurred. Due to this, the use of a microscope stage is highly recommended for precise focus with large magnification such as photographing skin cells. Alternatively, more shots of the same subject can be made with slightly different focusing lengths and joined afterwards with specialized focus stacking software which picks out the sharpest parts of every image, artificially increasing depth of field.
Focus stacking
What You Need:
A tripod.
- A DSLR camera capable of shooting in manual mode. It is possible to use a point and shoot camera, but it must have a manual mode and manual focus capabilities. - A depth of field app (which is helpful but not required).
- Photoshop or another focus stacking software.
Focus stacking is similar in principle to HDR (high dynamic range) photography. However, with focus stacking, images are captured with different focus points and later combined in Photoshop; this is in order to create an image with more DOF (depth of field) than would be possible with a single exposure. Landscape and macro photography are two genres of photography that benefit most from using this procedure.
But be warned: Calm winds and reasonably stationary objects are a must!
Before beginning to shoot, it is always helpful to know a lens’s sweet spot, defined as the aperture at which the lens produces its sharpest image. (It is usually found about two to three stops from wide open.) Experiment until this important setting is determined.
Macro photography can benefit from focus stacking more than any other type of photography, because a macro lens has an extremely shallow depth of field
- Place the camera on a sturdy tripod - Frame the subject and compose the shot. - Determine the exposure for the subject, and set the camera to manual mode to ensure that the exposure remains constant for each and every image. - Set the camera to Live View and aim the focus point on the nearest object you want to be in focus. Use the camera’s zoom (the plus button, not a zoom on the lens) to preview the focus through Live View. Then switch to manual focus and use the focus ring to fine-tune for sharpness, if necessary. - Take the first exposure. - Without moving the camera or adjusting any settings, move the focus point to a distance slightly farther away from the lens. Remember that DOF in macro photography will be measured in fractions of an inch, instead of in feet (as in landscape photography). - Repeat as many times as needed to cover every aspect of the subject’s DOF. This could range from as few as six images to 30+ images. Make sure the entire subject is covered or the results may be unusable. If available, check a DOF app on your smartphone to figure out how many images will be necessary to get every aspect of the photo in focus.
Open Photoshop
Get each image on a separate layer. Under File, choose Scripts and Load Files into Stack. Click Browse and select all the images.
- Check the Attempt to Automatically Align Source Images box.
- Click OK and each of the images will open into a new layer in Photoshop
- Open the Layer palette and select all layers.
- Under Edit, select Auto-Blend Layers.
- Check the box for Stack Images and Seamless Tones and Colours. Optionally, select Content-Aware Fill Transparent Areas, which will fill any transparent areas generated by aligning images in step 3.
- Click OK
- Flatten the image by selecting Layer>Flatten Image and save.
0 notes
Photo


W.H Walmsley
History
The term photo-macrograph was proposed in 1899 by W. H. Walmsley for close-up images with less than 10 diameters magnification, to distinguish from true photo-micrographs.
Walmsley was also quite a good microscopist, respected in this field and also in photography, especially photomicrography. He was active in mycology and authored several articles, and a book about photomicrography, 'The A.B.C. of Micrography' in 1902. He died in October of 1905. He was a founding member of the American Microscopical Society, and was a Fellow of the American Association for the Advancement of Science. He was a member of many other learned societies, including the Royal Microscopical Society. One of the earliest pioneers of macro photography was Percy Smith, born in 1880. He was a British nature documentary filmmaker and was known for his close-up photographs. Percy smith The son of Francis David Smith (1854-1918) and Ada (née Blaker - born 1856), known as Percy Smith. He married Kate Louise Ustonson in 1907. While working as a clerk for the British Board of Education, he began to photograph the natural world around him, but found his desire to exploit the educational possibilities of film stifled. That was until his close-up photograph of a bluebottle's tongue caught the attention of film producer Charles Urban. Before joining the Charles Urban Trading Company full time, Smith subsequently produced To Demonstrate How Spiders Fly (1909) and The Acrobatic Fly (1910). To Demonstrate How Spiders Fly is a 1909 British short silent animated documentary film, directed by F. Percy Smith, featuring a close-up of an animated model spider throwing its silken thread to take to the air. The film features, "the first of several animated creatures to appear in Smith's films," and according to Jenny Hammerton of BFI Screen online was made in the belief, "that he could cure people of their fear of spiders by showing them blown up images of their eight-legged foes on the cinema screen."
0 notes
Text
Photographic Techniques/Genres Week 4 Journal Entry Wednesday 25th January
As previously mentioned, we have been asked to produce another triptych. This week's theme is ‘abstract.’ I instantly was excited for this triptych as my creative skills would definitely shine through. I generally love the use of vibrant colours and quirky imaginative objects. Being at home due to Covid 19, made this surprisingly easier to accomplish, as I could stage my own photographs. My overall theme for this occurring project is macro photography; specifically, water droplets. My thoughts were to incorporate this within this week's triptych. Refraction can predominantly be associated with abstract photography. When light meets a water droplet, it is refracted at the boundary of air and water, and enters the droplet, where the light is dispersed into the seven colours. The rainbow effect occurs because the light is then reflected inside the droplet and finally refracted out again into the air. Knowing this, I was instantly able to subsume colours within my photographs and add the overall abstract feel to my idea. I wanted to include another subject/ object for my water droplets to sit on, with the thought of refraction, reflection and colours in mind. I found an old CD and sat it on my windowsill, slightly shifting it around in the sunlight to see the colours come to life. Like water droplets, the CD separates white light into all the colours that make it up. The colours reflecting from a CD are interference colours. A CD Is made of aluminium coated with plastic. The colours created, are by white light reflecting from ridges in the metal. During lesson on Monday the 1st of February, I presented my triptych to the class, my overall feedback was excellent. Feedback that was given by my tutors and peers: - “So advanced and doing beyond what I'm supposed to do.” - “Its complex.” - “Wowed by it.” - “Beautiful, almost space like.” - “Definitely hit the criteria.” - “Simplistic, but great.” - “Love the photography, you're so imaginative.” - “A triptych is a series of 3 images, don’t put 4, next time.” I'm very pleased with my feedback this week, as I was not happy with my last triptych, I was overwhelmed by all the great comments, and hopefully people will be inspired by my work. I will also take into account all my feedback given for each triptych, and what I can improve on further in the future.
0 notes
Text
Photographic Techniques/Genres Week 3 Journal Entry Wednesday 20th January
Following up on last week's journal entry, we have been asked to produce another triptych. This week's theme is ‘reflection.’ Initially I wanted to interpret this in my own way, and not produce something common or simplistic eg. (mirrors, water) but ultimately to represent ‘self-reflection.’ Following this, I change my mind expeditiously and obtained my inspiration from a photographer, that I researched in my last project: Experimental photography. This artist is called Nina Foster. I initially researched her chlorophyll prints, but came across some of her fine art, and geometric photography along the way. here is a link to her project called disorder: https://ninafoster.myportfolio.com/disorder This in turn, motivated me to produce my own reflection photography using mirrors, including a narrative. Before leaving home, I broke an old mirror and used a large piece to take with me to stage my photographs. I travelled to Dale Abbey, as I wanted to find somewhere with a substantial amount of forestation. The weather was quite cloudy at first, due to this, the light was significantly low, so a slower shutter speed was used. I used my tripod for the duration of my time taking my photographs. As time went on, the weather changed significantly, and it began to snow. This was very pleasing. As I hadn’t taken many photographs in the snow before. Following this, due to the weather conditions, I struggled with not having any shelter and my camera became wet, and fogged up frequently. I ended up rushing my photographs, and not using the correct apertures and shutter speeds. I did have to edit my photographs in post, as they were not up to the standard, I thought best fit. I was not overly happy with my end results, although my narrative behind the photography, was prominent. I will always learn from my mistakes. Note to self: “There are no rules to good photographs, there are only good photographs” - Ansel Adams On Monday we will be Presenting our triptychs to the class. This week I have also purchased a ‘ring light’ (Artificial light) this will help me with my overall photography for this project as I do not have any professional lighting yet. I have also acquired a macro lens, and cannon camera (borrowed, for this project.)
0 notes
Photo

Week 2 triptych - Reflection
Reflection of a broken society - Humans vs nature. - Rioadele Hamlett
Inspired by
Nina foster
; an artist I researched for my last project ‘experimental photography.’
https://ninafoster.myportfolio.com/disorder “I tried to structure the organic shapes by encasing them inside geometry, but are they not still wild within their own confinement? Just as we fearlessly stare down tigers in the zoo behind a glass wall, I have created false containment. By playing god, I fooled myself into believing I could control the uncontrollable. This is how the fantasy of authority works, we find solace in our false expectations. We impose geometry onto the natural world and believe it is tamed.” - Nina foster
0 notes
Text
Photographic Techniques/Genres Week 2 Journal Entry Wednesday 13th January
After consideration, my chosen genre will be Macro photography. I think this is a manageable and very interesting technique to present for my final essay. On Tuesday 12th January, I gave our class a presentation/ proposal regarding my chosen technique. I did this via teams and used the platform adobe spark to produce and present my work on. I detailed all the specifics I would need to carry out this project, how I will do it, what equipment I will need, my artist research, and my overall plan. We have also been set tasks each week, to produce a triptych - this is a series of three images, that all run alongside a chosen theme. I also produced my first triptych and have presented this to the class, with the overall theme of ‘self’ All triptychs will be put on my blog each week. This week, I will research further into using Harvard referencing, and what websites can be useful for me, and take notes on any information that could be applicable for my final essay and photography. Furthermore, I feel I'm on track with my progress so far, next week I will be producing my next triptych and buying some equipment such as lighting and will enquire about a 55mm- 200mm lens.
0 notes
Photo


Week one triptych - theme ‘SELF’
“Something that defines me, and my personality.”An alliteration - colours, candles and creativity.
0 notes