
Don't wanna be here? Send us removal request.
Statistics
We looked inside some of the posts by prettypearlsims and here's what we found interesting.
Average Info
Notes Per Post
2K
Likes Per Post
1K
Reblog Per Post
395
Reply Per Post
6
Time Between Posts
1 month
Number of Posts By Type
Text
11
Note
1
Photo
5
Last Seen Tumblr Blogs


Fun Fact
Mobile US users spent an average of 115.8 minutes on Tumblr app monthly.
Text
The Sims 3 - Removing Bloom Effect
a Tutorial by Simified
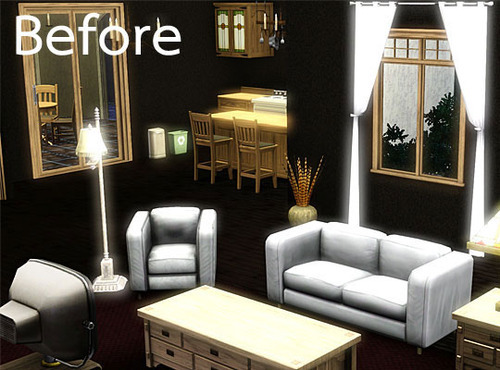
With the addition and since The Sims 3 World Adventures, a change was made to how things are seen in the world of The Sims 3. You may have noticed that many objects glow, day or night, especially in certain lighting conditions. While this may or may not be annoying to everyone, this glow is applied to things such as chairs, curtains, lamps, and countertops. If you don’t know what I am talking about, see the picture below.
By following this tutorial we will be removing the glow, provided the tutorial was followed correctly.
Do note that this edit will have to be made each time after a game update or new expansion pack or stuff pack is installed because the file is usually overwritten. Also note that by disabling the glowing, you will not be able to see the heat waves rising from the ground in Egypt in The Sims 3 World Adventures and headlights and lamps on cars will not glow.
Opening & Editing The File
Open Computer and browse to where The Sims 3 is installed. The most common location is: C:\Program Files\Electronic Arts\The Sims 3\Game\Bin.
Under the Bin folder, locate the file GraphicsRules.sgr.

Right-click on this file and choose Open.
Next, since the extension is .sgr, it’s not a common file. Windows will ask you what you would like to open it with. Choose Notepad from the listing and make sure to uncheck “Always use the selected program to open this kind of file.” Click Okay.

Once the file is open in Notepad you will then see some coding and stuff you may not understand. That’s okay, because the next few steps are really easy.
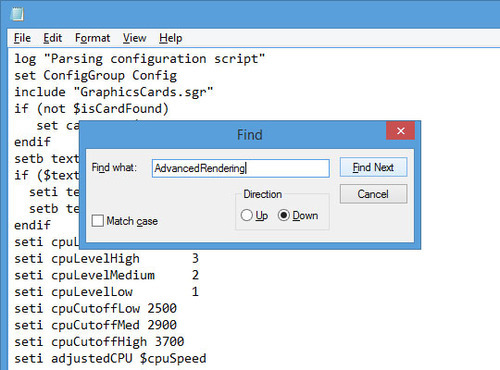
In Notepad, go to Edit > Find (or press Ctrl + F keys on keyboard) to bring up the find window. Type in AdvancedRendering and hit the button Find Next.
You will then be taken to a section called AdvancedRendering and it will have a few lines of text below it. This option allows for improved graphics in the game and if you have a relatively good card, chances are this option is enabled. As you see below, the line RenderPostProcessEnabled false is selected, but it’s under the Off option. If you have Advanced Rendering turned off, not only will your graphics look blurry but you also won’t get the glowing on objects – which is just what we want, minus the blurry graphics.
Highlight the line as shown and Right-click > Copy or press Ctrl + C keys on your keyboard at the same time to copy the line.
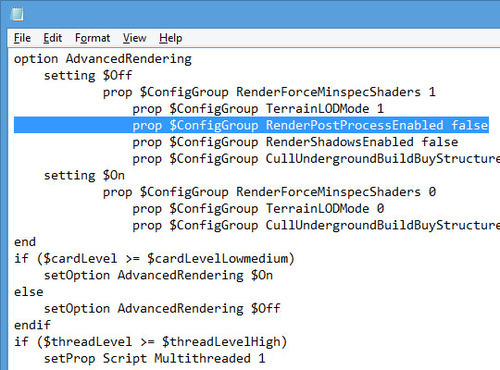
Once copied, place your cursor in the On section and paste the copied line on a new blank line by pressing Ctrl + V keys on keyboard or Right-click > Paste. If you did it correctly, it should look like the image below. Note: The line in the picture was highlighted so you can see the line you added.

Do not touch or copy any other lines within this file unless you want to break your game and prevent it from loading or displaying your graphics properly.
Now that you have added the RenderPostProcessEnabled false line under the On setting for AdvancedRendering it is now time to Save your changes.
Saving The File
Once you have added the line in Notepad, you will want to go to File > Save As.
It is important to know that you won’t be able to save in The Sims 3 folder without administrative permission. If you try to save in The Sims 3 folder you will get an error message of:
“C:\Program Files\Electronic Arts\The Sims 3\Game\Bin\GraphicsRules.sgr. You don’t have permission to save in this location. Contact the administrator to obtain permission. Would you like to save in the My Documents folder instead?”
Choose No.
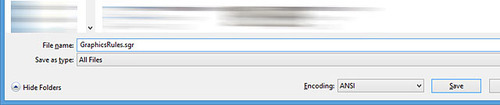
Next, browse to your Desktop by clicking on Desktop in the left side navigation pane window in File Explorer. When saving, take out the name it generated which should be the same name as the file and retype the filename GraphicsRules.sgr and make sure the Save as type is set to All Files. Click Save.
The file should have saved to your Desktop. Locate the file called GraphicsRules.sgr on your desktop. It should be a white plain file, and if you try to open it, it should not open with Notepad, but instead prompt you like in the very beginning.
The last step is to now overwrite the GraphicsRules.sgr file for The Sims 3 with your edited one. If you left the Computer window in The Sims 3 Bin folder, good! If not, open Computer and browse to The Sims 3 > Game > Bin located C:\Program Files\Electronic Arts\The Sims 3\Game\Bin.
Click and drag the GraphicsRules.sgr file from your Desktop into the Computer window for The Sims 3. You can also Right-click > Copy on the GraphicsRules.sgr file on your Desktop, and then Right-click > Paste on any white area in Computer/The Sims 3 window.
If done correctly, Windows will ask you about overwriting the file and if you would like to Move and Replace, Don’t move, or Rename files. Choose Move and Replace. You may be prompted to supply your computers administrator password, depending on your security settings, to confirm that you indeed want to overwrite this file. Since you made the edit and know what file you are replacing, it is okay to allow the file to be overwritten in this case.

Once done, close all your windows you had open and launch your game. If you have done the tutorial correctly, the next time you look at your counters, lamps, curtains, or other objects they won’t be glowing!
1K notes
·
View notes
Text


Gave a makeover to Talei Hale from Sunlit Tides. ❤
#sims3#ts3 scenery#reshade#sims 3 gameplay#sims#sims 3 screenshots#ts3#sims 3#the sims 3#sims 3 story#pearl sims#gshade#sims makeover
20 notes
·
View notes
Text


Raine living it up with some fine risotto in France! 🇫🇷🍴✨
#sims3#the sims 3#reshade#ts3 scenery#sims 3 gameplay#sims#sims 3 screenshots#ts3#sims 3#sims 3 story#pearl sims#gshade#france
11 notes
·
View notes
Text


💕🌷💕
#ts3 scenery#sims3#the sims 3#sims 3 gameplay#sims#reshade#sims 3 screenshots#ts3#sims 3#sims 3 story#pearl sims#gshade#colorful
15 notes
·
View notes
Text


Raine's sweet little nest 💕🌷
#ts3#sims#sims3#ts3 scenery#reshade#sims 3 gameplay#the sims 3#sims 3 screenshots#sims 3#sims 3 story#pearl sims#gshade
8 notes
·
View notes
Text


Raine's cute new nightwear ~♡♡
#sims3#ts3 scenery#the sims 3#sims 3 gameplay#sims#reshade#ts3#sims 3 screenshots#sims 3#sims 3 story#pearlsims#gshade
24 notes
·
View notes
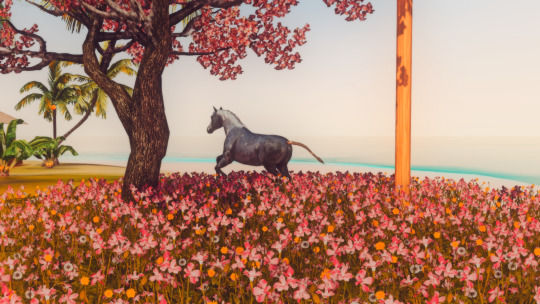
Note
I love your screenies! Do you happen to know where you got the wildflour fields item(s)??
Thank you! :) Yes here is the link: https://simaddix.tumblr.com/tagged/ts3world
1 note
·
View note
Text

Sims 3 is so magical~♡♡☆
#sims 3#ts3#the sims 3#ts3 scenery#sims3#sims 3 gameplay#sims#reshade#sims 3 screenshots#sims 3 story#gshade#pearl sims
115 notes
·
View notes
Text


Decorating Raine's home and playing around with Gshade.
#sims 3#ts3#sims#the sims 3#sims3#ts3 scenery#reshade#sims 3 gameplay#sims 3 screenshots#sims 3 story#pearl sims#gshade
14 notes
·
View notes
Text


Raine's cute new outfit. ♡♡♡
#sims 3#ts3 scenery#reshade#sims3#sims 3 gameplay#the sims 3#sims#sims 3 screenshots#ts3#sims 3 story#pearl sims
12 notes
·
View notes
Text


My girl Chanel ❤❤❤
#sims 3#sims#sims 3 gameplay#sims3#the sims 3#ts3#sims 3 screenshots#sims 3 story#ts3 scenery#reshade
11 notes
·
View notes
Text


My sweet Raine. She’s just settled into Sunlit Tides and absolutely loves the beach.❤
25 notes
·
View notes
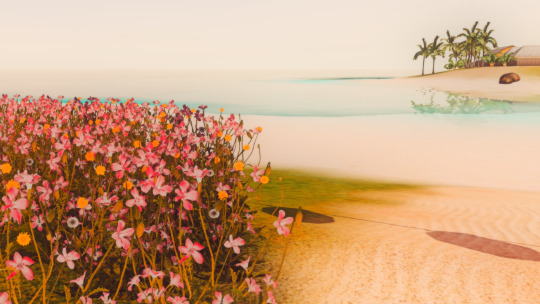
Photo


Pretty Flowers
12 notes
·
View notes
Photo


Enjoying some fishing.
9 notes
·
View notes
Photo


Beck
4 notes
·
View notes
Photo


Esther <3
5 notes
·
View notes
Photo


Red sky & a rainbow 💗
3 notes
·
View notes