
Don't wanna be here? Send us removal request.
Statistics
We looked inside some of the posts by practice1herts2023 and here's what we found interesting.
Average Info
Notes Per Post
0
Likes Per Post
0
Reblog Per Post
0
Reply Per Post
0
Time Between Posts
15 days ago
Number of Posts By Type
Text
17
Last Seen Tumblr Blogs


Fun Fact
25% of US internet users with an annual income of $80-100K use Tumblr.
Text
Nostalgia and Memory Development - 2
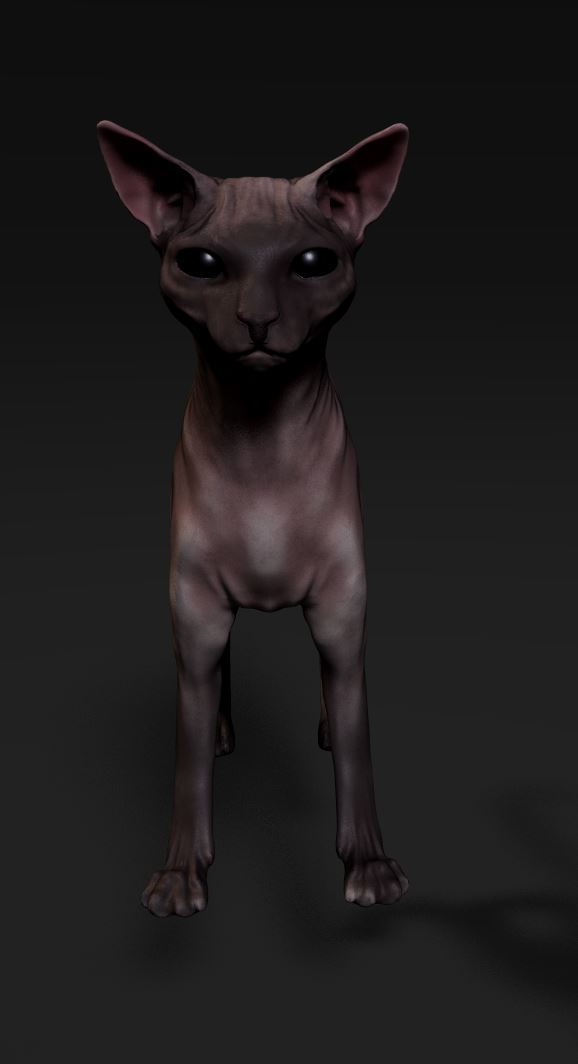
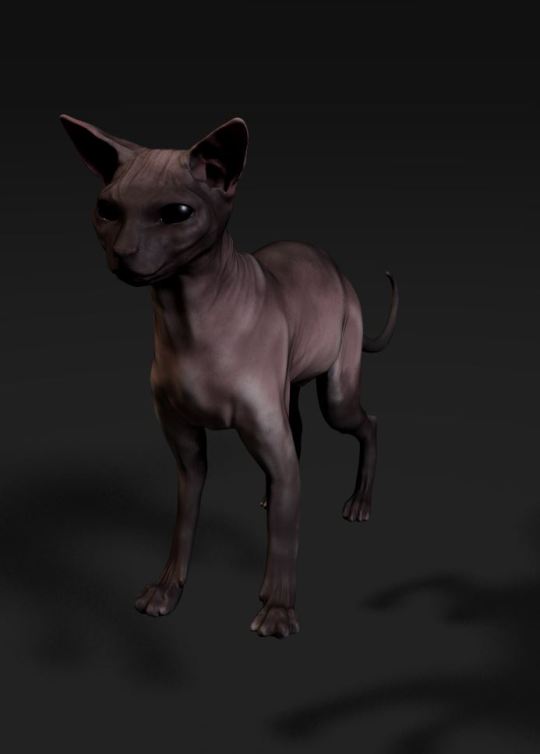
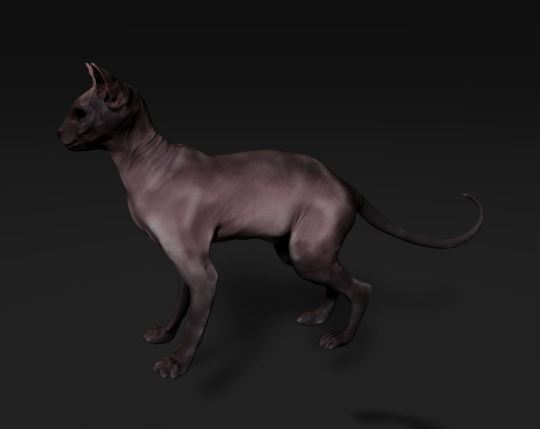
Spynx cat
Today, I imported the model and textures into Unreal Engine 5. To capture the final renders of the cat, I utilized a pre-existing rendering scene. I believe the final result turned out well, showing noticeable improvements from the original sculpt to the current state of the model. While there are certainly areas that could be improved, I'm satisfied with the outcome given the time constraints.


Renders - UE 5
0 notes
Text
Nostalgia and Memory Development - 1
Sculpting and Texturing
For my second development project, I choose Nostalgia and Memory. In this project, I would like to enhance my anatomical knowledge mainly.
In order to have a better understanding of a cat’s body I observed anatomical studies of a cat. This process helped to refine and enhance my model to create an easily readable 3D replica of a Sphynx cat.
Sculpting
As I began refining the body of the cat, I quickly realized that I had made numerous anatomical mistakes, which resulted in a less-than-satisfactory outcome. The inaccuracies in the initial sculpt were apparent, and it became clear that a more rigorous approach was necessary. Determined to improve, I decided to closely study the anatomy of the Sphynx cat breed, dedicating more time to understanding its unique physical characteristics.
As I progressed with a stricter observation of the cat's anatomy, the results began to improve significantly. I paid particular attention to the distinctive features of the Sphynx, such as its muscle structure, proportions, and most notably, the wrinkles that are characteristic of this breed. Through this detailed observation, I discovered the importance of symmetry in the Sphynx cat’s wrinkles, especially noticeable in younger cats. These wrinkles are primarily visible on the head, creating a pattern that is both intricate and symmetrical.
Focusing on these details, I spent a considerable amount of time sculpting the head. I carefully replicated the wrinkles and other defining features, ensuring that the symmetry and overall anatomy were as accurate as possible. This meticulous approach paid off, and I believe the head sculpt turned out exceptionally well. The wrinkles add a lifelike quality to the model, capturing the unique essence of the Sphynx cat.
Despite the significant progress I made, I faced the challenge of time limitations. There were still areas of the sculpture that needed further refinement and development, but due to these constraints, I was unable to continue working on it. I regret not having more time to perfect the sculpture, as there is always room for improvement and additional detailing.
In summary, the process of refining the cat's body taught me valuable lessons about the importance of anatomical accuracy and the benefits of detailed observation. The improvements made in the head sculpt are a testament to this learning process. Although I couldn’t take the sculpture to its fullest potential, the experience has undoubtedly enhanced my skills and understanding, which I will carry forward into future projects.
Sculpting progress:


texturing
For this project, due to time constraints, I was unable to manually retopologize the cat. Instead, I decided to use a lower remeshed subdivision of the high poly sculpt and re-projected the details onto this lower-resolution mesh. This approach allowed me to maintain much of the detail from the original sculpt without spending an excessive amount of time on manual retopology.
Once the re-meshing and detail projection were complete, I moved on to the UV unwrapping process in Maya. I unwrapped the cat model, creating two separate UV maps: one dedicated to the eyes and the other to the cat's body.
During the texturing phase, I began by applying smart materials for the base skin texture. These materials provided a solid foundation, simulating realistic skin tones. From there, I hand-painted the dark patterns unique to the Sphynx cat, carefully layering these details to achieve a natural look. Particular attention was given to the roughness between the skin folds on the head. This area required a cautious approach to capture the subtle variations in texture that make the Sphynx cat's skin appear lifelike. By adjusting the roughness map, I was able to create a convincing portrayal of the skin. Furthermore, I dedicated time to painting the eyes, aiming for a realistic and expressive look.
After completing the texturing, I exported the textures, readying them for application in the final model. This process, although not as well executed as I imagined due to time limitations, but it provided a comprehensive learning experience in balancing efficiency with quality. The project allowed me to refine my skills in re-meshing, UV unwrapping, and texturing, ensuring that even with constraints, I could produce a detailed 3D model.

References

Benjamin, P. (2021). Sphinx cat sculpt WIP. [Online] Available at: https://www.artstation.com/artwork/18lWaG.
Egelsky, S. (2023). Cat Anatomy. [Online] Available at: https://www.artstation.com/artwork/YBqD9K.
Attribution (n.d.). Lateral view of the cat skeleton. [Online] lumenlearning. Available at: https://courses.lumenlearning.com/suny-oneonta-comparativeanatomy/chapter/chapter-1/.
0 notes
Text
Dragon priest - Industry Feedback - 7
After finishing my Dragon Priest project, I asked for feedback from an industry professional on Instagram. His feedback serves as a valuable guideline for my future projects.
Furthermore, I asked for feedback from my personal tutor. He highlighted the issues with the topology as it doesn’t have enough supporting loops for animation, and he agreed with the observation of the industry artist too.
In my future projects, I will pay more attention to the detail of the sculpt, especially focusing on the clothing. I must pay more attention to the secondary details of the face, such as the proportions and skin details. The metallic map should be more adjusted in the future and the lighting of my scenes are good but can be enhanced.


NDA (2024). Instagram messages. Instagram.
0 notes
Text
Red and Blue Development - 6
Dragon Priest - finishing touches
This week I created beauty and technical renders inside Marmoset and beauty renders in Unreal Engine. I posed my model inside Zbrush and exported it into the program. I used the Light and Shadow assignment scenery for the Unreal renders. Furthermore, I created a VFX for the draconic spell for the posed asset. I entered my finished project into the 2024 Rookie’s award to gain feedback and contacts from industry professionals.


Technical and beauty renders - Marmoset


Unreal engine renders
Unfortunately, during my first export, I faced a strange bug inside Unreal Engine 5.3. The metallic maps were faint and unrecognizable compared to the Marmoset renders. I re-exported the textures as TGA files, and it didn’t seem to work. Later I realized that the program recognized the compressed metallic -AO-roughness map as a normal map and it caused the issue. Furthermore, I adjusted the roughness by multiplying it in the material editor to achieve a less shiny metallic surface for the armor.


0 notes
Text
Red and Blue Development - 5
Textures
During the texturing stage, my focus was on achieving realistic textures for the character. I primarily utilized red and blue color variations, aligning with the original assignment theme.
Initially, I began adding skin details based on my existing knowledge, but I found the results to be unsatisfactory. To improve, I watched a YouTube tutorial that specifically addressed skin texturing techniques. This exploration significantly broadened my understanding and approach to creating lifelike skin textures.


youtube
Abe Leal 3D (2023). Skin Texturing Tutorial in Substance Painter | Files available. [online] www.youtube.com. Available at: https://www.youtube.com/watch?v=-YUQ5futwSk.
While working on texturing the clothing, I noticed the need for more detail in the sculpt itself. I addressed this by manually enhancing the folds and adding darker areas to increase depth and definition. This process involved careful painting to ensure that every aspect of the character contributed to a cohesive and realistic appearance.


A crucial aspect of my workflow involved painting the roughness map meticulously. I employed various tools such as generators, blur filters, height maps, and a variety of brushes. Adjusting their intensity and blending modes allowed me to achieve the desired texture effects and overall aesthetic.
Through this experience, I significantly expanded my knowledge of texturing, particularly in understanding the critical role of correct roughness on a model's surface. This learning journey not only enhanced my technical skills but also deepened my appreciation for the nuances that contribute to creating compelling and believable textures in 3D art.
0 notes
Text
Red and Blue Development - 4
Retopology and UV
This week I focused on retopology, UV unwrapping, and projection. I utilized the quad draw tool in Maya 2025 to ensure the correct topology of the mesh. I carefully UV unwrapped the head, clothing, armor, and eyes for UDIM workflow. I created 4 UV maps for this project. I'm planning to use 4K textures in the next phase.
After this stage, I used Zbrush projection to enhance the accuracy of my topology. Later, I reimported the finished low-poly to Maya to fix the normals of the mesh.


0 notes
Text
Red n Blue Development - 3
Finished Sculpt
This week, I concentrated on refining the shapes and adding secondary details to the body sculpt. This process proved to be quite challenging, requiring focus on the finer aspects of the design. Ensuring that each shape was visually appealing involved a great deal of patience and careful observation.
One of my key objectives was to integrate dragon-themed elements into the armor. I started by sculpting a dragon head. Additionally, I added dragon wings to the side armor of the character, which not only enhanced the visual appeal but also contributed to the overall theme and narrative of the character.
Throughout this process, I constantly revisited and refined each element, ensuring that the integration of these dragon motifs was seamless and natural.
As I progressed, I continually evaluated the sculpture to ensure that it maintained a cohesive and balanced appearance. I think the finished sculpt will serve as a good foundation for the following stages of the project.


0 notes
Text
Red n Blue Development - 2
Body blockout
The next step in developing my character was to create the body. To start, I selected a base body model from the ZBrush library, which provided a solid foundation for my work. Using this base, I began extruding shapes to form the clothing, carefully shaping each piece to ensure it fit naturally with the character's form. This involved a lot of attention to detail, especially in areas where the clothing needed to follow the contours of the body.
Next, I added subtools to create the armor and skirt. Each piece of armor required mindful modeling to achieve the desired look, and the skirt needed to have the right flow and movement. I spent considerable time refining these elements, making sure they were anatomically correct.
Once the basic shapes were in place, I focused on remeshing and dynameshing the details. This step was crucial for achieving a clean and efficient topology, which is essential for both the aesthetic quality and the functionality of the model. I iteratively adjusted the mesh, ensuring that the topologywill be able to support the overall shape and future details of the character. Additionally, I worked on refining the silhouette to make sure it looked dynamic and appealing from all angles.
Throughout this process, I constantly evaluated the model to ensure it met my standards. This iterative approach allowed me to make necessary adjustments and improvements, ultimately leading to a well-defined character body.
Overall, this stage of development was both challenging and rewarding, pushing me to refine my skills. The effort invested set a solid foundation for the next stages of the project.


0 notes
Text
Red n Blue Development - 1
Head and cloak sculpting, Retopology and UV, Testing the projection
For my first development project, I decided to choose the Dragon Priest from the Red and Blue assignment.
After the multiple assignments during this year I realised the head sculpt and the cloak doesn’t look as good as I remembered. I started my development with refining the shape of the head and focusing on the details of the textile folds. After I finished the sculpture I moved to the retopology and UV unwrapping stage.


In this stage, I focused on creating the UV unwrap to an industry-standard level. Multiple 3D artists retouch the UVs in Maya to create an easily readable map with the mind of maximizing the available UV space. I used the relax and pin tools to achieve this result.

McGuire, T. (2020). Mollymauk Tealeaf. Available at: https://www.artstation.com/artwork/d8a5nA.

UV Unwrap - Maya
After I was finished with the manual retopology and UV Unwrapping, I moved back to Zbrush to use the projection tool. I used this method to achieve a more accurate topology on my optimized model. Then I watched a YouTube tutorial and started the secondary detailing process.
youtube
Skin details
youtube
projection
Annabelle Sémaan (2020). Get FREE Skin Scan Texture and HOW TO apply it in ZBrush (EASY). [online] YouTube. Available at: https://www.youtube.com/watch?v=uvMYH8ntJGQ.
CG3DANK - CG and 3D tutorials - more!!!! (2016). PROJECTION IN ZBRUSH(DYNAMESH TO TOPOLOGY MESH). [online] YouTube. Available at: https://www.youtube.com/watch?v=w22kX6Rz0yo.
3dscanstore (2024). HD Female Head Scan. [Online] Available at: https://www.3dscanstore.com/blog/Free-3D-Head-Model.
I followed the Tutorial of Annabelle Semann to project the details of the photogrammetry model on my character. I used Substance Painter and Zbrush for this process. After the projection was completed inside the Zbrush I added extra details for the skin such as wrinkles and pores. Following this process, I baked and textured the model inside Substance Painter to test the overall look of the model.


0 notes
Text
80. Lvl
Week 7
For beginner 3D artists
How to create a head from a Zsphere?

Introduction
Hello! My name is Nikolett, I’m a graduate character artist. I love to create characters for fantasy themes, my biggest inspirations are coming from video games and 2D illustrations. I started my journey on the path of 3D in 2020 when I enrolled at a British university to learn game art. I finished my BA in 2023. I’m currently honing and expanding my knowledge and skills at the University of Hertfordshire on the MA Games and Design course. As an artist without any previous art studies besides my BA, creating art can be challenging, confusing, and a complicated process. With this blog, I would like to share my perspective, and knowledge on how to create a head sculpt from a simple sphere in ZBrush.
References
Using good references is crucial. This is the first, most important step towards a convincing 3D asset. References can come from many different sources such as videogames, Sketchfab 3D models, or 2D images. Collecting them and laying them out in PureRef is a major help during the sculpting process. For this project I created a Karlach blockout sculpt inspired by the game Baldur’s Gate 3. My main references are from Artstation.

The Blockout
Every beginner’s biggest mistake in 3D sculpting is getting into the details before defining the overall shape of the bust. In my work pipeline creating a sculpture is divided into 3 stages – primary block-out, secondary block-out, and detailing. The detailing is also divided into primary and secondary details. In the primary block-out stage I focus on creating the overall shapes forms from in 3D space. It’s crucial to move around the 3D scene as much as possible to see different angles of the sculpture. In secondary block-out I add and define the major features of the face such as the location of the eyes, nose … etc. Primary detailing includes defining the facial features based on the references and secondary detailing involves adding fine details such as pores and scars.

For this sculpt I started with a sphere and modified its shape with the move tool, then I created a second sphere for the neck and adjusted it with the same tool. I added the ears in a separate tool too. I carved the eye socket with the clay buildup tool and started to add the nose and mouth with the same tool too. It doesn’t matter if it looks bad at this stage, you have to trust the process. After this, I used the move tool to adjust the features to the approximately anatomically correct location and started to define the secondary shapes of the block-out such as the mouth and nose. To refine the shapes more using flatten and damstandard brushes are crucial. The best advice in this stage is to look at the differences between the sculpt and the references. It will guide you to a better result. For the horns I worked on a separate tool and use deformation master and array mesh. For the hair, I also worked on a separate sub-tool from a Sphere.
Here is a really good tutorial about horn creation:
youtube
Pablo Muñoz Gómez-, 4 Ways to Create Horns in ZBrush -, 2022-, Youtube, https://www.youtube.com/watch?v=TN9ARiC_82w

This sculpture is missing the secondary details which is a bit more complicated process. The head itself is still in the primary detailing phase, which means it must be modified to achieve a closer look compared to the reference.
Try to get simultaneous practice, watch tutorials, and follow them along. Making this a habit really helps to learn faster and get a better result and understanding of 3D. Asking for help and feedback is also super useful on multiple web pages, such as Reddit. Don’t be afraid to make mistakes, they are part of the learning process.
0 notes
Text
3D Print
week 6


Baldur's Gate 3 - Karlach's hair
Wiktoria Kubien - 2023-Artstation: https://www.artstation.com/artwork/w0562Z
Karlach Head Baldurs Gate 3 Alena Dubrovina- 2023- artstation: https://www.artstation.com/artwork/294x6y
Pablo Muñoz Gómez-, 4 Ways to Create Horns in ZBrush -, 2022-, Youtube https://www.youtube.com/watch?v=TN9ARiC_82w


This week, I focused on practicing likeness sculpting in ZBrush. Starting from scratch to create a block-out was especially challenging, as maintaining accurate proportions is a critical yet difficult aspect of this process. I chose to sculpt Karlach from Baldur’s Gate 3, and capturing her distinct features in ZBrush proved to be a demanding task. The specific characteristics of her face and the intricacies of her horns required a lot of attention and precision.
As I worked on the sculpt, I delved deeper into understanding facial anatomy and the unique aspects of Karlach's design. The horns were a new challenge for me, and I spent considerable time studying their structure to ensure they looked realistic and integrated well with the rest of the model. The process taught me a lot about how different elements of a character's design come together to create a cohesive and recognizable likeness.
To enhance my skills, I relied on various resources, including a particularly helpful YouTube video by Pablo M. G. This tutorial significantly expanded my knowledge of ArrayMesh and Deformation techniques in ZBrush. These tools were instrumental in refining the details of my sculpt and achieving a more polished look.
Despite the progress I made, I realized that the hair on my sculpt is currently of lower quality than the rest of the face. This mistake really stands out, and it is an area I plan to focus on moving forward. My future goal is to add secondary details to the face to enhance its realism and to completely reshape the hair to match the quality of the facial features.
Overall, this week's practice in likeness sculpting was both challenging and rewarding. It pushed me to improve my technical skills and deepen my understanding of character design. I am excited to continue refining my sculpt in the future, adding more details, and ensuring that every element of the character, from the horns to the hair is on the same standard.
0 notes
Text
Light and Shadow
Week 5
When I think about light and shadow, a candle immediately comes to mind. This week's assignment provided an exciting opportunity to learn how to create visual effects for a candle asset. I envisioned a ritualistic, dark, and eerie environment illuminated by candles.


To begin, I created three variations of candles in ZBrush. After modeling, I exported them to Substance Painter for texturing, paying special attention to the roughness map. I aimed to achieve a shinier wax effect around the flames where the material is constantly melting. Once I was satisfied with the textures, I imported the mesh into Unreal Engine to build the environment and set up the lighting.


For the environment, I used rocks from the Unreal Engine library as placeholders. To create a dark, foggy atmosphere, I added volumetric fog with a red emissive. I placed two faint spotlights in the central area and added point lights to illuminate shapes in the background. This lighting setup enhanced the overall ambiance, making the scene more visually intriguing.
After setting up the environment, I added the candles, applied the mesh textures, and began working on the flame effect. I followed a tutorial to create a 2D flame effect in Clip Studio Paint at a 1k resolution. Then, I developed a separate material for the candlelight, using the planner and subtract functions to create a flickering movement for the flames.

The next step was to create a Niagara system using the candle material. I utilized a blueprint actor to combine the static mesh of the candle, the Niagara system, and a light source. Carefully positioning these elements on top of the candle ensured an accurate and convincing visual effect.


Overall, this project allowed me to explore and implement various techniques to create a compelling candle asset and environment. It was a rewarding experience that combined creativity and technical skills, resulting in a dark and atmospheric scene.

Reids Channel (2020). Unreal Engine 4 - Simple Candle Tutorial. [online] www.youtube.com. Available at: https://www.youtube.com/watch?v=px1QxFr8wzg.
0 notes
Text
Nostalgia and Memory
Week 4
Sphynx Cat
This week, I embarked on creating a 3D animal asset for games. Given that the assignment revolves around nostalgia and memory, I decided to model a Sphynx cat. As a child, I was captivated by cats, particularly the Sphynx breed. Their unique appearance and the ancient Egyptian reverence for cats added a layer of historical intrigue that resonated with my childhood interests.

pureref
Darkest (2019). n.d. [Online] goodfon.com. Available at: https://www.goodfon.com/cats/wallpaper-sphynx-eyes-look.html.
international cat care (2018). Sphynx. [Online] icatcare. Available at: https://icatcare.org/advice/sphynx/.
Zerindo (2022). Sphynx Cat. [Online] Available at: https://sketchfab.com/3d-models/sphynx-cat-df561a01189e4b3abea579432e66b130.


Sculpting Phase
To start, I employed the ZSphere method to block out the basic shape of a standing cat. This approach was quite challenging due to the complex anatomy of cats, especially around the legs. To tackle this, I primarily used standard and clay-build-up brushes, while the dam-standard brush helped refine intricate details. I used a few references, including Sphynx cat wallpapers and models from Sketchfab.
Texture Tests
As the cat's shape became more defined, I exported the mesh to examine its appearance with textures applied. This step was crucial, as it highlighted several anatomical inaccuracies. This realization prompted me to acknowledge the need for significant adjustments. Moving forward, I plan to revisit and reshape the cat's form, paying closer attention to the anatomical details to achieve a more precise and realistic model.
Overall, this project has been a fascinating blend of nostalgia and technical challenge. It allowed me to delve into a cherished childhood memory while honing my skills in 3D modeling and anatomical accuracy. The process has been both educational and sentimental, reinforcing my appreciation for the intricate beauty of the Sphynx cat. I’m eager to continue refining the model and see how it evolves with further adjustments and improvements.
0 notes
Text
Places Of Mind 2
Week 3


Dimitri Chappuis, 2020,Ghost Rider,
Artstation, unknown https://www.artstation.com/artwork/XBlrdL
Kael Ngu,2021 ,Ghost Rider #1 , Artstation, unknown https://www.artstation.com/artwork/8ww0zw
Mark Steven Johnson, 2007, Ghost Rider (Movie),
unknown, Columbia Pictures, Marvel Entertainment, Crytsal Sky
Pictures, Relativity Media https://en.wikipedia.org/wiki/Ghost_Rider_(2007_film)
Unknown,2018, Ghost Rider,
Unknown, Unknown https://sketchfab.com/3d-models/ghost-rider-5b1aa4c4ec36480f9d2e806d35cbbd58
Unknown, 2012, Ghost Rider - Marvel: Avengers Alliance
unknow, Marvel Entertainment,Playdom, Disney Interactive Studios https://character-level.fandom.com/wiki/Ghost_Rider_(Marvel_Comics)
Unknown, 2021, Unknown
Unknown, anatomy.app https://anatomy.app/encyclopedia/skull Unknown, 2021 National Spine Health Fundation https://spinehealth.org/article/spine-anatomy/

Blockout in Zbrush
In my early block-out in Zbrush, I used a male body mesh from the program library as a base for the clothing. I used extrusion and defined the basic shapes and forms of the character. The skull and the spine were sculpted from a Zsphere based on my references. I watched a YouTube tutorial on Zbrush cloth sculpting and shoe creation in order to understand the shapes and forms better. I decided to create the skull without a jaw. I think the character will look more inhuman which will help to create a bigger contrast between his personality and look. I’m planning to add spikes and chains to his clothes to create an interesting variety to the human shape. Furthermore, in the future, I would like to add flames around his head. It will be a challenging process since I never created visual effects in Unreal engine.
Follygon, 2021, How to create shoes in Zbrush, Youtube https://www.youtube.com/watch?v=Wsy-q-o73vg DexterityArt, 2014, Bicker Jacket Zbrush Sculpt, Youtube https://www.youtube.com/watch?v=vycm9PyqVys
Blaze
0 notes
0 notes
Text
Places of Mind 1
Week 3
Ghost rider
The task presented a challenge to me as a character artist. Delving into the distance realms of imagination, I was drawn to Marvel's unconventional antihero: Ghost Rider. During childhood, our perception of heroes and villains often simplifies them into clear-cut distinctions of good and bad. Heroes typically possess exceptional abilities, defending the vulnerable and embodying kindness. However, Ghost Rider intrigued me because he defied these traditional norms. He stands out as a unique antihero, punishing wrongdoers and protecting the defenseless, all while grappling with his own inner anger. At times, he employs severe methods to ensure justice. Imagining him as a fiery skeleton from hell inspired my creative journey and led me to rethink his appearance. My approach involved blending different styles, experimenting with varied interpretations, and infusing my personal artistic touch into the character. I think the creation of this character will lead me to understand anatomy better and expand further my knowledge in 3D cloth creation.
0 notes
Text
Red And Blue 4.
week 2


Render in Zbrush
The tutorials I watched previously about face anatomy and clothing folds resulted in a more realistic appearance on the character. In my opinion the folds around the chest and the inside of the robe need more definition. The ornaments need additional details before export. Overall, I’m proud of my improvement. In the future I would like to retop, UV unwrap and add secondary details with the help of projection in Zbrush to achieve an even realistic look. i think the high level details will have a significant positive impact on the sculpt.
0 notes
Text
Red And Blue 3.
Week 2

Screenshots from Zbrush
In blockout phase 2 I tried to focus on creating the basic shapes and forms of the robe. I watched a tutorial about cloth structure and face anatomy to gain knowledge. I realised that the facial muscles and the proportions are not appropriate, furthermore the folds on the robe not following the shape of the human head. It feels more stylized than realistic.
https://www.youtube.com/watch?v=fnXOQLTprkc – human face
Titouan Olive, 2014, ZBrush tutorial: Sculpt a face using anatomical principles, Part 10, 3Dword, Youtube
https://www.youtube.com/watch?v=yQUumzEmDQo –Cloth structure
HoOman Raad, 2021, Cloth structure and how to sculpt in Zbrush by HoOman Raad, Wingfox Studios, Youtube
0 notes