Photo

Theme [13]: Parfait by glenthemes
❀ ✄ ┈┈┈┈ preview / code / guide / credits 。
PARFAIT is a cute, minimal theme with optional click-to-show sidebar links, and a header section to put brief info. 𝐌𝐚𝐣𝐨𝐫 𝐮𝐩𝐝𝐚𝐭𝐞 // 𝐌𝐚𝐲 𝟐𝟎𝟐𝟐.
❀ ✄ ┈┈┈┈ theme features ‣
sidebar: title, blog name, icon, desc, searchbar, navlinks, customlinks
customlinks: up to 8, optional click-to-show, adjustable column count
header: banner image, short info with icons & labels
posts: 400-600px, optional shadows, optional click-to-show tags
music player: 1 song only ⋮⋮ song & artist name ⋮⋮ [ + instructions ]
❀ ✄ ┈┈┈┈ how to use this theme ‣
please read ⋆ the guide ⋆ I wrote, it tells you how to install this theme, plus where and how to edit the header text ♡
❀ ✄ ┈┈┈┈ terms of use / ask a question / tip jar ☕
6K notes
·
View notes
Text
Just a bunch of useful websites
12ft – Hate paywalls? Try this site out.
My Fridge Food – No idea what to make? Tell this site what ingredients you have on hand and it will give you recipes to cook.
Project Gutenberg – Always ends up on these type of lists and for very good reason. All works that are copyright free in one place.
Ninite – New PC? Install all of your programs in one go with no bloat or unnecessary crap.
Unchecky – Tired of software trying to install additional unwanted programs? This will stop it completely by unchecking the necessary boxes when you install.
Sci-Hub – Research papers galore! Check here before shelling out money. And if it’s not here, try the next link in our list.
LibGen – Lots of free PDFs relate primarily to the sciences.
Zotero – A free and easy to use program to collect, organize, cite and share research.
Car Complaints – Buying a used car? Check out what other owners of the same model have to say about it first.
CamelCamelCamel – Check the historical prices of items on Amazon and set alerts for when prices drop.
Have I Been Pawned – Still the king when it comes to checking if your online accounts have been released in a data breach. Also able to sign up for email alerts if you’ve ever a victim of a breach.
Radio Garden – Think Google Earth but wherever you zoom, you get the radio station of that place.
Just The Recipe – Paste in the url and get just the recipe as a result. No life story or adverts.
Tineye – An Amazing reverse image search tool.
My 90s TV – Simulates 90’s TV using YouTube videos. Also has My80sTV, My70sTV, My60sTV and for the younger ones out there, My00sTV. Lose yourself in nostalgia.
Foto Forensics – Free image analysis tools.
Old Games Download – A repository of games from the 90’s and early 2000’s. Get your fix of nostalgia here.
Online OCR – Convert pictures of text into actual text and output it in the format you need.
Remove Background – An amazingly quick and accurate way to remove backgrounds from your pictures.
Twoseven – Allows you to sync videos from providers such as Netflix, Youtube, Disney+ etc and watch them with your friends. Ad free and also has the ability to do real time video and text chat.
Terms of Service, Didn’t Read – Get a quick summary of Terms of service plus a privacy rating.
Coolors – Struggling to get a good combination of colors? This site will generate color palettes for you.
This To That – Need to glue two things together? This’ll help.
Photopea – A free online alternative to Adobe Photoshop. Does everything in your browser.
BitWarden – Free open source password manager.
Atlas Obscura – Travelling to a new place? Find out the hidden treasures you should go to with Atlas Obscura.
ID Ransomware – Ever get ransomware on your computer? Use this to see if the virus infecting your pc has been cracked yet or not. Potentially saving you money. You can also sign up for email notifications if your particular problem hasn’t been cracked yet.
Way Back Machine – The Internet Archive is a non-profit library of millions of free books, movies, software, music, websites and loads more.
Rome2Rio – Directions from anywhere to anywhere by bus, train, plane, car and ferry.
Splitter – Seperate different audio tracks audio. Allowing you to split out music from the words for example.
myNoise – Gives you beautiful noises to match your mood. Increase your productivity, calm down and need help sleeping? All here for you.
DeepL – Best language translation tool on the web.
Forvo – Alternatively, if you need to hear a local speaking a word, this is the site for you.
86K notes
·
View notes
Note
hi, i love your old guard character trait gifs!! how do you get the coloured writing to be see through?
thank you! the process is a bit uhhh not complicated, but definitely a little annoying. this is just how i figured it out, if anyone else has a better (easier) way, please let me know!
we’ll start with our text, in the font, size, and placement you wish it to be. the color doesn’t matter since we’ll only be using the shape. i use photoshop cs5, and it looks like this:

now, in adjustments, i create a gradient map with the colors i want the final text to be. it must have a mask, and your gif will look like this:


going back to the text layer, use the magic wand to select the outside. on the gradient map layer, delete the selected area from the mask, like this (+ my magic wand settings):


the same way, delete the empty spaces inside the letters, the Es and the O in this case, always going back to the text layer, using the magic wand and deleting from the gradient map’s mask, so it looks like this:

to finish it up, either delete or hide the text layer, leaving only the gradient map and you’re finished! the end result is this:

hope it helps, and any other questions feel free to ask!
707 notes
·
View notes
Note
newest follower here! 👋 hello!! i was just wondering if you had any good font combos you’re willing to share? ty much in return! keep up the cool work! 🙏👍
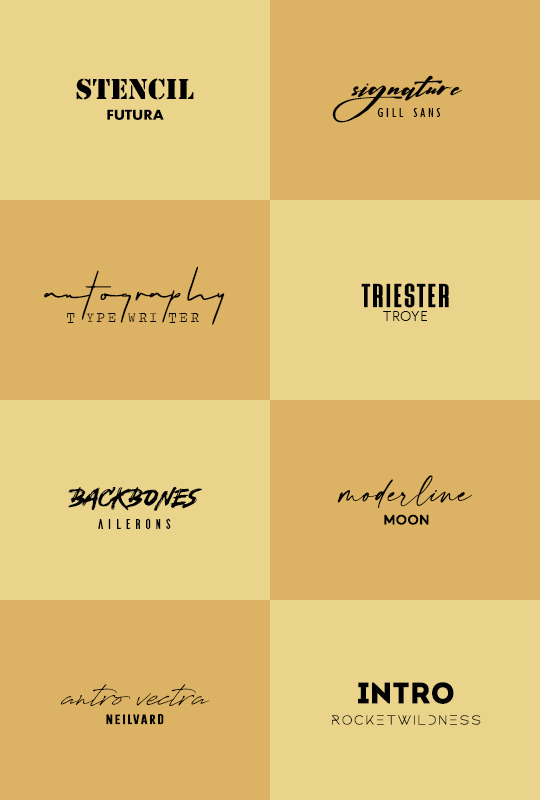
a few personal favorites;
stencil / futura
signature / gill sans mt condensed
autography / traveling typewriter
triester sans / troye
backbones / ailerons
moderline / moon
antro vectra / neilvard three
intro / rocketwildness
& a few other resources for font pairings: one / two / three
2K notes
·
View notes
Text

Hey ya’ll. An anon asked me about the handwriting effect I used in one of my gifsets, and I was SO excited I thought I’d make a full blown tutorial. This is my first tutorial, so if anything’s unclear or you have any questions pls drop me an ask.
I looked around at a couple of tutorials and this is a bit of a mashup of that. The main advantage of this method is that the speed(?) of the writing is really flexible, which makes it good for using with gifs with a set number of frames, but you could also use this with static edits v easily.
Full disclosure this is still v time consuming, but I couldn’t find a quicker way to do it and it does get quicker as you get to grips with it. I use Photoshop CC and this tutorial assumes a certain level of gif making knowledge, esp with the timeline function.
Keep reading
888 notes
·
View notes
Note
I was wondering if you could do a tutorial on this gifset that you did i really like ittt
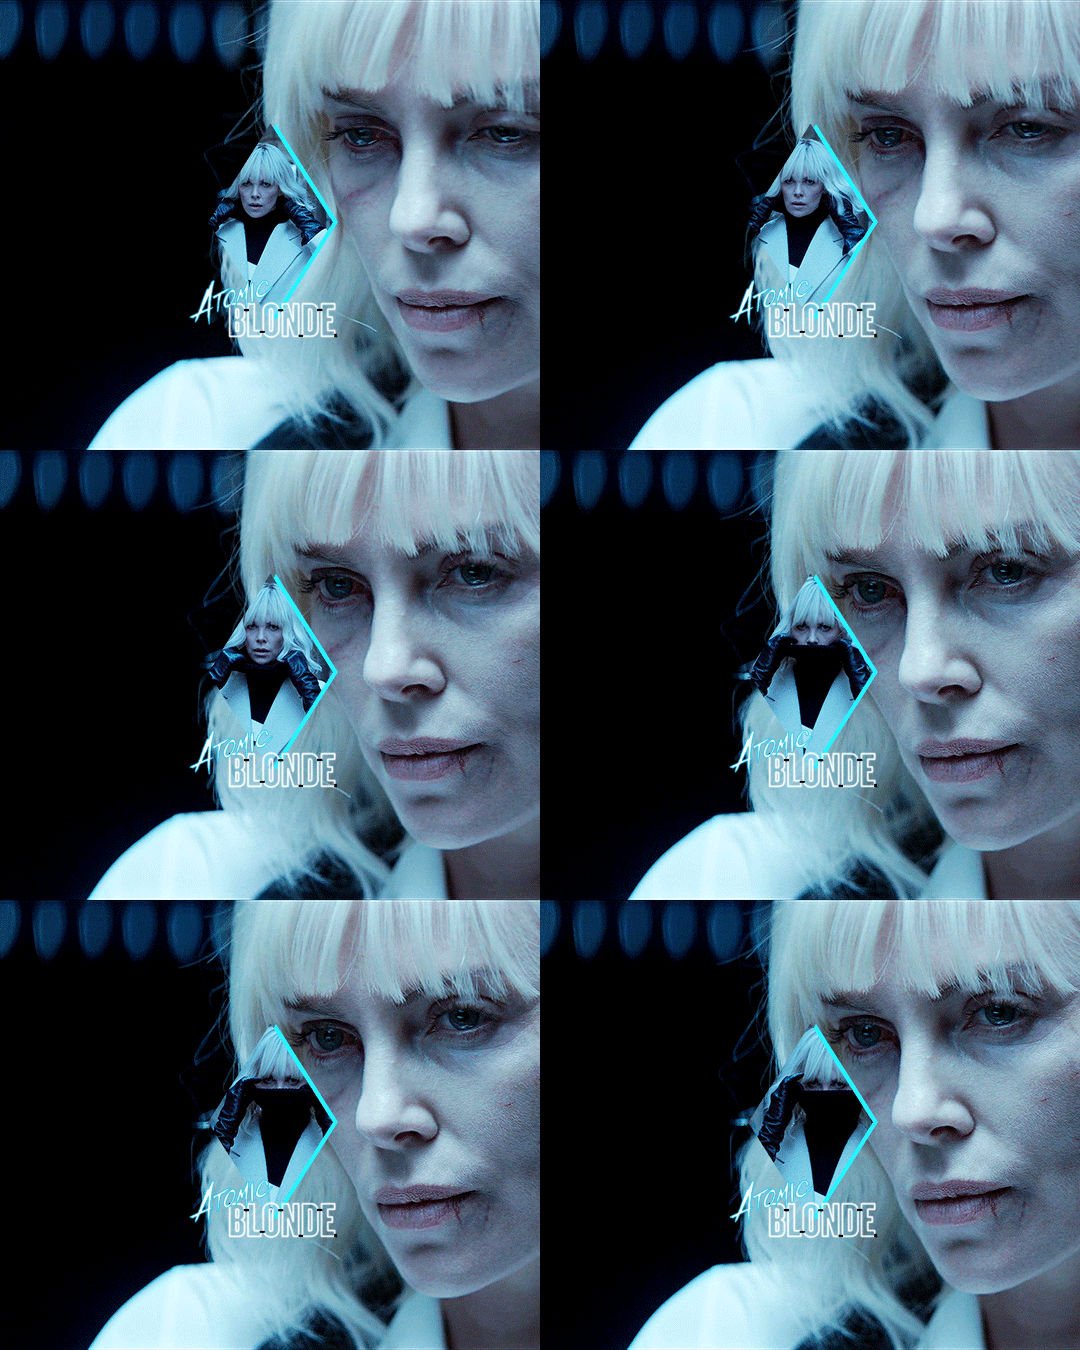
Thank you for sending this in, anon! I’m glad you liked it and wondered how it was made :) Fun fact: the day before you sent this, I had just started working on my next set in that “Select Filmography” series. I hope you like that one too when it’s ready!
I think I should start by saying I’m pretty new to giffing myself and there might be more efficient ways of getting to the same result. However, the point here is to show you the process I went through to make this gifset and hopefully help you understand how to make a similar one.
To follow this tutorial, you will need some version of Photoshop and some giffing knowledge. I know there are multiple ways of making gifs so I’m just letting you know I’m using the timeline and the “Convert for Smart Filters” option (I don’t really know how else to call it).
Now let’s get started!
STEP 1 - CHOOSE THE SCENES
It might sound obvious but, in my opinion, this is the most crucial step. It’s also the one that takes the longest (along with step 7, aka the coloring).
At this stage, you need to have a general idea on how you want your set to look like so you can choose the scenes accordingly. In my case, I knew I needed two types of shots for each movie: one close-up for the main gif and one mid shot for the shape. I also needed to take two other criteria into consideration: the movement (because of the shape) and the lighting (because darker scenes are such a pain to color). Last but not least, I didn’t want the characters to be talking (but that’s just a personal preference).
With all of that in mind, you can start saving a few screenshots of scenes that meet your criteria (or at least some of them). In the end, there won’t be that many to choose from so be prepared to make compromises.
STEP 2 - MAKE A DRAFT
Now that you’ve preselected a few scenes, you can make a first draft. This will help you turn your general idea into something more concrete.
Basically, this is your opportunity to organize your thoughts. What size do you want your gifs to be? What shape are you going to use? On which side do you want the close-ups to be? Do you want all of them to be on the same side or do you want to alternate from one gif to the other? Do the scenes you chose work together (gif-wise but also set-wise)? Are you happy with the way it looks, overall?
By answering all of the questions you might have now, you’ll save yourself a lot of time, trust me. Of course, you can totally skip this step if you already know exactly which scenes you’re going to use and how you’re going to present them together.
To give you an idea, this is what my draft looked like for Atomic Blonde.
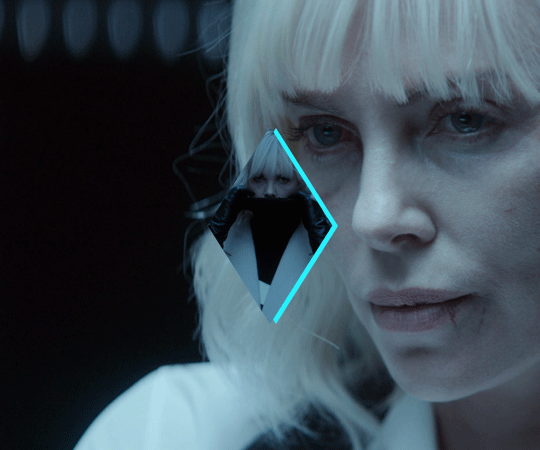
STEP 3 - PREPARE YOUR GIFS
Once you have a clearer view on how you want your set to look like, you can finally start giffing like you usually would (i.e. importing, cropping, resizing, etc.).
It should then look something like this.
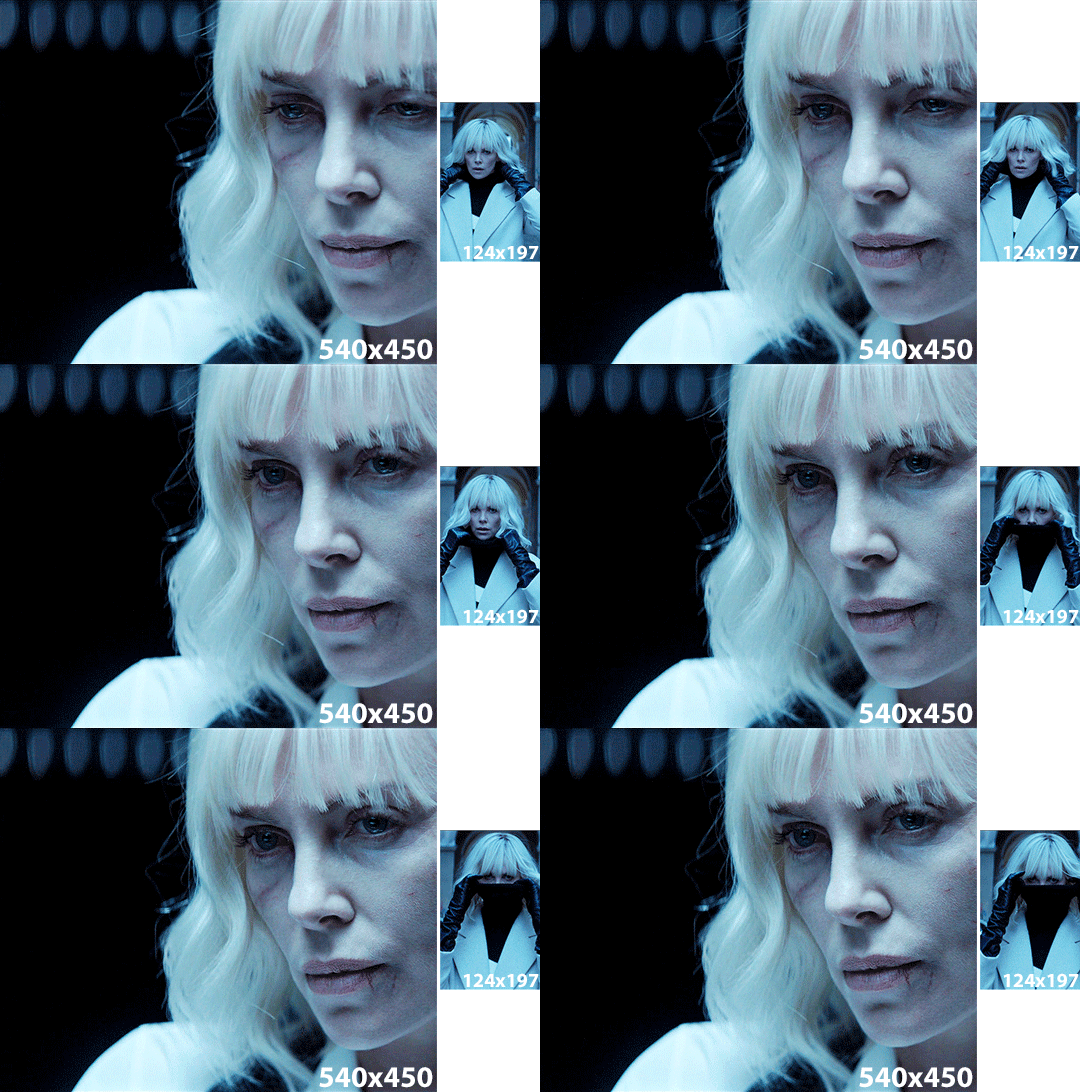
The important thing to mention here is that you want both of your gifs to be the same number of frames (32, in my case).
Ideally, you should also aim for the ~same~ coloring (especially for the skin tone, since both gifs will be so close to each other). This bit is particularly difficult when you chose scenes which have opposite lighting (see my two uncolored gifs below). Remember how I insisted on steps 1 and 2? It was to help you avoid this. So my advice would be not to choose these types of contrasted scenes, unless you can’t do otherwise and you’re ready to suffer!
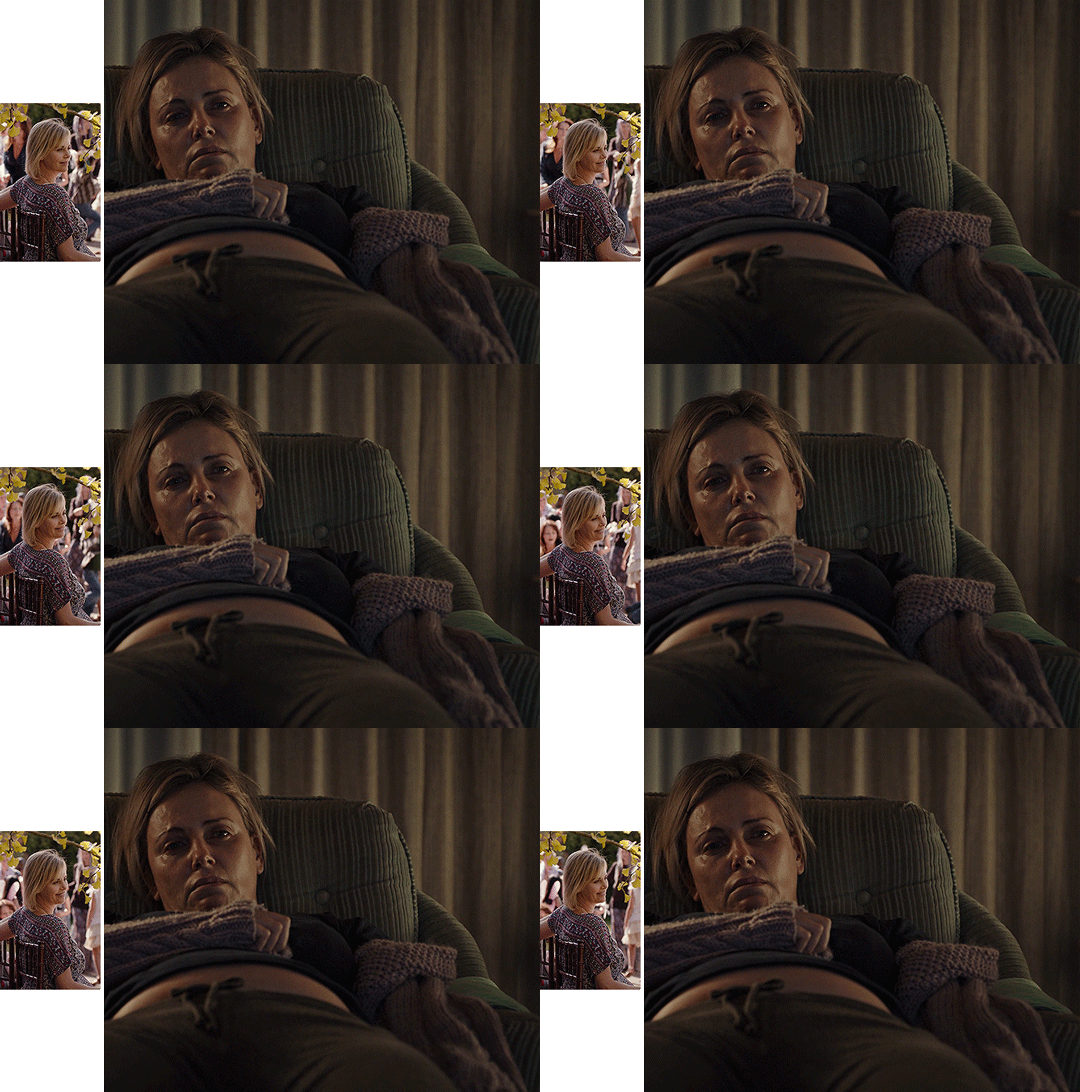
STEP 4 - MAKE YOUR SHAPE
To make your shape, you can click right on the Shape Tool (U) and select the last one, Custom Shape Tool. From the Shape menu appearing on top, you will be able to choose the shape you want from the drop down list and start drawing on your gif.
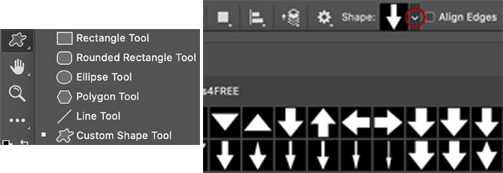
To be more precise with the dimensions, you can manually adapt the length and height from the Shape menu itself. I decided to go with the same ones as my gif.
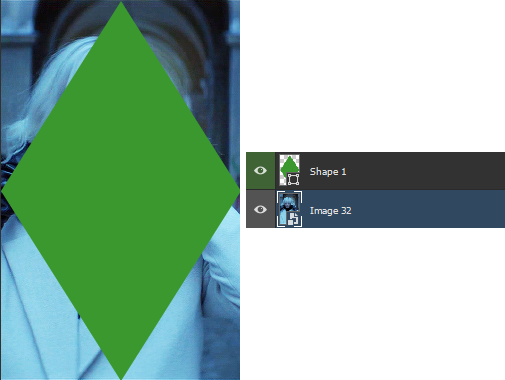
Once your shape is positioned like you want it to be, you can drag and drop the shape layer under your gif. Next, you will have to click right on the gif layer/smart filter and select Create Clipping Mask. The result is as below. Note that if the size of your shape was smaller than your gif, you would still be able to reposition your gif with the Move Tool (V).
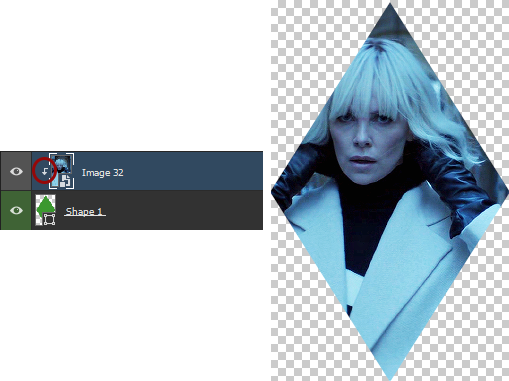
You can now export your shape gif, reopen it in Photoshop and convert it again to the video timeline and to a smart filter. This is where I’m not sure it’s the most efficient way of doing things but it’s the only way I found to keep the coloring of each gif separate. I also find it easier to work with a smart filter.
STEP 5 - COMBINE YOUR GIFS
To add your shape gif to your main gif, you can simply click right on the shape gif you just reopened and select Duplicate Layer. You can then choose the project which contains your main gif to duplicate it in there. Now go to your main gif and reposition your shape gif where you want it to be (how many times did I say gif here?). Finally, you can draw a new shape, using the same dimensions as in step 4, reposition it and choose any color you want from the Shape menu.
Since you will be repeating this process with your following gifs, I suggest you add a few guides so you know exactly where you should place everything to make all of your final gifs look the same.
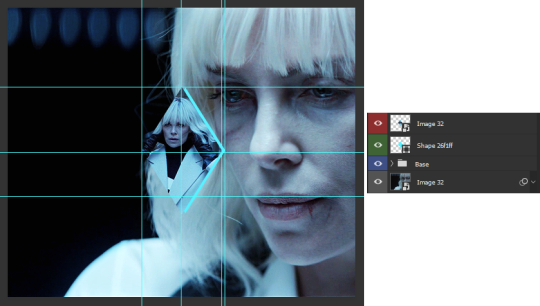
(In case you’re wondering, the “Base” folder contains my adjustment layers/basic coloring for the main gif.)
STEP 6 - ADD THE TITLE
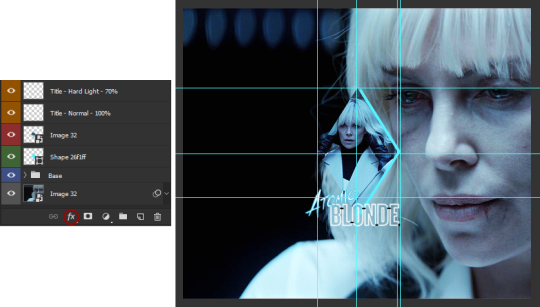
This step is pretty simple: go on the web and type “[name of the movie] title”. Download the png you like most, open it in Photoshop and resize it to a length of about 150-200 pixels. Next, duplicate the layer to your main gif and reposition it. In case you need to resize it again, select the title layer and go to Edit > Free Transform (Ctrl+T).
This is optional but in case you want to change the way it looks, know you can always duplicate the title layer and play with the blending options (see below). The good thing with a png is that you can also add some effects by clicking on the “fx” button.
STEP 7 - ADD COLORING (OPTIONAL)
To be honest, I had not planned on coloring my gifs. But I had already spent so much time on them and I was still unhappy with the way they looked. I mean, see how grey-ish they are? Not great...
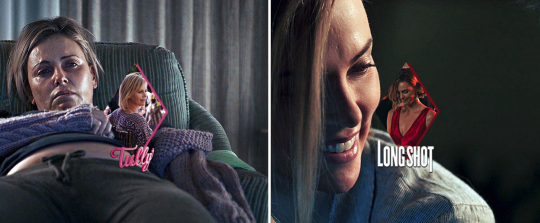
So the only thing left for me to do was to add some colors. Now, since coloring is worth a tutorial on its own and it already exists, I suggest you read through becca’s mega coloring tutorial (and especially steps 3 & 5). Seriously, shoutout to her for making this incredibly useful tutorial. She is so talented and I love everything she makes!
My Atomic Blonde gif barely even needed coloring so I’ll show you what I did for my Tully and The Old Guard gifs.
For the first one, once I had found which colors to use with which blending option and opacity level, I only had to remove the colors from the left side of the gif because there was barely any movement in that scene (phew!). For the second one, on the other hand, I decided to color frame by frame because there was way more movement, in comparison. This is quite a tedious process, which is why you want to limit yourself to a certain amount of frames.
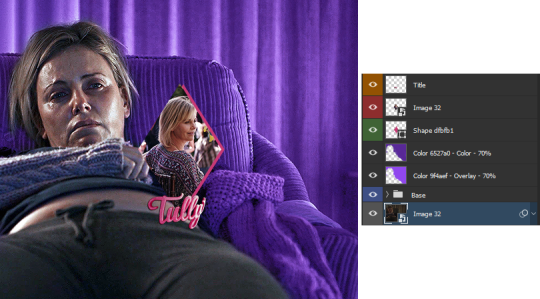
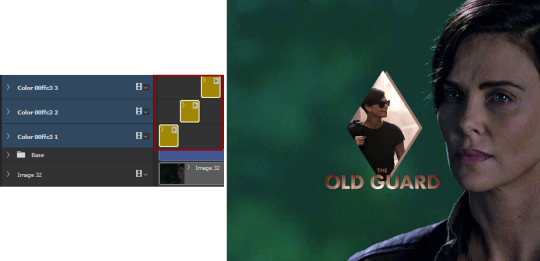
I’ll conclude by saying there are so many things you can do with coloring and what works with one scene might not work with another. So experiment with it: try different colors, play with the blending options and opacity levels, add some gradients and/or gradient maps, etc. Just know it will take some time to get to a somewhat satisfying result!
And that’s it... I hope this tutorial made sense and was somehow helpful. Of course, don’t hesitate if you have any questions! Also, if you do end up making a similar edit, pleeease send me the link or tag me in the replies or something ‘cause I would definitely love to see it!!
372 notes
·
View notes
Text
Two-Toned Gif Background: A Tutorial
As requested by Anonymous, this post will explain how to add two background colors in your gifs like this, with this as our example:

Please like/reblog if this has helped you and feel free to hit me up for any questions and concerns! ♥︎
↓ TUTORIAL UNDER THE CUT ↓
Keep reading
1K notes
·
View notes
Note
hello! your graphics are so so gorgeous, i want to ask in this (/post/187192216358) how you made everything only pink? if that makes sense? XD
for anyone looking for what the anon is referring to, here’s the link. i added a pink texture on like a multiply setting (i can’t remember now since i don’t have the OG file), but here’s a way to do that without one!
gradient map tutorial below!

Keep reading
262 notes
·
View notes
Photo
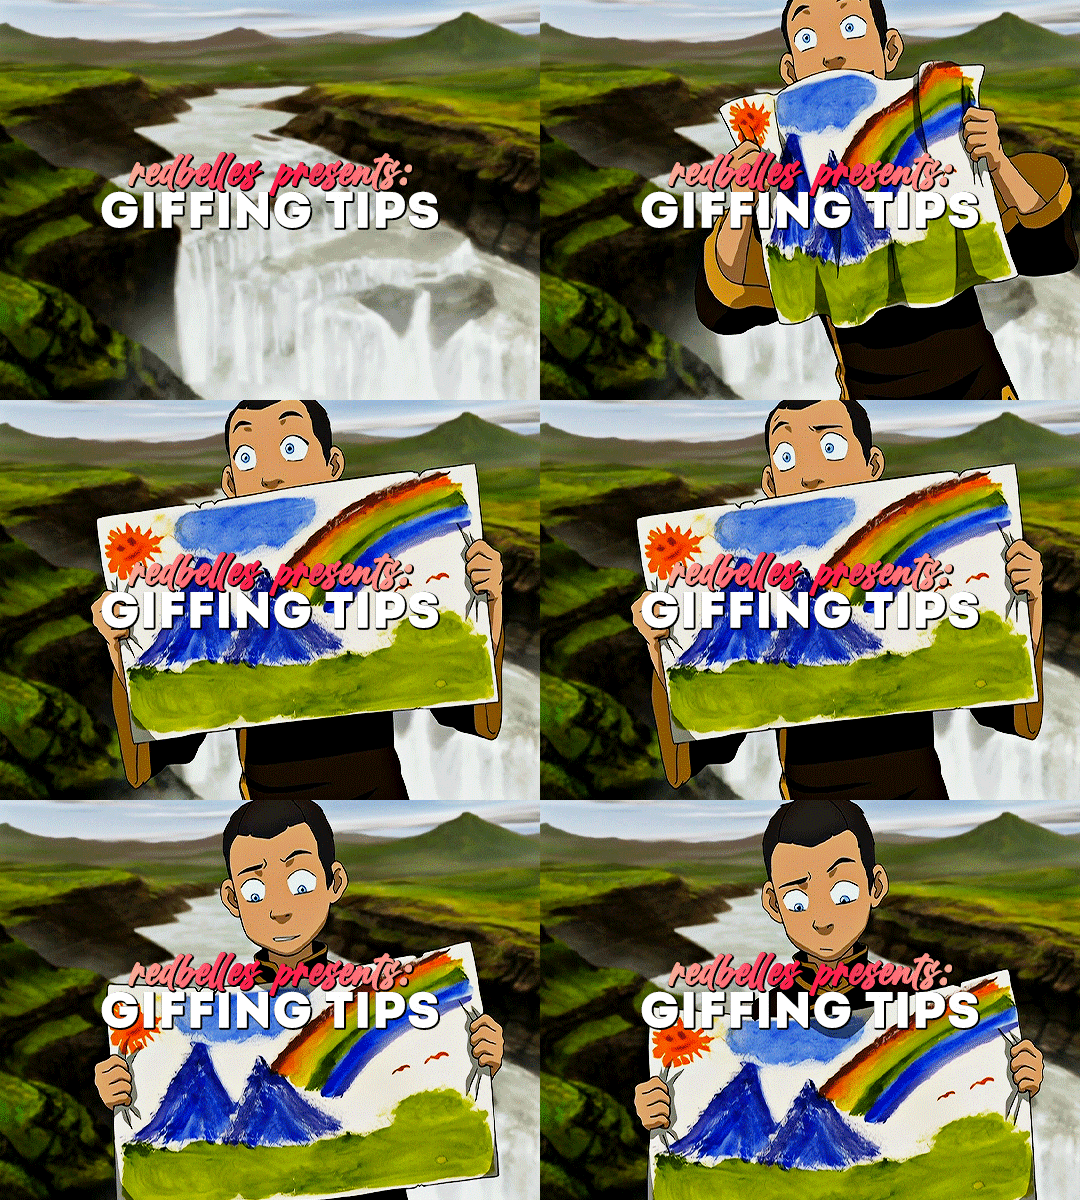
hello! i’ve been asked by a genuinely surprising number of people to walk through how i gif, so here i am with something that’s less a tutorial and more a collection of tips, tricks, and useful links. i hope it helps! ✨
Keep reading
311 notes
·
View notes
Note
hi! could you please tell me how you do gradient text in photoshop? like the text in your gif tutorial w/ the steve gif. thank you 💕
oh yea it’s really quick! so if you want something like this:

right click/ctrl click your text layer and select blending options
select gradient overlay on the left:

3. if you click on the dropdown arrow next to the gradient, you’ll see a lot of premade ones; the example i used for this is just a premade one from the pastels section

you can also double click on the gradient, and then this panel will appear:

if you double click on each square you can change the colors 🕺(also i added a drop shadow to the example)
65 notes
·
View notes
Photo
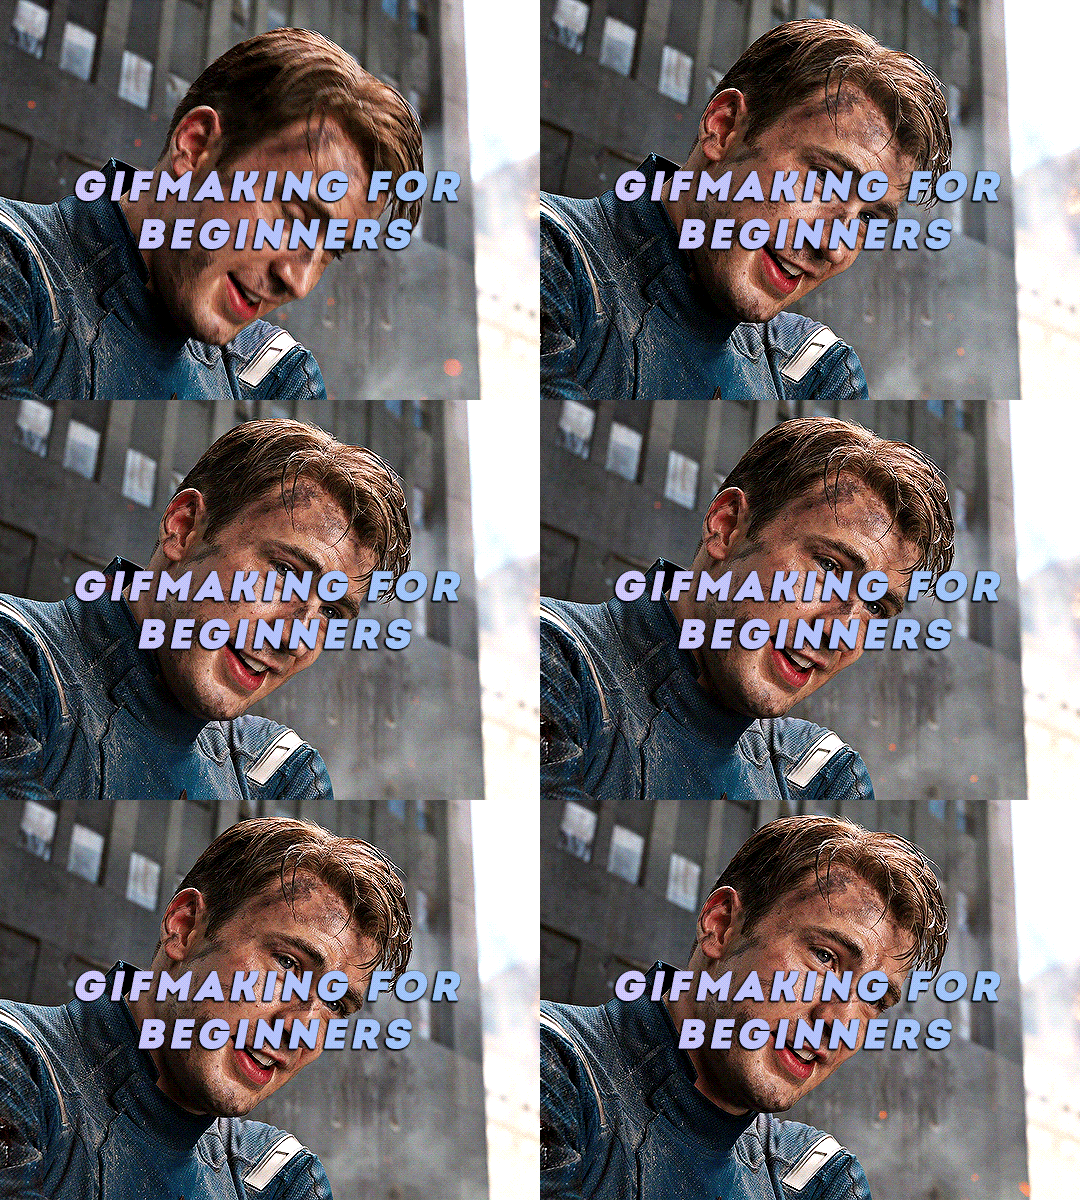
GIFMAKING FOR BEGINNERS
as requested! this is a super super detailed tutorial for the a-z of gifmaking basics, starting from getting photoshop & downloading hq movies/videos alll the way to tagging & scheduling your gifsets on tumblr for max interaction. if you’ve wanted to get into gifmaking but feel intimidated or you don’t know where to start, this is the tutorial for you!!! making gifs might seem overwhelming at first, but with practice, it’s quite easy to get the basics down. for reference, this post is up to date as of nov. 2020. please rb if this helps!
TUTORIAL UNDER THE CUT:
software needed
how to download hq movies/videos
screencapping
importing to photoshop
cropping & resizing
animation
gif speed
actions
sharpening
coloring
text
exporting the gif
fixing gif speed
captioning gifsets
how to tag gifsets on tumblr
when to post gifsets on tumblr
other helpful tutorials/resources!
Keep reading
9K notes
·
View notes
Photo

Patrick von Kalckreuth (Kiel 1898-1970 Starnberg)
“The North Sea” oil on canvas,-1955
27K notes
·
View notes
