Previously Corny Bear Cosplay. New Tumblr is @sparklerkei
Don't wanna be here? Send us removal request.
Video
youtube
How to Sew Loose Hair Into Wefts
Tutorial by: Breezeeweezee Cosplay Tutorial Link: https://www.youtube.com/watch?v=Gkf1wNM-lJw
166 notes
·
View notes
Video
youtube
Foam Scale Mail Armor Tutorial
Tutorial by: CorSec Props Tutorial Link: https://www.youtube.com/watch?v=L752JJxvYno
490 notes
·
View notes
Photo

How to make custom lace appliques – the “Frankenlace” method
A lot of people asked for more info on how I made the appliques that decorate the bottom of Zelda’s gown. Here’s my tutorial for the whole process! This method can be used to make all kinds of applique shapes and designs if you get creative with it.
These lace appliques are made out of other lace – hence the nickname. To get started, you’ll need to collect a few lace trims to use as raw material. Look for styles that are similar or complement each other, because you’ll be combining them. This is some, but not all, of the trims I used. I bought these in the LA fabric district, but most are available at trimexpoonline.com.
Cut your lace down into smaller pieces that are more modular. Don’t cut up ALL your lace – this is just an experimentation stage, to practice rearranging the design.
Using a template of your desired shape (I made mine digitally, but you can hand draw one too) practice arranging your pieces until you find a design that suits your needs. This is not my final design in the picture – I went through several versions before I was totally happy with how it looked. You might discover that you need more lace, which is why planning and experimentation are so important. When you’re satisfied with how it looks, it’s time to start putting it all together.
You’ll need an embroidery hoop large enough to cover your whole template, plus some netting that is as close to transparent as you can find. Most generic tulle is NOT fine enough to do well with this technique – the holes are too large and the tulle stretches too much when handled. Look for netting that does not stretch or fray, if possible. Put some netting in your embroidery hoop, tightening the surface like a drum. I taped my template to a small sheet of masonite to give myself a portable work surface. I also ended up using clamps to hold the embroidery hoop to the masonite, but forgot to get a picture. This is optional, but really helps the design from shifting too much as you work.
Tools for the next step: fabric glue (other brands work too), a small paintbrush, and a water cup. I watered my glue down a little to make it easier to spread with the paintbrush. Be careful not to add TOO much water, or your glue will be too thin, not grip well, and take a long time to dry.
Working in small sections, begin gluing your lace pieces onto the netting. Start at the center and work outward, if possible. Continue until all your lace pieces are glued onto the netting.
Here’s what mine looked like with all the lace attached! At this point, I flipped the embroidery hoop over and applied a second coat of glue over the entire back of the work. The netting is so thin that you can continue to apply more glue from the backside to get a more secure grip.
Optional: add rhinestones to taste. I used E6000 for this step. Not every applique requires rhinestones, but in this case I wanted Zelda to sparkle as much as possible.
Repeat to create as many appliques as you need! Zelda has 8 along the bottom of her dress. Here’s part of my assembly line.
When you’re ready to attach the applique to your fashion fabric, trim away some of the netting along the outside, but leave any “interior” portions that help stabilize the design. I simply glued my appliques onto the silk, but I later went back and hand-stitched them down for a more secure hold. After they are properly attached to your fabric, you can VERY CAREFULLY trim away the “interior” pockets of plain netting using small scissors.
The final look of my gown, after all the appliques and trim were attached.
This method is very time consuming and requires a lot of patience and concentration – but I just love the results! I wanted to achieve the look of professionally-made applique, but without access to industrial equipment, this was the next best thing I could come up with.

The white-on-white effect is subtle, but matches the look I was going for. Photo by Vontography.
I hope this is helpful to some of you in your own costume projects. Let me know if you have any questions, and good luck!
6K notes
·
View notes
Photo


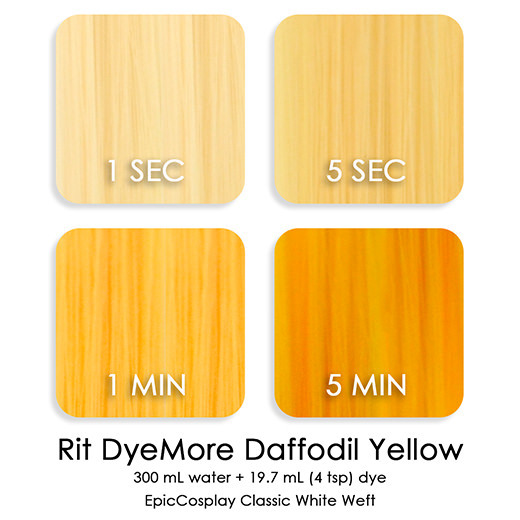
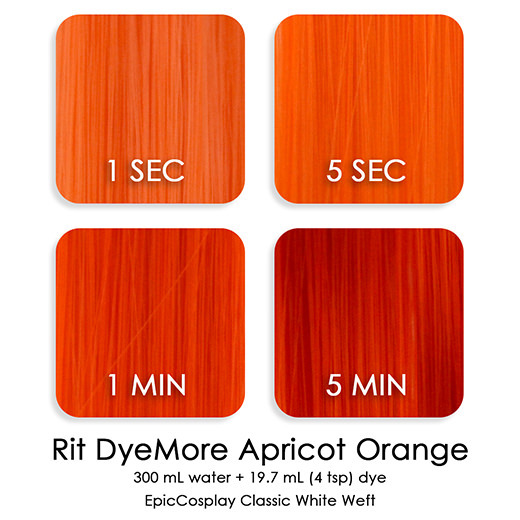

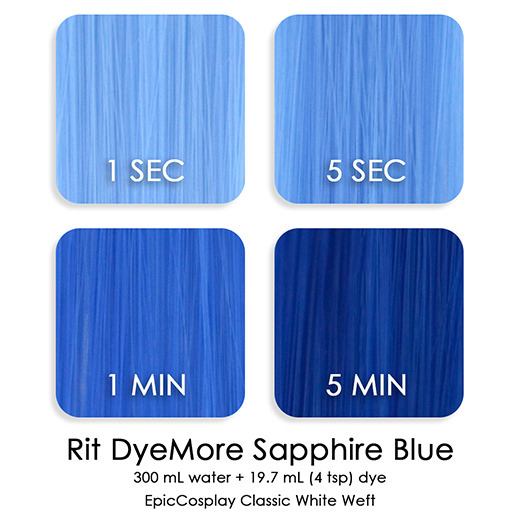
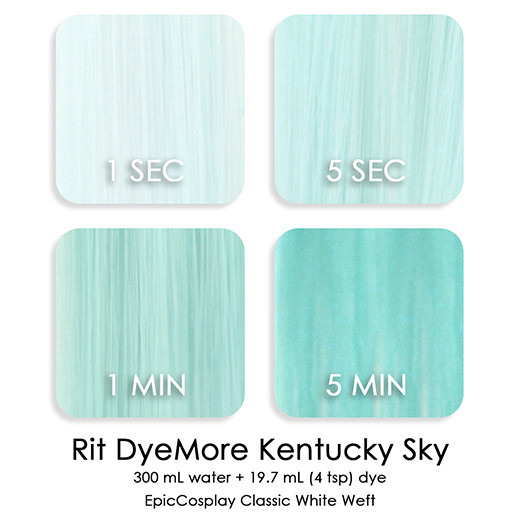
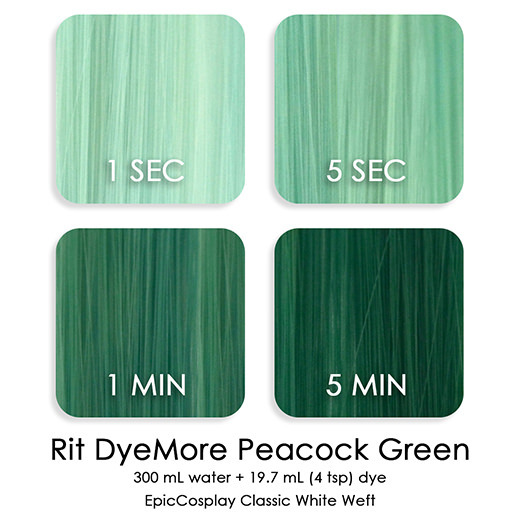
Full guide here.
You guys have asked for a dye guide and here it is! We used Rit DyeMore fabric dye, Rit’s line for polyester/synthetic materials (not to be confused with just Rit Dye). It is far more pigmented as a wig toner than their standard blends since it was developed for plastics.
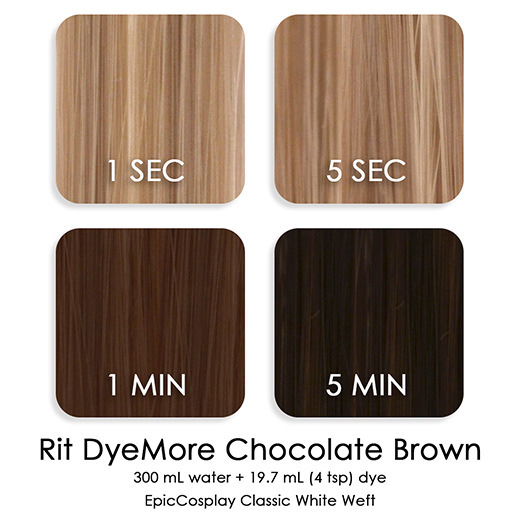
Swatches were made using our Classic White wefts (keep in mind that if you’re dyeing a wig other than white, the dye will not cancel out the original color but mix with it. ex: If you dye a yellow wig with blue dye, you will get a green wig).
300 mL (1.3 cups) of water was used with 19.7 mL (4 tsp) of dye. Water was kept at a LIGHT SIMMER (180F/82C), NOT rolling boil (212F/100C). Color took more evenly when water was at a simmer.
Individual swatches were placed in the simmering water at 1 second, 5 seconds, 1 minute, and 5 minutes.
Colors may turn out differently for you depending on concentration of dye, heat, time boiled, and how the wig gods are feeling that day.
It’s important to ALWAYS do swatch tests before dying your full wig. In addition, in the event that your fibers become curly after dyeing them, please use a regular flat iron (avoid chi irons) on low heat setting to straighten them.
Happy dyeing!
799 notes
·
View notes
Photo
I am totally going to use this for my CCS staff in the future!!


This is how I make my cosplay swords! If there are any questions, or if anything isn’t clear, feel free to ask me anything. The template I mentioned: sta.sh/21u4m1riua1s ((By the way, I’m going to Megacon next week!! I’ll be cosplaying as Alice Angel, Bendy, Vio Link, and Shadow Link!))
3K notes
·
View notes
Photo

Hurray for pattern alterations! It is going to take about an hour and a half total time to finish the alterations I need.
0 notes
Photo


Rue modeling my Yona cloak. Super happy with how it turned out. Since my surger thread is cream and brown right now I’ll probably work on my youngest sister’s Jolteon gijinka before I go further with my Yona, so I won’t have to change it too often.
0 notes
Photo

“I probably won’t make the cosplay for months” I say as I start making the cosplay.
0 notes
Note
Hi, I'm completely new to cosplaying, and am attending my local convention in June. I really want to cosplay Daenerys Targaryen from Game of Thrones but I'm 16 years old. Is this too young to cosplay at all? Or is it too young to cosplay Daenerys? What is it like cosplaying? Thanks :)
I started cosplaying when I was 13! I’ve seen little kids cosplaying, young teens, adults and even seniors. Sometimes there will be families who dress up together. You’ll fit right in.
Cosplaying is equal parts fun and hassle. It’s waking up early to get into your crazy outfit. It’s wondering how you will be able to use the bathroom, sit down, navigate, walk. It’s dealing with walking awkwardly in your brand new shoes. It’s trying to survive in the heat/cold when your outfit wasn’t made for it. It’s trying to eat without spilling. It’s walking down a hallway and being recognized for the character. It’s being stopped for photos every five minutes. It’s weird looks when you’re out of the con area, and awkwardly trying to explain what you’re doing to people who are out of the loop. It’s being able to meet and gush with other fans because you are this big geeky beacon of your fandom. It’s being in the right place at the right time to take the perfect joke photo for your character. It’s being PART of the convention while being at the convention. It’s getting back to the hotel room and taking off your costume so you can finally relax and then wanting to do it all again as soon as possible.
I hope you have a great time!— Duckie / Admin
38 notes
·
View notes
Text
Eventually I’ll finish my Ladybug ball gown. But for some reason I’ve been on a Yona hype day and I found the most gorgeous crepe backed satin from my mom’s stash that will work perfectly for her over tunic. And if I can get another yard of broadcloth I have an amazing pink for the underdress, I just only have 4 yards so it’s cutting it close. Plus we have some amazing raw muslin that will be perfect for her cloak! So the cloak will be my project for this week.
0 notes
Photo

Yona earrings for a future cosplay! I had the supplies so I decided to make them today. I probably won’t make the cosplay for some months
3 notes
·
View notes
Video
youtube
RESIN COLOR that’s clean and easy - by Little Windows
Tutorial by: LittleWindowsResin Tutorial Link: https://youtu.be/SeN5y-0t3uw
661 notes
·
View notes
Photo

STOP DYEING WIGS WITH SHARPIES AND ACRYLIC INK
USE. FABRIC. DYE. FOR. SYNTHENTICS.
I never ever ever see people talking about this, everyone understandably gets excited when they come across the holy news that is dyeing synthetic wigs with sharpies and ink but you will find out the hard way that that shit RUBS OFF on stuff.
Synthetic wigs are basically made out of similar fibers to what synthetic clothing is made out of. USE. FABRIC. DYE.
The wig won’t be crunchy, it won’t wear off, it won’t rub off.
THis is a link to a huuuge color experiment showing lots of shades dyed onto white fibres with RIT and then iDye Polyester, which is what I recommend bc it’s more predictable.
Spread this like fire I’m so tired of seeing everyone flip about ink when I know you’re gonna end up with crunchy, staining wigs.
45K notes
·
View notes
Link
42K notes
·
View notes
Text
I need to lose some weight before I sew for myself again. I don't want to make my dream cosplays when I'm going to lose weight in the future.
0 notes
