
naytinnoms
Om nom noms
A collection of recipes I've found and would like to try at some point! YUM!
1148 posts
Don't wanna be here? Send us removal request.
Last Seen Blogs

saltyeagledonkeyclam-blog
Untitled

miederlover
Mieder man

gianellagd
♍ G I A ♍

scootmagazine-blog
layback-lightup

the-alien-raccoon
the alien raccoon
Text
Do any of u have decent recipes that are like 5 ingredients (not including spices) and take 45 mins or less to prepare i gotta stop eating sandwiches for dinner
115K notes
·
View notes
Text
107K notes
·
View notes
Text
Perfectly Easy (and Tasty) Microwave Mochi Recipe
For those of you who are interested, this is how I make mochi. I used to do it the traditional steamer way but that took forever, and this is just as tasty but pretty quick to whip up! Also, there’s no possibility of you accidentally spilling boiling hot mochi all down your arms as you try to transfer the glop between cheesecloths (yes that’s happened to me and it was NOT. FUN.). If you don’t know what mochi is, it’s a Japanese sweet rice treat that is absolutely addictive: chewy and soft and YUM. I’m part Japanese and lived in Hawaii for a lot of my life so it’s a staple comfort food for me! I used to make it only for New Year’s and special occasions, but now that I microwave it I can make it whenever I want. Which is good, because look at how gorgeous it is:

Microwave Mochi Recipe (makes about 20 pieces)
Ingredients:
1 ½ cups mochiko (glutinous rice flour. Sold at most grocery stores in the Asian food section, look for a white box)
1 cup white sugar
1 ½ cups water
2-4 drops vanilla (this is optional, or you could use coconut extract/other flavorings instead, but I like vanilla)
Approximately 4 drops of food coloring. Traditionally you color mochi pink or green, so 4 drops of either green or red, but of course the color is really just up to you.
Instructions:
First you need a microwavable bowl. I use a tupperware container, it’s shallow but wide, like a pan. Any microwavable container that’s big enough would do though, I imagine.
Mix mochiko and sugar together in the bowl/dish until well blended (I use a fork). Add water to mixture and stir until no lumps are left, the mixture should be liquidy and smooth. It has a consistency similar to that of warm syrup. I like using a fork because it’s easy to break up the lumps and make sure the water’s well-integrated. Now add vanilla and food coloring, and stir until color is even throughout mixture.
Put microwavable dish into the microwave and loosely cover with plastic. If you are using a tupperware container that comes with a lid, like I do, then just rest the lid askew on top of the dish so that it can vent but is still mostly covered.
Ok, now here’s the trick on how to make sure it turns out nice. Microwave the mochi on high for seven minutes total, but not all in one go. Here’s how I do it: Microwave 2 minutes, then take out of microwave and stir with that handy dandy fork. The edges will be more cooked than the middle, so mix it all together and try to get it as even as possible, then place back in microwave. Microwave 2 more minutes, then repeat; mixture will be stickier now. Microwave 2 more minutes and stir again, then microwave 1 more minute, take out and stir, and you’re done! The mixture will be really glossy and brightly colored now, and very very hot. It will also be basically glop, so stirring is more just folding the mix a little to make sure it’s even. So to sum up: Microwave 2 minutes and stir, repeat twice more so you have a total of 6 minutes, and then microwave for 1 minute and stir one last time. I microwaved for eight minutes once and the mochi wasn’t nearly as good, it got hard, so STICK WITH THIS TIMING.

The mochi will be VERY hot. Let it sit for … I’ve never timed it, but I’m guessing it’s about five minutes. Basically you need it still warm, but not hot. You want it to still be pliable so you can shape it, but don’t want to burn your fingers! While the mochi is cooling, you can make the powder you need to coat it in. This is also very simple:
Ingredients:
½ cup potato starch (again, should be in Asian food aisle. Some people use cornstarch. DON’T USE CORNSTARCH.)
¼ cup granulated white sugar
Pinch of salt (not very much at all, you don’t want your mochi to taste salty, eew. I think the original recipe I’ve adapted this one from called for ¼ t but that was too much for me, so I just use a tiny pinch now. Your call.)
In small bowl, combine potato starch, sugar, and salt.
… There, you’re done making that! Easy, right? XD
Now it’s time to shape the mochi.
[Technically, you could just leave it in the pan to cool completely (depending on your dish’s shape) and then cut it up into pieces with a plastic knife. If you’re planning on doing that, then mix the mochiko up in a separate bowl and oil your microwavable dish with vegetable oil before pouring mochi mixture in to cook. I’ve never done it this way though so I’m not sure how well it would work, considering you’d be stirring a lot. If you want to try though, it’s probably doable.]
The most important thing to remember is that warm mochi is incredibly sticky, but it doesn’t stick very much to plastic. This means that whatever utensils you’re using/surfaces you’re putting the mochi on should be plastic! To shape my mochi I actually use two plastic spoons I got from Yogurtland, haha, but to each their own.
Anyway, once the mochi is cool enough, take a plastic spoon and scoop up some mochi! Approximately a Tablespoon per piece is what I do, but the size is really up to you and your spoon. I use two spoons so I can scoop with one and then use the other to separate the scoop from the rest of the mochi, and to make sure the scoop is shaped nicely–you know, like when you shape cookie dough with two spoons? Like that.
So scoop up a dollop of mochi, and then drop it into the starch/sugar/salt mixture. Roll it around in the starch until it’s coated. Then pick it up with your fingers and just roll it in the palms of your hand until it’s a nice smooth ball shape. This is fun because it’s so squishy, like a stress ball. And finally, place on a plate to cool! You don’t have to worry about it being sticky any more because the powder coats it to keep it from being sticky. Aaaaaaaand you’re done! Just repeat with the rest of the mochi until the mochi is all nice and powder-coated, and that’s all. All that’s left is to eat all the mochi, which is, alas, way too easy to do. So yummy.
More fun things to do with Mochi:
Make mochi ice cream! No more going to the store for your mochi ice cream fix, just make your own! Microwave only six minutes (2 + 2+ 2) and then shape as usual but flatten instead of leaving a ball shape. Scoop a bite size dollop of ice cream, place in center of flattened mochi, and fold mochi closed around ice cream. Make sure it’s well coated with the powder, and return to the freezer to eat later :D
Wrap the mochi around other things too: Lychees, strawberries, sweet red bean paste …
If you add cocoa powder to your mochi mix before microwaving it, you make chocolate mochi!
You can also use green tea in lieu of plain water to make green tea mochi! I’ve never tried substituting other liquids but I know coconut milk works, and I am planning on making a batch of chai tea mochi soon :D
This recipe turned out pretty long because I ramble but honestly this stuff is SUPER easy to make. So have fun with it, happy eating, and happy new year! :)
6K notes
·
View notes
Text
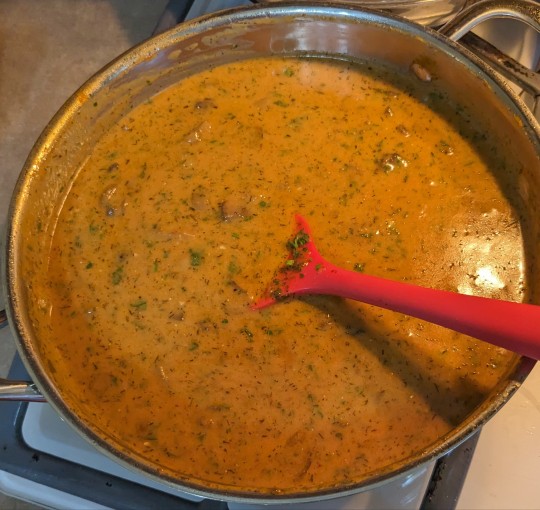
I made Hungarian mushroom soup and it's a little too delicious to be real
32K notes
·
View notes


Text
Mucus Buster
Everyone's got lingering congestion this year, so as someone who's no stranger to phlegm, and inherited the folk wisdom of a stage actress (the show must go on!) I share with you my recipe for making things better:
2L water
the juice and rind of one lemon (just dump the juiced rinds in, don't zest them, you maniac)
a small thumb of fresh ginger, sliced in coins
about a dozen cloves, some star anise, peppercorns, and maybe whole cinnamon or allspice or whatever else you like, in a tea ball (except the cinnamon if it doesn't fit, obvs)
good dollop of honey, to taste
Bring the water to a boil then dump in all the stuff. Keep it hot but not boiling – a slow cooker is good for this. Keep this pot on a low heat all day and serve yourself a mug every so often, adding water as necessary. At some point you will need to add a new lemon and some more honey, but the spices can generally carry over two pots if you're drinking it regularly.
The acid helps clear the gunk, ginger is good for the circulation, and clove/aniseed/pepper have some sort of decongestant/soothing properties. Honey is both nice and antiseptic, and apparently is a cough suppressant as well? Anyway, I just got over another run of Covid and this was wasn't 100% effective but it worked better than phenylephrine.
8K notes
·
View notes
Text
As lunar new year approaches, I'd like to share my mom's Chinese new year cake recipe. It's probably more like a pudding, as definition, but we call it a cake. This makes the perfect "not too sweet" nian gao. And it also doesn't stick to your teeth like a lot of nian gao. Edit: Recipe has been edited to include metric measurements as well as provide some dietary notes such as being gluten free.
2024 blaze edit: my mom had a massive stroke last March and it left her barely able to walk. She was an incredible cook and her head is full of the most wonderful recipes. I just felt this year, it was more important than ever to share some of those recipes so that even though she isn't able to cook for others herself, she can be cheered by the knowledge her recipes are still making ppl happy.
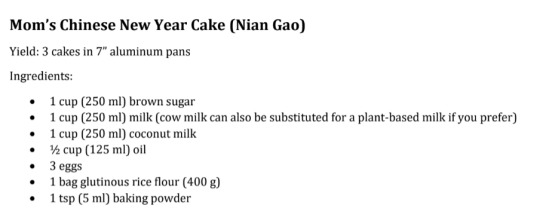
Full recipe text under cut. Download recipe pdf here.
Mom’s Chinese New Year Cake (Nian Gao)
Yield: 3 cakes in 7” aluminum pans
Ingredients:
1 cup (250 ml) brown sugar
1 cup (250 ml) milk (cow milk can also be substituted for a plant-based milk if you prefer)
1 cup (250 ml) coconut milk
½ cup (125 ml) oil
3 eggs
1 bag glutinous rice flour (400 g)
1 tsp (5 ml) baking powder
Directions:
Grease three 7” pans and set aside. Preheat oven to 375°F (190°C).
Mix together sugar, milk, coconut milk, oil, and eggs. Then stir in dry ingredients and blend until smooth. You don’t have to worry about overworking the batter as it is made with glutinous rice flour, not wheat flour.
Divide it evenly amongst three greased pans.
Bake @ 375°F (190°C) for 40-50 minutes. All three can be baked at the same time in the oven. Just rotate where they are in the oven halfway for even browning.
Notes:
Cake should have nice brown crust on top and glutinous squishy sticky core.
Tastes better the next day and once fully cool.
If you don’t want a bunch of leftover coconut milk from the can, use the entire can of coconut milk and then add enough milk to get up to a full 2 cups (500 ml) of liquid.
Don’t skimp on the coconut milk. The recipe is simple enough that you will taste the difference.
This recipe is gluten free. Glutinous rice flour isn’t related to gluten.
If you try it, let me know how it goes! I'd love to see.
15K notes
·
View notes
Text
37K notes
·
View notes
Note
Oh man I would LOVE a recommended batch-freeze gyoza recipe! I've never made then but I LOVE them, but I'm scared of googling it because of all the ingredients I don't know. Do I have to buy them all? Can I substitute for things I already have in my cupboards? Can I can skip some? How do I make this veggie/vegan? I JUST DON'T KNOW.
Ahhhh, Gyoza, the tasty tasty dumpling.
Can you substitute? Yes, of course!
Can it be Vegetarian? Yes, of course!
Essentials:
2 teaspoons salt
2 tablespoons grated or ground ginger. (ginger paste!)
1 tablespoon soy sauce
1 tablespoon sesame oil, or olive oil if you want.
Feel free to substitute or leave out whatever you like from the list below. Remember that everything here must be super-finely minced, or it won’t cook through.
Keep reading
384 notes
·
View notes
Text


I also found the recipe from the woman who survived Auschwitz and lost her faith to regain it through her children and grandchildren.
16 notes
·
View notes
Text
Do any of u have decent recipes that are like 5 ingredients (not including spices) and take 45 mins or less to prepare i gotta stop eating sandwiches for dinner
115K notes
·
View notes
Text
56K notes
·
View notes
Text
"scalloped" taters, an Old AF family recipe that was only written down in the last 20 years or so, with no measurements anywhere on the recipe card
oven-safe dish. preferably lidded, but loose aluminum foil works fine too
potates, however many you want or need to use up, sliced as thin as you get can them without a mandoline because no one in the family has ever had one
onions, halved and also sliced thin, quantity relative to how much you like onions
all purpose flour
milk (or halfnhalf if you're a decadent lil guy. you can also use unflavored and unsweetened nondairy milk. i've never tried it, but relatives have and reported positive results)
butter, either room temp so you can plop little bits of it or cut into tiny cubes
seasonings (salt, pepper, i've added fresh thyme and sweet paprika before to great success, old bay because i was half asleep and thought it was paprika and it was fine, nutmeg, five spice, go ham)
add a layer of taters to the bottom of the dish, not specified how deep, but flat double layer turns out best by my experimentations. add some onions. sprinkle some seasonings on it to taste. sprinkle some flour on it. again, no measurements, i use at least one heaping big soup spoon's worth of flour per layer, a solid dusting but you should be able to still see the potatoes through it. a few dots of butter. cannot stress enough that this is how the got dam recipe is written
repeat layers until you run out of potatoes, pressing down as needed. you want a little room between the top of the taters and the lip of the dish. or just bake it with a sheet pan on the rack below it if you're paranoid. don't flour the top layer of taters, butter it liberally instead. how much butter do you want? this is a recipe from 1890s southern usa, home of Eating Fat Recreationally, so the traditional answer is "too much"
the strongest vibe check: pour an unspecified amount of milk (carefully) into the potatoes without disturbing the layers. i usually put the milk in my nicest measuring pyrex with the good spout and pour slowly against the side of the dish. "how much milk?" you might ask naively, like i once did. "enough" is the answer i got. i usually pour until i see the whole mass of taters/onions/flour just start floating off the bottom of the dish. top layer not fully submerged but rubbing elbows with the milk. i like saucy potatoes. the temperature of the milk doesn't matter. i've simmered shit like garlic and bay leaf in it before pouring to great success
bake at 375 until it's done. literally word for word what the recipe says, doesn't say to cover it. i do so i can control sauce thickness and browning, but even that isn't necessary. i start checking after 20 mins. when it's done, the taters and onions will be soft all the way through and the milk/flour/butter/seasonings will have thickened into a sauce. how well this sauce hugs the taters and onions will entirely depend on whether my great great great grandmother reached through your spoon to help guide your flour to milk ratio. too runny for your liking, take the lid off and bake it some more. too thick, add more milk, push it around a little bit to mix, and bake it some more. the world is your potato
it's at its best after a 10-15 minute rest, but it isn't necessary. amount made is also relative; i have done a single serving of this in a ramekin with one (1) potato, quarter of an onion, in a toaster oven, all while very very sick, and it turned out splendidly. it's solid comfort food, 20/10 if great³ gramma possesses you during assembly
------
ooooh ty ty
3K notes
·
View notes

Text
Winter Solstice Recipes
With the winter solstice fast approaching, I thought I would share some of my favorite recipes to make! Some of them were originally found on websites, but I changed them up to suit my own needs just a bit!
Quick note before we begin: this will most likely be my last post until the New Year, as I will be with family for the most part. I will still reblog and like content, but there will be no original content from me. Thank you for your understanding!
Warm Winter Soup
Ingredients
2 tablespoons of butter or margarine
2 onions, chopped
2 carrots, shredded
1 tomato, diced
2 potatoes, peeled and cubed
3 cups of chicken broth (any broth works)
1 teaspoon of salt and pepper (or to taste)
1 tablespoon of dried parsley
1/2 tablespoon of dried thyme
1/2 tablespoon of dried rosemary
Juice if 1 orange or 1/2 cup of orange juice
2 cups of milk
1 bay leaf
Steps
In a large pot over medium heat, melt the butter or margarine and sauté the onions for 5-10 minutes.
Add the carrots, potatoes, broth, tomatoes, salt, and pepper. Stir well.
Add the orange juice, parsley, thyme, rosemary, and bay leaf.
Reduce heat to low and simmer for 30 minutes, stirring occasionally.
Remove the bay leaf.
Purée the soup in a blender or food processor. Alternatively, use a hand blender.
Stir in the milk, mixing well, and season with salt and pepper to taste.
Yuletide Cider
Ingredients
1 gallon apple cider
2 cups lemon juice
½ cup honey
½ cup sugar
2 oranges
1 apple, peeled and diced (honey crisp is recommended, but any is useful!)
2 tablespoons ginger or to tastes
2 tablespoons nutmeg or to taste
2 teaspoons chamomile or to taste
2 cinnamon sticks (optional!)
Steps
Pour in apple cider, lemon juice, honey, and sugar in a large pot on medium heat, while mixing carefully. Stir until the honey and sugar dissolve.
Cut the oranges into slices and put them in the pot.
Add the diced apple.
Add the ginger, nutmeg, and chamomile.
Allow to simmer for about 2-4 hours.
Pour into a cup and add the cinnamon sticks.
Orange Chamomile Pound Cake
Ingredients
1½ cup unsalted butter
6 chamomile tea bags OR 1½ cup of chamomile
8oz cream cheese
2½ cups sugar
1½ teaspoons finely grated orange zest
¼ cup honey
6 large eggs
2 tablespoons freshly squeezed orange juice
2 teaspoons vanilla extract
2 teaspoons salt
3 cups cake flower
For the glaze
3oz hot water
1 chamomile tea bag or ¼ cup of chamomile
1¼ cup of confectioner sugar
Pinch of salt
½ tablespoon honey
½ tablespoon freshly squeezed citrus juice (lemon, orange, lime, etc.)
¼ teaspoon vanilla extract
Steps
Place in a heavy bottomed sauce pan over medium heat. Gently melt the butter, and then add the chamomile. Cover with lid, remove from the heat, and let steep for 30 minutes.
Remove lid and set pot over medium heat to gently melt any hardened butter. Once melted, cover with the lid again, remove from the heat, and let steep for another 30 minutes. Squeeze out as much liquid from the tea as possible.
Transfer to an airtight container and let chill in the fridge until solid. Preferably overnight.
Preheat oven to 325°F. Butter and flour a 16 cup angel food cake pan. Tap out any excess flour and set aside.
In the bowl of a standard mixer, beat together butter, cream, sugar, honey, and orange zest at medium speed until light and fluffy. Ensure the mixing is thorough!
Add in eggs one at a time, ensuring each egg is thoroughly incorporated before adding the next. Add orange juice, vanilla extract, and salt. Mix until well blended.
Using a sturdy spatula, fold in cake flour until just combined.
Pour batter into the angel food cake pan. Smooth and level the top over.
Bake for 80-90 minutes, rotating midway through baking, until a toothpick or knife inserted in the middle comes out clean and the top of the cake is golden brown. Allow the cake to cool in the pan for 10-15 minutes.
For the glaze:
Steep chamomile in freshly boiled hot water for 8 minutes. Strain out tea, squeezing as much liquid as possible.
In medium bowl, combine all the glaze ingredients (powdered sugar, salt, honey, citrus juice, vanilla extract, and tea). Stir until smooth. If it ends up being too thick, add more chamomile tea.
Drizzle glaze over cooled pound cake as desired.
Happy Yule everyone!
92 notes
·
View notes