Fishie | 27 | black | she/they we're really in it now, mr. coconut
Don't wanna be here? Send us removal request.
Statistics
We looked inside some of the posts by mutant-xweetok and here's what we found interesting.
Average Info
Notes Per Post
14K
Likes Per Post
6K
Reblog Per Post
7K
Reply Per Post
12
Time Between Posts
13 hours
Number of Posts By Type
Text
14
Photo
3
Last Seen Tumblr Blogs


Fun Fact
Tumblr Inc. has $15.1M in annual revenue.
Text


Dead Chia Pin
Blessed be Dead Chia…you will be remembered in the hearts of many…
163 notes
·
View notes
Text


i've been wanting to draw all my neopets cause i think they're neat and i've got mini lore for all of them, effexora (acara) and krildar (lupe) are up first !
i think i adopted krildar a year or two ago as a yellow lupe that was stuck in the pound for a LONG time. he was a lab rat for a while (he's been a bunch of stuff, shoyru, acara, mynci, moehog, grarrl, and kiko, some in different colors/genders) but i like to think he liked being a lupe the best after all and just decided to get painted skunk for fun. he's just laid back and silly to me.
effexora i recently got from the pound just regularly browsing and kind of fell in love with lol. i did get her as a grey acara, but in my mind she was originally striped and got turned grey due to the current plot stuff. it's pretty much her dream to be painted plushie (she's real into stuffed animals/toys/collectables) but again, current plot stuff is preventing that for her.
(i don't currently have everything for the customization of these guys so i did use dti for the missing stuff lmao. ALSO. forgot to add the leopard print on effie's jacket but alas. not fixing it now)
2 me they're besties (and/or in a qpr thing). they just understand eachother. :^)
121 notes
·
View notes
Text

Please perceive my rainbow shoyru, Xorril...
173 notes
·
View notes

Text


guess i can post these now since apparently someone on official neopets staff had the same braincell abt the varwolf....anyway, heres my Edgy Varwolf design i made for my portfolio applying to Grundo's Cafe ^^; I've since turned this design into an oc!
155 notes
·
View notes
Text
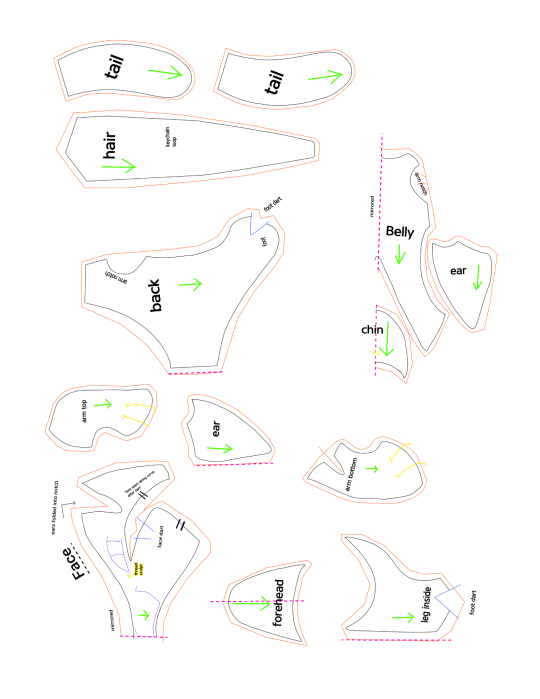
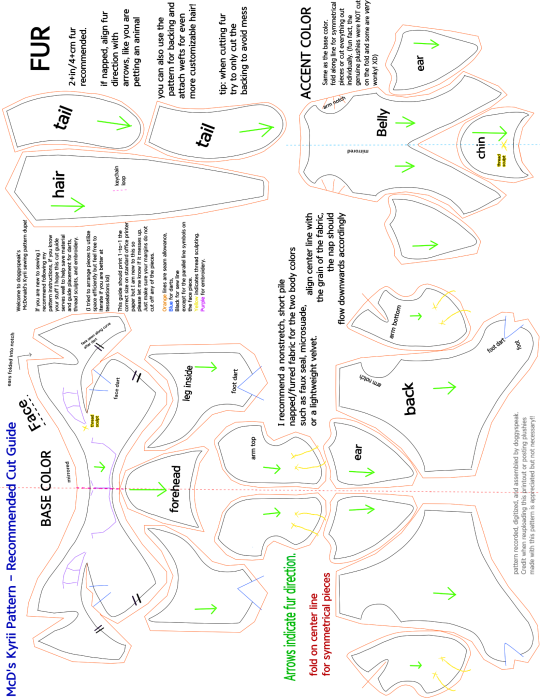
✩ Make your own Kyrii Plushie ✩
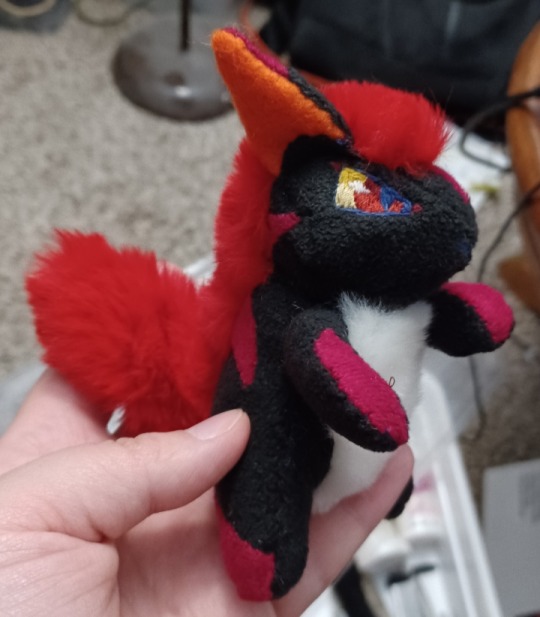
Thank you @free-sewing-patterns and @jestersneopia for asking so kindly for me to release my pattern dupe! :3 These guys are very intricate little plushies so I did my best to make something comprehensive. I also made detailed instructions which I will include after the readmore, so long post ahead!
McD's Plush Kyrii
What you will need:
•The two included images printed on 8.5"x11" (A4/Letter) paper.
•Enough of your desired Fabrics (reference the pattern size on your paper, you don't really need much at all)
✩ I recommend a short pile faux fur or other nonstretch fabric for the two body colors, and a long pile (1-4cm) faux fur for the mane and tail.
✩ You can also make the mane and tail using yarn or doll hair wefts by attaching them (sewn or glued) to a backing fabric like cotton or felt.
•Scissors or precision knife to cut fabric.
•Sewing implements (needle, pins, thimble, thread scissors, etc.)
•Thread matching one or both of your body color fabrics.
•black thread or embroidery floss for the mouth embroidery.
✩embroidery floss or thread in your desired eye colors (recommended a white for sclera, an iris color, and a black for outlines)✩OR✩buttons or safety eyes in your desired size and color.
•Stuffing (two or three handfuls of polyfill will do the job)
✩ribbon or cord to use as arm tension band and/or a loop to clip hardware like keychains and backpack hangers.
((✩ optional ))
General note: default suggested stitch length is 3mm apart unless stated otherwise.
Step 1
Print out the pattern, making sure to format your printer to use the full page with no margins. Check print preview to be sure nothing is cut off. (I made the piece inventory sheet to sort of offset any default margin weirdness but I'm new to this so let me know if it messes up.)
Step 2
Conceptualize your design and gather your materials. Are you cloning one of the plushies already out there, or making your own design? It is always good to keep reference on hand during any art project!
What special design elements are you translating to plush form? Keep in mind this pattern is small and intricate and it might be easier to omit or simplify certain design elements if you are working from something more detailed.
The cutting guide assumes 1 base color, 1 accent color, and 1 fur color with no significant shape, size, or design difference to the original McD's plushie. (Only a few fixes for symmetry and fur direction.)
Step 3
Prepare your base material for cutting. If you are doing embroidery or applique designs this may be easier while the fabric is flat and whole. Same with fur wefting, do anything like that while you have one big piece of fabric to work with. Trace the pattern pieces using chalk, heat erase pen, or some other washable marking tool using the cut guide provided. (I recommend cutting out any shape you need to add details to from the pieces inventory page, then trace those pieces on your fabric in roughly the same positions as the cut guide page.) Then do any embroidery or details you need to do while the pattern is flat.
Embroidery tips:
• Use a stiff backing piece like interfacing or felt behind your fabric to make the embroidery more durable and stiff.
•Use a back stitch or chain for lines, line in color for crisp color-changes.
•Parallel vertical lines close together catch the light and read as blocks of color best.
•Don't use stitches that are too long or loose, build stitches up diagonally like a brick pattern instead, the key is to attempt to stay parallel.
•If you are using sewing thread instead of embroidery thread, use two or three strands at once to save time.
•When you are done, cut away your backing fabric/interfacing a little outside where your embroidery stops so as not to interfere with future seams.
Step 4
Cut out your materials. If you didn't need to trace from the pieces inventory for pre-cut details, then you can just pin the cut guide paper to your fabric and cut it directly. Otherwise simply follow your trace and cut out your pieces. Be sure to keep track of which pieces go on the left and right of your plushie.
Step 5
Begin assembly by sewing all your darts first, those will be on each side of your face, inner leg, arm bottom, belly, and back pieces. Follow the blue lines that appear anywhere that says "dart" and any sew lines that create a V-like dip in the perimeter of the piece (like the arm bottom and belly pieces). Fold the seam allowance inside your seam so that the right sides of the fabric end up with a clean, unnoticeable seam. I recommend a tight, short straight-stitch about 2mm apart on darts.
Step 6
Make the loose body parts.
Sew together ears, arms, and tail by placing right sides together and sewing around based on the solid black lines in the pattern.
•Each ear will have a base color piece and an accent color piece. Make sure their shape lines up so that right sides of the fabric are together. The ear pieces are fairly flat and their sew lines should line up perfectly. Use any stitch you are comfortable with, straight stitch about 3mm apart works just fine.
•Sew one top arm piece and one bottom arm piece together for each arm. The discrepancy in their shapes creates a slight twist that gives the arm part a tube-like shape. I recommend pinning the pieces at the ends and wrist first to get the tension/gathering correct on the arm part. Any stitch works but a straight stitch will probably be easier to keep track of tension with or to rip if you make a mistake and need to retry. Keep it tight, about 2mm apart.
•For the tail, sandwich your pieces right sides together so that all the fur is tucked inside and you can sew the edges with a secure stitch like a whip or back stitch.(about 3-4mm apart) You might need to pick or brush out the fibers if they get caught in the seam.
Once you finish each piece, flip it inside out, wrong sides should remain inside while the right sides of the fabric show and all seam allowance remains inside. If any edges are having trouble flipping inside out, use a thin tool like a crochet hook or chopstick to prod them from the inside.
Stuff the 2 arms until they hold a 3D shape, firm fill recommended. Leave the other pieces in this step unstuffed.
You should have two ears, two arms, and one fluffy tail.
Step 7
Shape the face.
With the dart now sewn into the cheek, the two seams with the || registration marks should be much closer in length. Line the seam up according to the marks and fudge the rest of the length using tension. I recommend using a ladder stitch on the right sides while keeping in mind the general size of the seam allowance.
Repeat on the other side.
When you are done, your face piece should have curvy cheeks.
Step 8
Build up the head.
Connect the forehead piece to the face piece, the curve's center goes right above the nose.
Sew in the chin piece along lower jaw.
There is a bit of leeway into how long the ears will be and which angle they stick out. For best results, give it a test right side out and pin where you like the ears to stay.
The ears go into the notches on the top of the face piece, about half of the ear should fit into that notch. Sew it into that notch, any remaining ear folds around that top seam towards the forehead and is stitched down to give the ear a slight curve that helps it remain upright.
When you're finished you should have the (bald) head.
Step 9
Construct the body.
Sew the two inner leg pieces onto the sides of the belly piece.
Sew the back pieces onto the belly and inner leg piece, leaving the arm notches alone to make the arm holes. Sew all the way around the inner leg and to the center line on the belly where the dart seam sits. There may be some overlap/extra on the back piece.
Sandwich the tail between the two back pieces and sew them together. You can adjust the angle of the tail before you sew it in, the original plushie has its tail sticking up behind the back. (Tip: if you fully close the tail seam you can use a loose couple of stitches to attach it to the body to make a hanging tail that wags when you pick up and shake the plushie.)
Your current parts should be a head, a body, two arms, and the hair piece.
Step 10
Attaching the hair piece to the head.
(OPTIONAL): First, if you want to add a keychain loop like the original plushies, snip two tiny holes into the backing of your hair piece about 6mm apart and feed a small length of cord or ribbon inside to create a loop on the outside.
Leave plenty of slack on the ends of the loop for a more sturdy hold.
Secure the loop and holes with a lot of sewing and/or glue to keep the fur fabric from fraying. Stitch down the ends of the cord/ribbon to the backing of your hair piece.
Start sewing the hair piece to the head beginning with the hairline along the forehead to get it nice and clean. Next sew across the ears and down the face piece on both sides.
Your head should now have hair, with the rest of the mane hanging down behind.
Step 11
Sew head to body.
Make sure the chin piece lines up to the belly piece, the bottom of the head should line up with the rest of the back piece on either side.
Next, sew down one side of the hair piece to the back piece, connecting the bottom edge to the seam near the tail and stopping.
Leave the other side seam of the hair piece open for arm adjustment and stuffing.
Step 12
Attach the arms.
Tension Band Explanation:
The original plushies have an arm tension band inside to keep the plushie's shape and seams intact when pulling on the arms. Generally I think this can be skipped without much issue, but could be a good idea if you plan to use this as a bag hanger or keychain plush, as the arms are the extremities most susceptible to getting caught on things, and when they are secured more comprehensibly they are less likely to rip the plush apart when yanked. Not a big deal if you just plan to keep them around the house.
(OPTIONAL): If you want to install your own arm tension band, start with the plushie right-sides-out. Sew the band to one arm and pull it taught through the chest to the other arm, securing the tension band before sewing the arms into the body piece.
To sew the arms, be sure to pose them and pin them in place right-side out first. (originals usually have one arm down and the other up on their chins/waving, though they vary a lot and there are plenty of ways to position them for different expressions.)
Then, either turn insideout again or ladder stitch the arms into place.
Almost there! You should have all your pattern pieces together at this point.
Step 13
Stuffing the plushie.
Make sure your plushie is right side out, with no incorrect seams or holes other than one of the seams between the hair piece and back piece. If you need to, gently prod a crochet hook or chopstick along the backs of seams to turn them out.
OPTIONAL: To make a weighted plush, add a small mesh bag of plastic pellets or weight of your choice to the bottom of the plushie before stuffing.
Add in your polyfill, pillow fluff, yarn fibers, scraps, or whatever you decide to stuff the plushie with, paying attention to the density of the stuffing.
I recommend keeping the head and feet more densely stuffed to keep their shape while leaving the body a bit more loose for a squishable belly.
Step 14
Close up the last seam.
Using a ladder stitch, close up your last seam, pulling tight and tying off your thread at the end for a clean, invisible seam.
Now that all the seams are in, you can now brush or pick any long fibers from the hair and tail out of the seams.
The plushie is whole! You can keep it like it is, or do some thread sculpting for a more finished look!
Step 15
Thread Sculpting.
(OPTIONAL):
Using thread in the color of your body fabrics, you can pull tension at various points to create a more sculpted shape. The original had two through the face (vertically through the chin up behind the forehead, and horizontally between the corners of the eyes), and two over top of each hand and foot to look like the separation of the toes. See the original pattern pieces for precise placement.
And that's it! You should have a finished plush kyrii!
If you have any questions or concerns please contact doggyspeak. Feel free to use this pattern, share it, or edit it with or without credit.
PLEASE DO NOT SELL THIS PATTERN OR INSTRUCTIONS! IT IS BOTH NOT ORIGINALLY DESIGNED BY ME AND ALSO SOMETHING I'VE WORKED VERY HARD ON!
If you would like to see more pattern reconstructions from me, show me your finished plushies and provide feedback and suggestions to me. I would love to see what you have made and hear what you'd like to see next! ^o^
186 notes
·
View notes
Photo

[image: Ivmunt, a mutant acara of neopets fame. He has a toothy cheshire smile, fancy blue robes, and more eyes than he knows what to do with.]
◆
hey do y’all like………. neopets fanart
a little piece for @castleofthade of his character, Ivmunt! I love that little man.
272 notes
·
View notes

Text

trans rights jellyfish gnorbu mermaid says "trans rights"
148 notes
·
View notes


Text


Summer 2025! Below are summer pics from previous years!
89 notes
·
View notes

Text


Rough Concepts for more plushs…….. NOT DONE
Plush fairie flotsam , Plush valentines Jetsam, and MSP chomby
MSP chomby is looking really rough on the colors to me, and boring.. The flotsam is almost perfect I think Hehe
114 notes
·
View notes
