
Don't wanna be here? Send us removal request.
Statistics
We looked inside some of the posts by mi5014caryslewis and here's what we found interesting.
Average Info
Notes Per Post
1
Likes Per Post
1
Reblog Per Post
0
Reply Per Post
0
Time Between Posts
10 hours ago
Number of Posts By Type
Video
3
Photo
13
Text
1


Fun Fact
Average visit duration of Tumblr.com is 10 mins and 25 secs.
Video
vimeo
Turntable with more close up shots
(Password: northumbria)
0 notes
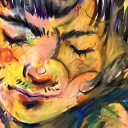
Photo

This was one of my favourite drawings I did during this module, and to be honest, that expression pretty much sums up the way I’ve been staring at Maya for the past term
0 notes
Text
“Should we have a Dangerous Dogs Act?” Final Evaluation
Overall, I’m fairly happy with the outcome of my characters and I feel like they represent my argument of “Should there be a dangerous dogs act?” well (although, knowing me, I could work on them for another 100 years and I’d still find things to pick at). I went through a bit of a journey when trying to figure out what I wanted to model for this module, initially thinking of doing a young child going up against a large scary dog, but then I thought more about the deeper meaning behind the argument, and after researching the act more, I realised there was a more interesting way to go about it.
While we were in the development process of this module, our lecturer brought in some unconventional materials to play around with, and after initially being completely stumped as to what to do with them, I started fiddling with some paper. I thought about how it would be interesting if I could create characters with their appearances contradicting the materials they’re made of, and how that also ties into how the Act judges the appearance of dogs, and not necessarily how they behave.
After some discussion in class, we settled on me creating two Dobermans, one with the stereotypical cropped ears and docked tail, and one without. This was to show that the real issue with the act is that the dogs are judged on appearance, and not so much what they do. Going back to the unconventional materials, I settled on have the “bad dog” with the cropped ears being made out of paper, and the “good dog” to be metallic. For the YES side of the argument, I wanted the uncropped Doberman to be metallic and robotic to show that it’s the ideal dog, and that it’s good, and it looks harmless and very man made. For the NO side of the argument, I wanted the paper dog to look frightened/aggressive while the edges of its body catch fire. This was to show that we create these dogs to look aggressive, we crop their ears, and we dock their tails. Yet once we’ve decided that it’s too scary, we have the ability to destroy their lives instantly, which people against the argument believe is wrong.
After sketching out their designs, I made some clay mock ups of each character’s head, which I took photos of to help me model the real things in Maya. I started modelling the paper dog first, as I predicted it would be the harder one to model, because I find that it’s much easier to make smoother objects look good in Maya, and I wasn’t going to apply any smoothing to my paper dog to make it look as crumpled and paper like as possible. I found it really fun to bring my character to life in Maya, and after some initial false starts with modelling the head, I finally got the hang of it, and I think it came out well. One of the struggles I always knew I was going to encounter with this model was going to be the UV mapping (which I was terrified of) but I ended up learning how to unwrap the UVs pretty quickly, so that I could take the outline into Photoshop and do some nice painted textures. This is also where my dad came in and gave me the idea to add dog attack newspaper clippings onto the crumpled paper texture, which looked amazing, and in hindsight, it would have looked really boring without them. It just goes to show it’s great having someone who hasn’t seen your planning look over your work, because they’ll see things with a new perspective.
Next it was time to model the metal dog, and with this one, the details would really make it. It was a bit easier to model this one, and while I was doing it, I learned how to add a glowing material in Maya (on its eye), which I then applied to the fire on the paper dog. I had a lot of fun with modelling the robotic dog because I loved the design for it, so seeing him come together piece by piece (literally) was really great. I love the small bits of detail, like his tiny tongue sticking out, and the little detailed bolts all over his body. Luckily, I relied on the Maya materials for this one, so I didn’t have to do any UV mapping, and just made him look shiny with presets.
The final details were posing and creating the leads for each dog. From the beginning, I wanted to have the paper dog in a frightened position, because with dogs, it can sometimes look aggressive, further adding to the mix up between appearance and behaviour. The metal dog too, was always going to be a very cute and playful pose, so when they interacted on the turntable there’d be a massive contrast between their appearances.
As for the leads, it was Hazels idea to have these long leads going upwards to symbolise the control humans have over these dogs, which I thought was a fantastic idea. I decided on a chain link lead for the paper dog, and a beautiful red ribbon for the metal dog, so there’s this contrast between the two, with one being very cold and serious, and the other being associated with gifts and happiness.
All in all, I really enjoyed this module because I find creating characters extremely fun, and watching them come to life was amazing, and in the future, I hope to be able to rig them and animate them too. If I were to do anything again, maybe I would come up with a little more detail for the metal dog, and perhaps find a way to add an even more metallic material to apply to him, but given the time limit we had, I feel as though I accomplished a fair amount.
0 notes
Video
vimeo
Final Turntable
This is the final turntable, including some close up and artistic shots. It was a little difficult to fit into 30 seconds so I will also upload a video that’s just a turntable, as well as a video containing more close up shots.
(Password: northumbria)
0 notes

Photo


Here you can see the massive difference between the two dogs, by how smooth the metal one is, and how angular the paper one is, just purely because of the polygons.
1 note
·
View note
Photo


The Paper Dog (Against the Dangerous Dogs Act)
This was the final model for my Paper Dog. I think it turned out well, and I love the expression on his face. The thought behind this character is that we shouldn’t be destroying dogs that we’ve created to look aggressive, and that we’ve trained to be this way. The cropped ears and docked tail are things that we’ve done to make it look scarier, and the burning is to convey that we’re destroying these dogs because of the Dangerous Dogs act, even though we made the choices to cosmetically change them to look this way, which is what people against the Act believe is wrong. And although the doberman is not a breed that is banned in the UK, I think it was a good dog to go with because of the frequent cosmetic changes we make to these animals to make them look scarier, which pushes the point about many of the dogs affected by the Act are targeted because of their appearance.
https://www.standard.co.uk/news/uk/hundreds-of-innocent-dogs-put-down-because-of-how-they-look-rspca-claims-a3315071.html
0 notes
Photo


The Metal Dog (For the Dangerous Dogs Act)
This is the final model for my Metal Dog, and I’m pretty happy with how it turned out. I think it looks exactly like the character sketches, and I really love the finish it has on it. The thought behind this character was to convey what people who want the Dangerous Dogs Act believe is right. They want good, friendly, well presented dogs, and I tried to exaggerate that by making the dog robotic, to show that it is the ideal dog. Again, to further add to my point about appearance, this dog was based off a doberman, but because it doesn’t look scary, people believe it isn’t scary. I think the ribbon and the pose really make this incredibly different to the other dog, as they make it look even more harmless and perfect, and the ribbon especially makes this ideal dog look like a gift to humanity.
https://www.spectator.co.uk/2018/07/get-rid-of-the-dangerous-dogs-act-and-more-people-will-die/
0 notes


Photo


Creating the Fire/ Adding the glow material
Initially, I was going to add fire as a particle effect, but seeing as this is a modelling module, I decided to create some cool twisty fire, with shiny materials and glow materials mixed together. I also added some embers too which really brought it all together, and they look fantastic against a black background.
0 notes