Don't wanna be here? Send us removal request.
Text
XB3001 development.
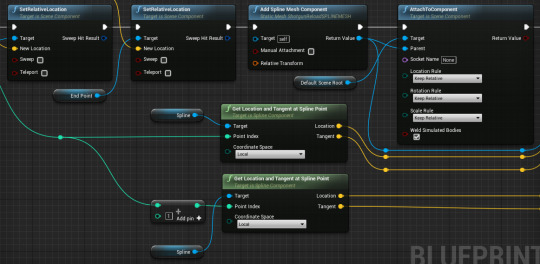
The Spline mesh was made using the construction script to create this zip-line style rail that would later allow for the player to go along it and attach on much like a zip-line from the game Bio-shock Infinite. The zip-line was found from the individual spline points and included information regarding the location of it and the layout of the of the spline to build it into a curving path.
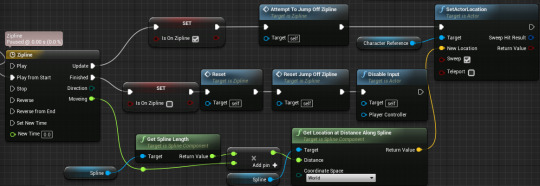
The Timeline for the zip-line was decided in the event graph that provided the intractability of it. This event decided the length of the zip-line and made it so that the timeline would animate the player going along it to reach a certain point along the frame. The graph would then require that it set the new location to the end point of the zip-line.
0 notes
Text
XB3001 development.
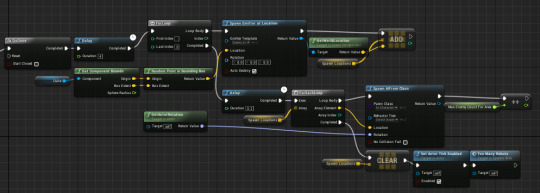
The spawn points for AI is done by predetermining the areas of the spawn in accordance with there location in the level. The spawn points for where the AI will spawn is pre decided first as a point within a fairly small area of a cube. This is then recorded in a variable before being changed so that a for each loop can read all these points and spawn a particle effect at there location. From here further action can be taken that allows for the AI to be spawn at that location in time with the particle effect almost like giving the effect of them teleporting themselves in.

The enemy that spawned from these points were spawned from an array of locations that held the necessary information about where they should appear within the set area.
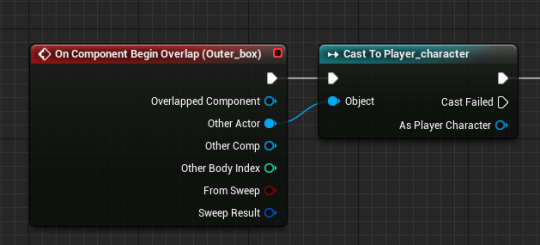
This intractability was only enabled when the player walked into the area therefore creating a interesting situation where the player may well find themselves surrounded by enemies without realizing that they are there. This encourages fast paced movement so that the player must constantly be trying to avoid the dangers around them hopefully forcing them to press on forwards.
0 notes
Text
XB3001 development.
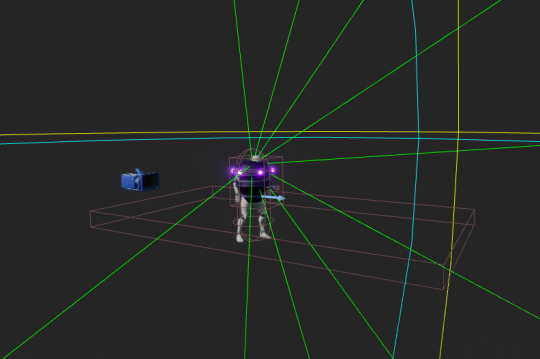
The AI robots were made from copying major elements from the player character before swapping over the non useful elements as they would make no difference to the AI as it is not player controlled. The AI its self was a simple mesh and had elements added to it, like pawn sensing, to understand its logic as a AI controller.

The AI sensing works off the player and whether they can be seen. If the player is seen then the AI is programmed to shoot a projectile towards the player that will deal damage if it collides with them. The AI auto tracks the player and will shoot the player if it sees them preventing some silly attacks from occurring when the player is nowhere near them.
0 notes
Text
XB3001 development.

The sprinting and movement on the character was done by simply changing the movement parameters so that they become a sprint. The same was done with a slide ability that shoots the player forward, giving them a quick burst of energy.

The sliding is changed through the ground friction that changes the speed in which the player moves them self across the floor. This preforms a crouch action before then making is so that they appear to slide a large distance across the floor in a forward motion.

After the player has been launched forward the player reverts back to their previous positions with the player no longer sliding around. The Un crouch button makes the player stand back up as normal appearing as though they have slid a distance, this is useful at avoiding enemies.
0 notes
Text
XB3001 development.
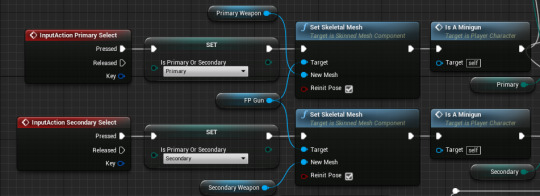
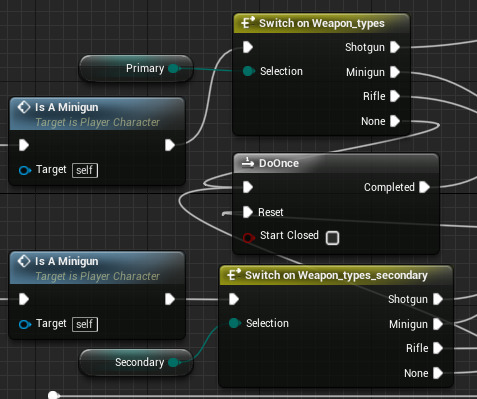
The weapon swap was done using a custom ENUM that manage to read between Primary or Secondary values of which determined what class was currently equipped within the game. There were 3 Enumerations used for the player character which were; “Primary or Secondary”, “Weapon types” and “Weapon types secondary”. These Enumerations were able to figure out whether or not the player had a Primary selected or whether they had a Secondary selected. The other two figured out the gun they had equipped in accordance with whether it is a primary weapon or whether it is a secondary weapon. These were all custom made in relation to what we needed the player to have and where about it was.
From here the player had the opportunity to read what the picked up gun was that would provide different stats based on what it is. For these weapons the skeletal mesh could then be changed in accordance with what was picked up. Therefore determining the type of weapon selected.
0 notes
Text
XB3001 development.

The Shotgun had its own custom shooting method that spawned up to 12 different projectiles in a radius in front of its self. This was done with a variable that included an array of transforms to record the spread of the shotgun weapon. This weapon then created a lot of different projectiles all around a point in front of the player character. This spread was done in the same manner as the spawn box that surrounded an area. Instead this figures the transforms first before then creating all the shotgun projectiles from the points already found in the player character. The variable is then cleared of all the data so that a new set of transforms can be created.
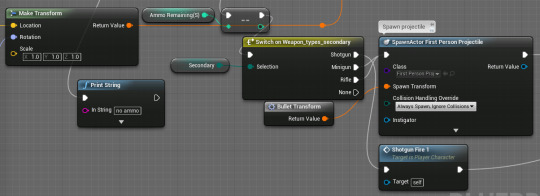
The reference for the transform is recorded in the shooting blueprint in which it figures out the relative location of the player and the weapon they currently have. Of course if they don’t have a shotgun equipped then it means that they will not be able to shoot a shotgun projectile because of the ENUM figuring this out.
0 notes
Text
Game development blog #16.


The sonic device functionality for interactions with players are highly different than that of the AI. I have eventually made it so that instead of acting as a lure like it did for the AI I made act as a blinding device to enemy players. This is done by creating a widget that only disappears either if they are out of its zone radius or the actor its self has been destroyed. This therefore creates a dangerous item that can potentially completely lose there may within the game level. Again IDs of players are needed because of the difference between states of all the players in the game.

The activation of the device means that it will spawn with its functionality enabled. It acts as a large rolling projectile that initially shoots out and rolls around. The custom event for activated simply acts as a timer that hold the information for whether or not the device is activated and when it will need to be destroyed.
0 notes
Text
Game development blog #15.
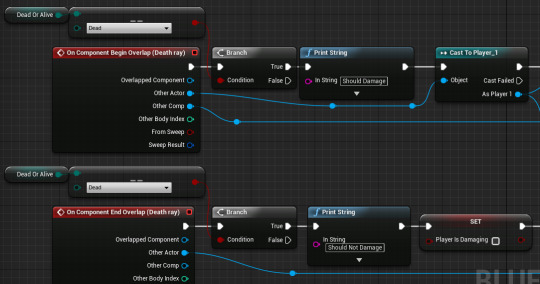
The blueprints above show the start of the functionality of the players to damage other players. In this case the overlap events are reading weather or not the overlapped character is dead and if they are not then it runs the rest of the functionality as a test for damage. These set of nodes are very similar to the version for the AI however require more precision as it has to correlate between both of the player controllers.

The functionality changed still with an idea to reduce movement massively preventing the player chasing to be very overpowered. The movement speed was halved when they were damaging a player but was increased up again as soon as they were not being damaged anymore. This was a mechanic intended to keep the game fair and with living players still having a chance to get away.

The line of blueprint above shows exactly how the player damages another, again this is done in the same vain as the AI does except that this one relates back to itself rather than the one referenced in the AI. This again is only activated when they player has already died therefore preventing alive players from needlessly hurting each other.
0 notes
Text
Game development blog #14.

I eventually have made a second event graph that holds some of the key functionality to dead players and their interactions to other players. In this case the player has become dead and there needs to be separate actions for player depending upon whether they are dead or they are alive.
One of the biggest issues I have faced during this project is the difficulty with particular elements of U.I not with how it looks but with functionality not working properly. One element in particular is some peculiar bug with the order of the U.I not being the same as the order of the players, in particular being one out from each other. This meant that I had to manually set this in the Main HUD blueprint that reset the order to what the order should indeed be.
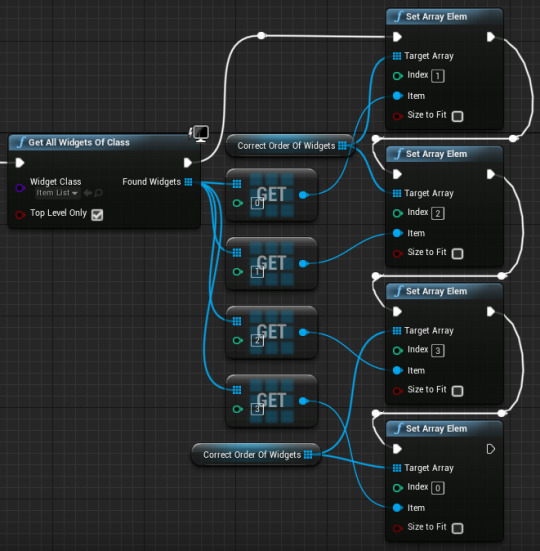
This order being reset manually then had to remove widgets based on when that player died, this was why U.I was being removed from incorrect players. The number values of the player and U.I were not matching and therefore were changed so that they did match the players as intended.

As can be seen above the layout of the blueprint had to be changed because of its problems regarding incorrect orders of things. The variable made in the Main HUD could be accessed easy enough and then numbers could be made so that they matched correctly to the players ID number without the original hassle of it removing from the wrong person. It still however continues to be problematic as any major changes to the code results in me having to add the get node back in (sometimes even more) for it to work.
0 notes
Text
Game development blog #13.
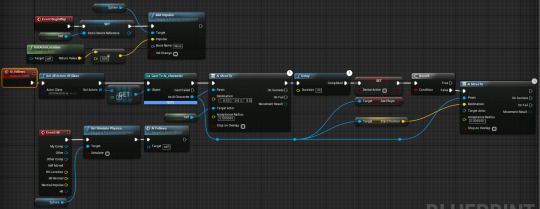
The image above shows the functionality of the “sonic device” item that is a representation of a lure to an AI player. On the other hand this is only when the AI is around so therefore if the player becomes the monster the use of this item will have to change into something else entirely. The AI functionality is different from the player as you won’t be able to particularly lure a player to a spot however you can do it with an AI monster.
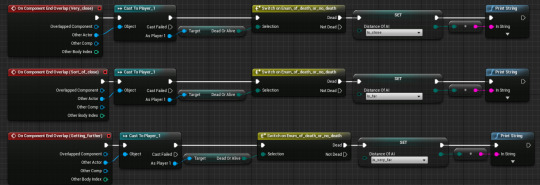
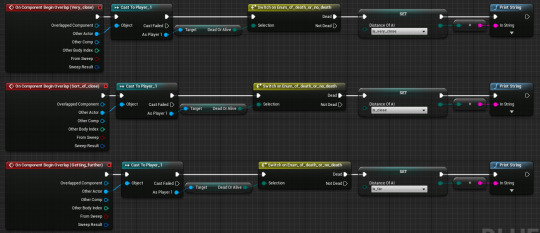
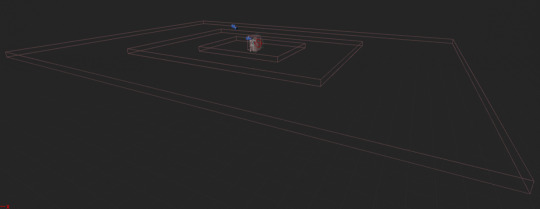
The Ghost sensor was also worked on and I ultimately managed to create the basis for it reading positions of players. The nodes above show a whole set of different outcomes of an ENUM to figure out where about the player is roughly located in accordance to the dead players. These are done using a set of overlaps on the player of which are only applicable when the corresponding player character is already dead. The image bellow shows how the trigger boxes look on the player and the rough estimate of size in comparison to the base Unreal character. Again the visual representation of this will be shown by a U.I that will likely use the colours of green, yellow, orange and red to show the proximity of the ghost to the player.
0 notes
Text
Game development blog #12.


Both the pitch item and the bear trap item are both spawn-able items that drop at the players feet and can hinder other players. The blueprints them selves for spawning are way simple as the pitch and bear trap spawn in the same way by getting the location of their own actor. The setting and resetting of things are controlled here and new priority is given to the item that dropped. As usual though the player can only do this if they are not already dead.

The nodes above show what the bear trap does as in stopping the player from moving. This is all functionality that is called within the blueprint for the bear trap which can only be spawned by players which have the item.
0 notes
Text
Game development blog #11.


The process for making the U.I change image based on weather they have an item or not is difficult. I find that simply trying to select an image does nothing and rather you have to view the U.I as one using brushes to change things in its place. In this case I have to break down the brush before I can change elements of it, then it allows me to change many of that brushes features including the image on it. I then have to remake the brush hooking everything the same except for the image node, here I change the image into the one I want. This is done twice so that the image can swap back and forth between the 2. It then changes depending on the player owner and weather or not they have the correct item.
0 notes
Text
Game development blog #10.

The Images for representing the U.I were all produced on Photoshop as a simple but nice looking U.I that the player could understand. These were all made as white images first that acted as a sort of outline to an item. The Grey images were exactly the same image however they had the opacity on their main imaged reduced as to be less clear. This was done so that the player can understand when they have them and when they don’t. The map U.I its self was a separate entity that was able to show the layout of the game, this was used off a different widget entirely as its own item.


The images show how this U.I for the map was actually used. It was done so that on a button press you are able to see the map and when you release the button the map disappears making it a toggle ability. I found that doing all the U.I myself by hand took a long while to create anything but I did notice that this could perhaps be because of my ability at art and that I’m creating a technical honors and not a fancy art piece.
0 notes
Text
Game development blog #9.


The UI creation for the player was created simply using simple health bars and a number system that remembered players ammo. These were done using UI features that allowed for an image (this case the health bar) and text (ammo system) to be recorded and remembered by The UI for use by the player.

The UI for displaying the health was done by getting player IDs to determine the number of the player, for this it was easy as you don’t need to find it your self but rather can tell the UI to find the number of that player for you. You still need to reference the setting its self for instance in this case finding the taser shots from the player character. It then is able to change the number by using a to text node available to the player. I do still have to create a binding for it though as this allows the functionality of it.

0 notes
Text
Game development blog #8.


The lines of nodes above show a damage system in place that is able to hurt the player and cause some serious damage to them. As can be seen the damage events are custom events that call each other at the end of their respective codes, such things like the delay are necessarily to make the damage appear as a tick down and although these seem problematic they are much more useful than if these were used on a tick event. The is valid event allows for the event to fire but only if the priors worked, Its a debug method to see that it always works on the right person. If the damage that the player receives results in them ticking to 0 health then it fires a custom event that deals with death.


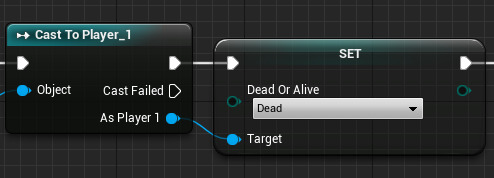
As seen in the previous development blog this causes the ENUM for the death result to change to them dying. Setting this will then hopefully allow for me to develop the blueprint further using things that read this state to limit functionality for players.
0 notes
Text
Game development blog #7.


I experimented around with Enumeration nodes that have a surprising amount of usefulness with regards to getting states. Similar in a way to branches the ENUM node is able to branch true or false based results in accordance to what the equaling result is. This is way more efficient than lots of branches as it avoids problems with corresponding nodes often at times branches state true or false only on 1 result, whereas ENUMs can only ever display what something is from the list (for example. If It is “Dead” then it can’t be “Not dead”).
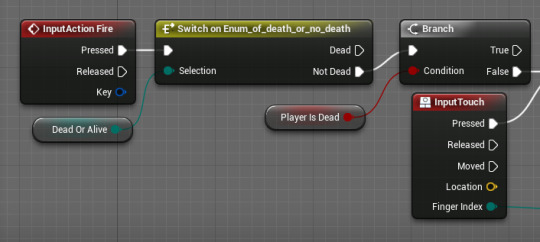
In this case the fire mechanic for shooting taser shots is not able to be used if the player is in a dead state. This limits use age like a branch node like the player is dead Boolean next to it however the ENUM is way more effective at hold data on many Enumeration results as branches don’t have that compatibility. The Setting for ENUMs work in a very similar manner to Boolean but as a key difference have a drop down menu that allows you to change it.
0 notes
Text
Game development blog #6.


The pickup mechanics for the items were easily repeatable and haven't taken me particularly long to do at all. Once I managed to get one working i figured that The rest could all work in the same way using player values to correctly find which is which. I as well created variables to find which was the right player as therefore I could reference them for anything I might change in the future.
I have found that using things that need a reference to players are actually much easier to do if you find a way to create a variable of it. For instance I found that casting and then finding the ID number of the player often resulted in a poor compatibility and can often cause the game to run highly jagged an lack smoothness of it. Therefore doing this only with overlaps of players ensures that the variables are the same and therefore can be easily repeatable by the player.
0 notes