Text
Dankira English Guide
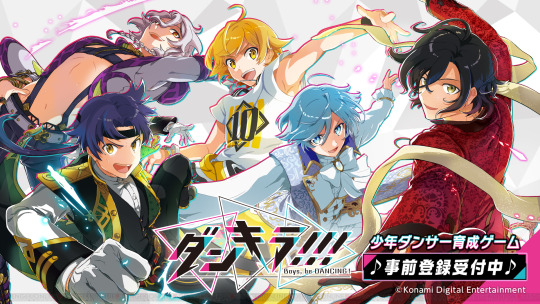
This is a guide for the newly released Japanese mobile game Dankira!!! Boys, be DANCING! This guide is to help those of you who cannot understand Japanese navigate and play the game. It has images of (almost) every menu in the game with translations on them and explains what they do. My ask box is also open if there’s something I missed or you just need help with something!
Some Images will have certain points marked with a pink circle, these are areas that I was unable to translate the text (I will still explain what the button does) or there was simply no text to translate, but I still want to talk about what’s marked.
Just in case tumblr compresses these and makes some of the text unreadable, this post is also available in an imgur gallery here.
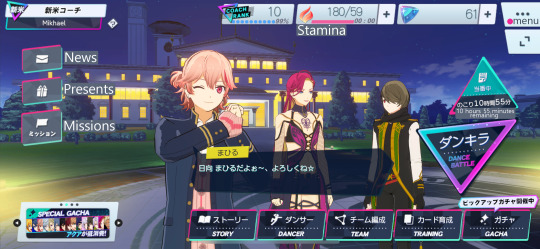
Starting with the home screen, this menu is actually pretty self explanatory. The main buttons you will be using here are nicely labelled in English.
In the top left we have your coach name and title. Below that is the news, present box, and your missions (I will talk about missions more later). At the top of the screen you have your coach rank, stamina, and your aqua.
Right above the Dance Battle button, you have your duty button. I unfortunately have a 12 hour one currently running so I am unable to take a screenshot of what that menu looks like, but it shouldn’t be too hard to figure out. While you have one running, the time remaining to completion is nicely displayed on the button for you. It displays the hour first, then the minutes, so I have 10 hours and 55 minutes remaining until its completed. The two characters you chose in this menu will have their Soul Link level increase when it’s completed.
Finally in the top right, we have our menu button. I labelled this one in pink as it has no text on it, only the three dots. This button will be on your screen in almost every menu, and is a convenient way to move around to different menus. When you tap on it, it will open and take up about half your screen.
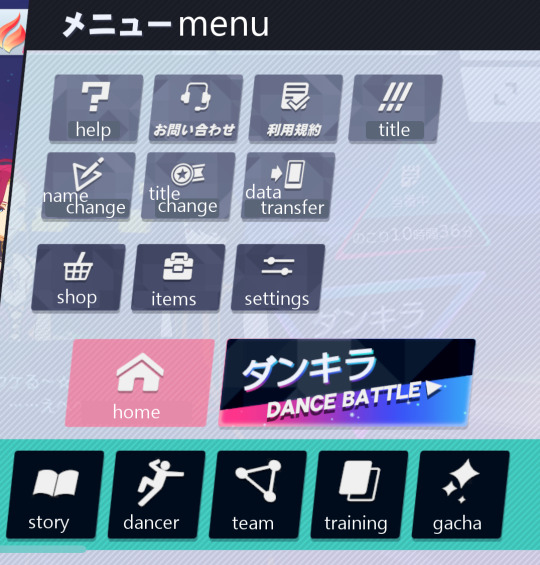
At the bottom, we have the same 5 buttons from the main menu, except they don’t have English text on them anymore. Above that are the home and dance battle buttons.
You might notice that there are two buttons here that aren’t translated. Unfortunately I cannot understand what they say, and after tapping them I don’t really understand what they do. These will require your own testing, or someone else’s explanation.
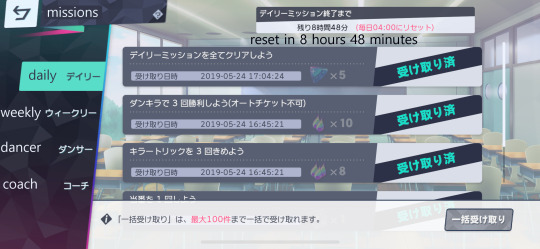
This is your Mission menu, accessed from the home screen. On the left, you can see there are daily, weekly, dancer, and coach missions. On the daily tab at the top, the black text is telling you how long until the reset occurs. In this screenshot it will reset in 8 hours and 48 minutes. In the same location in the weekly tab, it will tell you how many days until reset.
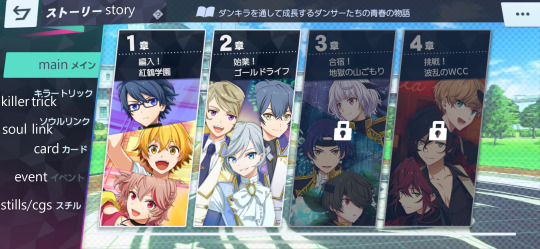
Here’s the story menu. This one is pretty easy to navigate so I won’t go into an explanation on how it works. You have your main, killer trick, soul link, card, and event stories. The stills/cgs button is, well, stills/cgs you have unlocked.

The dancer button will take you to a menu with the teams on it. It doesn’t really have text that requires translating on it so I’ve left an image of that menu out. Slide left or right to go to the next team, and you can tap on the boys name or image to come to this menu.
This is your Dancer menu. It starts you on his profile. Selecting killer trick shows the killer tricks you have unlocked for him. (I will explain this a bit more later). You also have your voice menu, this one is pretty self explanatory. It displays all the voice clips you’ve unlocked for him, and you can tap on one to hear it.
Right underneath him you can see there’s an outfit button. Here you can preview every outfit that your cards of him are able to unlock. When you have an outfit you don’t yet have unlocked selected, there’s a little green button near the bottom of the screen that will take you to the dancer tree that unlocks the outfit.
Next to that is the soul link button, which has its own big menu.
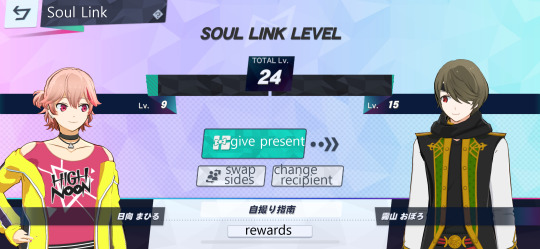
Soul link is pretty much your character’s bond with each other. It increases from doing dance battles with them, but this menu is the easiest (and fastest) way to increase it. You earn rewards like stories, voice clips, and aqua from leveling this up. At the bottom you can tap the rewards button to see exactly what you will earn.
You can get presents from doing missions. The weekly missions work in a sort of rotation, so you will receive a different dancer’s favorite gift from a different dancer every week.
The character on the left of the screen is the character giving the gift. So in this screenshot Mahiru would be giving a gift to Oboro. The swap sides button will make them, erm, swap sides, making Oboro the one giving the gift. The change recipient button just changes the character on the right.

Back from the main menu, the team button will take you here. At the top you see your team name, which you can easily rename by just tapping on it. Mine is just the default チーム1as I cant be bothered to change it lol. Your first team is the characters that display on your home screen.
Labelled in pink, we have the killer trick button. This changes which killer trick this character will perform when you use his killer trick.
Under that is the change outfit button. This one is pretty self explanatory, but this changes the outfit on the home screen (if its your first team) and the outfit he wears in dance battles.
At the bottom left we have the soul link button. This one just opens a neat little graphic that shows the soul link between the boys on your team.
The button to the right of that is untranslated as I can’t read what it says, but just give it a little tap, it’s a really small somewhat insignificant option.
Underneath that is the lovely, wonderful, osusume button. This is basically the “do it for me” button. Most people who have played Japanese mobile games before will know what this button does.

But, for those of you who don’t, here’s the osusume menu. The main buttons are the all types, body, technique, and spirit buttons. Confirming with the all types button selected will give you your strongest team in pure numbers. Selecting body will give you your strongest body attribute team etc etc you get it.
The button marked in pink is the same team button. What it does is, when selected, it will not change the members on your team. So if I wanted to make a body focus team with my 3 favorite characters, all I have to do is put them all on a team, select body, and confirm and the game builds that team for me.

Back from the home menu again, we have the Training menu. This doesn’t have much that requires translating or explaining. The status button changes what information is displayed on the bottom half of the card.

The sort button opens this little menu. The two top buttons are whether you want it in ascending or descending order. You can sort by level, rarity, or the untranslated one. I’m honestly unsure what this button does. I think its sorting by date received but I can’t say for sure because I can’t read it.
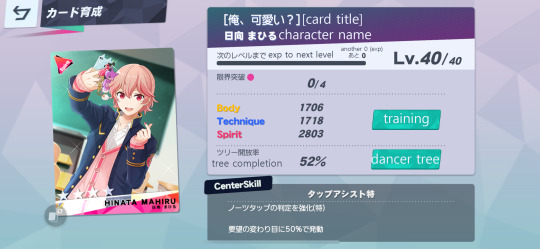
Tapping on a card will take you to this menu. Here you can see your card title, character name, exp, level, your body/technique/spirit values, and your center skill. The text marked in pink is how many duplicates of the card you have. I can’t read what the text says, so I can’t translate it but that’s what it is. I only have one copy of this card so I have 0/4 dupes. Getting a duplicate of the card increases its max level and unlocks more of its dancer tree (possibly other things too, im unsure).
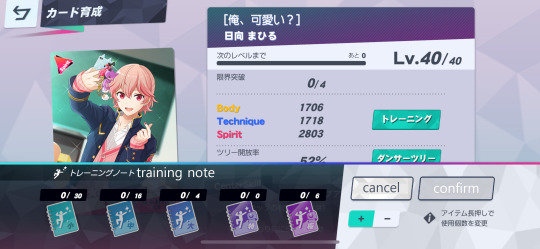
This is the training menu. This menu actually confused me when I saw it for the first time I might just be brainless idk, but I’m going to explain it even though it’s not too difficult to figure out.
So as you can see I have 0/30 of the first training notebook selected. This means I have 30 of them that I can use. Right under the cancel button there’s a plus and minus, this is toggling whether you’re increasing or decreasing the amount of notebooks you’re going to give him. This menu is pretty easy to get after that. It displays how much exp he’s going to get on his exp bar, so you can tell how much you need to give him.
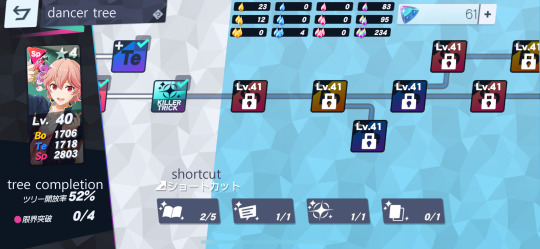
Moving on to the dancer tree. This is a menu that probably looks really familiar to those of you who have played Enstars or Utapri Shining Live (and many others I’m sure).
This menu has a lot of little nodes on it that when unlocked have different effects. The ones that have an attribute like bo/te/sp just increase that stat. You can also unlock stories, voice clips, killer tricks, and card artwork here. At the bottom you can use the shortcut buttons to take you to the next unlockable one of whichever you tap.
At the top you can see your little jewels (idk what they’re officially called) that you use to unlock the little nodes on the screen here. The 4th rainbow set of them can be used in place of any of the other ones. So if I required 5 of the blue small jewels to unlock something but I didn’t have any, I could use 5 rainbow ones instead.

Moving on to the final menu I think needs explanation, we have the team selection menu. This will appear when you select dance battle. Most of this is pretty easy to understand, but I’m still gonna talk about it a little bit.
On the right of the screen we have the auto ticket option. I have never used this but I assume it just plays the dance battle for you. In this screenshot I have 11 auto tickets available to use.
Above that is another option marked in Pink. This option says Dankira something... I can’t read the kanji in this one haha. Tapping on one of the 3 little slots opens a menu where you can use a little attribute booster. I also haven’t used this option but I assume it only works for one song.
And with that I will leave you gremlins to enjoy the game! If there’s something I didn’t explain, or something you just want extra help with please feel free to shoot me an ask (I also have submissions on if you want to send an image along with your question). Anonymous asks are available, and I will answer questions privately if you want! (Just let me know if you want your ask answered privately, I will answer it publicly otherwise).
18 notes
·
View notes