
Don't wanna be here? Send us removal request.
Statistics
We looked inside some of the posts by lilylink9-blog and here's what we found interesting.
Average Info
Notes Per Post
0
Likes Per Post
0
Reblog Per Post
0
Reply Per Post
0
Time Between Posts
3 days
Number of Posts By Type
Text
17
Last Seen Tumblr Blogs


Fun Fact
Forty percent of Tumblr users are between the ages of 18 to 25.
Text
Strawberry Rhubarb Buckle with Cheesecake Topping
This Strawberry Rhubarb Buckle (which is just an old school comfy cozy name for a strawberry rhubarb coffee cake) has an easy cheesecake topping that just brings the entire baked good to the next level! (Jump directly to the recipe.)
There are days I absolutely hate the internet. And I don’t say that as an old grumpy person (get off my lawn!) that pines away for the times when kids didn’t stare at the phone screens constantly. I’m talking about the constant struggle as a recipe developer to figure out exactly what is an SEO friendly title for a dessert that really doesn’t have a good name.
Here’s the thing. I know that I really wanted to make a dessert that had the classic combination of strawberries and rhubarb. And I wanted something that had a cream cheese component (without it being a full-blown cheesecake). I refuse to call this dessert a “dump cake” both because I hate that name, and also because it technically requires SOME mixing and layering which is the opposite of a dump cake.
But a quick search on the internet failed me. Some folks called this sort of dessert a cobbler. My Midwest mentality screamed NO, as a cobbler is strictly a fruit dessert with biscuit toppings. Other folks considered it a clafoutis but there’s no cream cheese topping on a clafoutis. And though I considered an old fashion batter pudding, it really isn’t the sort of dish you serve up warm with a bunch of spoons to eat directly out of the pan (though I wouldn’t judge you if you did).
So I totally bypassed the internet and texted my friend Shauna. Shauna’s one of my go-to baking pals who moved back to the Midwest (Chicago to be exact). We met ages ago here in San Francisco but she was always a Midwest girl at heart, so it only made sense that she would finally go back home. Right now she’s writing a cookbook called The Heartland Baker, and with some texting back and forth, she led me to BUCKLE. Ah the mythical buckle. I adore buckles, which are basically coffee cakes, but I don’t make them or call them that often. But this recipe, with its fruit sprinkled on top, and dollops of cheesecake batter speckling the fruit, is firmly in buckle territory. And, I guess, if I have to think about it, I met Shauna via the internet initially. I probably shouldn’t hate on the ‘net as much as I do.
A buckle is basically a coffee cake with a mid-country comfort name. This buckle, however, is a combo platter of coffee cake, spring fruit and a cheesecake topping that will have you diving in for seconds. Don’t be intimidated by the layering of the ingredients in the instructions, as the recipe is easy to make.
Total Time 1 hour 5 minutes
Ingredients
Cheesecake topping
8 ounces cream cheese at room temperature 1 brick
1/2 cup white granulated sugar 100 g
2 teaspoon vanilla extract
Cake batter
1 cup unsalted butter at room temperature 2 sticks or 225 g
1 1/2 cups white granulated sugar 300 g
1 tablespoon baking powder
3/4 teaspoon kosher salt
1/2 teaspoon ground ginger
2 large eggs
2 3/4 cups all-purpose flour 385 g
2 cups whole milk
3 cups sliced strawberries 370 g
2 cups 1/2-inch sliced rhubarb 200 g or about 3 fat stalks/6 skinny stalks
Instructions
Preheat the oven to 375°F. Lightly spray a 9 x 13 x 2-inch baking pan with cooking oil. Line the bottom and sides of the baking pan with parchment paper
Make the cheesecake topping by placing the cream cheese, sugar and vanilla in the bowl of stand mixer fitted with the paddle attachment. Cream until combined, with the cream cheese clinging to the side of the bowl. Scoop out the cheesecake topping with a silicon or rubber spatula and place in a bowl.
In the same mixing bowl (no need to clean it) make the cake batter by mixing the butter, sugar, baking powder, salt, and ground ginger together until the butter looks creamy and clings to the side of the bowl. Add the eggs, one at a time, mixing and scraping down the sides with a silicon or rubber spatula between additions.
Add the 1 cup of flour to the batter and mix to incorporate. Drizzle in 1 cup of the milk as the mixer is on low speed, and then stop and scrape down the sides of the bowl. Don’t worry if the batter looks broken. Repeat the process again, then add the final 3/4 cup of flour to the batter and mix thoroughly so it is well blended.
Scrape the cake batter into the prepared pan, spread it evenly on the bottom, then sprinkle the strawberries and rhubarb all over the top of the cake batter, pressing the fruit slightly into the cake batter.
Spoon the cheesecake topping over the fruit in small tablespoon rounds. Cover with aluminum foil and bake in the oven for 25 minutes. Remove the foil, and continue to bake 35 to 40 minutes or until the edges of the cake are golden brown and a toothpick inserted into the middle of the cake comes out clean. Let cool in the pan completely and then dust with powdered sugar right before serving.
Source: https://www.eatthelove.com/strawberry-rhubarb-buckle/
0 notes
Text
Skinnytaste Meal Plan (April 15-April 21)
posted April 13, 2019 by Gina
A free 7-day flexible weight loss meal plan including breakfast, lunch and dinner and a shopping list. All recipes include calories and Weight Watchers Freestyle™ SmartPoints®.
With Easter coming, I thought you’d be interested in a few dessert options if you’re entertaining. This Super moist Carrot Cake is delicious, we also love these Honey Lemon Bars, and these Coconut Macaroons.
If you’re new to my meal plans, I’ve been sharing these free, 7-day flexible healthy meal plans (you can see my previous meal plans here) that are meant as a guide, with plenty of wiggle room for you to add more food, coffee, beverages, fruits, snacks, dessert, wine, etc or swap recipes out for meals you prefer, you can search for recipes by course in the index. You should aim for around 1500 calories* per day.
There’s also a precise, organized grocery list that will make grocery shopping so much easier and much less stressful. Save you money and time. You’ll dine out less often, waste less food and you’ll have everything you need on hand to help keep you on track.
Lastly, if you’re on Facebook join my Skinnytaste Facebook Community where everyone’s sharing photos of recipes they are making, you can join here. I’m loving all the ideas everyone’s sharing! If you wish to get on the email list, you can subscribe here so you never miss a meal plan!
Also, if you don’t have the Skinnytaste Meal Planner, now would be a great time to get one to get organized for 2019! There was a print error last year, but it’s perfect now! You can order it here!
THE DETAILS:
Breakfast and lunch Monday-Friday, are designed to serve 1 while dinners and all meals on Saturday and Sunday are designed to serve a family of 4. Some recipes make enough leftovers for two nights or lunch the next day. While we truly believe there is no one size fits all meal plan, we did our best to come up with something that appeals to a wide range of individuals. Everything is Weight Watchers friendly, I included the updated Weight Watcher Freestyle Points for your convenience, feel free to swap out any recipes you wish or just use this for inspiration!
The grocery list is comprehensive and includes everything you need to make all meals on the plan. I’ve even included brand recommendations of products I love and use often. Cross check your cabinets because many condiments you’ll notice I use often, so you may already have a lot of them.
And last, but certainly not least, this meal plan is flexible and realistic. There’s plenty of wiggle room for cocktails, healthy snacks, dessert and dinner out. And if necessary, you can move some things around to make it work with your schedule. Please let me know if you’re using these plans, this will help me decide if I should continue sharing them!
MONDAY (4/15) B: Avocado Toast with Sunny Side Egg (4) and a pear (0) L: Penne Arugula Salad with Sun Dried Tomatoes (9) D: Spaghetti Squash Enchilada Bowls (3) with 1 ounce avocado (1) and Instant Pot Refried Beans* (0)
Totals: Freestyle™ SP 16, Calories 884**
TUESDAY (4/16) B: Avocado Toast with Sunny Side Egg (4) and a pear (0) L: Penne Arugula Salad with Sun Dried Tomatoes (9) D: Shrimp Scampi Tacos with Caesar Salad Slaw (6)
Totals: Freestyle™ SP 19, Calories 913**
WEDNESDAY (4/17) B: Overnight Oats in a Jar (5) L: Penne Arugula Salad with Sun Dried Tomatoes (9) D: Chicken and Asparagus Lemon Stir Fry (1) with ¾ cup brown rice (5) Totals: Freestyle™ SP 20, Calories 956**
THURSDAY (4/18) B: 2 scrambled eggs (0) with 1 piece toast (3) and 1 cup blueberries (0) L: Penne Arugula Salad with Sun Dried Tomatoes (9) D: Beef, Tomato and Acini di Pepe Soup (5)
Totals: Freestyle™ SP 17, Calories 858**
FRIDAY (4/19) B: Overnight Oats in a Jar (5) L: LEFTOVER Beef, Tomato and Acini di Pepe Soup (5) D: Fish Florentine (6)
Totals: Freestyle™ SP 16, Calories 843**
SATURDAY (4/20) B: Tex Mex Migas (6) L: The Skinny Tuna Melt (4) (recipe x 2) with an apple (0) D: DINNER OUT!
Totals: Freestyle™ SP 10, Calories 651**
SUNDAY (4/21) B: Easy Bagel Recipe (3) with 2 tablespoons reduced fat cream cheese (3), 1 ounce lox (2), sliced cucumber (0), tomatoes (0) and red onion (0) L: Chicken Quiche (6) with Low-Carb Potato Salad (4) D: Apricot-Rum Glazed Spiral Ham (4) with Instant Pot Mashed Potatoes (5) and Roasted Parmesan Green Beans (1)
Totals: Freestyle™ SP 26, Calories 1,159**
**Prep Sunday night, if desired. Soak beans overnight (Sun to Mon)
**This is just a guide, women should aim for around 1500 calories per day. Here’s a helpful calculator to estimate your calorie needs. I’ve left plenty of wiggle room for you to add more food such as coffee, beverages, fruits, snacks, dessert, wine, etc.
**google doc
Shopping List:
Produce
2 medium pears (any variety)
4 medium apples (any variety)
1 (5-ounce) package baby arugula
1 (10-ounce) package baby spinach
1 small (4-ounce) and 1 large (6-ounce) Hass avocado
1 medium head cauliflower (or 1 pound florets)
1 pound asparagus
2 small spaghetti squash
2 pounds Russet potatoes
12 ounces green beans (increase accordingly if you plan to cook for a crowd on Sunday)
1 small head romaine lettuce
4 ounces white mushrooms
1 medium banana
2 medium heads garlic
1 small bunch fresh cilantro
1 small bunch fresh Italian parsley
1 small bunch/container fresh dill (can sub 1 ½ teaspoons parsley in Potato Salad, if desired)
1 small bunch celery
1 medium jalapeno
1 small bunch scallions
4 medium vine-ripened tomatoes
1 small cucumber
3 medium lemons
1 dry pint fresh blueberries
1 (2-inch) piece fresh ginger
3 medium carrots
1 medium red bell pepper
1 large red onion
1 large yellow onion
Meat, Poultry and Fish
1 pound peeled and deveined jumbo shrimp
2 ¼ pounds boneless, skinless chicken breast
1 pound 90% lean ground beef
1 ¾ pounds (4) thick, skinless white firm fish fillet (such as grouper, bass or halibut)
4 ounces smoked salmon (lox)
1 (6 to 8 pounds) Hickory smoked fully cooked spiral cut ham
Grains*
1 loaf sliced whole grain bread
1 small package all-purpose or whole white wheat flour
1 large package corn tortillas (you need 16)
1 small package quick oats
1 package dry brown rice (or 3 cups pre-cooked)
1 (1-pound) package small pasta, such as Acini de Pepe
1 (1-pound) package penne pasta (such as Ronzoni Smart Taste or Delallo Whole Wheat)
Condiments and Spices
Extra virgin olive oil
Cooking spray
Olive oil spray (or get a Misto oil mister)
Kosher salt (I like Diamond Crystal)
Pepper grinder (or fresh peppercorns)
Hot sauce
Balsamic vinegar
Cumin
Chipotle chili powder
Cayenne (optional, for Refried Beans)
Red pepper flakes
Dijon mustard
Yellow mustard
NuNaturals liquid vanilla stevia (or your favorite sweetener)
Cinnamon
Reduced sodium soy sauce*
Canola or grapeseed oil
Bay leaves
Regular or light mayonnaise (I love Sir Kensingtons)
Red wine vinegar
Optional toppings for Easy Bagels: everything bagel seasoning, sesame seeds, poppy seeds, dried
garlic flakes, dried onion flakes)
Thyme
Paprika
Garlic powder
Dairy & Misc. Refrigerated Items
2 ½ dozen large eggs
1 large wedge fresh Parmesan (or Parmigiano Reggiano) cheese
1 tub reduced fat cream cheese
1 tub whipped butter (can sub 2 tablespoons unsalted butter with a pinch of extra salt in Mashed
Potatoes, if desired)
1 small box unsalted butter
1 package queso fresco (can sub ¼ cup Mexican blend in Migas, if desired)
1 pint half and half
1 (17.5-ounce) tub nonfat plain Greek yogurt (I like Fage or Stonyfield Farms)
Refrigerated pie dough (for 9-inch pie)
1 pint 1% buttermilk
1 small tub light sour cream (I prefer Breakstones)
1 (8-ounce) bag reduced fat shredded Mexican cheese blend
1 (8-ounce) bag reduced fat shredded Swiss cheese (can sub 1/3 cup Mexican blend in Quiche, if desired)
4 slices reduced fat cheddar cheese
1 pint skim milk
Canned and Jarred
1 small can/jar chipotle chilis in adobo
1 (15-ounce) can garbanzo beans
1 small can/jar anchovy filets
1 (28-ounce) can diced tomatoes
1 (32-ounce) carton beef stock
2 (4.5-ounce) cans tuna in water
1 (15-ounce) can reduced sodium chicken broth
1 small jar sundried tomatoes
1 small jar dill pickles
1 small jar apricot preserves
1 (15-ounce) can tomato sauce
Misc. Dry Goods
1 package dried pinto beans
1 small package chia seeds
1 small bag chopped pecans
Cornstarch
Baking powder
1 (1.7-ounce) bottle dark rum
*You can sub gluten-free, if desired
posted April 13, 2019 by Gina
Source: https://www.skinnytaste.com/skinnytaste-meal-plan-april-15-april-21/
0 notes
Text
How to Make Gluten Free Crackers
These Gluten Free Crackers are easy-breezy and so darn delicious! Keep them simple with sea salt or add in some seasoning like Everything Bagel spice, Italian spice or Ranch seasoning. Made with a mix of almond flour and ground flax seed these crackers are Paleo, Whole30 and low-carb friendly!
Gluten Free Crackers
There used to be a time that if you were gluten-free there was only one way to get a great tasting cracker that was safe to eat: to make one. But it’s 2019 and we’re lucky that we live in a time when there are a whole host of amazing gluten-free brands of snacks and foods available. You can walk into any grocery store now and find at minimum, a few options for gluten-free crackers. There are some out there that we absolutely adore (here’s looking at you Simple Mills), and some that you can “tell” are gluten-free. But the options and abundance of gluten-free products is ever expanding.
So why make your own crackers when there are so many good options out there? Because simply put, sometimes it’s a nice change of pace to be able to turn a few ingredients into a wholesome delicious snack! And honestly, these crackers are not at all complicated, with only a handful of ingredients and lots of different option to customize them with different flavors! We promise you’ll love this cracker and be glad you made it! Plus, they’re SO DELICIOUS!
They would be a fun baking project to bake with the kids as well! And the resulting cracker can be eaten on its own, used in a dip or added to a charcuterie board. What do you think, ready to make them?!
Seasoning Options
There are a few seasoning options we are suggesting here, but the truth is your options are endless. The trick is to put about half of the seasoning inside of the dough, and use the other half to top the cracker with. We’ve suggested either plain flaky sea salt, Italian seasoning, Everything Bagel seasoning or a ranch seasoning.
Store Bought Seasoning Blends
If you are using a store bought version of the flavored seasoning make sure to check the label for salt. If the seasoning blend has salt in it you may want to skip the addition of salt in the recipe.
Homemade Seasoning Blends
We are sharing a simple seasoning blend for Ranch spice and the Everything Bagel spice, just in case you are like us and would prefer to control the ingredients a bit more. These blends will keep for up to a year if you are starting with fresh herbs. It will make more than you need for the cracker recipe, store the remainder.
Ranch Seasoning Blend:
3 teaspoon dried dill
3 teaspoon dried parsley
3 teaspoon garlic granules
3 teaspoon onion granules
1-1/2 teaspoon black pepper
Everything Bagel Seasoning Blend:
1 teaspoon garlic powder
1/2 teaspoon fine sea salt
1 teaspoon poppy seeds
1 tablespoon sesame seeds
1 teaspoon dried minced garlic
1 tablespoon dried minced onion
Tips on Making Gluten Free Crackers
This dough is pretty easy to work with and roll out, but here are a few tips to make sure you are successful!
Use a scale to measure out your baking flour to ensure accuracy!
Make sure to blend the butter into the dough completely so that there are no visible pieces remaining. You can use cold butter or room temperature. There is also an option for using oil, as well.
Roll out to the correct thickness between 1/8″ – 1/16″. Too thin and they’ll burn and too thick and they’ll be chewy (though still delicious).
Set a timer! Start checking on these starting at 15 minutes. Look for very light golden brown edges and completely dry looking crackers.
If you want them ultra crispy, you could break the crackers apart and bake for a few more minutes.
Let them cool for a few minutes before breaking them apart.
Let cool completely before storing. If they have any warmth to them when they are stored they could turn the crackers soft.
Tools you need to make Gluten Free Crackers
Baking sheet (Cookie sheet or rimmed baking sheets both work)
Rolling Pin
Parchment Paper
Pastry wheel or pizza cutter
Basics: Bowl, whisk, spatula
If you like this gluten-free basics recipe, check out these others:
Easy Gluten Free Crackers
Ingredients
Seasoning options
Directions
Preheat oven to 300ºF and position an oven rack in the center of the oven. Line a baking sheet with parchment paper.
In a mixing bowl, whisk together almond flour, flax, garlic powder, salt and 2 teaspoons seasoning.
Add the butter to the dry ingredients and using your hands rub the butter into the mix until it is completely combined, with no visible pieces of butter remaining (or add in the oil). Add the beaten egg to the dough and mix together until completely combined.
Place the ball of dough in the center of the lined flat baking sheet and cover with a second piece of parchment paper. Using a rolling pin, roll out the dough into a rectangle that’s approximatly ⅛” - 1/16” inch thick.
Using a pizza cutter, cut the dough into squares. If you end up with leftover scraps of dough, gather them up and repeat the rolling process.
Sprinkle the dough with flaky sea salt or remaining 2 teaspoons seasoning, pressing down lightly to make sure the seasoning sticks.
Bake for 15-20 minutes, until golden brown and crispy.
Store crackers in an airtight bag or container for up to 3 days.
Loading nutrition data...
There may be affiliate links in this post! By clicking on them, or purchasing recommended items I may receive a small compensation, at no cost to you! However, I only recommend products I absolutely love and use in my own home! Thank you for supporting Lexi's Clean Kitchen when you shop! See my privacy policy for more information about this, the information we save, and more!

Source: https://lexiscleankitchen.com/how-to-make-gluten-free-crackers/
0 notes
Text
(Super) Berries & Creme Freezer Fudge
Apologies for the pop-up, but lately we’ve had quite a few people stealing photos and recipes from Pickles & Honey. It’s a big drag, and we find ourselves needing to more actively head it off.
If you’re here to enjoy our content: thank you. <3 Please go ahead and dismiss this message.
If you’d like to republish our recipe or photo, please reach out and ask permission. Note: Sharing a link to P&H is always appreciated (no permission necessary).
Thanks so much for reading.
-Amanda & Aaron

Source: http://www.picklesnhoney.com/2018/07/17/berries-creme-freezer-fudge/
0 notes
Text
Just Bento Cookbook event at Kyoto LOFT, April 22 - May 11 (2014)
If you're a bento fan and will be in Kyoto between April 22nd to May 11th, please stop by LOFT's Lunch Market, which is a department dedicated to bentos and lunch boxes. They'll have a big display for the Just Bento Cookbook during that time! The objective is to introduce the wonderful world of bentos to the international visitors that come to Kyoto in the spring. I'm really honored that they are using my book as the centerpiece of that event. I wish I could be there in person...but, I'll be there in spirit! ^_^
Here's the Kyoto LOFT home page (Japanese), and the Google Map (I've put it on my Kyoto map). I consider the LOFT store chain to be a must-visit bento equipment store, and you'll love it if you like Japanese accessories, crafty stuff, cute kitchen tools, stationery, and more too.
(Comments are still broken so if you have any questions please stop by my Facebook Page or poke me on Twitter ^_^;)

Source: http://www.justbento.com/just-bento-cookbook-event-kyoto-loft-april-22-may-11-2014
0 notes
Text
Instant Pot Pozole Verde con Pollo
To a small skillet, set over medium-low heat, add the pumpkin seeds and a pinch of salt. Toast for about 2 minutes, shaking the pan every now and then. When they start to brown, pour them right into the jar of your blender (we’ll be adding more stuff to the blender later!). Cover the blender and pulse until ground, about 30 seconds to a minute. 2. To the Instant Pot, add the chicken, onion, tomatillos, garlic, jalapeño, Mexican oregano, chicken broth and 2 teaspoons of salt. Close the “vent” and set the pressure cooker to high and 15 minutes. 3. When the Instant Pot goes off, do a quick release. I like to cover the valve with a clean kitchen towel and flip it open using a wooden spoon’s handle. When there is no more pressure, remove the lid, opening it away from you. 4. Remove the chicken and place on a cutting board. Place a strainer atop a big bowl, and pour the liquid through. Transfer all of the solids (the pepper, onion, tomatillos, etc.) to the blender, along with a cup of liquid (you can eyeball this measurement). Add the cilantro to the blender. 5. Pour the broth back to the Instant Pot, along with the hominy. Set the machine to the “saute” function and place the timer on 5 minutes. This will cook the hominy a bit while we blend up the green sauce and shred the chicken. 6. Back to the blender, allowing some steam to escape from the blender, process until very smooth, about 2 minutes. 7. Shred the chicken using two forks. By this time, the broth and hominy should be very warm. Add the chicken back to the Instant Pot, along with the remaining blender green sauce. Give it a big stir and adjust the salt to your liking. I added an additional 2 teaspoons. 8. Divide amongst bowls and garnish with crispy chips, slices of avocado, radishes, jalapeño, sliced cabbage and/or diced onion. Source: https://www.acozykitchen.com/instant-pot-pozole-verde-con-pollo/
0 notes
Text
Instant Pot Chicken Adobo
Learn how to make Instant Pot Chicken Adobo! This Filipino adobo recipe gets an update – the pressure cooker makes it more flavorful and tender!
In a few weeks, we will be welcoming a new member of the family. A baby girl, or Baby A, as she is currently known (we’ve all been racking our brains guessing her name) will be born to my little sister. Little does she know how very loved she already is, and how we are all counting down to her arrival! A new niece to spoil!
Around this time last week, I was driving home from the airport, after a quick, 24 hours in San Diego. Friends and family from across the country flew in to surprise my sister for a baby shower and to spend some time together before Baby A’s arrival.
Seeing my sister’s stunned look as she walked through the doors was priceless, but not quite as special as it was for me to see her baby belly, which had grown since I last saw her in November. She and my brother-in-law are some of the kindest, most thoughtful couples I know, and I can’t wait to see them enter this next chapter of their life.
Where there’s family, there’s food, so as I caught up with my cousins, we ate our fill of Filipino food. There was barbecue and pancit, caldereta and of course, adobo. Despite eating my fill, upon my return home, the adobo craving continued, and I had to make some for my family, who, as it turned out, was craving adobo, too.
I know what you’re thinking. Haven’t you already shared a recipe for Filipino Chicken Adobo?
Yes, I have, a classic Filipino chicken adobo recipe that is my tried-and-true. But I’ve been loving using my pressure cooker lately. Why? Well, for one, I often forget to marinate my chicken for optimal flavor, and I find that using a pressure cooker (such as an Instant Pot) helps make up for my lack of planning. Just as a pressure cooker is able to infuse extra flavor into homemade soup stock in less time, the same is true when making chicken adobo. While it may not save cooking time, it does result in maximum flavor without marinating, and that is a timesaver.
Besides, I wanted to make sure my sister has a good chicken adobo recipe she can use in the Instant Pot I sent her for Christmas. I have a feeling once Baby A arrives, she’s going to need all the easy recipes she can get!
Loved this Filipino Chicken Adobo? Try more of our favorite family recipes:
Classic Filipino Chicken Adobo Adobo Loco Moco Chicken and Asparagus Sotanghon (Glass Noodle) Soup Filipino Meatball Noodle Soup Pancit Bihon (Filipino Rice Noodles) Costa Rican Gallo Pinto (Rice and Beans) Arroz Caldo
Learn how to make Instant Pot Chicken Adobo! This Filipino adobo recipe gets a pressure cooker update – use your Instant Pot to make adobo more flavorful and tender!
Course Main Course
Cuisine Filipino
Keyword adobo, chicken, Filipino, garlic, instant pot, pressure cooker
Prep Time 10 minutes
Cook Time 30 minutes
Total Time 40 minutes
Servings 4 servings
Calories 681kcal
Author Liren Baker
8 chicken thighs on the bone skin on or off, to taste
1/3 cup soy sauce I prefer Silver Swan for this recipe
1/3 cup apple cider vinegar
1 small head of garlic mashed or finely minced
freshly ground black pepper
3 bay leaves
1 tablespoon canola oil
Place the chicken in soy sauce, vinegar, garlic, pepper, and bay leaves in the pressure cooker and set the multi-cooker to "brown."
When the sauce begins to bubble, turn the chicken and cook for another two minutes.
Transfer the sauce to a bowl, add oil to the pot, and brown the chicken on all sides, working in batches if necessary.
Return the sauce to the pressure cooker, cover with the valve set to "pressure" and cook on High pressure for about 20 minutes.
Depressurize the pressure cooker. Cook on the simmer function with the lid off to allow the sauce to reduce a bit.
Serve hot over rice.
Whether or not you leave the skin on the chicken, I leave up to you. If you are trying to cut extra fat, definitely remove the skin before marinating. For the slow cooker: Marinate as instructed. Brown the chicken on all sides, then add all the ingredients in the slow cooker insert. Cover and set the slow cooker for 10 hours on low (if you are in a rush, you can also try 6 hours on high).
Calories: 681kcal | Carbohydrates: 2g | Protein: 49g | Fat: 51g | Saturated Fat: 13g | Cholesterol: 283mg | Sodium: 1303mg | Potassium: 647mg | Vitamin A: 4.5% | Vitamin C: 2.5% | Calcium: 2.7% | Iron: 13.3%

Source: https://kitchenconfidante.com/instant-pot-chicken-adobo
0 notes
Text
Excess at XS Espresso, Bondi

I left it up to Nina to decide where we were going for brunch as her specific food requirements had bled my "to eat" list dry. The night before she texted me about XS Espresso and on the way I looked at their Instagram page full of colour shakes, donuts, fried chicken and burgers and wondered if she had finally come over to the dark side. My side.

"Oh no they've got healthy food too," she said and she and Garth order their healthy breakfasts while I order some things from the other side of the menu. It's like we were eating at two different cafes.
XS Espresso is very busy and sits on a sun drenched corner of Hall Street in Bondi. You order and pay at the counter and they bring the food to you. The food comes out one at a time. First the sweet waffles come out and there's a fairly long wait before the chicken waffles come out. And then finally around 20 minutes later Nina and Garth's breakfast arrives.

Cold Drip $4 and Taro latte $4.90
The drinks are faster although not fast. The cold drip coffee and taro latte are first. The latter is a sweetened, tasty version of the taro milk latte.

XS Surprise Shake $14
The Cronut shake wasn't available as they were out of Cronuts so we go for the XS Surprise. It's the sort of drink that kids go gaga over. I only know this because every kid that walked past went positively crazy over it begging their parents to order one while others counted up their change so they could afford one. And at $15 it isn't cheap. It is a Kinder Surprise topped waffle cone dipped in white chocolate with sprinkles and there's a chocolate shake in there too. Oh and there's also rainbow fairy floss just because.

Next Level Waffles $17
The waffles come out on a supersized plate. It's a waffle sandwich smothered in Nutella and Belgian chocolate, sliced strawberries, about a packet of mini m&m's and a smashed Crunchie and two fat scoops of vanilla ice cream.

This is really for those that like their desserts super sweet and sugary. I think the berries are really needed especially with this much sweetness and try as we might, we can only demolish half of this so this is really best shared with 3 or 4 people.


Chicken & Waffle $18
I know, another waffle dish but when I asked what was good they said this. It's a buttermilk fried chicken on a cinnamon waffle with maple bacon, creamy carrot and purple cabbage slaw, melted cheese and XS secret sauce which is like a chipotle mayonnaise. It's enormous and the chicken is juicy although a little cooked too far. I don't really detect much cinnamon in the waffle and there's a generous amount of maple syrup.

Happy Bowl $21
Strangely enough, I think out of all the dishes I prefer Garth's Happy Bowl with grilled chicken tenderloins, quinoa, smashed sweet potato, kale, grilled halloumi, beetroot hummus, cucumber, soft boiled egg with lemon, garlic and chilli. Sure it's a bit healthy for you but the chicken is tender and halloumi is always good.

XS Stack $17
Nina honed in on the avocado toast with a slice of sourdough topped with poached eggs, grilled halloumi, tomatoes and smashed avocado with za'atar. She's quite happy with her choice indeed.
And of course dessert isn't needed! ;)
So tell me Dear Reader, what are your thoughts of shakes like the one above? And which dish would you have ordered?
This meal was independently paid for.
99 Hall St, Bondi NSW 2026 Monday to Friday 6am–10pm Saturday & Sunday 7am–10pm Phone: (02) 9130 3514 xsespresso.com.au/
Source: https://www.notquitenigella.com/2019/06/22/xs-espresso-bondi/

0 notes
Text
Cheesy Jalapeño Popper Baked Stuffed Chicken
5 Freestyle Points 371 Calories
What happens when you combine Baked Jalapeño Poppers with chicken?? Oh yeah baby!! Cheesy stuffed chicken breast stuffed with diced jalapeño, cream cheese, cheddar jack cheese, scallions and bacon!
Jalapeño Popper Stuffed Chicken
Serve it with fiesta lime rice, cilantro lime rice or a two bean salad or black bean cucumber salad on the side to make it a meal.

For this recipe, I basically deconstructed my jalapeño poppers and stuffed them into chicken and the results where mouth watering!! Now updated to include Air Fryer directions!
Variations and Tips:
Use panko in place of breadcrumbs for a crunchier texture.
To make this gluten-free, use gluten-free panko.
To make them mild, take out the jalapeno seeds and membranes.
To make them spicy, leave them in.


Cheesy Jalapeño Popper Baked Stuffed Chicken
What happens when you combine Skinny Baked Jalapeño Poppers with chicken?? Oh yeah baby!! Cheesy stuffed chicken breast stuffed with diced jalapeño, cream cheese, cheddar jack cheese, scallions and bacon!
Ingredients:
2 slices center cut bacon, cooked and crumbled
3 jalapeños, chopped (remove seeds for milder)
3 oz 1/3 less fat cream cheese, softened
4 oz reduced fat shredded cheddar jack (Sargento)
2 tbsp chopped scallions
8 thin sliced skinless chicken breast cutlets, 3 oz each
1/2 cup Italian seasoned whole wheat breadcrumbs (or GF crumbs)
1 1/2 juicy limes, juice of
1 tbsp olive oil
salt and fresh pepper
olive oil non-stick spray
Directions:
Wash and dry chicken cutlets, season with salt and pepper. Preheat oven to 450°F.
Lightly spray a baking dish with non-stick spray.
Combine cream cheese, cheddar, scallions, jalapeño and bacon crumbles in a medium bowl.
Lay chicken cutlets on a working surface and spread 2 tbsp of cream cheese mixture on each cutlet.
Loosely roll each one, secure the ends with toothpicks to prevent the cheese from oozing out.
Place breadcrumbs in a bowl; in a second bowl combine olive oil, lime juice, salt and pepper.
Dip chicken in lime-oil mixture, then in breadcrumbs and place seam side down on a baking dish. Repeat with the remaining chicken.
When finished, lightly spray the top of the chicken with oil spray.
Bake 22-25 minutes, serve immediately.
Air Fryer Directions
Follow Steps 1 to 8, then air fry in batches 400F for 12 minutes, turning halfway.
Nutrition Information
Yield: 4 servings, Serving Size: 2 stuffed breasts
Amount Per Serving:
Freestyle Points: 5
Points +: 9
Calories: 371 calories
Total Fat: 17.5g
Saturated Fat: 0.5g
Cholesterol: 49mg
Sodium: 356mg
Carbohydrates: 11g
Fiber: 1.5g
Sugar: 0.5g
Protein: 42.5g
All images and text ©Gina Homolka for Skinnytaste


posted September 4, 2018 by Gina
Don’t Miss a Recipe!
Get new free recipes and exclusive content delivered right to your inbox:

Source: https://www.skinnytaste.com/cheesy-jalapeno-popper-baked-stuffed/
0 notes
Text
Chickpea Salad Sandwich Fuss-Free Vegan Cookbook
This Chickpea Salad Sandwich from Sam Turnbull’s Fuss-Free Vegan cookbook is exactly that – fuss-free! It makes for an easy and delicious lunch.
Jump to Recipe
If you’re not familiar with Sam, she’s the founder behind the vegan blog It Doesn’t Taste Like Chicken. She’s been cranking out recipes, paired with beautiful pictures, for a few years now! And last year, she came out with her first cookbook: Fuss Free Vegan. It’s a book containing 101 different comfort-food recipes, veganized, so that you can eat all of your favorites.
Along with tasty recipes, Sam also gives tips on how to eat vegan on a budget, stocking your pantry, and menu ideas for a variety of occasions! Some of the other recipes that caught my eye were the Better-than-Bakery Cheddar & Chive Scones, Quick & Easy Pho, and 24 Karat Carrot Cake. Mmmm..
But, today I wanted to focus on another back-to-school-friendly meal that you can pack away in your lunch box or bag! And while the chickpea salad sandwich is a classic at this point, this recipe will totally hit the spot. Customize it with your favorite sandwich toppings and it still comes together in mere minutes. Can’t beat that!
For more quick lunch recipes, check out my recipe index. I just revamped it!
1 year: Creamy Tomato Basil Tartlets // 5 years: Raw Plum Banana Cheesecake // 6 years: Blueberry Peach Chia Parfait
"This is hands down my favorite sandwich, and it’s my vegan answer to a tuna or chicken salad sandwich. It’s super easy to make, tastes great, and I almost always have all the ingredients in my pantry and fridge. You can enjoy as-is, or you can layer on some extra veggies. This is such a classic in my house that you’ll often find me forking at leftovers straight from the fridge."
Author Sam Turnbull of It Doesn't Taste Like Kitchen
1 can 19 oz chickpeas, drained and rinsed (about 2 cups)
3 Tbsp Mayonnaise for Days page 208 or store-bought vegan mayo
1 Tbsp Dijon mustard check for gluten-free, if necessary
2 tsp capers optional
¼ tsp salt
¼ tsp black pepper
2 stalks celery chopped
¼ red onion chopped
8 slices of bread or 4 tortillas gluten-free, if preferred
Toss the chickpeas, mayonnaise, mustard, capers, salt, and pepper into a food processor and pulse to combine until the chickpeas reach a nice mashed texture, but not puréed.
Alternatively, you could do this with a fork or potato masher if you don’t have a food processor. Add the celery and red onion and pulse a few more times just to incorporate, or stir to mix in. Pile on top of bread or a tortilla. Top with extra veggies of your choice if you wish.
Excerpted from Fuss Free Vegan: 101 Everyday Comfort Food Favorites, Veganized. Copyright © 2017 Samantha Turnbull. Published by Appetite by Random House®, a division of Penguin Random House Canada Limited. Reproduced by arrangement with the Publisher. All rights reserved.
This book was sent to me by the publisher, to feature. I have not been compensated for this post, I just like supporting fellow authors!
Related Posts
Category: Cookbooks, Entree, Gluten-free, Lunch Tags: back-to-school, blog, capers, celery, chickpea, classic, d750, dairy-free, easy, entree, food, food photography, food stylist, healthy, it doesn't taste like chicken, lunch, macro, nikon, nut-free, recipe, salad, sam Turnbull, sandwich, vegan, vegan yack attack, vegetarian
Source: https://veganyackattack.com/2018/08/23/chickpea-salad-sandwich/
0 notes
Text
Mini Turtle Cheesecakes by The Pioneer Woman
I love cheesecake, but sometimes I can’t be bothered to make a big, honking full-sized one. I don’t know what the mental block is, but if I have the idea “Hey! I think I’ll make a cheesecake!” I immediately get really tired and want to get back in bed. I think it’s partly to do with the fact that a full-sized cheesecake is a living, breathing thing, and while I can usually avoid winding up with a big crack down the middle, sometimes a cheesecake does what it wants to do. In addition, a full-sized cheesecake takes so long to chill properly, and by the time you can actually cut a slice and enjoy it, you have now aged 27 years.
As I said, I just want to get back in bed.
So mini cheesecakes are where I live! They’re simpler, provide more immediate gratification (relatively speaking) and you can freeze them and just pull out what you need when you need it.
And they don’t make me tired. Sold!
First, make the chocolate cookie crust. Add chocolate graham crackers to a food processor. (Or you can use Oreos!)
Add a little sugar…
Then pulse the crumbs…
Until they’re really fine.
Keep pulsing while you drizzle in melted butter.
This makes the crumbs nice and moist.
Oh, and buttery!
Line a couple of muffin pans with paper cups, then add crumbs to each one. You need about 2 tablespoons of crumbs in each cup.
Use your fangers or the bottom of a 1/4 cup measure to pack them tightly in the cups.
Now just set these aside; no need to bake ’em!
Next up: Make the cream cheese filling! That’s softened cream cheese…
Sugar…
And eggs.
Oh! And vanilla!
Beat this until it’s totally smooth…
Then (this is where things really go off the rails) drizzle in some jarred salted caramel. (If you can’t find salted caramel sauce, you can just use regular caramel sauce with a little salt added.)
Mix this in, scraping the sides of the bowl and trying really hard not to dive in and eat this with a spoon. Just remember everything your mama taught you about patience being a virtue!
Divide the batter equally among the muffin cups.
It should work out to be roughtly 3 tablespoons of batter per cup. Give or take a gallon.
Now put these into a preheated 350 degree oven and bake them for about 15 to 17 minutes, until they’re set.
Let them cool for a bit, then pop the pans into the fridge to chill completely, about 2 hours or so. (Or you can make these and keep them in the fridge overnight if you have a life to go live!)
When the cheesecakes are chilled and you’re ready to finish them, make a luscious and easy ganache: Add chopped semisweet chocolate to a bowl…
Then pour over hot heavy cream…
And let it sit for a couple of minutes.
Once the chocolate has started to soften, start whisking it slowly…
And keep going until the mixture is smooth and perfect. This is a slightly thick ganache; you can add a little more cream if you want it to be a little thinner.
Add a little ganache to the tops of the chilled cheesecakes and spread it to even it out.
Lightly press a pecan half in the center…
Then sprinkle mini chocolate chips all over.
The straw that broke the camel’s back is a little more salted caramel sauce on top! Don’t try to be neat about it; if it gets on the paper cup, great. Life is beautifully messy.
You can freeze these in the finished form, then just pull them out and let them thaw. Or you can chill them in the fridge and serve them later in the day.
Or…
You can just dive in right now.
As you can see, that’s exactly what I did.
Enjoy these, friends!

Mini Turtle Cheesecakes
November 28, 2018 0
Prep Time:
2 Hours
Difficulty:
Easy
Cook Time:
17 Minutes
Servings:
24 Servings
Ingredients
Crust
24 whole Chocolate Graham Crackers, Broken Into Pieces
8 Tablespoons Salted Butter, Melted
1/2 cup Sugar
Filling
3 packages (8 Ounce) Cream Cheese, Softened
1 cup Sugar
2 whole Large Eggs
1 teaspoon Vanilla Extract
1/2 cup Jarred Salted Caramel Sauce
GANACHE
12 ounces, weight Semi-sweet Chocolate, Chopped
3/4 cups Heavy Cream
TOPPINGS:
1 cup Pecan Halves
1/2 cup Mini Chocolate Chips
1/2 cup Salted Caramel Sauce
Instructions
Preheat the oven to 350 degrees.
For the crust: Line a 24-cup muffin tin with cupcake liners. Pulse the graham crackers and sugar in a food processor until fine crumbs form. Add the butter, then pulse until well combined. Distribute the crumbs among the prepared cups, about 2 tablespoons in each, and press to firm them up. Set crusts aside.
For the filling: Beat the cream cheese in an electric mixer fitted with the paddle attachment until smooth. Mix in the sugar and eggs. Add the vanilla and salted caramel and mix again. Distribute the batter among the muffin cups, about 3 tablespoons per cup. Tap the tin on the counter to distribute the batter evenly.
Bake, watching to make sure they don't burn, until set in the middle, 15 to 17 minutes. Cool on a wire rack, then chill for 2 hours.
For the ganache: Place the chopped chocolate in a bowl and set aside. Heat the cream in a saucepan until warm and bubbles begin to form around the edges, 1 to 2 minutes. Pour over the chocolate and allow to sit for 2 minutes. Mix until smooth, then set aside to cool slightly.
Place about 1 tablespoon ganache on top of each cheesecake. Add 1 pecan half and mini chocolate chips to each one. Drizzle with the remaining caramel sauce. Chill in the fridge or freeze, uncovered, for 1 hour. Transfer to an airtight freezer container and freeze for up to 3 months.
Allow to thaw at room temperature for 30 minutes before serving.

Source: https://thepioneerwoman.com/cooking/mini-turtle-cheesecakes/
0 notes
Text
Pork Tenderloin Recipe Easy Sheet Pan Dinner
This Pork Tenderloin Recipe is a flavor packed easy sheet pan dinner. Tender green beans, crispy roasted potatoes and delicious glazed pork tenderloin all cooked simply on one sheet pan.
This pork tenderloin recipe caught my eye in a Cook’s Country magazine because it was so pretty on the sheet pan, but when I read the recipe I knew it was going to be absolutely delicious.
Pork Tenderloin
The key to this tasty recipe is a simple flavor profile and a few clever cooking hacks. First, the green beans are arranged under the pork tenderloin so they absorb the flavor and don’t dry out. Second, instead of having to marinate or sear the tenderloin, you simply use hoisin sauce as an all in one flavor packed glaze.
The hoisin sauce is genius as a glaze in this recipe. It doesn’t really give an asian flavor profile to the dish, it just adds the extra sweet and salty flavor that really compliments the pork.
Start by arranging the fresh green beans and the potato halves on a sheet pan as shown.
Then place the pork tenderloins over the green beans and brush with hoisin sauce.
Season with additional salt and pepper and roast at 450 degrees until pork tenderloins read 140 degrees on an instant read thermometer, 20 to 25 minutes.
While the pork tenderloins are roasting, mix up a simple herb butter compound that will help finish the tenderloins and the potatoes and green beans.
Remove tenderloins from oven and let rest before slicing, topping with half of herb butter.
Top potatoes and green beans with remaining herb butter and stir to combine.
Pork Tenderloin Recipe
Pork Tenderloin Recipe Easy Sheet Pan Dinner
Course: Dinner
Cuisine: American
Ingredients
2 1 pound pork tenderloins, trimmed
1/4 cup hoisin sauce
1 pound green beans, stems trimmed
1 1/2 pounds baby potatoes cut in half lengthwise
3 tablespoons olive oil
kosher salt and freshly ground pepper
4 tablespoons butter softened
2 tablespoons freshly minced chives
1 garlic clove minced into paste
non stick cooking spray
Instructions
Lower oven rack to middle lower position and preheat oven to 450 degrees. Spray heavy duty baking sheet with nonstick cooking spray.
In a large bowl, combine green beans with 1 tablespoon of olive oil, 1/4 teaspoon of kosher salt and 1/4 teaspoon of freshly ground pepper. Arrange green beans in center of baking sheet.
In the same bowl, toss potatoes with 2 tablespoons of olive oil, 1/4 teaspoon of kosher salt and 1/4 teaspoon of freshly ground pepper. Transfer to baking sheet and arrange on either side of green beans, cut side down.
Lay tenderloins, not touching, over green beans and brush with hoisin sauce, sprinkle lightly with salt and pepper. Roast for 20 to 25 minutes, or until thickest part of tenderloins reaches 140 degrees on a meat thermometer.
While tenderloin is roasting, combine butter, chives, garlic, 1/4 salt and 1/4 pepper. When tenderloin is done cooking, remove sheet pan and top each tenderloin with one tablespoon of garlic herb better and let pork tenderloin rest before slicing.
Top potatoes and green beans with remaining two tablespoon of garlic herb butter and serve.
You may also like:
Chicken Cobb Salad Recipe
Sheet Pan Steak Fajitas
Sheet Pan Shrimp Stir Fry
5 Easy Dinner Ideas for Busy Weeknights
My five FAVORITE recipes for busy families!
Quick to make
Light on your budget
Easy to clean-up
and...most important...absolutely DELICIOUS
<![CDATA[/* Layout */ .ck_form /* divider image */ background: #fff url(data:image/gif;base64,R0lGODlhAQADAIABAMzMzP///yH/C1hNUCBEYXRhWE1QPD94cGFja2V0IGJlZ2luPSLvu78iIGlkPSJXNU0wTXBDZWhpSHpyZVN6TlRjemtjOWQiPz4gPHg6eG1wbWV0YSB4bWxuczp4PSJhZG9iZTpuczptZXRhLyIgeDp4bXB0az0iQWRvYmUgWE1QIENvcmUgNS41LWMwMTQgNzkuMTUxNDgxLCAyMDEzLzAzLzEzLTEyOjA5OjE1ICAgICAgICAiPiA8cmRmOlJERiB4bWxuczpyZGY9Imh0dHA6Ly93d3cudzMub3JnLzE5OTkvMDIvMjItcmRmLXN5bnRheC1ucyMiPiA8cmRmOkRlc2NyaXB0aW9uIHJkZjphYm91dD0iIiB4bWxuczp4bXA9Imh0dHA6Ly9ucy5hZG9iZS5jb20veGFwLzEuMC8iIHhtbG5zOnhtcE1NPSJodHRwOi8vbnMuYWRvYmUuY29tL3hhcC8xLjAvbW0vIiB4bWxuczpzdFJlZj0iaHR0cDovL25zLmFkb2JlLmNvbS94YXAvMS4wL3NUeXBlL1Jlc291cmNlUmVmIyIgeG1wOkNyZWF0b3JUb29sPSJBZG9iZSBQaG90b3Nob3AgQ0MgKE1hY2ludG9zaCkiIHhtcE1NOkluc3RhbmNlSUQ9InhtcC5paWQ6MUQ5NjM5RjgxQUVEMTFFNEJBQTdGNTQwMjc5MTZDOTciIHhtcE1NOkRvY3VtZW50SUQ9InhtcC5kaWQ6MUQ5NjM5RjkxQUVEMTFFNEJBQTdGNTQwMjc5MTZDOTciPiA8eG1wTU06RGVyaXZlZEZyb20gc3RSZWY6aW5zdGFuY2VJRD0ieG1wLmlpZDoxRDk2MzlGNjFBRUQxMUU0QkFBN0Y1NDAyNzkxNkM5NyIgc3RSZWY6ZG9jdW1lbnRJRD0ieG1wLmRpZDoxRDk2MzlGNzFBRUQxMUU0QkFBN0Y1NDAyNzkxNkM5NyIvPiA8L3JkZjpEZXNjcmlwdGlvbj4gPC9yZGY6UkRGPiA8L3g6eG1wbWV0YT4gPD94cGFja2V0IGVuZD0iciI/PgH//v38+/r5+Pf29fTz8vHw7+7t7Ovq6ejn5uXk4+Lh4N/e3dzb2tnY19bV1NPS0dDPzs3My8rJyMfGxcTDwsHAv769vLu6ubi3trW0s7KxsK+urayrqqmop6alpKOioaCfnp2cm5qZmJeWlZSTkpGQj46NjIuKiYiHhoWEg4KBgH9+fXx7enl4d3Z1dHNycXBvbm1sa2ppaGdmZWRjYmFgX15dXFtaWVhXVlVUU1JRUE9OTUxLSklIR0ZFRENCQUA/Pj08Ozo5ODc2NTQzMjEwLy4tLCsqKSgnJiUkIyIhIB8eHRwbGhkYFxYVFBMSERAPDg0MCwoJCAcGBQQDAgEAACH5BAEAAAEALAAAAAABAAMAAAICRFIAOw==) repeat-y center top; font-family: "Helvetica Neue", Helvetica, Arial, Verdana, sans-serif; line-height: 1.5em; overflow: hidden; color: #000000; font-size: 16px; border-top: solid 20px #3071b0; border-top-color: #3071b0; border-bottom: solid 10px #3d3d3d; border-bottom-color: #1d446a; -webkit-box-shadow: 0px 0px 5px rgba(0,0,0,.3); -moz-box-shadow: 0px 0px 5px rgba(0,0,0,.3); box-shadow: 0px 0px 5px rgba(0,0,0,.3); clear: both; margin: 20px 0px; .ck_form, .ck_form * -webkit-box-sizing: border-box; -moz-box-sizing: border-box; box-sizing: border-box; #ck_subscribe_form clear: both; /* Element Queries — uses JS */ .ck_form_content, .ck_form_fields width: 50%; float: left; padding: 5%; .ck_form.ck_horizontal .ck_form_content border-bottom: none; .ck_form.ck_vertical background: #fff; .ck_vertical .ck_form_content, .ck_vertical .ck_form_fields padding: 10%; width: 100%; float: none; .ck_vertical .ck_form_content border-bottom: 1px dotted #aaa; overflow: hidden; /* Trigger the vertical layout with media queries as well */ @media all and (max-width: 499px) .ck_form background: #fff; .ck_form_content, .ck_form_fields padding: 10%; width: 100%; float: none; .ck_form_content border-bottom: 1px dotted #aaa; /* Content */ .ck_form_content h3 margin: 0px 0px 15px; font-size: 24px; padding: 0px; .ck_form_content p font-size: 14px; .ck_image float: left; margin-right: 5px; /* Form fields */ .ck_errorArea display: none; #ck_success_msg padding: 10px 10px 0px; border: solid 1px #ddd; background: #eee; .ck_label font-size: 14px; font-weight: bold; .ck_form input[type="text"], .ck_form input[type="email"] font-size: 14px; padding: 10px 8px; width: 100%; border: 1px solid #d6d6d6; /* stroke */ -moz-border-radius: 4px; -webkit-border-radius: 4px; border-radius: 4px; /* border radius */ background-color: #f8f7f7; /* layer fill content */ margin-bottom: 5px; height: auto; .ck_form input[type="text"]:focus, .ck_form input[type="email"]:focus outline: none; border-color: #aaa; .ck_checkbox padding: 10px 0px 10px 20px; display: block; clear: both; .ck_checkbox input.optIn margin-left: -20px; margin-top: 0; .ck_form .ck_opt_in_prompt margin-left: 4px; .ck_form .ck_opt_in_prompt p display: inline; .ck_form .ck_subscribe_button width: 100%; color: #fff; margin: 10px 0px 0px; padding: 10px 0px; font-size: 18px; background: #0d6db8; -moz-border-radius: 4px; -webkit-border-radius: 4px; border-radius: 4px; /* border radius */ cursor: pointer; border: none; text-shadow: none; .ck_form .ck_guarantee color: #626262; font-size: 12px; text-align: center; padding: 5px 0px; display: block; .ck_form .ck_powered_by display: block; color: #aaa; .ck_form .ck_powered_by:hover display: block; color: #444; .ck_converted_content display: none; padding: 5%; background: #fff; /* v6 */ .ck_form_v6 #ck_success_msg padding: 0px 10px; @media all and (max-width: 403px) .ck_form_v6.ck_modal .ck_close_link top: 30px; @media all and (min-width: 404px) and (max-width: 499px) .ck_form_v6.ck_modal .ck_close_link top: 57px; .ck_powered_by display: none !important; ]]>

Source: https://www.number-2-pencil.com/pork-tenderloin-recipe-easy-sheet-pan-dinner/
0 notes
Text
BEB Favorites: August 2018
Home > Unplugged > Favorites > BEB Favorites: August 2018
Welcome to the August installment of BEB favorites!
We’re nearing the end of the month, which means it’s time for another BEB favorites!
Here is a roundup of some favorite things to close out the summer. I can’t believe that we’re already hurdling into fall and, before we know it, the holidays! This will be my last Favorites installment before holiday gift guides… Enjoy!
Jo Malone Nectarine Blossom & Honey – I bought this on a whim at the beginning of summer. I’ve worn it a few times and absolutely love it. I don’t care for floral scents, and this one is the perfect balance between light and crisp, fruity, and just ever so slightly floral. A new favorite!
Duluth No-Yank Tanks – I’ve been wearing these for a couple of years now and they are the BEST layering tanks. They literally do not move, at all. They don’t ride up or stretch out, seriously the perfect tank. I have a ton in different colors.
Huggies OverNites Diapers – We have sworn by these diapers since Joseph was young, but I don’t think I’ve ever mentioned them. We were having so many issues with wet pajamas and sheets every single day no matter what we did, and I finally came across these diapers. I prefer Pampers for daytime diapers, but their night solutions weren’t working. These Huggies night diapers are AMAZING. Joseph is out of diapers at night, but Dominic wears them, and now Isabelle does too since she’s sleeping for long stretches and was peeing through pajamas too. I recommend these to everyone!
Janie and Jack – I’ve mentioned these clothes occasionally; they are my favorite go-to for dressing the kids up for holidays and very special occasions. It is pricy, but the quality is outstanding and we always get tons of compliments.
VTech Kidizoom Camera – This camera was a Christmas gift for Joseph and it has been the gift that keeps on giving. He used to pretend to take pictures with random things, so my mom got him this camera and he and Dominic both LOVE it! They use it every single day and it actually takes decent pictures. They can put filters on pictures and play around with frames. They actually know how to use it way better than I do. It does have games on there, but there’s a parental control feature and I removed them from the main menu.
That’s a wrap with what I’ve been loving recently! I would love to hear about some of your new favorites as well; share them in the comments below!
This is not a sponsored post and I have not received compensation from any of these companies to talk about their products. The above post may contain affiliate links.

Source: https://www.browneyedbaker.com/beb-favorites-august-2018/
0 notes
Text
KITCHY CABIN KITCHEN REVEAL // SPONSORED BY SAMSUNG
You might have seen this month’s feature in Domino Magazine where I revealed my cabin renovation. Now I’m beyond excited to give you a deeper look at my kitchen in partnership with Samsung.
When I was daydreaming about our cabin, I knew the kitchen would be the heart, the center of activity. First, it’s BAM right there in the middle, and second, that’s where everyone ends up hanging out, right? When I first saw the cabin, the kitchen was this awkward, closed off space – low hanging ceilings with a soffit and then heavy oak upper cabinets fortified against the rest of the space. This did not seem right – the soaring A-Frame ceiling demanded an equally airy space. The appliances were all different colors and the oven range was hidden behind the sink. I wanted the kitchen to invite people to sit at the counter and help cook, not cut off the cook via a pile of dirty dishes.
The cabin needed a complete reno– and the decision to install Samsung appliances was an easy one. The entire kitchen and laundry room are decked out with their sleek and functional pieces. I’m not much of a gear-head/techie – that’s more my husband, Craig – but I am truly geeking out over these. Every item has something incredibly special and practical about it. This isn’t something I would typically notice, but now that I have a baby, every small efficiency counts.
My Samsung Family Hub fridge connects to Instacart, so I can immediately place grocery orders when I notice I’m running low on something; when I’m out shopping I can look at the inside of my fridge on my phone to answer the perpetual question of, “But do I need more milk?” The dishwasher is incredibly quiet and equipped with Samsung’s WaterWall technology which cleans every dish and its adjustable upper rack makes room for bulky or delicate dishes. And you know we’re baking at the kitchy cabin – enter the Flex Duo range! This convection oven delivers fast and even baking, plus wifi connectivity, so I can keep tabs on what’s cooking while I’m busy around the house. These appliances are perfect for families!
A kitchen has the challenge of being innately utilitarian. No matter what, it needs to serve a function, so design and style can’t get in the way of that. My aim was to open everything up and choose touches to make the kitchen a cozy, usable space, but one with style too.
So, the first thing to go were those upper cabinets. It’s amazing how removing them immediately opened up the house. Adding a fresh coat of paint (I used Whisper by Dunn Edwards) immediately brightened up the room. I could not believe the transformation that happened. It was immediately airier, and light seemed to bounce around everywhere.
I chose an L-shape for the kitchen, so there was space for a row of Shaw stools in walnut from Rejuvenation. I love the idea of everyone gathering around the kitchen, so counter stools invite that kind of “pull up a chair” dynamic. The cabinets are all Ikea with SemiHandmade Doors in “slab antique” on top. I love the whole idea of SemiHandmade – you get a custom kitchen look and quality at a fraction of the price – and “slab antique” has a lovely warmth to it rather than a stark white.
In the mountains, engineered wood is preferred to hardwood. The weather is harsh, and all of that expanding and contracting means the hardwood gets wonky really fast, whereas engineered wood keeps clean lines all year round. I reached out to Lumber Liquidators for their engineered wood and chose Tobacco Road. It’s acacia with a beautiful rich tone that’s not too dark. I also chose a walnut counter top from Lumber Liquidators to complete the look.
To accent the wood pieces by Lumber Liquidators, I chose Rough Sawn Salvaged Fir shelved with brass strap brackets by Rejuvenation as floating shelves. It’s minimalist and modern, but still has enough character to work in the space. I piled stacks of green and blush ceramics by Lux Eros, one of my favorite artisan ceramicists, onto the shelves. I love the handmade, chic look of her pieces – they’re so unique and beautiful. All of this is tied together with a giant wallop of color by Fireclay Tile. I chose a blend of saffron, avocado, and sorbet pink as my color cues throughout the cabin, and these custom handmade tiles are just so joyful and unexpected. I joked from the beginning that I wanted the cabin to be anti-hygge – no soft white monochromatic tones and nordic minimalism. I want après ski fondue party vibes! I chose the Agrarian line for both the kitchen and laundry – so high impact! I love the element of surprise it brings to the room.
As much as the stove, the sink is a popular spot in my kitchen – Craig, my husband, is the best at keeping my messy ways in check. I love the Beale MeasureFILL Touch Kitchen Faucet by American Standard. I am constantly flooding my counters by filling a pot with water, but getting distracted and forgetting that the faucet is on – so the MeasureFILL technology feels specially made for me. It delivers a precise set volume of water on demand, so if I need 2 cups of water for a recipe, I can literally set it and forget it. There’s also the touch on and off functionality using the dial, plus the ability to be used as a manual faucet. The look is sleek and simple – perfect for my modern cabin kitchen. Above the sink I have a simple, minimalistic pull-down shade from The Shade Store. I love how it adds a soft glow to the kitchen if you pull it down.
And finally, I have to talk about the laundry room! I adore the moment of opening the doors and being surprised by a riot of color. The cupboards are painted in Dunn Edwards Shaded Spruce with another hand painted Fireclay Tile adding a geometric feeling. It’s the same color palette as the kitchen, but a different pattern to mix it up. I try to make any space where I’m doing a chore as pretty as possible. So, if I’m folding laundry, I want to be staring at happy colors and beautiful tile. It’s all grounded with my sleek and beautiful Samsung FlexWash and FlexDry. The dryer has a second compartment to dry delicates, while the main load is drying as well. And like the wifi technology that comes with my oven, this washer and dryer offer the same. I’m able to monitor the cycles all from my phone – hello multitasking! So not only is the space beautiful, it’s efficient as well.
I hope you guys enjoyed seeing the big Kitchy Cabin Kitchen reveal! I can’t wait to share the rest of the house with you.

Source: https://www.thekitchykitchen.com/kitchy-cabin-kitchen-reveal-sponsored-by-samsung/
0 notes
Text
Hestan 10-Piece Cookware Review + Giveaway
posted by Jaden
This is a Hestan 10-Piece Cookware Review, including a giveaway for my favorite pan – the Hestan 3.5 Quart Sauté Pan with Lid. -Jaden
We’ve reviewed Hestan cookware before, a frying pan and a wok. It’s become our favorite cookware in the Steamy Kitchen, outperforming any other set we’ve ever tried.
The Hestan NanoBond surface is stainless steel bonded with thousands of titanium and chromium-based alloys. There are no chemicals used in this cooking surface. That means a cooking surface that’s environmentally friendly and incredibly durable….4x harder than stainless steel. The cookware is so innovative, that Hestan owns 14 global patents for the fit and finish.
The 10-piece set sells for $1,499.95. Yes, it is expensive, and if you only want the best of the best cookware, this is it.
One of the best features of the pan is the flush rivets, which means oil, grease and bits of food are easy to clean from the pan.
Because of the titanium surface, you can use a scrubby to really clean the pans without fear of scratching. Of course, every metal pan will discolor with use. With Hestan cookware, the pans polish back to a mirror-like, shiny, scratch-free surface.
Hestan 8-quart Stockpot with Lid
Hestan 8.5″ Open Skillet
(image coming soon)
Hestan 11″ Open Skillet
I really like the feel of the large skillet. It’s balanced and lightweight. I can easily lift and maneuver with just one hand.
Hestan 1.5qt Saucepan + Lid
The smaller saucepan is a great size – wide enough so that it doesn’t tip over on my stovetop open grates.
My old set had a slightly smaller saucepan, which constantly tipped over on my stovetop grates. See the size difference?
Hestan 3qt Saucepan + Lid
Hestan 3.5qt Sauté with Helper Handle + Lid
My favorite piece of the set is the 3.5-quart Sauté Pan with Lid. Again, the piece is balanced and lightweight. The shape of the handle is comfortable.
The pan is about 3-inches deep.
I’ve used this pan in our latest recipe, Ribeye Cap Steak with Roasted Potatoes & Carrots – a one pan meal for 2 people. The Hestan pan seared the steak perfectly, and allowed the potatoes and carrots on the outer edges of the pan to cook evenly.
Plus, the pans are pretty enough to use serve the meal at the table, too.
Learn more about Hestan.
We are giving away a Hestan Sauté Pan with Lid (my favorite piece!)
** Please add [email protected] to your contacts to help prevent email notifications from going into spam folders.
Never miss another Steamy Kitchen Giveaway!
Subscribe to our Giveaway Notifications to keep up to date on all of our giveaways! We will even throw in a special gift when you confirm your subscription!
List of Past Winners.
DISCLAIMER & OFFICIAL RULES: The giveaway product is provided by the sponsor of the giveaway and will be shipped from the sponsor directly. No purchase necessary to enter or win. Giveaway is open to people who are 18 years of age at time of entry and open to people worldwide. Steamy Kitchen and its sponsors only ship physical prizes to United States addresses. However, Steamy Kitchen reserves the right to provide an Amazon.com or Amazon.ca gift card for the value of the prize (at time of publishing) in lieu of shipping physical product due to shipping costs and logistics, especially for our international winners. Steamy Kitchen assumes no responsibility for late or misdirected entries due to SPAM, technological, or e-mail filtering issues or for prizes lost in transit. Winner will be notified by email, and must respond within 5 business days, otherwise winner will forfeit the prize and another winner may be drawn. For this giveaway, entrants can enter the designated number of times per e-mail address per day. The use of any system, robot, agent, or software to automatically submit entries in connection with this Giveaway is prohibited. Winners of giveaways are published on Steamy Kitchen, and winner's name and city/state/country are announced in Steamy Kitchen email newsletters. See rest of the Official Giveaway Rules.
Comments Off on Hestan 10-Piece Cookware Review + Giveaway
Source: https://steamykitchen.com/47472-hestan-10-piece-cookware-review-giveaway.html
0 notes
Text
Seoul Mates At Soul Dining, Surry Hills

Soul Dining is a Modern Korean restaurant on Devonshire Street in Surry Hills. Inside the charcoal concrete walled restaurant is a menu made up of items like Kingfish in Kimchi water, Spicy Pork Jaffles, Ashed Chicken and Blood Sausage Croquettes with influences from China and Germany as well as Korea.

"I'm running 10 minutes late," messages Girl Next Door as I walk into the Soul Dining on Devonshire in Surry Hills. She has woken up with the flu and tells me that she completely forgot we were catching up today (!!). It was only when I messaged her that I'd see her soon that she threw on some clothes and got in an Uber and made her way there. That 10 minutes gives me time to look through the menu.
Soul Dining is a modern Korean restaurant owned by couple Illa Kim and Daero Lee. Inside the walls are painted charcoal and I'm sitting at the curved end of a blue velvet banquette. There is one single outdoor table for anyone that wants privacy or to bring a dog. It sits on the construction zone that is currently Devonshire Street.

Service is super friendly and accommodating by the restaurant manager Hyunchul Kim. I've already taken a look at the menu online and decided on some things that I really want to try but are then persuaded by Kim to give the tasting menu a go for $65 a person as it features most of the things that I want (plus the prawns that I'll order separately).
Illa says, "Kim (restaurant manager) and us, we used to be flatmates and we always wanted to open a restaurant together. We used to dream about what kind of a restaurant when we had our weekly dinners at home with too many glasses of wine. We didn’t plan on doing a Korean restaurant, we just wanted to do something that represents what we are and what’s in our memories. Naturally a lot of the dishes have Korean influences but sometimes also German as I grew up in Germany. We basically do whatever we feel like and what we think we understand well. What is most important, we always try to have our own interpretation of a dish."
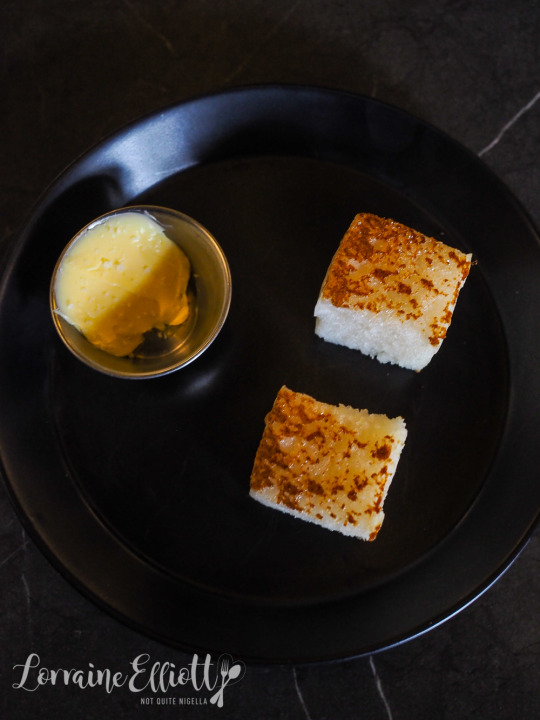
Girl Next Door arrives and orders a pot of lemongrass and ginger tea to soothe her throat while we nibble on the first bites of bread. The rice bread is toasted on one side and has a spongey, chewy texture and is fermented with a milky, sparkling rice wine called makgeolli that acts much like a sourdough starter. I love makgeolli and the flavour really comes through and the texture is soft, light but also bouncy. "I could eat a dozen of those," says Girl Next Door, her appetite returning quickly. Indeed, so could I.
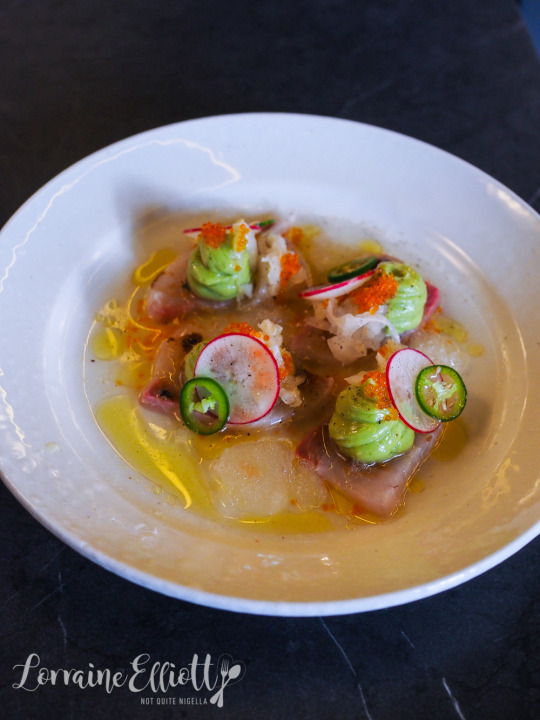
Kingfish in Kimchi Water
The first dish from the menu to arrive is the kingfish in kimchi water. The kimchi water is designed to neutralise the aroma of kingfish and is made using their own white kimchi or Doenjang fermented soybean paste. In comparison to Japanese miso doenjang is stronger and more aromatic. The kingfish is served with dabs of avocado puree and, radishes, jalapeno and flying fish roe.
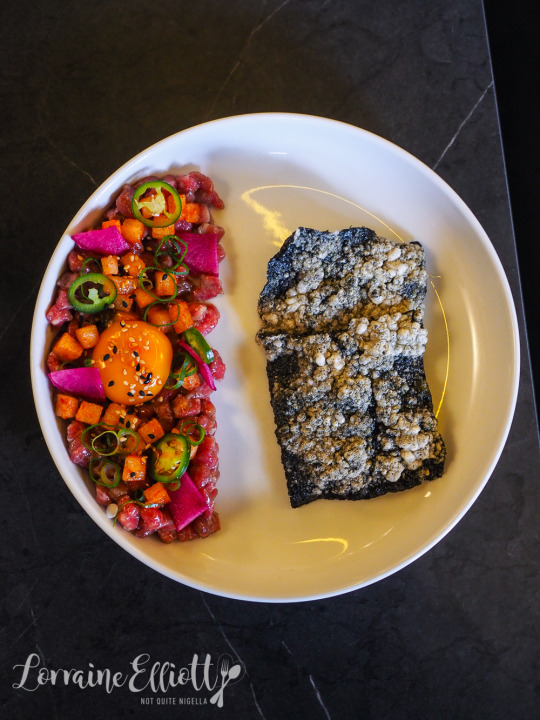
Wagyu Tartare
Kim sets this down and explains that tartare isn't just for the French and that Koreans have been doing tartare for many years too. In Korea it is called "Yukhoe". Korean yukhoe is made with hand chopped beef, singo pear, egg yolk, chilli, watermelon radish fish sauce and plenty of sesame oil. To the side is a seaweed cracker brushed with sticky rice paste that is then flash fried that gives the beef a seafoody quality to it. It's good although I do find singo pear does tend to water down tartare a little bit and I prefer more concentrated flavours.
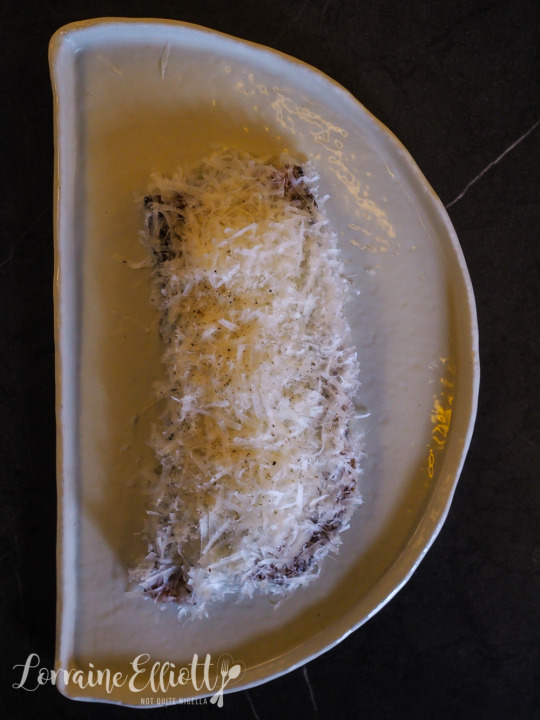
Kim's Eggplant
The eggplant is served in four pieces and is melting and soft underneath a blanket of tomato jam, anchovy paste and reggiano cheese. It's surprisingly sweet and I go back for seconds of this as it has the comforting qualities of both well cooked eggplant and plenty of cheese.

Curly Corn on The Cob
I have never seen corn served or cooked like this before. The corn is boiled, fried and then grilled and served as a quarter of a cob cut lengthways. This makes is very easy to eat and it's delicious. It is brushed with garlic butter and then comes with a generous sprinkling of pistachios and a pot of creme fraiche. The pistachios are an interesting choice, they suit it although you do have to spread the creme fraiche on the corn to make them stick.

Pickled Stuffed Fried Chilli
These pickled chillies have quite a history. A 4 week history to be exact. That's the amount of time it takes to pickle these chillies in a soy brine. They are then stuffed with cream cheese and served with kim chi with an extra pot of ranch dressing because why not and ranch dressing is the best. This gives the lightly spicy chillies an additional creaminess and light tanginess too.
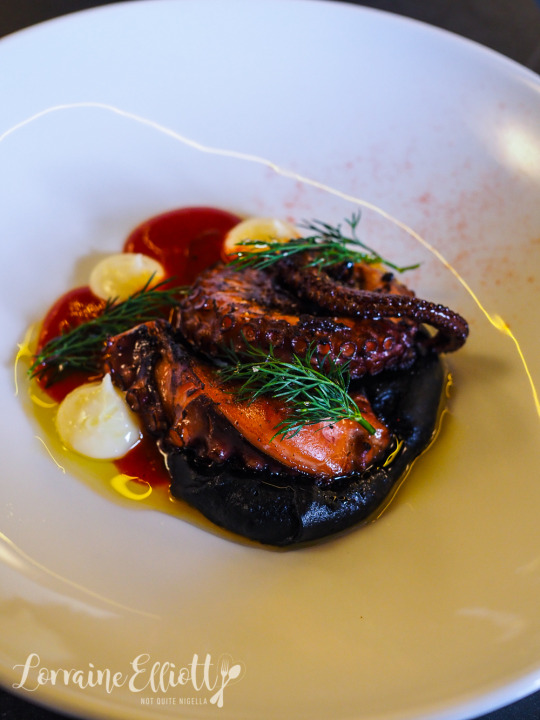
Char Grilled Octopus
Octopus is all over menus in Sydney and has varying degrees of success. This is one of the great ones. The octopus is tender and smoky and served with a silky smooth squid ink mash, gochujang chilli sauce and a house made aioli with dill sprigs.

Rice cakes with truffle cream
Our next dish is a dish that the kitchen sent out because they just received their first truffle of the season from Tasmania. Normally the rice cakes are chilli glazed but here they are served in a cream sauce with chicken stock with freshly shaved truffles on top. If you like truffle gnocchi this is the dish for you. As they are early season truffles, the flavour is quite light but the aroma is there. The texture is like a slightly chewier gnocchi and we mop up the sauce with the bread.
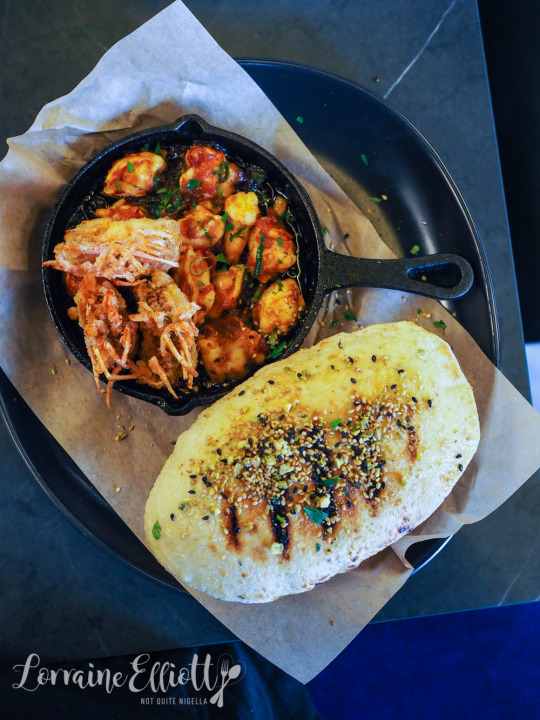
King Prawn XO $20
OK so the tasting menu is comprehensive but I was curious to see what the King Prawn XO was like. Kim explains that the XO is more a soffritto than an XO made with tomato, garlic and chilli with plenty of capsicum. The prawn heads are cooked separately and are tossed in butter and then fried. It comes with a puffy, airy "not so flatbread" on the side which we puncture and use to wrap the prawn meat in and swish around the bowl of sticky rice cakes with truffle cream. But my favourite bit of the dish? Those crunchy prawn heads!
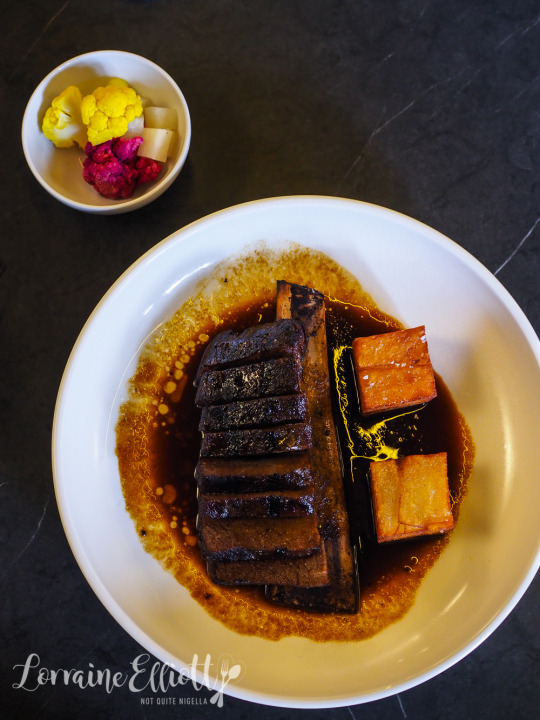
Barbecue Beef Short Rib
I saved my favourite savoury dish for last. The barbecue beef short rib is an ode to meaty deliciousness. The beef short rib is sous vide and then barbecued and finished with a galbi glaze (a sauce made with dark soy and singo pear that breaks down meat to make it tender).

The beef takes 12 hours to cook and is luscious and simply melts in the mouth. The potato pave are crispy and a nice textural contrast. Considering how much we had eaten I must confess one thing: I ate four pieces of this and would have kept going except I was sharing.
Panna Cotta
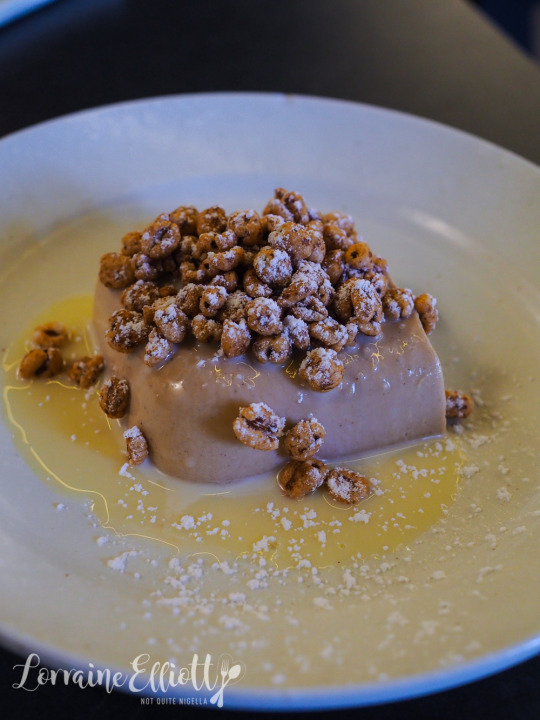
It's dessert time and there are two on the tasting menu. The panna cotta is inspired by a Korean cereal called Jolly Pong. It's a wheat based cereal not dissimilar to honey puffs and the panna cotta itself is made of a milk soaked in the cereal. It's a lovely, mild dessert that has a nice panna cotta wobble to it.

Cinnamon donut apple thyme vanilla ice cream
But hands down my favourite dessert is the apple hottoek or cinnamon sugar donut topped with caramelised apple slices served with a thyme vanilla ice cream. First let's talk about this donut pancake. There is regular wheat and glutinous flour so it has a gorgeously chewy texture to it. The sweetness is juuust right, not overly sweet but sweet enough. Plus the thyme vanilla ice cream is creamy heaven. "Can I order 10 of these to take with me?" I ask, picturing a blissful afternoon inside by the heater watching tv and making my way through a pile of these...
So tell me Dear Reader, do you eat prawn heads? And do you ever completely forget when you are meeting someone?
This meal was independently paid for.
204 Devonshire St, Surry Hills NSW 2010 Lunch: Thursday to Saturday 12pm-3pm Dinner: Tuesday to Saturday 5pm-11pm souldining.com/

Source: https://www.notquitenigella.com/2019/06/24/soul-dining-surry-hills/
0 notes
Text
Banana Olive Oil Cake + Toffee Sauce
I’m serious. Make this cake asap, you wont regret it!!
Coming from a girl who hates bananas, I’m telling you that this is one of my favorite cakes that I’ve made and seeing as it’s topped with whole banana slices (well halves, but whatev), that’s saying something.
It’s simple to make, uses ingredients that almost everyone always has on hand, and it’s flavor and texture are unreeeeeeal.
This is called an olive oil cake but the olive oil flavor is very subtle. You could use melted coconut oil or vegetable oil in it’s place. I love using olive oil in cakes. As long as you don’t use extra virgin and the cake doesn’t call for heaps of oil, you won’t even notice it.
One nice thing about this cake? Your bananas don’t need to be super ripe. I find that though super ripe bananas can lend a lot of sweetness to your baked goods, they also add a lot of heavy banana flavor. I used bananas that were nice and yellow, but not brown at all yet and they were perfect. The cake is definitely banana based but not overpowering at all.
NO banana mashing is required for this cake, either. I like to blend up the wet ingredients in a blender, then add the bananas and process them until they are broken down but not completely smooth. Then the mixture can be poured in with the dry ingredients and mixed together. Try something like this if you are looking for a stronger flavored olive oil cake!
A little warning to the waste-wise: When preparing the bananas for the top of the cake you will be left with about 8 banana quarters (to keep the banana slices going in the same direction you need more bananas than can actually be used in the cake). The extra bananas will have a flour coating on the bottom. Just throw them into a container and freeze them. They’ll still work great for a future loaf of banana bread.
I was surprised to find when I first tried this cake that the bananas on top were actually incredibly delicious. Lemon juice is brushed over the top of them before they are baked so that they don’t turn brown and that acid gives the cake a little tart pop that is so nice with the sweet.
I’m not going to lie, the best part of this cake is the toffee sauce. I mean, the cake by itself is delicious, yes, but TOFFEE SAUCE. Sprinkled with a little coarse sea salt. I don’t think I need to say more.
This recipe could also be turned into muffins (just reduce the sugar a little), or go with this recipe if you’re into white chocolate 😉
Out of olive oil but still want banana cake? This one’s for you.
Banana Olive Oil Cake + Toffee Sauce
Ingredients
FOR THE CAKE:
½ cup Olive Oil (not extra virgin)
3 large Eggs
1¼ cups Light Brown Sugar
2 teaspoons Vanilla
3 medium-sized Bananas, (ripe, but they don't need to be brown)
1½ cups All-purpose Flour
�� teaspoon Salt
2 teaspoons Baking Powder
½ teaspoon Cinnamon
¼ teaspoon Ground Cardamom
extra flour
4 large Bananas (these don't need to be super ripe)
1 Lemon
FOR THE TOFFEE SAUCE:
½ cup (1 stick) Salted Butter
⅔ cup Brown Sugar
½ cup Heavy Cream or Full Fat Coconut Milk
Coarse Sea Salt
Instructions
FOR THE CAKE:
Preheat the oven to 350 degrees. Grease and flour a deep-sided 9" round baking pan.
Place the oil, eggs, brown sugar, and vanilla in a blender and process until smooth. Add three of the bananas and process until there are no large chunks of bananas left, yet the mixture is still slightly lumpy. Pour the banana mixture into a large mixing bowl.
In a smaller mixing bowl, whisk together the flour, salt, baking powder, cinnamon, and cardamom.
Add the dry ingredients to the banana mixture and whisk together until just combined.
Pour the batter into the prepared pan.
Add about ½ cup of flour to a shallow bowl. Peel the 4 large bananas. Toss the bananas in the flour gently, so that they are fully coated. Using a sharp knife, slice the bananas in half, then slice each half horizontally. You should have 8 slices of banana that curve one way and 8 that curve the other. Take 8 of the banana slices that all curve in the same direction and place them carefully on top of the batter, cut side up, so that they form a wheel of sorts (see photos of cake). Squeeze a little lemon juice on the cut side of each banana and spread across the surface with your finger - this will stop if from browning unpleasantly.
Bake the cake in the preheated oven for 35-40 minutes, or until a tester inserted into the center of the cake comes out clean.
Let the cake cool for 30 minutes in the pan. Invert onto a serving platter. Top with toffee sauce sprinkle with a little chunky sea salt, and serve (spoon a little extra sauce over the slices of cake).
Store in an airtight container for up to 3 days. Toffee sauce should be stored in the refrigerator.
FOR THE TOFFEE SAUCE:
Place the butter and brown sugar in a saucepan. Heat over low, stirring occasionally, until the butter is melted and the sugar is dissolved.
Bring the heat up to medium high. Cook the mixture at a boil for a few minutes, or until it begins to turn a deep amber color. As soon as the mixture darkens, pour in the cream. Mixture will sputter and seize. Continue to cook until the mixture becomes smooth and silky.
Remove from heat.
Let cool.
Pour over slices of banana cake.
Store in the fridge in an airtight container. Reheat as needed.
3.2.2925

Source: https://www.thekitchenmccabe.com/2019/03/10/banana-olive-oil-cake-toffee-sauce/
0 notes