Text
yo whatup bruv , swag 💯 okay so how I ~ makea the gifs 🤌🏻
1. DOWNLOAD
t*rrent -- I go to rarbg. to & get the 720/1080 files . for a 40 min episode this is usually about 1-2gb for the 720 version which is fine tbh to use for making gifs OR I get the one that’s 2-3gb which I only get if I wanna make 500px height gifs. For a 2 hour movie it’s 5-10gb (it’s a lot of space on my computer yea, that’s why I rarely have more than a few films or series on my computer at once, I either transfer them over to my extended drive that’s got 2tb or just delete them altogether)
youtube -- I use this website for it, works a charm; https://www.y2mate.com/youtube/3mtIHg2oowM
2. SCREENSHOTTING
mplayer -- i use this one to screenshot videos with, but I can’t find a decent version of it for pc so I've found this other tutorial for pc;
mpv player -- idk I can't test this one cause I’m on apple but it looks pretty decent
3. PS INSERT
okay from there on I get the screenshots I'd just made into photoshop right here (yes it’s in dutch but it should be in the same spot) file > scripts > load files onto stack :

Add the screenshots I want, make a frame animation from it which will give me a single frame only.

which is why I click on make frames from layers on that little ~ 4 lines on the side.
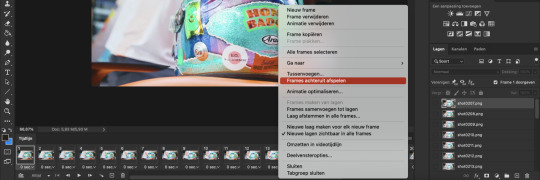
then you gotta revert the frames cause they will be in the wrong order.
4. CROPPING, SIZING AND SHARPENING
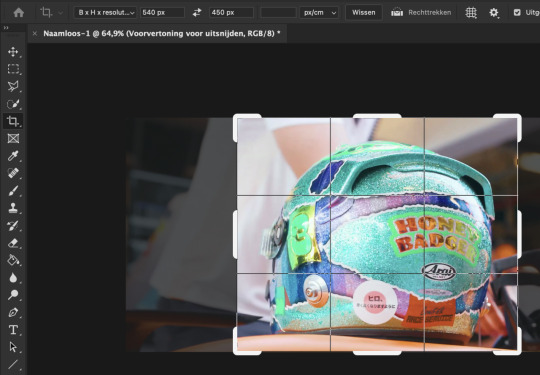
sizing + cropping -- I do it all at once; on the top of the cropping thing you can change it to B x H x resolution (second from the top) & I can choose the size that I want (do note to put it into px !)

sharpening -- I got 2 options I use, doesn't really make that big a difference in my opinion;
1) action dl

go back to the 4 lines on the side; click flatten frames into layers then make sure you’re standing on the first frame in the timeline and also in your little frames thing on the right & then just run the action . Then change it to 0.05 frames per second, add a little coloring to it & voìla !
2) action dl (use the the ‘540px gifs’ one)
this action converts it into a smart object and everything so step one is to go to videotimeline, run the action & if all’s correct it will take you back to frame animation.

delete the first two frames here (they’re double)
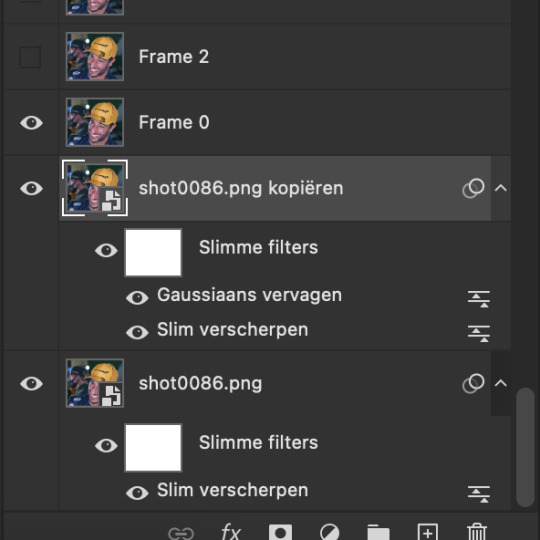
make sure these 2 are turned on/visible on all frames, add coloring once again & ur done !
5. DIFFERENCE IN SETTINGS
sharpening -- for the 2 actions above this is the difference;


I guess the second one is better/sharper but I don’t really see it until I REALLY look soo .. first option is less of a hassle in my opinion (altho I did make that second action quiite extensive so it takes out a lot of work) but choose what u will ..
save for web -- settings

these settings are what I usually use but I’m not the biggest expert on them . the only 2 things you should Ever change are the ‘bicubic’ on the bottom right in the image size section, but I couldn’t tell you what the other options really do, I just know some people use different settings there. & the ‘pattern’ one on the top left (’patroon’ cause .. dutch) which u can set to ‘diffusion’ instead which makes this difference;

the difference is mainly visible in the background; it makes it go from blocks in pattern (LEFT) to dots in diffusion (RIGHT); again, choose whatever you will ..

6. FIN
I believe this is it .. all there is to it . idk if you got questions or if parts are unclear but just ask me then .. hope you liked seeing DR3 yo .. embarrassing
9 notes
·
View notes
Photo
GIFMAKING FOR BEGINNERS
as requested! this is a super super detailed tutorial for the a-z of gifmaking basics, starting from getting photoshop & downloading hq movies/videos alll the way to tagging & scheduling your gifsets on tumblr for max interaction. if you’ve wanted to get into gifmaking but feel intimidated or you don’t know where to start, this is the tutorial for you!!! making gifs might seem overwhelming at first, but with practice, it’s quite easy to get the basics down. for reference, this post is up to date as of nov. 2020. please rb if this helps!
TUTORIAL UNDER THE CUT:
software needed
how to download hq movies/videos
screencapping
importing to photoshop
cropping & resizing
animation
gif speed
actions
sharpening
coloring
text
exporting the gif
fixing gif speed
captioning gifsets
how to tag gifsets on tumblr
when to post gifsets on tumblr
other helpful tutorials/resources!
Keep reading
9K notes
·
View notes
Text
THERE IS A FONT THAT IS DESIGNED TO MAKE U REMEMBER EVERYTHING
I don’t usually share a whole lot but THIS IS INCREDIBLE
http://sansforgetica.rmit/?utm_source=Facebook&utm_medium=social&utm_campaign=Sans_Forgetica&utm_content=Launch_Video
123K notes
·
View notes
Photo


my last 3 brain cells watching me throughout the day
10K notes
·
View notes


