Kro // 25 // they/them // socially awkward cosplayer ⭐ I'm up for possibly taking how to requests ⭐ Not all cosplays posted are mine
Don't wanna be here? Send us removal request.
Text


I'll be honest I totally forgot about this blog, but heres a Dabi cosplay I did months ago!
5 notes
·
View notes
Text
Since Tungle dot Hell is being like That™
Okay so, since our dear hell sight is about to purge everyone on the 17th and seriously limit everyone else…
Here is my Instagram:
krogrimm
My TikTok:
also krogrimm
My Twitter:
Everything is Krogrimm
This is all in the case that I’m flagged or removed for some reason.
3 notes
·
View notes
Text


I dont have near enough pictured of my Aizawa cosplay honestly
[they/them]
#aizawa shouta#eraserhead#bnha#boku no hero academia#mha#my hero academia#aizawa cosplay#eraserhead cosplay#bnha cosplay#mha cosplay#cosplayer#genderfluid cosplayer
0 notes
Text

T POSE TO ASSERT DOMINANCE
158 notes
·
View notes
Text
“i really liked your post!”
Thanks How About You Reblog It :)
44K notes
·
View notes
Photo


"Passion to calm, hesitation to resolve, love to gravestones. That is the Trancy butler." . . . Amazing shots of my Claude Faustus cosplay from Miniminicon in San Antonio (with my amazing friend in her Alois) . . . . Claude Faustus: Me . Alois Trancy: Jazzycake.cos (on instagram) . Photo: Alfashots956 (on instagram)
#black butler#black butler claude#claude faustus#claude faustus cosplay#black butler cosplay#alois trancy#black butler alois#black butler alois trancy#alois trancy cosplay#cosplay#claude and alois#trancy butler#trancy manor#cosplay photoshoot#cosplay photoset#cosplay photos#alois and claude
33 notes
·
View notes
Photo


Hidden Platform Shoe Tutorial for Invisibly Increasing Height
View full size tutorial on DeviantArt here: http://rinkujutsu.deviantart.com/art/Hidden-Heeled-Platform-Shoe-Tutorial-Genos-OPM-614226288
Here is a tutorial for adding hidden heels/platforms to regular shoes or boots. I usually don’t care to boost my height or lengthen my legs for a costume, but I need to be taller than my brother who will be wearing Saitama to go with my Genos from One-Punch Man costume. As you can gather, hidden heels are handy for making heights in cosplay groups accurate :P . Most other times, I don’t think it is worth sacrificing comfortable shoes to be taller.
If there is anything that is confusing or needs to be clarified in this tutorial, let me know so I can make it better!
I would love to see anything made with this tutorial! Send me the link to finished projects so that I can add it to the DeviantArt description.
Social Media links:
Facebook: https://www.facebook.com/Rinkujutsu-1412178079080819/
Twitter: https://twitter.com/rinkujutsu
Tumblr: http://rinkujutsu.tumblr.com/
2K notes
·
View notes
Photo


Leather Boot Cover Tutorial Part 3
View full size tutorial on DeviantArt here: http://rinkujutsu.deviantart.com/art/Leather-boot-cover-tutorial-part-3-TP-Link-boots-531311443
Back to part two: http://rinkujutsu.tumblr.com/post/145688589451/leather-boot-cover-tutorial-part-2-view-full-size
To part four: http://rinkujutsu.tumblr.com/post/145689186776/leather-boot-cover-tutorial-part-4-view-full-size
One of my biggest struggles as a beginning costume maker was trying to do boot covers. Specifically, leather boot covers. While there are plenty of great tutorials for fabric, vinyl and spandex boot covers, I couldn’t find any good tutorials that used leather. Through trial and error, I developed a method for creating sturdy and authentic looking boot covers from leather. While I would recommend having some previous experience with boot covers before attempting this method, if you are ambitious give it a try! You can make any boots with this method, I just happened to be making my Twilight Princess Link boots when I decided to create this tutorial. I hope this tutorial is helpful!
If there is anything that is confusing or needs to be clarified in this tutorial, let me know so I can make it better!
I would love to see anything made with this tutorial! Send me the link to finished projects so that I can add it to the DeviantArt description.
Social Media links:
Facebook: https://www.facebook.com/Rinkujutsu-1412178079080819/
Twitter: https://twitter.com/rinkujutsu
Tumblr: http://rinkujutsu.tumblr.com/
209 notes
·
View notes
Photo

Wig Hack Wednesday #4 ! Today I wanna introduce a no-sew-no-glue method to add volume to your wig with a jumbo braid (or braiding hair). Using this method will save you time and money because you’ll be getting more bang for your buck! Jumbo braids are pretty cheap and can range from around $2-$8 depend on quality of the hair fiber. Usually, they are used to add thickness to braid hairstyles, but you can use it for any “big-hair” hairstyle, really. Be careful when using hair dryer or heat tools with jumbo braids because they cannot stand as much heat-styling as other wig fibers. For this tutorial, I’m using a jumbo braid in marshmallow from Arda Wigs. - Untie the end of the jumbo braid. Separate and cut a small piece of weft from it. Keep in mind that you’ll need the piece to be double of the length you would want for the final product because you will be folding the piece in half. - Use a crochet hook to go under the elastic band of the wig and grab the folded hair - Bring the hook back through the same hole, making sure the latch closes before you pull it through the hole - Grab the hair with your fingers, twist it once and hold - Bring the hair from the hanging side and pull it through the twisted loop without tightening the loop - Bring the loop to the opposite side and twist it again - Pull the hair from the hanging side through the loop again - Pull and tighten the knot so it’s as small as possible - Keep adding more hair to the other elastics and different sections of the wig. You can tease it for more volume!
I used this method to make a Sage Madara (Naruto) wig and it produced great result with high volume but still very light-weight. I hope this helps you create cool wigs with super volume at low cost (looking at Steven Universe people…lol )
3K notes
·
View notes
Photo


Guide to Back Yokes and Yokes Infographics from Enerie
Writers continue to reblog these infographics for their useful terminology. If you’ve missed any infographics, here they are:
Know Your Shoes Part 1 Lobster Claws anyone?
Know Your Shoes Part 2
Know You Heels
Know Your Hosiery
Know Your Gloves
History of Hairstyles Part 1
History of Hairstyles Part 2
Know Your Braids
Know Your Scarves
Know Your Belts Part 1
Know Your Belts Part 2
Know Your Sleeve Lengths
Know Your jacket length
Know Your Skirt Lengths
Know Your Pant Lengths
Know Your Pleats
Know Your Darts
Know Your Denim Pockets Part 1
Know Your Patch Pockets Part 2
Know Your Pockets Part 3
Know Your Sleeves
Know Your Bras
Know Your Collars
Know Your Hair Buns
Fashion Pattern Vocabulary Part 1
Fashion Pattern Vocabulary Part 2
Know Your Sunglasses Infographic
Know Your Necklines
Sleeves and Necklines
Know Your Hats
Know Your Collars and Cuffs
Know Your Necklines
Know Your Skirts
Know Your Nail Shapes and What’s Popular on Instagram
Know Your Eye Liners
Know Your Wedding Dresses
History of Swimwear
Know Your Vintage Sleeves here
Know Your Vintage Collars and Necklines
Know Your Zippers and Zipper Pulls
Know Your Yokes and Hems
2K notes
·
View notes
Text
have y’all seen pics of cosplayers being arrested because
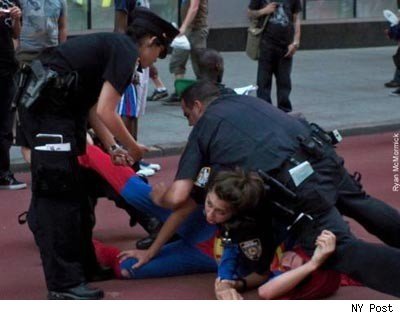
it is simultaneously
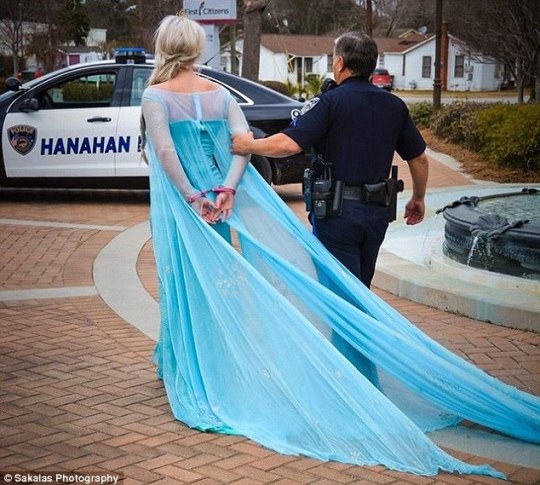
the best and worst thing
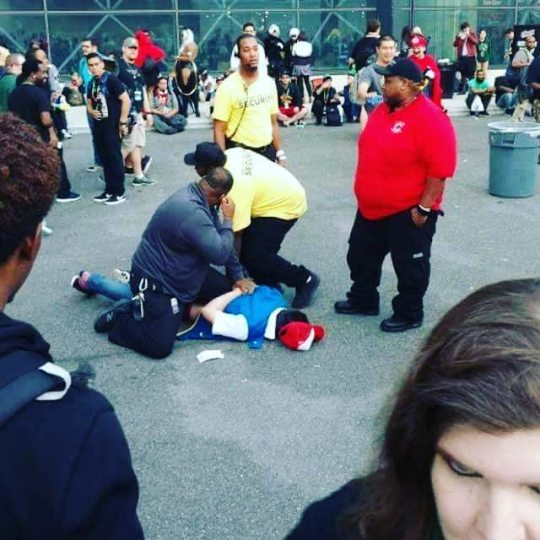
I have ever
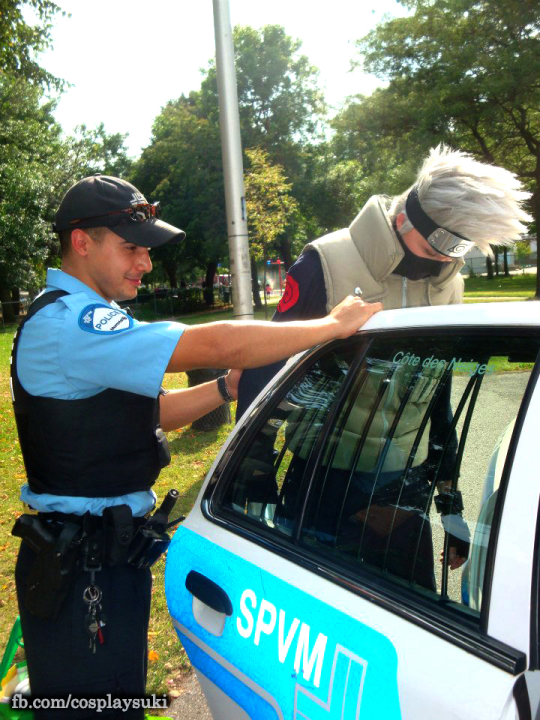
fuckIN G seEN

likE WHAT DID THEY DO
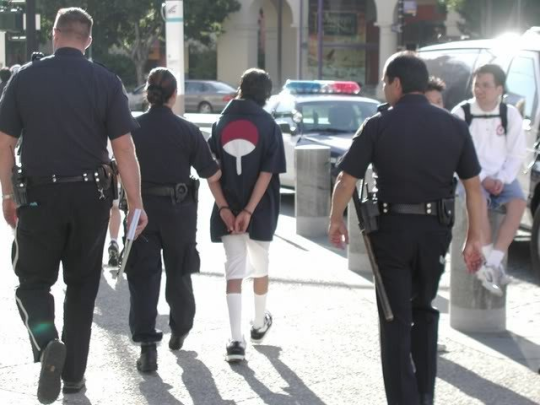
TO GET ARRESTED???
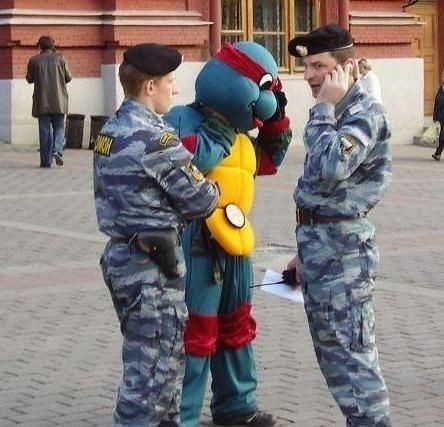
FOR THE LOVE OF GOD PLEASE TELL ME
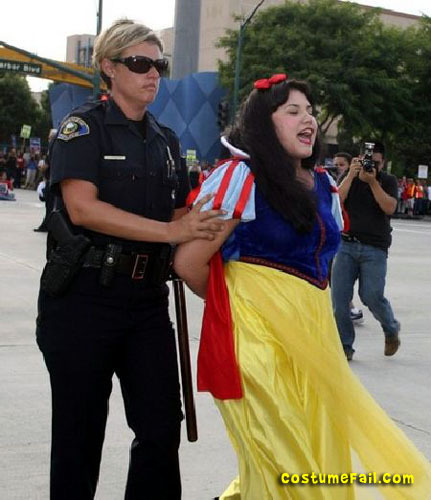
pleasE I NEED CONTEXT
182K notes
·
View notes
Text
Voltron Helmet Tutorial
So I got asked how I made my helmet, so I decided to make an actual separate tutorial instead of just a few progress shots!
Materials:
EVA Foam
Packing or Painter’s Tape
Tin Foil
Cardstock (optional)
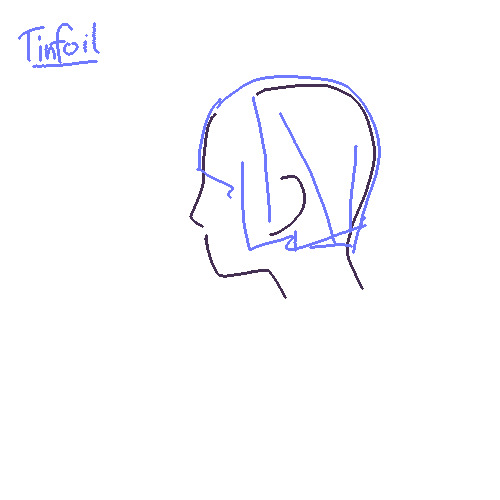
Okay, so first, I took a huge sheet of tinfoil and covered my head, leaving my face out:
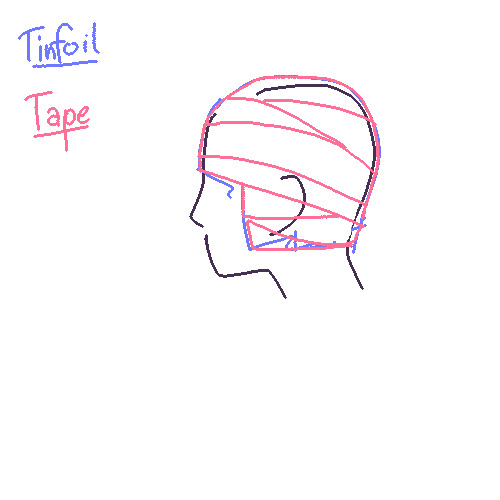
then I covered the foil with tape, again leaving my face clear:
I then drew the basic pattern shapes onto the tape:
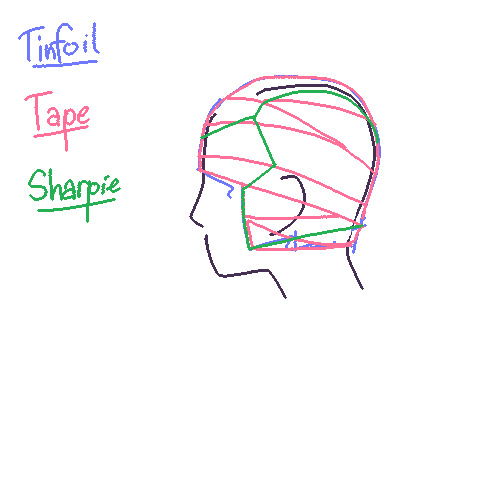
(again for clarity)
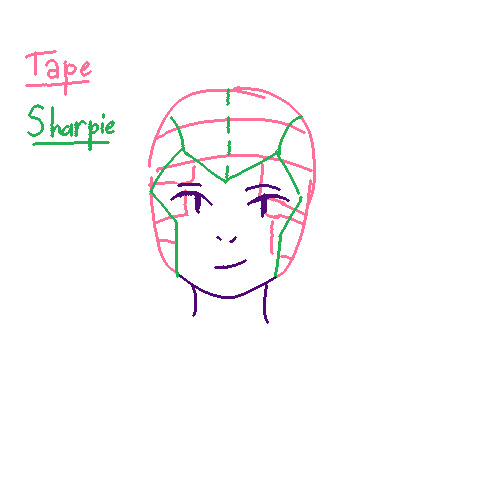
After, I CAREFULLY slipped it off, and cut along the lines. I cut a slit near the top of the side piece so I would know where to dart it on the foam:
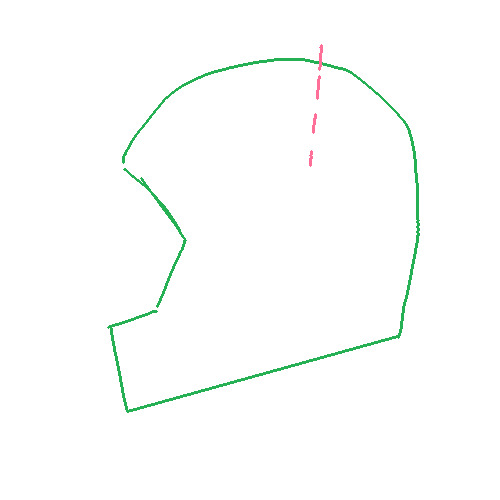
I traced these onto cardstock to smooth and even the cuts I made:
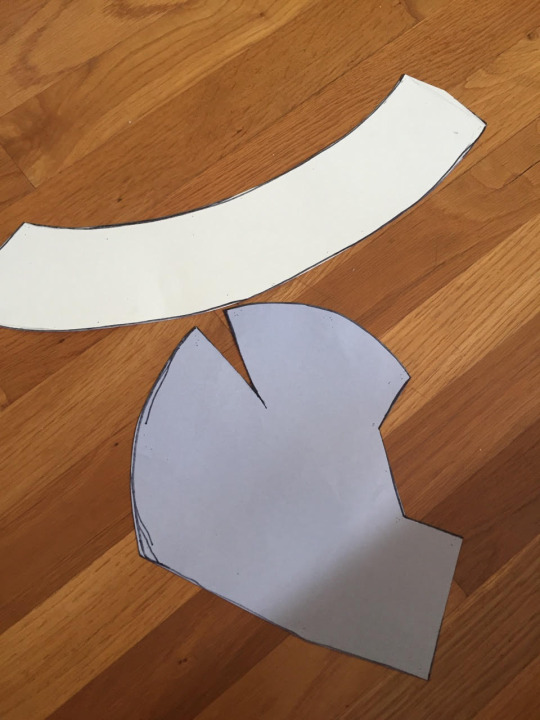
I used these the trace onto my EVA, and cut those out. I made sure to cut the edges that meet along a diagonal after I cut the pieces out so that it would bend without showing the seam:
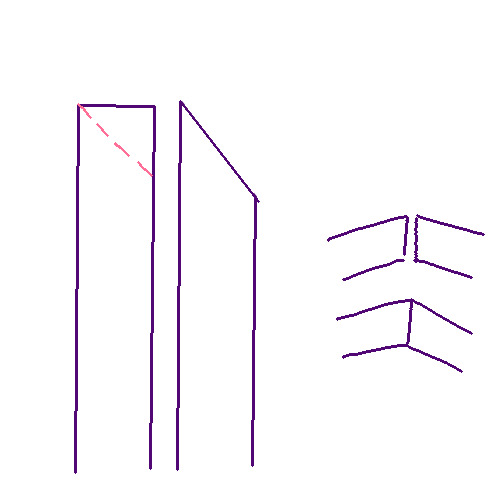
after that I just used hot glue to attach everything together, added superglue along the seams, sanded once dry, and cut the detail piece out of thin craft foam from the pattern i already made:
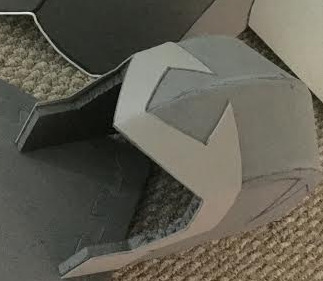
Paint it to your liking, et voilà!!
1K notes
·
View notes
Text
Can we PLEASE take a moment to appreciate the goddamn AMAZING amount of craftsmanship that goes into making pro ballet costumes?

I MEAN …

COME ON PEOPLE!

GENUINELY FUCKING SPECTACULAR!

THE DETAIL!

THE BEAUTY!!

THE GORGEOUSNESS OF IT ALL!!!

Costume designers are some of the most awesomely skilled people on the planet and I feel like they very rarely get as much admiration as they deserve. Especially in ballet, because a lot of the time at least half the audience doesn’t get the chance to see how intricate and beautiful these pieces truly are. I want to thank the artists who put so much effort into making characters look amazing.
130K notes
·
View notes
Photo

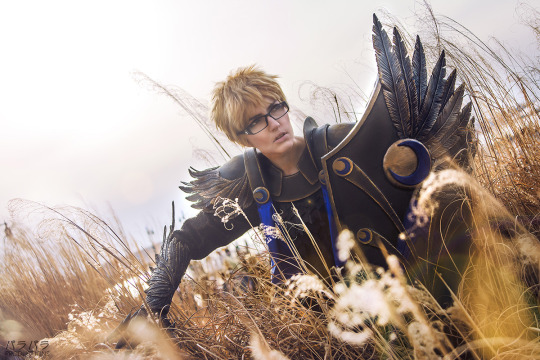
Cosplay Tutorial: How to Create Worbla Feathers
By popular request: it’s the worbla feather tutorial!!
For Tsukki’s Legend of Karasuno cosplay, I decided to go with a heavy crow motif, and what better way to do that than covering myself in feather armor? I ended up crafting close to 100 in total between the shield, gauntlet, and pauldrons, using a few different tweaks for different armor pieces. However all of my feathers were made in one of two ways: either by sandwiching worbla around foam for a very thick, large feather, or by stacking two pieces of worbla for a thinner but very sturdy feather that is thick enough to etch deep details into. Read on for these two methods!
Keep reading
3K notes
·
View notes
Photo


Got your hands on one of those My Hero Academia jumpsuits from Spirit but would rather have a two-piece uniform? Look no further! I was in the same boat, so I threw together this quick tutorial on how to convert your costume and make it more accurate to the uniforms the characters actually wear!
A couple of really important notes before you proceed: -This will only work if your uniform is too big on you! I’m smol and even the small size was too tall for me by several inches, in addition to the huge waist. You’ll need those extra inches to hem the jacket and the pants, so don’t go cutting apart your jumpsuit if you don’t have them! -This only requires some basic sewing knowledge - basically you just have to hem and maybe take in a seam. You can use either a machine or hand-sewing techniques. -This method minimizes marking misalignment (those neat “U.A.” stripes!!) by putting the size alteration of the pants in the center back seam. You still have to replace the zipper fragment in the center front seam, so not only do you need a couple of extra inches in the waist – the front seam will probably end up looking a little bit wonky up close, so this tutorial may not be for you if you’re a perfectionist.
Now that that’s out of the way, happy sewing! Followed by happy villain conquering!!
516 notes
·
View notes
Photo

Making Big Feathers
Since there were quite a few people who asked how I’ve made a feather for my Captain Fortune cosplay, today I’ll try to make my very first tutorial!
Tutorial by: JUST Vitkute Tutorial Link: https://cususite.wordpress.com/2016/06/29/making-big-feathers/
372 notes
·
View notes
