
Keploy is an AI-powered testing tool that specializes in creating test cases and generating stubs/mocks for end-to-end testing.
Don't wanna be here? Send us removal request.
Statistics
We looked inside some of the posts by keploy12 and here's what we found interesting.
Average Info
Notes Per Post
1
Likes Per Post
1
Reblog Per Post
0
Reply Per Post
0
Time Between Posts
5 days
Number of Posts By Type
Text
16
Photo
1
Last Seen Tumblr Blogs


Fun Fact
Tumblr’s reach among the 26-to-35-year-olds in the US is 11%.
Text
Top 5 Alternatives to Cypress for Automated Testing
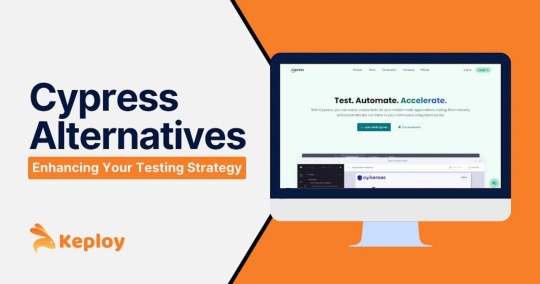
Automated testing has become an integral part of the software development lifecycle, ensuring the reliability and efficiency of applications. Cypress has gained popularity as a powerful end-to-end testing framework, known for its fast execution and real-time browser testing capabilities. However, as with any tool, there are situations where Cypress alternative solutions may better suit the specific needs of a project. In this article, we'll explore some alternatives to Cypress for automated testing.
1. Keploy
Best for automated API testing with efficient test case generation from API calls.
Keploy creates backend API tests with built-in-mocks or stubs by recording your application network calls making your testing process not only faster than unit tests but also incredibly efficient.
Turn API Calls into Test-Cases and Mocks
With Keploy, you can effortlessly record and replay intricate, distributed API flows as mocks and stubs. It's like having a time machine for your tests.
2. Puppeteer
Puppeteer, developed by Google, is a Node.js library that provides a high-level API to control headless browsers or full browsers over the DevTools Protocol. It is commonly used for browser automation, including tasks like taking screenshots, generating PDFs, and scraping data.
Unlike Cypress, Puppeteer does not focus on end-to-end testing but can be utilized for integration testing or scenarios where detailed control over the browser is required. Its integration with the Chrome browser allows for powerful manipulation of web pages.
3. TestCafe
TestCafe is a cross-browser end-to-end testing framework that does not rely on browser plugins. It supports multiple browsers out of the box and allows testing on real devices. TestCafe is known for its ease of setup, as it does not require browser plugins or WebDriver installations.
With a focus on stability and reliability, TestCafe provides automatic waiting for page elements and handles timeouts effectively. It supports various authentication mechanisms and integrates seamlessly with Continuous Integration (CI) tools.
4. Playwright
Developed by Microsoft, Playwright is a Node.js library for browser automation. It supports multiple browsers, including Chrome, Firefox, and WebKit, and provides a simple and concise API for interacting with web pages.
Playwright stands out for its ability to capture screenshots and videos during test execution, making it valuable for debugging and documentation purposes. It also supports cross-browser testing and can be integrated with various testing frameworks.
5. Nightwatch.js
Nightwatch.js is a browser automation framework built on Node.js and Selenium WebDriver. It supports end-to-end testing, allowing developers to write tests in JavaScript or TypeScript. Nightwatch.js provides a clean and concise syntax for writing tests and supports parallel test execution.
One of the advantages of Nightwatch.js is its built-in test runner and assertion library, simplifying the test creation process. It also integrates with popular Continuous Integration tools, making it suitable for automated testing in a CI/CD pipeline.
Conclusion
While Cypress has gained popularity for its speed and simplicity in end-to-end testing, there are various alternatives available, each with its strengths and use cases. The choice of a testing framework depends on the specific requirements of a project, including the need for cross-browser testing, support for different programming languages, and the level of control over browser interactions.
Teams should carefully evaluate their testing requirements, consider factors such as browser support, community support, and integration capabilities, and choose a testing tool that aligns with the goals and complexities of their project. Whether it's Selenium WebDriver, Puppeteer, TestCafe, Playwright, or Nightwatch.js, the right choice will contribute to the effectiveness and efficiency of automated testing in the software development process.
0 notes
Text
Exploring E2E Testing: Ensuring Software Quality from Start to Finish

In the dynamic landscape of software development, ensuring the quality of applications is paramount. End-to-End (E2E) testing has emerged as a crucial practice to validate that a software application behaves as expected across its entire workflow. This comprehensive testing approach simulates real user scenarios, allowing developers to identify and rectify issues before they reach end-users. In this article, we'll delve into the fundamentals of e2e testing, its benefits, challenges, and best practices.
What is End-to-End Testing?
End-to-End testing is a software testing methodology that evaluates the functionality of an entire application from start to finish. Unlike unit testing, which focuses on individual components, and integration testing, which verifies interactions between components, E2E testing ensures that all components work together seamlessly. This holistic approach mimics the user's experience and validates the application's behavior across different layers and components.
Key Components of E2E Testing:
Automation: E2E testing is often automated to simulate real user interactions. Automated testing frameworks, such as Selenium, Cypress, and TestCafe, enable testers to create scripts that mimic user actions like clicking buttons, filling forms, and navigating through the application.
Scenarios: Test scenarios in E2E testing represent real-world user journeys. These scenarios cover critical paths within the application and help identify potential bottlenecks or issues that users might encounter.
User Interface (UI) Testing: E2E testing extensively covers UI interactions to ensure that the user interface elements and user experience meet the specified requirements. This includes validating layout, design, and responsiveness across various devices and browsers.
Data Flow: E2E testing evaluates the flow of data through the entire system. This involves verifying that data is correctly processed, stored, and retrieved across different components and layers of the application.
Benefits of End-to-End Testing:
Comprehensive Coverage: E2E testing provides a comprehensive examination of the entire application, ensuring that all components work together harmoniously. This helps identify issues that might go unnoticed in unit or integration testing.
Real User Experience: By simulating real user interactions, E2E testing provides insights into how end-users will experience the application. This helps in detecting issues related to usability, performance, and overall user satisfaction.
Early Bug Detection: Identifying and fixing bugs early in the development lifecycle is more cost-effective. E2E testing allows teams to catch issues at an early stage, preventing them from escalating and reaching production.
Increased Confidence in Releases: With thorough E2E testing, development teams gain confidence in the stability and reliability of their applications. This confidence is crucial for frequent and successful software releases.
Challenges in End-to-End Testing:
Complexity and Time: E2E testing can be time-consuming and complex, especially for large and intricate applications. Creating and maintaining a suite of E2E tests requires a significant investment in time and resources.
Flakiness: Automated E2E tests can be susceptible to flakiness, where tests produce inconsistent results due to factors such as network latency, third-party dependencies, or changes in the application's UI.
Maintenance Overhead: As the application evolves, E2E tests may require constant updates to align with changes in the UI, functionality, or underlying architecture. This maintenance overhead can be challenging to manage.
Cost: Developing and maintaining E2E testing infrastructure, including tools and frameworks, can incur costs. Organizations need to balance the benefits of E2E testing with the associated expenses.
Best Practices for Effective E2E Testing:
Selective Test Automation: Not all scenarios need to be automated. Focus on automating critical paths and scenarios that have a high impact on the application's functionality.
Isolation of Test Environments: Ensure that the testing environment is isolated from the production environment to prevent unintended consequences. This includes using separate databases, servers, and configurations.
Regular Test Maintenance: Keep E2E tests up-to-date with changes in the application. Regularly review and update test scripts to align with the evolving features and UI elements.
Parallel Execution: To expedite testing, consider parallel execution of test cases. Running tests concurrently can significantly reduce the overall testing time.
Continuous Integration/Continuous Deployment (CI/CD) Integration: Integrate E2E tests into the CI/CD pipeline to automatically trigger tests with each code change. This ensures that new features are validated and deployed seamlessly.
Collaboration between Teams: Foster collaboration between development, testing, and operations teams to address issues promptly. This collaborative approach enhances communication and accelerates the resolution of identified problems.
Conclusion:
End-to-End testing is a critical element in the software development lifecycle, ensuring that applications meet user expectations and perform seamlessly across various scenarios. While it comes with its challenges, the benefits of comprehensive test coverage, early bug detection, and increased confidence in releases outweigh the drawbacks. By adopting best practices and leveraging automation tools, development teams can harness the power of E2E testing to deliver high-quality software in an efficient and reliable manner.
0 notes
Text
The Crucial Element of Integrity in Coding: Building Trust Through Ethical Practices 🌐💻

Introduction:
Integrity is a foundational element that permeates every aspect of our lives, and the world of coding is no exception. In the realm of software development, integrity goes beyond simply writing efficient and error-free code; it extends to the ethical principles that guide developers in their decision-making processes. This article explores the crucial element of integrity in coding, emphasizing the importance of ethical practices and the role they play in building trust among users, collaborators, and the broader community.
Accuracy and Precision:
The foundation of integrity in coding lies in the accuracy and precision of the code. Developers must ensure that their code produces the intended results and functions as expected. Inaccuracies or imprecisions can lead to unintended consequences, including security vulnerabilities and system failures. Upholding accuracy and precision demonstrates a commitment to delivering reliable and trustworthy software. ✨
Transparency:
Integrity in coding is closely tied to transparency. Developers should be transparent about their code, making it understandable and accessible to others. This includes providing clear comments, documentation, and adhering to coding standards. Transparent coding practices not only facilitate collaboration but also contribute to the sustainability of software projects by allowing for easier maintenance and troubleshooting. 📚🔍
Security:
Ensuring the security of the code is a paramount aspect of integrity. Developers must prioritize safeguarding user data, preventing unauthorized access, and identifying and patching potential vulnerabilities. By incorporating security measures throughout the development process, coders demonstrate a commitment to protecting users' privacy and maintaining the integrity of the software ecosystem. 🔐💼
Ethical Decision-Making:
Integrity in coding involves making ethical decisions throughout the development lifecycle. Developers often face choices related to data handling, privacy concerns, and the overall impact of their code on users and society. Upholding ethical standards requires considering the broader implications of coding decisions and choosing paths that prioritize the well-being of users and the community. 🤔🌍
Accountability:
Integrity is closely tied to accountability in coding. Developers should take responsibility for the code they produce, acknowledging and rectifying errors promptly. This includes being open about mistakes and learning from them to improve future coding practices. By holding themselves accountable, developers contribute to a culture of trust and continuous improvement within the coding community. 🤝🔍
Collaboration and Teamwork:
Integrity in coding extends beyond individual developers to the collaborative efforts of entire teams. Effective communication, mutual respect, and shared responsibility are essential elements of building and maintaining integrity within coding teams. Collaboration ensures that coding practices align with ethical standards and that collective efforts result in software that users can trust. 🚀🤝
Conclusion:
In the ever-evolving landscape of coding and software development, integrity stands out as a foundational element that cannot be overlooked. Upholding ethical practices, ensuring accuracy and transparency, prioritizing security, making ethical decisions, being accountable, and fostering collaboration are all crucial aspects of maintaining integrity in coding. By embodying these principles, developers not only build trustworthy software but also contribute to a culture of integrity that strengthens the coding community as a whole. As the digital world continues to advance, the importance of integrity in coding remains steadfast, guiding developers toward creating a technology-driven future founded on trust and ethical principles. 🌟👩💻🚀
0 notes
Text
The Power of Automated Unit Testing: Ensuring Code Quality and Efficiency

Introduction
Software development is an intricate process that requires precision and reliability. As applications become increasingly complex, developers must find ways to maintain code quality, ensure functionality, and prevent regressions. This is where robotized unit testing becomes an integral factor. Automated unit testing is a crucial practice that aids developers in crafting high-quality software. In this article, we will explore the concept of automated unit testing, its benefits, best practices, and tools to streamline the process.
Understanding Automated Unit Testing
Unit testing is a product testing strategy where individual parts or units of code are tried in detachment. These units can be functions, classes, methods, or other small pieces of code. Automated unit testing involves the creation and execution of test cases that evaluate the correctness of these individual units automatically, without manual intervention.
The primary goal of automated unit testing is to identify defects early in the development process, making it easier and more cost-effective to fix issues. Unit tests validate whether specific parts of the codebase behave as intended, ensuring that changes and updates do not introduce unexpected errors.
Benefits of Automated Unit Testing
Early Bug Detection: Automated unit tests help catch and address issues in code as soon as they are introduced, reducing the likelihood of bugs accumulating and becoming more complex to resolve later in the development cycle.
Code Quality: Writing unit tests encourages developers to think critically about their code, leading to better code quality, more maintainable software, and improved documentation of the code's expected behavior.
Regression Prevention: By automating tests, developers can quickly identify regressions, ensuring that new changes do not break existing functionality.
Faster Development: Automated unit tests can serve as a safety net that provides confidence to developers when refactoring or extending code. This accelerates the development process as developers can make changes with less fear of introducing new bugs.
Collaboration: Unit tests serve as a form of documentation that helps team members understand how code components are supposed to work, facilitating collaboration and knowledge transfer.
Best Practices for Automated Unit Testing
Isolate Units: Test one unit (function, method, or class) in isolation, mocking or stubbing its dependencies. This isolates the unit under test, making it easier to identify the source of any failures.
Keep Tests Simple: Write simple and concise test cases. Avoid complex test logic, and focus on testing the unit's core functionality.
Automate the Tests: Use testing frameworks and tools designed for automated unit testing. Popular choices include JUnit for Java, pytest for Python, and Jasmine for JavaScript.
Use Descriptive Test Names: Name your tests descriptively, making it clear what each test is evaluating. This improves test documentation and helps pinpoint issues when failures occur.
Run Tests Frequently: Incorporate automated tests into your development workflow and run them frequently. Continuous Integration (CI) tools can help automate test execution on code commits.
Maintain a Test Suite: Keep your test suite up-to-date as your codebase evolves. Refactor and extend your tests alongside your code to ensure that they continue to provide value.
Measure Code Coverage: Use code coverage tools to determine the percentage of code covered by your tests. This helps identify areas that require additional test coverage.
Tools for Automated Unit Testing
Several tools and frameworks are available to streamline the process of automated unit testing. Some of the most popular ones include:
JUnit: A widely used unit testing framework for Java.
pytest: A popular testing framework for Python, known for its simplicity and extensibility.
NUnit: A unit testing framework for .NET languages like C#.
Jasmine: A testing framework for JavaScript, specifically designed for testing frontend code.
PHPUnit: A unit testing framework for PHP.
Mocha: A versatile testing framework for JavaScript that supports both browser and Node.js testing.
Conclusion
Automated unit testing is a critical practice in modern software development that significantly improves code quality, identifies bugs early in the development cycle, and supports efficient collaboration among team members. By following best practices and using the right tools, developers can harness the power of automated unit testing to build robust and reliable software, ultimately saving time and resources in the long run. Embracing automated unit testing as an integral part of your development process is a smart investment in the quality and sustainability of your software projects.
0 notes
Text
Demystifying Behavior-Driven Development (BDD): A Guide to Efficient Software Development
Introduction
In the ever-evolving landscape of software development, developers and stakeholders continually seek ways to streamline and enhance the development process. One methodology that has gained traction in recent years is Behavior Driven Development (BDD). BDD is a collaborative and user-focused approach that promotes clearer communication, better testing, and more efficient development. In this article, we'll explore what BDD is, its principles, and how it can benefit software development projects.
Understanding Behavior-Driven Development (BDD)
Behavior-Driven Development is an agile software development methodology that originated from Test-Driven Development (TDD) and borrows concepts from Domain-Driven Design (DDD). BDD is designed to improve communication between developers, testers, and non-technical stakeholders, ensuring that the software meets business requirements and user expectations effectively.
The key elements of BDD include:
Collaboration: BDD encourages collaboration between developers, testers, and product owners. This collaboration is essential for identifying and defining the desired behavior of the software.
User-Centric Focus: BDD places the user at the center of development. It aims to understand and define the expected behavior of the software from a user's perspective.
Specification by Example: BDD uses real-world examples to describe the behavior of the system. These examples are typically written in plain language and serve as a common reference point for everyone involved in the project.
Automation: BDD emphasizes the automation of tests and specifications. Automated tests help ensure that the software behaves as expected, and they serve as living documentation.
Iterative Development: Like other agile methodologies, BDD promotes iterative development, enabling teams to adapt to changing requirements and user feedback.
Principles of Behavior-Driven Development
Ubiquitous Language: BDD encourages the use of a shared and consistent language between all team members. This language should be used to describe the software's behavior and requirements, fostering a common understanding.
User Stories: BDD often relies on user stories as a way to capture and describe the desired behavior of the software from a user's perspective. These stories serve as a foundation for defining the software's features and functionality.
Given-When-Then: The "Given-When-Then" structure is a fundamental part of BDD. It breaks down the specification into three parts: Given (preconditions), When (actions), and Then (expected outcomes). This structure makes it clear how the software should behave in various scenarios.
Benefits of Behavior-Driven Development
Improved Collaboration: BDD encourages better collaboration between developers, testers, and non-technical stakeholders. By using a shared language and focusing on user-centric behavior, misunderstandings are reduced.
Clarity and Transparency: The use of plain language and concrete examples in BDD specifications makes it easier for all team members to understand the software's requirements and expected behavior.
Early Detection of Issues: By writing and automating tests early in the development process, BDD helps catch issues and bugs at their inception, reducing the cost of fixing them later in the development cycle.
Living Documentation: BDD tests serve as living documentation, ensuring that the software's behavior is well-documented and up-to-date. This documentation is especially valuable when onboarding new team members or maintaining the software.
User-Centered Development: BDD keeps the user's needs and expectations at the forefront of development. This focus results in software that aligns more closely with user requirements.
Challenges of Behavior-Driven Development
While BDD offers numerous advantages, it's not without its challenges. Some common hurdles include:
Learning Curve: Implementing BDD may require team members to learn new practices and tools, which can be challenging for some.
Time and Resource Intensive: Writing comprehensive BDD specifications and automated tests can be time-consuming, particularly in the early stages of a project.
Maintenance: Like any form of documentation or tests, BDD specifications and automated tests must be maintained to stay relevant and accurate.
Conclusion
Behavior-Driven Development is a powerful methodology that enhances software development by focusing on collaboration, user-centric behavior, and automation. By using plain language and concrete examples, BDD helps teams create a shared understanding of the software's requirements and expected behavior. While there are challenges to implementing BDD, the benefits in terms of improved communication, transparency, and user-centered development make it a valuable approach for modern software projects. Embracing BDD can lead to better software, happier users, and a more efficient development process.
0 notes
Text
Building a Robust REST API with Java Spring Boot and MongoDB 🚀🍃📦
In the ever-evolving world of web development, creating a robust and scalable RESTful API is a fundamental skill. rest api java spring boot and mongodb is a powerful combination that allows developers to build efficient APIs quickly. In this article, we'll walk you through the process of creating a REST API using these technologies, so grab your coding gloves and let's get started! 🧤👨💻
What is Spring Boot and MongoDB?
Spring Boot 🍃
Spring Boot is a Java-based framework that simplifies the development of web applications and microservices. It provides an environment for building production-ready applications with minimal configuration and boilerplate code. Spring Boot's convention-over-configuration approach allows you to focus on the business logic of your application rather than dealing with infrastructure concerns.
MongoDB 🍃
MongoDB is a popular NoSQL database that stores data in a flexible, JSON-like format called BSON. It is known for its scalability and ability to handle large volumes of data. MongoDB is a great choice for building APIs as it can adapt to the changing data structures typically found in modern applications.
Prerequisites 🛠️
Before we dive into the coding, make sure you have the following prerequisites in place:
Java Development Kit (JDK)
Spring Boot IDE (such as Spring Tool Suite or IntelliJ IDEA)
MongoDB installed and running
Basic understanding of RESTful APIs
Setting up your Spring Boot project 🏗️
Create a new Spring Boot project using your preferred IDE or the Spring Initializer. You can use Maven or Gradle as the build tool.
Add the necessary dependencies, including spring-boot-starter-web and spring-boot-starter-data-mongodb, to your pom.xml or build.gradle file.
Configure your MongoDB connection in application.properties or application.yml. You can specify the connection URL, database name, and authentication details.
Creating a Model 📦
Next, you need to define the data model that your API will work with. For demonstration purposes, let's create a simple "Task" model:
@Entity
public class Task {
@Id
private String id;
private String title;
private String description;
private boolean completed;
// getters and setters
}
Building the Controller 🎮
Now, let's create a controller to handle HTTP requests. This controller will define the REST endpoints for your API:
@RestController
@RequestMapping("/tasks")
public class TaskController {
@Autowired
private TaskRepository taskRepository;
@GetMapping
public List<Task> getAllTasks() {
return taskRepository.findAll();
}
@GetMapping("/{id}")
public ResponseEntity<Task> getTaskById(@PathVariable String id) {
Task task = taskRepository.findById(id).orElse(null);
if (task == null) {
return ResponseEntity.notFound().build();
}
return ResponseEntity.ok(task);
}
@PostMapping
public Task createTask(@RequestBody Task task) {
return taskRepository.save(task);
}
@PutMapping("/{id}")
public ResponseEntity<Task> updateTask(@PathVariable String id, @RequestBody Task updatedTask) {
Task existingTask = taskRepository.findById(id).orElse(null);
if (existingTask == null) {
return ResponseEntity.notFound().build();
}
existingTask.setTitle(updatedTask.getTitle());
existingTask.setDescription(updatedTask.getDescription());
existingTask.setCompleted(updatedTask.isCompleted());
taskRepository.save(existingTask);
return ResponseEntity.ok(existingTask);
}
@DeleteMapping("/{id}")
public ResponseEntity<Void> deleteTask(@PathVariable String id) {
taskRepository.deleteById(id);
return ResponseEntity.noContent().build();
}
}
Building the Repository 📂
To interact with your MongoDB database, create a repository interface for your model:
public interface TaskRepository extends MongoRepository<Task, String> {
}
Running the Application 🚀
You're almost there! Run your Spring Boot application and ensure that MongoDB is up and running. You can now start making HTTP requests to your API endpoints using tools like Postman or by creating a front-end application.
Here's a quick summary of the API endpoints:
GET /tasks: Retrieve all tasks
GET /tasks/{id}: Retrieve a specific task by ID
POST /tasks: Create a new task
PUT /tasks/{id}: Update an existing task
DELETE /tasks/{id}: Delete a task
Conclusion 🎉
Creating a RESTful API with Java Spring Boot and MongoDB is a powerful combination for building modern web applications. You've just scratched the surface of what you can achieve with these technologies. As you continue your development journey, you can explore additional features such as authentication, validation, and pagination to make your API even more robust.
So, go ahead, experiment, and build your REST API with Spring Boot and MongoDB! Happy coding! 🚀🌍🛠️
0 notes
Text
Unveiling the Digital Connect: A Fascinating Journey Through the History of APIs

In the age of digital marvels, we often take for granted the seamless flow of information across the vast expanse of the internet. At the heart of this digital revolution lies an unsung hero, the Application Programming Interface, or API. This unassuming acronym has played a pivotal role in shaping the digital landscape we know today. Join us on a captivating journey through the history of APIs, and discover how they have connected our world like never before.
The Genesis of APIs
The concept of APIs can be traced back to the earliest days of computing, where software systems needed to communicate with one another. Initially, this communication was often proprietary, limiting the exchange of data to closed systems. It wasn't until the advent of the internet that APIs truly began to flourish.
Birth of the World Wide Web
The 1990s witnessed the explosion of the World Wide Web, marking a paradigm shift in how information was accessed and shared. Tim Berners-Lee's creation of the HTTP protocol paved the way for a standardized method of data exchange, giving birth to a universal language for APIs.
SOAP and REST: A Duel of Titans
As the internet grew, so did the need for more robust and standardized ways for systems to communicate. The late '90s saw the emergence of SOAP (Simple Object Access Protocol), a protocol that allowed for the exchange of structured information. However, the early 2000s brought forth REST (Representational State Transfer), which emphasized simplicity and flexibility.
This led to a titanic battle between SOAP and REST, with REST eventually emerging as the favored approach for its lightweight design and scalability. RESTful APIs became the cornerstone of modern web development.
Web 2.0: The API Explosion
The mid-2000s ushered in the era of Web 2.0, characterized by user-generated content, social media, and interactivity. APIs played a central role in this transformation, enabling seamless integration of services, from social sharing buttons to map functionalities.
Twitter's API, for instance, allowed developers to create third-party applications that revolutionized how we interacted with the platform. Today, APIs are the backbone of most social media services, from Facebook and Instagram to LinkedIn and beyond.
The App Ecosystem
The rise of smartphones in the late 2000s gave birth to the app ecosystem, a phenomenon driven by APIs. These mobile apps, powered by APIs, transformed the way we live, work, and play. From booking a ride with Uber to ordering groceries through Instacart, APIs became the enablers of our everyday tasks.
Cloud Computing and Beyond
With the advent of cloud computing, APIs extended their influence into the corporate world. Companies began using APIs to connect their systems with cloud-based services, simplifying infrastructure management and enhancing scalability. AWS, Google Cloud, and Microsoft Azure are just a few examples of cloud providers offering comprehensive APIs.
IoT and the Future
As we step into the future, APIs continue to evolve, finding new horizons in the Internet of Things (IoT). IoT devices rely on APIs to communicate, making smart homes and cities a reality. APIs have also become essential in the field of artificial intelligence, allowing developers to access powerful machine learning models and services.
The Unifying Force
In essence, APIs have been the unifying force behind the digital revolution. They have torn down the walls of closed systems, enabling a world where information flows freely. From the early days of the World Wide Web to the burgeoning IoT landscape, APIs have connected our world like never before.
So, the next time you tweet, book a flight, or ask your virtual assistant for the weather, take a moment to appreciate the history and significance of APIs. These silent enablers have shaped the digital world we live in today, and their future promises even greater connectivity and innovation. The journey of APIs is a testament to human ingenuity, and it's a story that's far from over.
0 notes
Text
Go eBPF Unleashed: Amplifying Your Control Over Linux Kernel
Introduction
In the dynamic landscape of software development, three key concerns reign supreme: performance optimization, in-depth system observation, and fortifying security. In the realm of Extended Berkeley Packet Filters (eBPF), Go is emerging as a powerhouse language, transforming how we analyze and manipulate network traffic, system calls, and other facets of application performance. Today, we embark on an exhilarating journey into the universe of Go eBPF, uncovering its vast potential and myriad applications.
Demystifying eBPF
eBPF, short for Extended Berkeley Packet Filter, is a virtual machine residing within the Linux kernel. This ingenious creation allows you to securely run custom programs within a confined, safeguarded environment. These eBPF programs can be attached to various hooks within the kernel, opening the gateway to powerful and efficient monitoring, analysis, and manipulation of critical events such as system calls, network packet handling, and beyond.
What makes eBPF particularly captivating is its ability to extend the capabilities of the Linux kernel without the need to write and load complex kernel modules, which can be cumbersome and error-prone. eBPF programs are penned in a restricted subset of C and are executed within the kernel's own virtual machine, offering a marriage of safety and efficiency that is crucial for low-level operations.
Go and eBPF: A Match Made in Developer Heaven
Go, colloquially referred to as Golang, is a statically typed, compiled language renowned for its elegance, efficiency, and rock-solid support for concurrency. The burgeoning synergy between Go and eBPF has not gone unnoticed. Here's why Go makes a compelling choice for eBPF development:
Safety First: Go is a memory-safe language, effectively guarding against common memory-related pitfalls that can otherwise lead to security vulnerabilities. This safety is an absolute necessity when writing code that operates within the kernel, where even minor mistakes can have catastrophic consequences.
Performance Par Excellence: Go's performance is right up there with languages like C and C++, making it an ideal candidate for crafting eBPF programs that need to execute swiftly and with the utmost efficiency.
Robust Ecosystem: The Go ecosystem is vast and vibrant, featuring an array of libraries that cater to network programming, an invaluable resource for those venturing into eBPF applications.
Developer-Friendly: Go's hallmark simplicity and readability mean that it's accessible to a broad spectrum of developers, including those who may not have extensive experience in systems programming.
Crafting Go eBPF Programs
To venture into the domain of Go eBPF, you'll need a few fundamental tools and components:
A Go Environment: Ensure that you have Go installed on your development machine.
The Power of libbpf: libbpf is a library that streamlines the interaction between Go and eBPF programs. It provides an array of helper functions and abstractions that simplify working with eBPF in Go. You can find libbpf on GitHub and install it to bolster your projects.
BPF Toolchain: This includes tools like Clang and LLVM, essential for compiling eBPF programs written in Go.
The Go eBPF Library: This gem of a library offers Go bindings for libbpf and facilitates the development of eBPF programs in Go.
Applications Galore
Now that you're all set up with Go and the necessary tools, let's delve into the captivating array of applications that Go eBPF opens up:
Network Wizardry: Go eBPF programs can capture and dissect network traffic like never before. This superpower is a game-changer for diagnosing network performance bottlenecks, conducting robust security monitoring, and performing deep packet analysis.
Guardian of Security: With Go eBPF, you can craft robust intrusion detection systems capable of real-time monitoring of system calls and network events, alerting you to potential threats and allowing you to take immediate action.
Profiling and Tracing Mastery: When it comes to profiling and tracing applications to pinpoint performance bottlenecks and optimize execution, Go eBPF shines like a beacon. It offers an insightful window into code execution, revealing avenues for significant performance enhancements.
System Call Firewall: By attaching eBPF programs to system call hooks, you can enforce security policies, control the behavior of specific processes, and fortify your system against malicious activities.
Conclusion
Go eBPF is more than just an innovative intersection of two powerful technologies. It is the gateway to secure, efficient, and developer-friendly expansion of Linux kernel capabilities. With its safety features, competitive performance, and extensive ecosystem, Go has rightfully earned its spot as a premier choice for crafting eBPF programs. As the eBPF ecosystem continues to evolve, Go eBPF is poised to play a pivotal role in redefining the future of system monitoring, security, and performance optimization in the dynamic world of software development. If you're passionate about maximizing performance, enhancing observability, and safeguarding systems, it's high time you embark on the mesmerizing journey into the world of Go eBPF and uncover its boundless potential.
0 notes
Text
A Comprehensive Guide to the Automation Testing Life Cycle

Introduction In today's fast-paced software development landscape, automation testing has become an integral part of the software development life cycle. It helps ensure the quality and reliability of software products while reducing the testing effort and time. To effectively implement automation testing, it is essential to follow a well-structured Automation Testing Life Cycle (ATLC). This article will provide an in-depth look at the key phases and best practices in the automation testing life cycle. Automation Testing Life Cycle Phases 1- Test Planning: Objective Definition: Clearly define the scope, objectives, and goals of the automation testing effort. Identify what needs to be tested and what can be automated. Tool Selection: Choose the appropriate automation testing tools that best suit your project's needs. Factors to consider include application type, technology stack, and budget. Resource Allocation: Determine the necessary resources, including automation engineers, test environments, and hardware.
2- Test Design: Test Case Selection: Identify test cases that are suitable for automation. Choose scenarios that are repetitive, time-consuming, and critical to the application's functionality. Scripting: Develop automation scripts using the selected testing tool. Ensure that scripts are maintainable and reusable. Data Management: Prepare the test data required for automation and establish a strategy for data-driven testing.
3- Test Environment Setup: Environment Configuration: Set up the testing environment to mimic the production environment as closely as possible. This includes the installation of the application, databases, and necessary configurations. Automation Framework Development: Create a robust automation framework that provides the structure for test script execution and reporting.
4- Test Execution: Execution Planning: Develop a schedule for test script execution. Decide whether to run tests continuously, during specific build phases, or as part of the CI/CD pipeline. Script Execution: Run the automated test scripts, monitor test execution progress, and capture test results. Defect Reporting: Automatically log defects and issues in a bug tracking system for immediate resolution.
5- Test Reporting and Analysis: Results Reporting: Generate detailed test reports with information on test execution status, pass/fail results, and logs. Failure Analysis: Investigate and analyze test failures to identify root causes. Debug and update test scripts as needed. Metrics and KPIs: Collect and analyze automation testing metrics such as test coverage, test execution time, and defect density.
6- Maintenance and Regression: Script Maintenance: Continuously update and maintain test scripts to keep them in sync with application changes. Regression Testing: Execute automated regression tests to ensure that new updates or features do not introduce defects into existing functionality.
7- Continuous Improvement: Feedback Loop: Gather feedback from the automation team, developers, and testers to make necessary improvements to the automation testing process. Tool and Technology Evaluation: Keep an eye on emerging automation tools and technologies to stay up-to-date and leverage innovations in the field.
Best Practices in Automation Testing Life Cycle 1-Clear Objectives: Set clear and achievable objectives for your automation testing effort, focusing on ROI, test coverage, and reduced testing time. 2-Comprehensive Test Planning: Plan meticulously by defining scope, allocating resources, and selecting the right tools to suit your project's needs. 3-Effective Test Case Selection: Prioritize test cases based on risk and complexity, emphasizing critical scenarios. 4-Robust Automation Framework: Develop a flexible and maintainable automation framework that supports various test scripts. 5-Continuous Integration: Integrate automation tests into your CI/CD pipeline to enable regular test execution and early defect detection. 6-Regular Maintenance: Keep automation scripts up-to-date with application changes to ensure they remain effective. 7-Collaboration: Foster collaboration among testers, developers, and automation engineers to ensure effective defect resolution and testing. Conclusion The Automation Testing Life Cycle is a structured approach to integrating automation testing into the software development process. It helps organizations achieve higher testing efficiency, improved test coverage, and faster time-to-market for their software products. By following the phases and best practices outlined in this article, you can create a robust and effective automation testing strategy that delivers reliable and high-quality software.
1 note
·
View note
Text
Understanding Mocks, Stubs, and Fakes in Software Testing

Software testing is an essential part of the software development lifecycle, ensuring that the code functions correctly and reliably. In the world of testing, especially unit testing, various terms like "mock vs stub vs fake are often used to describe objects or components that play specific roles in testing. These terms are crucial for creating test doubles, which are objects that stand in for real dependencies to isolate and verify the functionality of the code under test. Let's dive into the distinctions and use cases of mocks, stubs, and fakes.
Mock Objects
Purpose: Verify Interactions
Mock objects are primarily used to verify interactions between the code being tested and its dependencies. The primary focus is on ensuring that the code under test correctly interacts with these dependencies. Mock objects help answer questions like, "Was this method called with the expected arguments?" or "Was this method called the right number of times?"
Behavior: Recording and Assertion
Mocks are pre-programmed with expectations about the calls that will be made to them. They record these interactions and allow you to assert that the expected interactions occurred during the test. If the code doesn't interact with the mock as expected, the test will fail.
Example:
Imagine you're testing a service that interacts with a database. You create a mock database object, set expectations for specific queries, and verify that the code under test performs the expected database operations.
Stub Objects
Purpose: Provide Canned Responses
Stubs are used to provide predefined responses or data to the code being tested. They focus on returning specific values or behavior to simulate real dependencies but do not emphasize interaction verification. Stubs are helpful when you want to isolate the code under test from the complexities of real dependencies.
Behavior: Simplified Response
Stubs are relatively simple. When their methods are called, they return predetermined values without recording interactions. They don't assert how many times a method was called or with which arguments.
Example:
Consider a scenario where you're testing an email sending component. You might create a stub for the email sending service that always returns "success" to simulate successful email delivery, avoiding actual email transmission during tests.
Fake Objects
Purpose: Provide Realistic but Simplified Behavior
Fakes are real implementations of dependencies but with simplified or alternative behavior. They aim to mimic the real behavior of the dependency while making testing more practical or efficient. Fakes can be valuable when using real dependencies is too time-consuming, expensive, or complex.
Behavior: Mimic Real Behavior
Fakes emulate the actual behavior of the dependency but may do so in a simplified or faster manner. They are implemented in a way that is closer to the real thing, often using alternative approaches to achieve the same results.
Example:
Suppose you need to test a component that interacts with a file system. Instead of using the actual file system, which might be slow and cumbersome, you create a fake file system that stores files in memory. This speeds up testing and simplifies the setup.
Choosing the Right Test Double
The choice of whether to use a mock, stub, or fake depends on the specific requirements of your test and the nature of your dependencies. Here are some considerations:
Mock when you need to verify interactions, such as method calls or specific arguments, between the code under test and its dependencies.
Stub when you want to simulate simple behavior and provide canned responses to isolate the code under test from complex or slow dependencies.
Fake when you need a more realistic alternative to real dependencies to make testing faster, more practical, or more controllable.
In conclusion, mocks, stubs, and fakes serve distinct purposes in software testing. Understanding when and how to use each of them is vital for creating effective and efficient unit tests, ultimately contributing to the quality and reliability of your software.
0 notes
Text
A Comprehensive Guide to Unit Testing in Software Development
Introduction:
Unit testing is a technique of testing that emphasizes testing a particular piece of code. Unit testing is mainly done to test the functionality of a block of code i.e to check whether the code does what you expect it to do. But does that mean we have to test every functionality individually? An application has numerous functions, wouldn't writing test cases for each of them increase the development time? Let's check this out in detail.
What exactly is a "unit" in unit testing?
A unit can either be a class or an interface, functionality or even an entire package/module.
It is the smallest piece of code that can be tested in isolation.
The word “isolation” has been emphasized here since a test case is not considered to be a unit test if the test cases run parallel to other test cases.
The idea behind unit testing:
The primary goal behind unit testing is to isolate a chunk of your code and then verify if that piece of code works as it is expected to work or not.
Unit testing is the first level of testing and is done mostly by the developers who have developed the application since developers are the ones who have first-hand knowledge about the logical execution of a piece of code.
For example, let us consider that we have an eCommerce application with functionalities like product filtering, payment gateway, login logout system etc. Therefore, to test let’s say the product filtering function, you have to make sure that the function gives you the same set of output based on a given range of colors, brands and prices. This can be done by writing another function that calls the product filtering function with different input parameters and would then check whether the out given by the function and the output that we expect it to give are the same or not.

The developers mostly use unit testing as a means of validating the functionality or the logical execution of the code. Since there can be several functionalities in your application, you might need to create several unit test cases to cover the execution of each function. Therefore the developers need to keep in mind that the unit test does not slow down the performance or increase the development time of the code. It is due to this reason that a test case is not considered to be a unit test if it talks to the database or if it is dependent on the file system since this would slow down the performance.
Unit testing focuses only on a particular piece of code that should be tested in isolation. It is due to this reason, that a unit test case has a very precise extent of assessment. Unit test cases target a single piece of code, and in case the test fails, we know exactly where the fault is coming from. This in turn helps in looking for bugs in the application and fixing them during the early stage of its development.
Pros of unit testing:
Through unit testing, developers can detect and fix the bugs during the early stages of development which increases the efficiency of your code. Refactoring of code becomes much easier if you have unit tests in place.
Detection of errors in the early stages helps in eliminating the bugs which could lead to major issues in the future stages of development. This as a matter of fact, also saves a developer's time.
Unit testing also enhances the readability and understandability of code by the developers.
Cons of unit testing:
Writing unit tests for each functionality can be cumbersome and time-consuming.
Even though unit testing is done for chunks of code in isolation, not all errors are detected. Some errors might occur when the different modules interface with each other. These errors are mostly detected during the integration testing phase.
Since unit testing tests the logical implementation of a code, it cannot test the application for its non-functional characteristics such as usability, scalability and performance
Techniques of unit testing:

Unit testing techniques are of 3 types.
White box testing: Also known as glass box testing, transparent testing or structural testing. This approach requires an in-depth knowledge of the internal structure of a function. Thus this technique allows the testers to validate the logical aspect of a function i.e to test the behavior of a function.
Black box testing: In this approach, test cases are designed without any knowledge of the design or internal structure of the program. The test cases are designed entirely by analyzing the input/output behavior of the function. This approach is also known as function testing since the test cases are designed only based on the functional specification of the software. Test cases are designed entirely from the user’s point of view.
Gray box testing: Also known as semi-transparent testing, this approach is a mixture of both black box testing and white box testing (hence the name gray box testing). Here, the testers know the internal structure and its working. However, this knowledge is quite limited.
Myths of unit testing:
“Unit testing increases the burden on a project”
While a part of it might be true, Unit testing your product would save your product from having major bugs and issues in the future development stages of your product. Since unit testing increases code reusability, it is in turn saving your development time and effort.
“It’s a simple piece of code, therefore it does not need testing”
Again, a part of it might be true. However, you never know where the error may come from in the future. The code might seem simple to you, until and unless something goes wrong. Defining test cases for even the simplest piece of code would add stability and security to your product.
Conclusion:
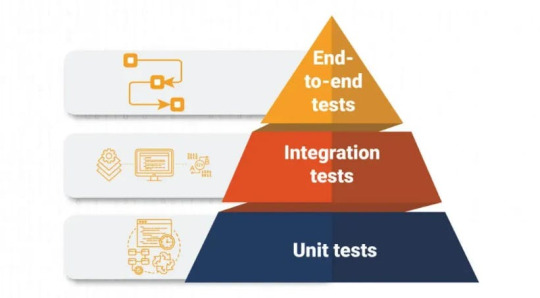
Unit testing is said to be the heart of the development lifecycle. Help you in detecting bugs in the early stages of development and save time, effort and development cost. Therefore, unit testing is a crucial part of any project. There are other levels of testing as well (Integration testing, end-to-end testing etc.), however, unit testing is the core of all testing levels.
0 notes

Text
Know the Power of API Test Generators: A simple Guide

Introduction
In the ever-evolving landscape of software development, Application Programming Interfaces (APIs) and End-to-End (E2E) testing are integral components for ensuring the functionality and reliability of applications. API test generators automate the creation of API test cases, while E2E testing tools validate an application's entire workflow. When these tools are combined, developers can ensure the robustness of their applications. In this comprehensive guide, we'll explore how API test generator can work seamlessly with an E2E testing tool like Keploy to enhance the overall testing process.
Understanding the Role of API Test Generators
API test generators automate the creation of test cases for APIs by analyzing their specifications, which often follow standardized formats such as OpenAPI or Swagger documentation. They provide several advantages, including efficiency, comprehensive test coverage, consistency, scalability, and integration with testing frameworks and Continuous Integration/Continuous Deployment (CI/CD) pipelines.
Keploy: Empowering End-to-End Testing
Keploy is an E2E testing tool designed to validate the entire workflow of an application. Unlike API tests, which focus on individual API endpoints, E2E testing examines how the various components of an application work together, ensuring that the application functions as expected from the user's perspective.
The Marriage of API Test Generators and Keploy
Comprehensive Test Coverage: Combining API test generators with Keploy allows developers to ensure comprehensive test coverage. API test generators handle the testing of individual API endpoints, while Keploy tests the complete end-to-end functionality of the application, including user interactions, navigation, and data flow.
Seamless Integration: API test generators can seamlessly integrate with Keploy to create a cohesive testing strategy. API tests can validate the backend services, while Keploy can simulate user interactions with the application's frontend, covering both the frontend and backend aspects.
Efficiency and Consistency: API test generators eliminate the need to manually write and maintain API test cases. Keploy, on the other hand, provides a framework for writing and executing E2E tests. When combined, these tools streamline the testing process, reduce the chances of human error, and maintain test case consistency.
Continuous Testing: In a CI/CD pipeline, API test generators can be configured to automatically generate API test cases whenever the API specification changes. Keploy can be integrated into the pipeline to execute E2E tests after each deployment, ensuring continuous testing and early detection of issues.
Use Case Scenario
Let's consider a scenario where an e-commerce application is being developed. The API test generator can automatically create API test cases to validate the various endpoints responsible for product management, user authentication, and payment processing. Keploy can then simulate user interactions with the application, such as product selection, adding items to the cart, and completing a purchase. This combined approach ensures that both individual API endpoints and the entire application workflow are thoroughly tested.
Conclusion
API test generators and E2E testing tools like Keploy complement each other and play vital roles in ensuring the functionality and reliability of software applications. By using API test generators to automate API testing and Keploy for E2E testing, developers can create a robust testing strategy that covers both individual API endpoints and the overall application workflow. This approach not only enhances the quality of the software but also streamlines the testing process, making it a valuable asset in today's software development landscape.
0 notes
Text
Exploring the World of APIs: A Deep Dive into Types and Architectures

What is an API?
Application programming interfaces, or APIs as they are more generally known, allow organizations to link systems, apps, devices, and datasets and to unlock data. It's important to understand which kind of APIs will be most effective for a project based on its intended use case, the people who will use and access these APIs, and the systems and datasets that must be linked. Determining the best types of api architecture to construct and designing the architecture accordingly are essential for efficient API performance and API maintenance.
What is an API in general understanding?
API acts as a link between the frontend and the backend. For example, if you went to the hotel and called the waiter to take your order, the waiter would go to the kitchen and tell the chef that this table number wants to eat these dishes. In technical terms, the frontend is your hotel, the waiter is an API, and the kitchen is the backend. What the waiter did was take the order, which means receiving the request from the client (user) and sending it to the kitchen (backend). thats the task of an API.
Different types of API’s
The API defines endpoints and suitable query and response forms. Web APIs are the APIs used for communication between browsers. Services such as site notifications and Web storage are available. Different online APIs, including free, corporate, and partner APIs, offer varying levels of protection and privacy. A composite API, which is a collection of data or service APIs, can be integrated with other web APIs.
1.Internal APIs:
It is also known as private, internal APIs that are hidden from others and used within a company. This method enables firms to simplify information exchange across departments and locations. Internal APIs, while internally accessible, nonetheless provide security mechanisms to validate the employee's identification before providing system access.
2.External APIs:
This API is also known as public or external, with open APIs providing relaxed security and allowing programmers and other users to freely access data. Some systems are completely transparent, while others may require a basic registry or API key. Because of this functionality, public APIs are an excellent alternative for businesses looking to expedite interactions with third-party users such as suppliers or customers. It also allows software developers to quickly and easily implement components.
3.Partner APIs:
Partner APIs, like the open approach, seek to facilitate collaboration between a company and its external users. More encryption is used. however, to enable data access to certain business partners. While partner APIs are commonly available to other public APIs, third-party gateways restrict access to registered services.
4.Composite APIs:
The composite API design can withstand several integration systems and all data. Because of this additional capabilities, Composite APIs are ideal for completing a single action with many services. It also gives developers access to numerous endpoints, such as web and other API applications, using a single function call. The strong composite API infrastructure improves data services and provides a system-integrated solution.
Types of APIs by purpose
It’s rare that an organization decides it needs an API out of the blue — most often, organizations start with an idea, application, innovation, or use case that requires connectivity to other systems or datasets.
System APIs: System APIs unlock data from core systems of record within an organization. Examples of critical systems that APIs could unlock data from include ERP, customer and billing systems, and proprietary databases.
Process APIs: Process APIs interact with and shape data within a single system or across systems — breaking down data silos. Process APIs provide a means of combining data and orchestrating multiple System APIs for a specific business purpose. Examples of this include creating a 360-degree view of the customer, order fulfillment, and shipment status.
Experience APIs: Experience APIs provide a business context for the data and processes that were unlocked and established with System and Process APIs. Experience APIs expose the data to be consumed by its intended audience — such as mobile applications, internal portals for customer data, etc.
Types of API architectural styles
Another area of choice for an API is which architectural style or styles will be employed. If certain functional capabilities are required, it is critical to select an architectural style or pattern that best supports the intended use of the API. This is often an API design decision made by more technically savvy teams.
There are various styles of architecture for APIs, as well as varying data formats within these styles, below we’ve listed some of the most common:
REST: REST (Representational State Transfer) is an architectural style that separates the concerns of the API consumer from the API provider by relying on commands that are built-into the underlying networking protocol. Clients use the included links and forms to perform actions (e.g. read, update, share, approve. etc.). HTML is the best known example of this style and there are several other formats just for APIs (HAL, CollectionJSON, Siren, etc.). There are many benefits of REST APIs — including flexibility, and ability to accommodate popular data formats like JSON and XML among others.
RPC: Remote Procedure Calls — or RPCs — typically require developers to execute specific blocks of code on another system. RPC-style remote invocation of procedures other systems usually requires developers to call those procedures by name. RPC is protocol-agnostic, which means it has the potential to be supported on many protocols, but also loses the benefits of using native protocol capabilities (e.g. caching). The proliferation of non-standard procedure names from one RPC API to the next results in tighter coupling between API consumers and providers which in turn overburdens developers involved in all aspects of an RPC-driven API ecosystem. RPC architectural patterns can be observed in popular API technologies such as SOAP, GraphQL, and gRPC.
Event-driven/Streaming: Sometimes referred to as evented, real-time, streaming, asynchronous, or push architectures, event-driven APIs don’t wait for an API consumer to call them before delivering a response. Instead, a response is triggered by the occurrence of an event. These services expose events to which clients can subscribe to receive updates when values on the service change. There are a handful of variations for this style including (among others) reactive, publish-and-subscribe, event notification, and CQRS.
0 notes
Text
Building a Robust REST API with Java, Spring Boot, and MongoDB: Integrating Keploy for Efficient API Testing

Introduction
In today's fast-paced digital world, building efficient and scalable web services is crucial for delivering seamless user experiences. One of the most popular combinations for creating a rest api with Java Spring Boot and MongoDB. In this article, we will explore how to develop a RESTful API with these technologies, enhancing the testing with "Keploy."
What is Keploy?
Keploy is a developer-centric backend testing tool. It makes backend tests with built-in-mocks, faster than unit tests, from user traffic, making it easy to use, powerful, and extensible.
Setting Up the Environment
Before we dive into the code, let's make sure we have our environment properly set up. You will need to install rest api Java, Spring Boot, and MongoDB, along with Keploy.
- Java: Ensure you have the Java Development Kit (JDK) installed on your system. You can download it from the official Oracle or OpenJDK website.
- Spring Boot: Spring Boot simplifies application development by providing pre-built templates and libraries. You can set up a Spring Boot project using Spring Initializr or Maven/Gradle.
- MongoDB: You can install MongoDB locally or use a cloud-hosted service. Remember to configure MongoDB properly with your Spring Boot application.
- Keploy: Install Keploy locally on your system via the one-touch installation mentioned in Keploy docs.
Creating a Spring Boot Application
Let’s begin by creating a basic Spring Boot application with keploy in mind.
Create a Spring Boot project using Spring Initializr or your preferred method. Be sure to include the necessary dependencies like Spring Web, MongoDB, and Lombok for enhanced code readability.
Define your MongoDB configuration in the application.properties or application.yml file.
spring.data.mongodb.uri=mongodb://localhost:27017/your-database-name
Implement a RESTful API by creating controllers and defining your endpoints. Here’s an example of a simple controller class:
@RestController
@RequestMapping("/api")
public class YourController {
@Autowired
private YourRepository repository;
@GetMapping("/your-resource")
public ResponseEntity<List<YourResource>> getAllResources()
{
List<YourResource> resources = repository.findAll();
return ResponseEntity.ok(resources);
}
// Add more endpoints for CRUD operations
}
Implement the data model and the repository interface for MongoDB interaction. You can use annotations such as @Document and @Field to map your Java objects to MongoDB documents.
Build and package your Spring Boot application into a JAR file using Maven or Gradle.
Testing with Keploy
Now, it’s time to leverage keploy to test your application. Here are the basic steps:
To start recording the API calls, run keploy in record mode along with the application using the following command:
keploy record -c "CMD_TO_RUN_APP"
Once all the API calls are recorded, press CTRL + C to stop the application from running in record mode.
Once the application stops, a folder named keploy is generated with all the recorded API calls as test cases and data mocks in a .yml file.
Now, to test your application with the recorded test cases and data mocks, run keploy in test mode along with the application using the command:
keploy test -c "CMD_TO_RUN_APP" -- delay 10
After running all the test cases, keploy will show a detailed report and also store the report in the folder keploy with all the passing and failing test cases with a final result of whether the application passed the test or not.
Conclusion
This article explored how to build a robust REST API with Java, Spring Boot, and MongoDB while integrating Keploy as a vital API testing tool. This combination of technologies empowers developers to create efficient and scalable web services, ensuring a seamless user experience. By incorporating Keploy into the development process, you can enhance the reliability of your application. With the right tools and techniques, you can simplify both the development and testing processes, making your application more resilient and adaptable to changing needs. Happy coding!
0 notes
Text
Harnessing the Power of Open Source API Testing
Introduction
In the ever-evolving landscape of software development, ensuring the reliability and functionality of APIs (Application Programming Interfaces) is crucial. APIs serve as the bridge between different software components, enabling them to communicate and interact seamlessly. To ensure that these APIs perform as expected, API testing is essential. Open source API testing tools have gained popularity as cost-effective and flexible solutions for developers and testers alike. In this article, we'll explore the significance of open source API testing, its benefits, and some of the most popular tools available today.
The Importance of API Testing
APIs are the backbone of modern software applications. They facilitate data exchange, allow different systems to work together, and enable third-party integrations. Ensuring the quality and reliability of APIs is paramount to avoid system failures, security breaches, and poor user experiences. Here are some key reasons why API testing is crucial:
Functionality Testing: API testing verifies that the API performs its intended functions correctly. It ensures that the data inputs and outputs are accurate and adhere to the API's specifications.
Security: Security vulnerabilities in APIs can have severe consequences. API testing helps identify and mitigate potential security risks, such as unauthorized access or data leaks.
Performance: Poorly performing APIs can slow down applications or even lead to outages. API testing assesses an API's performance under various conditions to ensure it can handle expected levels of traffic.
Compatibility: APIs are used across different platforms and devices. Testing ensures that the API works consistently across various environments and devices.
Documentation: Testing helps validate and improve API documentation, making it easier for developers to understand and use the API.
Open Source API Testing: Advantages
Open source API testing tools offer numerous advantages that make them appealing for developers and organizations:
Cost-Effective: Open source tools are typically free to use, making them a budget-friendly choice for both small startups and large enterprises.
Community Support: These tools often have active and engaged communities of developers who contribute to their improvement and provide support through forums and documentation.
Flexibility: Open source tools can be customized to suit specific testing requirements, allowing testers to adapt them to their unique needs.
Transparency: Users have access to the source code, which enhances transparency and trust in the tool's functionality and security.
Wide Adoption: Many open source API testing tools have gained wide adoption in the industry, making them well-tested and reliable choices.
Popular Open Source API Testing Tools
Keploy: Keploy is an AI-powered testing tool that specializes in creating test cases and generating stubs/mocks for end-to-end testing. It can achieve an impressive 90% test coverage in just a matter of minutes using open-source testing resources. Keploy offers several notable features, including a straightforward Integration Framework for incorporating new libraries, the ability to convert API calls into test cases and data mocks, and the capability to handle a wide range of detailed test cases. Additionally, it supports four programming languages: Java, Node.js, Python, and Go.
Postman: Postman is one of the most well-known API testing tools. It offers a user-friendly interface for creating and running API tests, as well as features for automating tests and generating documentation.
Swagger (OpenAPI): Swagger, now known as OpenAPI, provides a framework for designing, building, and documenting APIs. It includes tools for testing APIs based on their specifications.
REST Assured: REST Assured is a Java library for testing RESTful APIs. It simplifies API testing by providing a domain-specific language for writing tests.
SoapUI: While SoapUI is primarily known for testing SOAP-based web services, it also supports RESTful APIs. It offers both open source and commercial versions.
Karate: Karate is a unique open source API testing tool that combines API testing with behavior-driven development (BDD). It allows testers to write API tests in a natural language style.
Conclusion
Open source API testing tools have become essential assets for software development teams aiming to build reliable and robust APIs. Their cost-effectiveness, flexibility, and strong community support make them an attractive choice for organizations of all sizes. As APIs continue to play a pivotal role in modern software development, investing in open source API testing tools can help ensure the success of your projects while saving both time and money. Whether you are testing RESTful or SOAP-based APIs, there is likely an open source tool that suits your needs, enabling you to create and maintain APIs that perform flawlessly in today's interconnected digital world.
0 notes