
Don't wanna be here? Send us removal request.
Statistics
We looked inside some of the posts by kalungepallavi and here's what we found interesting.
Average Info
Notes Per Post
0
Likes Per Post
0
Reblog Per Post
0
Reply Per Post
0
Time Between Posts
3 days ago
Number of Posts By Type
Text
17
Last Seen Tumblr Blogs


Fun Fact
Tumblr has 4 main sources of revenue.
Text
Exploring the Ultra Dynamic Sky and Weather Blueprint in UE5: Artistic Flexibility vs. Convenience
Introduction
Unreal Engine 5 offers an array of tools to enhance the realism and dynamism of digital environments. Among these tools, the Ultra Dynamic Sky and Weather Blueprint stands out for its ability to simplify the creation of dynamic skies and weather effects. But does this convenience come at the cost of artistic flexibility? Let's dive into how this Blueprint works and consider whether it limits creative expression in virtual environments.
youtube
What is the Ultra Dynamic Sky and Weather Blueprint?
The Ultra Dynamic Sky and Weather Blueprint is a UE5 plugin designed to provide a highly customizable sky and weather system. It allows users to easily integrate various atmospheric effects into their scenes, including:
Dynamic Skies: Create realistic sun, moon, and cloud movements.
Weather Effects: Simulate rain, snow, fog, and other environmental conditions.
Time of Day Transitions: Automatically adjust lighting and ambiance based on the time of day.
This Blueprint is particularly appealing because it saves time and effort in setting up these complex systems manually. Instead of configuring each element from scratch, users can leverage pre-built functionality to quickly achieve impressive results.
youtube
Artistic Flexibility vs. Convenience
While the Ultra Dynamic Sky and Weather Blueprint offers significant convenience, some artists worry that using pre-packaged solutions might limit their creative freedom. Here's a closer look at the pros and cons:
Pros:
Efficiency: The Blueprint accelerates the development process by providing ready-made solutions for dynamic weather and sky effects. This can be especially useful for developers working under tight deadlines.
Consistency: It ensures that the atmospheric effects are consistent and integrated seamlessly, reducing the risk of errors and inconsistencies that can occur with manual setups.
Ease of Use: For artists who may not specialize in environmental effects, the Blueprint offers a user-friendly interface that simplifies complex tasks.
Cons:
Limited Customization: While the Blueprint is highly configurable, it may not offer the level of granular control that some artists desire. Customizing effects beyond the Blueprint's capabilities might require additional coding or manual adjustments.
Over-reliance on Defaults: Relying heavily on pre-set features can sometimes lead to generic results, making it harder to achieve a unique artistic vision. Artists might find themselves constrained by the Blueprint's built-in options.
Personal Reflection
During my exploration of the Ultra Dynamic Sky and Weather Blueprint, I noticed that it was priced between £25 and £50, which might seem steep for some. However, the investment can be justified by the time saved and the enhanced functionality it provides. While the Blueprint does offer significant benefits in terms of efficiency and ease of use, it's important to weigh these advantages against potential limitations in artistic control.
In my own projects, I've found that while tools like the Ultra Dynamic Sky Blueprint are incredibly useful, I still need to balance their use with manual adjustments to maintain a unique artistic vision. This approach allows me to leverage the convenience of pre-built systems while ensuring that my work retains a personal and distinctive touch.
Conclusion
The Ultra Dynamic Sky and Weather Blueprint in UE5 is a powerful tool that can greatly enhance the efficiency of creating dynamic environments. While it does provide a streamlined and user-friendly solution for atmospheric effects, it's important for artists to remain mindful of its limitations. By combining the Blueprint's capabilities with custom tweaks and adjustments, you can achieve a balance that maximizes both convenience and artistic expression.
0 notes


Text
Cyberpunk Lighting in Unreal Engine 5: A Case Study
This blog examines the work of Jeppe Mygh, a freelance Environment Concept Artist, who created the "End of the Line" project using Unreal Engine 5 (UE5). Mygh's project demonstrates advanced techniques in lighting, composition, and environment design within a cyberpunk-inspired setting.
Lighting Techniques
Mygh's approach to lighting in UE5 showcases several key techniques:
1. Use of Ultra Dynamic Sky for atmospheric lighting
2. Strategic placement of neon signs for contrast and focal lighting
3. Implementation of William Faucher's EasyFog for depth and atmosphere control
4. Application of soft spotlights to enhance light cast by key elements
These techniques collectively contribute to the creation of a moody, cyberpunk-inspired environment (Mygh, 2024).
Composition and Storytelling
The artist's compositional approach emphasizes:
- Centralized focal point to evoke loneliness
- Use of negative space in the background city
- Strategic placement of background elements to guide viewer attention
youtube
Mygh's attention to storytelling details, such as the inclusion of a waste disposal site and graffiti, enhances the narrative depth of the scene (Mygh, 2024).
Technical Workflow
The workflow demonstrated in this project includes:
1. Initial sketching and blockout in Blender
2. Scene assembly and lighting in Unreal Engine 5
3. Utilization of pre-made assets for efficiency
4. Implementation of UE5's Procedural Content Generation tools
5. Post-processing in UE5 and final color adjustments in Photoshop
Reflections and Future Applications
Mygh's project offers valuable insights for 3D environment artists working in UE5. His approach to lighting and composition provides a framework for creating atmospheric and narratively rich environments.
In my own artwork, I plan to apply several techniques learned from this article:
1. Utilizing UE5's lighting tools, particularly Ultra Dynamic Sky and EasyFog, for more nuanced atmospheric effects
2. Focusing on strategic placement of light sources to guide viewer attention and enhance mood
3. Incorporating more storytelling elements through environmental details and composition
For future improvements, I aim to:
- Explore more advanced procedural generation techniques in UE5
- Experiment with different color palettes within the cyberpunk aesthetic
- Enhance my post-processing skills in UE5 to achieve more refined final images
This project by Jeppe Mygh serves as an excellent case study in cyberpunk-inspired environment creation using UE5. It demonstrates the integration of various lighting techniques, compositional strategies, and storytelling elements to create a cohesive, visually striking digital space.
References:
Mygh, J. (2024) 'A Guide on Setting Up Cyberpunk Lighting in UE5', 80 Level. Available at: https://80.lv/articles/a-guide-on-setting-up-cyberpunk-lighting-in-ue5/
0 notes
Text
Weekly Blog: Recreating Arcane’s Lighting in Unreal Engine 5
This week, I explored a fascinating project by Iliya Klimov, a Lead Promo 2D Artist at Azur Games, who has been working on replicating the unique lighting style of Arcane: League of Legends in Unreal Engine. Lighting plays a crucial role in establishing the contrasting atmospheres of the show’s dual settings: the undercity of Zaun and the opulent world above it.
Capturing Zaun’s Atmosphere
Iliya focused on recreating the dark, moody environment of Zaun, known for its gloomy greenish lights mixed with warmer tones. This combination is key to conveying the sense of loneliness, danger, and poverty that permeates the undercity. Using Unreal Engine, Iliya managed to replicate this atmospheric contrast effectively, bringing the world of Arcane into a new medium.
The Creative Process
While detailed insights into Iliya’s process are still forthcoming, it’s clear that he utilized assets from Dekogon to build the scene. His work demonstrates the power of lighting in not only setting the mood but also in storytelling within a virtual environment. The careful balance of light and shadow in his project echoes the emotional depth found in the original Arcane series.
Looking Ahead
This project serves as an inspiring example of how digital artists can use Unreal Engine to bring complex, emotionally charged environments to life. As I continue to develop my skills, I’m looking forward to experimenting with similar lighting techniques to enhance the mood and storytelling in my own projects.
Stay tuned for more updates and insights as I continue to explore the world of digital art and game development!
References:
Sergeev, A. (2021, December 6). Recreating lighting from Arcane: League of Legends in Unreal. https://80.lv/articles/recreating-lighting-from-arcane-league-of-legends-in-unreal/
0 notes
Text
SCENE SETUP IN UNREAL 5 (PART 2)
Adding Life to the Alley: Shop Names and Lighting in Unreal
This week, I took a significant step forward in bringing our cyberpunk alley to life by adding custom shop names and diving deeper into Unreal Engine's lighting system. Here's a quick rundown of the process and some exciting results!

1.

2.
Shop Names: From Maya to Unreal
After creating 3D text for various shop names in Maya, I integrated these elements into our existing alley scene. The process involved:
Carefully positioning each shop name within the Maya scene
Ensuring proper scaling and alignment with the modular building facades
Exporting the updated scene as an FBX file
Once imported into Unreal, I was thrilled to see how these new additions immediately added character and depth to our environment. The shop names not only provide visual interest but also contribute to the overall storytelling of our cyberpunk world.
Screenshots: A Glimpse into Progress


I've attached a few screenshots to showcase the current state of our alley. You can see how the shop names integrate with the existing architecture, adding that extra layer of realism and immersion.
Lighting: Setting the Mood
With the shop names in place, I turned my attention to lighting. Unreal Engine's robust lighting system offers a wealth of options, and I've been experimenting with:
Neon sign effects for the shop names
Street lamps and hidden light sources to create depth
Atmospheric fog to enhance the cyberpunk ambiance

The lighting process has been both challenging and rewarding. Each adjustment to light placement, color, or intensity dramatically affects the mood of the scene. I'm particularly pleased with how the neon effects interact with the fog, creating that classic cyberpunk glow.
Next Steps
While I'm excited about the progress, there's still work to be done. My next focus will be on:
Fine-tuning the balance between ambient and direct lighting
Adding subtle animated elements to bring more life to the scene
Exploring post-processing effects to enhance the overall visual impact
Stay tuned for more updates as our cyberpunk alley continues to evolve!
0 notes
Text
Exploring Advanced Texturing and Lighting Techniques: A Stray-Inspired Environment
This blog examines the work of Anja Wagner, a 3D Environment Artist, who created a detailed environment inspired by the game Stray. Wagner's project, "Transcendence," demonstrates sophisticated techniques in texturing and lighting using Substance 3D software and Unreal Engine 5 (UE5).
Conceptualization and Planning
Wagner's approach emphasizes the importance of thorough pre-production. She utilized PureRef for creating comprehensive reference sheets, analyzing the scene in terms of structure, mood, color palette, and asset requirements. This meticulous planning stage is crucial for maintaining consistency and direction throughout the project (Wagner, 2024).
Texturing Workflow
The artist employed a dual approach to texturing:
1. Tiling Textures: Created in Substance 3D Designer, focusing on layered detail creation from macro to micro levels.
2. Unique Asset Texturing: Utilized Substance 3D Painter for individual props, emphasizing realistic wear and aging.
Wagner's process in Substance 3D Designer involved breaking down surfaces into layers of detail, from large shapes to micro-imperfections. This layered approach allowed for the creation of complex, realistic materials (Wagner, 2024).
Material Setup in Unreal Engine 5
Wagner's UE5 workflow showcases advanced material creation techniques:
- Use of master materials and material instances for performance optimization
- Implementation of blend materials for complex surface variations
- Utilization of Vertex Paint for detailed material blending
These techniques allowed for efficient creation of varied and detailed surfaces while maintaining performance (Wagner, 2024).
Lighting and Atmosphere
The lighting setup in UE5 was crucial in achieving the desired mood. Wagner employed:
- Point lights for focal emphasis
- Contrasting warm and cool tones to guide viewer attention
- Volumetric fog for atmosphere and light scattering
The artist's approach to lighting demonstrates the importance of balancing technical skill with artistic vision to create a cohesive atmosphere (Wagner, 2024).
Conclusion
Anja Wagner's "Transcendence" project serves as an excellent case study in advanced environment creation. It highlights the synergy between Substance 3D tools and Unreal Engine 5 in creating highly detailed, atmospheric scenes. The project underscores the importance of thorough planning, layered texturing approaches, and sophisticated lighting techniques in 3D environment art.
youtube
This work not only showcases technical proficiency but also emphasizes the artistic decision-making process in creating immersive digital environments. It provides valuable insights for both aspiring and experienced 3D artists in the field of environment creation.
References:
Wagner, A. (2024) 'Using Substance 3D+UE5 Combo to Set Up Stray-Like Textures & Lighting', 80 Level. Available at: https://80.lv/articles/using-the-substance-3d-ue5-combo-to-set-up-stray-like-textures-lighting/
Anja Wagner. (2024, June 25). Transcendence | Stray fan art [Video]. YouTube. https://www.youtube.com/watch?v=1SoavV6fdiY
0 notes
Text
Creating 3D Text for Shop Names in Maya
This past week, I dove into the world of 3D text creation in Maya, and it has been an incredibly rewarding experience! Inspired by a YouTube tutorial, I learned the essential techniques to craft eye-catching shop names that can enhance any 3D scene. Here’s a quick overview of what I discovered:
youtube
Step-by-Step Process
Creating the Text: I started by using the Text Tool in Maya. This allowed me to easily input the shop name and choose a suitable font that matched the desired aesthetic.
Extruding the Text: Once I had my text, I converted it into a polygonal object. I then used the Extrude feature to give the text depth, transforming flat letters into bold, three-dimensional shapes.


1.

2.
Key Takeaways
Creativity: 3D text allows for endless creative possibilities. Experimenting with fonts, materials, and lighting can lead to unique designs.
Technical Skills: I gained valuable skills in using Maya’s tools and features, which will be beneficial for future projects.
Attention to Detail: The process taught me the importance of refining details, such as adjusting the bevels and ensuring smooth edges for a polished look.
Overall, this week has been a fantastic journey into 3D text creation. I’m excited to apply these skills to future projects and continue exploring the vast capabilities of Maya!
References:
Digital Dreambox. (2022, December 5). Create 3D Text | Maya Type Tool [Video]. YouTube. https://www.youtube.com/watch?v=keSf9_KFd3s
0 notes
Text
MODULAR ALLEY SETUP IN MAYA-UE5
Creating a modular environment in Maya and transferring it to Unreal Engine is an exciting process that allows for efficient workflow and easy iteration. Here's a quick rundown of my recent experience setting up an alley scene using this method:
Maya Modeling and Setup
I began by creating a series of modular assets in Maya, focusing on elements that could be reused throughout the scene. These included:
Doorways and windows
kinds of pillars
Roofs
Shops


Using these modular pieces, I assembled the basic structure of the alley in Maya. This allowed me to quickly visualize the overall composition and make adjustments as needed.


Exporting to Unreal
Once satisfied with the Maya layout, I exported the assets as individual FBX files. It's crucial to maintain a consistent scale and orientation when exporting to ensure everything aligns correctly in Unreal.
Unreal Engine Import and Organization
In Unreal, I created a well-organized folder structure to keep assets manageable:
Meshes
Materials
Textures
Blueprints
This organization is vital for larger projects and helps prevent confusion as the scene grows.
Material and Texture Check

After importing, I applied the materials and textures to the assets in Unreal. This step is critical for ensuring that everything looks as intended. I took the time to verify that:
Textures were displaying correctly
Material parameters were set appropriately
Normal maps and other texture maps were functioning as expected
Lighting and Atmosphere
With the basic scene set up, I began experimenting with lighting to create the desired atmosphere. Unreal's dynamic lighting capabilities allowed me to quickly iterate and find the right mood for the alley.

Comparison and Iteration
Throughout the process, I frequently compared the Unreal scene to my Maya layout. This helped me identify any discrepancies and make necessary adjustments. The modular nature of the assets made it easy to swap pieces in and out as needed.
By following this workflow, I was able to efficiently create a detailed alley scene that maintained visual consistency between Maya and Unreal. The modular approach not only sped up the initial creation process but also allows for easy future modifications and expansions of the environment.
0 notes
Text
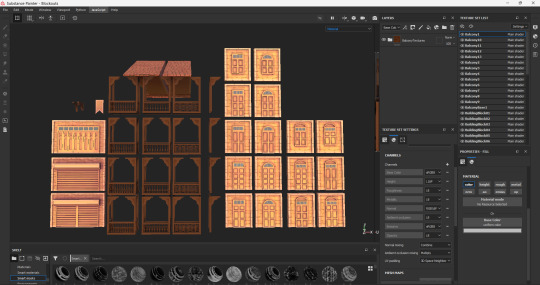
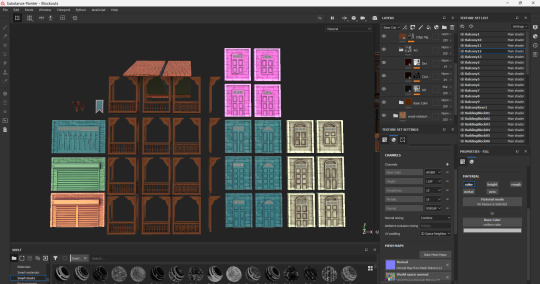
Texturing Modular Assets in Substance Painter
Welcome to this week's blog on creating semi-realistic stylized textures in Substance Painter for beginners! Today, we'll explore a simple 4-layer approach to achieve a handpainted, gradient-like look that's perfect for stylized environments like your Project Circuit Claw.
The 4-Layer Approach
Our texture will consist of four key layers:
Base Color
Ambient Occlusion
Edge Highlight
Gradient
Base Color
Start with a solid base color that sets the tone for your asset. Choose a color that fits your overall environment theme. For Circuit Claw, you might opt for cool blues or warm oranges depending on the area.
To add depth, try using a Fill layer with a subtle noise pattern. This breaks up the uniformity and adds visual interest.
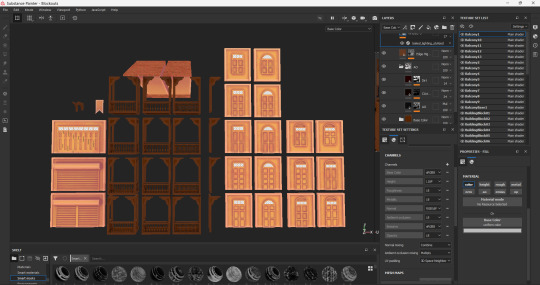
Ambient Occlusion
Add an Ambient Occlusion layer to enhance the depth and form of your model. Use a dark color with low opacity and set the blend mode to Multiply. This will darken the crevices and undersides of your asset, creating a sense of volume.
Edge Highlight
Create an Edge Highlight layer to make your asset pop. Use a lighter version of your base color or a complementary hue. Set the blend mode to Add or Overlay and mask it to affect only the edges. This will give your asset a subtle glow and enhance its silhouette.
Gradient
Finally, add a Gradient layer to tie everything together. This can be vertical, horizontal, or radial, depending on your asset's shape. Use colors that complement your base, perhaps transitioning from cool to warm tones. This layer adds depth and interest to large flat surfaces.

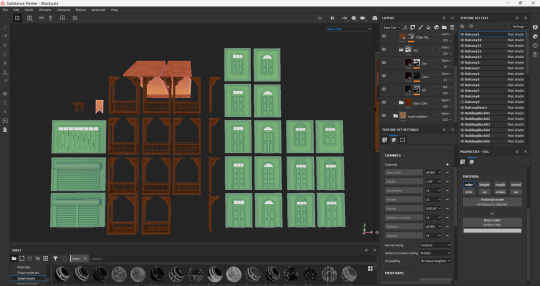

Tips for Variation
To avoid monotony in your modular assets:
Color Shifts: Subtly alter the hue of your base color for different modules.
Gradient Direction: Vary the angle or type of gradient across assets.
Wear and Tear: Add slight variations in edge wear or scratches to differentiate pieces.
Remember, the key to semi-realistic stylized textures is finding the balance between simplification and detail. Don't be afraid to exaggerate certain elements for visual appeal.
Happy texturing to me:) , and see you next week for more updates on the Project. Toodles!
References:
Gintsiak, E. (2020, December 14). Recreating Marceline in a Semi-Realistic style. https://80.lv/articles/recreating-marceline-in-a-semi-realistic-style/
Focus_Method. (2022, January 10). What is the secret behind these SP hyper realistic texturing? [Online forum post]. Polycount. https://polycount.com/discussion/229046/what-is-the-secret-behind-these-sp-hyper-realistic-texturing
Adobe Substance 3D. (2024, June 17). Tips & Tricks in Substance 3D Painter to Make Semi-REalistic Textures | Adobe Substance 3D [Video]. YouTube. https://www.youtube.com/watch?v=ng-Wb7RaYHU
Escape Studios. (2021, August 11). Substance Painter Tutorial: Photorealistic prop Texturing [Video]. YouTube. https://www.youtube.com/watch?v=dKjC75r1FWU
FastTrack Tutorials. (2024, July 2). Realistic texturing tips in substance painter [Video]. YouTube. https://www.youtube.com/watch?v=_qirDRMN1WI
0 notes
Text
The Art of Arcane Texturing and Lighting Techniques
Hidden, the widely praised animated series created by Fortiche, has set new standards in visual narrating through its imaginative utilization of texturing and lighting. This blog investigates the complex cycles behind the show's unmistakable stylish, focusing on the texturing techniques employed by Fortiche's artists and the recreation of Arcane's lighting in Unreal Engine.
Texturing in Arcane
Fortiche's texturing artists have created the show's distinctive visual style with exceptional skill. The Texturing Supervisor, Candice Theuillon, presented her work on Vi, revealing the intricate details that give the character life. Senior Surface Craftsman Gilles Roman's commitment to the Firelight Leader character exemplifies the depth and complexity achieved in the texturing process.
The texturing work reaches out past main characters, as evidenced by Céline Giglio's character paintings and Simon Goeneutte-Lefevre's detailed texturing of Jinx's Fishbones weapon. These examples highlight the careful meticulousness attention to detail that permeates every aspect of Arcane's visual design.
Lighting Diversion in Unbelievable Motor
Iliya Klimov, Lead Promotion 2D Artist at Azur Games, has undertaken a fascinating study in reproducing Arcane's distinctive lighting within Unreal Engine. Arcane's visual narrative relies heavily on Klimov's work capturing the atmospheric contrast between Zaun's Undercity's gloomy, greenish lights and warmer tones.
Utilizing Dekogon assets, Klimov created a scene that demonstrates Unreal Engine's capability to replicate complex lighting scenarios. The project showcases how careful manipulation of lighting can evoke the sense of loneliness, danger, and poverty that characterizes Zaun in the series.
In conclusion, Arcane's lighting and texturing techniques represent a significant development in animated storytelling. Fortiche's artists have pushed the limits of what is conceivable in character and environment design, while concentrates on like Klimov's exhibit the potential for reproducing such complex visual styles continuously motors.
This exploration of Arcane's visual creativity features the show's specialized accomplishments as well as opens up additional opportunities for future animated productions. As the field keeps on advancing, the techniques pioneered in Arcane will likely influence the next generation of animated storytelling.
References:
80.lv (2024) 'A Closer Look at Texturing in Arcane', 80 Level. Available at: https://80.lv/articles/a-closer-look-at-texturing-in-arcane/
80.lv (2024) 'Recreating Lighting From Arcane: League of Legends in Unreal', 80 Level. Available at: https://80.lv/articles/recreating-lighting-from-arcane-league-of-legends-in-unreal/
0 notes
Text
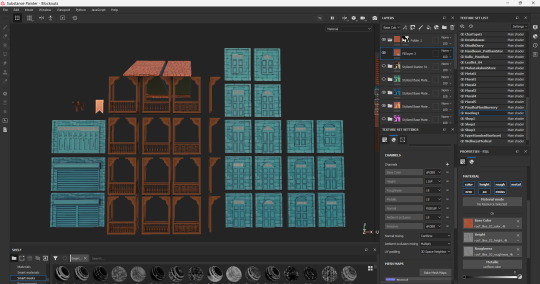
Weekly Blog: Texturing RoboCat Using Substance Painter
This week, I focused on the texturing process for the RoboCat model using Substance Painter. After completing the initial 3D blockout in Blender, I imported the model into Maya due to time constraints. Since I'm more proficient in Maya, I continued the detailed modeling and UV unwrapping there. Once the modeling was finalized, I moved on to bringing the RoboCat to life with detailed textures that capture both its mechanical and feline elements.


Importing the Model and Preparing for Texturing
The first step was importing the RoboCat model into Substance Painter. I ensured that the UVs were properly unwrapped in Maya to avoid any stretching or misalignment during texturing. Once imported, I baked the mesh maps, including normal, ambient occlusion, curvature, and others. Baking these maps is crucial as they provide the foundation for adding realistic details like wear, dirt, and shadows.

Base Material Application
I started by applying base materials to different parts of the RoboCat. For the metallic body, I chose a brushed metal material and adjusted the roughness and metallic sliders to get the right amount of shine. For the more organic parts, like the tail and ears, I used a matte material to contrast with the shiny metal, giving the RoboCat a balanced, yet dynamic look.
Adding Details
Substance Painter's smart masks and generators were incredibly helpful for adding wear and tear to the metal surfaces. I used the edge wear generator to create realistic scratches and scuffs on areas that would naturally experience more contact. For the fur-like textures on the tail and ears, I layered various materials and used the paintbrush tool to blend them seamlessly.

Adding details like scratches and fur texture in Substance Painter.
Final Touches
To enhance the character's personality, I planned to include small details like a glowing robotic eye and engraved patterns on the metallic surfaces. I haven't added the glow yet, but I'll revisit the file for further refinements if time permits and update the textures in Unreal. Once the texturing was complete, I exported the texture maps from Substance Painter, ready for application in the final render.


Looking Ahead
Next, I will be importing the textured RoboCat into Unreal Engine to set up the final scene with proper lighting and post-processing effects. I am excited to see how these textures interact with the environment and contribute to the overall aesthetic of the project.
Stay tuned for more updates as I continue to refine RoboCat and bring more characters to life! :)
0 notes
Text
Exploring 3D Weapon Art: Jay Travers' Journey and Tips for Aspiring Artists
Introduction:
Jay Travers, a 21-year-old aspiring 3D artist from England, shared his approach to creating 3D weapon art and his experiences learning through trial and error. Jay’s journey from student to self-taught artist provides inspiration for others venturing into the world of 3D modeling, texturing, and rendering. His insights into tools like Marmoset Toolbag and his focus on continuous learning highlight the dedication required to excel in this field.
Education and Early Inspiration:
Jay’s interest in 3D art began in college, where he studied 3D Modeling and Animation. Originally drawn to product and graphic design, he discovered a passion for digital art, particularly in the gaming industry. His education provided a solid foundation in tools like Autodesk Maya, but Jay emphasizes the importance of exploring multiple software options to stay adaptable in a rapidly evolving industry.
Inspiration and References:
Drawing inspiration from video games like *Red Dead Redemption 2 and Cyberpunk 2077*, Jay focuses on creating realistic, hard-surface weapon art. He also relies heavily on references, particularly real-life weapon inspection videos and detailed images from auction houses and museums. These references are crucial for achieving the high level of detail necessary for his projects.
Modeling Approach:
Jay began his 3D modeling journey with subdivision modeling, which involves careful manipulation of topology to create smooth, artifact-free surfaces. While this method helped him develop problem-solving skills, he now advises against it for larger projects due to its complexity. Instead, he recommends learning popular workflows that simplify the process and produce cleaner results.
Texturing Techniques:
Jay’s texturing style often involves creating weathered, worn-looking surfaces. He learned by studying other artists’ materials and experimenting with procedural generators and brushwork in software like Substance Painter. Jay prefers using standard brushes with modified settings and custom alphas to add unique details, but he cautions against overusing popular assets that can make your work look generic.
Lighting and Rendering with Marmoset Toolbag:
For rendering, Jay has adopted Marmoset Toolbag due to its real-time rendering capabilities and ease of use. He follows a classic 3-point lighting setup to highlight his models and recommends Marmoset’s resources for hard-surface modelers. Despite its cost, he believes Marmoset Toolbag is a worthwhile investment for anyone serious about 3D rendering.
Challenges and Advice:
Jay acknowledges the challenges of breaking into the 3D art industry, especially finding work. He stresses the importance of dedication, continuous learning, and practice. He advises aspiring artists to seek out specialized courses early on and to immerse themselves in the community by engaging with other artists, studying their work, and taking advantage of available resources like tutorials and online articles.
Conclusion:
Jay Traver's journey from student to 3D artist is a testament to the power of perseverance and the importance of self guided learning. His experiences offer valuable lessons for anyone looking to improve their skills in 3D modeling and rendering.....particularly in the realm of game development. Whether you're just starting or looking to refine your craft,. Jay's insights are a reminder that dedication and a willingness to learn are key to success in this creative field.
References:
Travers, J. (2021, February 8). Studying Weapon Art: reference, SubD modeling, texturing. https://80.lv/articles/studying-weapon-art-reference-subd-modeling-texturing/
0 notes
Text
Hand-Painted Texturing Techniques: Bringing Life to 3D Models
In the world of 3D art, texturing is where models truly come to life. This week, I delved into the art of hand-painted texturing, a technique that allows for a unique, stylized aesthetic that can add a lot of character to a project. Inspired by articles on 80.LV, I explored how hand-painted textures can bring depth and personality to the assets for my "Circuit Claw" project.
Why Hand-Painted Textures?
Unlike procedural or photo-based textures, hand-painted textures are crafted with a personal touch. They allow artists to emphasize certain details, exaggerate features, and create a more vibrant and artistic look. For "Circuit Claw," this approach is perfect as it complements the stylized, cyberpunk-inspired visuals.
The Process
1. Base Color Application: I started with a simple base color, laying down the foundation for the texture. This step is crucial as it sets the tone for the entire model.
2. Adding Details:Next, I focused on adding finer details—scratches, wear and tear, and highlights. This is where the model starts to gain personality. I paid particular attention to how light interacts with different surfaces, enhancing the realism even in a stylized context.
3. Shading and Highlights: Hand-painted textures rely heavily on manually painted shadows and highlights. By carefully considering light sources, I could create textures that feel three-dimensional, even without advanced lighting setups.
4. Refinement: Finally, I went back over the texture, refining the details and ensuring consistency across the model. This step is where the texture really comes together, balancing artistic expression with the technical needs of the game engine.
Challenges and Insights
Hand-painting textures is a time-consuming process that requires patience and precision. However, the results are incredibly rewarding. The key challenge was balancing detail with the overall style—too much detail could break the stylized look, while too little could make the texture feel flat.
Conclusion
Hand-painted texturing is an art form in itself, one that offers a lot of creative freedom. It allows you to inject personality into your models in a way that other texturing methods might not. For "Circuit Claw," this technique is helping to craft a world that's not only visually striking but also rich with artistic detail.
I’m looking forward to continuing this journey and refining my techniques as the project progresses. Stay tuned for more updates!
0 notes
Text
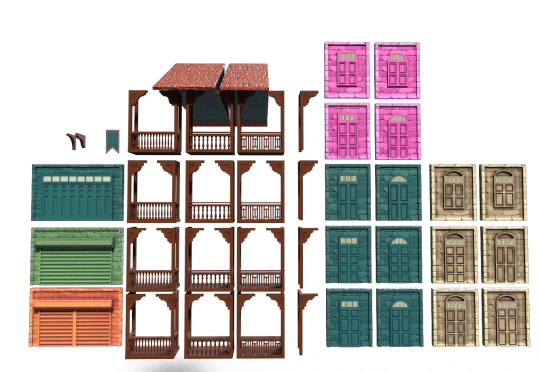
Circuit Claw Development: Building the Modular Alley Patch (Bacony, Pillars)
Modular design is a game-changer in game development, offering flexibility and efficiency. By breaking down environments into reusable components..developers can streamline workflows and ensure consistency across large projects.
Inspired by insights from 80.lv, YT videos, I’m applying modular design principles to my current project. This approach not only speeds up asset creation but also allows for easier updates and modifications.
Here’s a look at some modular components in action:


Unwrapping the mesh on the 2D plane(UV axis)


Used MASH tool in Maya to create linear kinda modelling


Different Balcony Designs:

1.

2.

3.
0 notes
Text
Circuit Claw Development: Building the Modular Alley Patch
This week, I dedicated my efforts to advancing the modular alley patch for "Circuit Claw," the core environment that will bring our futuristic Indian cityscape to life. The primary goal was to design and model versatile, reusable assets that could seamlessly blend traditional Indian architecture with a cyberpunk aesthetic, creating a cohesive and immersive urban environment.
This is my first time working on modular assets, so I watched some quick YouTube videos to get a better understanding. My goal is to create solid block elements for the environment that align with the designs and references.
youtube
youtube
Few Concepts/Designs for the ModularAssets which I collected from different sources like from Google, Pinterest,etc:


3D Modeling in Maya
With the designs set, I moved on to 3D modeling in Maya. The focus was on creating detailed, yet performance-efficient assets. I modeled various modular components like wall sections, shop shutters, and balcony structures, paying attention to how they would interact within Unreal Engine 5. The goal was to ensure these elements could be reused across the environment without sacrificing visual fidelity.
1.


Next Steps:
Having completed the almost the half of the modeling phase, I’ll soon shift my focus to texturing. My plan is to achieve a hand-painted style that captures the vibrant yet gritty atmosphere of the alley. Once the textures are complete, I'll integrate the assets into Unreal Engine 5, where I'll continue to test and refine the environment.
Stay tuned for next week's update. Hopefully, where I’ll dive into texturing and further asset integration! :)
References:
Matthew Marquit. (2017, July 24). 3D Modular Building Concepts [Video]. YouTube. https://www.youtube.com/watch?v=5bY3mmBunpo
Stefan. (2019, December 15). Beginner Introduction to Modular Modelling #1 References [Video]. YouTube. https://www.youtube.com/watch?v=H227qxzfCn4
0 notes
Text
Exploring Auto-Retopology Tools: A Quick Overview
youtube
Auto-retopology tools have revolutionized the workflow for 3D artists, but each comes with its unique strengths and limitations. Here’s a concise look at the auto-retopology features in Maya 2023, Blender, and ZBrush, based on recent notes and observations:
Maya 2023 (Purpose: Mainly used for hard surface modeling).
Steps for Auto-Retopology:
Prepare the mesh by cleaning it up: Mesh -> Clean-up (Run), Mesh -> Remesh (Apply).
Perform auto-retopology: Mesh -> Retopologize.
Edit settings:
Preserve Hard Edges: ✅ For hard surface objects (keeps sharp edges).
Target Face Count: Set according to project needs.
Drawbacks:
Symmetry issues: Auto-retopology might struggle with symmetric objects.
For organic models, like character skulls, preserving hard edges is usually not recommended.
Maya 2024 :
youtube
Blender
Status: Limited information noted, especially concerning quad-based results.
General Insight: More research needed to assess its performance and specific solutions for quad retopology.
ZBrush
Tools and Techniques:
Hard Surface: Use DynaMesh for initial remeshing, followed by ZRemesher for detailed retopology. This allows setting resolution and focusing on edge flow.
For Faces: Start with decimation (auto-cleanup).
Use DynaMesh for base mesh and then ZRemesher.
Handles features like eye loops and mouth loops reasonably well, though not perfect.
I watched couple of following videos for my better understanding of Retopology and to take quick notes:
youtube
For complex character. Good reasoning/technique. Can help when you'll get enough time.
youtube
Key Takeaways:
Hard Surface Objects: Auto-retopology tools are generally more effective here but still struggle with complex surfaces.
Organic Shapes: Manual retopology is often preferred due to the limitations of auto-retopo tools in maintaining detail and edge flow.
Note: For both hard surface and organic models, manual retopology remains a reliable approach for achieving optimal results, despite the advancements in automatic tools.
0 notes
Text
Blog 2: Identifying and Evaluating My Individual Learning Processes
In the upcoming weeks, I will reflect on and evaluate the individual learning processes associated with my "Circuit Claw" project. This evaluation will provide insight into the new skills and knowledge I will gain and how they will enhance my proficiency as an environment artist.
Skill Development in ZBrush: I will be focusing on developing my skills in ZBrush, particularly for creating detailed organic models. I plan to document my progress by comparing initial and final models, noting improvements and challenges in mastering ZBrush tools and techniques.
Stylized Hand-Painted Texturing: This project will also be an opportunity to refine my skills in stylized hand-painted texturing. I will evaluate my approach to creating textures that fit within the Arcane art style and assess how effectively these textures enhance the overall aesthetic of the environment.
Lighting and Composition: I will enhance my lighting skills by experimenting with various lighting setups in Unreal Engine 5. My learning process will involve testing different lighting scenarios and assessing their impact on mood and composition. I will document how my understanding of lighting evolves and improves throughout the project.
Technical Skills in Unreal Engine 5: I will deepen my knowledge of Unreal Engine 5, focusing on particle systems and environmental effects. My evaluation will include documenting how I tackle technical challenges and apply new techniques to achieve high-quality visual effects.
By reflecting on these learning processes in my blog, I will provide a detailed account of how these experiences contribute to my growth as a 3D artist, demonstrating the practical application of my skills and knowledge in a real-world project.
0 notes