Don't wanna be here? Send us removal request.
Text
Recursive Roman Numerals
I want to talk through how I built a JavaScript Roman Numeral converter using recursion. To be clear, this program should take in an arabic number and return the equivalent Roman Numeral. We want to account for numbers up to 3,999; after that Roman Numerals do a weird thing where they basically restart and indicate thousands using horizontal lines above the symbols.
For a quick refresher on Roman Numerals, see this:

As you can see, the main increments are 1 - I, 10 - X, 50 - L, 100 - C, 500 - D, and 1000 - M.
First off, if you’re not familiar with recursion, there are tons of people smarter than me on the internet who go in depth on the subject - But the gist is, a recursive function is a function that calls itself inside the function. Here’s a good example on recursion.
Har Har Har… Alright, anyways - let’s get into it.
I want to approach this from a TDD standpoint - I’m using the Jasmine test framework, but there are multiple options for JavaScript testing.
Bear with me, because it’ll seem like we’re moving slow and in the “wrong” direction at first but I think it’s important to see the thought process here.
First, we’ll write a test case for our simplest output, the Roman Numeral ‘I’.
it ("should return I for the number 1", function() { expect(toRoman(1)).toEqual("I"); });
Easy enough! Let’s satisfy that test:
function toRoman(number) { return 'I'; }
One down. Back to the tests - let’s write a second test for the Roman Numeral ‘II’.
it ("should return II for the number 2", function() { expect(toRoman(2)).toEqual("II"); });
So now we’re accounting for two separate outcomes - the best way to deal with that would be a conditional, right?
function toRoman(number) { if (number === 1) { return 'I'; } if (number === 2) { return 'II'; } }
Cool. Let’s try something new with 3: We can take this a couple ways - we could add another conditional, but there’s a pattern here, right? Continue adding one ‘I’ as the number increases by one.
function toRoman(number) { var romanNumeral = ''; for (i = 0; i < number; i++) { romanNumeral += 'I' } return romanNumeral; }
Nice, so we’re passing the cases the one, two, and three. But what happens when we get to the test for 4?
it ("should return IV for the number 4", function() { expect(toRoman(4)).toEqual("IV"); });
=> ‘IIII’
Oh no!
And here’s where things get tricky. Our pattern doesn’t hold true anymore for 4. We’ll see a break in patterns again at numbers 9, 40, 90, 400, and 900 because of the way that Roman Numerals are written. They don’t repeat the same character more than 3 times - instead, in these cases, they use a smaller numeral in front of a larger numeral to indicate subtracting the first from the second.
From this point, there are many ways to solve this - I’m sure if you look around there are tons of clever solutions. Of course, we could always have a 3,999 line conditional statement...
I decided to use recursion. Mostly because I wanted to practice recursion.
First, I set an array of objects that contained the arabic value and its roman numeral conversion. I added all the main Roman Numerals that play nicely with a pattern, and our edge cases that don’t.
var values = [ {value: 1000, roman: 'M'}, {value: 900, roman: 'CM'}, {value: 500, roman: 'D'}, {value: 400, roman: 'CD'}, {value: 100, roman: 'C'}, {value: 90, roman: 'XC'}, {value: 50, roman: 'L'}, {value: 40, roman: 'XL'}, {value: 10, roman: 'X'}, {value: 9, roman: 'IX'}, {value: 5, roman: 'V'}, {value: 4, roman: 'IV'}, {value: 1, roman: 'I'}, ];
I also added a variable to hold our Roman Numeral throughout our function, like we did earlier:
var romanNumeral = '';
Here’s what my recursive solution looks like:
function toRoman(number) { var values = [ {value: 1000, roman: 'M'}, {value: 900, roman: 'CM'}, {value: 500, roman: 'D'}, {value: 400, roman: 'CD'}, {value: 100, roman: 'C'}, {value: 90, roman: 'XC'}, {value: 50, roman: 'L'}, {value: 40, roman: 'XL'}, {value: 10, roman: 'X'}, {value: 9, roman: 'IX'}, {value: 5, roman: 'V'}, {value: 4, roman: 'IV'}, {value: 1, roman: 'I'}, ]; var romanNumeral = ''; if (number === 0) { return romanNumeral; } values.forEach(function(numeral) { while (number >= numeral.value) { romanNumeral += numeral.roman; number -= numeral.value toRoman(number - numeral.value); } }); return romanNumeral; }
When writing a recursive function, we need a way to break out of the recursion. I did this using a conditional checking if our number variable was equal to 0.
if (number === 0) { return romanNumeral; }
Then, we loop through each object in the ‘values’ array. We check each object’s ‘value’ to see if the number passed in is greater than or equal to it. If it is, take the roman numeral associated with it, push it onto our string, and subtract that value from our number. Finally, call our function again using the “new” value of number. This will run until the number is equal to zero, which is when we will break out of our loop and return the string ‘romanNumeral’.
We can see this is passing our old tests, so lets write some new ones:
it("should return I for the number 1", function() { expect(toRoman(1)).toEqual("I"); }); it("should return II for the number 2", function() { expect(toRoman(2)).toEqual("II"); }); it("should return III for the number 3", function() { expect(toRoman(3)).toEqual("III"); }); it("should return IV for the number 4", function() { expect(toRoman(4)).toEqual("IV"); }); it("should return V for the number 5", function() { expect(toRoman(5)).toEqual("V"); }); it("should return VI for the number 6", function() { expect(toRoman(6)).toEqual("VI"); }); it("should return VII for the number 7", function() { expect(toRoman(7)).toEqual("VII"); }); it("should return VIII for the number 8", function() { expect(toRoman(8)).toEqual("VIII"); }); it("should return IX for the number 9", function() { expect(toRoman(9)).toEqual("IX"); }); it("should return X for the number 10", function() { expect(toRoman(10)).toEqual("X"); }); it("should return XL for the number 40", function() { expect(toRoman(40)).toEqual("XL"); }); it("should return L for the number 50", function() { expect(toRoman(50)).toEqual("L"); }); it("should return XC for the number 90", function() { expect(toRoman(90)).toEqual("XC"); }); it("should return C for the number 100", function() { expect(toRoman(100)).toEqual("C"); }); it("should return D for the number 500", function() { expect(toRoman(500)).toEqual("D"); }); it("should return M for the number 1000", function() { expect(toRoman(1000)).toEqual("M"); }); it("should return M for the number 1000", function() { expect(toRoman(1000)).toEqual("M"); }); it("should return MMCDLVI for the number 2456", function() { expect(toRoman(2456)).toEqual("MMCDLVI"); }); it("should return MMMCMXCIX for the number 3999", function() { expect(toRoman(3999)).toEqual("MMMCMXCIX"); });
And we’re passing! We covered tests for numbers 1-10, and then all edge cases and major Roman Numeral increments up to 3999. We also threw a random case in there just for fun.
And that’s it! We just wrote a Roman Numeral converter using recursion. I hope that helps anyone who comes across this!
0 notes
Text
PropTypes in React
When I built my first React app (America Online), I was wide eyed and excited to jump into the code. I wanted to prove my React worthiness by building something as quickly as I could. So naturally, I overlooked something like PropTypes. I knew what they were, but I didn’t feel like I needed them. After all, I know what the component needs to render, so what’s the big deal?
Well, I was wrong. After re-visiting React I’m ready to admit the error of my ways. PropTypes are awesome, and I want to write a bit about how they’re used and why they’re important.
First things first — you must install PropTypes before you can use them. You can do so from npm as prop-types. If you’ve been using React for a while you’re probably thinking that they’re already included with React, but as of 15.5 they are a separate library.
So why are PropTypes important?
Preventing bugs in your program: PropTypes work as a way to validate that components are receiving props in the correct (intended) data type. React will throw a warning if you require an array and pass in an object, for example. This becomes increasingly important as the codebase grows, components are reused, and multiple developers are collaborating.
Readability: A well written component’s render method should be able to show you what it’s going to ultimately look like. If you’re new to the code, a look at the PropTypes should tell you what needs to be passed in to the component to ensure it renders correctly.
And how do we use them?
Here’s a basic example:
Let’s say we’re displaying a grocery list. We know we want to pass in our list as an array, and we want our component to render out each item as a separate list item.
var React = require(‘react’); var PropTypes = require(‘prop-types’) class GroceryList extends React.Component { render() { return ( <ul> {this.props.list.map(function (item) { return <li>{item}</li> })} </ul> ) } } GroceryList.propTypes = { list: PropTypes.array.isRequired }
Here, we specify that list MUST be an array when passed in as props. If we were to pass in a string, or object, or any other data type, React would yell at us. We also used .isRequired so that we make sure that the list prop is passed in to render the component.
We can even take it one step further and specify what data types we want the array to be made of. For instance:
var React = require(‘react’); var PropTypes = require(‘prop-types’) class GroceryList extends React.Component { render() { return ( <ul> {this.props.list.map(function (item) { return <li>{item}</li> })} </ul> ) } } GroceryList.propTypes = { list: PropTypes.arrayOf(PropTypes.string).isRequired }
Now we’re specifying that we want our list array to be made up of strings. Nice!
We’ve really just scratched the surface of PropTypes but I wanted to give a brief overview of the ‘why?’ and the ‘how?’. You can get pretty much as specific as you’d like with PropTypes, from identifying exact required values, to requiring a specific shape of an object, to even writing your own custom validation functions. Check out the React documentation — the possibilities are endless.
0 notes
Text
Making moves in JavaScript and HTML
This is a very basic tutorial on how to set up a canvas in HTML and create movement using JavaScript.
The first thing we’ll do is make our .html file with html tags, script tags (for JS), and a canvas.
The width, height, and ‘id’ of the canvas are up to you — but we’ll be referencing the name of the canvas ID later on.
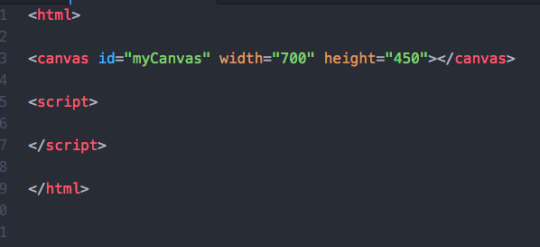
Next, we’ll define some variables. In this tutorial we’re only going to take into account horizontal movement along the x-axis. There are probably a few ways to go about this but here’s my way:
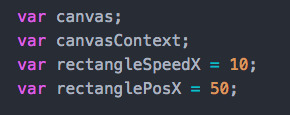
The canvas and canvasContext variables we’ll leave undefined for now — we’ll get to those real soon.
The rectangleSpeedX refers to the speed at which you want your future rectangle to move. You’ll want to play around with this later.
rectanglePosX refers to the X coordinate that at which you want your rectangle to start at. Remember this is in pixels, and is the amount from the left side of canvas (the origin).
Next, lets use those canvas and canvasContext variables:

window.onload will load the contents of the function as everything on the page loads. We’ll use the canvas and canvasContext variables to get handles on our canvas id we created earlier, as well as specify the context of the canvas as ‘2d’. This will allow us to draw stuff on it.
setInterval is probably the most important part of all this, but ignore it for now. We’ll be back at the end of this and it will tie everything together.
Time to draw some rectangles..
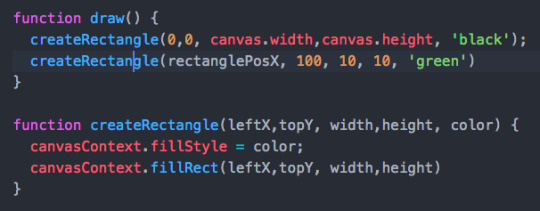
The createRectangle function contains all the logic to build a rectangle. Take a look at the arguments here. canvasContext.fillstyle will set the color, and .fillRect will set the position and size (in pixels).
As of now, draw() will create two rectangles — one as the black canvas and the other as a 10x10 green square. If you open your file in the browser it should look something like this:

Time to get things moving..

Here, move() is going to take the value of the current position of rectanglePosX and increment it by the speed we defined in rectangleSpeedX.
Below is a handy function used to call draw() and move() at the same time. We’re going to come back to setInterval() and use this.
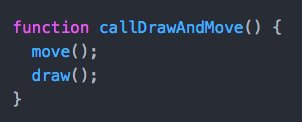

Now we can finally use setInterval(). This is really important. Basically, setInterval is going to allow you to refresh the page as slowly or as quickly as you want. This is how movement is made.
The first argument to setInterval is the function you are calling. In our case, that’s the drawing and movement. The second argument is the frequency (in milliseconds) that you want to run that function. The higher the number, the slower your object will move.
And there you have it! Refresh your page and watch that green box speed off the canvas. It should look something like this (minus the looping):

Here’s all the code in one snippet just to see it all together:
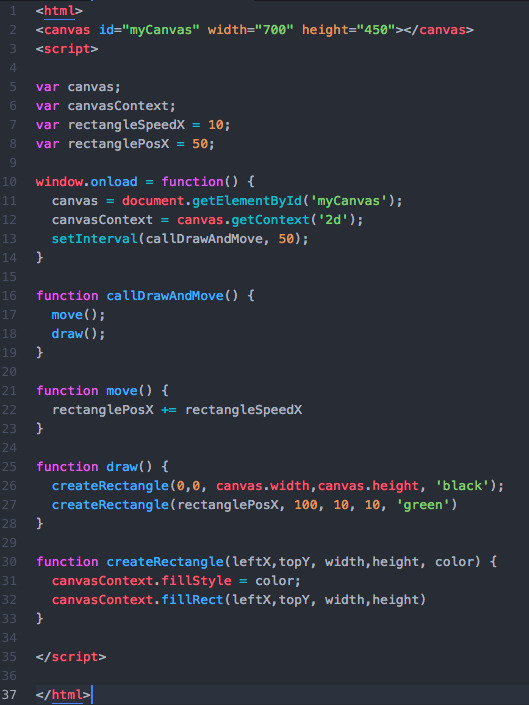
And that’s a very basic intro to making things move with JavaScript. You can apply the same pattern to add more objects, or create a Y coordinate/speed and move along both axes. You can also play around with conditionals to make the object bounce off the walls of the canvas.
0 notes
Text
Active Record Associations: The difference between has_one and belongs_to
The Rails framework supports six types of associations:
belongs_to
has_one
has_many
has_many :through
has_one :through
has_and_belongs_to_many
I recently dove into Ruby on Rails after studying Ruby for the last few months. So far in my experience with Active Record associations, I’ve primarily used has_many, has_many :through, and belongs_to. Actually, when I looked at the Rails documentation I was surprised to see has_one. In this post I want to explain the has_one relationship and how it differs from belongs_to.
Spoiler alert: You’ll probably never use has_one.
We use has_one and belongs_to to establish a one-to-one association between models. So when would you want to do that? Well, I don’t really know. I actually have a hard time imagining a scenario where you’d ever want to have a one-to-one association across two different tables. Logically, it makes sense to just combine the data on the same table unless your situation explicitly calls for the separation of the information. Maybe server optimization issues? Security needs?
Anyways, if you find yourself in one of these rare situations, here’s the difference between has_one and belongs_to: It all comes down to the foreign key.
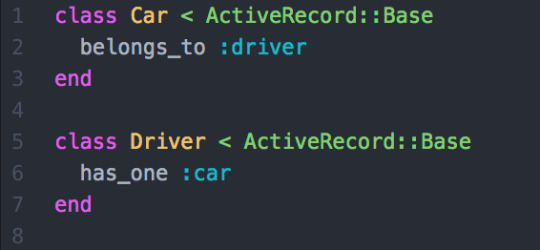
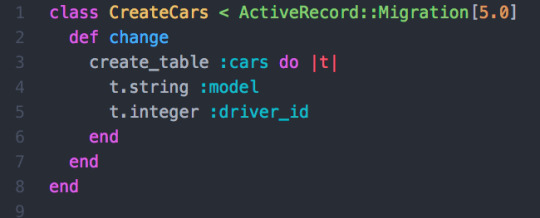
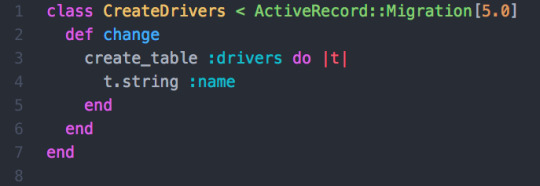
The object that belongs_to the other will always have the foreign_key that makes the association. In other words, use belongs_to when you want the foreign key in the declaring model, and use has_one if you want it on the other model.
Lets establish a hypothetical universe where cars can only have one driver and a driver can only own one car to see how this would work:
And here’s an example of the respective tables:
And that’s it! If you have any thoughts or better examples on when to use has_one, feel free to send them over.
0 notes