
Don't wanna be here? Send us removal request.
Statistics
We looked inside some of the posts by jhuntfmp-blog and here's what we found interesting.
Average Info
Notes Per Post
0
Likes Per Post
0
Reblog Per Post
0
Reply Per Post
0
Time Between Posts
20 hours ago
Number of Posts By Type
Text
6
Link
10
Video
1
Last Seen Tumblr Blogs


Fun Fact
Tumblr has been banned in Indonesia for providing people with access to pornographic content.
Text
My Calendar January - May 2017


These have helped me keep everything in order, I know when I am working on what project and in what time scale I need to have things completed by. I usually do pre-lighting as well as camera prep and tests early the week before a shoot. The reason I do it the week before is so its still fresh in my head for the shoot but it gives me some time to work out any issues and resolve them.
All other pre-production, such as floor plans and shot lists are done well before the week before.
Its great because before I did not ever use calendars or diaries, now on I will always use both because I am much more organised and prepared with them.
0 notes
Text
Cycle
My Role: Director of Photography
Director: Anis Sebti
Brief Overview of Story: Groundhogs Day meets Black Mirror. The main character wakes up the same everyday and gets instructions on his phone, he gets into several difficult situations but always wakes up unharmed ready to di it again.
Pre-Production: From the start we knew we wanted to use the FS700, this was due to fact we wanted to used slow motion and the FS700 would allow us to do that. I also wanted a really sharp, very realistic image (i.e. I didn’t want it dreamy like with Radio City) so we chose the Zeiss CP2′s with no filters.
Anis wanted a gritty feel to the promo, but he gave me total control of the camera and lighting (although there were still small things he wanted). So I did my floor plans, tested out some lighting and we got to the shoot! here are some of my rudimental floor plans:


Production: I decided that for the scene thats repeated we’d light from outside using a 1.8k HMI with Chocolate Gel over to give it a bit of a dirty sun look. Then boosting the ambient light in the room with a LEDgo panel with full diffusion over it to really soften it and shooting that into a wall to bounce back to the actor, the light was daylight balanced.
We used all natural light when shooting outside, we used a silver board to bounce sunlight back into the faces of our actors which helped lift them from the background. Luckily we had an overcast day so the light was nice and even and unchanging.

In the Dope House scene we used a lot of practical lights, lots of blue and orange with a pink glow coming in through the door, it had a really strong colour palette.

We then converted this space into the interrogation room which we lit with a single spotlight and lots of haze, for the close-ups we used a poly to light the faces of our actors.


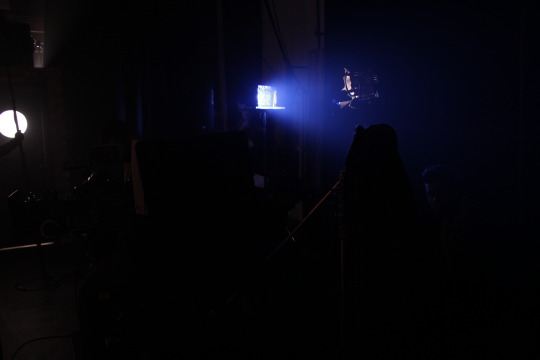
The final scene was in the ‘observation room’ which we blacked out a room got a large monitor with a video playing on it and enhanced the light coming from the screen with LEDgo panels above the monitor and put a backlight on the actors to pick them out from the black.

Results: The results are great, the rushes look amazing. I am very happy with the image and am hopeful for the storyline, I think we got enough from the characters to get people gripped by the story.
The following link is my rough assemble edit:
https://www.youtube.com/watch?v=U3_Jx0KB5uA&feature=youtu.be
I was very happy with the edit, spending more time on it and maybe in the hands of a better editor I think the project will be really great.
What I’ve Learnt: As this was one of the last projects of the years I’ve already brought so much into this one that I have learnt, I again learnt a lot on this project as hope to do so on many more in the future.
- Not to rush. We were ahead by an hour, which is such a rarity and I wanted to get one more shot before the end of the day and was advised not to and to spend time planning for the day after. This was good advice and advice that I will take forward with me. I was so concerned about staying ‘ahead’ when I could have used that time to get other things in order and make sure the frame and image were better.
- When having orange and blue in a frame at the same time you need to make one of them overly strong. Because of the colour temperature that the camera is set to either orange or blue will look more like daylight so have to be exaggerated for camera so you can clearly see the colours. This can be boosted in post but as i’ve mentioned before I like to do it practically if possible.
Peer Reviews:
Dave (Gaffer) - When Josh approached me to be Gaffer on the Cycle music promo I was more then happy to jump on board, once again he was well organised and committed to the shoot. it was towards the end of the year when shoots were coming up thick and fast, and my team and I had almost no time to help with pre-lighting because of commitments on other shoots, but when we turned up in the studio a day before the shoot was about to begin, we saw that Josh had already done most of the work. Josh goes above and beyond to help out on shoots, and makes everyone's life so much easier.
Next Time: I will, again, have a better understanding on the whole process of filmmaking. I will go forward with the knowledge that sometimes I need to sit back and not be so caught up in my own head that I forget things. I can see that as i’m learning more and things become almost second nature that I have more attention to the image and frame at hand which makes me better every time.
0 notes
Text
Olivia Holt
My Role: Gaffer
Director: Andy Morgan
Director of Photography: Adam Grasso
Brief Overview of Story: We follow a girl who gets back from work wishing she was partying instead of working. She picks up a picture frame which acts as a little portal to a party environment and where normal things turn silly.
Pre-Production: I was not involved with pre-production on this project.
Production: This music promo is an incredibly ‘tween pop’ so the video was always going to be inherently cheesy so the director and DP knew we had to make it that way.
There was lots of high-key and soft lighting, making things feel light and airy. I enjoyed this project a lot as gaffer because I had a team of sparks that could help and be setting up the next scene while I was on standby and tweaking the scene currently being shot.
Results: The result as expected was a cheesy teen pop video, which is what the client wanted. The lighting is soft, clean for the majority and funky, fun for the party scene.
https://vimeo.com/216242429
Password: mib4dd
What I’ve Learnt: High-key, soft lighting. Which is great for commercial work, lots of commercials for products, especially sofas and carpets use high-key lighting to make the product seem like it will bring a new lease of life to your home.
Keeping the sparks motivated and prepping for the next scene. When there was downtime too I got them to reorganise the equipment we had in the house we shot in, ready to be packed back on the van at the end of the shoot, this would help speed up the de-rig.
Next Time: I would like to work on project with the director and director of photography that I am interested in, I know thats not always possible (You go where the work is). When I work with this DP again, I will be more attuned to his preferences and the way he works.
Testimonial:

Bibliography:
0 notes
Text
Malevolent
My Role: Spark
Director: Chris Cronin
Director of Photography: Alex Stone
Brief Overview of Story: Malevolent was a proof of concept for a feature film, shot like its one take, similar to Birdman (2014). The brief story was showing the house the main character lived in before and after a demon had torn through.
Pre-Production: I was not involved with pre-production on this project.
Production: The shoot was 2 days which meant we were tight on time and we were shooting in houses mainly which meant tight on space too. We had to make the most of the spaces we got.
The lighting set-ups were usual day and night set-ups. HMI outside to replicate the sun or the moon and smaller, usually fluorescent lights inside to emulate interiors or bounced like from the source outside. The night scenes had plenty of practicals which give great shadows on the walls, especially when they’re fallen over or shining through or onto something.
Results: I haven’t seen the finished proof of concept yet, the rushes I saw looked great. I just hope they told the story that they wanted to tell.
What I’ve Learnt: I learnt a lot from the DP of this shoot, including:
- How to create an opening door lighting gag. The DP wanted the shadow of a opening door in shot, revealing the shadow on a character on the floor. It was an awkward space we were set up in but we made it work and I’m always gong to remember that method.
- Better ways of cutting gels and getting them on windows, although this is still quite an intricate and tricky task to get perfect.
Next Time: This experience has helped me to process the working of Directors of Photography I haven’t worked with before, I have worked with a few now and understand they all work slightly differently but this was the first project I really took that into consideration.
Watching the process of shooting a film thats supposed to be one take is interesting. Seeing the carefully placed cut points and near exact camera movements was good to see.
Testimonial:


0 notes
Text
A Place for Everything
My Role: Spark
Director: Barnaby Boulton
Director of Photography: Matthew Lewis and Svillen Slavov
Brief Overview of the Story: A Place for Everything is a short story about a man who when at work misplaces his stapler, when he goes to look for the stapler he comes across an odd chap that runs lost and found. He quickly discovers he isn’t there to find his stapler.
Pre-Production: I wasn’t involved with pre-production on this project.
Production: This production was at Nu Boyana Film Studios in Bulgaria, just outside of Sofia. We arrived on the first day and scouted all the locations and had a look at brief blocking explanations. Second day we pulled the lighting gear from the storage and took it to our main base which was Studio 5 where 2 sets had already been built for us.
Once we had all the gear out and sorted we cracked on with pre-lighting the first scene we were shooting which was the ‘caretakers office’ scene. They wanted a low-key, warm fell with pools of light. I had done pools of light with Misandrist the previous week so I knew we’d be using Source 4′s and I knew how to rig them. We used two Source 4′s, one over the desk of the caretaker, one in the middle of the room between the elevator and the desk.

Myself and Adam rigging the Source 4 in the middle (Photograph by Alex Fountain)
They DP’s wanted some interest on the background so asked if we could attach dedo’s and 300w tungsten heads to the rig and pick out some interest. I made a suggestion of putting practical lamps in all the spaces around the edge of the set, they loved this idea and went for it.

As you can see in the picture the spots of light dotted around the edge, they really come into their own in the film (Photography by Alex Fountain)
We lit the elevator with Kinos and celebs, pushing the spill from the lift (the blue spill at the bottom of the photograph above) with another kino as you can see in the photograph below.

Me giving Adam a safety chain, safety is paramount on film sets. (Photograph by Alex Fountain)
Once we finished in this area we moved to the American house, which was just one in a street of several American style houses. We were shooting a dream style sequence in this house to being the DP’s wanted strong sunlight coming in so we used 2 x 4k HMI’s with half CTO to warm them up slightly through different windows and set up a 20 x 20 blackout to stop direct sunlight coming in.

Me making sure the window was fully covered from direct sunlight (Photo by Alex Fountain)
We then boosted the light inside by putting a celeb above the table that the action is based around and a 575 HMI in the corner shot through 250 diff to really soften it.

This photograph shows the finished feel from inside the house (Photograph by Alex Fountain)
We used this set up for 2 scenes of the film.
The night scene in this house was interesting as its the first time i’ve rigged something in a cherry picker. We put a 4k HMI in the cherry picker with full CTB over it, I then went up in the cherrypicker and directed the operator to position it, once positioned I was brought back down to the ground and it was sent back up. This was the ‘moonlight’ source for this scene. Inside the room we rigged dedo’s to the rafters and picked out small details in the room aswell as having two small practical pink flowers that made some nice shadows on the wall.

Talking to Matt, one of the DPs, about gel’s to use before I went back up in the cherry picker (Photograph by Alex Fountain)
The props house was where things really got going, Adam headed down their early whilst we were still shooting the circus scene to get the cabling sorted so all areas were fed with 16amp. Then when I got down there they wanted to shoot within 40 minutes, so me and Adam got as many small tungsten heads and dedo’s we could and started rigging them on top of the racking that were holding all the props. We had a time limit in the props house, which was 1 evening - 5pm until midnight. The DP’s wanted pools of light for the characters to walk though, I think we achieved this rather well, we lit areas where the stopped a little brighter and passage areas dimmer.
We had to rig, de-rig and re-rig as we went because of the amount of heads we had. As soon as they had finished one section, we would get the lamps down and re-rig them for the next section. This method had helped me get quicker, which is a great advantage.

The caretaker just got a message from a pipe, Dedo’s in the background lighting the door behind him and some of the props around. (Photograph by Alex Fountain)
There were several other scenes that we lit using similar techniques that I’ve already explained, slightly different effects because of the situations and diffusions we’d use. Below is a link to the final cut on Google Drive, the scenes described and more can be viewed here:
https://drive.google.com/file/d/0Bzi__lNMVkA1N1BrWkxIZm54UHc/view
What i’ve Learnt: I think this is a project that I learnt an unbelievable amount on, such as the following:
- I learnt how to set-up and use lights I had previously not used before. For example, Joker Bugs and Pocket Pars which are both really useful little lights that are punchy and versatile.
- I learnt how to rig a light in a cherry picker, although I only observed but I am now aware of the process and safety surrounding it.
- Working quicker, safer and more efficient. Because of the nature of the job and the lack of people in the lighting department we had to be aware and responsive at all times, this really helped me to get quicker and better at being a spark.
- Also working wth people you’ve worked with before can be an advantage. You learn how each other handles situations and how you both work together. It’s a good advantage in an environment like film.
- I found out that trusting old gear isn’t always advised. I struck up an old ARRI daylight head and within 3 minutes the bulb blew when I was right next to it. I was fine but there must have been a fault with the bulb or head because I did everything by the book. (I also learnt that the studio doesn’t care why the bulb, they still expect the production to pay for it)
Testimonial:

Next Time: Because of the range of set-ups that were used in this film I will have so much more knowledge to take forward, which is amazing. I also need to get a good pair of shorts for sparking next time, sometimes it was too hot in jeans and I would have had more storage in cargo shorts.
0 notes
Video
tumblr
Misandrist - Split Diopter shot with green screen.
I wrote about issues we had with the green screen and diopters in production separately, but there was an issue of them being used in the same shot. This other issue was with the diopter blurring half of the green screen in the background of the shot. This causes a little bit of an issue when putting a piece of plate footage over the green in the background.
The way the VFX team told us to do it, after the issue had been raised, was to shoot in layers and add the depth of field in post. I will know for next time.
0 notes
Text
Misandrist
My Role: Director of Photography
Director: Jobe Wolf
Brief Overview of Story: Misandrist is a story about two women who have had enough of men, they take a restaurant hostage to prove a point. The film is set in a theatre style setting, look into ‘Dogville’ by Lars von Trier for a similar style.

Heres a picture of our de-constructed set, ready for Act 2 (Picture by Anthony Dennett)
Pre-Production: During pre-production we discuss the general themes of the film and lined them up with our expectations of what we imagined the final image could be. First and foremost Jobe categorised the film as a Neo-Noir Thriller, this gave us a good base to build the film upon.
For this we wanted a good image to work with in the edit, we wanted good quality and lots of information which is why we chose the Panavision Genesis with the Codex pack. This gave us the option of shooting 1080p 4:4:4 12-bit, which is an incredibly data rich image. The only drawback to the Genesis is that low light quality, well the fact that it has to have a lot of light in order to produce a clear image. If it doesn’t have enough light the image is incredibly noisy.
Similar to Radio City I was torn between two lenses, the Zeiss CP2′s (again with Black Pro Mist filters) or the LOMO lenses. This time I went for the LOMO’s, mainly for the advantage of 27mm lens which I thought would be useful. Someone also pointed out to me that it was a beautiful lens, to which I agreed after testing.
Jobe wanted to had some split focus shots where we had one character in focus in the foreground and one in the background, there are two main ways of doing this. One method is comping two images, once you have a frame locked you leave the camera there and shoot the scene twice with two differing focal points and then comp the images together in post. The other method is split diopters, this is a piece of glass that goes over the lens which changes one half of the images focal point. These are very tricky to get right but a good skill for everyone involved to learn. We went with the diopter option, I like doing this practically. Below is a picture of a split diopter.

(VashiVisuals)
As we knew we wanted a noir feel to the picture I did some research into noir style lighting because I haven’t done it before. I found an article on filmmakeriq.com and it stated that “In Film Noir, the most prominent lights are going to be strong keys and back light. Fill light is not as dominant as we want to exaggerate the contrast and get that low key look.” ("The Basics Of Lighting For Film Noir | Filmmakeriq.Com")
After the research myself and Jobe started going through the blocking for the scene and creating a storyboard so we could get a plan down that everyone could follow. This was also so I could see where the action was going to be so I could assess where I thought the lights needed to go to light the scene.
The film was broken down into 3 clear acts, I will break down the lighting for each act.
Act1 - This act Jobe wanted each part of the action to be surrounded by complete darkness so for each table we had a Source 4 spotlight rigged directly above and pointing straight down on the table below. This was our main source of light, we used a lighter coloured table to reflect light back into them from underneath, I also used haze to make the shaft of light stand out from the darkness too. I also placed some cyc lights on the floor, which were fed through the dimmer desk. These were shone into the drapes in the background, this helped to lift the amount of light in the scene so we didn’t get as much noise in the final image. In the grade we will bring down these areas to complete blackness.
Act2 - The main source of light in the act was the window, I put a 2.5k HMI through one window, which had blinds on to create the blinds effect over the faces of actors and on the floor too. Alongside this I used a 1.8k HMI through the door window, which had diffusion on, to continue that bright outside look.
I had a Kino with 1/2 CTS (Colour Temperature Straw) on the far side, this was to emulate some of the practical lights from inside and to fill the faces from the other side with a small amount of light. I didn’t want to use the fill too much because I wanted a high contrast ratio in the faces. Again I had cyc lights on the floor, shooting into the drapes around the side to lift the ambient light to reduce noise, we also had one behind the bar to make the bar stand out from the drapes too.
We used a lot of practical lights for this scene, below is a list of where and what we used:
- 5 x 2ft fluorescent tubes with CTO, under the bar top to downlight the bar and behind the hostages to backlight them for closeups.
- 2 x LEDgo panels below the bar shelves to uplight the bottles, create some interest in the background.
- 2 x 2 banks of 100w bulbs in uplight fixtures on the flat above Donny and Magda.
- 4 x 60 w vintage bulbs hanging over the bar, to create interest and backlight character standing at the bar.
- 3 x 60w vintage bulbs hanging in the middle of the set above the girls table (Although we couldn’t adjust these into shot so they were used as ambient in the end)
The following link is to a small video I made out of the lighting tests I did for misandrist, the footage is in black and white because this is how I want my final version of the film to look:
https://youtu.be/F4Mt0HR_XuU
Production: During production we had the camera mainly on the fisher 9 dolly, this was to make it easier and quicker to move into position. We also started with some tracking shots and a 360 degree shot around the table with the two girls on. This was difficult, a good challenge and the results are great!
We had a set back in the first day so we were a little bit behind from there on in, we still got it all shot but were always chasing our tails and maybe didn't have enough time to finesse some shots as I would have liked.
In the first act we had more complicated shots than in the second act, more tracking, the 360 shots and the split diopter shots. This made the first act more challenging, in a good way.
It took us a long time to get the split diopter shots right, you have to line up the edges of the diopter itself in the right place, have the actors at a correct distance apart to get the focus right and not have any part of the actor or prop cross into the other half of frame. I decided that I liked props and actors hands crossing over, I felt it added something to our project that isn’t really done.
Lighting was relatively easy for the first act, the Source 4′s were pre-rigged and fed into the dimmer desk, this gave us control of the intensity but they were in a fixed position. The diopter shots involved having the foreground already lit then at a certain line of dialogue the background Source 4 was raised in intensity to reveal other characters.
In the second act we had to move, lower and change angle of the HMI’s shining through the window depending on shot, we also had to move the Kino inside to help fill the faces. One major mistake I made in pre-production was not testing what we could see through the window in the camera. This set us back a lot of time because we had to blackout some of the stands, other things behind the window to stop it from being in view.
Also, during the second act, I had two silver boxes made which we then shot 2 5k lamps into with a Medium Blue gel these silver boxes were mounted so they could spin. This gave us our police lights that come into the scene at a specific point. There would be a dialogue cue for the sparks on the boxes so they knew when to spin them.
Our police lights in action, this was spinning to create the revolving effect of the light (Picture by Anthony Dennett)
We used a hazer throughout to give the scenes more of an atmosphere and so in certain parts you could see the streaks of light shining through the haze.

Gaffer Dave and the sparks, Connor and Conna, getting the hazer ready for the day ahead( Picture by Anthony Dennett)
A big issue we had was with the green screen when shooting the boys, I’ve never shot green screen in a project before. The issue came when we were using the split diopter against the green screen, there was too much noise in the image which meant keying was difficult. The advise from the VFX team was that we should have shot it in layers, first the background, then the rear action then the foreground. In future I will know this. Check the following post to view a short clip showing the noise, split diopter and green screen.
Results: The final look to the film is close to what I wanted, and to what Jobe wanted. The special shots we used ended up looking great, the 360 shots and the diopter shots.
The footage is looking good in the majority, there are bits that I have re-watched that could be framed slightly nicer and the use of some bounced light just to lift faces in a few shots would have been great.
Below is a link to the video page fro Misandrist’s Facebook page, the trailer is viewable here:
https://www.facebook.com/pg/misandristfilm/videos/?ref=page_internal
The following link is to the picture locked version of the film on Google Drive:
https://drive.google.com/open?id=0B5OozGUVLX26LXc1MC1xRE5Qb1E
What I’ve learnt: I’ve learnt an incredible amount from this experience. Technically, I’ve learnt more about the Genesis camera, LOMO lenses, 360 tracking shots (and cutting them together) and a lot about split diopters too. These will all be very useful skills for the future.
I’ve also learnt about timing and that complicated shots need extra time planning into them, this may sound obvious but an extra 20 minutes planned for can always be a bonus.
Another thing i’ve now got a better understanding of is the amount of light needed for older cameras. They do need a lot to get nice image. Off the back of this I now know that its better to have too much light to then be able to take some away quicker than having not enough light and struggling to pump any more in. This can save time when shooting!
The 180 degree rule was another thing I learnt a lot about. Firstly on the 360 degree shot when we came to finish the move we realised that we needed to be over the correct (by correct I mean opposite) shoulder for it to make sense, otherwise it would look like the characters were both sitting on the same side of the screen. Also, I broke the 180 degree rule with the boys conversation with the waitress. It starts off on one side of the line, looking towards the window and outside, then we switch over to the other side for the conversation with the waitress to include her in the frame. I think I broke it in a way that makes sense to the audience because its almost like a reverse shot so everything is flipped and there is a different background.
I learnt a great deal about green screen and the easiest ways to shoot it, layering images is the easiest way currently, so taking this information forward will be a great help indeed.
Next Time: There are so many things I would like to improve for next time here is a list of them:
- Spend more time testing and refining before the shoot. Test everything even if you’re told its fine!
- Use a better equipped camera for the job. The camera was great but for this low key lighting set-up it struggled in some circumstances. Choose better for the situation.
- Plan in more time for tracking and diopter shot in future, regardless of how easy the shot is.
- Shorter takes. We did a lot of takes that had a lot of dead time in them, Jobe wanted these to get the reactions of all the characters. One or two takes per character was all we really needed though, not every time. This would have sped us up and given us more chance to finesse certain shots.
- Don’t panic. Panicking leads to making mistakes and wasting time, I know there was one point where I started to panic and rushed a few shots. I think you will be able to tell in the edit.
- Shoot the green screen in layers. Background plate, background action, foreground. And make sure there is as little noise as possible in these green screen shots.
-Rely on my Gaffer more. I tried to take on too much and do lighting tasks myself, I should have delegated better to Dave.
Peer Reviews:
Lily (Production Designer) - Josh was a very reliable member of the production team throughout the whole production period. It is important for a DOP and Production Designer to communicate throughout, and Josh definitely made himself available if I ever had any queries or concerns. We agreed from an early stage that the colour palette and minimalist set would work well from the start, and josh was able to determine crucial set marks for tables early on in the set build which was a great help. I would be very happy to work alongside josh in future productions.
Dave (Gaffer) - Josh was DOP for Misandrist, he is always well prepared and knows exactly what he wants. Being a spark at heart, he started to try and help us do our jobs instead of being telling us what to do, so I had to tell him off a couple of times because I didn't want him getting distracted. apart from that he was an absolute joy to work with over the course of this shoot, always working with a smile on his face no matter how challenging the shoot became.
Misandrist Bibliography:
Brown, Blain. Cinematography: Theory And Practice. 2nd ed. Focal Press, 2012. Print.
VashiVisuals. Split Diopter. 2013. Web. 10 Apr. 2017.
"The Basics Of Lighting For Film Noir | Filmmakeriq.Com". Filmmakeriq.com. N.p., 2017. Web. 27 Jan. 2017.
0 notes