
Don't wanna be here? Send us removal request.
Statistics
We looked inside some of the posts by jamesauchters-blog and here's what we found interesting.
Average Info
Notes Per Post
1
Likes Per Post
1
Reblog Per Post
0
Reply Per Post
0
Time Between Posts
4 days ago
Number of Posts By Type
Text
2
Last Seen Tumblr Blogs


Fun Fact
China blocked Tumblr because of pornography and censorship problems in 2013.
Text
Azure Sentinel Impressions – A cloud-native SIEM with teeth

After setting up Windows Virtual Desktop last week, I thought I would continue the preview theme of my blog. Prior to RSA San Francisco, Microsoft announced Azure Sentinel: A cloud first Security information and event management (SIEM) tool built on top of Azure Log Analytics, Logic Apps & Jupyter notebooks.
As a huge security geek, Microsoft's gradual push into the security space is something I will always welcome and I’m really excited to see some competition to Splunk’s IT Service Intelligence & AWS Guard duty. The intent from Microsoft is to provide super cool automated threat detection features, while also providing detailed analysis and incident response capability to security operations center (SOC) engineers!
The other side effect of using AI/ML is the reduced alert fatigue. Open any badly tuned SIEM (even some well-tuned ones) and you will quickly realise how many logs a fully operational environment generates. With new cloud services doing a bunch of heavy lifting, SOC engineers can focus on what matters: Responding and investigating.
Thankfully, deployment for Azure Sentinel is extremely simple – even faster if you’re already using Azure Security Center. Let’s get stuck in!
Azure Sentinel – What you need before you begin
Before you start you will need the following:
An active Azure Subscription
A couple of pre-configured virtual machines
An East US log analytics workspace. Sentinel is East US only while in public preview, but expect this to change as the product nears release date.
To get some useful data in quickly, I’ve already configured Azure Security Center and forced server enrollment. If you’re not using Security Center, it is the best way to get excellent insight into your Azure security standing. The added bonus is on-boarding Sentinel is much easier!

If you need to enable automatic provisioning, you can turn this on with a standard Security Center plan ($15/node). The settings are available from: Security Center > Security Policy > Subscription Settings > Data Collection.
Azure Sentinel - Step #1: Activating Sentinel
Enabling Azure Sentinel is extremely easy – almost too simple for a blog post.
Search for Sentinel in the focus bar on the top of your Azure Portal and select the option with the blue shield. This will take you to Azure Sentinel workspaces, where you can view the sentinel environments already configured.
Rather than utilising one Azure Sentinel instance for a complete subscription, Microsoft has accounted for multiple log analytics workspaces. I think this a really neat method for providing isolation boundaries for different areas of your environment.

Once you're at this page, click the connect workspace button glaring at you and select your pre-configured workspace when prompted.

Azure Sentinel - Step #2: Setting up connectors
If you managed to complete the worlds easiest activation, you should be faced with the following welcome screen, and Sentinel is now active in your environment. You still need to onboard services and enable functionality, so stick with me for a bit longer.

Select ‘data connectors’ on the right-hand side and be blown away by all the available choices. For this blog, I’ll be onboarding my Azure Security Center, Security Events and Azure Activity. This should give us an initial footprint to see some functionality. In a production configuration, I would hopefully configure the first 9 options at a minimum. Obviously, this is dependent on what services you are utilising.

The Security Center enablement is quite simple. From here, select the menu clicker and enable a Sentinel connection for each subscription you have onboarded - you’re a good azure admin, so that’s all of them.

Remember when I said that using Security Centre makes Sentinel easier? As you can see here, I’ve enabled all events for Security Center and Sentinel has automatically detected this. If you haven’t used Security Center 😭😭😭, pick the desired level of logs you want, and select 'Ok'.

Finally, I’m going to onboard Azure Activity logs. This will give us visibility of what is happening at the platform level, and allow us to hunt for suspicious deployments, privilege escalation or undesired configuration change! Of the three services I have onboarded, this one is the most complex, requiring a grand total of 4 clicks. Quite exhausting, isn't it?


At this point, I would recommend shutting down your computer and taking a walk to your nearest pub for a well-earned Furphy.
Sentinel takes a little bit of time to start seeing logs, and a bit longer to gain some actionable log data.
Like a well-seasoned TV chef, here’s a snapshot I created earlier.

Azure Sentinel - Step #3: Activating Machine Learning
You now have a functioning SIEM and can begin to analyse and respond to events within your environment. Congratulations!
From here, it's time to leverage one of the largest selling points of Azure Sentinel - it's machine learning (ML) capability, titled Fusion.
Intended to reduce alert fatigue and increase productivity, Sentinel Fusion is one of the many cloud products now utilising machine learning. Unfortunately, this isn’t enabled out of the box, and requires you to complete a couple commands to activate.
First, launch cloud shell within your portal.

Next up, update the below command with your subscription ID, resource group name and workspace details and paste it to the console.
az resource update --ids /subscriptions/{Subscription Guid}/resourceGroups/{Log analytics resource Group Name}/providers/Microsoft.OperationalInsights/workspaces/{Log analytics workspace Name}/providers/Microsoft.SecurityInsights/settings/Fusion --api-version 2019-01-01-preview --set properties.IsEnabled=true --subscription "{Subscription Guid}"
You should receive a JSON response if the fusion activation completed successfully.

If you’re not sure and need to validate, use the following command:
az resource show --ids /subscriptions/{Subscription Guid}/resourceGroups/{Log analytics resource Group Name}/providers/Microsoft.OperationalInsights/workspaces/{Log analytics workspace Name}/providers/Microsoft.SecurityInsights/settings/Fusion --api-version 2019-01-01-preview --subscription "{Subscription Guid}"
At this point in my demo, I don’t actually have enough alerts and services to generate a Azure Sentinel Fusion alert, but if you want to learn more about using fusion, check out the official Microsoft blog post announcement here.
Azure Sentinel - Step #4: Threat Hunting and Playbooks
Now that we’ve configured Azure Sentinel and Fusion Machine Learning, I’m sure you’re excited to investigate threat hunting & automatic remediation (playbooks). Thankfully, both areas in Sentinel are built on top of existing, tried and tested platforms.
For Incident response, Sentinel utilises Azure Logic Apps. Anyone familiar with this product can testify to its versatility and Sentinel presents the complete list of Logic Apps for your subscription under the playbooks section.

Should you wish to create a Logic App specific to Azure Sentinel, you will now notice an extra option within the triggers section.

For hunting and investigation, Azure Sentinel provides a few great sections where SOC engineers can investigate to their hearts content.
For log analysis, Sentinel utilises the OMS workspace, built on top of KQL. Splunk engineers should find the syntax pretty easy to pick up, and Microsoft provides a cheat sheet for those making the transition.

Engineers can utilise these queries to create custom alerts under the analytics configuration section. These alerts then generate cases when a threshold is met and will soon be able to activate a pre-configured runbook (currently a placeholder is shown in the configuration section).
If you’re new to threat hunting, SANS provides some quick reference posters like this detailed Windows one and deep dives on a multitude of security topics within its reading room! The following alert rule triggers when multiple deployments occur in the specified time-frame.

My alert generates a case, which engineers can then investigate as demonstrated below.

In-depth investigation often requires detailed and expansive notes, and this is where the final investigation tool really shines.
The last option under threat management is Notebooks, driven by the open source Jupyter project. Clicking this menu option will take you out of the standard Azure portal and into Notebooks Azure.

If I had to pick one thing I dislike about Azure Sentinel, the separate notebooks page would be it. I really hope that this can be brought into the Azure portal at some point, but I do understand the complexity of the notebook’s functionality. Here you can view existing projects, create new ones or clone them from other people.
Covering all the functionality of Jupyter notebooks could be a blog series on its own, so head over to the open source homepage to see what it’s all about.
Azure Sentinel Impressions - The Xello Verdict
Overall, I’m really impressed with the product. While certain parts are quite clearly in preview and still require work, this is a confident first step into cloud SIEM market. If you’re evaluating early like myself, get used to seeing the following words throughout the product.

There really is a large amount of functionality in the pipeline, so Azure Sentinel only gets better from here. I’m especially excited to see the integrations with other cloud providers and have already signed up to preview the AWS guard duty integration.
If you want to dive straight into the Sentinel deep end, have a look at the GitHub page – there is a thriving community already committing a wealth of knowledge. Prebuilt notebooks, queries and playbooks should really help you adopt the product.
Stay tuned for my next blogs, where I will be exploring the Secure DevOps kit and will really put Azure Sentinel through its paces with an insecure virtual machine demo!
Originally posted on: Xello.com.au
0 notes
Text
Windows Virtual Desktop – Now in Public Preview
As a long-suffering Citrix and RDS administrator, I’ve eagerly awaited the release of Microsoft’s virtual desktop offering that was announced at last year’s Microsoft Ignite – to put it to the test.
With Windows Virtual Desktop finally entering public preview, I took the chance to explore what the service offers and write up a blog post on my deployment experience, the “gotchas” I ran into, and some initial thoughts.
Fair warning, this is a long article, so skip to the end if you want my verdict!
Windows Virtual Desktop – The essentials before you begin
Before you start, you will need to have the following:
· An active Azure Subscription
· A pre-configured Virtual network & AD Domain
· A bit of patience: It’s still in preview, and different people are reporting varying levels of success with the deployment.
Thankfully, the deployment process has been well documented by Microsoft and I already had a lab environment set up.
For those wishing to follow along in a safe environment, I’ve placed some Azure Resource Manager (ARM) templates here for deploying some of the prerequisite infrastructure (you still need to configure AD properly).
Now - onto the fun stuff!
Windows Virtual Desktop – Step # 1: Installation
The first thing you will want to do, is grab some useful information and the new PowerShell module.
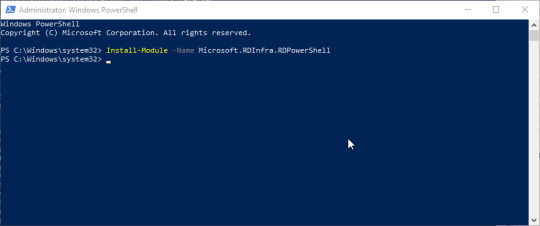
Locate and note down your AAD tenant ID and subscription ID – you will need these shortly. To install the PowerShell module, use the following command:
Install-Module -Name Microsoft.RDInfra.RDPowerShell
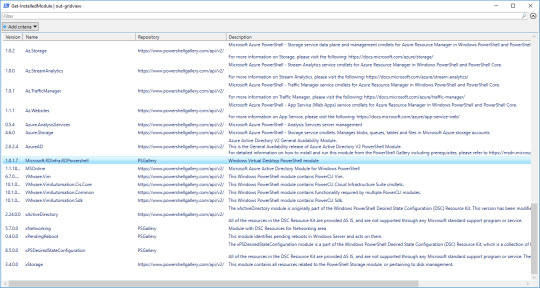
You should be able to verify the install with:
Get-InstalledModule | Out-GridView
(The grid view is not needed; it just makes everything so much easier to find!)
Windows Virtual Desktop – Step # 2: Tenant setup
Now, open the following URL: https://rdweb.wvd.microsoft.com in two SEPARATE tabs – we need to complete the next process twice. Once for the service, and once for the client. In the first window, input your Tenant ID and click submit. You will be asked to sign in and should get back a success message.
In the second window, swap the dropdown to “Client App”, input your tenant ID and submit. Hopefully you will get a second success!

Windows Virtual Desktop – Step # 3: Assigning users, roles and permissions
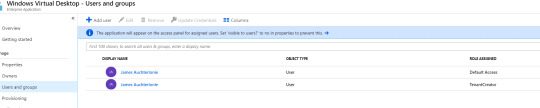
You should now be able to view the Windows Virtual Desktop within your enterprise applications.

From the Enterprise Apps page, you will need to add an application permission to “Windows Virtual Desktop”; Assign a new user, and the role should be automatically populated as tenant creator.
Windows Virtual Desktop – Step # 4: Powershell
Next, you will create a Virtual Desktop Tenant using PowerShell.
The following two commands should complete this, with a slight pause for a password!
Add-RdsAccount -DeploymentUrl https://rdbroker.wvd.microsoft.com
New-RdsTenant -Name <TenantName> -AadTenantId <DirectoryID> -AzureSubscriptionId <SubscriptionID>
Make sure you keep the Tenant name in mind, as you will need this shortly.

I got a bit side tracked at this point, as it looked as if I could specify extra flags for an OMS workspace.
The possibility of onboarding the service from the first deployment is something I could not pass up.
Sadly, it didn’t appear to function, so I’ve left this as something to investigate as the product comes out of preview!
Windows Virtual Desktop – Step # 5: Session Host Pool
Next, we will create the juiciest part – a session host pool! Navigate to the resource addition section of Azure and look up “Windows Virtual Desktop - Provision a host pool”.
The setup is a simple ClickOps exercise with a couple of gotchas. I won’t dive too deep here, as the portal is self-explanatory.
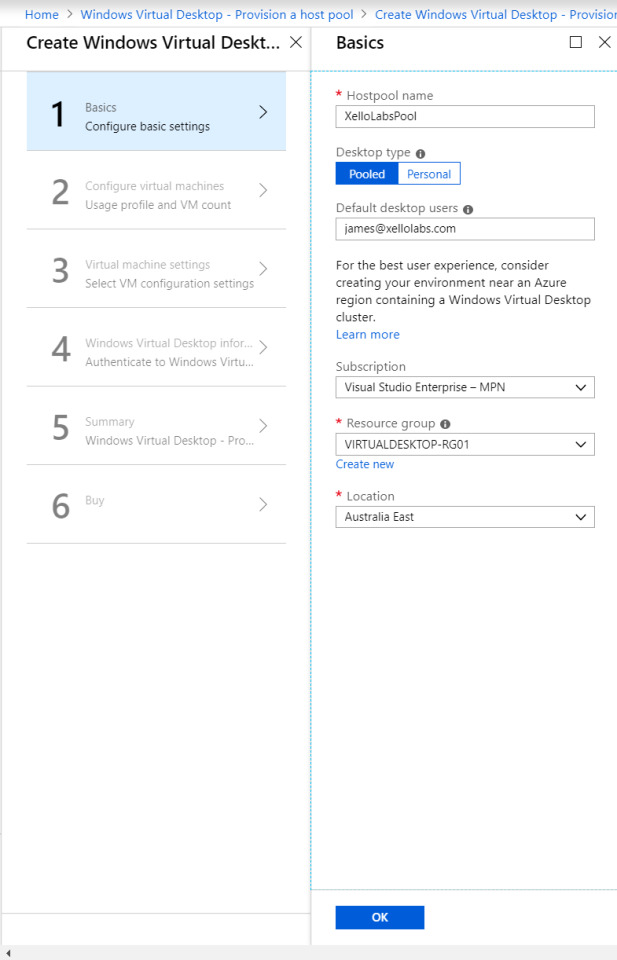
The basics are as follows:
Configure a host pool and your initial testing users. Jot down the host pool name, as you will need this later.
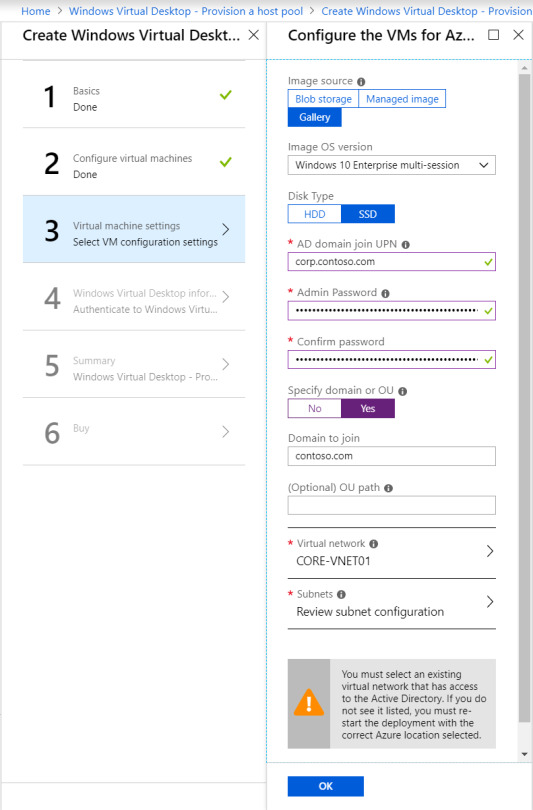
The VM configuration: Select how many users you expect, how much usage you expect, and a VM name prefix. Azure only allows 15 characters for VM names, so don’t make this one too long.
If you’re labbing the solution, it’s probably good to change the VM size and make sure it’s a single VM – 100 D8S virtual machines really hammers the credit card!

More VM configuration: This time its domain joining and the VNet configuration. Important to call out here, the web portal does not appear to recognize subdomains. Should you utilize a subdomain, you will need to select the “specify domain” option and type it in. I had corp.contoso.com (Original I know) as my domain, so this got me scratching my head for a bit!
Tenant Configuration: This is where you will utilize the Tenant name from those initial PowerShell commands. If you didn’t keep record of it, get-rdstenant is your friend!
Use the credentials for the user you specified as “TenantCreator” earlier.

Final steps: Validate everything is correct and click deploy! (10 points to anyone who spots the error in the below validation!)

I’ve downloaded the template here, because if you’re not using templates and automation – you’re living in the past. Something for a future blog post! The deployment can take a while depending on your VM sizing, so patience is key.

Windows Virtual Desktop – Step # 6: Test users
If you have followed along with me for this long, well done! Once the deployment is completed, you should be able to log into this page with a test user.

Note: If you need to add extra test users, the doc for that is simple and can be located here.
Windows Virtual Desktop – The Xello Verdict
My initial thoughts on the Windows Virtual Desktop product are super positive.
For starters, it’s a huge upgrade from Remote Desktop Services 2016. My key comments and advice when evaluating or troubleshooting are:
Pay attention. While most of the deployment is a “next next” click through exercise there is a lot of room for error. The product is in preview and will have undocumented issues. Following on from this, be careful with your deployment size. While Microsoft takes care of the underlying connection brokering and session management, the default 100 VM deployment is expensive.
Don’t test this with an Azure AD account late at night. The solution uses on premise AD and you will be confused.
The product currently only supports Central US & East US 2. This will change as the product comes out of preview but expect some latency in the short term.
Do you have application configuration or performance requirements? You may need to test them a bit more than normal. Considering that Microsoft acquired FSLogix for this reason, I’m yet to evaluate how Microsoft worked through performance challenges and non-persistent settings. OneDrive immediately comes to mind in this space.
The Microsoft Doc and the event logs are your friends. I had to be patient and use the diagnostic commands at different stages when getting used to the product. Don’t be afraid to log into each desktop directly either. Under the hood it is still Windows 10!
If you want to learn more about Windows Virtual Desktop, or even just grab some advice on deployment, please feel free to reach out to myself and the Xello team!
Like the walkthrough? Stay tuned for the next part in my technical blog series, where I’ll be covering the Azure Sentinel and putting its security benefits to the test. Originally posted on: Xello.com.au
1 note
·
View note