
Don't wanna be here? Send us removal request.
Statistics
We looked inside some of the posts by isodev and here's what we found interesting.
Average Info
Notes Per Post
5
Likes Per Post
5
Reblog Per Post
0
Reply Per Post
0
Time Between Posts
2 days
Number of Posts By Type
Text
9
Last Seen Tumblr Blogs


Fun Fact
Users from the US are the majority of Tumblr visitors.
Text
Essential Share for HBuilder Developers! Uploading IPA Files on Windows
Abstract: HBuilder is currently the most popular mobile app development framework in the market. However, many users encounter difficulties uploading IPA files to the App Store due to the lack of a Mac computer for using Xcode or Application Loader. This blog post introduces a simple and convenient method of uploading IPA files through a web platform, without the need to install any software.
Introduction:
HBuilder is a powerful and convenient development framework for creating mobile applications. However, Windows-based developers often face challenges when trying to directly upload IPA files to the official Apple App Store, as Apple does not provide a Windows version of the upload tool. Is there a solution for uploading IPA files on Windows computers? This article will introduce a user-friendly approach to help HBuilder developers overcome this problem.
1. Uploading through a Web Platform
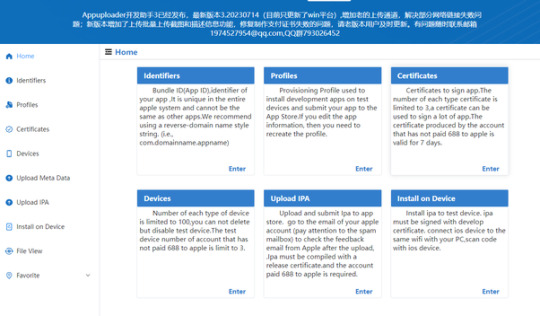
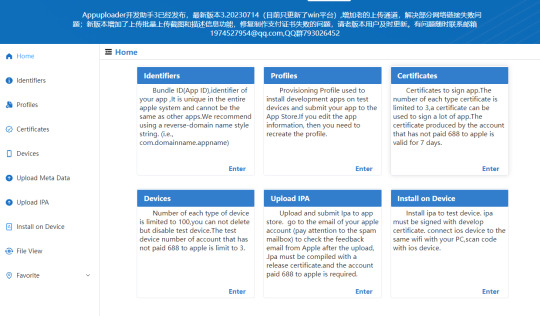
The method we will introduce involves using a dedicated web platform for uploading IPA files. You can access this platform through the appuploader - Windows version of Application Loader, which supports uploading and viewing iOS app IPA files.
Firstly, open the website and enter the developer center's dedicated password. Then, select the corresponding IPA file to begin the upload process.

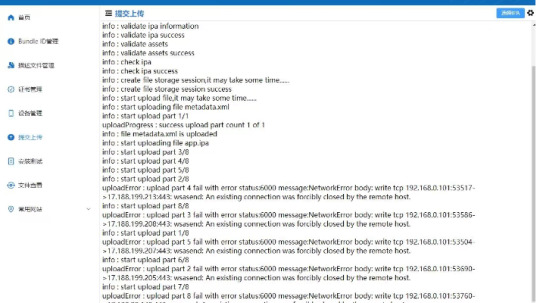
2. Monitoring the Upload Progress
During the upload process, you can monitor the progress to stay informed about the current status. If there are no issues with the IPA file, the upload will be completed successfully.
3. Pros and Cons Comparison
This upload method offers several advantages, including its simplicity, ease of use, no software installation requirement, and fast upload speed. However, it is worth noting that it requires entering the developer center's dedicated password, which may present a certain level of risk.
Conclusion:
For HBuilder developers without access to a Mac computer, utilizing a web platform for uploading IPA files proves to be a simple and effective approach. This method eliminates the need for software installation and can significantly enhance development efficiency by using a web browser.
References:
Official Yunedit Website: appuploader - Windows version of Application Loader
HBuilder Official Website: HBuilderX - Efficient Geek Techniques
0 notes
Text
iOS APP version update and upgrade tutorial: How to package and submit a new version of the APP for review?
Abstract: This blog post provides a detailed tutorial for iOS developers on how to use the Appuploader tool to package, upload, and submit a new version of an iOS APP for review.
Introduction: In the process of developing an APP, it is inevitable that updates and upgrades will be required. This blog post will explain how to quickly and easily complete the process of updating and upgrading the APP, so that your users can enjoy a better user experience.
Adding a new version
1. Open http://itunesconnect.apple.com and go to the page of the APP you want to update.
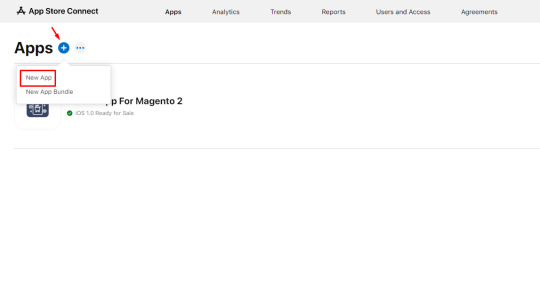
2. Click on "+ Version" or "+ Platform" to add a new version by increasing the existing version number.
Applying for iOS certificates
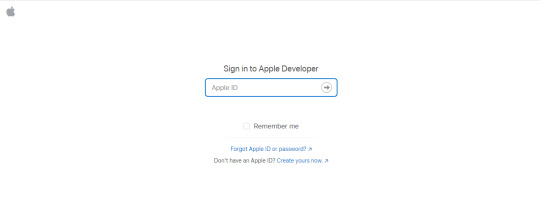
1.Login to Appuploader using your Apple Developer account.https://www.applicationloader.net/
2. Select the "Certificate" option and click "+ ADD" to create a new distribution certificate.
3. When creating the distribution certificate, you need to enter the certificate name, type, and password (remember to save it).
4. After successfully creating the certificate, download and save the .p12 certificate file to your computer.
5. Return to the Appuploader homepage, select the provisioning profile, and create a distribution provisioning profile.
6. Enter the name, check the previously applied distribution certificate (.p12), save the provisioning profile, and download it to your computer.
These steps will help developers complete the process of updating and upgrading an iOS APP. By using the Appuploader tool and applying for the correct certificates, developers can easily manage and release new versions of their APPs, providing a better user experience. Remember to prepare and submit the relevant materials in accordance with Apple's review rules and requirements to ensure a successful APP store submission.
0 notes
Text
Can I create an iOS certificate without an Apple developer account - latest
Abstract: This article introduces the method of using appuploader tool to generate iOS certificates and provisioning profiles without a Mac computer. With the popularity of the topics of front-end development and H5 frameworks, more and more people hope to package H5 applications into iOS applications. However, Apple's official certificate application method requires a Mac computer, which may be difficult for developers without one. To solve this problem, we introduce a convenient method for generating iOS certificates and provisioning profiles using appuploader tool without a Mac computer.
Introduction:
In the current era of front-end development, the development of H5 applications is very popular, and packaging H5 applications into iOS applications has also received widespread attention. However, Apple's official certificate application method requires a Mac computer, which may be difficult for developers without one. In order to solve this problem, we introduce a method to generate iOS certificates and provisioning profiles using appuploader tool without a Mac computer.
Step 1: Download and install appuploader tool
First, we need to download and install appuploader tool. appuploader is a powerful tool that can help us generate iOS certificates and provisioning profiles without a Mac computer.

)
Step 2: Register a developer account
Before using appuploader, we need to register an Apple developer account. The process of registering a developer account can refer to Apple's official guide and provide relevant information and payment as required.
Step 3: Generate certificates using appuploader
Open appuploader and log in to your developer account. In the tool interface, select the "Generate Certificate" option. Then, fill in the relevant information according to the prompts, including developer account, certificate type, etc.
Step 4: Download certificates and provisioning profiles
After generating the certificate, appuploader will automatically download the certificate and provisioning profile to your computer. These files will be used to package H5 applications into iOS applications.
Step 5: Package the application using the certificate and provisioning profile
After obtaining the certificate and provisioning profile, you can use various H5 APP packaging software to package your H5 application into an iOS application. During the packaging process, the previously generated certificate and provisioning profile will be used to ensure that the application is successfully packaged.

)
Conclusion:
Using appuploader tool can conveniently generate iOS certificates and provisioning profiles without a Mac computer. This provides convenience for developers without a Mac computer, eliminating the need to purchase expensive equipment to generate certificates. Through the steps introduced in this article, we hope to help developers smoothly generate certificates and package their H5 applications into iOS applications.
Reference materials:
Official website of appuploader tool: Appuploader home -- A tool improve ios develop efficiency such as submit ipa to appstore and manage ios certificate
Apple Developer Account Registration Guide: 网页未找到 - Apple Developer
Recommended H5 APP packaging software: Choose the most suitable packaging software according to personal needs.

)
0 notes
Text
IOS Listing Review Guide: How to Avoid Being Rejected and Successfully Submitted Once
Summary: This article compiles important considerations for iOS app submission to help iOS developers and app operators avoid the frustration of rejection during the review process. By following these guidelines, we can successfully submit our applications for review in one go, saving valuable time and energy.
Introduction:
Friends engaged in iOS development and app operation are well aware that the review process for iOS app submission is extremely strict and rejections are common for various reasons. Each time we get rejected, we need to address the issues and resubmit for review, which consumes a significant amount of time and effort. In order to help everyone smoothly pass the review process, I have compiled a guidebook for iOS app submission, which includes specific points to pay attention to. By following these guidelines, we can minimize the chances of rejection and strive for a successful review in one submission.
In-app update check function
Version updates for iOS apps must be done through the App Store, and it is not allowed to include update prompts within the app itself. Therefore, during the development process, it is crucial to avoid designing such functionality to prevent rejection.
Lack of installation detection when using third-party login
When integrating third-party login functionality, it is necessary to check if the user has installed the corresponding third-party client. If it is not installed, do not display the corresponding login button. Additionally, it should be noted that Apple does not allow an app's normal use to depend on another app, so providing a web login option can be considered.
Collecting IDFA without implementing advertising functionality
If the app itself does not have advertising functionality but collects the Identifier for Advertisers (IDFA), it may result in rejection during the review process. It is recommended to display a banner advertisement during the review and place it in a conspicuous position, then disable it after the review is passed.
Including UGC without providing user agreement and reporting functionality
If the app includes user-generated content (UGC) functionality, it is necessary to provide a user agreement and implement content reporting functionality; otherwise, it may be rejected during the review.
Using unrelated screenshots during submission
The app name, description, screenshots, and other elements must be relevant to the content and functionality of the app; otherwise, they may be rejected. Please ensure the use of real and accurate app screenshots and avoid using self-designed illustrations as substitutes.
App registration restricted to invitation codes
Apple requires that apps should not restrict usage to only a portion of users, so limitations on registration through invitation codes should not be set.
Mentioning the name or icon of third-party mobile platforms within the app
Any mention of terms such as "Android" or "Android system interface" in text, icons, or system interfaces will lead to rejection during the review. Please pay special attention to avoiding such mentions.
Involving rewards without stating non-affiliation with Apple
If the app offers physical rewards, Apple products should not be presented as prizes, and it should be declared that there is no affiliation with Apple.
Failure to provide a method for restoring in-app purchases
If the app supports in-app purchases, it is essential to add a "Restore Purchases" button on the interface.
Unrelated functionalities inaccessible without registration
For apps such as news apps, users should not be forced to log in to access content when they are not logged in; otherwise, it may result in rejection.
iPhone app not displaying correctly on iPad
Even if the app is designed exclusively for iPhone users, it should still display properly on iPad. Apple's review guidelines require that iPhone apps can run on iPad in iPhone resolution or with double the resolution of iPhone 3GS.
Infringing upon third-party copyrights
Video, music, and book apps are prone to rejection due to copyright infringement. Additionally, it is advisable to avoid using third-party trademarks within the app.
Recently, a useful iOS app submission tool called "appuploader" has been discovered, which has been tried and proven effective. Those who need to submit apps to the App Store can give it a try.

By following the guidelines provided in this iOS app submission guidebook, we can greatly increase the chances of our app being approved, avoid rejections, and save valuable time and effort. It is essential to ensure that the app's functionalities align with Apple's policy requirements, provide clear and complete user agreements, and ensure that the app's description and screenshots accurately reflect its functionality. Additionally, specific requirements and restrictions regarding advertising, rewards, third-party login, and other features should be carefully considered.
References:
Apple Developer Documentation: App Store Review Guidelines - https://developer.apple.com/app-store/review/guidelines/
ASO100 Blog: Solutions to Common Issues in iOS App Submission - https://www.aso100.com/blog/zhuanlan/14.html
Appuploader Official Website - https://www.appuploader.net
0 notes
Text
How to solve the problem of login failure using appuploader with the following prompt
I am planning to use the tool appuploader to submit and publish the app to the store. However, if I fail to log in using appuploader, I will be prompted with the following message. What should I do to resolve this issue
0 notes
Text
How to submit your application to the App Store in 2023
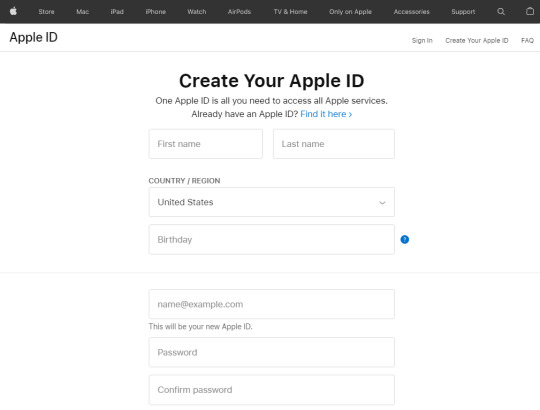
How to Submit Your App to the App Store Create Your Apple ID The first thing you need to do when submitting your app to the App Store is to create your Apple ID. This Apple ID will be used to access all the services provided by Apple.
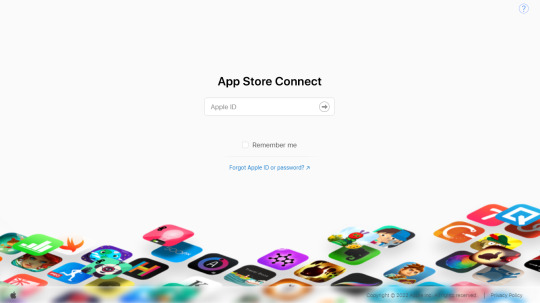
Tools and resources for app development and distribution Access to beta software Full suite of services with advanced features App testing tools Expert technical support App analytics tools and advanced features Sign in to App Store Connect App Store Connect is a website where you can manage all the operations you want to perform with your app in the App Store. Sign in to App Store Connect using your Apple ID.
In addition to the app store guidelines, make sure your app doesn't have any bugs. If the reviewer finds any errors in your app, he/she will reject it from entering the App Store. Therefore, testing is very necessary. Don't just test your app casually. Perform tests under abnormal conditions, such as low network, low storage space, older devices, etc. Test your app with the help of friends and family. TestFlight can help you invite testers and provide feedback before releasing your app to the App Store. It allows you to invite up to 10,000 testers using their email IDs.
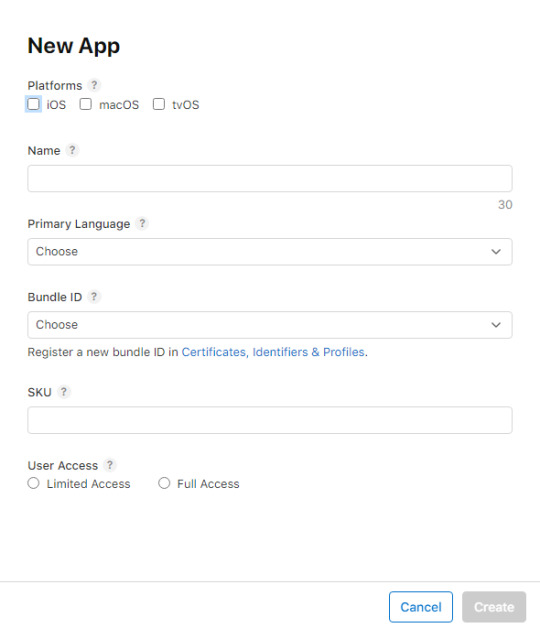
Create App Store Listing Using App Store Connect Follow these steps to create an App Store listing:
Step 1: Sign in to App Store Connect.
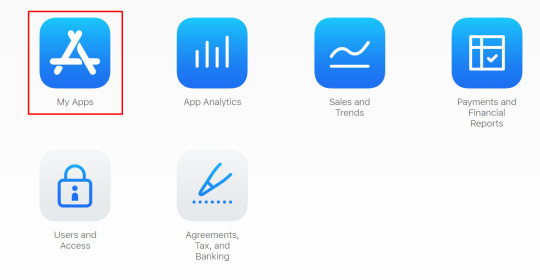
Step 2: From the App Store Connect Dashboard, select My Apps.
Define age rating for your app.
Step 6: Now, select Pricing and Availability from the left panel. Define the pricing and other required details for your app.
Step 7: Next is App Privacy. Enter the privacy policy URL. Use an online privacy policy generator to help you with this.
Note: The guide continues with more steps not included here.
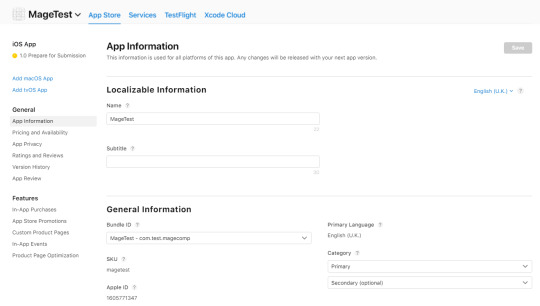
Step 8: Next, select "1.0 Prepare for Submission" from the left sidebar. Scroll down and choose how you want to release your app after it goes through the certification process:
Manual – Go to App Store Connect to release the app. Automatic – Automatically release the app. Specific Date – Schedule a specific release date for the app. Version Release
Upload App Store Screenshots and Previews You need to visually connect with users using images and videos. For this purpose, the App Store allows you to add previews and screenshots.
Previews are short videos from your app. Check the App Preview Specifications for more information.
Screenshots are images that illustrate the features of your app. Check the Screenshot Specifications for more information.
Make sure to follow the specifications provided by the App Store to minimize the chances of your app being rejected.
The App Store allows you to add previews and screenshots for 4 different screen sizes. You can add up to 3 app previews and 10 screenshots per display.
App Screenshots
It asks us to provide app screenshots for various resolutions of iOS devices. If we don't have access to all these devices for taking screenshots, we can use the screenshot generation feature provided by AppUploader: https://www.applicationloader.net/
After completing the screenshots, scroll down, and you will be prompted to upload a build version:
Upload Build Version
However, we noticed that the official upload tool provided can only be installed on a Mac computer. Here, we will not use the recommended tool and instead continue using the AppUploader mentioned in the previous step to upload the IPA.
Switch to the AppUploader interface for uploading the IPA to the App Store. Click on "Upload new file" to bring up the following interface. Enter your Apple Developer account username and the dedicated upload password to upload the IPA file as shown in the image below: Upload IPA

1 note
·
View note
Text
How to use Appuploader to submit and upload iOS applications:
How to use Appuploader to submit and upload iOS applications: Select IPA and Channel: On the submit upload page, select the IPA file. There are four available channels in the upper right corner: 1, 2, 3, and 'Old Channels'. Set a dedicated password: Set a dedicated password for submission. Upload IPA: Start the upload process by selecting the IPA file. After successful upload, you will receive a feedback email from Apple containing further instructions. Submit upload interface: This interface is mainly aimed at users who have already paid $99 to Apple. The free account cannot access this feature and will see a red circle prompt: "Your account has not yet paid Apple $99. You can only create a development certificate and cannot submit or upload for distribution. You cannot use Apple to log in, pay, or push notifications." Simply put, this means that the free account can only use the software for internal testing and cannot publish applications. Note: If the submission fails due to firewall issues with your internet service provider, you can try using the 'old channel' or switch to a mobile hotspot or VPN.
1 note
·
View note
Text
Picture and text introduction to the process of packaging and uploading IOS APP under Windows system
Nowadays, many partners are developing applications across platforms, and some children's shoes do not have Macs. This article will introduce how to directly launch apps in the Windows system environment, without having to engage in virtual machines or similar activities. It is still easy to package and launch iOS apps under Windows. Below is a detailed introduction from seven steps!

1 note
·
View note
Text
Guide to Generating iOS Certificates and Profile Files for App Development
Introduction: Currently, many companies use H5 frameworks for app development, and among these H5 frameworks, uniapp is the most mature. Therefore, hbuilderx has become the preferred choice for developers. However, packaging an app requires a certificate. So how do we obtain this certificate? Generating an Apple certificate is relatively complex, so here I will focus on the process of generating an iOS certificate.
Currently, many companies use H5 frameworks for app development, and among these H5 frameworks, uniapp is the most mature. Therefore, hbuilderx has become the preferred choice for developers. However, packaging an app requires a certificate. So how do we obtain this certificate?
Generating an Apple certificate is relatively complex, so here I will focus on the process of generating an iOS certificate:
If you don't have an Apple Developer account yet, you need to register for one in the Apple Developer Center. The tutorial for registering an Apple Developer account is as follows: Tutorial for Registering an Apple Developer Account (in Chinese).
Once you have the Apple Developer account, you can follow the steps below to create the certificate.
First, let's create a p12 certificate. The process for creating a p12 certificate is as follows:
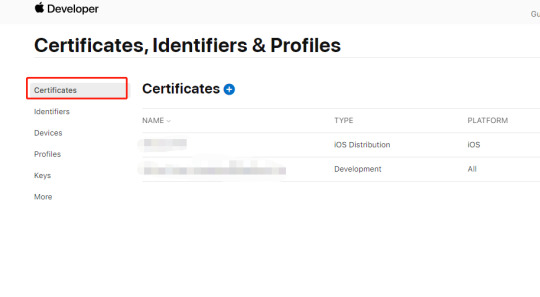
1.Log in to the Apple Developer backend and click on the "certificates" menu to enter the certificate management page. Click on the blue plus sign on the right side to start creating a certificate. When creating the certificate, choose the "iOS Distribution Ad Hoc and App Store" type, which includes both real device testing and distribution types (ad hoc for testing, app store for distribution). Please do not choose the "Apple" or "Dev" types of certificates, as they cannot be used for cloud packaging in hbuilderx.
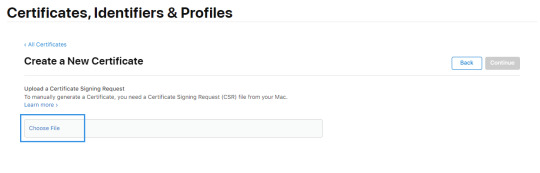
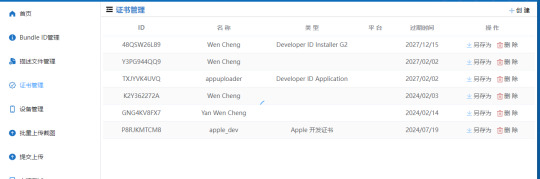
Use the function of generating iOS certificates in Appuploader to create this .p12 file, as shown in the image. After generating the .p12 file, download it to your local computer.
Go back to the Apple Developer Center. The .p12 certificate generated by appuploader will be synchronized back. You can then use appuploader to generate the p12 format Apple certificate. With the above steps, the p12 packing certificate has been generated.
Now, let me teach you how to generate the profile file required for packaging:
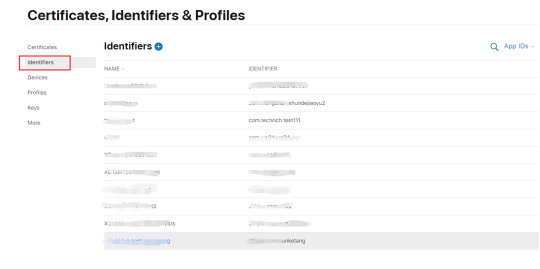
1.Enter the Apple Developer Center and click on "Identifiers" to create an app ID (package name). After creating it, it should look like the image below. Note that the format of the package name is typically in the format of a Java package name: com.xxxxxx.yyy.
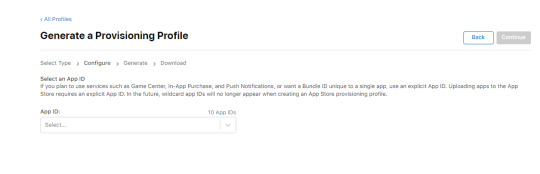

4.During the creation of the profile file, it will ask us to choose the app ID and cer certificate. Be careful not to select the wrong ones, as shown in the two images.

Appuploader home -- A tool improve iOS development efficiency such as submitting IPA to App Store and managing iOS certificates.
Use the function of generating the description file in Appuploader to create this profile file, as shown in the image. After generating the description file, download it to your local computer.


2 notes
·
View notes