
Getting aTumblr account for an animation course, what next?
Don't wanna be here? Send us removal request.
Statistics
We looked inside some of the posts by ironninjacreator-blog and here's what we found interesting.
Average Info
Notes Per Post
7
Likes Per Post
1
Reblog Per Post
2
Reply Per Post
4
Time Between Posts
30 days ago
Number of Posts By Type
Text
10
Last Seen Tumblr Blogs


Fun Fact
Users from the US are the majority of Tumblr visitors.
Text
Blog # 9 - Misadventures in Misunderstanding: The journey of making a cylindrical cartoon
It all began this trimester, when my lecturer explained to the class that we finally get to create a story-driven animation on our own. The catch? It had to be suitable for that giant, cylindrical LED screen in Perth’s Yagan Square. Angry and fully of woe, I had gotten exactly what I had asked for, albeit in a format I was in no way prepared for.
Choosing a theme for the whole body of student work took a whole day of yelling out words, writing them up on a board, or a projection screen (half the day was in the lecture theatre talking with the screen owners), and voting on the most popular themes, and gradually removing the least popular ones until finally it was decided that the theme of this trimester’s work will be:
Dreams
Prior to the theme was chosen, I was itching to create a Pixar-style short film, with a short action-horror sequence at its climax, which I had written a script for one or two trimesters ago. The owners of the screen explicitly told the school that anything to be displayed on the screen has fit these conditions:
- Must be G-rated
- No fast movement
- No flashing
- No use of solid green, orange or red or warning or traffic signs (there are traffic lights surrounding the square, were the screen sits, which such things are going to cause accidents)
- Nothing scary
- Nothing religious (pertaining to any religion)
- Nothing political
- Nothing provocative, or thoughtful, or would otherwise make the audience learn, ponder or discover anything profound.
Well there goes that nightmare of mine I’d had planned for backup. Wow, these restrictions are painful.
So shortly afterwards, on one of my days off, I spent hours reading up on dream symbolism and divining the meaning of dreams, hoping I could come up with some inspiration from some of the nicer dreams I could remember. It took a very long time to sift through all my repressed nightmares to pass through into the forgotten realm of good dreams long since passed. Here is a list of what dreams I could remember that day, and how well I thought they could work out considering the limitations I had:
- Driving through A shopping centre, in my mum's car, finding her in a secret movie theatre in the wall of the pet-toy section. At the time of dreaming, I was in the middle of high school and didn't know the first thing about driving. Technically a nightmare.
I doubt I can draw cars, and there’s a lotta stuff going on here
- Wall jumping up a concrete oubliette. I don’t remember if this dream was scary or pleasant.
Might be a bit depressing, might be uplifting, who knows?
- Smoking a peace pipe and flying down rainbow road, looking for a friendly female ghost, who would lead me to find her bag full of mystic powder that would bring prosperity to my tribe, with my mum and (at the time of dreaming) boyfriend, then wolves lead the me to her resting place , when I returned to the physical world. Overall, a fun and interesting dream.
I have a feeling this wouldn’t be accepted for MANY reasons.
- I was hanging out with some friends, then turned into a werewolf and just left them there and ran off into the woods. I didn't scare them or anything, I just said, "hey guys, I’m a werewolf!" and just left. Another happy dream.
Can change this to one friend, either way that involves a werewolf transformation, those are hard.
- I wanted to watch a Disney movie, when I opened the DVD case, I found a bag of yellow fairy dust instead of a DVD, and poured it into the disc tray and it worked normally, I think I watched Tarzan. This has recurred on at least three occasions, with a different movie each time. Good times.
Replace Disney with a made up cartoon and this might just work; then again this might make kids think this is perfectly acceptable to replicate in real life, and it really isn’t.
- I was best friends with Jareth the goblin king, but he was a huge douche-bag (like he always is) and kept on tripping over cats with tiny wire pyramids. I was curious as to how the hell he was doing that and tried to build my own wire pyramid, but it kept falling down. Not terrifying, but not fun either.
I dunno, maybe it’s too weird, even if I make the goblin king not Jareth.
- I was certain I was dead and found myself in Valhalla, proved my worth to the other heroes, and partied it up with all the ghosts. I remember being totally fine with this and very confused when I woke up that morning. This was an awesome dream.
I have a feeling this won’t be picked up either because PAGAN RELIGIOUS THEMES and DEATH!
- There’s probably a point in time I played cricket with Crash Bandicoot. Good times.
A little boring, also can’t use Crash Bandicoot
- Buying a pair of cosplay shoes with my dad, in the middle of a zombie outbreak, neither of us gave a shit about it. I distinctly remember finding this one fun, for some reason.
Three characters, plus zombies out the window and a pair of shoes. maybe a little too complicated.
- I was Demyx from Organisation XIII. There was a huge pool noodle/ nerf gun war going on in my house between the entire Organisation. It was super fun, and hilarious. There were bases in each room of my dream house (a conglomeration of the many houses I’ve lived in) and there were small alliances of members battling against each other. I was teamed up with Xaldin (who wielded 6 pool noodles at once). It may have been a memory of a Community episode mixed with a play-through of Kingdom Hearts 356/2 Days. Super fun dream.
This is really fun, but there’s no way this is gonna work
- I dreamed I was a teenaged boy who was held captive by two teenage girls, but they kept arguing about what they were going to do with me, so I just left through the front door while they were focused on shouting at each other. Strangely, I don’t remember being scared, but rather confused.
Hilarious, but no.
- I find (male soldier) myself in military prison, I then break out and start doing some sick-ass parkour around the empty base, the forest and parked truck, I’ve never felt so free. (And then I was stalked and attacked by a huge black guy with a grenade launcher). Started off nicely, then got terrifying.
I sincerely doubt I can draw the parkour soldier.
- My best friend came over to play video games. When I woke up I remembered he'd been dead for a few months. A profoundly happy dream.
This is gonna make me cry while I work on it
- I was a huge male monster who fell in love with a small female blue imp and went on adventures in the wilderness beyond the destroyed city, swung around the towers like Spiderman and had fireside chats at sunset. (And then I murdered her, after fighting another monster and absorbing its rage). Another one of those started off great dreams, then suddenly warped into a nightmare.
This is maybe a little too complex and weird for Yagan square, also the nightmare I’d wanted to explore as my initial backup plan
- I was with a friend in the city, and they dropped a coin, I followed it and jumped over a bench to pick it up. Instead of picking up a coin it was an apple. I was super confused, and threw it back to my friend. This is what happens when you eat cheese before bed.
This is easily the simplest excerpt from my Bison Cheese-Dream I can do. Seriously the Bison Cheese Dream, it’s so friggin weird, but I love remembering it.
- I was waiting at a bus stop, and get on the bus when it arrives. However, when I pay the fee and walk in, the bus's dimensions are entirely wrong. The seats go in the direction of the door, instead of back into the bus; which is definitely not what the bus looked like when it pulled up to the stop. I just couldn't deal with how stupid the dream was and just woke up, thinking I’m done with this bullshit. Neutral dream.
This looks good
- I was walking through a forest and in a clearing I see something on a stump. I walk up to it, and it can’t decide if it is a treasure chest or a dragon egg, and keeps glitching like this as I look at it. I resolve not to drink it and continued down my path. Decent, but not great.
This is actually a guided meditation, not a dream, but whatever. This also looks good.)
- I ate a coke slushy, and ran barefoot around a carpark in the dark. (Put some creatures in it). One of those neutral dreams again.
Somehow this might come off really creepy
- I probably made friends with a huge monster, or a skeleton and played with them at some point or another. These are good ones.
If someone thinks this isn’t heart-warming, they are wrong
- Surely I can put in my 'get to sleep' mechanism, of flying through space with dragons towards the great library.
This looks like fun, but scene transitions and multiple dragons. Might pair this down to just one dragon flying thru space to the great library…
After I’d finished typing up my list, I asked my fellow students what they thought of my dreams.
One of them looked at one of my dreams, which I’d thought would be too creepy, and adapted it into his own story of a small child dancing with a robot. It is adorable. He also thought pouring a bag of sand into a DVD player was totally fine and wouldn’t result in dumb kids copying that.
Another thought wall jumping up a concrete oubliette was a good idea, I have a feeling they don’t know the meaning of the word ‘oubliette’. (It is a dungeon-hole. You throw people in there to forget about them, the only door is a trapdoor, way up high from the bottom of the hole; escape is impossible.)
Another person I found out had a severe phobia of being kidnapped, who also found nothing wrong with my Valhalla dream.
Following this I was able to narrow these down to the dreams with no nightmare content, pre-existing IPs, anything too long or complex or anything with religious content down to:
- Astral planning with my dead friend
- Excerpt from the Bison Cheese-Dream (coin to apple)
- A dragon flying to the great library ‘get to sleep’ mechanism
And resolved to try and modify them into something usable. Eventually I dropped the dead friend dream, even though I had planned to not include me waking up and realising he’d died, keeping it basically just us happily playing Tekken (or possibly an early form of a fighting game I plan on making, because, well Tekken is an existing IP), purely because I was in no way ready to immortalise him yet, also… it’s a fighting game, which is violent, and therefore not G-rated.
I attempted to make a storyboard out of the Bison Cheese-Dream and tried to modify it to make it more weird and surreal, but it was too short and not very funny.
Which left me with the dragon flying to the great library … which was fine, but came off quite boring, so I’d tried to add in obstacles, and a grumpy dragon librarian, demanding and overdue fee and it all turning out to be a dream. However, my lecturers found this also rather uninteresting and informed me that pinning human problems on a dragon isn’t particularly funny, instead I should try thinking of what a dragon would be late for.
So, I wrote a list of what a dragon could be late for, and found that being late to kidnap a princess would be a logical conclusion, simple, playful and silly. The extent to which it initially ran involved the dragon, a cave, a mountain pass, a forest, a Goth princess in a Goth castle, her father the king of all Goths, a wizard, and two armies fighting including trebuchets flinging cows. This was understandably far too complex all the sudden, so I’d removed the armies and trebuchets.
Then I’d written a personality sheet under the instruction of one of the lecturers.
The Dragon (name pending)
What is the day-to-day life of dragon like?
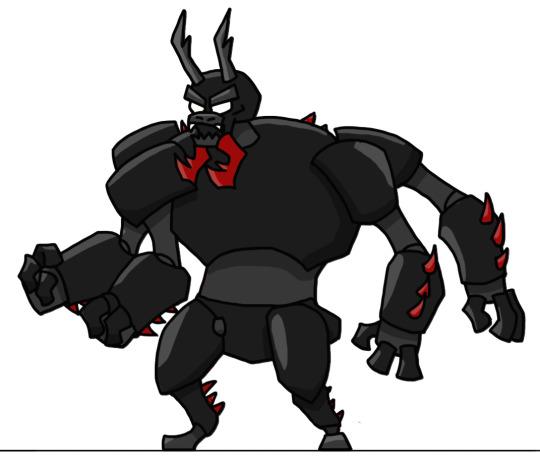
The dragon is the friend/ pet/ summoned creature for a local evil wizard, so thus, he acts as the wizard’s muscle, he scares off knights, guards his castle, steals/ kidnaps things for him, does the laundry and keeps the candles lit in the tower. At night he goes back home to his cave and reads. While everyone thinks the dragon is a tough, scary brute he is actually really shy and nervous, and hides that under a facade of draconic strength
What is important to him?
Keeping his master happy, a full belly, a good book to read, the safety of Goth princess.
What is their ultimate goal/ purpose?
He really just wants a friend, in particular: Goth princess
FATE WOSE THAN DEATH?
- Wizard master forces him to murder the princess
- He becomes the ferocious monster his master actually wants him to be
- He kills the princess accidentally
- Other such things in similar vein, he is a gentle soul
It was at this point I packed away the wizard and figured I could use these characters in a TV/ web cartoon considering their relationships, and how this could drive some very heartfelt drama, in a comedy-fantasy setting.
Then I made up a treatment and refined it into a script, and refined that further. Then I began to do some concept art for the characters. It had occurred to me that drawing quadrupeds in ¾ view is difficult, and trying to draw a fully detailed beefy dragon in motion is going to be awful, so I had to remove some of his less than necessary spikes.
The biggest conception challenge was… drawing a teenage girl. I have been drawing exclusively male characters since I was 3, and that has been a massive detriment to my ability to draw. So my first attempt at drawing a 15 year old Goth girl ended up looking an awful lot like one of Michelangelo’s paintings of a woman. (Incredibly muscular, with very vague, very bad attempts at feminine form, and just wrong breasts.) I had to speak to a drawing lecturer to explain female bodies to me. (Which is annoying since I have one, and only recently began to look like one) It turns out women have softer eyes, less jagged hair, smaller noses and eyebrows, thinner necks, more flat, level shoulders (men have larger trapeziuses, making their shoulders appear to slant diagonally.), an hourglass figure (not necessarily bigger hips, but pinch in the waist a little, making the shoulders and hips level, since males have shoulders wider than the hips.), thicker thighs, thinner shins and smaller feet. (The legs thing is just how I draw people, because I always draw pants, the actual human leg anatomy tends to stump me.) Then I simplified her dress, and boots, and made her hair a nice long curved triangle.
Then I went on to create the storyboard and made some small changes as recommended by my lecturers, then returned to most of my original story, and truncated the original ending (which involved everything turning into melting chocolate and Goth princess playing an electric guitar while pulling a wheelie on a motorcycle, which is just too much) and having the dragon panic when he mistakes his teddy bear for the bear in his dream.
Somewhere after this came time to pitch the story to the lecturers and it was approved. However, the dragon’s intentions are still unclear, to be honest I was not up for having the dragon try to eat the princess, but the lecturer said it was a good idea, so I ignored it. He also recommended that in order to get the story up on the screen I separate frames like a comic. This I felt was a good idea.
At some time after this we had a ‘student marketplace’, in which we gather up everything we’ve made and advertise it, asking for help from someone of a separate artistic discipline so everyone gets to mingle and get used to the idea of working with people of separate abilities. Since I had a driving test scheduled on the same day, I couldn’t attend and talk to the other students about their projects and instead gave my lecturers a PowerPoint file and three pages worth of adverts and sign-up sheets with my student e-mail on it, describing my abilities for joining other projects, and asking others to lend their abilities to my project, and the lecturers would set it up in one of the marketplace rooms. After failing the test, I returned to school the next day and looked at everyone’s adverts, none of which interested me until a few days later.
I’d found a small flyer for a short animated action film with a half-goblin woman hero, a kobold and a huge lycan, asking for voice actors. I wasn’t certain if it was a film or a game, but I didn’t care, I was not going to pass up voicing something that sounded this cool and e-mailed the project owner. I received the PowerPoint showing the story, animatic and concept art and got even more excited, and spoke with the owner, who asked for a sampling of exerted vocalisations (the woman and the kobold fight the lycan, so fighting grunts and hurt grunts.), so I tried out voicing all the characters.
When I voiced the woman, I found out I sound exactly like Link from the Legend of Zelda, which is not what anyone is looking for, even when I tried pitching up my voice. I then got overexcited and tried out the lycan, and began to growl, roar, bellow and bark; which I think sounded great, but needed some post processing for added depth and resonance. I also discovered I still have no idea how to scream from the stomach, and ended up roughing up my throat. Which understandably ended up badly affecting my attempt at voicing the kobold, not too much, but it was noticeable. The kobold was supposed to have a cute, high pitched squeak and I did succeed to some extent, however it was much deeper than intended and I ended up with a nasty cough.
Then I gave over my vocal samples to the project owner who decided I was the perfect voices for the lycan and the kobold. He then recommended I voice the kobold first when the real recording session happens, to alleviate the strain on my vocal chords. What I learned annoyingly late that once again was that I had not been able to tick off my interdisciplinary work because doing voice acting, which is more in line with a film or audio engineering student thing, as opposed to animation, for another animation project, is not going to cut it. What I was supposed to do is either draw concept art or animate something for any other discipline (film, audio, design, web design or game design) or get someone else to paint the backgrounds in my cartoon, get someone to make the music and sound effects for my cartoon, or voice my characters.)
From this I spent weeks trying to time out the storyboard into a reasonable animatic, and add in more frames for clarity. And then move on further into the pencil test, which is basically using the animatic and filling in the rest of the frames so there is actual animation, but it is not as refined as the final animation, with rough lines and little to no colour. This took up a very long time, especially since the purpose of the four frames changed multiple times, and took ages to change things around, since just moving folders around for some reason didn’t work.
Around about this time, all the students were given as form to fill out followed by a one on one meeting with the lecturers, known as a TSM (teacher-student meeting.… I think?). We were asked a series of questions asking how were felt we were progressing mentally and emotionally through the course with a simple grading between in need of improvement, ok, good and perfect, and we had to write a small paragraph as to why we came to that conclusion. From there the teachers would ask you about that paragraph and explain how they feel you are developing. Suffice to say I felt fine about things, and my lecturers felt the same, with the only real suggestions being that I should try to keep an open mind (I mention rather profusely that I am very stubborn), by not going against my beliefs in future projects but being open to using different art styles and work with other people. (I wouldn’t make a pro-cigarette cartoon, but I should try to draw more than pseudo anime muscle-boys and beef-dragons, while I dunno, making friends with other interests than platformer games and action anime.)
They also praised my decision to use my Tuesdays off as a mental-health/ self-care day to de-clutter my house and watch movies that make me cry in order to release my bottled by frustrations and sadness; since not doing that leads to getting very sick and missing lecturers, which sucks because the lecturers have vastly improved in recent months, and missing hours of college facility use, reduces how much work I can do, since my home computer is very much unsuited to do anything remotely useful right now. (Aside from recording and processing video game footage for my upcoming YouTube show). Teach also said I should buy a new computer. I showed him that I mend my clothes instead of buying new ones, so will endeavour to save money to afford such a thing in the future. He looked a little stunned at my ability to surgical- cross-stich on a long-sleeved hem, possibly realising that poor students use Centrelink to pay for +50k animation courses. No hard feelings, Callum and Rach’. You guys do awesome work, and I appreciate that you think so highly of me.
At some point after broadcasting that I’m asking for an audio student to help me for the second time on one of the school’s message boards, and some guy showed up, we spoke once and a month or so passed with no mention of him making any music. Much later we met outside the toilets and he announced he couldn’t do it as he was swamped with assignments, so we broke it off.
After a small breakdown halfway through the course I used the school’s Facebook page and screamed into the void for an audio student to make some music and sound effects for my cartoon, specifically asking for Loony Toons style musical sound effects, and music. Then, very suddenly one of the audio students for my Media Studies subject shows up the next day and we get into a detailed discussion. We spoke about every single sound effect (including three different dragon screams), and the various beat changes in the story coinciding with speed and mood of the music, and exactly how long the music should go for, including the overall tone and length of the credits music. With much relief I continued on with my pencil test.
By the time of the first screen test, I had rendered out my pencil test and watched it be played on the screen, along with the rest of my class. The only real issues arising from this test was that I apparently was running at 24 frames per second, which appears a bit clunky on giant screens which should be at 30 frames per second; My scene transitions were a little fast, so I should make them at least a second long and that haven’t put anything on the other two sides of the screen.
So I resolved to fix those issues, by making the cartoon run at 30 fps, because I feel that 60fps would require more frames, and I don’t want to draw that many frames; lengthening transitions, and figuring out how to fade (and also make my transparent greys actually render as transparent) and also adding in a rough comic-book cover around the frames to give the drivers something to look at.
It was about 2 days later Stan Lee passed away, and I was feeling rather uncomfortable with having a Jack Kirby styled comic cover. I feel now that I will try to honour Stan Lee with the background, instead of feeling guilty about it.
For the second screen test I made sure to finish the character drawings and move the comic cover to face the intersection. I was asked to move the cover again, by using a different ‘mask’ to set the position correctly, without a nasty seam over the princess’s face.
I was finally called up for my actual voice-acting gig, and I met with the woman who would voice the main character, who had spent probably 2 hours speaking German, and making effort grunts. My session was no longer than half an hour, voicing the kobold… who made high-pitched noises instead of words. My directions were: ‘sound curious’, ‘sound angry’, ‘you are throwing bombs’ and ‘go nuts’. Shortly afterwards I convinced the director to let me do one lycan bellow, since he had run out of time to use the lycan, and the story was replaced with an animation showreel of just the lady and the kobold. Regardless I was rather happy with the results, and I didn’t have a scratched-up throat at the end. The director was quite impressed with my odd noises, though in retrospect, everything I’d said was a variation of “Row!”, and I could have moved along the alphabet to change things up. Oh well, my trills were nice, and he got to see first-hand that I actually can roar that loud.
I then endeavoured to make sure the various documentation required to pass this unit was looked after before finishing the in-betweens and working on the backgrounds. Some of which involved looking at how bats fly. (I would have looked at bees, but I have no time figure out a complex movement as that); proving that I do speak with an audio student; writing up the other blog on how to draw Ignis, sweeping the floor; further filling up this blog with the many and varied things that go into making the cartoon like TSMs: the various stages of production happened; bumps and triumphs;
Figuring out how to get pictures off my phone and building a simple rig in Adobe After Effects. (I detest using shadow-puppet style animation in a 2D format, when the option for cell animation is right in front of me. I have seen it done well; I just don’t like it very much and prefer frame-by-frame cell animation, regardless of difficulty. Besides, how can you do smear frames with a rig?)
The in-betweens are exceptionally annoying, since I had about two weeks to fill in the actual animation, doing small chunks at a time, filling in the centre frames between key frames, until I had a smooth-ish movement and no missing frames, suffice to say I am rather annoyed that pre-production ate far too many weeks into what should have been production time. It took me weeks to figure out what the story was meant to be, it isn’t easy, y’know?
Background work would have to come later, as would moving around the cover in post-production to show the comic-cover to the intersection, surely the next screen test would excuse all the dark-definitely-not-traffic-light-green on the street-side of the screen, and marvel at my smoothly animated beef-dragon Ignis, standing up from a nap to observe a calendar on his cave wall.
Callum told me I had no time to do in-betweens for everything, and to instead work solely on lines and colour. So that was two weeks well wasted. Lines and colour took me about 3 sessions. Then I went and made the backgrounds for the whole screen, and the four frames. My audio student finally was able to bring me the sound I was looking for, after some confusion. He was under the impression the timing would have to be changed to fit the final animation. Whereas I thought it was be simpler to use the keyframes (which had the same timing as the final frames) to set the sound effects to, and the music remained at around about the same length for most of the production (though due to how Adobe Animate works, and my little understanding of how to use it, I ended up with an extended blank white video, after the credits rolled.)
On the final day, I spent drawing backgrounds and trying to get a stable/ correct looking render, and figure out how to separate elements into pictures and video with a transparent background. On multiple occasions Animate had issues and froze up while ‘processing strokes’. I took me a while to realise that I could just end the task in task manager (because I rapid tap cntrl+s like a crackhead) and continue where I left off, leaving me with huge chunks of time spent on another project, when I should have focussed on the animation.
During this time, I was taking a YouTube crash-course in how to use Adobe after effects, in order to piece together my video into layers, and shift them around to fit the layer mask, so that they would seamlessly sit on the screen, in the correct position I was nagged about during the screen tests. (That, and I consistently had flat dark green background while working with the animation, which I rectified by putting in a sky, mountains, a stream and finally, the castle. Green regardless of shade can’t be flat, you need variation in order for it to read as ‘not a green light’)
I fought with the Animate render settings, and hid and un-hid layers until I finally ended up with the frames and a transparent background as the top video layer; the transparent background comic cover art, which wrapped around the screen, like a Pac-man warp-hole and a flat white back for the comic frames. Once I got the audio and music, I found that Jimmy, the audio student had happily edited all the sound effects and music to one of my more recent draft videos, cut to the correct size. So, I simply placed that video under every other layer, so the video would be invisible, but the sound would still play. Then I screen-capped a decent picture and threw that onto my title card and saved it as a .png. Finally, I opened up Adobe premier, dragged in my title card and my video with sound, and stretch the title card out until the video ran for exactly 2 minutes, since the screen owners will only accept whole minutes, for some reason.
These last Three days of intensive work equated to the worst crunch I’ve had so far. On the last Friday I came in on 8:30am and sat down, and worked on the line work and colours. I didn’t eat, and went to the toilet only once, until I left at 4:00pm. I drew up a few quick drafts of the main warp-around background on that Sunday. When I came in last Monday I came in at 8:30am, sat down and finished my line and colour work, then got up and left at 4:00pm, no lunch, no toilet breaks. Wednesday was a panic-fuelled frenzy of beginning at 8:30am, and ending at 4:30pm, featuring program crashes, frustrated misunderstandings and sweat-filled overtime, hoping the next render would work, and again no lunch or toilet breaks. Needless to say I’m glad I did what I could, but I don’t want to come home late again, while smashing down two tacos while running to the train, and breaking my bladder ever again.
On Friday, my animation was accidentally deleted off the school’s Google Drive folder. So I decided to fix up my masking issues and re-upload it. It turns out that the official plans required the title card to last exactly 45 seconds, and the animation has to be in whole minutes, so I had my mate Sharif help me add in 10 seconds to the title card, and speed up the animation by 10 seconds to fit the requirements.
This had better be worth it. I’m so glad I got it done, it’s finally over. Never again will I ever make a cartoon for a cylindrical screen, even for exposure. I vote next assignment for a normal screen, so I can focus on doing something that doesn’t require weeks of jumping through so many hoops, resulting in a crunch like this.
Tomorrow is showcase night. It goes up and I’ll be free.
0 notes
Text
Blog # 8 – How to consistently draw a dragon
Trying to consistently draw a character is action is a common, yet frustratingly difficult ability to learn, and it can only be attained through practice. In animation, the character is always moving from pose, to pose, and making sure they don’t distort unintentionally (barring smear frames) is a necessary part of that, and something you need to pick up quickly. So, annoying as it may be, I’ll show you how I try to keep my characters consistent. (It’s exactly the same at drawing anything else)
With animation I draw the skeleton and overall shape and pose first to make sure the animation looks right before adding the detail. This keeps things quick, but it is messy and imprecise. Since I am a student, and get a few months per project, I don’t have years of production time to fall back onto.
First I create a model reference sheet to figure out the dimensions of the character, and get used to drawing them from various angles in a neutral pose (top and bottom is useful too, but I didn’t get around to it.) Colours are nice, so you can source them when colouring the animation.

Then, when I get an idea of a key pose, I gather a posable figure (action figure or artist’s model, or even a quickly thrown together 3D proxy model.) and figure out where the limbs go, and the sort of weighting I’ll use and probably take a photo.

Then, using that action figure, and my model sheet, I’ll make an effort to mimic the action figure’s pose with the shape of the model sheet, beginning with the basic skeleton, and some of the muscle shapes, to fill things out, and because my dragon is a huge beefmaster and needs to be represented as such as early as possible.

Then I add and refine the shape further to make sure the shape is readable and the anatomy is reasonable.

I continue to modify the shape if things look weird, which they tend to. Since I felt like Ignis needed to hunch over more, since he is supposed to be sweeping with a human-sized broom, I pushed the pose further, and made him squat more, to stabilise the stance. I could have had him full-on sitting, but didn’t go forward, as I wasn’t entirely certain of the anatomy as my references didn’t cover this pose.


In order to make sure that the shape I’ve drawn would make any kind of sense in three dimensional sense, I draw a quick grid over the major pieces. This also goes on to assist in draping hair or clothing, or placing accessories and weapons, and whereabouts shadows and highlights gather. If these don’t work out, your shape, pose and perspective need dome tweaking. I’m still green with this stuff, so my drawings won’t be perfect.

Once I’m certain my pose is usuable, I’ll finally go on to do my lineart. Adding detail and emotion to the figure to make them a person.

Then, using the colour palate from the model sheet, I put colours behind the lines.
For Photoshop users Protip: Magic wand tool inside the lines, top toolbar > Select > Modify > Expand by 2 pixels, Paint Bucket tool. You’re welcome.
I like to play around with 3 colours per character, and I find a balance messing with the Hue and saturation until I find something pleasing to the eye.

I finish with shadows. I draw an arrow representing the direction of the light source and put in the shadows on the opposite side. At the best of times I’m lost with the nature of shadows, but I try my best to understand them. This is where keeping that grid system comes in handy, or another 3d reference with a light source.

0 notes
Text
Blog # 7 - Making a modular asset
First and foremost, when creating your Goblin horde, you need get an idea of what a common grunt would look like, and draw up a front and side-view model reference, like so:

Largely speaking I based this goblin on Warcraft goblins, a few drawings I found somewhere on Pinterest, bats, pigs, and lean humans. He is short and given oversized hands, feet and head, and a mouth full of huge teeth.
Then I draw some accessories over the top:

After which, I imported the naked goblin model sheet into 3dsMax, by creating three planes and dragging the picture over to the planes, and positioning them so I could see the front, back and sides from their respecting viewport angles.

I then hid the back reference for the time being, and began to model the goblin’s face. I start out with a cube, and cut it in half, so I can mirror it later, and then define the overall readable form, not bothering much with detail .Take note that I didn’t follow the references exactly, as often I tend to draw things in conflicting and strange angles, that wouldn’t translate well, so I have to find a middle ground between the front and side references.

I steadily gave the face a more defined shape. I particular, I made the cheekbones, lip and chin stick out. Made an eye with a plane, and crated a massive eyebrow hovering over the face, and built planes sticking out of the jaws for the teeth to be textured on and a small neck.

Next I made the ears. They took some time, as I had to find a middle spot, and try to make the shape with a few polygons as I can. I also added a pupil to the eye.

Then I began blocking out the body, and added a symmetry modifier.

I then changed the position of the arm, to add in more geometry to the back, I reshaped the torso to befit the reference picture, rounded it more and shape the chest better for deformation.

Then I extruded out some arms, and detached them to make a simple arm.

I then gave the arm some basic shape…

…Then added in some more loops to the arm and the chest to give more roundness to the arm…

…Then I put in a thumb and some mitten fingers, and added more rings around the joints, to assist in deforming the model.

I then attached the arm, to the body in an ‘A’ pose (A poses are for modelling and rigging, T poses are for adding clothing.) and added more loops around the shoulder to allow for better weighting and deformations.

I removed the other half of the head and torso, as I realised that by attaching the singular arm to a body with a symmetry modifier, made everything but the arm symmetrical. Also, I grabbed all the vertices on the inner half and snapped them to the centre of the grid, so that the next time I add a symmetry modifier to it, it will actually click together, with no overlap.

Next I made the crotch and the bum. It is important to make this, so the legs can stick out later.

So then I extruded out some legs, and modified the crotch and bum to better fit. I made sure the bottom of the feet were completely flat and zeroed out on the Z-axis.

I made some knees, and moved them into position. Three loops around joints are a bit of a running theme here.

Then I added an edge loop and extruded the feet out, and shaped them up. I made the claws flat, as I plan to texture them on, instead of modelling them, much like the hands.

I added more shape to the legs and adding in loops for bending the thighs and feet.

I then realised that I hadn’t put bottoms on the feet. So I tried bridging the gaps from the sides of the feet, and noticed I had an uneven number of edge loops on the inside of the leg, and decided to remove a few, and move around a few vertexes around the foot to better plant on the ground. I finished off the edge of the foot with a triangle, as I couldn’t remove the edge loop from the back of the leg without removing the second edge loop from the centre of the body, which is a huge lynchpin for the whole model.

Here’s how he’s looking, with his current flat shading.


And here’s how he looks with smooth shading.

I discovered the mouth wasn’t working at all. The lower lip (highlighted in red) was clipping through the upper lip, and the upper lip’s teeth were lodged inside the chin.

So, I decided to fix this, by pulling the upper mouth up and the lower mouth down, deleting the old upper teeth, and duplicating the sides of the upper mouth, and shrinking them, placing them just barely clipping above the upper mouth. I also found a weird flat triangle and deleted it.
(Lower mouth indicated in red)

More loops for the neck! I put a triangle by the shoulder, I couldn’t figure out how to resolve it into a quad, without ruining the mesh. I made a tri behind the ear. I don’t know why.


Fixed up the edge flow for the crotch and butt and added a crack to the butt. This is important for weighting and animation, guys.

Now the main model is finished being modelled, and ready to be clothed.

Now, it’s time to freeze the model, so I can’t accidentally select him while I model the armour; then I changed the reference picture on the reference planes. To do this, you can literally click and drag the picture in your file explorer directly onto the planes. Don’t expect this to work on anything but planes, though, it will look weird.

I next I modelled half a helmet, and put a symmetry modifier to it.

Then I made a pauldron, with a symmetry modifier on it.

Then I made a secondary pauldron under the first pauldron.

Then I made some edge-loops on the goblin model, extruded and detached it into a separate object, put symmetry on it, and re-froze the goblin, so I can work around the model.

Then I extruded and shaped the loincloth plane around the legs.

Next, I duplicated the helmet, and flattened it down into a shield.

Then I made an axe, and set it in the Goblin’s hand.

Instead of extruding out the gauntlets and boots from the model, as a set of new models, I’ll make them into an alternate texture.
Next I tried resetting the x forms for all my objects. Initially that didn’t work. So, I removed the symmetry modifiers, and made all the objects face exactly forward on in the world space. Then I moved all the pivot points to the centre of the objects, reset all the x forms and collapsed all modifier stacks. Then, I put added new symmetry modifiers.


I thought I’d test out how well the symmetry is working, so I put a UVW modifier on it, and turned on the checker pattern texture checker, things seam ok, but UV’ing with symmetry modifiers tends to break things.

Next, I made the UV Maps for each item, and the character.
To start off UV mapping, I’ll begin with the helmet. For an extensive look at how I UV map and texture, please see my blog specifically on that here.: https://ironninjacreator.tumblr.com/

Then I put a texture on the helmet.

Then I UV mapped the body.

Then I UV mapped the shield

Then I UV mapped the Axe

Then I UV mapped the pauldron

Then I UV mapped the loincloth

Then I textured the body

Then I textured the helmet

Then I textured the shield

Then I textured the axe

Then I textured the pauldron

Then I textured the loincloth

Then I made the alpha map for the body

Then I made the alpha map for the loincloth

Here he is, all done!


0 notes
Text
Blog # 6 - How to UV Map and Texture in 3DsMax
Here’s how I UV’d the Goblin’s helmet from my next blog.
If you’ve already built half the helmet, moved the pivot point to the centre of the helmet, reset the x forms, collapse the modifier stack, then go ahead and chuck on an Unwrap UVW modifier. Or, y’know do that first.
Once that’s done, for some reason 3DsMax really likes to give you seams where it thinks you want them, trust me, you want them somewhere else, if the incredibly messy results in the UV editor window are any indication.
3DsMax doesn’t like UV Mapping objects with symmetry modifiers on them, so make sure you delete any symmetry modifiers you are using, you can use them later, after you make the UV map, and are in the process of texturing.

Cntrl + A in edge mode, and hit the Reset Peel button here, to get rid of those awful auto-seams.Thus, you now have no seams, and now the UV editor window has a bunch of overlapping flatness as a singular UV island. That’s not going to texture at all. What you want to do is cut seams into the model to make easy to texture UV islands.

To do this for simple inorganic objects, select all (cntrl+A) the model and UV islands in face mode, and click the Flatten By Polygon Angle button. This results in a small set of UV islands. However, we are not done yet.

You’ll want to start selecting and breaking off edges in places that make some degree of sense. For instance here, to separate off the rim of the helmet, select this ring and break it off.

For the rest of this, you want to start connecting pieces back together, by selecting an edge on the model, and finding the two edges on the UV window, picking one and using the Stitch Custom button.

Continue doing this until you feel the UV islands make sense, and the checker pattern texture checker looks consistently sized and not deformed. Like so:

If the checkers look deformed, select an island with the cube button and face button highlighted, and go to the Tools tab, and select Relax… from there, let the island relax into a position. If this still looks bad, try breaking up the island again by selecting the edges on either the model or the UV editing window, and using the Break button, to the left of the Flatten by Polygon Angle button.
I tried to connect the rims together, but it didn’t work. Now that that’s all done, Go to the Arrange Elements section and set the Padding to 0.002 pixels, and click the Pack Normalize button.

You then go ahead and save the UVs, though I have no idea what to do with that. In order to texture the object, we need save these UV co-ordinates as a picture, so we can draw over it in Photoshop, or picture editing program of your choice. To do so, go to the Tools tab, and select Render UWV Template.
In the height and width blank, the size is automatically set to 1024 x 1024 pixels. I like to set the size to 2048 x 2048, as it gives me more ‘texal density’, or size allowance for sharper detail, since I like to use clean lines.
Once you’ve picked a size you like, hit that Render UVW Template button.

Now, if you picked a bigger than average size, don’t freak out if you can’t see the lines in your rendered picture, it’ll show up in the actual file you save it out to. To save it, click the save button


(it looks like a floppy disc), give the picture a relevant name and save it out as a .targa file. I don’t know why, I like .pngs, but my lecturers tells me Targas only.
Now, it’s time to test out the picture, and apply it to the model.
Simply open the .targa in Photoshop, unlock the first layer and use the Magic Wand tool and click on the empty space, then right click and select Select Inverse. Cntrl + Shift + n to create a new layer, while the dotted outlines are still on the wire, then on the new layer, with a large brush colour in all the islands with a colour. Then save it as a Photoshop file to work with later, then a .png to test out with.


To apply the texture to the model, open up the Material Editor in 3DsMax, on the ribbon.
Then pull the Bitmap node out of the Maps section onto the grid. This opens up a window for you to find your .png texture.

Then, from the little circle on the side click and drag out, which opens up a dropdown menu, pick Materials, then Scanline, then Standard. Then connect the bitmap node to the Diffuse colour circle.


Then click and drag the Standard material node onto the helmet. Then click on the Bitmap node, and then this tiny button indicated by the red arrow in the top left area in the material editor window in order to see the texture. It is very hard to see, and very easy to forget. Try not to.

Now, drop a symmetry modifier on it, and you’ll find the picture is flipped and duplicated on the other side of the model.

For comparison, this is how to UV map and texture an organic model. Same as before, remove the symmetry modifier, and add on a UWV unwrap modifier and reset the peel seems.

Next, we are going to use Peel Seems. Use the Point to Point selection, to cut seems along the body and create a sort of plush toy pattern. When you are done drawing the seam, click Quick Peel.

First cut off the head, it needs the most detail, because it’s a face. I’ll continue cutting inside the mouth, then move onto the major parts of the body.

I made a cut around the shoulder and wrist. the bottom of the palm I cut off from the top, and a cut under the arm. For the most part, these cuts are the same cuts you find on shirts and gloves. Similarly, I cut down the inside of the leg, after separating it from the body, and the ankle, like pants. Like the hands, I separated the bottom from the top to make it easier to draw the palms and soles.


I hid my seams behind the floating eyebrows. I separated the ear from the head, and cut down the outside side, to make it easier to remember what I’m texturing. I made the top and bottom inner mouth two flat pieces. The teeth planes are already separate.

This is the result of my seaming so far:


then threw on the checker test pattern to see how my seams were working.
I have no idea when or how, but the eye planes somehow broke… They are welded together.

I had to go back into modifying the model, and breaking off two vertexes stuck together, and moving them away from each other. Then I moved the vertexes of the eye UV islands so the checker pattern made sense.

Then I resized the head, mouth, teeth and eyes, set the packing to not resize, and hit pack normalize. And rendered out the UV file as a 2048 x2048 targa

Now, that you have the picture applied to the model, you can go into Photoshop and update the picture and save it under the same name, and it will update in 3DsMax. I recommend swapping between 3DsMax and Photoshop to check on how your texture is working and where to put in lines and colour as you go, making sure you eliminate the appearance of seams first, and line up lines, then add in details, and saving every so often under the same name. To check, move around in the 3dsmax viewport, as the texture isn’t likely to update immediately.

I drew a metal cage around the leather cap.

I added shading around places that would recede, and highlights on places that would jut out. (On a separate layer, with the transparency turned down) Then, using a spray-like brush, I made a series of dots, and blurred them, with low transparency; giving the detailed appearance of wool, leather and steel. The underside of the helmet is made darker, because it is always upright.

And there you go. Now save them out as their final named .pngs, .targas and photoshop files, in case they still need editing.
0 notes
Text
Blog # 5 - 3DSMax Symmetry
There are multiple ways to make it so when you change an object on one side, the same changes happen on the other side in real-time. Before we explore that, create a primitive cube, and convert it into an editable poly

Then with a swift loop, cut the cube in half on the x axis, grab all the vertexes, and set them to 0 on the x axis.

Now, we could use the Mirror tool (Second ribbon from the top ribbon, indicated by a two squares split by a vertical dashed line.) , and set the Mirror axis to X, and the Clone selection to Instance


However, when you do this, this creates another object, which you have to attach later, and properly weld in the centre. While modelling, it is very easy to click on the other object, and move it around; so you should freeze it, turning the second object white.

Also, if you try UV mapping and texturing your object, while it’s still two separate pieces, you can only see one side with the texture on it.

So I prefer to instead use a symmetry modifier, which also allows you to manipulate a vertex, edge or plane on either side of the object, and duplicate that change on the other side. Also, while you are UV mapping and texturing, the picture is flipped and duplicated on the other side, too.
You can do this easily, by going into the modify tab on the right (the white curve in a teal box), and click on the modifier blank, and type in ‘symmetry’

Then, when the modifier’s settings pop up, set the axis to mirror on the x axis. If it isn’t working quite right, check the flip box, and move the orange mirror axis gizmo to the centre of the world

Then, in order to see the real-time changes, click on the test-tube button under the modifier stack window

This also applies to UVs and textures, which massively increases the amount space on your texture maps, leading to cleaner-looking textures. Remove the symmetry modifier used during modelling while making the UV maps, and then re-add it for texturing (this applies to diffuse texture maps, normal/ bump maps, secularity maps etc.) after resetting your X-forms. This is because symmetry breaks the UVs immediately and constantly while trying to uv. Apply it once the texturing is finished

There you go.
0 notes
Text
Blog #4 - Interdisciplinary Work
During my studies of a Bachelor of Animation, I was told to do some work for another group of students, outside our Trimester level. We all set up what we were working on across two classes and were asked to check out what everyone else was doing and pick whatever looked cool to you. What no one informed me of was that the team we worked with had to be from another artistic discipline (web design, game design, audio engineering, or film… not animation) halfway through the trimester as I was happily working with another animation team, I was suddenly told to split from the team, and check out a game development team. Since the secondary animation team was horribly understaffed I felt bad about it and tried to work with three teams for about a week, while thinking up what to do with the game dev team, eventually I broke off from the animation team.
Long story short, the game dev team quickly realised that character designer/ animator me wasn’t going to draw good spaceships, so they told me: Draw some aliens. So I did.
Here is a quick stock of alien sketches I did for the game dev team.
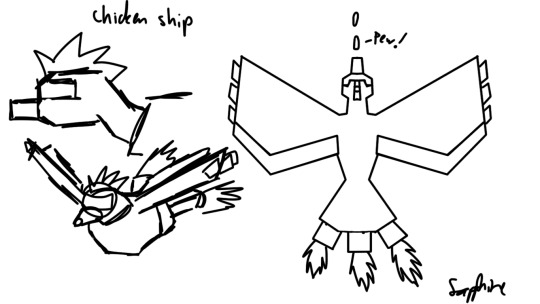
So before I was asked to draw aliens, I took a crack at drawing a spaceship, I promised it would in fact just be a metal chicken, and I’m sure I did indeed deliver a metal chicken. I recall a lecturer from my Tafe days showing me the works of Feng Zhu, who taught art students, and drew vehicles inspired by the animal kingdom, mostly fish. So… I drew a chicken, because I like chickens.
Understandably, I couldn’t go far with my brazenly absurd and above all…well, bad spaceships.
So, when I got the note that I should shift to character design instead I breathed a sigh of relief, then sighed again for disappointment, as this was still very much a science fiction game, and drawing monsters tends to be rather different from drawing monsters… and my strengths are in drawing humans, animals, furries and monsters. Aliens would be difficult step, but hey, at least I’m drawing something organic, can’t complain.
So back in Tafe, I was running with a group making a cartoony sci fi platformer, and I’d drawn astronauts, T-Rexes and common Greymen. So I thought I might as well throw in a grey to start off with.

As I’d been spending months writing essays and blogs and building things in 3DsMax, it had been an unreasonably long time since I’d actually drawn something, seeing as Greys are rather neutral humanoids, they are a good alien to experiment with how you are going to play with proportions for a given set of characters. These guys were scrapped pretty quickly, but I have no problem with that.

So after I’d drawn the greys, I thought “bugs are sci fi, right?” and totally was not thinking of the movie I saw that weekend and drew two entirely random bugs. I was trying to determine if the bugs in the game would be centaurian (hexapeds with two arms and four legs) or four-armed bipeds. I like my bugs nice and chunky, so I drew the limbs a little thicker. My wasp I feel doesn’t look particularly exciting. So I moved on to other bugs.

Recalling that some people are terrified of moths and butterflies, I thought I try drawing a vicious moth-man. Had I bothered to look up moth-man legends I might have actually drawn something scary, but instead I came up with this hilariously bad joke of a moth alien.

So I came to the conclusion that if I was going to draw a decent bug-alien, I would have to make it something big and strong and tough. So I thought of beetles, they’re tough, and pretty huge. I drew out the form being mostly triangular, with a greatly exaggerated upper body; and found out I prefer four-armed Biped aliens to centaurian bugs. Since I am not an entomologist, I just threw in all the insect mouth-parts I could think of on a human-skull-shaped head and gave it horn-like antennae. In order to further exaggerate the ludicrously tiny legs, I just left him with actual beetle legs, which don’t really look like they have feet. I made the abdomen rather small, and mostly for balancing purposes, and just threw a bunch of spikes on him where I felt they were needed. Strangely the whole dev team liked all of my bugs, but the War Beetle was definitely the best loved.
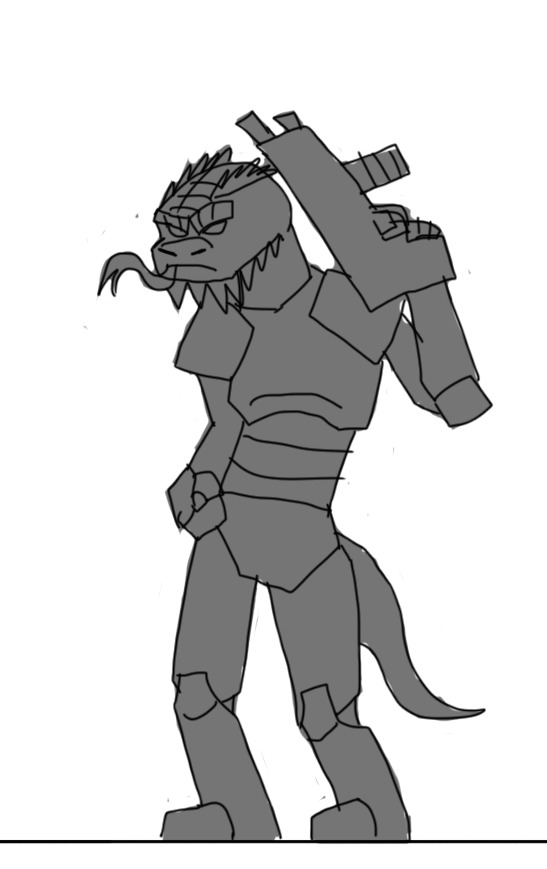
Reptilians are a given, after greys and bugs, and apparently before Lion-Men, according to my alien conspiracy friends. This one is a standard grunt, mostly modelled off Ratchet and Clank robots and a certain Ratchet Deadlocked skin called W3rm. What isn’t from the game wasn’t playing last weekend is that he is in fact bearded dragon, holding a crappy gun, because I just can’t draw guns at the moment. Swords? No problem. Guns… problem. I tried to draw him in an IDGAF bad-boy pose… I don’t think it worked; however the dev team liked it.
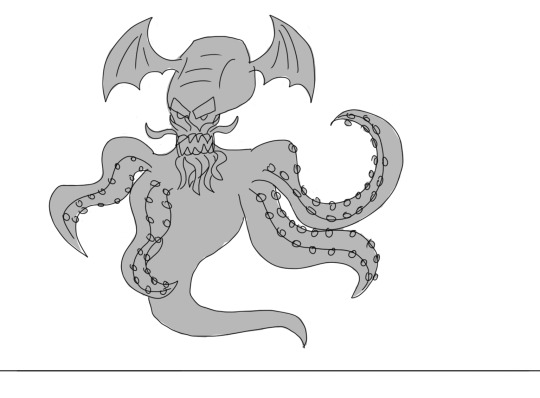

The dev team was strangely insistent on my drawing an eldritch monstrosity inspired by a cephalopod. I frankly, do not understand this wave of interest in the works of H.P Lovecraft, I consider the man a racist jerk with serious mother issues. Plus I’ve never read anything of his as I just don’t have an interest in his stuff. So yeah, I drew some cephalopods with bat wings on their heads. That’s probably as close to drawing Cthulhu, Shubniggurath, shoggoths or any other abominations of R’yleh I don’t care to learn the names of. Understandably, the dev team didn’t pick either, because… well, look at them.

When I informed the dev team that I’m not particularly great with aliens, I let them know that without a doubt I was going to draw a cyborg dragon. My only real concerns with this picture are that the not enough of him is robotic, particularly is right arm, jaw and wings. Also the silhouette isn’t very good, I doesn’t clearly show off his six limbs. However the dev team was quite entranced with him, likening him to Charizard of Pokémon fame.
Now for the final coloured versions of the top 3 characters the developers chose.
To be honest, I have no idea what I’m doing with colours, and I began with red for all of these guys, and used the Photoshop Hue and Saturation tool to change layer colours until I went through the rainbow, saving out .pngs, and picked out my favourite colours from there.

Red Army Ant
I redrew the arms, and shoved a gun in his hands, it shoots plasma. I’m not amazing with guns, but whatever, I gave it a shot (hehehehe…) I picked red colour, because ants are usually red or black in colour.
Dread Scarab War Beetle
I call this colouration ‘dread scarab’ because red and black are scary. I wanted the viewer to feel as if the spikes are either poisonous, or covered in blood.
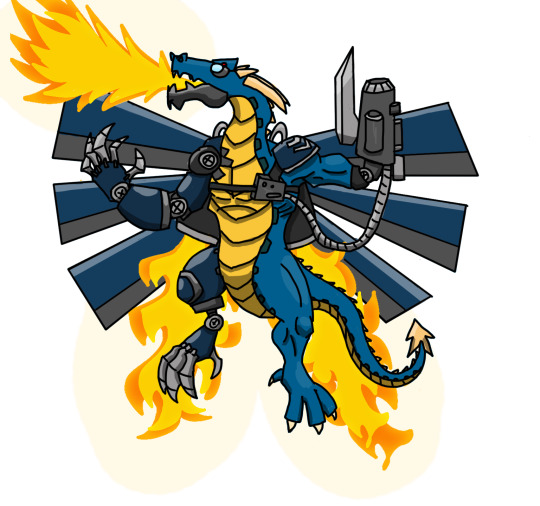
This guy I decided to redraw the cyber-dragon with a more dynamic pose, in order to show off the 6 robotic wings and make the arms easier to read. I felt that the war beetle was already super beefy, so I toned down the shoulder length. Then I made the tricked out gun and connected up a wire to a small machine by his heart. I completely forgot my initial ‘harlequin’ bionic setup, and put the other leg on the same size as the wholly robotic arm, but I still think it works. I also drew some crappy fire.
I hope you have enjoyed my concept art blog :)
0 notes
Text
Blog #3 - Including everyone
I love movies, cartoons and video games, and I want other people to find joy in these mediums as well. However, not everyone can share my joy, as video games in particular tend to bar off anyone who doesn’t fit the stereotype.
Women and girls are often put off by either a lack of representation, or very bad representations (weak, or ridiculously sexual) of their gender, if not the harassment they may face should they dare interact with a game’s community, many of which tend to be horribly toxic. If you’ve ever wondered about female representation in media ,there is a simple test you can perform to determine how inclusive of women a work of art like TV, movies and video games can be gauged by the Bechdel Test, coined by Bitch Magazine comprised of two rules:
1: There are 2 named female characters
2: They talk to each other about something other than men.
You may be shocked to find how rarely a work passes this test.
The Bechdel Test can also be applied to any other minority in a work, for instance, you can substitute 2 named female characters for 2 named black characters, talking about something other than white people, or 2 named disabled characters who talk about something other than able characters, or even in fantastic examples with two named non-human characters talking to each other about anything other than humans; even then you may find it interesting to note how rarely works ever pass this test.
On the topic of race, I find it disturbing how in this day and age creators fall into damaging stereotypes, tokenism and cultural appropriation; even I myself have found it hard to depict race in a work, and to not end up coming off racist. The only way to really get around this issue is to include people of the race you want to depict in the creation process, do your research on the culture and talk to them during the process to make sure you are properly representing them; because believe it or not a person who belongs to a particular group decides what is offensive to that group, rather than anyone on the outside looking in.
Finally, gaming is a rather elitist medium, with things many ‘hardcore’ gamers take for granted such as just knowing standard control layouts can be very off-putting to anyone new trying to join in and play, as these concepts which are hard-wired into our heads, simply aren’t obvious to newbies, and it’s a rare thing a good tutorial actually explains these, if not at least point them out. Were it not hard enough for an able-bodied or minded newbie to try playing, it is extraordinarily difficult for anyone with a disability. Physical disabilities such as lack of limb, limited or no limb control, motion-sickness, deafness and the varying degrees of blindness can make gameplay at least difficult, if not impossible by normal means. Simply put, games can be optimized during the testing stages of development with options to modify:
- Visual and sound cues to benefit colour blind and deaf players and add in
- Text size, font and colour,
- HUD size, orientation and colour,
- Gameplay speed,
- Mouse/ analogue sensitivity,
- Aim assist, camera controls,
- Button remapping (including one-button for multiple uses and degrees of automation),
- Hints or auto-solve puzzles
- Adjustable Difficulty levels, with description of what to expect
While this does bring up the ‘Does Dark Souls Need an Easy Mode?’ argument, I’ll agree some games are designed to be very challenging, I find it awfully rude to outright exclude a large chunk of potential gamers who may want to experience a game simply because it was designed purely for ‘hardcore’, able gamers. I believe that if you bought a game, it is yours to play with as you please, and thus relish playing on easy mode, because I like to experience story content without being bogged-down by what can be sometimes overly complex, or difficult gameplay, and there are many believe that challenge is intrinsic to video games, I find that what makes video games video games is their interactive-ness, with challenge being a nice extra.
In extreme cases, physically disabled players require 3rd party controllers designed to cater for their condition, however, programs such as nProtect Game Guard block the use of these controllers in competitive play in some games, as they are considered cheating devices. This outright blocking is unfair as this does not allow extremely disabled players to play with everyone else, on a reasonably level playing field.
Mental disabilities and mental illnesses also can make gameplay difficult, as modern video games become increasingly complex, and tutorials being ridiculously long, or poorly designed, or straight up not included, this is daunting for anyone with a learning impairment. Let’s not forget that mental illnesses make gaming harder, one such interesting thing that has come to my attention is the over-use of jump-scares in horror games which is definitely going to prevent anyone suffering from anxiety, or any heart-related issues. While it may seem weird that anxious people would even consider playing horror games, people have their interests and want to play regardless, and may even enjoy the atmosphere, but are too disturbed by contemporary horror media’s overuse of the jump-scare. Personally, I think jump-scares are thoughtless, and lack style and gravitas; compared to oppressive or haunting atmosphere, which don’t do much aside from confusing and shocking the player for a cheap scream.
Generally speaking, I believe that creative who go on to make their art, should really think about how their work will be interpreted, and try to include as many people as they can, after all, we need money in order to feed ourselves, right? Why not broaden your impact, and try to make it a brush stroke on the canvas of history, instead of a bruise.
1 note
·
View note
Text
Industry Blog #2 – Phil Fish, how to represent yourself
I read week 3’s Social Media and Your Career topic and learned that social media use is important for self-promotion, if you want to get paid. Generally speaking, it went on about linking your website with your social medias, picking social medias to use and what to do with them, which for the most part concerned acting like an actual human, because people like that. People don’t like talking to companies or robots, they like talking to other people, so compose yourself tastefully and say what you want/have to say, how you would actually say it. I know, what a revelation, right?
Keeping the audience engaged is important, update your followers on where about your project is, ask them for assistance, reward them with challenges which in turn reward them with non-monetary bonuses. Really get to know your audience and talk to them like you would anyone else. Show them what you’ve got.
Figure out your audience and cater to that. Is your audience broad and general demographic? Then make something everyone, or at least most people like.e.g. An explosive summer action movie. Is your audience very particular and specific? Do your research on that thing and make something that will appeal specifically to that audience.e.g. make a Science Fiction film. Or, try both. Make something broad concerning something specific. e.g. Make an action movie, in in a Sci-Fi setting, balancing your demographics carefully, care taken designing your tension cycles, and trying not to bog down the audience in expository techno-babble.
However, the most important lesson from it was: Don’t be Phil Fish. Phil Fish is an infamous ex-game developer known mostly for being an asshole, and secondly, for making the game Fez. Phil Fish ruined his career by being very abrasive and unprofessional online and on panels, which made him a gigantic hate-sink among the gaming community, finally forcing him to stop making games. So, I shall use Phil’s career as a symbol of how not to compose yourself professionally. Instead of being aggressively blunt, flaunting my successes and showing up absolutely everywhere to get my name out; I would try to tone down my bluntness, by remaining sincere, but friendly and most of all, polite. I will try to remain humble, by not showing off. I shall also refrain from showing up to too many interviews, panels and forums, I will only go in if I deem it worth my time, and worth theirs.
2 notes
·
View notes
Text
What is most important to me, as an animator
From a list of twelve things originating from a lecture a week or so ago, I consider these tings and why beginning with:
Firstly, the very most important thing to me is satisfying my creative vision, as I seek to develop my art, I love creating things.
Secondly, a want to contribute to the art-form as I want to add to the richness of animation and character design, leaving my mark on the world.
Thirdly, I want to help others realise their visions, because I understand that it can be very difficult to get something looking right.
Fourthly, I want to influence public opinion as I want to make changes in the world to better the environment, and the people inhabiting it.
Fifthly, I like the excitement of working on an animation, or character design.
Sixthly, I want a steady income, because I like knowing when and where my money is coming from; it gives me piece of mind, and allows me to continue my current lifestyle.
Seventhly, I would like, not necessarily flexible working arrangements, but rather consistent work arrangements, set at reasonable times, in order to befit my normal schedules.
Eighthly, I want to be well connected so I can get jobs and recommendations.
Ninthly, I might like to make lots of money, because I want to buy a house, and some neat stuff.
Tenthly, I may want a big hit, getting a big hit, would result in recognition, and a good shot of money, however, recognition demands higher expectations of more frequent and similar releases.
Eleventhly, being well-known to the public would be nice, and widening my influence, but it also leads into my last issue.
Twelfthly, winning the respect of my peers would be nice, but I don’t really care much about what others think. Lastly, winning awards is nice, but I really don’t care, as long as I think I did well.
4 notes
·
View notes
Text
Well, this is weird...
Greetings fellow SAE students, and assorted randoms!
This is my first Tumblr account, and it will be used solely for the completion of my Bachelor of Animation at SAE (a sweet art college in Northbridge Perth, Western Australia). I feel I may get another account later, when I get a job, so... yeah this account will have remarkably little on it, and few of it interesting (unless you like hyperboles and sarcasm, which I will unashamedly use, throughout this academic endeavour).
Anyways, party on dudes.
0 notes