
Intogeeks offers a comprehensive service tailored for users seeking to optimize their virtual machine experience with macOS Sonoma. Our team specializes in the creation of custom macOS Sonoma ISO images, specifically designed for compatibility with Windows PCs, VirtualBox, VMware, and other virtual machines. By leveraging our expertise, users can effortlessly set up and configure their virtual environment, enjoying the familiarity and efficiency of macOS Sonoma without the need for dedicated Apple hardware. With our step-by-step guidance and expert support, you can embark on your virtualization journey with confidence, knowing that you have the backing of a trusted partner every step of the way.
Don't wanna be here? Send us removal request.
Statistics
We looked inside some of the posts by intogeeks and here's what we found interesting.
Average Info
Notes Per Post
1
Likes Per Post
1
Reblog Per Post
0
Reply Per Post
0
Time Between Posts
9 days ago
Number of Posts By Type
Text
12
Last Seen Tumblr Blogs


Fun Fact
Mobile Tumblr US users spend an average of 4.04 minutes per session on the app.
Text
Download macOS VMware Image and Set Up Your Virtual Machine
Creating a virtual machine with macOS on VMware is an excellent way to experience Apple's operating system without needing a physical Mac. Whether you're a developer testing apps, a tech enthusiast exploring macOS, or a Windows user who wants to try macOS before committing to new hardware, setting up macOS on VMware is a practical solution. This guide will walk you through the process of downloading a macOS VMware image and setting up your virtual machine, making it a straightforward and accessible project.
Why Use VMware for macOS?
VMware is a leading virtualization software known for its robust features, reliability, and ability to run multiple operating systems simultaneously. By using VMware to create a virtual machine, you can run macOS on your existing hardware without needing to dual-boot or risk any data loss. This method is particularly useful for developers, testers, and users who want to experiment with macOS without investing in a Mac.
Step 1: Download the macOS VMware Image
The first and most crucial step in setting up your macOS virtual machine is obtaining a VMware-compatible macOS image. This image is essentially a snapshot of mac os sonoma that you can load into VMware to create your virtual machine. Here’s how you can get it:
Official macOS Installation Files: If you have access to a Mac, you can download the official macOS installer from the App Store. However, converting this installer into a VMware-compatible image requires some technical know-how.
Pre-built macOS VMware Images: For a more straightforward approach, you can download pre-built macOS VMware images available online. These images are typically configured and ready to use, making the setup process much easier. Be sure to download from reputable sources to avoid corrupted files or potential security risks.
Compatibility Considerations: Ensure that the macOS version in the VMware image is compatible with your version of VMware Workstation or VMware Player. Also, check that your hardware meets the minimum requirements to run macOS as a virtual machine.
Step 2: Install VMware Workstation or VMware Player
If you don’t already have VMware installed on your system, you’ll need to download and install VMware Workstation (for Windows/Linux) or VMware Fusion (for macOS). VMware Player is also an option if you're looking for a free solution, though it has fewer features than Workstation.
Download VMware: Go to the official VMware website and download the appropriate version for your operating system.
Install VMware: Follow the installation prompts. The process is straightforward, but make sure you have sufficient disk space and system resources to run a virtual machine.
Install VMware Tools: VMware Tools is a suite of utilities that enhances the performance of the virtual machine and improves user interaction. It’s recommended to install this once your virtual machine is up and running.
Step 3: Create a New Virtual Machine
With VMware installed and the macOS VMware image downloaded, you can now create your virtual machine.
Open VMware: Launch VMware Workstation or VMware Player.
Create a New Virtual Machine: Click on "Create a New Virtual Machine." You’ll be prompted to choose the installation media. Select "I will install the operating system later," then proceed.
Select macOS as the Operating System: In the "Guest Operating System" section, select "Apple Mac OS X" and choose the version corresponding to your VMware image.
Name Your Virtual Machine: Give your virtual machine a name like "macOS Sonoma" and choose a location to store the virtual machine files.
Allocate Resources: Allocate sufficient memory (RAM) and CPU cores to the virtual machine. For macOS, at least 4GB of RAM is recommended, but 8GB or more will provide better performance. Allocate at least two CPU cores, but more can improve performance if your system allows.
Attach the macOS VMware Image: In the "Virtual Hard Disk" section, select "Use an existing virtual hard disk file" and browse to the macOS VMware image you downloaded.
Step 4: Configure and Start the Virtual Machine
Before starting the virtual machine, a few configuration tweaks can help ensure smooth operation.
Adjust Virtual Machine Settings: Go to the virtual machine’s settings and make any necessary adjustments. For instance, you might want to increase video memory or enable 3D graphics acceleration.
Modify VMX File (Optional): For some macOS versions, you might need to add specific parameters to the VMX file (the virtual machine's configuration file). These settings can improve compatibility and performance.
Start the Virtual Machine: Once configured, click "Start" to boot the virtual machine. If everything is set up correctly, the macOS installation screen should appear.
Complete macOS Installation: Follow the on-screen prompts to complete the macOS installation. This process is similar to installing macOS on a physical Mac and involves setting up your user account, configuring settings, and finalizing the installation.
Conclusion
Setting up macOS on VMware using a VMware image is a powerful way to explore macOS without the need for Apple hardware. Whether you’re a developer, a tech enthusiast, or simply curious about macOS, this method allows you to run macOS in a controlled, virtual environment. By following the steps outlined in this guide, you can effortlessly download a macOS VMware image, set up your virtual machine, and start enjoying the macOS experience on your existing hardware. With VMware's flexibility and the power of macOS, your virtual machine setup can serve as a valuable tool for testing, development, and exploration.
VIsit us:
mac virtual machine
0 notes
Text
macOS Ventura Download: Easy Installation Tips for Your Mac
Upgrading to macOS Ventura brings a host of new features, enhancements, and improvements that can greatly enhance your Mac experience. Whether you're looking for improved performance, enhanced security, or new productivity tools, macOS Ventura has something to offer. However, the process of downloading and installing a new operating system can be daunting, especially if you're not familiar with the steps involved. This guide will walk you through the process, offering easy installation tips to ensure a smooth upgrade to macOS Ventura on your Mac.
1. Prepare Your Mac for the Upgrade
Before you begin the installation process, it’s important to prepare your Mac to ensure everything goes smoothly. Start by checking if your Mac is compatible with macOS Ventura. Typically, Apple provides a list of supported devices on their official website. macOS Ventura is generally supported on newer Mac models, so make sure your device is on the list.
Next, back up your data. Although the installation process is designed to be safe, there's always a risk of data loss during major upgrades. Use Time Machine or another reliable backup method to create a full backup of your system. This way, if anything goes wrong, you can restore your Mac to its previous state without losing any important files.
2. Ensure You Have Enough Storage Space
macOS Ventura requires a significant amount of storage space for the download and installation process. Typically, you’ll need around 12GB to 15GB of free space, but it’s wise to have at least 20GB available to accommodate the system’s needs. If your Mac is running low on storage, consider cleaning up your disk by deleting unnecessary files, emptying the trash, or moving some of your data to an external drive.
3. Check Your Internet Connection
A stable and fast internet connection is essential for downloading macOS Ventura. The installation file can be quite large, so a slow or unreliable connection may result in a prolonged download time or interruptions. If possible, use a wired Ethernet connection for more stability, but if you’re using Wi-Fi, ensure you’re close to the router and other devices aren't hogging bandwidth.
4. Download macOS Ventura from the App Store
Once your Mac is ready, head over to the App Store. Search for “macOS Ventura” in the search bar, and once you find it, click on “Get” or “Download.” The download process will begin, and depending on your internet speed, this could take some time. Be patient and avoid interrupting the download.
5. Begin the Installation Process
After the download is complete, the macOS Ventura installer will automatically open. If it doesn’t, you can find it in your Applications folder. Before proceeding, make sure all your work is saved and close any open applications to avoid potential conflicts.
Click “Continue” to begin the installation process. You’ll be prompted to agree to the terms and conditions, which you should read carefully. After accepting, you’ll be asked to choose the disk where you want to install macOS Ventura. Typically, this will be your main hard drive.
6. Monitor the Installation
Once you’ve selected your installation disk, click “Install.” Your Mac will restart and the installation will begin. This process can take anywhere from 30 minutes to over an hour, depending on your system’s speed and the amount of data on your drive. It’s important not to turn off your Mac during this time. The screen may go blank or display a progress bar, which is normal.
7. Post-Installation Setup
After the installation is complete, your Mac will restart again, and you’ll be guided through the initial setup process. This includes signing in with your Apple ID, setting up iCloud, and configuring various system preferences. Take your time to carefully choose your settings, as these will affect how your Mac functions going forward.
8. Reinstall or Update Applications
Once you’re up and running on macOS Ventura, check your applications to ensure they’re working properly. Some older apps may require updates to be compatible with the new OS. Visit the App Store or the developers’ websites to download any necessary updates. If you encounter any apps that aren’t working, try reinstalling them or looking for alternative software that’s compatible with macOS Ventura.
9. Explore the New Features
Now that you’ve successfully installed macOS Ventura, it’s time to explore what’s new! macOS Ventura introduces several new features and improvements, including enhanced multitasking with Stage Manager, upgraded Mail and Messages apps, and new privacy features. Take some time to familiarize yourself with these changes, as they can significantly improve your workflow and overall Mac experience.
10. Regular Maintenance and Updates
Finally, to keep your Mac running smoothly with macOS Ventura download, make sure to perform regular maintenance. This includes checking for system updates, cleaning up your disk space periodically, and backing up your data regularly. Keeping your system up to date ensures you’ll always have the latest features, security patches, and performance enhancements.
Conclusion
Upgrading to macOS Ventura doesn’t have to be a stressful experience. By following these easy installation tips, you can ensure a smooth and successful transition to the latest macOS version. Preparing your Mac, downloading the update, and carefully following the installation steps will allow you to enjoy all the new features and improvements that macOS Ventura has to offer.
0 notes
Text
macOS Sonoma ISO Download: Best Tips and Tricks for VMware
If you’re planning to run macOS Sonoma on VMware, the process can be smooth and efficient if you know the best tips and tricks. Whether you're a seasoned user or new to virtualization, this guide will help you download and install macOS Sonoma ISO on VMware with ease.
1. Prepare Your System
Before diving into the download process, ensure your system meets the requirements for running VMware and macOS Sonoma. You’ll need at least 8GB of RAM, a multi-core processor, and sufficient storage space (at least 40GB). Additionally, make sure your VMware software is up to date, as older versions may not fully support macOS Sonoma.
2. Download macOS Sonoma ISO
Finding a reliable source for the mac OS Sonoma ISO file is crucial. You can download it directly from Apple’s official website if you have access to a Mac, or from reputable online communities that provide the ISO file for virtualization purposes. Always ensure that the ISO file you download is legitimate and free from malware.
3. Configure VMware Settings
Once you have the macOS Sonoma ISO, open VMware and create a new virtual machine. Select macOS 13 or the closest available version as the operating system. Assign sufficient RAM and CPU cores to the virtual machine for optimal performance. It's recommended to allocate at least 4GB of RAM and 2 CPU cores, though more can improve performance.
4. Optimize the Virtual Machine
To get the best performance from your macOS Sonoma virtual machine, adjust the display settings to match your monitor's resolution. Additionally, increase the video memory to ensure smooth graphics rendering. VMware also allows you to set up shared folders, enabling easy file transfers between your host system and the macOS virtual machine.
5. Install VMware Tools
VMware Tools is essential for enhancing the functionality of your macOS Sonoma virtual machine. It provides better graphics performance, seamless mouse integration, and improved system stability. After installing macOS Sonoma, go to the "VM" menu in VMware, select "Install VMware Tools," and follow the on-screen instructions.
6. Snapshot Your Virtual Machine
Before making any major changes to your macOS virtual machine, create a snapshot. This allows you to easily revert to a previous state if something goes wrong during installation or configuration. Regular snapshots can save you time and effort in troubleshooting issues.
7. Troubleshooting Tips
If you encounter issues like slow performance or kernel panics, consider increasing the allocated resources or adjusting the VMware settings. Ensuring that your VMware software is up to date and compatible with macOS Sonoma can also resolve many common problems.
By following these tips and tricks, you can efficiently download and set up macOS Sonoma on VMware, allowing you to explore the latest macOS features in a virtual environment.
0 notes
Text
Chrome OS Networking Tips: Configuring Internet and Connectivity
Mastering Chrome OS networking is essential for a smooth internet experience. In this guide, we cover essential Chrome OS networking tips, from setting up Wi-Fi connections to troubleshooting common issues. Learn how to configure your internet settings for optimal speed and security. Whether you're on the go or at home, these Chrome OS networking tips will help you maintain a stable and secure connection. Explore how to improve your connectivity and ensure your device is always online with these expert Chrome OS networking tips.
0 notes
Text

Get the latest macOS Ventura installer with our comprehensive guide. Discover how to download and install macOS Ventura on your Mac, ensuring you have the newest features and improvements. This guide covers everything from obtaining the installer to setting up your system for a smooth installation process. Whether you're upgrading from an older macOS version or performing a fresh install, you'll find step-by-step instructions to make the process straightforward and hassle-free. Stay up-to-date with macos ventura installer and enhance your Mac experience today.
0 notes
Text
Cryptocurrency and Regulation: A Global Overview
Explore the complex relationship between 'Cryptocurrency and Regulation: A Global Overview.' This insightful guide delves into the evolving landscape of cryptocurrency regulations around the world. Learn about the diverse approaches taken by different countries, the impact of these regulations on the market, and what it means for investors, traders, and developers. Whether you're new to cryptocurrency or a seasoned enthusiast, this resource provides a comprehensive understanding of the regulatory environment shaping the future of digital assets.
0 notes
Text
What’s on the Horizon for Cryptocurrencies in 2024: Key Trends to Monitor
Discover what’s on the horizon for Cryptocurrencies in 2024 with this in-depth exploration of key trends to monitor. This guide delves into the latest regulatory shifts, advancements in blockchain technology, and the growing influence of decentralized finance (DeFi). Learn about emerging opportunities and potential challenges that could shape the market, helping you stay informed and prepared in the ever-evolving world of Cryptocurrencies. Perfect for investors and enthusiasts looking to stay ahead.
0 notes
Text
macOS Ventura Installer: Quick and Easy Setup
Setting up your macOS Ventura installer has never been easier, thanks to the streamlined process designed to get you up and running with minimal hassle. Whether you're upgrading from a previous version or installing macOS Ventura on a new machine, the steps are straightforward and user-friendly.
First, ensure your Mac is compatible with macOS Ventura. Check Apple's official list of supported devices to confirm. Once confirmed, back up your data using Time Machine or another reliable backup method. This precaution ensures your data remains safe in case anything goes wrong during the installation process.
Next, download the macOS Ventura installer from the App Store. This large file may take some time to download, depending on your internet speed, so be patient. Once the download is complete, the installer will automatically launch. Follow the on-screen prompts to proceed with the installation. You'll need to agree to the terms and conditions, select your installation disk, and click 'Install'.
During the installation, your Mac will restart several times. Make sure your device is plugged into a power source to avoid interruptions. The entire process typically takes about an hour, but it can vary based on your system's performance.
After the installation is complete, you'll be greeted by the macOS Ventura welcome screen. From here, you can restore your data from the backup you created earlier or set up your Mac as new. Enjoy the new features and improvements that macOS Ventura brings, such as enhanced privacy settings, redesigned applications, and better performance.
By following these steps, you'll find that using the macOS Ventura installer is a quick and easy way to upgrade your Mac and enjoy the latest features from Apple.
0 notes
Text
Getting Started with macOS Ventura: Using Virtual Machines and Installation Files
MacOS Ventura is packed with exciting new features and improvements designed to enhance user experience and productivity. For those who want to explore macOS Ventura without committing to a full system upgrade, using a macOS Ventura .ISO or VMDK file to set up a virtual machine is an excellent solution. This blog will guide you through the process and benefits of using these files.
Why Use macOS Ventura .ISO?
A macOS Ventura .ISO file provides a convenient and flexible way to install and test the operating system on various hardware setups. Here are a few reasons why you might want to use a macOS Ventura .ISO:
Testing and Development: Developers can test applications on macOS Ventura without upgrading their primary system.
Compatibility: Users with non-Mac hardware can experience macOS features.
Backup and Recovery: An .ISO file can be used as a recovery tool in case of system failures.
Obtaining macOS Ventura .ISO
To get your hands on the macOS Ventura .ISO file, you can follow these steps:
Official Sources: The safest method is to download it from official Apple channels such as the Apple Developer website or the Mac App Store.
Create Your Own ISO: If you have access to a Mac, you can create an ISO file from the official macOS installer using Terminal commands.
Setting Up macOS Ventura Virtual Machine
A virtual machine (VM) allows you to run macOS Ventura on your existing hardware without replacing your current operating system. Here's how you can set up a macOS Ventura virtual machine:
Using VirtualBox
Download VirtualBox: Install the latest version of VirtualBox from the official website.
Create a New VM: Open VirtualBox and click "New" to create a new virtual machine. Choose "Mac OS X" as the type and "macOS 10.13 High Sierra (64-bit)" as the version.
Allocate Resources: Assign sufficient RAM and create a virtual hard disk.
Mount the .ISO File: Go to the VM settings, navigate to Storage, and add the macOS Ventura .ISO file as a virtual optical disk.
Start the VM: Start the virtual machine and follow the on-screen instructions to install macOS Ventura.
Using macOS Ventura VMDK
A VMDK (Virtual Machine Disk) file is another option for setting up a macOS Ventura virtual machine. It’s similar to an .ISO but designed specifically for virtual machine environments. Here’s how to use a macOS Ventura VMDK:
Download the VMDK File: Obtain the macOS Ventura VMDK file from a reliable source.
Create a New VM in VirtualBox: Follow the same steps as above to create a new VM.
Use the VMDK File: Instead of an .ISO, select the macOS Ventura VMDK file as the hard disk for the virtual machine.
Start and Install: Boot up the VM and proceed with the installation.
Benefits of Using macOS Ventura Virtual Machine
Flexibility: Easily switch between different OS versions and configurations.
Safety: Test new features without risking your primary system’s stability.
Convenience: Quickly set up and dismantle virtual environments as needed.
Conclusion
Follow the steps outlined in this guide to get started with your macOS Ventura virtual machine and enjoy all the new features and improvements. Using a macOS Ventura .ISO or VMDK file to set up a virtual machine provides a flexible and efficient way to explore Apple’s latest operating system. Whether you’re a developer testing new software, an IT professional preparing for deployment, or simply an enthusiast eager to experience macOS Ventura, these methods offer a practical solution.
0 notes
Text
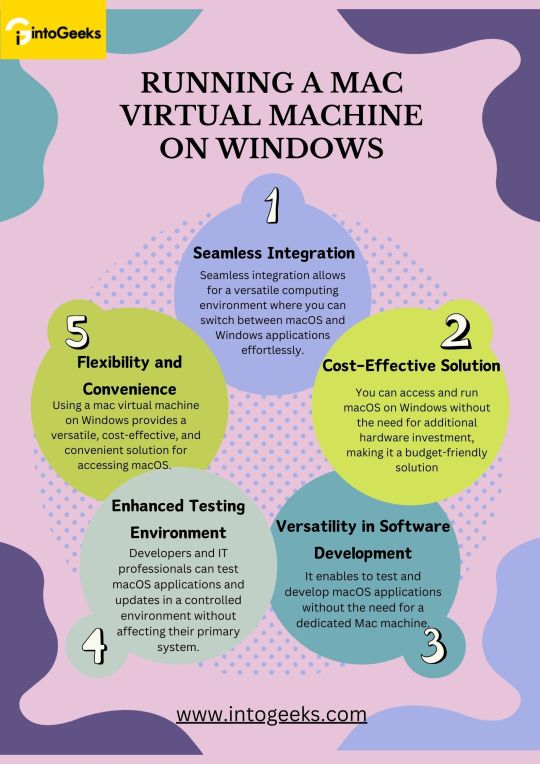
Running a Mac Virtual Machine on Windows
Running a Mac virtual machine on Windows offers several significant advantages. This setup allows users to run macOS on Windows seamlessly, enabling the use of macOS applications alongside Windows programs. This integration is particularly beneficial for software developers and testers, as it provides a versatile environment to develop and test macOS applications without needing a dedicated Mac.
One of the primary benefits is cost efficiency. Creating a macOS virtual machine on Windows eliminates the need for purchasing additional hardware, making it a budget-friendly option for those needing macOS functionality. Additionally, this setup grants access to exclusive macOS features and applications, such as Xcode and Final Cut Pro, which are essential for many professionals.
Furthermore, running a virtual machine macOS on Windows enhances testing capabilities. It allows for a controlled environment to test updates and new applications, ensuring they are thoroughly vetted before deployment. Overall, a mac virtual machine on Windows offers flexibility, cost savings, and increased productivity.
0 notes
Text
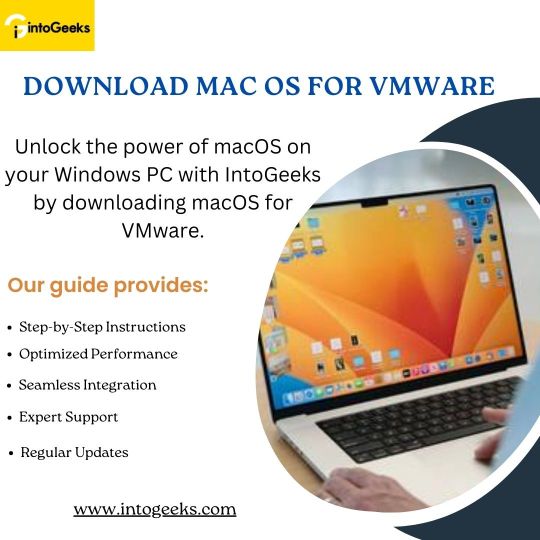
Download macOS for VMware - IntoGeeks
Unlock the potential of macOS on your Windows PC with IntoGeeks by downloading macOS for VMware. Our comprehensive guide provides detailed, step-by-step instructions to ensure a smooth download and installation process. Experience the sleek interface and powerful features of macOS Ventura without leaving your Windows environment.
With IntoGeeks, you can optimize the performance of your macOS virtual machine and run macOS applications seamlessly alongside your Windows programs. Our guide also offers tips to enhance integration and ensure smooth operation. Additionally, you'll have access to a community of tech enthusiasts and professionals for support and advice.
Stay up-to-date with the latest macOS versions and VMware enhancements with our regular updates. Visit IntoGeeks today and start your macOS on VMware journey, transforming your Windows PC into a versatile powerhouse.
0 notes
Text
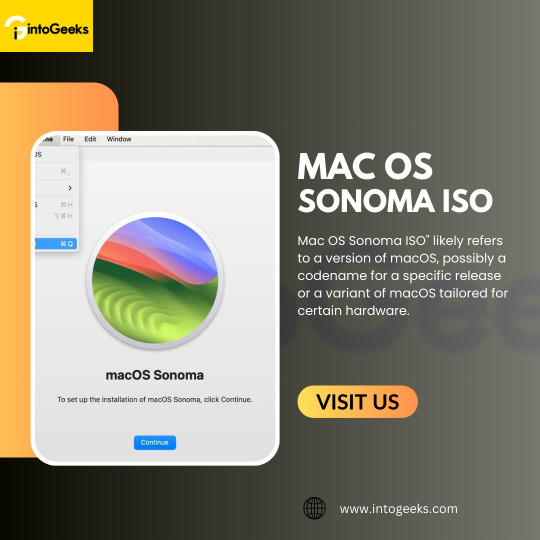
Discover the innovative world of Mac OS Sonoma ISO, a distinct macOS variant that brings a fresh perspective to your digital experience. Seamlessly blending cutting-edge technology with user-friendly design, Sonoma ISO offers a unique journey through the realm of Apple's operating systems. Explore its intuitive interface, robust features, and unparalleled performance, all packaged in a convenient ISO format for effortless installation and exploration
1 note
·
View note