making a new simblr because horse. im a queer adult man from sweden. i like both maxis match and realistic cc idc! feel free to talk to me :3 im wcif-friendly as long as i have the energy to look.
Don't wanna be here? Send us removal request.
Text
youtube
The Young Punx have today released the English and Simlish versions of their In the Bleak Midwinter cover, a song that plays on TS4 holiday station and in TS3, recorded in 2009 but never seen a proper release until now!
You can stream it or buy it on various platforms through here: https://bfan.link/midwinter
They also shared the Simlish lyrics in the comments of that version on Youtube, and here is a short vid about the tune and its production and history.
Show The Young Punx some love for listening to fan requests and releasing both the Eng & Sim versions and the Simlish lyrics after all this time :) I've been listening to this for years and trying to find the Eng version, which is why I'm sharing it now that it's out.
#the young punx#in the bleak midwinter#the camden choral collective#the sims 4#the sims 3#ts4#ts3#music#soundtrack#ost#sims4#sims3#christmas carols#xmas music
2 notes
·
View notes
Text
im one of the sims brands most "loyal" (not uncritical... :3) players/customers. i dont buy every pack or anything, bc im poor, but we in the family bought ts1 packs when i was a little kid. then we bought ts2 packs, later as an adult i bought ts4 and several packs, and then caved in and bought ts3 and a couple packs on a sale years after getting ts4. i really like the sims (tho i also hate the managing of it. i hate the bugginess and low quality and lack of understanding of what would make the game better.)
why im saying this is bc as a lifelong loyal sims player/customer i dont understand the login rewards. i dont like that. i dont support fomo tactics and i dont see why giving limited time updates would make players happier than just getting more SDX drops and basegame updates. those two ways of delivering free rewards to 1) give players new stuff 2) improve the game 3) make players happy, those two ways already exist. what is the point of limited time rewards (the point is fomo) if players will *also* check back in when there's a genuinely good new free SDX drop or free BG update
#ts4#also hello im playing sims again since a couple days but not bc of the login rewards. i reinstalled it before hearing about that
1 note
·
View note
Text

reposting with permission: work in progress of ts1 weather mod, made by Gothi-sims and originally posted here.
im just amazed by this and needed to share! aesthetic!!!
#ts1#the sims 1#gif#ask to tag if theres any vision warnings i should add#retro gaming#aesthetic#90s#y2k#retro graphics#retro games
68 notes
·
View notes
Note
Would it be possible to make the hetero diamond day eye non defaults so we can have all the solid colors as well?
the heterochromia ones include the standard solid colours of diamond day v1 :) so it doesnt change that it just adds a bunch of heterochromia ones after it. hope thats what u meant!
(if i remember correctly, i think i had trouble figuring out how to make non-default horse eyes show up in cas, but it worked fine to make defaults with additional extra colours, so thats what i did)
2 notes
·
View notes
Text
youtube
good content on youtube
3 notes
·
View notes
Text

Screenshots under the cut.
An edit of the default shading of the horse coat that maintains a maxis match style with somewhat more accurate muscle anatomy and more visible changes with the weight sliders. Includes a custom normal as well as all three shading variants used by the sliders.
Longer coat and foal coat are planned but not currently included, mainly because I can't find the damn normal maps in the file cruiser. Once I do, they'll be added.
Download:
SimFileShare | Patreon


207 notes
·
View notes
Text


i know this is my sims blog but i think u guys should also get subjected to my beautiful black fjord (/andalusian cross) on wild horse islands. hes my dressage horse
#and yes black fjords arent a thing. ppl just like to have fun in videogames :3#nonsimz#<-tag for filtering stuff#wild horse islands#roblox#whi
22 notes
·
View notes
Text
im still horsing just slow bc ive been busy & eepy (disabled version aka full body exhaustion)
i also got kinda stuck not knowing how to layout the rest of the lot for my sims stables but mb i should just post it here and ask for opinions lol
2 notes
·
View notes
Text
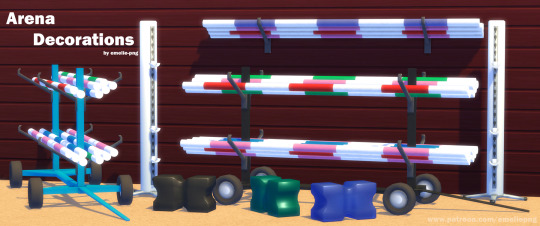


Arena Decorations
Base Game
Non-Default
Found in Sculptures and Wall Sculptures
Here's some arena decorations for you all! Jump posts, pole cart and a pole hanger you can put on walls.
This was quite the learning experience, had a little bit of a fight with gloss and AO issues, but I think I eventually got it fixed. Let me know if there's any issues!
Feel free to edit mesh or recolour as long as you credit me.
DO NOT upload to paysites and/or adsites.
Download (Patreon) Free
630 notes
·
View notes
Text


Striped Hooves
Hadn't seen these done yet and I've got appaloosas to make!
Might tweak these in the future but happy to release them as they are now. ♡
Download!
631 notes
·
View notes
Text


More 'how to make Paint Mode actually viable to help reduce the borderline-criminal compression and add HQ support' experiments - Turns out adding custom nose swatches isn't that hard and it's actually super easy to export a painted coat (again, via Cmar's Coat Converter tool that I linked in my previous reverse engineering post) and then spank it onto an additional swatch after it gets cleaned up. Plus, this gives the massive boon of being able to then paint on top of that 'exported' Paint Mode coat, which when the coat was a hoof overlay, you couldn't do. Also you don't even need to make the texture fully opaque; in the previews above Schrodcat painted a sooty dapple overlay in Paint Mode that can then be applied on top of any base coat preset.
This then can lead to a very interesting 'making a cool horse coat' workflow of;
Painting an initial pass of a coat in Paint Mode.
Exporting that Paint Mode coat with Cmar's tool.
Fixing the compression of the texture via ChaiNNer or PS/whatever.
Making it a nose colour swatch.
Painting more details on the coat in Paint Mode, on top of that nose colour swatch.
Repeating steps 2 and 3, and then overlaying the new exported coat with the one exported initially in PS/whatever.
Rinse and repeat as often as you'd like to add more details/shading/etc.
Make it all into one nose colour swatch and bingbangboom, custom horse coat with no compression artifacts that you can still paint on top of for things like shine stencils, etc. & just requires you to share the custom nose swatch .package when gifting the horse around.
"Well, okay, Maddie," You may be thinking now, "That's cool for nose colours, even though not having a thumbnail might be kind of annoying. But what can hoof colours be used for now?"
Excellent question, and my answer is they're perfect for custom white markings, since, like I addressed last time, you can't paint over them in Paint Mode; anything you paint will always be drawn under the texture that is in hoof colour slot.


So if you make custom white markings (Heck, you can even paint one in Paint Mode if you'd like, so long as you don't add a base colour beneath it in Paint Mode, Cmar's tool will export with full transparency since the tool doesn't export things like the underlying coat preset) and turn them into a hoof colour, you can continue to paint the base coat beneath the markings and you'll never risk painting over them and/or needing to paint around them.
Ezpz, as the kids say.
In terms of HQ, this is probably an even better way to translate Paint Mode coats for use with the HQ mod too.
89 notes
·
View notes
Text
Guide on making custom coat presets. (Allows for better quality custom coats)
Okay, I decided to throw this together. There's some things I can't figure out still, but oh well, we're just getting through this as we go.
To clarify what I mean - this is not a stencil or a brush.
This will appear here:
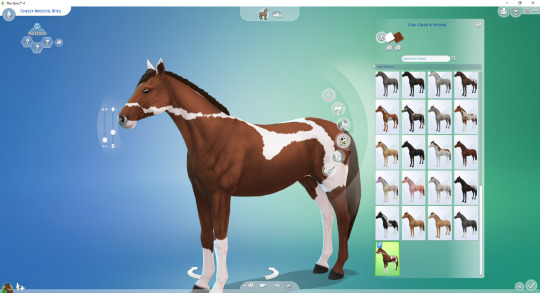
To preface this guide though, I cannot, for the life of me, figure out how to make it appear as an individual option in-game, so, these are considered SWATCHES of the original coats.
Okay, with that out of the way.
Things you'll need:
Sims 4 Studio
GIMP
Probably Notepad, but it's optional on how easy it is for you to track things.
Guide:
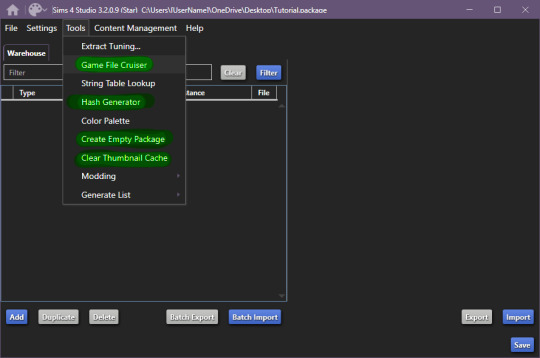
These are the tools we'll be using in S4S.
Start by creating your empty package, once you're done, open up Game File Cruiser:
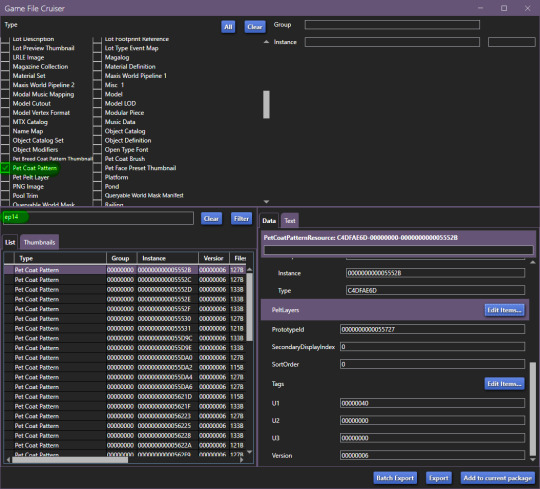
before you do ANYTHING, make absolutely sure that the search bar below the file list has "EP14" in it, otherwise you will 100% end up editing a cat or a dog coat pattern and that's now what we want, at all.
Add the first horse file to your package
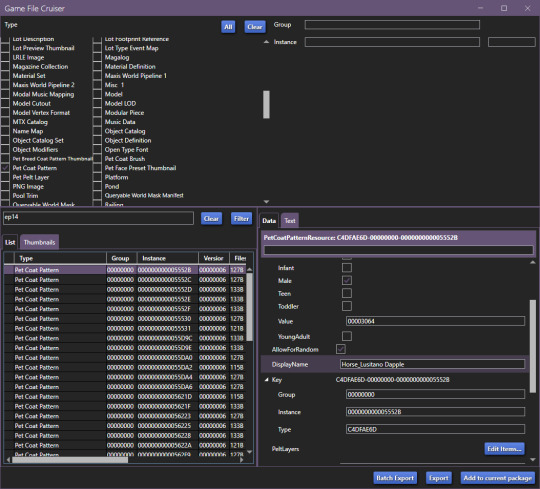
In our case, it's the Lusitano Dapple coat, don't worry, if you're making a breed-specific coat, you can change this later.
Now that it's been added to our package file, it should look like this:

We now have two options, I'll explain this to those who don't care about creating a game-generated thumbnail and want to find it easier.
To make your "test" thumbnail, you'll want to copy the instance ID of the file we just added to our package:
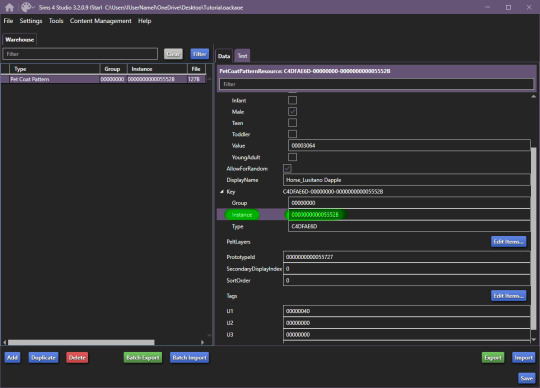
It should look like this, the instance ID should be in 2nd from the top search bar, then, select all and click filter (it just makes life easier than finding the specific file type).
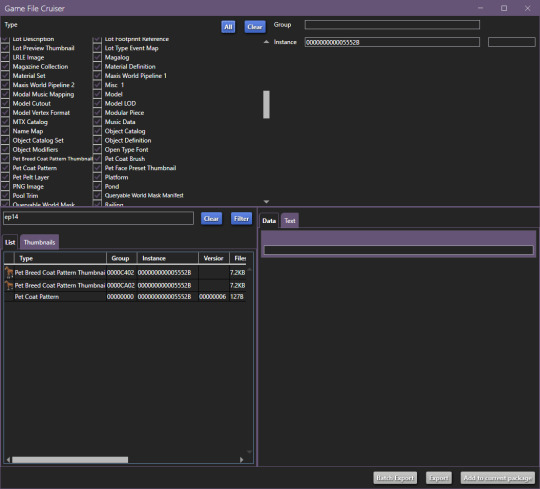
These are the current, in-game CAS thumbnails. We'll add both of them to the package, they're for ponies and adult horses.
Now you can export these two pictures (They need to be saved as .png's), edit them as you'd like and then import them back into the package.
Now, you CAN add up to 5 different pelt layers that can be easily recoloured in-game, however, we'll only be working with two pelt layers in this tutorial, because it's a tutorial and you'll learn how to make more of them anyway.
Click on "Pet Coat Pattern" and then look over the data:

From there, Click on "PetPeltLayers":
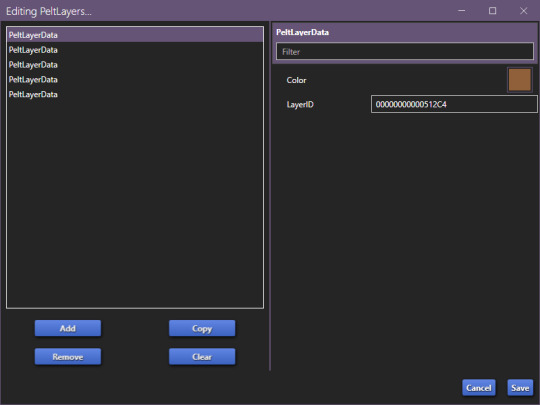
The first pelt layer is ALWAYS a solid colour, we'll begin by copying the LayerID (Instance ID) and going back to game file cruiser.
Just like previously, you should keep EP14 in the search bar and just use the instance ID bar to find things, as that's all we'll be doing.

Add the Pet Pelt Layer to your package file, then, copy the "texture key" from the Pet Pelt Layer:
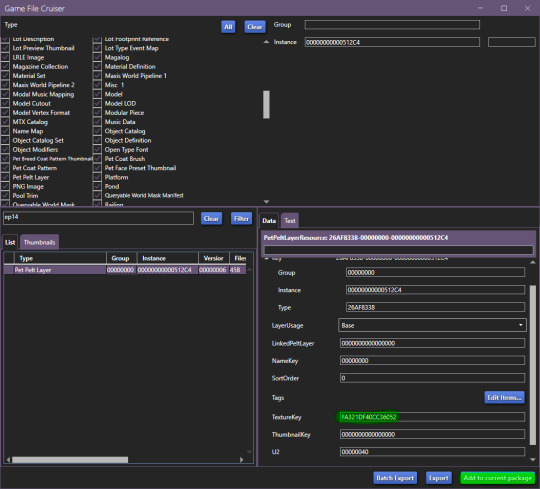
Then find the Texture Key:
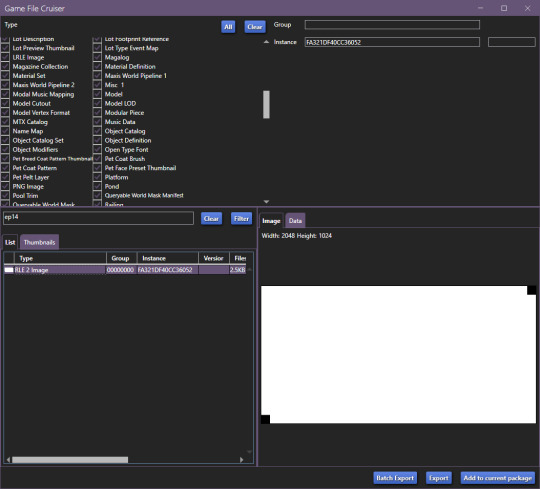
This is the solid colour layer, it HAS to be there as this is what will help you edit your base colour. Add this to your package file.
Now, our package file will look like this:
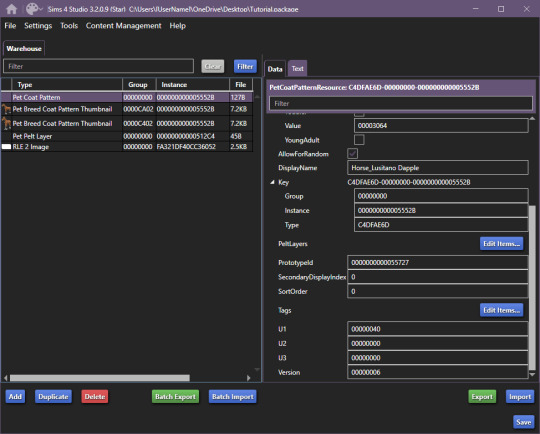
Unfortunately, we're not done, just yet, we'll want to grab at least the second PetPeltLayer:
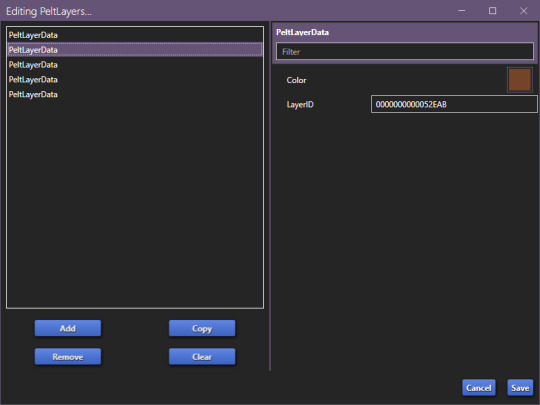
Just like before, we're going to copy the ID and find the Pet Pelt Layer + the Texture for this layer:

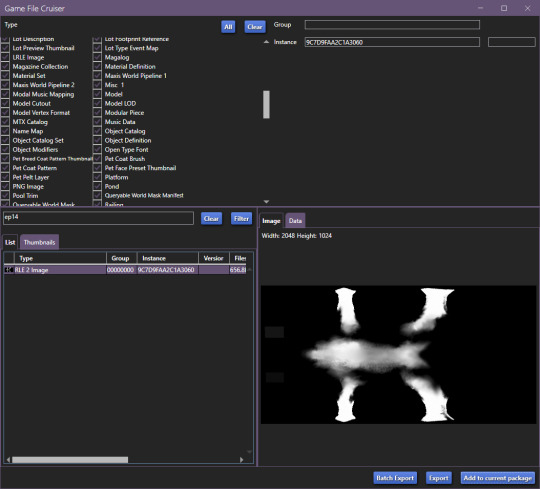
Now, our package file will look like this:
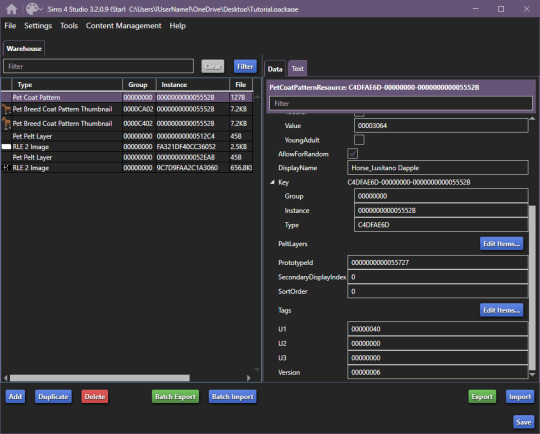
You can now go ahead and close the Game File Cruiser, we won't be using it anymore.
Right now, this is our package file and we need to do some cleanup first.
We'll be opening up the PetPeltLayers once more and we'll remove the last 3 entries:
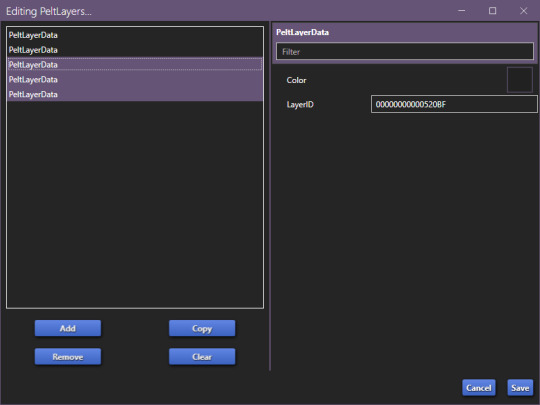
You should be left with only two entries, as that is what we'll be editing (leaving the other 3 will break the preset).
Now, we'll start generating new hash codes for everything:
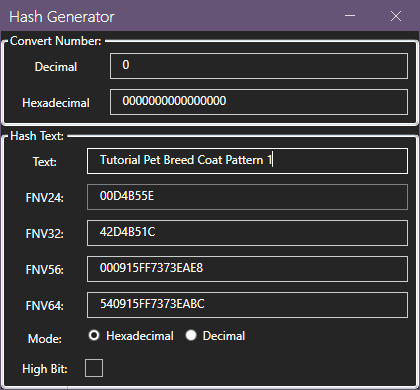
As in my previous guides, be descriptive with what you're typing there and then just change the last number.
The process is annoying and slow, so bear with the images, and follow along.

The TextureKey coloured in red is the 3rd ID you'll generate, it's what links the texture to the Pet Pelt Layer, which links it to the Pattern we're creating. (Sorry for the squished thumbnail, open it in your browser, I was running out of picture space for the rest of the tutorial lol).
And now we repeat this for the second Pet Pelt Layer.
Now, if you want the game to just generate the thumbnail for you, you can skip this step, if you want to make a custom thumbnail, then copy the Pet Coat Pattern Instance ID into the two Thumbnails we've added to our package file:
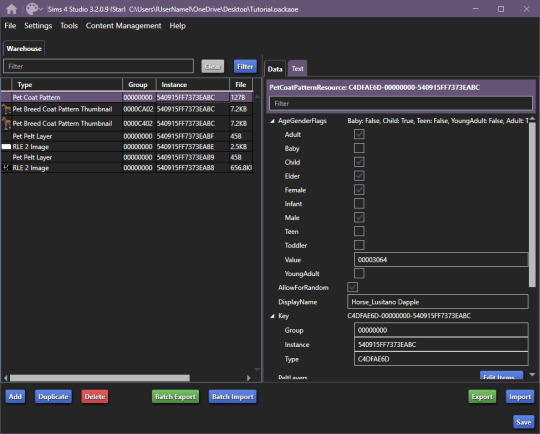
This is what the package file has to look like at this point.
Now is the relatively easy part, editing the second RLE 2 Image. We won't touch the base, because it's not necessary.
I recommend using the Horse Diffuse Map as a base when you're drawing your pattern. It'll be easier to see what you're doing. You can download it here: Horse Diffuse Map.
Remember, that your pattern HAS to be white, black space is IGNORED by the game and considered a "transparent" layer, so that you can see the layer beneath the you're working on.
This is my quick, and lazy test one I've made, I use a PNG of the Diffuse Map as a base and on a separate layer I draw with white coloured brushes:
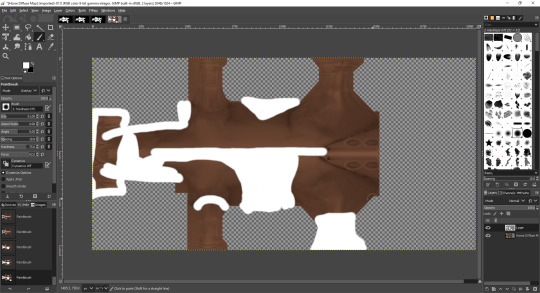
You may notice the very straight lines on the diffuse map - make sure to colour OVER them as if you do not, it will appear in-game because those are the seams where the mesh "meets"
Once you're satisfied with your pattern, you can go to export, just make sure that the white pattern is on a separate layer to the diffuse map. At this point you can add a black background underneath the white and export.
All you have to do is export the RLE2 Image you've edited as a DDS image in the L8 format:
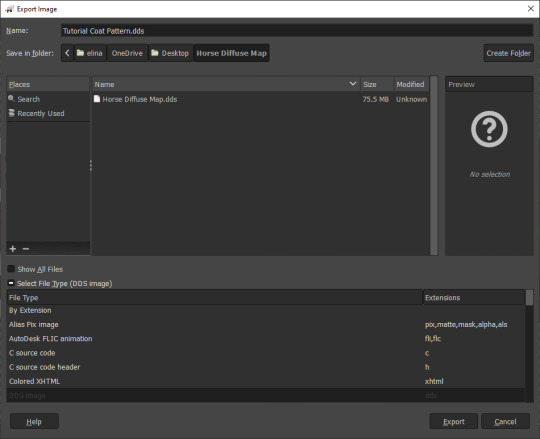

Then, we're going to import it into our package and save our package:
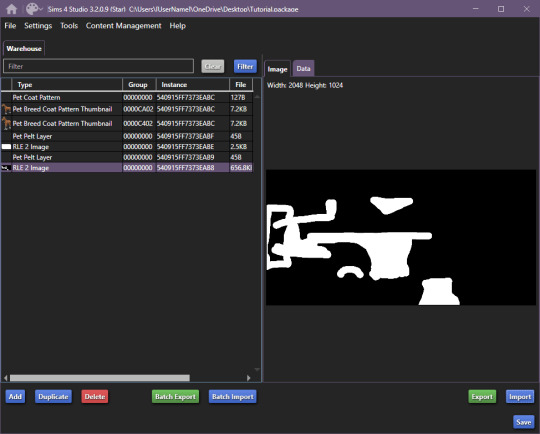
Remember to not touch the completely white base coat!
Now that this is over, we'll go back to Pet Coat Pattern and edit some settings.
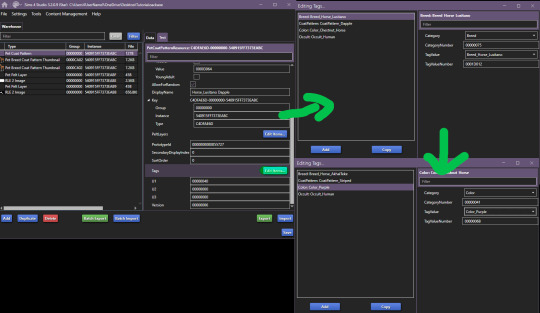
The first three settings is what I recommend changing around. The first setting changes the breed, the second setting changes how the coat pattern is labeled and the third setting changes the colour it's tagged under.
Only change "TagValue" - it will give you a dropdown menu, don't change anything else. The TagValueNumber changes automatically, so don't worry about it.
EDITED TO ADD:
Additionally, don't forget to go into "PetPeltLayer" and change the colours, this is what will show up as "base" colour that you can change in-game. You can change them for every PeltLayerData file you have.
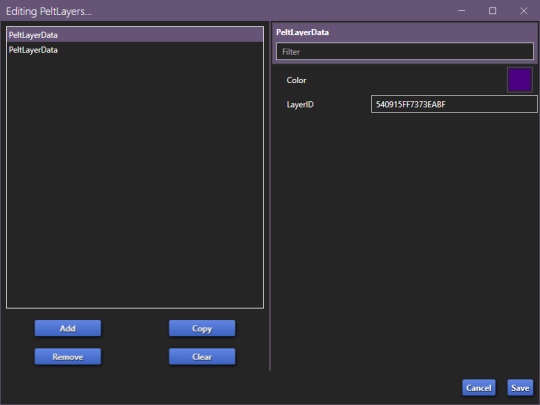
Now, save and go test it out in game:

Bada bing, bada boom we've got our "custom" coat preset.
If I've forgotten anything, let me know. This took me 2 hours to write, so forgive my typos. If anything is unclear, let me know. I ran into a struggle with the picture limit on Tumblr (found out that it's 30, I should move my guides somewhere else, but where?)
144 notes
·
View notes
Text
Working on making some of the stuff from Horse Ranch functional with Eco Lifestyle. But, umm.... Forgot to fix the rotation slot before testing lol
101 notes
·
View notes
Text
minor edit of Diamond Day default horse eyes, just added a requested heterochromia swatch, but also reorganised the cas swatches to be random colour coded for each pair (left and right) of the heterochromia so its less of a mess to keep track of in the cas menu with all the same blues and browns everywhere. no real preview post since i was just gonna post this for the requester on discord, but its up for dl if anyone wants here on sfs. (if i add more request swatches eventually ill do a full new version release w previews etc)
7 notes
·
View notes
Text
i like that a lot! i love for my virtual horses to have some fur detail but the one that came with the pack was very strong lol
So I've been looking into the "furry" horse coat, so to speak, English isn't my strong suit at nighttime.
anyway, i made the fur coat slightly more transparent, god i hated every second of it though bc...... for comparison, in this order are the pics:
EA no long fur:

EA thick fur:

and then my very lazy edit:

for that payout (which honestly isn't a lot to be fair)

I had to ouch my brain while trying to correctly setup the instance ID's, i messed up a few times but then finally got the ball rolling
it's not necessarily difficult, but takes a while to set it all up.
I didn't bother editing all of the pics, just the LRLE, which thankfully is a PNG, so no big deal on exporting
if anyone wants the wonky "semi-fur", I'll post a dl
i'll probably play around with it a bit more, but I don't think this would get a ton of use for most people, though it definitely can give you a few more things to work with, if you're making your own custom horses down to coat thickness presets etc
close ups of the thic coat and my coat:
EA:

mine:

23 notes
·
View notes
Text

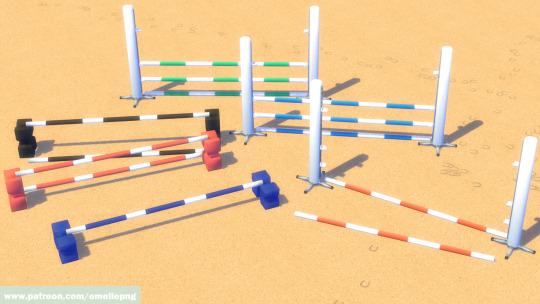
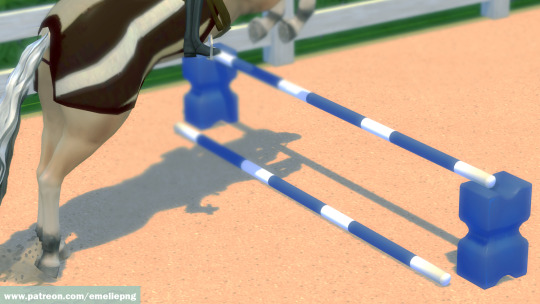
New Functional Jumps
Horse Ranch Required
Non-Default
Regular jump 4 swatches
"Sugarcube" jump 5 swatches
I didn't think I would be able to finish this today, but I did! My first build/buy item!
Two functional jumps, and one "sugarcube" jump. I'm going away on vacation for about a week, but when I get back I intend to make the jump post and the "sugarcubes" into decorative items that you can put around your arena.
Feel free to edit mesh or recolour as long as you credit me.
DO NOT upload to paysites and/or adsites.
Download (Patreon) Free
888 notes
·
View notes

