This blog is about my experience at college on the Level 3 Games Design Course
Don't wanna be here? Send us removal request.
Text
EA22A
Today we learnt how to create audio to add to game clips. This was an interesting lesson as it was completely new to me, and I thoroughly enjoyed it.
We used premier pro to create our audio sounds, and this started off as a challenge for me as it was something I had never used nor come across. However, before we started, we went through a presentation that our tutor had created to explain the tasks. This went through what each feature did and how to do the basics. We also watched a YouTube video from a youtuber called Lila. The video was called ‘Effortless audio editing for beginners’. This helped to explain the ins and outs of premier pro and how to change volume and placement of the sounds etc.
Our first task was to open premier pro and have a play around with the different tools and equipment provided. I downloaded one of the audios I had created the day before and started messing around with volume and effects. At first, I struggled to understand what everything meant and did but as time went on, I started to get to grips with everything.
After we had completed this we then were given our homework task to complete. This was to use a game clip and add audio to it.
I used multiple different sounds using Free Sounds. This is a place where people have uploaded sounds, they have made, and anyone can use these. The first sound I found was the background sound. I was looking for a sound for something else but came across this sound first. It sounded like it was made for a platform game and believed this fit well with the game clip I had chosen.
My scene had a section at the start where the character was running through a vent. When I saw this, I immediately thought of the sound of metal, so I searched for walking on metal. This didn’t come up with the results I wanted so I then searched for metal sounds. I found what I was looking for and used this as the sound. I copied and pasted it a few times to get the result I was looking for as it was too short for the whole duration of them running. I also had to cut some of the sounds to shorten them to the length I needed.
I then found a sound of the character jumping down out the vent door. Once they have landed, they immediately pick up a knife/axe looking item. They then kick two people so I found a sound of a karate kick which had been exaggerated to make it sound louder than it would have been. I used this sound a few times throughout the clip as the character made this move multiple times.
Another point in the clip was when she kicked open a door and turned into some sort of a shadow. When I saw this, I came up with the idea of a ghost sound in which I found one that sounded perfect and fit the actions time perfectly. At the same time the character transformed into the shadow there was also a door that opened and so I looked for a checkpoint kind of sound as I didn’t want to use the sound of a door opening again. I also thought that there was a little door icon that popped up when they approached the door and could have been seen as a checkpoint.
After finding all my audios that I wanted to use I went back into premier pro and started cutting and fitting the sounds to fit the action. It took me a bit of time and a lot of trial and error as I found that when putting the sound with the action I didn’t like it and wasn’t what I was looking for. I also had to experiment with the sound and effects too. This helped me to make some audios louder or some more deeper in pitch.

0 notes
Text
Group Project Part Two
Process Of Creating My Final Piece – Elder Room
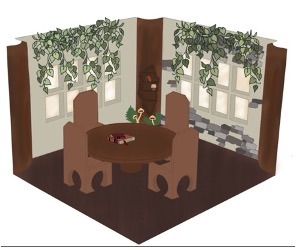
Step One: I started with using google sketchup to create a 3D model of the room. This helped me to look at it from a different perspective. I also felt like it brought my image to life.
Step Two: I then took a screenshot of the model and put it into procreate and went over the objects. I added other features such as I made the pillars out of tree trunks and added a bookcase.


Improvements I Made:
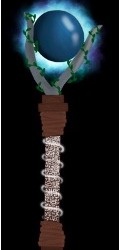
The first picture of the staff is what we wanted it to look like as the final design. While drawing it I thought of how the character would hold it and decided that I needed to narrow the centre piece so they would be able to hold it. This is because when drawing it I drew a straight line down from the top and the centre piece was too wide for them to be able to hold the staff. I added the ruins to give more detail and added the orb at the top to make it unusual.
Convey Meaning Through My Designs:
I used the ruins through the staff to show that it was an old artifact. I made the artifacts glow to convey the idea of magic flowing throughout the staff. This is because the staff is one of the last pieces of magic in the world. I also used the leather straps to show that it was worn down and ancient.
The vines I used on the metal which is holding the orb was to connect the Elder Room and the artifact together. This is because the Elder Room has a lot of nature and stands out from the rest of the world which is dying due to the corruption.
I made the pillars in the Elder room out of tree trunks to show the idea of it being a natured based room. I also added a bookcase into one of the trunks because the Elder’s would use books to get information and to help the wizard in finding salvation. I wanted the environment to be quite cosy and homely instead of a rich and grand room. I also wanted the room to contrast against the dying main world. This is why I made the room quite small and compact.
I added the light to the windows to make the room look like it wasn’t part of the main world and maybe in heaven.
0 notes
Text
Group Project Reflection Part One
For the past few weeks we have been working on a group project. The project was to develop an artefact, a culture/ society and a character that demonstrates or embodies the culture.
During this process we had to discuss a lot with our team about different aspects. We had to learn how to work within a team to develop ideas from scratch and use everyone’s strengths to complete this task.
Primary and Secondary Research
Primary and secondary research helped me a lot during this assignment and proved to be very useful. Now after finishing the presentation I could have done better if I had referenced the pictures I took more when drawing the rocks on the wall for example as they didn’t have much depth to them and looked very flat. This may have resulted in my ideas looking better and being more realistic.
Primary research would be looking at books, objects, people, questionnaires, surveys etc. Secondary research would be using other peoples research for example news articles, the internet’s pictures, Pinterest etc.
Primary Research I used:
Pictures – I had a walk up Kendal Castle and on the way I took pictures of different plants and trees. I also took pictures of stone brick walls as this was what we decided to make the walls as in the Elder Room.
Survey – When designing the previous idea for the artifact I jumped into the final look quite quickly after playing around with some of my own ideas. This proved to be not as helpful as I thought as I hadn’t spoken much to my team. On further research I decided it was best to come up with a bunch of designs for the key we were going to go with originally. With further discussion with my group we came up with the idea of doing a staff instead as we thought this would look better so I started again and came up with new ideas for a staff. I did the multiple different sketches again using photoshop and then asked my group again on what they liked and disliked. This is how we came up with the final design of the artifact as well as using secondary research. There was a lot of trial and error during the process.
Watching movies – To create the idea of an Elder room I had watched Black Panther throughout designing. I liked the concept of there being another world for the Elders of the previous Black Panthers. I liked how they had made this other world to look peaceful and heavenly like they are finally in peace. I came up with the idea of there being an ethereal room where everything seems to be perfect as I thought this would fit our idea. I also added lots of nature to this room as the corruption in the main world had destroyed the nature so I thought it would make sense for this perfect place to be the complete opposite.
Secondary Research I used
Internet pictures – In the beginning before we had started drawing anything we made a separate PowerPoint in which we used as a mood board and we had slides for everyone’s ideas for each individual point. For example, the artifact, the characters, the map etc. We found this helpful so we could add to everyone’s ideas and then come up with sketches of these images. I used many different images to find what I liked. This also included using Pinterest.
In conclusion
Going forward I think I could have used more secondary research within my work for example looking at books and articles to see what other people had done.
However, secondary research has its negatives such as you may not find the right source you need or you may not get the right information your looking for. This is because the research been done by someone else was what they were looking for so they have catered their information to suit them. It is limited because you are unable to get different angles of the same image unlike with primary you are able to take many different pictures to get different results.
Some examples of the primary and secondary research I used

Process Of Creating My Final Piece - Artifact
When I started to think of ideas for my artifact piece I almost jumped into the final look straight away. However, I decided to approach it differently this time which after finishing I will be continuing with this work plan in the future.
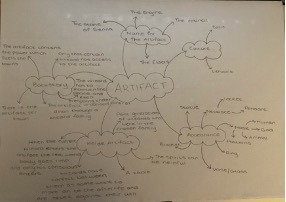
Step One: I began with using a piece of paper and coming up with a mind map of ideas for what it could look like and what we wanted the artifact to do. I did this with my group so I could get their input too.
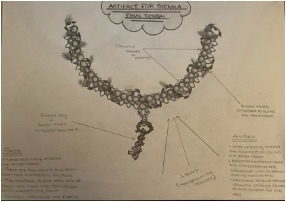
Step Two: I next started doodling some potential ideas for keys, lockets, pendants etc. I liked the idea of a key on a necklace so I went with this idea and started doing some research and looking at necklace designs as seen above.
Step Three: I used photoshop to create some different key designs and asked my team which they liked best (this is when we decided that we were going to create a staff instead) I then chose the design I liked best and created a final piece for the original idea of the necklace this is so then we had some evidence of messing around with a different look for the artifact before choosing the final we used.
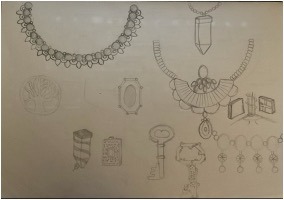

Step Four: With further discussion with my team we decided to create a staff as this was more interesting as previously mentioned. I created more ideas of different designs that the staff could look like and went from there. I asked the others in my group what they preferred and I came up with the final look. This time I used procreate to come up with the designs.


0 notes
Text
Wednesday 6th October 2021
Week 5: Lesson Two
Morning Session 9.15am - 12.30pm
This morning we started of the day with looking at the use of different shades and composition. We learnt the meaning of composition and how it was used to create more detailed environments. Our first task of the day was that we were given a page of pictures and we had to draw lines to indicate what was foreground, middle ground and back ground.
The second task we were given was an empty template with slides that we had to create our own environments using only black, white and two shades of grey. This was a challenge because we were limited only to shades and no colour. Then after we had completed this we did timed trials in which our tutor would give us a theme and we had to create an environment in 4 mins. This was challenging as it made us think and act quite quickly. Some of them I liked however some of them could have definetly been better.
Afternoon Session 1.00pm - 4.30pm
The rest of the day we continued to look at compisitions and then chose one to focus on and start adding more detail. This was a d ay looking at environmental art which I found interesting because I learnt how to give your environments more depth and make it look more realistic instead of flat
0 notes
Text
Tuesday 23rd November 2021
Week 10: Lesson One
Morning Session 9.15am - 2.00pm
This morning we started of with looking back at last weeks work which was level designs. I really enjoyed doing this so I was excited to continue working on it.
Last week I sketched out a few brief ideas on what I would like it to look like and I decided on doing a library room. I chose this because I liked the idea of a cosy environment and when I thought of that I straight away got a vision of a library and was set on this. I started transferring my sketches into google sketchup in a 3D view as I thought this may be helpful to see the sketches in a different perspective. I like working in 3D because it brings your drawings into a more life like view and brings it to life.
I continued with this today adding some more basic details and shapes. Once I had completed this I had the basic layout of my level and could then start developing on it. I took a screenshot of it and moved it into procreate on my ipad. I personally prefer to use procreate to photoshop as I feel I have more control over my drawings and hand movements. I struggle using the tablets for photoshop as I am drawing off the screen so I am not able to see as much of my hand placements.
Once I had moved it to procreate I lowered the opacity of the layout and started going in and adding more detail. I will link the pictures at the bottom. I lowered the opacity so then I could draw over the original design and go back in and change some of the shapes and add more to them. In the end I chose to do a christmas themed room so I added some festive lights and objects to emphasise this idea. I have still got some more things to add before I can start finalising my ideas and adding colour. I will most likely do another layer of line work over the new things so then I can see what I am working with.

I am going to add some more detail this evening in my own time at home and then when we work on this again I can start adding colour hopefully.
Afternoon Session 1.00pm - 2.00pm
The afternoon session we went over reflective journal writing and discussed what would help to improve our entries and I found this incredibly helpful as I am not use to writing like this.
0 notes
Text
Tuesday 2nd November 2021
Week 7: Lesson One
Morning Session 9.15am - 12.30pm:
This morning we were split into two groups and we had to present our assignments that we had been given during the October term break. While watching other presentations we made notes on what we found interesting about that persons character design and the overall presentation.
The week the assignment was set I had caught Covid so I was struggling to come up with ideas and to start drawing. During the October term which was the second week we were given to complete this I managed to start doing research and came up with a character and a backstory which will be added into this entry.
Due to me not having a long time to do this assignment I feel like there is a lot of improvements to be made and that I could have fleshed the ideas out more. I feel like i could have showed how the character was made step by step instead of just showing the final design. I could have given more ideas for the world look and I could have created a Pinterest board as my mood board lacked images. Another thing I could have added is a colour palette to give and idea of potential colours of her outfit and also different designs of her outfit instead of just the dress I used. One last thing I could have done was think more about the gene of the game including the time period and the age range it was aimed at.
With this being said I am going to spend some time this week improving and adjusting my assignment presentation to improve it as I feel it could be a lot better. My biggest mistake was spending the majority of the time creating the final design instead of doing more research and design ideas which could have created a better character.
Afternoon Session 13.00pm - 14.00pm:
This afternoon for the last hour of the day, we went through the units for the rest of the year and the assessment criteria which showed us what we needed to include. We also went through how to make our reflective journals better and then went back and improved on it. That was all we did in the afternoon and then we went home for the day.

0 notes
Text
Thursday 7th October 2021
Week 5: Lesson Three
Afternoon Session 1.00pm - 4.30pm
This morning we had our introduction to the day and were told about some people coming in to take pictures and record us in our class environment. We thought this this would be a good oppurtunity to show some of the work we had been doing previous. As I was the only female in the class that day they decided it would be a good idea to have me in a lot of the pictures. This then would show future possible females who are looking to join this course that even though there is a majority of boys in the classes that females can do this course too. I thought this was a great idea and helped out as much as possible to show this. Within these pictures we did a variety of different things such as drawing figures that are tutor had brought in. Later on we went to the museum to take pictures of different animals, birds and insects to help us with drawing the anatomy. Pictures were taken of us observing the animals and once they had finished we spent the rest of the day in the museum. I enjoyed this as it allowed me to try something new and would help me in future drawings.
As this was a Thursday we only had an afternoon session
0 notes
Text
Tuesday 5th October
Week 4: Lesson One
Morning Session 9.15am - 12.30pm:
This morning we kicked the lesson off with making sure all our forms for work experience etc were filled in and handed to the tutor. We then started to look at our health and wellbeing booklets in which we will be assessed on. This took the majority of the morning session to complete. It was definitely a wake up as we had to recall things we had learnt about mental health the previous week in our tutorial lesson.
Towards the end of the morning session we started to look at different terminology for changing the tone and saturation of colours etc. We then were given a plain white sphere outline in which we had to shade and make look like it was 3D. This was a challenge as we started to understand the use of different brushes and tools to complete this. It was a lot of trial and error to find what shades fit together to make the lightening fit in the correct spot.
The first image is what we were given, most of the class used photoshop to do this task however I used procreate. The second image is of my final piece. I don’t usually do 3D shapes unless I’m doing buildings so there is a lot of improvements to be made, however for my first attempt I am proud of what I managed to create.
Afternoon Session 13.00pm - 14.00pm
This afternoon we spent the final hour working on Pinterest creating mood boards for different environments. I made different categories for example sci fi, nature, caves and cliffs and so on. This was fun to do as it gave me many ideas of drawings I could do.
Evening 14.00pm - 16.00pm
I spent the next two hours making sure I had handed in all my work and then updated my blog. For the rest of the evening I spent with my online friends playing on my xbox and relaxing, listening to some music too.
This is my first blog and I will be posting every Tuesday, Wednesday, Thursday


1 note
·
View note