Hey there, I'm Georgia - a twenty year old student based in the UK. I am an amateur baker and lover of all things food. I hope that you will enjoy joining me on my journey as I detail some of my favourite food outings and makes, as well as, offering easy vegan alternatives for my recipes!
Don't wanna be here? Send us removal request.
Statistics
We looked inside some of the posts by gingeryginseng and here's what we found interesting.
Average Info
Notes Per Post
35K
Likes Per Post
13K
Reblog Per Post
22K
Reply Per Post
5
Time Between Posts
4 months ago
Number of Posts By Type
Text
7
Photo
4
Last Seen Tumblr Blogs


Fun Fact
Tumblr was named as a finalist in Lead411’s New York City Hot 125 in Aug 2010.
Text
Egg Fried Rice
Including a vegan tofu alternative.
Quick and deliciously easy, egg fried rice is open to countless variations, making it the most delicious and versatile meal for any time of the day!

Egg fried rice is such a feel-good food! I used to look forward to my mom cooking it for lunch on the weekends and would often go back for second servings. (In fact, I love rice so much that I used to eat plain boiled rice and soy sauce for dinner during my first year at uni #strugglemeal #stillgoodthough.)
I recently posted a quick recipe on how I make egg fried rice to my Instagram story (ig gingeryginseng). I was taken aback by how well-received this was with many of my friends commenting on it and even sharing it on to their followers. But being so cheap, and quick to make, was it a surprise that it kicked off so well?
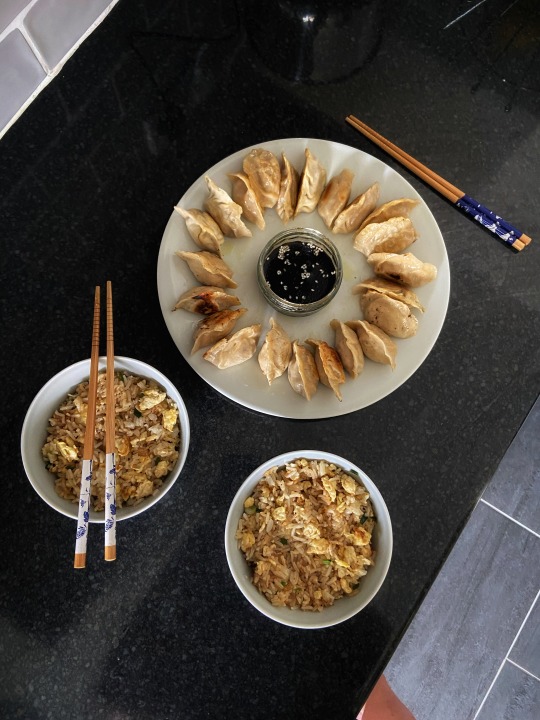
The above photo was taken at the same time as the recipe from my Instagram story. Looks good right? A recipe for dumplings is definitely overdue, but what fillings would you guys like to see? Please comment below telling me!
But firstly, what exactly is egg fried rice? Chinese fried rice was first recorded during the Sui dynasty of 589 - 618 BC. As the name suggests, it consists of rice that has been stir-fried in a wok with eggs, vegetables, seafood or meat. This tasty dish is a takeaway staple, eaten as a main or a side.
However, domestically, fried rice is typically made using leftover ingredients from the day before - that is, foods that are no longer fresh yet are still too good to be discarded. Whilst this was common in rice-growing south China, northerners cooked a similar dish with fried noodles called chow mein. Sound familiar?

The rice and other leftovers were paired with pantry items of soy sauce, lard and cloves of garlic to make a delicious and economical meal. And thus, this naturally lends itself to countless variations! In the picture above, I went a little fancy and used fresh prawns with my rice. My mom on the other hand makes a delicious variant with ham, carrots, sweetcorn and peas.
In traditional Chinese cuisine, vegetarianism and veganism are relatively unheard of. However, no need to fret for I have a solution for those who need it! Scrambled tofu is the perfect vegan substitute for eggs, whilst meat can be omitted.
Ingredients
2 tablespoons of sesame oil.
4 beaten eggs (or 225g of firm tofu, mashed with a fork).
250g of cooked rice.
2 tablespoons of light soy sauce.
1 tablespoon of dark soy sauce.
1 tablespoon of Shaoxing wine (or white rice vinegar).
Salt and pepper to taste.
2 chopped scallions.
Directions
Cook the rice according to its instructions. (Fresh rice can be used as long as it is not too wet and sticky, otherwise, there will be clumps in your fried rice. Leftover, dried rice is much better - do this step the night before if possible.)
In a wok on medium-high heat, add the oil and scramble the eggs, or tofu, until cooked.
Add the rice and stir thoroughly to break any clumps, to heat it evenly and, to distribute the egg evenly.
Season with soy sauce, vinegar, salt and pepper.
Stir in the scallions, cooked meat or vegetables if using.
Bon appétit (or 慢慢吃 (màn màn chī) in Chinese!).

Notes
*Photos and recipe by me.
*For more information on the origins of Chinese fried rice.
4 notes
·
View notes
Text
Turtle Bay UK
01.08.20
Fruity cocktails and tasty Caribbean food!


Two Fridays ago, I enjoyed a delicious night out with cocktails and a mixed seafood grill at Turtle Bay - a Caribbean themed restaurant and bar chain in the UK.
Whilst the food is tasty, I think most would agree that Turtle Bay is best loved for its cheap and cheerful cocktails (best when it is 2′4′1), and its energetic and colourful ambiance. In fact, this was the first time I had been out since the start of lock down!
As you can see in the picture, social distancing was enforced, and so the restaurant did not feel as lively as usual but, the music was still loud, and the evening was enjoyable nonetheless. It was even somewhat a special occasion as we were celebrating the last day of my summer school.
So what did I order?
Cocktails -
Island Affair (Ve) - white rum, Triple Sec, melon, mango, coconut milk, orange juice. £8.50.
Reggae Rum Punch (Ve) - Wray & Nephew, grenadine, strawberry, lime, pineapple, bitters. £8.50.
Meal -
Fish Fry - crispy salmon, panko squid, spiced fries, jerk mayo and coleslaw. £13.20.
Trini Curry Chicken - coconut and mango sauce with whole curried chicken breast, coconut rice and peas. £11.20. (Sadly, I was not able to take a photo because my boyfriend began eating straight away! Haha, proves that the food is very good - even at the expense of my blog content!)
Notes
*Food by Turtle Bay UK
*Photos by me
#Turtle Bay#cocktails#rum#jamaican food#seafood#mixed grill#chips#fries#alcohol#restaurant review#eating out
1 note
·
View note
Text
Chicken / Vegetable Katsu Curry
A thick and rich coconut curry served with chunky vegetables, crispy chicken, and soft, fluffy rice - Japanese katsu curry is a well-loved dish, best served all year round!

In life, it is said that one has unlimited wants but only finite needs - and for me, Katsu curry is certainly a need! Albeit I am yet to travel to Japan (fingers crossed for 2021) and try an authentic katsu curry, it is still my go-to meal when ordering at a Japanese restaurant. At least, it was until quarantine...
Hungry and seriously deprived, it was only a matter of time until I took matters into my own hands. The first time I made my own katsu curry was back in April, and since then, it has become a regular favourite of mine. Admittedly, it does take quite a bit of effort and time to make, due to the batch frying, but it is an incredibly easy and versatile meal!

But first, what exactly is katsu curry? Japanese curry is commonly enjoyed in one of three ways - over rice, over udon noodles, or as a filling inside bread - all of which are delightful. The sauce is usually served with onions, carrots and potatoes, and meats such as beef, pork, or chicken. A katsu curry is therefore a breaded, deep-fried piece of pork or chicken, served with said curry sauce.
The version of katsu curry that many of us are accustomed to is that of Wagamama, a British chain that serves Japanese inspired dishes. This differs from the traditional curry in that the sauce is sieved before served, making it smooth and runny, rather than packed with bites of veg. This may be accredited to the fact Wagamama is tailored for a western market and thus have adapted their recipes accordingly. Interestingly, however, it was the British who originally introduced curry to the Japanese in the 19th century. It is now so widely consumed in Japan that, according to Japanese food writer Morieda Takashi, the average person eats it at least once a week - more often than sushi and tempura.
Today, I have decided to share with you my own version for a katsu curry! More in line with a traditional curry, this make is packed with rich flavours and varying textures. I especially enjoyed the inclusion of the stewed vegetables as it added more flavour and some bite to my dish, Plus, I guess it balanced out the "unhealthiness” of the deep-fried chicken, or at least in my mind it made me feel less guilty for including my five-a-day!
Luckily enough, the curry sauce I made is naturally vegan! Feel free to omit the chicken or to substitute it for other non-meat alternatives such as aubergine, pumpkin, or sweet potato! In my recipe, I used panko crumbs to make it crispier and more in line with the recipe from Wagamama. These can be easily found in many large supermarkets, but if not, feel free to make a lighter, tempura batter. (This is equally as good and I love to fry my veg in it too!)

Ingredients:
120g rice
2 chicken breasts (or vegetables of choice. I suggest using aubergine, sweet potato, or pumpkin that was been sliced.)
50g plain flour.
2 whisked eggs (or vegetable oil to substitute.)
200g panko breadcrumbs.
75ml of vegetable oil.
Curry sauce
2 tablespoons of vegetable oil
2 sliced onions
2 crushed garlic cloves
15g of grated ginger
1 teaspoon turmeric
3 tablespoons of curry powder
1 diced potato
2 chopped carrots
5 - 15 sliced mushrooms (depending on size)
2 tablespoons of plain flour
700ml of chicken (or vegetable) stock
200ml of coconut milk
1 teaspoon of light soy sauce
1 teaspoon of sugar
Directions:
Starting with the curry sauce, heat the oil in a saucepan and soften the onions, garlic, and ginger. Stir in the curry powder, turmeric, and flour on low heat.
Slowly add the stock and coconut milk before adding the cut vegetables. Covered with a lid, leave to simmer on medium-low heat for 30 minutes.
Meanwhile, cook the rice according to its instructions.
Coat the chicken fillets (or vegetables) in flour and then egg (or oil). Cover all sides with panko breadcrumbs before deep-frying in a second pan until golden brown.
Before serving, season the curry with soy sauce, salt, and sugar.
Slice the chicken and plate it up with the rice and curry. Add a side of salad like Wagamama or garnish with sliced spring onions and red chilies as I did.
Bon appétit (or meshiagare in Japanese!)
Notes:
* Recipe adapted from GoodtoKnow.
* Photos by me.
* For more information on the origin of Japanese curry.
4 notes
·
View notes
Text
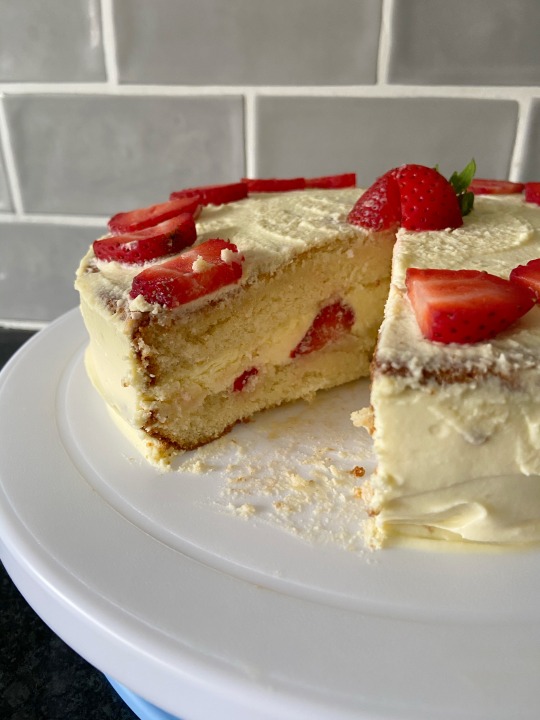
Japanese Strawberry Shortcake
Fluffy, airy and moist, this Japanese Strawberry Shortcake consists of layers of delicate sponge cake generously filled with whipped cream and fresh strawberries. Whether celebrating an occasion or treating yourself to afternoon tea, this is a winning centrepiece!
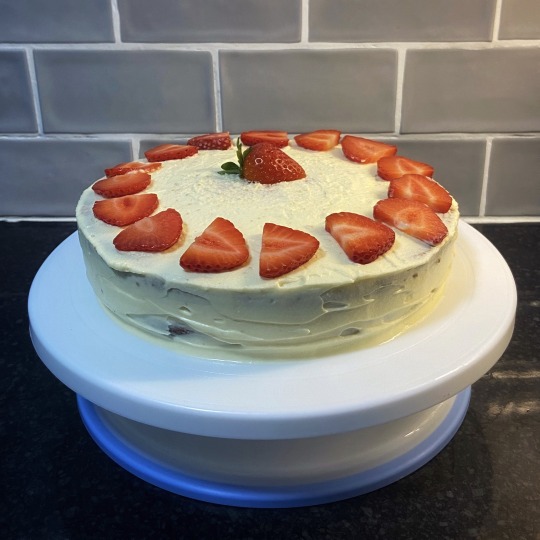
I love Japanese cakes, it was therefore no question that I had to include one on my blog! And where else am I better off starting other than with the famous strawberry shortcake? The sponge itself is super soft and elastic, making it much lighter than typical cakes. It is a genoise cake, meaning it is made by whisking air into the eggs to make it rise rather than using leavening agents like baking powder or soda. With two to three layers, they are then delicately filled with freshly whipped cream, and an explosion of ripe strawberries, creating an elaborate symphony of flavours and textures with each bite.
Strawberry shortcake is one of, if not the most, popular cake in Japan. It is formally bought to celebrate special events whereby it is a birthday party or Christmas. Even for something more casual like a small get together, this cake is perfect for such an occasion; I also guarantee it will bring you compliments all round.
Whilst browsing the internet, I was surprised to learn that such an elegant cake could be made so easily! It used largely pantry items, making it already very accessible for the amateur baker. Its assembly of the layers and external decoration was also the perfect opportunity for me to try out my new baking utensils!
I was heavily inspired by HidaMari’s recipe for strawberry shortcake. After watching her video, I decided to treat myself to a cake leveller and a turntable which she is seen to be using in her video. For how inexpensive they were, I was surprised at how robust the quality was, and also how much I enjoyed working with them - it made decorating the cake infinitely easier, quicker and less frustrating (I am a perfectionist - forgive me!). So for the sake of my blog, I am very excited to review my lovely new purchases.

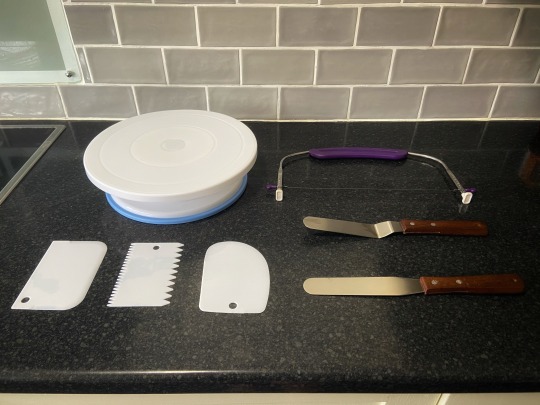
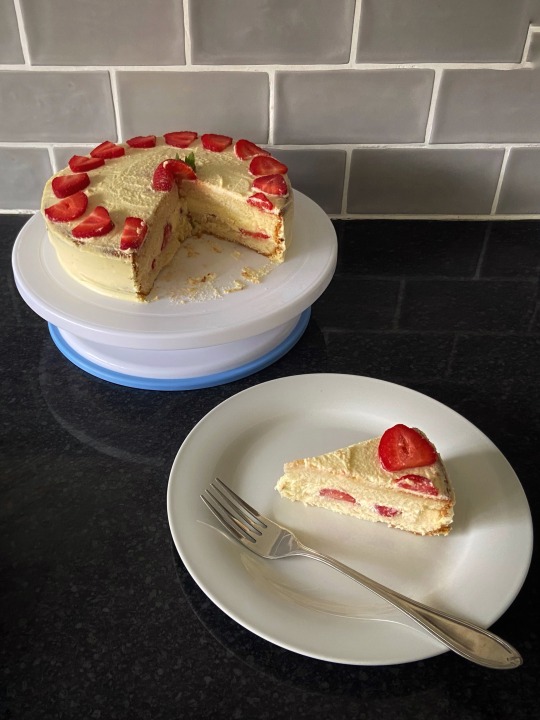
The first one I used was the cake leveller to cut the cake into neat, equal layers. Although this step can be done ordinarily with a serrated knife, I loved just how clean and straight the cut was. And even in this instance, whereby the cake was going to be hidden with frosting, the leveller still gave me a quiet satisfaction at how professional and seamless the inside was going to look when cut! After all, the interior is arguably the most important part of this cake as it reveals those carefully placed strawberries!
Once cut, it was time to move on to my second new toy - the cake turntable! Oh, the joys of finally having a cake stand (albeit it’s not the most glamorous one). A cake turntable is a rotary cake stand used to decorate cakes and assemble them. The turntable itself is very sturdy and moves smoothly without difficulty. It even came in a set with a flat and angled palette knife, and three icing smoother tools - obvious essentials when it comes to making the most professional, streamlined cake! This was fabulous for my needs and I am now well equipped for all my subsequent bakes.
Whilst on the topic of decorating, I think it would be worth mentioning that I did encounter one small problem whilst decorating this cake. In true Gingery Ginseng fashion, I wanted to adorn the top with a ring of whipped cream florets between the negative space of the strawberries. I, however, got far too carried away with whipping the cream that it churned to butter! HAHA!
It was a shame that my culinary vision did not come true, but needless to say, this cake was extremely delicious. Accordingly, I still wanted to share my baking experience, and the delights of my new toys, with all you lovely readers!
With all said, let’s move on to the recipe!
Ingredients:
Sponge cake
30g butter
30ml milk
4 eggs
110g sugar
20g honey
120g plain flour (sifted twice to ensure a smooth batter.)
Syrup
2 tablespoons of water
3 tablespoons of sugar
1 tablespoon of any liquor of choice (I used white rum but I have seen recipes with whiskey and even flavoured spirits like Cointreau.)
Decoration
500ml double cream
50g sweet condensed milk (optional)
40g icing sugar
halved strawberries
Directions:
Sponge Cake
Line an 8-inch cake tin with baking parchment, and preheat the oven to 170ºC.
Begin with whisking the eggs until combined. Add the sugar and continue to whisk. Then place it in a bain-marie (be careful to not have it too hot as it will scramble the eggs!) and continue to whisk until the temperature rises to 40 ºC.
Using a stand mixer, add the honey and whisk the batter until pale, thick, and tripled in volume. Meanwhile, in a second bowl, melt the butter and whisk in the milk. Set the second bowl aside.
Removing the bowl from the stand mixer, sift half of the flour to the batter and gently fold through. Once incorporated, add the remaining flour and again, gently fold through. Make sure to do this step slowly so that the mixture does not deflate.
Add a spoonful of the batter to the butter mixture and mix well. This extra step is essential because the fat in the butter will deflate the batter if we add it directly. Add the mixture back to the batter and mix.
Pour the batter into the cake tin and drop it onto the counter to release any air bubbles.
Bake in the oven for 20 - 25 minutes.
Once cooked, immediately remove from the tin and let it cool on a wire rack. Cover the cake with a damp towel to keep it moist.
Assembly
Prepare the strawberries, halving them, and removing the husks.
Make a syrup in a small bowl with the water, sugar and liquor. Microwave for a minute to dissolve the sugar.
Whisk the double cream, condensed milk and icing sugar until stiff.
With a serrated knife or cake leveller, cut the cake horizontally into two layers.
Place the bottom of the cake on a plate or turntable, and brush the syrup over its top and sides. This will keep the sponge moist.
Spread a layer of whipped cream on the cake. Arrange the strawberries on the sponge and then coat with another layer of cream. (Admittedly I forgot to do two layers of cream but I preferred it this way!)
Place the top layer of the sponge cake and brush with the syrup.
Cover the exterior with whipped cream. Use an icing spatula to achieve a smooth finish by rotating the turntable towards you. Remove any excess cream.
Decorate with cream and strawberries. Other fruits such as blueberries can be used.
Bon appétit (or meshiagare in Japanese!)

Notes:
* Recipe adapted from HidaMari Cooking and Just One Cookbook.
* Photos by me.
* Link to Wisfox rotating cake turntable and icing set.
* Link to Wilton cake Leveller.
#serves: 10#time: 2 hours 30#cake#japanese strawberry shortcake#japanese dessert#japanese food#strawberry#dessert#baking#shortcake
1 note
·
View note
Text
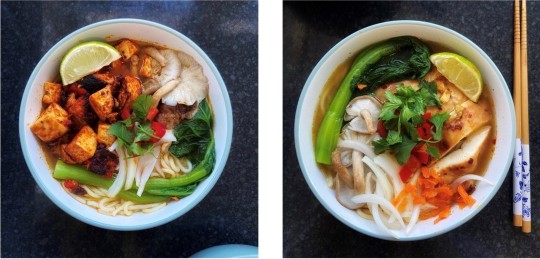
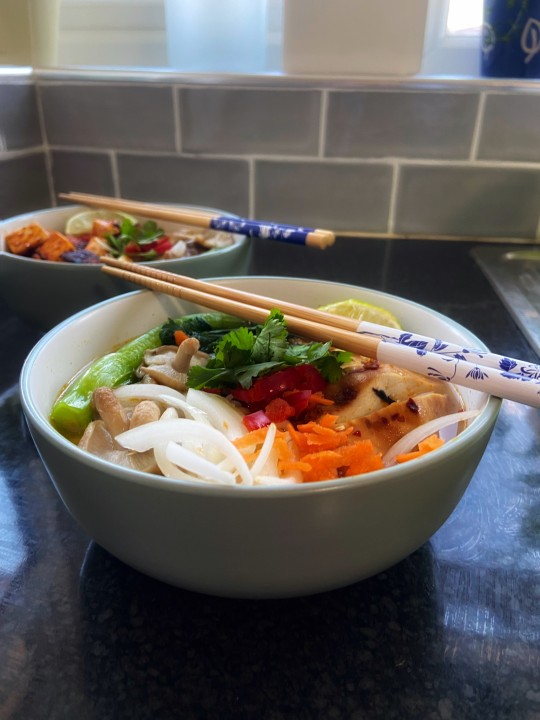
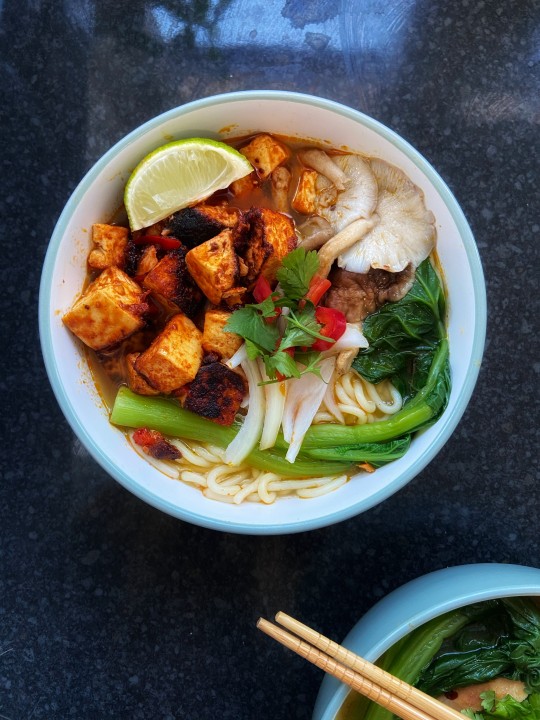
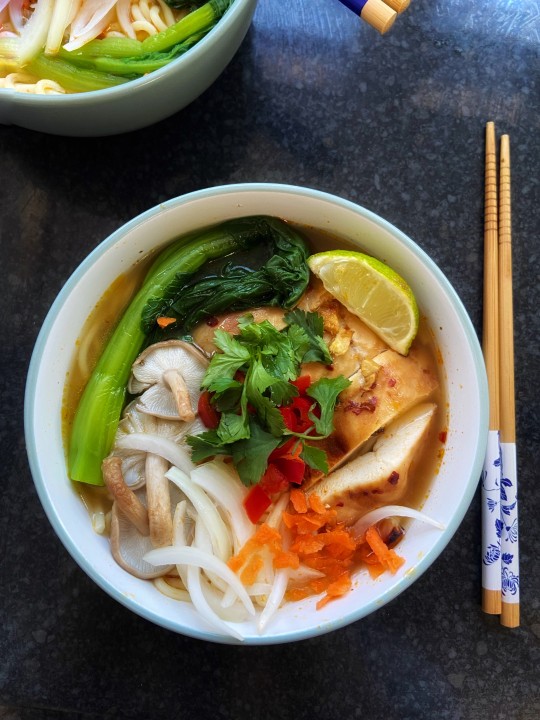
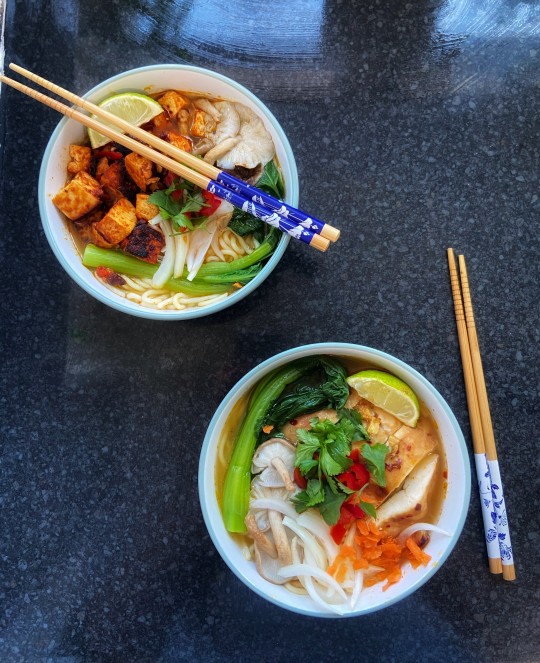
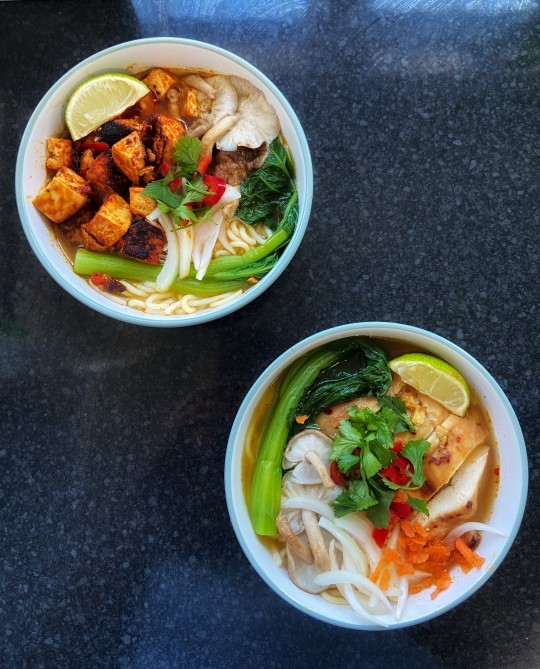
Spicy Tofu / Chilli Chicken Ramen
Silky noodles and a homemade, aromatic broth - this is my tried and tested recipe for a deliciously light, and comforting, spicy tofu and or chilli chicken ramen.
Ramen, ramen, ramen - the food I often dream about. Although I do not want to come across clichéd, almost any variant of ramen is my go-to food in many Asian eateries. Even when I was in Hong Kong last year, I found myself gravitating towards chicken or prawn wonton and noodle soup for almost every meal - and as always, though it should go without saying, the spicier, the better!
Even at home in the UK, whether I fancy a ridiculously quick snack in the form of an instant packet (Mama Tom Yum is my favourite - YUM!!), or something more hearty and nutritious, my cupboards are always well-stocked to satisfy such cravings.
So what is ramen? Ramen is a Japanese noodle soup. Not to be confused with instant noodles which is a variant of the sort, traditional ramen is a rich broth consisting of Chinese wheat noodles (called la mian which means “pulled noodles” - notice the etymology?), vegetables and meat. Ramen, or then called shina soba, or “chinese buckwheat”) was allegedly introduced to Japan by Chinese immigrants at Yokohama Chinatown in 1859.
As it grew in popularity, naturally, regional variations came about such as the miso (soybean paste) ramen of Hokkaido or shoyu (soy sauce) of Yokohama. The toppings we find on our ramen also vary largely with char siu (BBQ roast pork), kamaboko (fish cakes), boiled eggs, seaweed, and corn all being very popular. However, it does not end there, of course! Each topping can be substituted according to personal preference such as the replacement of meat for tofu, or even the inclusion of plant milk for a richer and creamier broth than what is typically achieved with stock alone.
I love to experiment with my ramen (and I am sure many recipes are to come your way!), but for now, I would like to share with you my recipe for a deliciously heartwarming chilli chicken noodle soup! Admittedly, this is not an authentic spicy ramen recipe but, if you may, it is my humble take on it. Although I love carousing around Asian supermarkets and checking out all of its tasty supplies, I know that this is not realistic nor accessible for many people. And so, I am presenting to you my recipe which largely uses pantry items.
But, if meat is not your thing, no problem! I also made a spicy tofu alternative which was just as good, if not better! I am a sucker for tofu with my favourite type being firm silken. However, this type is not commonly found in many supermarkets as it is used primarily in Asian cooking (such as miso soup and mapo tofu). Ultimately, the taste and texture are not detrimental, however, it may be worth checking out what other types your supermarket stocks - you never know, you may even find a new favourite and become a tofu connoisseur!
Without further adieu, get your chopsticks ready as it is ramen time!

Ingredients:
Ramen
700ml of chicken / vegetable stock.
5 tablespoons of sriracha hot chilli sauce (adjust the amount according to personal preference).
4 tablespoons of soy sauce.
1 tablespoon of sesame oil.
1 teaspoon of garlic powder.
150g soba / medium egg noodles / ramen noodles (soba tends to be vegan although you may need to check the ingredients before buying. The latter two are further suggestions as they are more readily available to buy in supermarkets).
Chilli Chicken
2 chicken breasts.
15g of fresh root ginger.
4 tablespoons of soy sauce.
1 tablespoon of chilli flakes.
1 teaspoon of white sugar.
Spicy Tofu
400g of firm / extra firm tofu
2 - 3 tablespoons of spicy fermented bean paste (I used Korean gochujang but anything can be used, especially miso paste! Again adjust according to spice preference.)
(Above can be substituted for 3 tablespoons of soy sauce and half a teaspoon each of paprika, turmeric, salt, chilli flakes, and garlic powder).
1 tablespoon of sesame oil.
Toppings / Garnishes
What I used - a wedge of lime, coriander, sliced red chillies, finely sliced onions, grated carrot, oyster mushrooms, gai lan (or any other variety of Asian greens such as pok choy).
Further suggestions - boiled egg, sweetcorn, broccoli, spinach, kimchi, pickled vegetables, seaweed, spring onions, beansprouts, sesame seeds, chilli flakes, etc.
Directions:
Chilli Chicken
Preheat the oven at 220°C.
Marinade the chicken breasts in soy sauce, sugar, grated fresh ginger, and the chilli flakes.
Cook for 15 minutes on a tray lined with baking parchment.
Whilst the chicken is in the oven, prepare the vegetables and start making the broth.
Spicy Tofu
Drain the tofu either by using a tofu press or with paper towels.
Cut the tofu into cubes and marinate them in either the bean paste or soy sauce mixture.
Heat the oil over a medium-high heat and then add the tofu. Fry for 3 - 4 minutes until browned on each side.

Ramen
In a saucepan, dissolve the stock cube in boiling water, and then add the sriracha, soy sauce, sesame oil, and garlic powder. (I used nthe left over water from boiling my vegetables for extra flavour.)
Simmer for 5 minutes on low heat.
Now add the noodles and cook according to the instructions on the pack.

Plating up
Divide the noodles and broth between two bowls.
Top each bowl with sliced chicken / tofu and your selection of vegetables. Finish off with a lime wedge, coriander, spring onions, and chopped chillies.
Bon appétit (or meshiagare in Japanese!)
Notes:
*Chilli chicken recipe inspired by Wagamama.
*Spicy tofu recipe adapted from Pinch of Yum and The Baking Fairy.
*For more information on ramen, check out this handy guide.
*Photos by me.
2 notes
·
View notes
Text
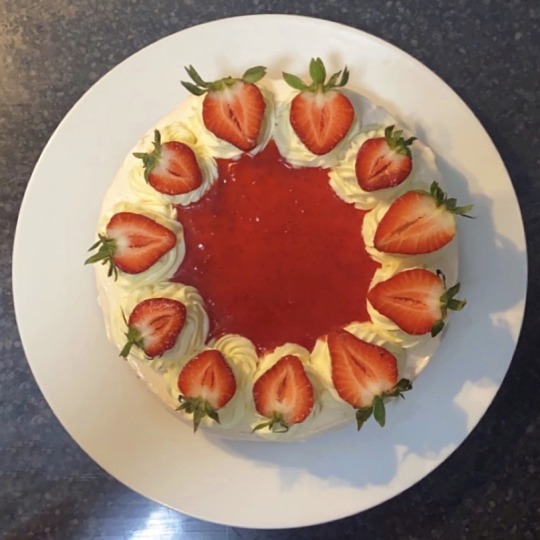
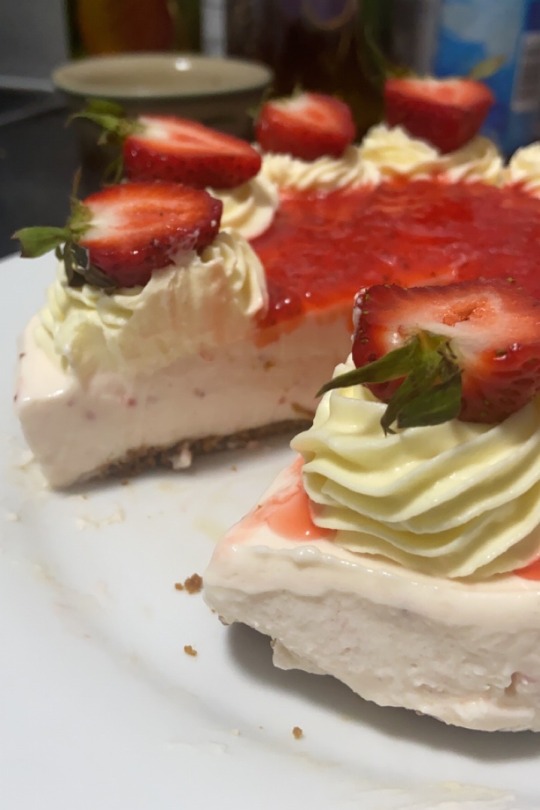
Strawberry Cheesecake
A buttery biscuit base and a deliciously sweet filling, this no-bake strawberry cheesecake is adorned with freshly whipped cream and ripe strawberries. It is the ultimate dessert and centrepiece for tea time treats or special occasions.
Truth be told, growing up I was never a huge cheesecake eater. I’d always look over it for something more chocolately and stodgy if there was an option (I am more than receptive to a slice or two of chocolate cake!).
Whether it is because this is my first cheesecake make, or simply because I adore strawberries, this creation was a very early make in my baking journey but one I always compare subsequent bakes to! Undeniably, one of my most favourite makes (and food photography attempts) ever!
Whilst my love for this recipe is more than apparent, what actually makes it so special? I love how soft and creamy the filling is in comparison to more traditionally dense cheesecakes. I think this can be attributed to the fact I used low fat cream cheese (as dairy is a thickening agent). This, along with the deliciously light and fluffy cream, beautifully melted into the biscuit base which is light and chewy (I personally prefer a more chewy and cookie-like base to a crumbly one. However, any type of biscuit can be used to accommodate for your own preference. Ultimately, it is your creation - experiment and make it your own!).
This is a no-bake and no-egg cheesecake - this should hopefully appeal to more of you lazy bakers or those with dietary requirements. Unfortunately, however, I am afraid this is not a vegan make due to the inclusion of dairy and gelatin to help the cake set. But I have seen recipes whereby non-dairy cream cheese and coconut milk are used to achieve similar results! I have even seen ones made from cashews and almonds!
But how can I forget the pièce de résistance - the strawberries! The homemade purée is the perfect blend of sharp and sweet sensations. Poured within the area of the cream and strawberries, this delightfully added a pop of colour and more interest to my presentation. I love decorating my cakes with fruit - the halved strawberries tasted so fresh and added a bite to the otherwise melt-in-your-mouth filling.
I could continue to write paragraphs and paragraphs of self-appraisal for this make (I am very modest, I know!) but to reiterate, this cake was so easy and so gratifying to make! So let’s just jump into how I did it!
Ingredients:
Cheesecake
150g Biscuits (I used chocolate chip cookies but digestives are another good option!)
75g Melted Butter (adjust as appropriate - I prefer using more butter in order to achieve a more chewy, and less crumbly, base)
200g (Vegan) Cream Cheese
90g Sour cream / Yoghurt / Mascarpone (this can be substituted for more cream cheese but this makes for a creamier recipe)
30g Sugar
30g Milk
6g Gelatin / 4 table spoons of Corn starch
130g Strawberry purée
300ml Double Cream / Coconut Cream
45g Icing Sugar
Fresh Strawberries to decorate
Strawberry purée
200g Strawberries
30g Sugar
10g Lemon Juice
Directions:
Line a cake tin with parchment paper.
Crush the biscuits into fine crumbs and add the melted butter. Combine and press into the cake tin. (You can either leave aside or bake for 15minutes at 180C to harden the base. If doing so, please allow time for the base and tin to cool down.)
In a large bowl, combine the sour cream and cream cheese. Add sugar and mix completely.
In a separate bowl, combine the milk and gelatin. Mix this over a second bowl of hot water to dissolve any gelatin crystals. When done, add this to the cream cheese mix and combine until creamy. Set aside.
To make the strawberry purée, add sugar and lemon juice to chopped strawberries in a saucepan. Bring to a high heat until the mixture is bubbling. Then blend this into a purée.
Add two thirds of the purée to the cheesecake batter and mix.
In a separate bowl, whisk double cream and icing sugar together til thick. Combine 200g of the whipped cream with the cheesecake mix. Refrigerate the remaining cream for later use.
Pour the cheesecake mix on top of the biscuit base in the cake tin. Freeze til set for an hour or two.
Now this is the fun part - decorating! Do so as you please but for my cheesecake, I piped florets of double cream along the circumference of the cake (I used a 2D closed star piping tip). I then placed halved strawberries on top of the cream, and the remaining purée within the icing. (Other decorative suggestions may include drizzling melted white chocolate, using dried frozen strawberries or even making a strawberry jelly with the remaining purée and gelatin. Either way, have fun with it!)
Bon appétit.
Notes:
*Recipe adapted from HidaMari Cooking.
*Photos by me.
2 notes
·
View notes
Text
Terry’s Chocolate Orange Brownies
Made with almond milk!
Moist, decadent, and extremely chocolatey - what more could you want in a brownie? Well, as a fiend for all things chocolate, I can confidently say that the inclusion of orange zest is a heavenly twist on this classic.


I am super excited about this post for it is the first recipe on my blog! If you know me, I love making chocolate brownies, and even more so eating them! I am always changing up my recipes with different ingredients whereby it is fudge, nuts, or even fresh fruit (the latter being sometimes tiresome to work with, however, that makes up for another post!).
So alongside my love for brownies (warm, cold, with ice cream or whipped cream - you name it!); I also adore chocolate oranges. They remind me of Christmases and how my sister and I would be gifted with endless supplies each year.
Whilst baking, I actually fell short of a few eggs and so substituted them for a drizzle of olive oil and some almond milk - both for texture and moisture. And thus, unintentionally, this creation made for the most perfect no egg and dairy-free recipe (excluding the Terry’s pieces used for decoration). I shall therefore be offering you two options - a dairy, and a vegan alternative. So no matter what your dietary requirements are, let’s dive deep into the recipe!
Ingredients:
250g Dark Chocolate (I used Bournville)
200g Unsalted Butter (I used Stork which happens to be vegan!)
3 eggs / 180ml Almond milk (or any other type of plant-based milk)
275g Light Brown Sugar (caster sugar can also be used, however, I prefer the chewier texture, and taste, of using light brown sugar for brownies!)
90g Plain flour (+ 1 teaspoon of baking powder if making vegan - needs to be substituted for the egg whites in order to rise!)
35g Cocoa Powder
1 Teaspoon of orange essence (or the zest of 1 orange)
150g Dark Chocolate / Terry’s Chocolate Orange
Directions:
Preheat your oven to 180C / 160C fan and line a baking tray with parchment paper.
In a heatproof bowl, melt the butter and 250g of dark chocolate together over a pan of boiling water.
Meanwhile, using an electric whisk, beat the eggs (or almond milk if using) and the sugar until pale and doubled in volume.
When done, slowly fold the melted chocolate into the sugar mix.
Once combined and rich in colour, sift the plain flour, (baking powder), and cocoa powder on top of the mix. Add a teaspoon of orange extract or zest, and then fold it all together.
Fold through chocolate chips or pieces of Terry’s chocolate orange - I personally prefer using chunks of chopped dark chocolate for big, chocolatey puddles.
Pour into the prepared tray and bake in the oven for roughly 45 minutes. Cooking times may vary with appliances, so cover your brownies with tin foil to avoid burning, and use a skewer to check if the centre is baked and comes out clean. Once baked, leave to cool in the tray.
Bon appétit.
Notes:
*Recipe adapted from Jane’s Patisserie
*Photos by me
5 notes
·
View notes


Photo

Onigiri for breakfast. What’s your favorite onigiri snack? ❤
26K notes
·
View notes