Text
Tree Replacement - Boring Bones
I love to embark on new projects and the project of the time was to create color replacements for some plants in the game, which despite the beautiful format, presented very saturated or unpleasant colors (for my personal taste).
Now they can be combined in a variety of ways, blending in with their surroundings rather than standing out from it. Making everything even more harmonious, charming and beautiful!

The trees replaced in this image:
-Chinese Elm (Around the World) -Spiny Grape (Base) -Cherry tree (Base)

The trees replaced in this image: - Poplar (Base) - Birch (Ambitions) -Spruce (Supernatural)

The trees replaced in this image: -Canada poplar (Supernatural) -Willow (Base) -Oak (Base)
For the file to work correctly you need to have The Sims 3 base, World Adventures, Ambitions and Supernatural. Soon I will add more replacements, possibly creating a separate file for each species according to the expansion pack. I hope you enjoy the new look these plants can provide. With these replacements your worlds have everything to be even more beautiful!
Note: The name of the trees may vary depending on the language of the game, in addition to the interpretation of the translator I am using
➡️DOWNLOAD
207 notes
·
View notes
Text

What if I say I learnt a way to make ts3 run even smoother🙀 The game is currently running on 2.5+gb of RAM and 5+gb of VRAM… This is insane.
2K notes
·
View notes
Text
How to use DXVK with The Sims 3
Have you seen this post about using DXVK by Criisolate? But felt intimidated by the sheer mass of facts and information?
@desiree-uk and I compiled a guide and the configuration file to make your life easier. It focuses on players not using the EA App, but it might work for those just the same. It’s definitely worth a try.
Adding this to your game installation will result in a better RAM usage. So your game is less likely to give you Error 12 or crash due to RAM issues. It does NOT give a huge performance boost, but more stability and allows for higher graphics settings in game.
The full guide behind the cut. Let me know if you also would like it as PDF.
Happy simming!
Disclaimer and Credits
Desiree and I are no tech experts and just wrote down how we did this. Our ability to help if you run into trouble is limited. So use at your own risk and back up your files!
We both are on Windows 10 and start the game via TS3W.exe, not the EA App. So your experience may differ.
This guide is based on our own experiments and of course criisolate’s post on tumblr: https://www.tumblr.com/criisolate/749374223346286592/ill-explain-what-i-did-below-before-making-any
This guide is brought to you by Desiree-UK and Norn.
Compatibility
Note: This will conflict with other programs that “inject” functionality into your game so they may stop working. Notably
Reshade
GShade
Nvidia Experience/Nvidia Inspector/Nvidia Shaders
RivaTuner Statistics Server
It does work seamlessly with LazyDuchess’ Smooth Patch.
LazyDuchess’ Launcher: unknown
Alder Lake patch: does conflict. One user got it working by starting the game by launching TS3.exe (also with admin rights) instead of TS3W.exe. This seemed to create the cache file for DXVK. After that, the game could be started from TS3W.exe again. That might not work for everyone though.
A word on FPS and V-Sync
With such an old game it’s crucial to cap framerate (FPS). This is done in the DXVK.conf file. Same with V-Sync.
You need
a text editor (easiest to use is Windows Notepad)
to download DXVK, version 2.3.1 from here: https://github.com/doitsujin/DXVK/releases/tag/v2.3.1 Extract the archive, you are going to need the file d3d9.dll from the x32 folder
the configuration file DXVK.conf from here: https://github.com/doitsujin/DXVK/blob/master/DXVK.conf. Optional: download the edited version with the required changes here.
administrator rights on your PC
to know your game’s installation path (bin folder) and where to find the user folder
a tiny bit of patience :)
First Step: Backup
Backup your original Bin folder in your Sims 3 installation path! The DXVK file may overwrite some files! The path should be something like this (for retail): \Program Files (x86)\Electronic Arts\The Sims 3\Game\Bin (This is the folder where also GraphicsRule.sgr and the TS3W.exe and TS3.exe are located.)
Backup your options.ini in your game’s user folder! Making the game use the DXVK file will count as a change in GPU driver, so the options.ini will reset once you start your game after installation. The path should be something like this: \Documents\Electronic Arts\The Sims 3 (This is the folder where your Mods folder is located).
Preparations
Make sure you run the game as administrator. You can check that by right-clicking on the icon that starts your game. Go to Properties > Advanced and check the box “Run as administrator”. Note: This will result in a prompt each time you start your game, if you want to allow this application to make modifications to your system. Click “Yes” and the game will load.
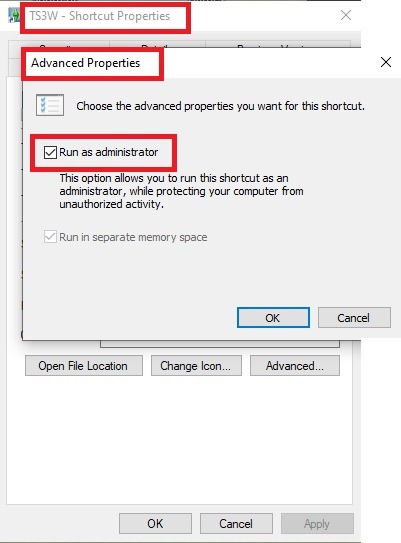
2. Make sure you have the DEP settings from Windows applied to your game.
Open the Windows Control Panel.
Click System and Security > System > Advanced System Settings.
On the Advanced tab, next to the Performance heading, click Settings.
Click the Data Execution Prevention tab.
Select 'Turn on DEP for all programs and services except these”:
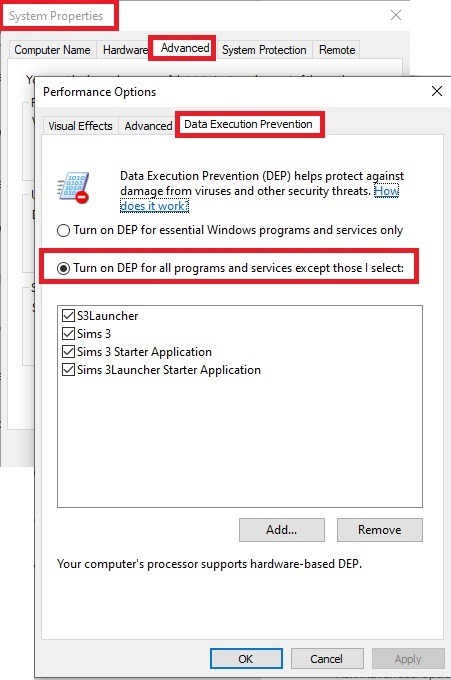
Click the Add button, a window to the file explorer opens. Navigate to your Sims 3 installation folder (the bin folder once again) and add TS3W.exe and TS3.exe.
Click OK. Then you can close all those dialog windows again.
Setting up the DXVK.conf file
Open the file with a text editor and delete everything in it. Then add these values:
d3d9.textureMemory = 1
d3d9.presentInterval = 1
d3d9.maxFrameRate = 60
d3d9.presentInterval enables V-Sync,d3d9.maxFrameRate sets the FrameRate. You can edit those values, but never change the first line (d3d9.textureMemory)!
The original DXVK.conf contains many more options in case you would like to add more settings.

A. no Reshade/GShade
Setting up DXVK
Copy the two files d3d9.dll and DXVK.conf into the Bin folder in your Sims 3 installation path. This is the folder where also GraphicsRule.sgr and the TS3W.exe and TS3.exe are located. If you are prompted to overwrite files, please choose yes (you DID backup your folder, right?)
And that’s basically all that is required to install.
Start your game now and let it run for a short while. Click around, open Buy mode or CAS, move the camera.
Now quit without saving. Once the game is closed fully, open your bin folder again and double check if a file “TS3W.DXVK-cache” was generated. If so – congrats! All done!
Things to note
Heads up, the game options will reset! So it will give you a “vanilla” start screen and options.
Don’t worry if the game seems to be frozen during loading. It may take a few minutes longer to load but it will load eventually.
The TS3W.DXVK-cache file is the actual cache DXVK is using. So don’t delete this! Just ignore it and leave it alone. When someone tells to clear cache files – this is not one of them!
Update Options.ini
Go to your user folder and open the options.ini file with a text editor like Notepad.
Find the line “lastdevice = “. It will have several values, separated by semicolons. Copy the last one, after the last semicolon, the digits only. Close the file.
Now go to your backup version of the Options.ini file, open it and find that line “lastdevice” again. Replace the last value with the one you just copied. Make sure to only replace those digits!
Save and close the file.
Copy this version of the file into your user folder, replacing the one that is there.
Things to note:
If your GPU driver is updated, you might have to do these steps again as it might reset your device ID again. Though it seems that the DXVK ID overrides the GPU ID, so it might not happen.
How do I know it’s working?
Open the task manager and look at RAM usage. Remember the game can only use 4 GB of RAM at maximum and starts crashing when usage goes up to somewhere between 3.2 – 3.8 GB (it’s a bit different for everybody).
So if you see values like 2.1456 for RAM usage in a large world and an ongoing save, it’s working. Generally the lower the value, the better for stability.
Also, DXVK will have generated its cache file called TS3W.DXVK-cache in the bin folder. The file size will grow with time as DXVK is adding stuff to it, e.g. from different worlds or savegames. Initially it might be something like 46 KB or 58 KB, so it’s really small.
Optional: changing MemCacheBudgetValue
MemCacheBudgetValue determines the size of the game's VRAM Cache. You can edit those values but the difference might not be noticeable in game. It also depends on your computer’s hardware how much you can allow here.
The two lines of seti MemCacheBudgetValue correspond to the high RAM level and low RAM level situations. Therefore, theoretically, the first line MemCacheBudgetValue should be set to a larger value, while the second line should be set to a value less than or equal to the first line.
The original values represent 200MB (209715200) and 160MB (167772160) respectively. They are calculated as 200x1024x1024=209175200 and 160x1024x1024=167772160.
Back up your GraphicsRules.sgr file! If you make a mistake here, your game won’t work anymore.
Go to your bin folder and open your GraphicsRules.sgr with a text editor.
Search and find two lines that set the variables for MemCacheBudgetValue.
Modify these two values to larger numbers. Make sure the value in the first line is higher or equals the value in the second line. Examples for values: 1073741824, which means 1GB 2147483648 which means 2 GB. -1 (minus 1) means no limit (but is highly experimental, use at own risk)
Save and close the file. It might prompt you to save the file to a different place and not allow you to save in the Bin folder. Just save it someplace else in this case and copy/paste it to the Bin folder afterwards. If asked to overwrite the existing file, click yes.
Now start your game and see if it makes a difference in smoothness or texture loading. Make sure to check RAM and VRAM usage to see how it works.
You might need to change the values back and forth to find the “sweet spot” for your game. Mine seems to work best with setting the first value to 2147483648 and the second to 1073741824.
Uninstallation
Delete these files from your bin folder (installation path):
d3d9.dll
DXVK.conf
TS3W.DXVK-cache
And if you have it, also TS3W_d3d9.log
if you changed the values in your GraphicsRule.sgr file, too, don’t forget to change them back or to replace the file with your backed up version.
OR
delete the bin folder and add it from your backup again.

B. with Reshade/GShade
Follow the steps from part A. no Reshade/Gshade to set up DXVK.
If you are already using Reshade (RS) or GShade (GS), you will be prompted to overwrite files, so choose YES. RS and GS may stop working, so you will need to reinstall them.
Whatever version you are using, the interface shows similar options of which API you can choose from (these screenshots are from the latest versions of RS and GS).
Please note:
Each time you install and uninstall DXVK, switching the game between Vulkan and d3d9, is essentially changing the graphics card ID again, which results in the settings in your options.ini file being repeatedly reset.
ReShade interface
Choose – Vulcan
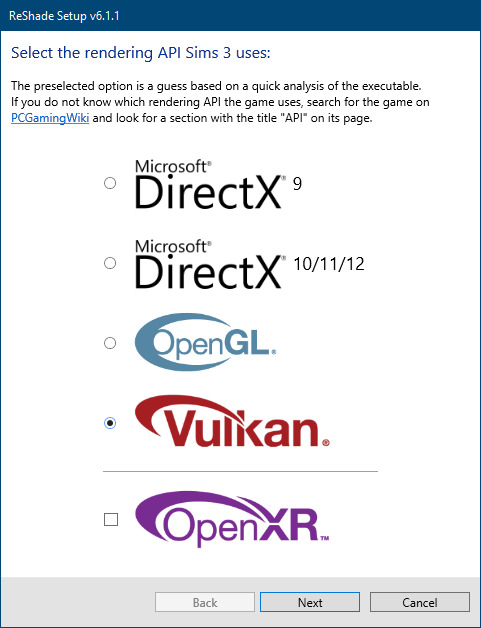
Click next and choose your preferred shaders.
Hopefully this install method works and it won't install its own d3d9.dll file.
If it doesn't work, then choose DirectX9 in RS, but you must make sure to replace the d3d9.dll file with DXVK's d3d9.dll (the one from its 32bit folder, checking its size is 3.86mb.)
GShade interface
Choose –
Executable Architecture: 32bit
Graphics API: DXVK
Hooking: Normal Mode
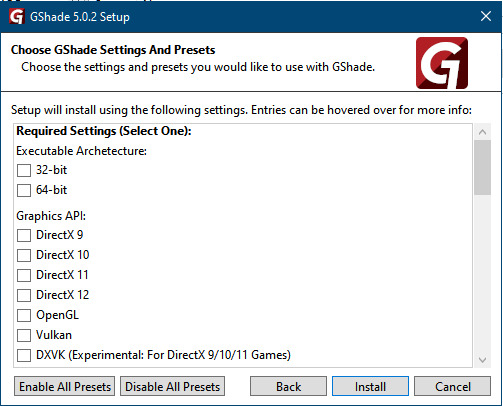
GShade is very problematic, it won't work straight out of the box and the overlay doesn't show up, which defeats the purpose of using it if you can't add or edit the shaders you want to use.
Check the game's bin folder, making sure the d3d9.dll is still there and its size is 3.86mb - that is DXVK's dll file.
If installing using the DXVK method doesn't work, you can choose the DirectX method, but there is no guarantee it works either.
The game will not run with these files in the folder:
d3d10core.dll
d3d11.dll
dxgi.dll
If you delete them, the game will start but you can't access GShade! It might be better to use ReShade.
Some Vulcan and DirectX information, if you’re interested:
Vulcan is for rather high end graphic cards but is backward compatible with some older cards. Try this method with ReShade or GShade first.
DirectX is more stable and works best with older cards and systems. Try this method if Vulcan doesn't work with ReShade/GShade in your game – remember to replace the d3d9.dll with DXVK's d3d9.dll.
For more information on the difference between Vulcan and DirectX, see this article:
https://www.howtogeek.com/884042/vulkan-vs-DirectX-12/
509 notes
·
View notes
Text
Can't Reinstall The Sims Complete Collection
For those that have struggled to reinstall The Sims Complete Collection, how did you solve it? I had to reinstall my game recently because it stopped working, and it wouldn't let me uninstall it until I downloaded a third-party program to remove leftovers of it. I finally did manage to uninstall the game, but I still receive this message when trying to install it.

87 notes
·
View notes
Text

WIP #1 - Stories Be Told
A mod that has arisen from playing TS2 and loving Stardew Valley! (and always wanting to get to know the townies a bit better :))
I know I haven't really replied too much on the post about the mod idea, but I had to figure out personally what to pick and how to even attempt this from a technical perspective.
I went through 5 adaptations, to eventually get to this result! :) So while most of it is definite, I'm still fine-tuning a lot (and writing the stories).
How does it work?
The mod comes with two ways to get to know your fellow townie! With townie, you have to understand that EA townies will have them. Newly generated townies will NOT have any stories.
🕵️♀️Secrets (aka, facts!)

Depending on your sim's Lifetime points (that red/green bar), and relationship status (friends, enemies, etc), you'll get to know more about them! Of course, if you're in the red, you might get some nasty comments!

The idea is that the better you get to know them, the more they open up. Just like real people! They all have their unique dialogue as well!
❤️ Heart Events ❤️
Inspired heavily by Stardew Valley's approach, as using the TS2's scripted events wasn't working technically speaking,
A heart event will trigger by itself with a Text message, just like getting an invitation for a party.
Let's have a look at one with Morgana's Heart events!

Morgana has sent a text message asking Christopher to come along to have dinner at her house. We could ignore it without any consequences... or go ahead and go anyway!

Your sim will automatically make their way to the place they are invited to go to! And Christopher just made it as well :)

(Not getting too much into spoilers here hehe) but eventually Thornton and Morgana end up in a fight.

What's cool is that certain heart events will want your input! Such as this one:

I'm still working on fixing the dialogue btw :p
Some of these will have pretty unpredictable outcomes, so be aware of that if you want your town to stay the same without any progression into a family's dilemma!

... and what's even better is that this all happened automatically!
Just like a scripted event, they ended up arguing where it made sense in the dialogue, moved to the kitchen to excuse themselves, and eventually asked the player to leave (of which the player did automatically!)
🛠 Info for World builders and Developers
What's even better is that you can make your stories yourself! While heart events will require you C#, the secrets will only require you the existing sim's Sim Id and some XML knowledge! :)
I'll make tutorials of course on how to make each, but I figured it would be good to add that this is all super flexible on making your own stories.
That's it! The mod is technically done from a technical perspective, but I still have loads of stories to write (I only finished Morgana's so far 😬), So any feedback at this point would be really appreciated so I can implement it before release! :)
I'll release it first with Stories for Sunset Valley first, then move on to twin brook, Bridgeport, etc.
542 notes
·
View notes
Text


sip & rustic wooden floors as recolorable patterns.
I've always been a really big fan of the sip & rustic (13pumpkin) floor conversions by cakenoodles, but I don't often use them because they aren't recolorable and I'm very pedantic. I turned them into a pattern + made them recolorable so I could use them in a build, and I'm sharing in case anyone else wants them too.
all I've done is mess with these in photoshop to make them recolorable; full credit goes to cakenoodles & the creators they converted these floors from in the first place.
comes with both horizontal and vertical versions of both patterns.
download (.zip)
863 notes
·
View notes
Text

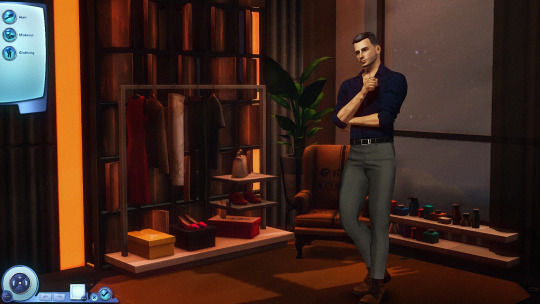
Custom CAS Background and Stylist Room Background Tutorial: How to Make Your Own
Before I begin this tutorial I would like to credit CherieDawn67 at Modthesims for figuring out how to replace the background meshes and textures. My mod is only possible due to her hard work.
I must also credit @mspoodle1 for fixing the lighting/weather issues in the first version of this mod.
---
01. Open up my CAS Room or Stylist Room package file in S3PE. Take note of the following IMG resources:
Create a Sim room's background: instance 0xBBF74B40103CCD80
Create a Pet room: instance 0xF1977DAF066F6F09
Create a Bot room: instance 0x7DB75D780535AF71
Stylist room: instance 0xA7E661A96D5DBCD6
Right-click on any of them and export the image as a ".dds" file. The background image is a 2048x2048 px DDS DXT5 image file.
Technically you could use a 1024x1024 px texture instead but the image quality in-game will be lower.
02. Open the image in the graphics program of your choice.
03. Find an image that is 2048 px wide, and around 1024 px in height. It should be in landscape orientation. Could be a texture extracted from a TS4 CAS background, a photo, artwork, a scenery screenshot from another game like Skyrim/Baldurs Gate/GTA/etc. Whatever you want. You could even take your own screenshots for this.
04. Paste your image over my image, being mindful of the borders. Anything beyond the borders will not be visible in the camera's field of view.
05. Save and export this image as a DDS DXT5 image.
06. In S3PE, right-click on the IMG resource. Replace it with the image you created in the previous steps.
Make sure you are replacing the correct instance as mentioned in Step 01. Since each room uses its own dedicated image, you could have different backgrounds for each Create-a-Sim/Create-a-Pet/Create-a-Bot room. Since the Stylist room is a separate package, you could have a unique background in there as well.
07. Save and close S3PE.
08. Plop the edited CAS Room Default or Stylist Room Default in your Overrides folder and have a look in-game. You must have the Ambitions EP installed in order for the stylist room to do anything.
The default replacement background should not affect your CAS camera mods, CAS lighting mods, or CAS standing poses.
326 notes
·
View notes
Photo


DOWNLOAD
READ PLEASE
lips preset 4-5
eyes preset 1-5
nose preset 1-2
2K notes
·
View notes
Text
Complete!! YAY!


OK I believe this is ready now. Please note that I did my best. I am sure I might have missed something.
Downloads [SFS]
What's new:
The Newbies were revived
Created and linked Ginia Kat so Tara has an ancestor. Also, do not add the Tara in the lots and houses bin as the Tara in this neighborhood is the same one.
Added the Mashuga family.
Added the Hick family.
Added the Charming family.
Mortimer and Bella are together.
Cassandra has not met Don.
Added story telling for the neighborhood.
Updated and altered memories as well as relationships.
Please do not replace the N001 files, instead delete the old N001 folder and use this one, you cannot have both without renaming the files and folders.
As always please make backups of your folders and report any issues.
OK now back to regular life of making new builds & gameplay :)
362 notes
·
View notes
Text


So I've always wanted to remake my original grocery store but there isn't a lot of grocery custom content for sims 3. I put it off for a while until @mookymilksims made a grocery store set and I went completly went bob the builder mode !
Me and mookymilksims have decided to do a collab where she showcases the build in this video, definetly make sure to check it out ! This build wouldn't be possible if it wasn't for her conversions, they really completed the space 🥹 Thank you miss ma'am @mookymilksims !

youtube

Lot size : 40 x 40 Lot type : Visits authorized EP's : Ambitions, University, Generations, Late Night, Supernatural, Showtime, Island Paradise, World Adventures Custom Content amount : High - 200+ packages
Mods used for the builds
More Vending Machine Foods by olomaya Functional news paper stand by Phoebejaysims Shiftable curtains by alverdine

Do not claim this build and any of the cc used as your own to respect all the creators.
Redirect to this post if you're sharing it
Mediafire | Simfileshare [CC included, unmerged to avoid duplicates if you already have the CC]
Place .package in Library folder
Creators thank you list : mookymilksims, hudy777, martassimsbook, phoebejaysims, riverianepondsims, omedapixel, grandelama, buhudain, granthes, AroundTheSims
Notify me if something is missing/wrong with the build ! (Truly, I don't mind or get offended by it, in fact I make a lot of mistakes do tell me 😭)
242 notes
·
View notes
Text

I spent the day working on this part of the interface, I had to rebuild everything manually but I couldn't be more proud of the result and the participation of the subscribers while I did it live on the channel. Many thanks to everyone who contributed with suggestions <3

44 notes
·
View notes
Text

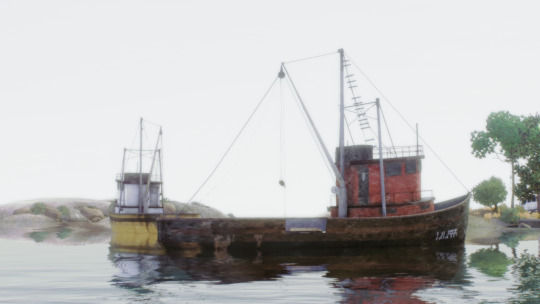
here are my successfully converted fishing boats, converted from ts2 to ts3
download - simfileshare .package and .sims3pack files
original by psychosim

list of fishing boats I've converted:
irma - green hull, white wheelhouse diane - blue hull, pale yellow wheelhouse lilith - dark brown hull, red wheelhouse maude - entirely yellow mamie - brown hull, yellow wheelhouse kynda - yellow hull, white wheelhouse coral - entirely in teal (nameless in my files, sorry!)
notes:
the darker boats might look a bit pixelated (lilith with her dark red wheelhouse for example), but the white/pale wheelhouses all look pretty good.
the fishing boats might go invisible from far away on lots specifically, the ones i put down in caw are visible no matter the distance. to put them down on lots, turn on moveobjects and give them a small underwater mountain to sit on, so they don't turn into sunken fishing boats.
please let me know if you experience any other issues.
for some of the boats i wrote in fun facts about old sailor's superstitions in the description. they're old, but we certainly abide by these superstitious rules on my ship still. good thing i don't even know how to whistle.
427 notes
·
View notes
Text


Been working on something cool. It’s a work in progress and not perfect, but I’d love your feedback! Changed the interface to a lighter blue, but still tweaking things. Might abandon it, but I’m too stubborn to quit easily. Thoughts on these images?
51 notes
·
View notes
Text
The Sims 3 Project renaissance (RELEASE)

Hello everyone. First of all, I want to apologize for my long absence and for not releasing the "Project renaissance" mod last summer. Unfortunately, there were reasons for this. Due to difficult life circumstances, I had to stop developing the mod for a while. But let's not talk about sad things.
Finally, I am ready to present you the mod "Project renaissance", which I have been working on for a long time.
I replaced the textures of 17 trees and 31 plants from The Sims 3 base game. The game was released 15 years ago, and today it looks pretty outdated in terms of graphics. Despite this, the game still has a huge fan base, which creates amazing mods and game materials, thereby making our game even more attractive and interesting.
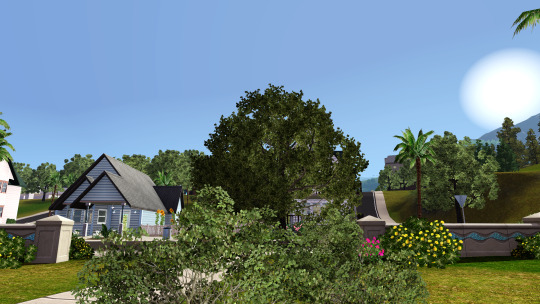

Thanks to the "Project renaissance" mod, you can add a little realism to your game, the vegetation will look much more realistic.
I made two versions of the mod: small textures and large textures.
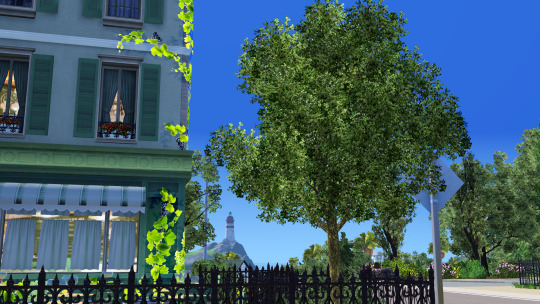

The first version is suitable for a comfortable gameplay, the second is more suitable for creating beautiful screenshots and videos, as it loads the system well enough. Gradually, I will refine my mod, I plan to add new vegetation textures for additions, as well as replace the textures of the landscape and roads.

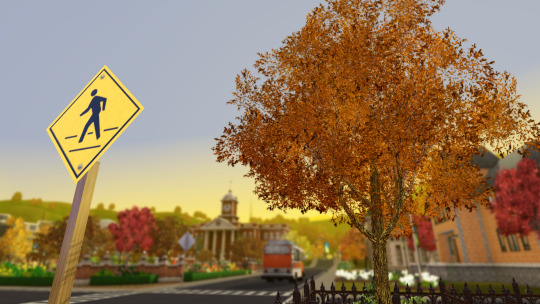
Please leave your feedback and share your impressions about "Project renaissance" mod. I will be very glad to receive any of your questions and feedback! Have a nice game!
download
2K notes
·
View notes
Text

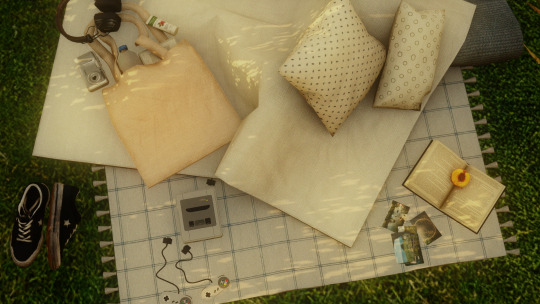
hello! this set took me A LOT of time(especially that f***ing bag) but rn I am pretty proud of it <3 also, thank you for +100 followers!
every one of these objects is absolutely useless. they can serve you as a deco for your sims photoshoots or whatever,
dl: sfs
more pictures and polycount info below!
classic bicycle: 12898 vertices, 13621 faces converse one star shoes: 6410 vertices, 10870 faces open book: 2829 vertices, 3700 faces photos: 698 vertices, 756 faces picnic blanket: 7115 vertices, 10288 faces, recolorable super nintendo: 6456 vertices, 5793 faces thrown bag with clutter: 6188 vertices, 8334 faces, 2 recolorable swatches(brown and black headphones) abandoned house: 21742 vertices, 12334 faces barn: 116 vertices, 84 faces


credits for 3d models: x x x x other objects are made by me, check my tou
ko-fi
166 notes
·
View notes
Text
Useful TS3 shortcuts you might not know about - quickly copy and recolor! (GIF)
• Hold Shift while dragging a palette to recolor the entire floor or wall


• Ever get frustrated copying objects with an eyedropper? Hold Shift and place the selected object to copy it without loading it! Works in both Build or Buy modes, can copy Debug objects with no codes ;)

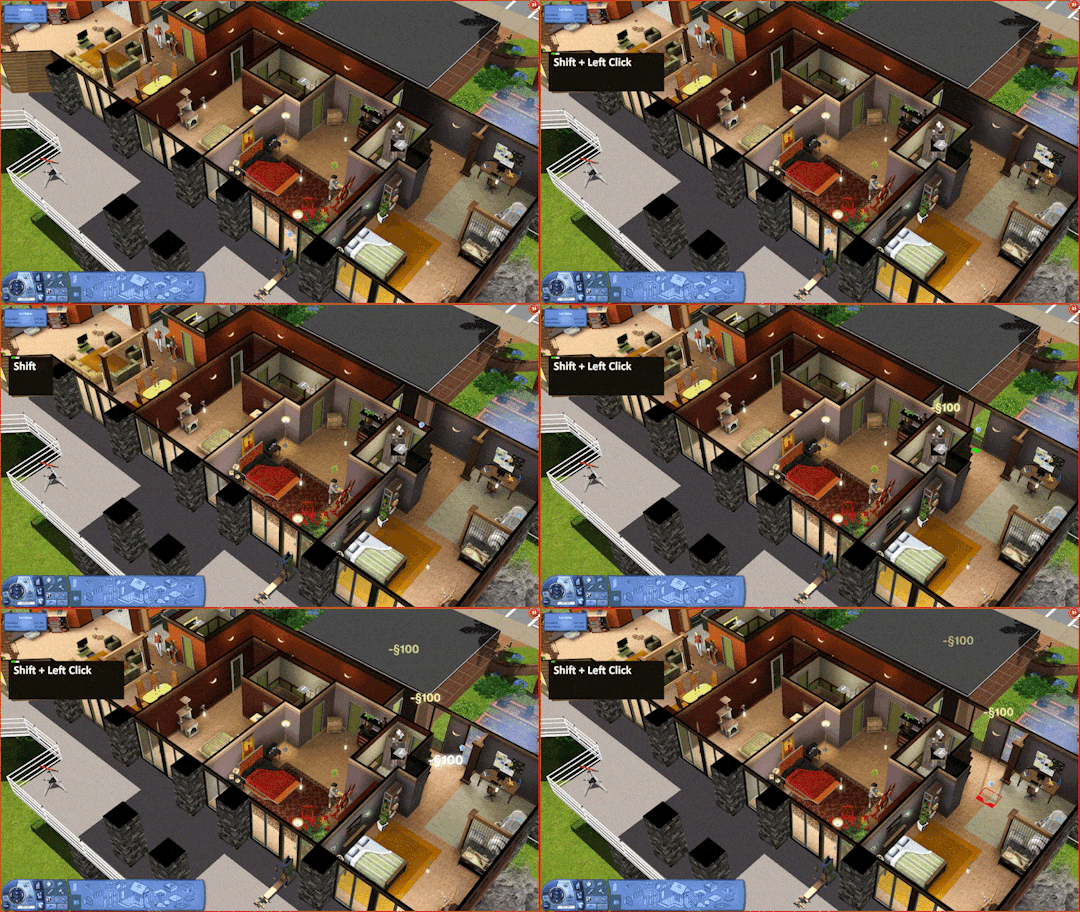
• Hold Shift and drag fence or wall tool to create a room; hold Ctrl to remove the wall or fence
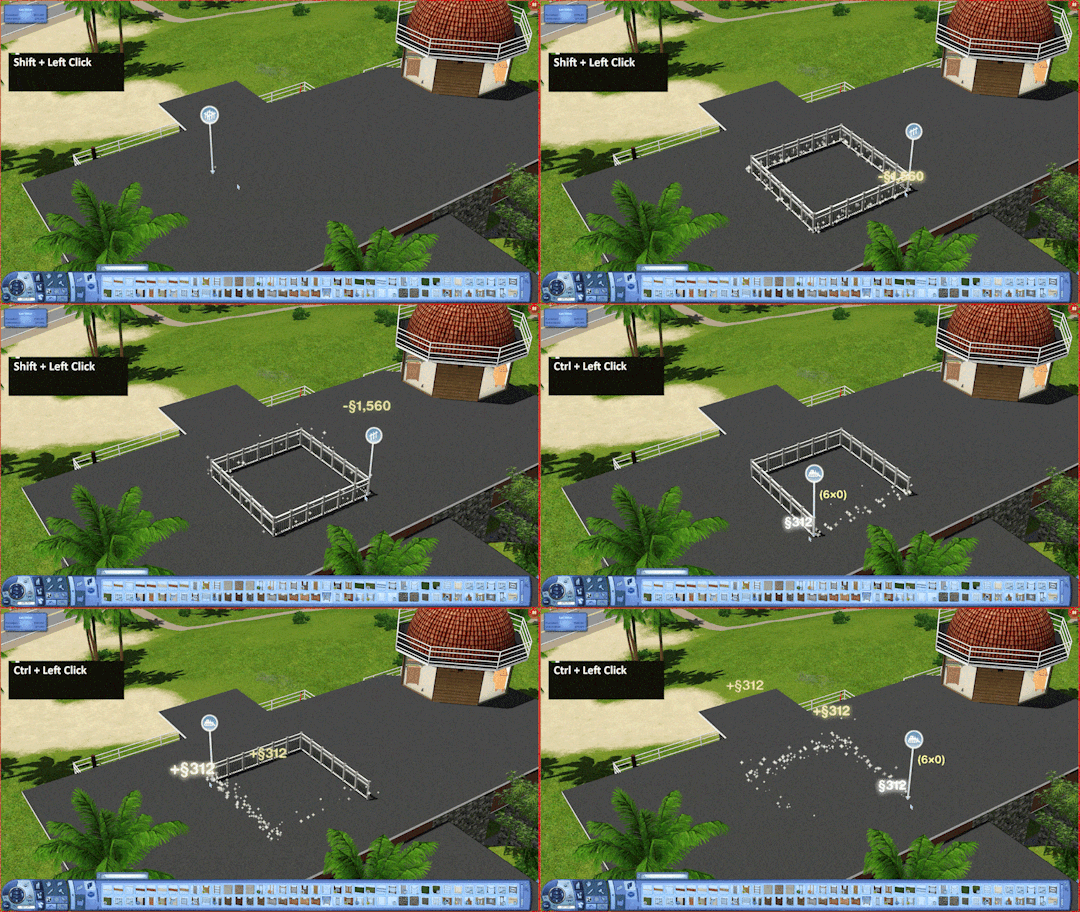
These shortcuts have saved me lots of time! I rarely use both sledgehammer and eyedropper :) By the way, the support team has said that my tumblr is finally unbanned! Whew, let's see!
815 notes
·
View notes
Text


Face Presets Default Replacements : Eyes V.2
So, I always thought the default presets for the eyes were so weird. I mean some look like they're squinting their eyes and some look like they've seen a ghost. For that reason, I completly changed every single preset to something much more realistic looking.

EA Default Presets


My Replacements


What I modified :
Distance between the eyes + size of eyes + shape of brows + shape of eyes + height of eyelids + height of eyebrows

Important : The first file is the replacements for all the basegame presets, the second file is for World Adventures presets, only download that file if you have World Adventures.
SimFileShare | Mediafire | ---
Sliders needed : None, It’s all base game
Facts about presets in general : They are all ages and unisex. By downloading this both female and male sims of all ages gets these new face presets.
Credits : S3PE, FacePresetEditor
384 notes
·
View notes