
Don't wanna be here? Send us removal request.
Statistics
We looked inside some of the posts by foreveroverdressed-posts-blog and here's what we found interesting.
Average Info
Notes Per Post
5
Likes Per Post
5
Reblog Per Post
0
Reply Per Post
0
Time Between Posts
2 months
Number of Posts By Type
Photo
17
Last Seen Tumblr Blogs


Fun Fact
Tumblr’s website traffic is steadily declining.


Photo


Hello! This post I would like to share some of my adventures in Iceland last month. There was definitely some unexpected aspects of this trip that I wish I would have known prior to my own adventure. So here are my highlights/tips and how I would budget for future trips. Getting there: Flying to Iceland is more accessible than ever thanks to Wow Air and Icelandair based out of Reykjavik! These are budget airlines that basically operate as a connection hub to Europe or a final Nordic destination from several cities in the US and Canada. So that’s what initially opened this opportunity up for me, being able to travel to Europe for only $265 bucks! Hotels/Getting around: As you will discover when searching for accommodations, Iceland is quite expensive and the hotel choices are limited. It’s such a small country and it’s simply just not the same scale as any other destination that I’ve travelled. We looked to Airbnb to book a location that was centrally located in Reykjavik and had decent street parking for our rental car. Speaking of which, a rental car is 100% necessary if you plan on travelling anywhere in the country beyond Reykjavik. We rented a cute little red Ford Fiesta that was great on gas mileage. As I will keep mentioning, Iceland ain’t cheap so I would budget to spend at least $200 for a weekends worth of gas. If you plan on doing any off-roading, definitely recommend renting a vehicle equipped for that! Getting around Iceland is fairly easy. There’s only one highway for the entire country, and it’s essentially how you have to get around to any other city. Food/Drinks: I had a very negative impression on what the Nordic cuisine would entail based on prior research. Surprisingly I didn’t have one bad meal! I tried the iconic hot stand Baejarins Beztu Pylsur in Reykjavik, and it was amazing (and one of the cheaper meals). We also went to Skal, a very impressive spot close to our BnB. We had an amazing Arctic Char with Yukon gold potatoes and I was in love. The chefs were so friendly and walked us through their preparations in front of us. I would budget about $250 on food for a weekend in Iceland. This sounds nuts and like you’ll be eating like a king, but it’s just so expensive to eat/drink in Iceland. I realized this when we were in a small town and the only option was KFC (two sandwiches were $30!!) My best advice is that a pizza goes a long way, and to prepare your own coffee every morning. Also if you want to go to bars, a cheap beer is about $10 and a mixed drink about $17. I literally feel like Iceland nightlife is more pricey than NYC! What to see: there’s no shortage of adventures in Iceland. We were only there for a weekend so definitely had to prioritize which landmarks we wanted to see the most. If you’re in Iceland, chances are you are trying to see some volcanoes. My favorite was our hike up to Snæfellsjökull, an active volcano on the northwestern part of the island. You also probably want to see some waterfalls, which are so amazing. If you head Southeast towards Vík, you will hit several waterfalls and general tourist destination. The best part of Iceland adventuring, in my opinion, is the ability to pull off the side of the road anywhere and admire whatever strikes you at the moment. Blue Lagoon: It's literally the most iconic landmark in Iceland, and one of the 25 wonders of the world. If you plan on going, you must book tickets in advance, as it is so popular. Also, account for about $200 dollars for this experience (Oh Iceland). The photos of this geothermal hot spring speak for itself, but what you might not know is how to prep for the lagoon. They recommend that you shower/condition your hair prior to entering. I made the monumental mistake of showering, but not conditioning. The result was the minerals/silica created a very stiff/tangly feel to my hair. I thought maybe afterwards I could just deep condition and be back to normal. NOPE. It took 3 weeks until my hair normalized. I tried everything imaginable from deep conditioning to multiple washes in one shower, nothing. The only thing that I think speed up the process was applying a food grade coconut oil mask to my hair. I applied this about 4 times before seeing results. I also used a purifying charcoal shampoo to try and remove the minerals from my hair. Also if you have colored hair, that will likely fill or fade out in the Lagoon so I would suggest hair up for sure. Overall we had a great experience. I think 4 days was just enough time to explore, and frankly the most money I would want to spend! The country felt very European and we even got to watch Iceland play in the World Cup! I’m connecting in Iceland again in September and can’t wait to fly over those views again! Have you travelled to Iceland or plan to? I’d love to hear about it!
1 note
·
View note
Photo


May 3rd, 2018: Bridal Shower in the Bluegrass
This past weekend I attended my bridal shower thrown by my stepmom, Jennifer. It was a gorgeous weekend in the Bluegrass with my closest friends, family, and future in-laws. We had a “Brunch and Bubbly” themed shower complete with mimosas and vegan/ vegetarian-friendly bites. My gals and I got to reminisce and had attempted several failed Boomerangs and selfies. Above are some of my favorites! Thanks to my Mom for snapping the pics.
0 notes
Photo


About 2 months ago I got a Glossier haul from their showroom in NYC. I was super excited to try their skincare products that create that natural dewy glow. I have tested out some of their products and will share with you my thoughts.
So here's some background information on my skin…I had cystic acne for about 5 years. It was the worst, and after some convincing from one of my BFFs, I started Accutane. (Side note: if you have this issue and feel there is nothing working then I highly recommend and I’ve literally only heard of great results other than the side effects). After completing Accutane, my skin has finally gone from extremely dry to pretty normalized. I still have some scarring after the years of acne. So overall happy with my skin currently, just was looking to lighten up some of the scars, and get that *dewy* look that is super hyped. Hence why I wanted to try Glossier.
TLDR; Their priming moisturizer messed my face UP. If you have normal to oily skin then STAY AWAY (besides one). Post Accutane left my skin blemish free, minus the microscopic blemishes around my period. So feeling confident that my skin could handle anything, I wanted to give their products a go based on their genius social media presence and descent blogger reviews. Looking back, I have noticed the people that really love these products have more dry skin. I will go through all the products I have tried and explain which to give a try or one to stay away from.
Glossier Phase 1 Set: I’ll purchase anything that's in a pack or kit if that means I can sample some products and save a little money! I was super excited to give this a try based on some of the reviews I had read. This set comes with three products: The Priming Moisturizer, The Balm Dot Com, and The Milky Jelly Cleanser. The first product I tried was what I was the most excited about, The Priming Moisturizer. I had been on the hunt for a good primer for a while before going on my Glossier haul. I figured this was the product that created the perfect glowing base for foundation. I applied this after rinsing my face and only had to use the tiniest bit due to how rich it was going on. Then I applied my foundation after and noticed a bit of piling, which I loathe. I made it work with the foundation just so I could get a good read on the product. At the end of the day, my face felt like, wet. My face became so oily that it looked like I was sweaty, not dewy. Trust me I powdered slightly after foundation in the morning because I knew it was feeling odd at application. I did this same routine the following day (extra powder this time around), and noticed the same oily feeling throughout the day. As I was going home from work, I felt a pimple coming in on my cheek. I was so confused because I had zero pimples for like 2 years. I looked in the mirror and had a dramatic internal scream because it was an enormous planet coming in on my face, bigger and more painful than my previous cystic acne. So immediately assessed if I had any other changes that could bring this on other than the moisturizer. NOPE. I wanted to love it and have that dewy look, but I can’t have that without a flawless base. I did not apply the moisturizer again and I woke up with a face full of similarly sized pimples. I was so angry because I had finally had normal skin and I felt like I went to steps back. The worst part about all these pimples is that I knew they would scar. So there's the physical reminder of this failure from the product. My skin effectually normalized again and I was just over it. I gave Glossier this feedback when I went back to their showroom and they had great follow up on why the product didn’t work for my skin. They sent me an email and everything to see if my skin cleared up. So definitely brownie points for customer service. The Balm Dot Com is an okay lip balm. They have a variety of scents. I got the coconut one and it felt nice. I put a balm on my lips before bed and I didn’t notice anything extraordinary happening. I wouldn’t go out of my way to purchase this again. The Milky Jelly seems okay, but I was afraid to use it based on the results from the priming moisturizer. I heard it was pretty moisturizing and also good for dry skin so I was too nervous to take the chance. I do have friends who have used it with similar skin as mine, and they have good things to say and that its great for removing makeup. I just didn’t want to take the chance.
The Solution: When I had gone on my Glossier haul in NYC, this product had just launched. There was not a lot of reviews yet based on the newness. Even though I had a bad experience with the moisturizer, I felt this was okay to try since there is nothing oily in it. I apply it on a cotton pad after washing my face. I will do this in place of toning because I don’t want to overdo it with products. I only use it about 3 times a week to prevent irritation. This product is a chemical exfoliator. I felt it was a great way to clean up my skin without physical scraping it. After the moisturizer disaster, this was what saved my skin. It reduces blemishes and redness and reveals like “brighter” skin. I wouldn’t go as far to say that my skin looks dewy or anything with makeup on, but It definitely improves the base of my makeup. I have noticed some of my scars fading (pictured above). I've been using this for about 10 weeks now and I can only imagine the results to continue improving. Overall, I would recommend this product to anyone that's looking for a chemical exfoliator.
Boy Brow: This is the product that initially got me hooked on Glossier’s social media. I wanted to get those beautiful bushy brows that the models have in their images. At the Glossier showroom, I was able to sample the products to see what colors were good for my skin/brows. I have naturally dark brown brows, so I went with their black shade. I think this brow gel is good. It does the job and keeps the brows in place. It's not something I would purchase again, just because I really don’t think about putting this on for an everyday look.
Haloscope: This highlighter actually had the worst reviews from other bloggers, which was weird to me because I quite like it! Its not super blinding like powder highlights which is nice. It goes on nice and creates a pearlescent glow on your cheekbones. I could see people not liking it if they don’t get the right shade, I picked up quartz which is like a pinky tone. My only complaint is that you have to apply with your fingers so you don’t smear the rest of your foundation. Overall, I really enjoy this product and I use it daily. I will definitely purchase this again!
So there you have it. I feel like 50 percent of the products I used I was unimpressed with. Glossier is super great if you have dry skin and can handle the oily nature of their skincare. I will continue to use The Solution and Haloscope in my daily routine. Any products that you have tried from Glossier that was a hit or miss? Tell me!
0 notes
Photo


Wedding planning. Sounds fun, till you get into it. There is something about this process that makes the simplest task sometimes the most dramatic and challenging. I must preface this post that I am planning a wedding from 5 hours away from the location. My wedding party lives all across the US, and most of my fiancé’s family live in Canada. Essentially all communication for all things wedding is via text and email with little face to face discussions. Given those cards, it can often lead everything open to miscommunication. So I would like to share with you how I stay sane and attempt to keep communication clear during this crazy process. Two words, Google Sheets.
The great thing about this tool is that anyone can edit the document if they are invited to view it. So it is constantly being updated and can be done from anywhere at any time. Works just like Microsoft Excel, except it is easily accessible to everyone.
There are probably 10,000 things you have to do leading up to the big show. Someone’s gotta do it, and it cannot be all the bride. Although I like to have an overview of all things wedding, I had to let myself delegate out some tasks. With delegation, you still have to be the contact for the jobs. Before my Google sheets document, I was finding myself reaching out to my help with information, but it wasn’t always clear with details. This could include, who is paying for something, has a deposit been put down, are we moving forward with a different vendor, etc. So I decided to create a document as a reference to all these questions.
What has it done for me? Well, it lays out everything I need to do and gives me a visual timeline of how its getting done, and by whom. It alleviates the feeling of always “asking for” something else for the wedding. It completely lays it all out there. Don’t get me wrong, the communication isn’t perfect, but using this as a tool helps everyone stay on the same page instead of asking me “HEY HAVE YOU TALKED TO SO AND SO ABOUT THIS” or “DO YOU KNOW WHEN SO AND SO IS GOING TO GET TO THAT”, because after so much of that, I can get irritated and stressed.
I also used Google Sheets to create a guest list, including their addresses and confirming their attendance. This was great for creating the guest list because I was able to let my stepmom/mother/grandmother/future mother in law add everyone they would like to invite, and include all of their details.
So this has been my holy grail lately. If you’re planning a wedding, I would like to know what works for you? TAKING NOTES.
0 notes
Photo


March 21st, 2018: Space Age Country Girl
Just a quick lil post about a soaking up the sun. Non-jacket weather is upon us! Get excited.
Top- Zara
Leggings- H&M (similar here)
Jacket- H&M
Hat- H&M
0 notes
Photo


March 5th, 2018: Beijing Photo Diary
I could tell lots of stories about my experience in China, however, I think the photos speak for themselves.
0 notes
Photo


February 28, 2018: 70's dreaming
Spring is finally creepin in and I love it. Just a 70s inspired look while I was enjoying some warmer weather.
blazer: H&M
pabst crop: thrifted
leggings: Forever 21
shoes: H&M
0 notes
Photo

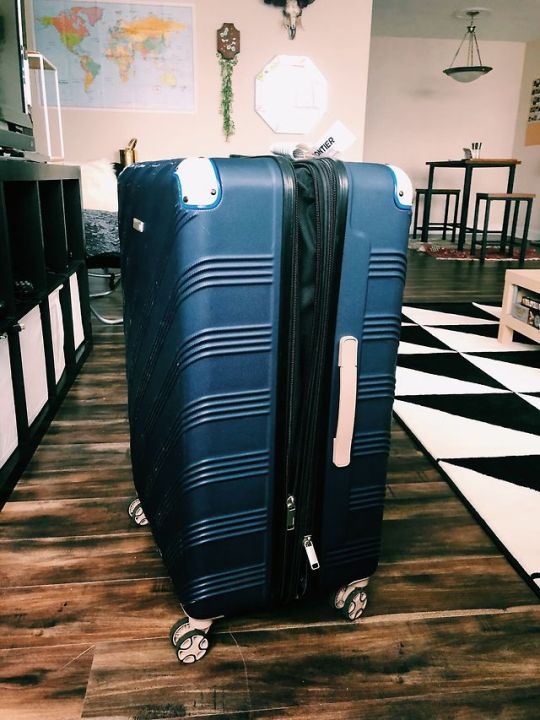


February 11, 2018: Packing for China SS/18
In 2 days I will travel to Beijing, China! We will be exploring all the sights with family for 10 days. I am super excited to go somewhere new, however, I’ve been procrastinating a bit when it comes to packing. Usually, I am a pro at packing light since most of my trips to Europe have been for 3 or more weeks. Those trips have all been in the summer where it was easier to pack light and the outfits are a bit cuter. It is, unfortunately, February and I will need to keep it cozy and warm. I have also been on the hunt for any miscellaneous hacks and items I might need. In an attempt to be the most prepared, I have been scrolling blogs/Pinterest for China packing lists, and the selections have been slim. So I thought I’d share my own. This would work for any cold weather adventure packing! I have attached my list.
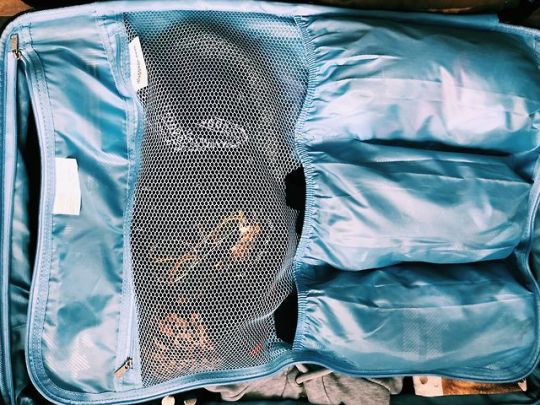
The suitcase: I have been on the hunt for the perfect suitcase for YEARS. My last suitcase was great, but it’s wheel broke off in Milan. I loved it so much that I duct taped the wheel on for a few trips afterward. I’m no longer living the ratchet life (kinda), and I have upgraded to a great suitcase with a wheel! My new one is a hardshell navy spinner from IT suitcases. This only weighs 9 pounds, which is great for when I am struggling to go under that 50 pound weight limit. I like that this suitcase has 3 compartments for undergarments and zip flap for toiletries. There is also an expandable zipper, which gives more room for shopping and souvies! I purchased it from TJ Maxx for $90 bucks but they can also be found cheap here.
Shoes: I cannot stress enough the importance of good shoes when traveling. You can last so much longer during a day of exploring with the right shoe. I think it’s safe to bring 4 pairs of shoes. Obviously a good tennis shoe for exploring and any exercising that you may be doing. I am bringing my Yeezys, which I could probably sleep in these shoes because they are that comfy. I would also bring a casual Chelsea boot that could be dressed up and dressed down. I have a chunky platform for any nights on the town. And then my Doc Martens for any exploring that may include rain or snow. Pro tip, wear your most clunky shoe on the plane to create more room/less weight in your suitcase.
Outfits: The goal in my packing is always to bring items that can be layered and most interchangeable with each other. I feel like I did the same here with knits and jackets. I try to think of packing outfits instead of just throwing in 10 tops and 10 bottoms. I have found if you pack that way, then you will probably not be excited about the items you have packed, and might bring more than you need (taking up more lbs of that 50 pound limit). So bring items that you are excited to wear, and make multiple outfits out of key pieces. For this trip, I have mostly brought casual and conservative looks. Just packed one dress for any formal occasion. I definitely made sure to bring super warm socks, extra gloves, and beanies to stay warm. Don’t forget to bring loungewear that can be worn as your gym look if you plan to exercise! You never know what the temperature conditions are on the plane, so I recommend wearing a light shirt with a flannel or hoodie around the waist just in case it’s freezing, or can be taken off if it's too toasty.
Makeup/Skincare/Toiletries: For a 10 day trip, I am trying to go as simple as possible for the number of products I am bringing (THAT 50 POUND LIMIT ADDS UP I PROMISE). For shower supplies, I am just bringing travel sized of my favorite products. The makeup situation is minimal since I am on that life lately. Maybe just bringing the everyday face essentials, a mini Too Faced eyeshadow palette for any day to night makeup looks, and my travel sized Morphe brush kit. So the skincare… I have been on such a strong routine lately, more on that in a later post. I don't want to fall out of my routine because a lot can happen to your face in 10 days. With that being said, I have tiny TSA approved bottles to put the necessities in (cleanser, toner, rosehip oil, eye cream, hyaluronic acid, SPF). Pro tip, bring face wipes and mouthwash in your personal item for the plane. It’s unlikely that there will be room or time for a full *getting unready* so these will do till you get to the destination.
Personal item: The most important part of getting to your destination. You can really improve your flight experience by what you put inside of your personal item. For all of my Euro trips, I have taken a backpack as my personal item. It just needs to be able to slide under the seat in front of you. Inside of the backpack I put face wipes, mouthwash, headphones, books/mags/notebook, camera stuff, chargers/cords, electricity converter (the outlets are different in Asia and have higher wattage so you need this), empty water bottle, any medicines/vitamins, and a towel (which can be used as a blanket). I will also slide my purse inside of the backpack so I won’t have to pay any extra fees.
Whew, I think that is it. I’m a bit nervous about entertaining myself for 15 hours on our flight. The Europe flights seem so easy now. Any tips on how you get through long flights or sleeping in coach would be greatly appreciated! Hope this is helpful for anyone like me who needs more structure when packing.
0 notes
Photo


January 31st, 2018: Eyelash Experiment
WHY- I’m always eager to experiment with all things beauty. I’m currently having an obsession with skincare and that *natural makeup glow*. So, I have attempted to simplify my everyday makeup routine. Since glowing skin is the focus, I figured that I should leave out the eyeliner and just have little eyeshadow and mascara. Well..... my lashes (even with my beloved Better Than Sex Too Faced Mascara) were not doing it for me. I felt like there was more pop needed from my eyes. Because the goal is to simplify my makeup routine, I did not want to mess with falsies. They always irritate my eyes anyways! I started to notice some girls that had really long and pretty eyelashes, without the synthetic look. I then started researching how the heck falsies could look that natural. That’s when it was decided that I was going to get eyelash extensions.
WHERE- After watching Youtube reviews on eyelash extensions, I learned that it was imperative to go to a specialist and not just a salon that sometimes offers that service. I watched too many videos with scary eyeballs to risk it! So I found a Groupon in Cleveland for B-Lashed. I got a great deal for one full set and a fill for $60! I had a great experience there. The lashes last about 2-4 weeks depending on how well you take care of them and which set you choose.
THE LASHES- I was actually really nervous to get the “procedure”. The thought of unknown objects around my eyes for an hour was a very scary thing. I didn't know exactly which level of lash I should go for. Thankfully she had images of three different levels to choose from. There was a natural, glam, and a dramatic set. Basically, the higher the levels increase in lash amount. Definitely was hesitant to goto too crazy with the dramatic set since it was my first time. Then I chose my length. I went with a level 13 (scale 8-14). I figured since I went light with the amount I could go longer with length. The anxiety was all for nothing! I literally almost fell asleep. She had a great atmosphere where I just relaxed and woke up with these lashes!
UPKEEP- My biggest question prior to getting the lashes was how to clean them. The glue on the actual lash because loosened by any type of oil-based products. Keeping that in mind, I will take a Q-tip and dab it in my oil-free makeup remover to have the most precise clean without damaging the lashes. I have been a little afraid of wearing eyeliner with the lashes (any tips for cleaning appreciated!), so I haven’t had to intensely remove makeup from the lids. As far as my eye cream at night, I only apply it on the top of my lid and under eyes. I don’t want anything messing these guys up! The lashes stay pretty straight. Sometimes when you're sleeping they will get twisted, but that’s what I use a spoolie for!
DO IT AGAIN?- Yes! So far, so good. With all things considered; the time saved, the quality of the lashes, the great price, I would recommend this! Anyone that has *meh* lashes and not into the falsie game should definitely give it a whirl! The only thing I can see myself getting tired of the monthly trips to get the fill. But hey, then that's just a somewhat pampering day every month! So if you want that “I woke up like this” look, then totally give it a try!
I would love to do tons of beauty experiments, so If you have something you would like to see done, then leave a comment! Please let me know your thoughts, feedback is always appreciated.
0 notes
Photo

LA I had avoided it. It's been my dream since I saw Clueless when I was a kid. I avoided it because I was afraid of being disappointed by it. Everyone always complains about the traffic and things being expensive. Those things are both valid and annoying aspects of the city. But as annoying as it was to take an hour to get anywhere, you just adjust. Once you get past those inevitable facts, you just enjoy it and become present. I loved it and I am DEFINITELY coming back asap. Here are my favorite highlights from the adventure
1 note
·
View note
Photo

Hiking My favorite part of this trip. Geographically, LA has it all. City, beach, and mountains. This reminded me of Barcelona, which is my favorite city in the world. The mountains in LA were so G gorg. On our first day to explore, Molly took us to Malibu to go hiking at Coral Canyon. This is where the pink caves are. This trail gives such a gorgeous view of Malibu. I'm obsessed.
0 notes
Photo

Dream homes Almost every building in LA just makes me die a little inside. There are so many modernist and Art Deco style homes that I just wanted to walk inside of. Most of them are surrounded by adorable plants and just ughhhhh. This one above particularly pained me. It's basically a Barbie dream house on the beach in Venice. I creepily took the photo as the owner watered his plants. Whatever. It's beautiful.
1 note
·
View note
Photo

More architecture porn.
1 note
·
View note
Photo

Melrose Trading Post Anywhere I travel, shopping is always a must. Flea markets are my thing. I love rummaging through vintage clothes and goodies. Particularly shorts as shown above. They had just the best selection of cut offs and patches. I was swooning over everything. Also had a delish smoothie from one of the food trucks. 10/10 will return, but with more cash next time.
1 note
·
View note
Photo

Santa Monica My last day was spent just walking from Venice to Santa Monica on the beach. This part of LA is super cute. It made me feel like I was in vacation mode. Third Street Promenade was everything. Visiting the Nasty Gal store IRL felt like my pilgrimage to Mecca. I could have spent like 3 days there alone. Then I had to leave. I went from 85 degrees and sunny, to 15 degrees and snowing in Cleveland. So it goes.
0 notes
Photo

Vegas A place I thought I would hate but had to try once. WRONG. I loved it. It's very over the top and kind of glam, perfect for an impromptu trip on my birthday. I tried to go into it with no expectations and I feel that made it a better experience. There's so many aspects that surprised me. Like the fact that people are lit even at like 9 am. Old people are my favorite and they were everywhere. With only two days in Vegas, I got the gist. Now I'm ready to go back when it's warm/ when I can see Britney. So here are the highlights of my adventure.
0 notes