Just two best friends making positive changes in our lives. Ingrid's personal tumblr: ingridconlimon
Don't wanna be here? Send us removal request.
Video
youtube
Your Grip Strength is Limiting Your Other Lifts
Have you ever played that game at an arcade where you squeeze these metal handles as hard as you can and it determines how strong your grip is?
One of the most understated elements of training is, in my opinion, grip strength.
Whether you’re gripping a baseball bat, holding onto the pull-up bar, or picking up a heavy deadlift, you need to have strong forearms.
I find it so unfortunate that many people use and abuse straps for their lifts. Yes, straps have their time and place, but as I’ve said before, I’m a minimalist when it comes to lifting. I believe the more you are able to learn to create tension, and the stronger you get, the better off you will be. You can deadlift more weight with straps, but you are using a crutch. If your forearms are the limiting factor in a deadlift, then maybe you just need to strengthen them!

The muscles in the forearms connect all the way up to the neck and shoulders.
According to Thomas Myers's Anatomy Trains, the whole arm and shoulder functions under one fascial web. The fascia is a thin, protective layer of connective tissue that surrounds the muscles. When one part of this fascial web is activated, so too, is the rest of it. With this, we can deduce that a better grip on the bar will allow for a stronger press.
Let’s take, for example, a strict press. This is a shoulder exercise, right? Well, yes, but that doesn’t mean we don’t need to recruit other muscles in the body! Creating tension from the feet, all the way up through the hands, will activate more muscle fibers, and thus, make the weight fly up faster! One cue in particular that helped me was to think about actively squeezing the barbell as hard as possible.
Charles Poliquin notes,
“when your grip strength improves, less neural drive is needed for the forearm and hand muscles to perform other exercises. That is why many trainees report breaking training plateaus in a host of lifts, ranging from dead lifts to curls, after doing a grip specialization routine.”
All of the big lifts require you to create a tremendous amount of tension in your body. The “tighter” you get, the better. Any areas of weakness will make a lift that much more difficult. Strengthen your forearms, and you will be able to get a better grip on the bar, which can result in more weight. A+!
Aside from improving total body strength and motor control, training the forearms may prevent pain in the wrists and forearms.
“There are 35 muscles involved in movement of the forearm and hand, with many of these involved in gripping activities,” notes Jason Shea, CSCS. He then continues on to talk about how inadequate grip strength may result in injuries like tennis elbow, UCL tears, and other elbow and wrist-related issues. If the forearms are weak, you will place an unnecessary amount of stress on your tendons and ligaments around the elbow and wrist joints. Charles Poliquin also mentions that
“these ailments are often caused by improper strength ratios between the elbow muscles and the forearm muscles. If the elbow flexors, like the biceps and brachialis, are too strong for the forearm flexors, uneven tension accumulates in the soft tissue and results in elbow pain”
Therefore, if you’re spending a ton of time strengthening the muscles in your upper arm (biceps, triceps, etc.), but minimal to no time strengthening the muscles downstream, you’re setting yourself up for injury.
Additionally, some studies have linked rotator cuff health to the integrity of the forearm muscles. When your grip is activated, so too are the muscles of the rotator cuff (teres minor, infraspinatus, supraspinatus, and subscapularis).

You need to have some strong freaking forearms to pull that kind of weight!
Now, for the exercise portion! Here are eight of my favorite ways to make you a pro at grabbing things:
Plate pinches
Farmer carries (unilateral and bilateral)
Plate flips
Hangs from the pull-up bar (for an extra challenge, try unilateral)
Rock climbing (no video necessary)
Fat bar deadlifts or pull-ups
Heavy kettlebell swings
Finger board (used for climbers)
Note that grip strength is going to be positional, meaning that your forearms may be very strong holding a very small or narrow object, and weak holding thicker objects. It’s important to vary the width of the equipment you use every once-in-a-while.
You may have noticed that wrist curls and extensions are absent from this list. I’m not much of a fan of training the grip in this way, because it has less of a carry-over to other activities. We want to train for function, not necessarily for size!
Now go find some heavy objects and grip them! Open pickle jars for your friends, or swing from branches like Tarzan. Build your forearms and reap the tremendous benefits from all of this newfound strength.
To check out my other blog posts, go to my website and like my Facebook page!
271 notes
·
View notes
Video
youtube
A Low-Impact Workout To Build Lower-Body Strength
Greatist writes:
Fact: You don’t need to break into a sprint or execute plyometric moves to get a great workout. Sometimes small movements, with little resistance and a higher number of repetitions, are all you need to feel the burn.
And that’s where this week’s 35-minute Pilates-style workout from Grokker comes in. There’s no jumping, punching, or running—but it’s still a great workout that will help build muscle in your lower body and work small muscles you’ve likely been neglecting.
You’ll start on the floor and work your abs, glutes, and thighs. Next, you’ll use the barre in a series of movements that will stretch and extend your legs. For this workout, you’ll need a barre (the back of a chair will work), a Pilates ball (or a soft cushion), light hand weights (optional), and a resistance band you can tie into a loop. You’ll start slow, so there’s no need for a warm-up. Just hit play below when you’re ready!
343 notes
·
View notes
Photo


It's national pug day so have a photo set of my snorty & snotty babyyyyyy 💕
4 notes
·
View notes
Text
Update (Ingrid)
-I've been kicking my own ass at the gym. I try to work out hard at least 5x a week -I'm starting to run a little more since I'm trying to join the Air Force but that seems like it will happen never. -procrastinating makes me stress out -currently starting to lift so updates on that LATER
1 note
·
View note
Video
youtube
Yoga For Weight Loss (Hips & Hamstrings)
Yoga With Adriene writes:
Transformation is not about becoming something you are not. It is about coming back to your true self. That is the beauty of Yoga and integrating the principles of yoga into your work out. This yoga practice gets FIERY with a focus on opening in the hips, stretching the hamstrings, a core connect and some neck and shoulder love. A nice full sequence to connect your mind your soul and to work that body! Be mindful, move with your breath and enjoy!
157 notes
·
View notes
Video
youtube
Yoga For Weight Loss || 40-Minute Fat Burning Yoga Sequence
Yoga With Adriene writes:
This yoga for weight loss sequence is designed to reunite you with not just your abs but your mindful core. Connect with your breath, build strength, tone belly fat, burn calories, detoxify, improve digestion and support a happy healthy back with this customized practice with Adriene!
333 notes
·
View notes
Photo
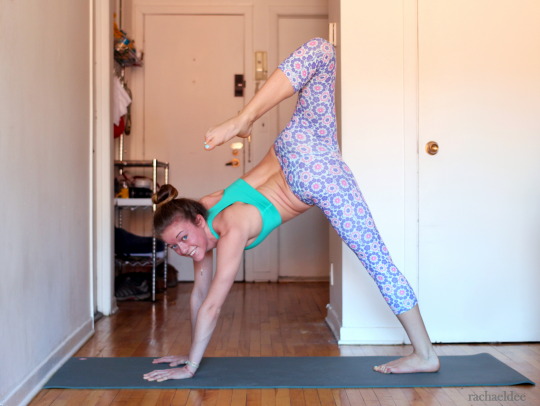
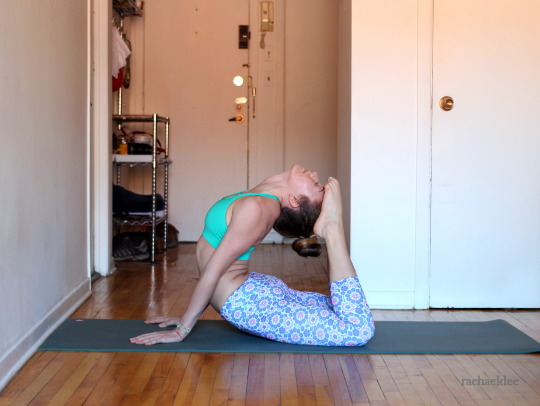

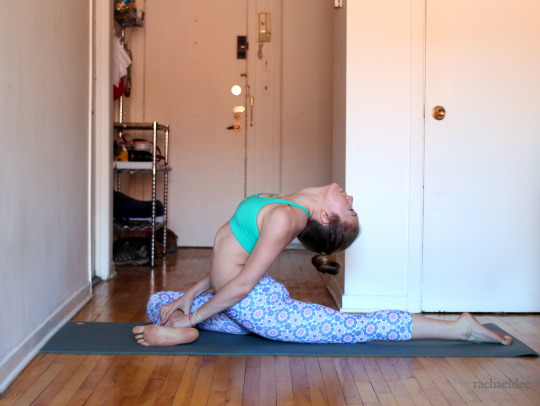
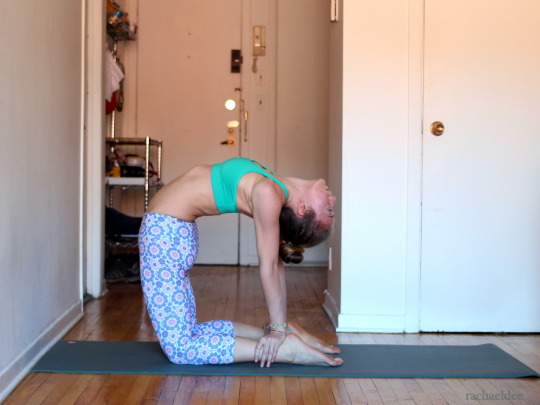
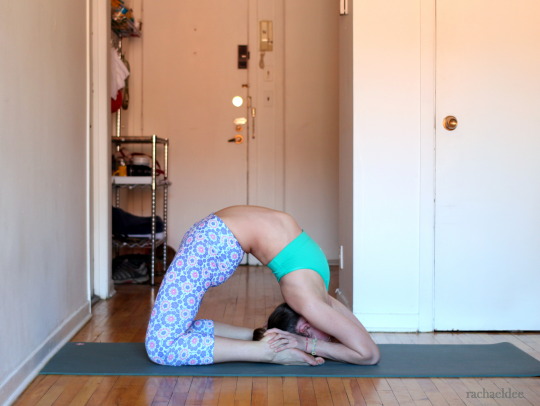
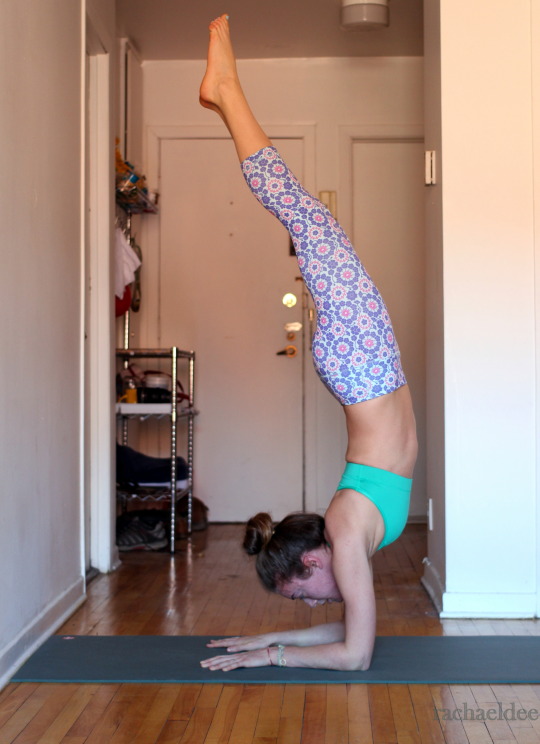
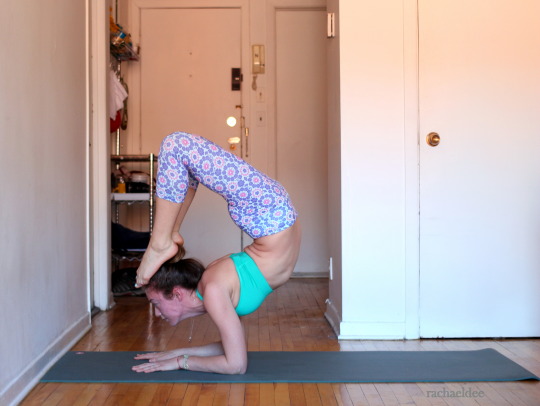
yoga for scorpion pose!
hello friends! i thought i would do a little guide for some yoga poses to help you deepen your lower back bend and build up strength for scorpion pose. keep in mind that scorpion is a very challenging inversion that requires a lot of arm, core, and back strength. incorporating these poses into your practice can help you work on all of those aspects!
arched 3-legged downward facing dog: begin in regular downward dog, and then swing your right leg back. bend the leg to the left and look up over your left shoulder. this will give you a deep back stretch and also work your arms and core.
king pigeon pose: lie on your stomach with your hands placed by your sides, elbows bent. bend your knees and gently push your upper body up, while continuing to support your back with your core.
two-legged inverted staff pose: i like to get into this by first pushing up into full wheel, and then easing down onto my forearms and straightening my legs. if you’re new to backbends, simply working on wheel is enough! transition to this one when you feel ready for a deeper lower back stretch. to come out, tuck your head through your shoulders and gently lower down onto your back.
arched pigeon pose: one of my favourite backbends! get into pigeon and then gently look back behind you and use your core to support your backbend. you can hold onto your front leg for additional support. come back up slowly!
camel pose: standing on your knees, look back behind you and grab each leg at the ankles, one leg at a time. hold this for a couple of breaths, keep your core engaged and also feel the stretch in your quads and hip flexors. this is a great post-run pose for your legs as well!
full camel pose: much more advanced - you can get into this by lowering down to your forearms from camel, and you don’t have to keep ahold of your ankles. reach your arms back behind you to support yourself and don’t overstretch yourself!
forearm stand: when you feel comfortable doing headstands, forearm stands are the next inversion to try. go near a wall, set up so your hands are about a foot away, and get into dolphin pose. walk your feet toward your body as close as you can, then kick into it. make sure you’ve got the stability to hold forearm stand before you try to add the backbend.
forearm scorpion: get into your forearm stand, and first play around with bending your legs or incorporating a slightly bent back. you can also get used to the feeling by setting up close to the wall and gently walking your feet down and then back up - this is a great strength building exercise. as your back flexibility and strength increases, when you want to get deeper into the bend you will have to look further and further forward and shift your weight until you’re looking at the wall and not at the floor.
remember to always take inversions very slowly and be careful. i know it seems really difficult, but if you take it slow there will come a day when it feels easier. and remember that flexibility is only a small part of the equation - one surefire way to improve at inversions is to work on strength - planks, pushups, and core. although they look very serene or easy in photos, inversions require a lot of physical strength and you will probably be sweating and breathing hard when practicing them - that’s totally normal! after a few forearm or handstand poses i always get up and give my arms a shake because otherwise they get very tired. always practice near a wall when you’re beginning and remember that yoga shouldn’t ever feel painful - discomfort from stretching is normal, pain isn’t.
and don’t forget that modifying these poses to fit your own needs and flexibility is the best way to work on your own yoga journey. everyone starts somewhere and the only way to improve is to practice. :)
happy inverting, friends!
mat (provided by Manduka): Manduka Pro Black Sage
pants: Lululemon wunder under crops, summer 2013
4K notes
·
View notes
Photo
This is the best.

☵ http://hippiework.tumblr.com ☲
377 notes
·
View notes
Photo

Photo by prosperkrys http://instagram.com/p/urNMvlSh_5/ #NailedItYogis #babycrow or #bakasana variation. This was the first time I had ever seen this #yogapose and had to try. I love #CrowPose variations oh so much ☺️ #prosper ✌️ BlackYogaSuperstars.com will help you begin your yoga practice for $5 —> http://www.fiverr.com/s/58rxwm
1 note
·
View note
Photo

Purchase Yoga Supplies on Amazon here —> http://jermil.com/BYS_VIP/ Photo by nicolecalhoun77 http://instagram.com/p/uNVAUSCchd/ Day 3 of #NINJAYOGIS !! #grasshopper variation! 👏👏👏 @ryannecunningham @edez92 @lauraroseyoga ^o^ BlackYogaSuperstars.com will help you begin your yoga practice for $5 —> http://www.fiverr.com/s/58rxwm
3 notes
·
View notes
Text
Day 2
Of yoga did not follow directly after day 1 but I got it done today. Time management is going to be a huge factor in completing this 30 day guide as well as getting through school and balancing other responsibilities. I’ve been feeling mentally and emotionally solid for a few days and somewhat productive. Today’s practice was a bit rushed but still felt good. Still working on the crow pose.
0 notes
Photo


Crow pose is feeling a lot better.
5 notes
·
View notes
Text
Yoga!
I really love it and I always talk about wanting to really get into it; really feel the overall mind and body benefits (and do the super cool poses!). So I decided to start this 30-Day Yoga Guide for Beginners. It's very helpful in that it gives you a Daily Seated Stretch guide that you're to do every day, along with other stretches and poses for other days. It goes day by day for 30 days, with pictures and descriptions. I figured it would be a good place to start. And since I'm at home, I can work at my speed, which is nice. Eventually, I'd like to practice at a studio, but for now, while the money is tight, I can get my yoga on in my room. The goal is to see the guide all the way through: October 11 - November 9! It will be a challenge to stay on board but I really want to work on my consistency.
I completed Day 1 and that wasn't bad at all. I usually do more whenever I end up grabbing my mat and stretching, but it's all good. I worked on getting deep into the stretches and breathing deeply. I had on Rainy Mood but had another song in my head. With time, I know my ability to focus will improve.
I worked on the Crow Pose. I realized I had to look forward to keep my head up so I could actually balance better and not fall over so fast. It's a little rough on the wrists but they'll get stronger. Eventually I want to add some inversions and handstands.
I'm really looking forward to improving from all this!
3 notes
·
View notes
Photo

Ebony girl : http://sexy-ebony-girl.tumblr.com/
812 notes
·
View notes


